Skip to content
DisclaimerTerms Of UseGDPR PolicyCookie Policy

Lisa Dishes

  • Home
  • Drinks
  • Appetizers
  • Dinner
  • Dessert
  • About
  • Contact
  • Privacy Policy
DisclaimerTerms Of UseGDPR PolicyCookie Policy

NO-ING-IMG

- 4 chicken thighs, boneless and skinless - 3 tablespoons Dijon mustard - 3 tablespoons honey - 2 tablespoons olive oil - 1 garlic clove, minced - 1 teaspoon paprika - Salt and pepper to taste - Fresh parsley, chopped (for garnish) For this Air Fryer Honey Mustard Chicken, you need just a few simple items. The chicken thighs are the star here. They stay juicy and have great flavor. The Dijon mustard adds a sharp taste. Honey gives a nice sweetness that balances it all out. You will also need olive oil, which helps the marinade stick. Garlic adds an aromatic punch. Paprika gives a mild smokiness and color. Don't forget to season with salt and pepper to enhance the flavors. Lastly, fresh parsley adds a bright touch when you serve it. Make sure to have all these ingredients ready. It makes the cooking process smooth and fun! To start, I whisk together some key ingredients. In a medium bowl, combine 3 tablespoons of Dijon mustard, 3 tablespoons of honey, and 2 tablespoons of olive oil. Next, add one minced garlic clove, a teaspoon of paprika, salt, and pepper. Whisk until smooth. This mix is sweet and tangy. It brings out the best in the chicken. Now, you want to coat the chicken evenly. Place the 4 chicken thighs in a resealable bag or a shallow dish. Pour the marinade over the chicken. Make sure the chicken gets a good coat. This step is key for flavor. For the best taste, marinate the chicken for at least 30 minutes. If you have more time, go for up to 2 hours. This helps the flavors soak in. Store the chicken in the fridge while it marinates. If you use a bag, seal it tight. If you use a dish, cover it with plastic wrap. Before cooking, preheat the air fryer to 380°F (190°C). This takes about 5 minutes. Once hot, take the chicken out of the marinade. Let the excess drip off. Now, arrange the chicken thighs in the air fryer basket. Make sure they are in a single layer. This helps them cook evenly. Cook for 10-12 minutes. Flip the chicken halfway through to ensure even cooking. Check that the chicken reaches an internal temperature of 165°F (75°C). After cooking, let the chicken rest for a few minutes. This makes it juicy. Finally, slice and garnish with fresh parsley before serving. Enjoy your tasty meal! To get that perfect crisp on your chicken, avoid overcrowding the air fryer basket. When you pack too many pieces in, steam builds up. This steam makes the chicken soggy instead of crispy. Also, keep in mind the thickness of your chicken thighs. If they are thicker, they may need more time to cook. Check the internal temperature. It should reach 165°F (75°C) for safe eating. Adjust the cooking time as needed. You can add more flavor to your chicken with herbs and spices. Try adding fresh thyme, rosemary, or even a pinch of cayenne for some heat. Each herb brings a different taste profile. If you want to switch things up, consider using different sweeteners or mustards. Maple syrup or agave nectar can replace honey. You can also use yellow mustard instead of Dijon for a milder flavor. Experiment with what you have on hand! {{image_2}} You can use many cuts of chicken for this recipe. I often choose boneless, skinless thighs. They stay juicy and cook evenly. Bone-in pieces also work, but they take longer to cook. If you prefer chicken breasts, just slice them in half. This helps them cook faster and stay tender. You can mix things up with the sauce too. Consider adding some heat with spicy honey mustard. Just add a dash of hot sauce or chili flakes to the mix. For a fresh twist, try adding citrus flavors. A splash of lemon or orange juice brightens the sauce. It gives the chicken a nice zing. To complete your meal, pair the chicken with good sides. I love serving it with roasted veggies. They add color and nutrition to the plate. You could also try a simple salad. A fresh green salad with a light vinaigrette works great. Mashed potatoes or rice are also good options. They soak up the sauce well. To store leftover Air Fryer Honey Mustard Chicken, let it cool first. Place the chicken in an airtight container. This helps keep it fresh for up to three days. You can also wrap it tightly in plastic wrap. Avoid leaving it out at room temperature for more than two hours. This can lead to foodborne illness. To freeze the chicken, wrap it well in plastic wrap or aluminum foil. Place it in a freezer-safe bag or container. This keeps the chicken good for up to three months. When you want to eat it, thaw it in the fridge overnight. Never thaw chicken at room temperature; this can cause bacteria to grow. To reheat, you can use the air fryer again. Set it to 350°F (175°C) and cook for about 8-10 minutes. This will keep the chicken juicy and warm. Cooking chicken in an air fryer usually takes 10 to 12 minutes. The exact time may vary based on the chicken's size. For chicken thighs, 10 to 12 minutes is perfect. If you use chicken breasts, they might need 12 to 15 minutes. Always check the internal temperature. It should reach 165°F (75°C) for safety. Yes, you can use other mustards. Yellow mustard or spicy brown mustard work well. Each type adds a unique flavor. If you want a milder taste, yellow mustard is great. For a kick, try spicy brown. You can get creative and mix different mustards for fun flavors. If your chicken isn't crispy, try a few tips. First, make sure you don't overcrowd the air fryer basket. This allows hot air to circulate. Second, try adding a light spray of olive oil before cooking. This can help create a crispier crust. Lastly, you can cook it a bit longer, checking every minute. This blog post covered a tasty air-fryer chicken dish. We went through the ingredients, detailed instructions, and tips for perfecting your meal. I also shared variations to keep things fun and fresh. Whether you have leftover chicken or want to try a new sauce, there are plenty of options. I hope you feel excited to make this dish at home. Enjoy every bite and make it your own!

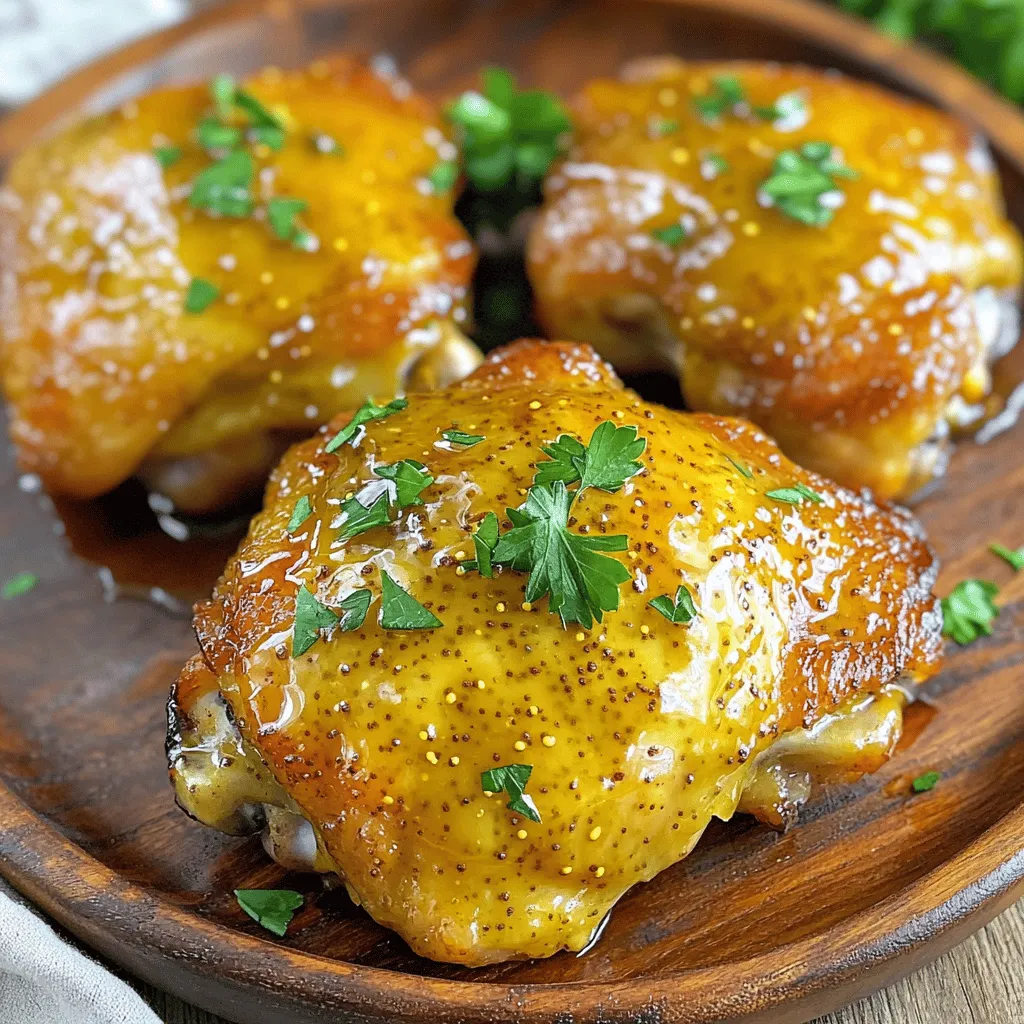
Air Fryer Honey Mustard Chicken Simple and Tasty Meal

Are you ready to impress your taste buds? This Air Fryer Honey Mustard Chicken is not only easy to make,

To make the Protein Strawberry Shortcake Parfait, gather these key items: - 2 cups Greek yogurt (plain or vanilla) - 1 scoop vanilla protein powder - 2 cups fresh strawberries, hulled and sliced - 1 cup granola (preferably low-sugar) - 1 teaspoon vanilla extract You can add your own twist with these options: - 1 tablespoon honey or maple syrup (for added sweetness) - Fresh mint leaves for garnish For Greek yogurt, I love using Fage or Chobani. They have a great texture and taste. For protein powder, Optimum Nutrition is my go-to. It blends well and adds nice flavor. Choose a low-sugar granola like Nature Valley for crunch without too much sweetness. Remember, the right brands can make your parfait even tastier! First, grab a medium bowl. Add 2 cups of Greek yogurt. This will make your parfait creamy and rich. Next, add one scoop of vanilla protein powder. This boosts protein and flavor. If you like, add 1 tablespoon of honey or maple syrup for sweetness. Finally, mix in 1 teaspoon of vanilla extract. Stir everything well until smooth. Your yogurt mixture should be thick and creamy. Now comes the fun part: layering! Start with a clear parfait glass or bowl. Add about 1/3 of the yogurt mixture as the first layer. Next, slice 2 cups of fresh strawberries. Place half of them on top of the yogurt. The berries add freshness and color. Sprinkle a layer of granola on top. This adds crunch and texture. Repeat the layers with the remaining yogurt, strawberries, and granola. Finish with a dollop of yogurt on top. Add a few extra strawberry slices as decoration. For a stunning look, use clear glasses. This shows off your beautiful layers. You can also garnish with fresh mint leaves for color. This adds a nice touch and aroma. Serve your parfaits right away for the best taste. If you want more sweetness, drizzle a bit more honey on top. Enjoy this tasty treat that is also healthy! When you layer your parfait, think about color and texture. Start with a layer of yogurt. Next, add strawberries for a bright red splash. Then, top it with granola for crunch. Repeat this process. Aim for three layers or more for a stunning look. For the top, add a final scoop of yogurt. Place a few sliced strawberries on top. This makes it pop! You can swap Greek yogurt for any yogurt you like. If you want it dairy-free, use coconut yogurt. For the protein powder, try chocolate for a twist. You can skip the sweetener if your berries are sweet. Want less sugar? Use unsweetened yogurt and skip the maple syrup. Granola can change too; use oats or nuts instead. If you have extras, store them in the fridge. Use an airtight container to keep them fresh. The parfait will last for two days, but the granola may get soggy. To avoid this, store granola separately. When you're ready, layer it fresh on top. Enjoy your delicious treat later! {{image_2}} Want to add a twist? Try the chocolate version! Just swap the vanilla protein powder for chocolate. This change gives the parfait a rich flavor. You can still use Greek yogurt and strawberries. Add chocolate granola for a crunchy bite. The layers will be chocolatey and fruity. It’s a fun way to enjoy your parfait! To make this parfait vegan, choose plant-based yogurt. Almond or coconut yogurt works well. Use vegan protein powder too. You can keep the strawberries and granola. Drizzle maple syrup for extra sweetness. This version is dairy-free but still tasty. You won’t miss the dairy with these flavors! If you want a low-carb option, use sugar-free yogurt. Choose a protein powder that is low in carbs. You can skip the granola or use a low-carb version. Layer the strawberries with the yogurt mix. This parfait is light but still fills you up. It’s perfect for anyone watching their carbs! This parfait packs a healthy punch. Here’s what you get in one serving: - Calories: About 250 - Protein: 25 grams - Carbohydrates: 30 grams - Fat: 5 grams The Greek yogurt and protein powder boost the protein content. Granola adds carbs, while the fat comes from yogurt. Overall, it’s a great balance. Each ingredient brings its own perks: - Greek yogurt: High in protein and probiotics. It aids digestion and builds muscle. - Strawberries: Full of vitamins and antioxidants. They support heart health and boost immunity. - Granola: Provides fiber and energy. It helps with fullness and keeps you going. - Honey or maple syrup: Natural sweeteners that offer some vitamins and minerals. These ingredients work together to offer nutrition and taste. You can enjoy this parfait any time. Here are some ideas: - Breakfast: Start your day with a protein boost. - Snack: Perfect for a midday pick-me-up. - Dessert: A sweet treat that’s still healthy. Pair it with a piece of fruit or a handful of nuts for extra nutrition. Enjoy this parfait as part of a balanced meal plan. Yes, you can use frozen strawberries. Just thaw them before using. They will be soft but still tasty. This option works well if fresh strawberries are not available. The flavor will still shine through in your parfait. Plus, frozen strawberries can save you time and effort. To make a vegan version, swap Greek yogurt for a plant-based yogurt. Look for options made from almond, coconut, or soy. Use a vegan protein powder instead of whey. For sweetness, maple syrup is a great choice. This way, you can enjoy a creamy and tasty parfait without animal products. You can increase protein by adding nuts or seeds. Chia seeds or hemp seeds work great. You can also layer in some nut butter. This adds flavor and boosts protein at the same time. Additionally, consider adding more protein powder to the yogurt mix. This keeps your parfait healthy and satisfying. Making a delicious parfait requires key ingredients, smart steps, and creative options. We covered essential and optional ingredients, plus brands that stand out. You now know how to prepare your yogurt mixture and layer it for a stunning look. Remember the tips for perfect layering and ingredient swaps. Don't forget the variations for chocolate lovers or those needing vegan options. Enjoy the nutritional boosts and health gains from your parfait. This dessert is simple, fun, and a great fit for any meal plan.

Protein Strawberry Shortcake Parfait Tasty and Simple

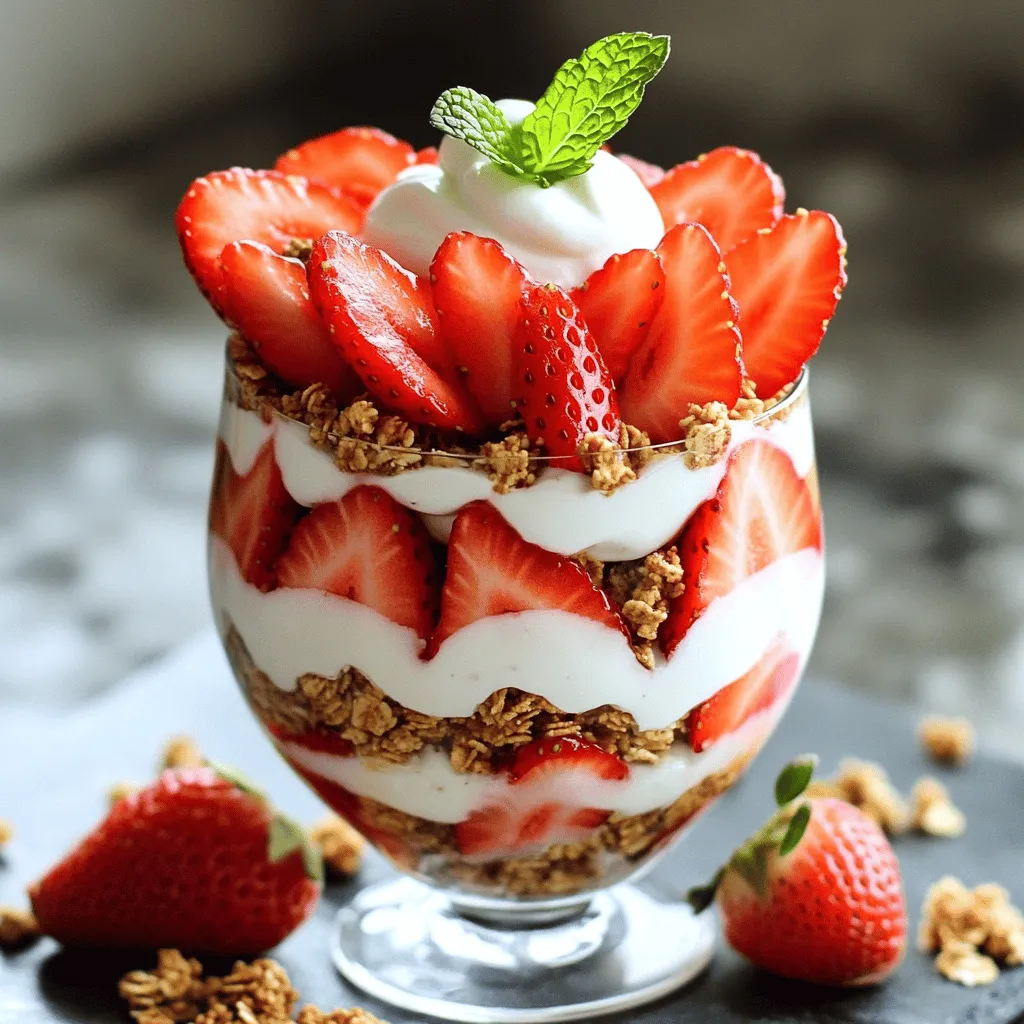
Are you ready to enjoy a delicious treat that’s also good for you? This Protein Strawberry Shortcake Parfait is both

To make No Bake Cookies & Cream Truffle Balls, you need: - 1 cup crushed chocolate sandwich cookies (like Oreos) - 8 oz cream cheese, softened - 1 cup white chocolate chips - 1 tablespoon coconut oil - 1/2 teaspoon vanilla extract - Additional crushed cookies for coating If you need to adjust amounts, here are some handy conversions: - 1 cup = 8 ounces - 1 tablespoon = 3 teaspoons - 1/2 teaspoon = 2.5 milliliters For the best results, I recommend these brands: - Chocolate Sandwich Cookies: Oreo or generic brands work well. - Cream Cheese: Philadelphia cream cheese is a trusted choice. - White Chocolate Chips: Ghirardelli or Nestlé are great options. - Coconut Oil: Spectrum or Nutiva provide high-quality coconut oil. Using these ingredients will help you create a delicious and smooth truffle that everyone will love. First, gather your tools. You need a medium mixing bowl and a spatula. Take 1 cup of crushed chocolate sandwich cookies and add it to the bowl. Then, add 8 ounces of softened cream cheese. The cream cheese should be soft to mix well. Stir the mixture until it looks like dough. You want a smooth texture. If it feels too dry, add a bit more cream cheese. This dough should be easy to handle. Now, it’s time to shape the dough. Use your hands to roll the mixture into small balls. Aim for about 1 inch in diameter. This size makes them easy to pop in your mouth. Place the balls on a baking sheet lined with parchment paper. You should end up with 15 to 20 truffle balls. Make sure to give them some space. This helps them cool evenly. Next, chill the truffle balls. Put the baking sheet in the fridge for about 30 minutes. This helps them firm up. While they chill, prepare the coating. In a microwave-safe bowl, combine 1 cup of white chocolate chips and 1 tablespoon of coconut oil. Heat this in the microwave in 30-second blasts. Stir in between until it’s all melted and smooth. After chilling, take the truffle balls out of the fridge. Use a fork to dip each ball into the melted chocolate. Make sure each ball is fully coated. Let any extra chocolate drip off. Then, place them back on the baking sheet. While the chocolate is still wet, sprinkle crushed cookies over each ball for decoration. Finally, put the truffles back in the fridge for about 10 to 15 minutes. This sets the chocolate, and you’ll have tasty truffles ready to enjoy! To get that ideal texture, start with softened cream cheese. This helps mix well with the crushed cookies. Mix until you reach a dough-like consistency. If the mixture feels too dry, add a little more cream cheese. You want it to hold its shape but still feel soft. Rolling the dough into small balls helps them set nicely. When melting chocolate, use a microwave-safe bowl. Add your white chocolate chips and coconut oil. Heat in 30-second bursts. Stir after each burst to avoid burning. The chocolate should be smooth and glossy. If it feels too thick, a tiny bit more coconut oil can help. This keeps the chocolate from clumping when coating the truffles. For a fun presentation, use decorative plates. Arrange the truffle balls nicely. You can sprinkle extra crushed cookies on top for color. Mini cupcake liners add a nice touch. For an extra pop, add mint leaves around the truffles. This makes for a lovely display at any gathering! {{image_2}} You can mix things up with different cookie types. Try using peanut butter cookies for a nutty twist. Vanilla wafers give a lighter flavor. For a fun spin, use chocolate chip cookies. Each cookie type changes the taste and feel of your truffles. This way, you can have a new treat with every batch. Want a vegan version? Simply swap the cream cheese for a vegan alternative. Use dairy-free chocolate chips for the coating. Look for coconut cream or nut-based cream cheese. These changes keep the truffles creamy without dairy. It's easy to make them fit your diet. Add-ins enhance the taste and texture of your truffles. Consider mini chocolate chips for a richer bite. Chopped nuts add crunch and healthy fats. If you love coconut, try adding shredded coconut. You could also mix in some sea salt for a sweet and salty touch. These extras make your truffles unique and fun! To keep your truffle balls fresh, store them in an airtight container. Layer them with parchment paper to prevent sticking. Place the container in the fridge. They will stay fresh this way for up to one week. If you have a lot, consider dividing them into smaller containers. You can freeze your truffle balls if you want to save some for later. First, place them in a single layer on a baking sheet. Freeze for about an hour until firm. Once firm, transfer them to a freezer-safe bag or container. Be sure to remove any air. They can last for up to three months in the freezer. When you're ready to enjoy them, thaw in the fridge overnight. These truffle balls are best enjoyed within a week for optimal flavor. Check for any signs of spoilage, like off smells or changes in texture. If they look good, they should taste good! For the best experience, eat them cold right after they set. This way, the texture remains creamy and delicious. Yes, you can use many types of cookies. Try vanilla wafers or chocolate chip cookies. Each cookie brings a new taste. This lets you play with flavors. Just keep the cookie base similar in texture. It should still crush easily. To boost the chocolate flavor, add cocoa powder. Mix in a couple of tablespoons with your cookie dough. You can also use dark chocolate for the coating. Melt dark chocolate instead of white chocolate for a richer taste. Serve these truffles on a nice plate. Use mini cupcake liners for a fun touch. Garnish with extra crushed cookies or mint leaves. This adds color and style to your dish. Perfect for parties or family fun! You now have all the tools to make No Bake Cookies & Cream Truffle Balls. We covered ingredients, step-by-step directions, and helpful tips. Remember to experiment with flavors and storage options. This treat is simple and fun to make. Enjoy these truffles at parties or as a sweet snack. Share them with your friends and family. They will love them just as much as you do. Happy truffle-making!

No Bake Cookies & Cream Truffle Balls Delight

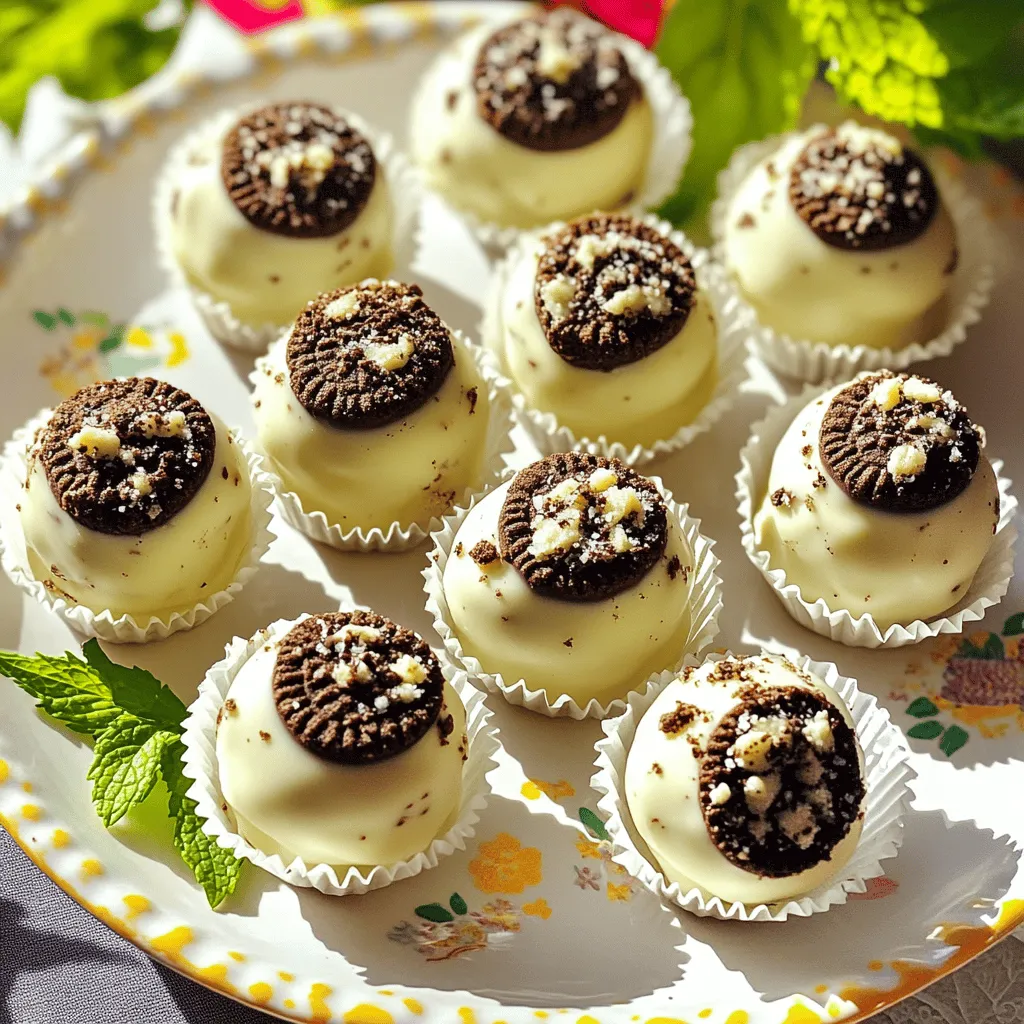
If you’re craving a sweet treat that’s easy and fun, look no further! My No Bake Cookies & Cream Truffle

- 1 cup all-purpose flour - 1 teaspoon baking powder - 1/2 teaspoon baking soda - 1/2 teaspoon ground cinnamon - 1/4 teaspoon ground nutmeg - 1/4 teaspoon salt - 1 cup grated carrots (about 2 medium carrots) - 1/4 cup granulated sugar - 1/4 cup brown sugar, packed - 1 large egg - 1 cup buttermilk - 2 tablespoons vegetable oil - 1 teaspoon vanilla extract - 1/2 cup chopped walnuts - Ingredients for cream cheese glaze In this recipe, we use a mix of dry and wet ingredients to create our pancake batter. The dry ingredients include flour, baking powder, baking soda, and spices. These add flavor and help the pancakes rise. I love to use fresh spices like cinnamon and nutmeg. They make the pancakes smell amazing. The wet ingredients feature grated carrots, which give the pancakes their signature taste and texture. You’ll also find sugars, egg, buttermilk, and oil among them. Each one plays a vital role in making the pancakes moist and rich. Buttermilk adds a nice tang, too. If you want to add extra crunch, consider walnuts. They blend perfectly with the spices and sweetness. Remember, the cream cheese glaze is a must! It adds a creamy, delightful touch to every bite. Trust me, it complements the pancakes beautifully. Enjoy gathering these ingredients; they set the stage for a fun cooking experience! - In a large bowl, whisk together: - 1 cup all-purpose flour - 1 teaspoon baking powder - 1/2 teaspoon baking soda - 1/2 teaspoon ground cinnamon - 1/4 teaspoon ground nutmeg - 1/4 teaspoon salt This mix of dry ingredients gives the pancakes a great rise and flavor. - In another bowl, mix the wet ingredients until smooth: - 1 cup grated carrots (about 2 medium carrots) - 1/4 cup granulated sugar - 1/4 cup brown sugar, packed - 1 large egg - 1 cup buttermilk - 2 tablespoons vegetable oil - 1 teaspoon vanilla extract Combining these ingredients adds moisture and sweetness. - Pour the wet mix into the dry mix. Whisk gently until just combined. It’s okay if there are a few lumps. If you like, fold in 1/2 cup chopped walnuts for extra crunch and flavor. - Preheat a non-stick skillet over medium heat. Lightly grease it with cooking spray or a bit of oil. - Pour 1/4 cup of batter onto the skillet for each pancake. Cook for 2-3 minutes until bubbles form on the surface and edges look dry. - Carefully flip each pancake and cook for another 2-3 minutes until golden brown. Transfer them to a warm plate while you cook the rest. - In a bowl, combine the glaze ingredients: - 4 oz cream cheese, softened - 1/2 cup powdered sugar - 2 tablespoons milk - 1 teaspoon vanilla extract Mix well using a hand mixer or whisk until smooth and creamy. - If you want a thinner glaze, adjust the consistency by adding more milk as needed. Serve the warm pancakes drizzled with the cream cheese glaze for a delightful treat! To get the best texture, avoid overmixing the batter. When you mix, stop once you see a few lumps. This helps keep the pancakes fluffy. Also, use a hot non-stick skillet. Preheat it over medium heat for even cooking. A hot skillet ensures the pancakes brown nicely. If you have leftover pancakes, let them cool first. Place them in an airtight container. They will last in the fridge for about three days. To reheat, pop them in the microwave for 20-30 seconds. For the cream cheese glaze, store it in the fridge too. Keep it in a sealed container. It should last for up to a week. When ready to use, stir it to bring back the smooth texture. Garnishing your pancakes can make them more appealing. Try adding extra grated carrots on top. Chopped walnuts also add a nice crunch. Stack the pancakes high on a plate for a beautiful display. Serve them with a drizzle of maple syrup for extra sweetness. These pancakes are perfect for breakfast or brunch. Enjoy them with friends or family! {{image_2}} You can change up your carrot cake pancakes with seasonal spices. Try adding ginger for warmth or cardamom for a unique twist. You can also mix in fruits like pineapple or raisins. Pineapple gives a sweet and juicy bite, while raisins add chewy texture and extra sweetness. If you need gluten-free pancakes, use almond or coconut flour. These flours work great and keep the pancakes light. For a vegan option, replace the egg with a flaxseed meal or a ripe banana. Swap buttermilk for almond milk mixed with vinegar. This keeps the taste rich and creamy. Infuse your batter with citrus zest. A bit of orange or lemon zest brightens up the flavor. You can also add chocolate chips or coconut flakes for fun surprises in every bite. Chocolate pairs well with the sweetness of the carrots, while coconut gives a tropical feel. Carrot cake pancakes stay fresh in the fridge for about three days. Store them in an airtight container to keep them moist and tasty. For the cream cheese glaze, store it separately in the fridge. It lasts about a week. Just make sure to cover it tightly. To freeze pancakes, stack them with parchment paper between each one. Place the stack in a freezer bag or container. This keeps them from sticking together. When you want to eat them, reheat in the microwave or toaster. Heat them for about 30 seconds, or until warm. This method works well for long-term use. Do you have extra grated carrots? You can add them to salads or smoothies for a nutrient boost. They also work well in muffins or bread. If you have leftover cream cheese glaze, try it on brownies or as a dip for fruit. It adds a sweet touch to many desserts. Yes, you can make these pancakes ahead of time. To prep in advance: - Cook the pancakes and let them cool. - Stack them with parchment paper between each one. - Store them in an airtight container in the fridge for up to three days. - To reheat, place them in a toaster or microwave until warm. If you don’t have buttermilk, you can use: - Milk mixed with vinegar or lemon juice. Use 1 cup of milk and add 1 tablespoon of vinegar or lemon juice. - Yogurt, thinned with a bit of water or milk, works well too. - You can also use plant-based milk with a splash of vinegar for a dairy-free option. To check if pancakes are done, look for these signs: - Bubbles will form on the surface of the batter. - The edges of the pancakes will look slightly dry. - When flipped, they should be golden brown. These signs mean your pancakes are ready to enjoy! In this blog post, I covered how to make delicious carrot pancakes. You learned about the essential dry and wet ingredients, plus optional add-ins. I shared step-by-step cooking instructions and tips for storage. You can also explore variations and creative uses for leftovers. Now, it’s time to enjoy your pancakes! With these recipes and tips, you’ll impress everyone at breakfast or brunch. So grab those ingredients and get cooking!

Carrot Cake Pancakes with Cream Cheese Glaze Delight

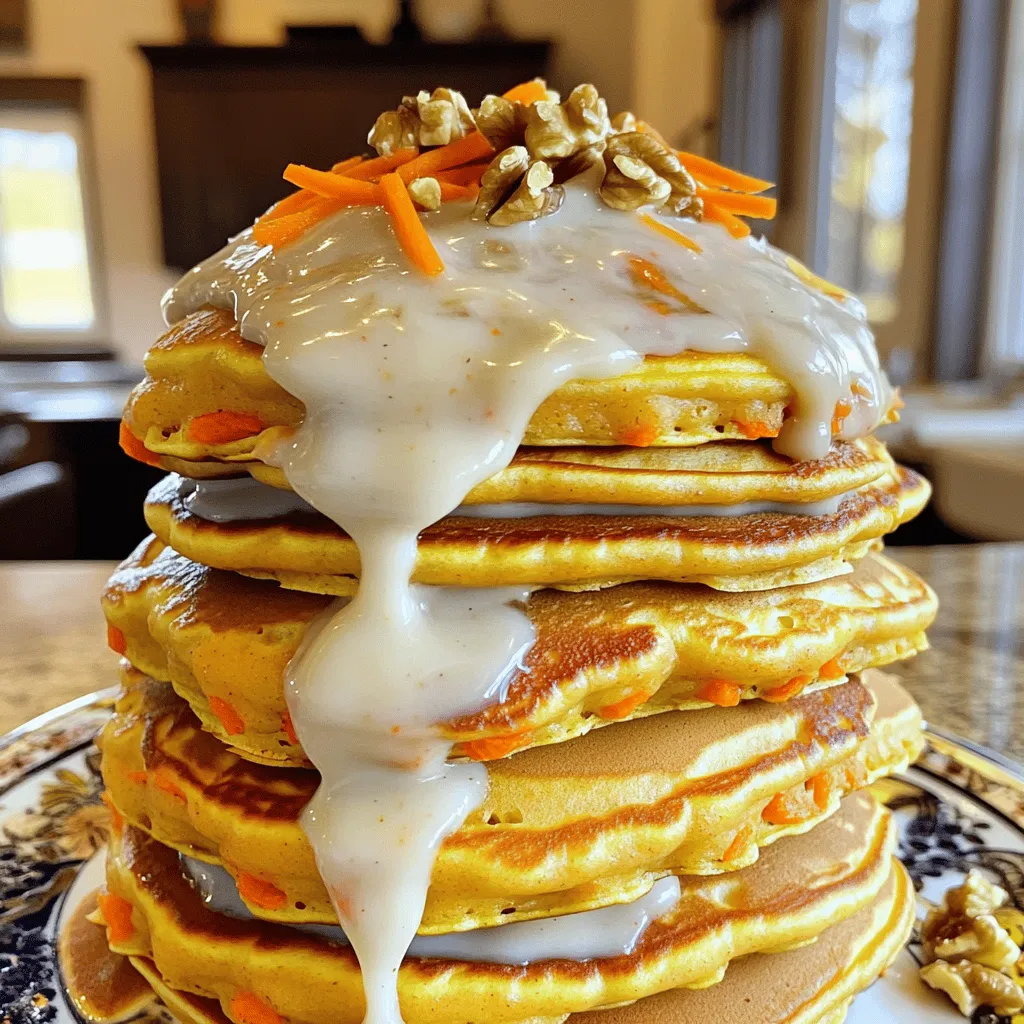
Get ready for a breakfast treat that combines two favorites: carrot cake and pancakes! In “Carrot Cake Pancakes with Cream

- 8 oz rice noodles - 1 lb shrimp, peeled and deveined - 3 cloves garlic, minced - 2 tablespoons chili sauce (adjust to taste) - 2 tablespoons soy sauce - 2 tablespoons sesame oil - 1 tablespoon olive oil - 1 red bell pepper, sliced - 1 green bell pepper, sliced - 1 cup snap peas - 2 green onions, chopped - Fresh cilantro for garnish - Salt and pepper to taste The rice noodles give a soft base for the dish. They soak up all the sauce. You can use any kind of rice noodles you like. The shrimp should be fresh or thawed completely. I recommend buying shrimp that are already peeled and deveined. This saves time. Garlic adds a nice kick to the dish. Use fresh minced garlic for the best flavor. Chili sauce can be adjusted to your taste. If you like it spicy, add more. The soy sauce adds umami and saltiness. Sesame oil gives a nutty flavor. The bell peppers and snap peas add color and crunch. Green onions are perfect for garnish. Fresh cilantro adds a bright taste. - Mild: Use 1 tablespoon of chili sauce. - Medium: Use 2 tablespoons of chili sauce. - Spicy: Use 3 tablespoons of chili sauce. Feel free to adjust the spiciness to match your taste. Always remember to taste as you go! First, you need to cook the rice noodles. Follow the package instructions carefully. This usually takes about 5-7 minutes. Once they are done, drain them and rinse under cold water. This stops the noodles from cooking further. Set them aside for later. Next, grab a large skillet or wok. Heat the olive oil over medium-high heat. Add the minced garlic and stir for 30 seconds. You want it fragrant, not burned. Now, add the shrimp to the pan. Season with salt and pepper. Cook for 2-3 minutes until the shrimp turns pink. It should be fully cooked. Then toss in the sliced red and green bell peppers, along with snap peas. Stir-fry these for another 2-3 minutes. You want the veggies to be tender but still crisp. In a small bowl, mix the chili sauce, soy sauce, and sesame oil. Pour this mix over the shrimp and veggies. Stir well to coat everything evenly. Now, add the cooked rice noodles to the skillet. Gently toss all the ingredients together. Heat them through until they are warm and well combined. Finally, take it off the heat. Garnish your dish with chopped green onions and fresh cilantro. Enjoy your Chili Garlic Shrimp Noodles! To get the best flavor, balance the heat and savory notes. Use fresh garlic for a strong taste. Adjust the chili sauce based on your spice level. If you like it hot, go for more. The soy sauce adds depth, while sesame oil gives it a nutty aroma. Mixing these ingredients well is key. Cook shrimp quickly over medium-high heat. This keeps them tender and juicy. When they turn pink, they’re done. Don’t overcrowd the pan; it can cause steaming. Cook in batches if needed. Season with salt and pepper for extra taste. A quick sauté is all you need for perfect shrimp. Rinse cooked noodles under cold water. This stops cooking and prevents stickiness. Use rice noodles for a soft texture that absorbs flavor well. Toss the noodles gently with the sauce. This helps them stay separate and evenly coated. Avoid overcooking; keep them al dente for a great bite. {{image_2}} You can change some ingredients for different flavors. If you don’t have rice noodles, use spaghetti or udon noodles. For shrimp, chicken or tofu works great too. If chili sauce is too spicy, try sweet chili sauce instead. You can also use low-sodium soy sauce for a healthier option. To make the dish more exciting, add extra veggies. Broccoli, carrots, or mushrooms fit in well. You can toss in some crushed red pepper for more heat. A squeeze of lime juice adds a fresh touch. Want more crunch? Try adding roasted peanuts or cashews on top. You can cook this dish in different ways. Instead of a skillet, use a grill pan for a smoky flavor. A pressure cooker can speed up cooking time. You can even make this dish in an air fryer for a crispy twist. Each method brings a unique taste to this dish! After enjoying your Chili Garlic Shrimp Noodles, let them cool down. Place the leftovers in an airtight container. This keeps them fresh for up to three days in the fridge. Make sure to keep the shrimp and noodles together. This helps the flavors blend well. To reheat, use a skillet over medium heat. Add a splash of water or oil to prevent sticking. Heat until warmed through, stirring often. You can also use a microwave. Place the noodles in a bowl, cover with a damp paper towel, and heat in short bursts until hot. Stir between bursts. You can freeze the noodles and shrimp for up to two months. Place them in a freezer-safe bag or container. Make sure to remove as much air as possible. When ready to eat, thaw in the fridge overnight. Reheat as mentioned above to enjoy your meal again. Yes, you can make this dish in advance. Cook the noodles and shrimp ahead of time. Store them in the fridge in an airtight container. When you're ready to eat, just reheat everything in a skillet. This way, you save time and enjoy a quick meal. Chili Garlic Shrimp Noodles pair well with various sides. Here are some ideas: - Steamed broccoli - Fried rice - A fresh green salad - Egg rolls or spring rolls These options add texture and flavor to your meal. Yes, you can easily make this dish gluten-free. Use gluten-free soy sauce or tamari instead of regular soy sauce. Be sure to check the rice noodle package to confirm they are gluten-free. Enjoy your tasty meal without worry! You've learned about the key ingredients and cooking steps for tasty chili garlic shrimp noodles. I shared tips to enhance flavors and achieve the right noodle texture. Exploring variations helps you customize the dish to your taste. Storing and reheating leftovers ensures you enjoy this meal later. Finally, I answered common questions to boost your cooking confidence. Use this guide to create a delicious dish that impresses yourself and others. Enjoy your cooking journey!

Chili Garlic Shrimp Noodles Flavorful Easy Recipe

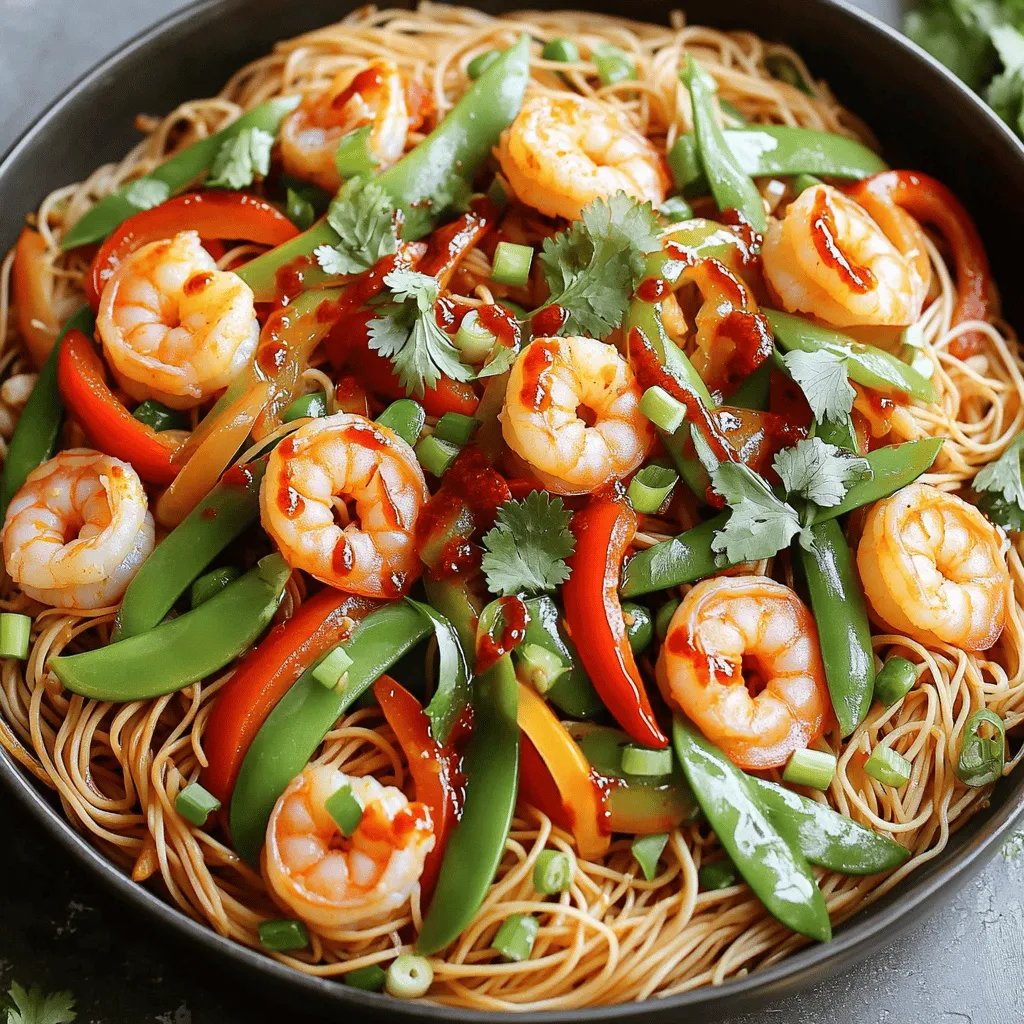
Are you ready to spice up your dinner with a quick and tasty meal? Chili Garlic Shrimp Noodles combine bold

- 2 ripe bananas, mashed - 1 cup granulated sugar - 1/4 cup unsalted butter, melted - 2 large eggs - 1 teaspoon vanilla extract - 1 cup all-purpose flour - 1/2 cup unsweetened cocoa powder - 1 teaspoon baking soda - 1/2 teaspoon salt - 1/2 cup semi-sweet chocolate chips - 1/2 cup chopped walnuts (optional) When measuring flour, spoon it into the cup. Then level it off with a knife. This helps you avoid packing too much flour. For cocoa powder, sift it to remove lumps. It makes mixing easier. Use a kitchen scale for precise measurements. It gives the best results with baking. You can swap ripe bananas for applesauce in a pinch. It keeps muffins moist. If you want less sugar, use a sugar substitute. You can replace all-purpose flour with whole wheat flour. This gives a nutty taste. For dairy-free options, use coconut oil instead of butter. Enjoy the same rich flavor! {{ingredient_image_1}} Start by preheating your oven to 350°F (175°C). This step is key for even baking. While the oven heats, you can prepare your muffin tin. Line it with paper liners or lightly grease it. This helps your muffins come out easily. In a large bowl, mash the two ripe bananas with a fork. Then, add one cup of granulated sugar. Next, pour in a quarter cup of melted butter. Crack in two large eggs and add one teaspoon of vanilla extract. Mix all these ingredients well until they blend smoothly. This mixture will make your muffins moist and tasty. In another bowl, whisk together one cup of all-purpose flour, half a cup of unsweetened cocoa powder, one teaspoon of baking soda, and half a teaspoon of salt. This step adds structure and flavor to your muffins. Mixing dry ingredients separately prevents clumps. Now, it’s time to combine the wet and dry mixtures. Gradually add the dry mixture to the wet mixture. Stir gently until just combined. Be careful not to overmix, as this can make your muffins tough. Next, fold in half a cup of semi-sweet chocolate chips and walnuts if you’re using them. Spoon the batter into the prepared muffin tin, filling each cup about three-quarters full. Bake in the preheated oven for 18 to 20 minutes. Check if they’re done by inserting a toothpick into the center. If it comes out clean, your muffins are ready! Let them cool in the tin for five minutes, then move them to a wire rack to cool completely. To get soft and moist muffins, use ripe bananas. Their natural sweetness adds flavor and moisture. Mix the wet and dry ingredients gently. Overmixing can make your muffins tough. You want to stir until just combined. This helps keep them light and fluffy. Once your muffins cool, store them in an airtight container. This keeps them fresh for a few days. You can also freeze them for later. Just wrap each muffin in plastic wrap. When ready to eat, thaw at room temperature or microwave for a few seconds. For baking, use a good muffin tin. I like to line it with paper liners for easy cleanup. A large mixing bowl helps to combine all ingredients well. A whisk works great for dry ingredients, while a spatula is best for folding in chocolate chips. Pro Tips Use Overripe Bananas: The riper the bananas, the sweeter and more flavorful your muffins will be. Look for bananas with brown spots for the best results. Don’t Overmix: Stir the batter just until the dry ingredients are incorporated. Overmixing can lead to dense muffins instead of light and fluffy ones. Customize Your Add-ins: Feel free to swap the walnuts for other nuts, or add in dried fruits or different types of chocolate for a unique twist. Store Properly: To keep muffins fresh, store them in an airtight container at room temperature for up to 2 days or in the refrigerator for up to a week. {{image_2}} If you want gluten-free muffins, it's easy to make swaps. Use gluten-free flour instead of all-purpose flour. Look for a blend that works in baking. This way, you keep the texture and flavor. The muffins will still be moist and delicious. Just make sure to check the other ingredients, like baking soda, for gluten-free labeling. You can make your muffins even better with a few simple additions. Consider adding spices like cinnamon or nutmeg for warmth. A splash of almond extract or orange zest gives a nice twist. You can also mix in some cocoa nibs for extra chocolate crunch. These small changes can take your muffins to a new level. If you want to make your muffins a bit healthier, try using whole wheat flour. This adds fiber and nutrients. You can also reduce the sugar by a bit if you like. Use mashed bananas to sweeten and cut back on granulated sugar. Another idea is to swap half of the butter with unsweetened applesauce. These swaps keep the muffins tasty while being a bit better for you. To keep your double chocolate banana muffins fresh, store them in an airtight container. This helps to keep them soft and moist. You can leave them at room temperature for up to three days. If you want to keep them longer, consider the freezer. To freeze your muffins, first, let them cool completely. Then, wrap each muffin tightly in plastic wrap. Place the wrapped muffins in a freezer-safe bag. They can stay in the freezer for about three months. When you're ready to eat one, just take it out and let it thaw at room temperature. The shelf life of your muffins depends on how you store them. If kept at room temperature, they last three days. In the fridge, they can last up to a week. For the best taste and texture, I recommend eating them within a few days. Enjoy your muffins while they're fresh! Yes, you can use frozen bananas. Just thaw them first. Drain any extra liquid. Frozen bananas are great for baking. They become soft and sweet when cooked. This helps in making your muffins moist and flavorful. To check if your muffins are done, use a toothpick. Insert it into the center of a muffin. If it comes out clean, your muffins are ready. If there is batter on the toothpick, bake them a bit longer. Usually, they take 18 to 20 minutes in the oven. Keep an eye on them to avoid overbaking. Absolutely! You can add many mix-ins to your muffins. Consider nuts, dried fruit, or even peanut butter chips. Each mix-in can change the flavor and texture. Just keep the total amount of mix-ins to about one cup. This way, your muffins stay fluffy and rise well. In this post, we explored muffin-making from start to finish. We covered key ingredients, detailed steps, and handy tips. You learned how to customize muffins with variations and better storage methods. Remember, successful muffins rely on good measurements and mixing. Always feel free to experiment with flavors and textures. With practice, you will bake muffins you and others love. Now, grab your ingredients and start baking! Enjoy your muffin-making journey!

Delicious Double Chocolate Banana Muffins Recipe

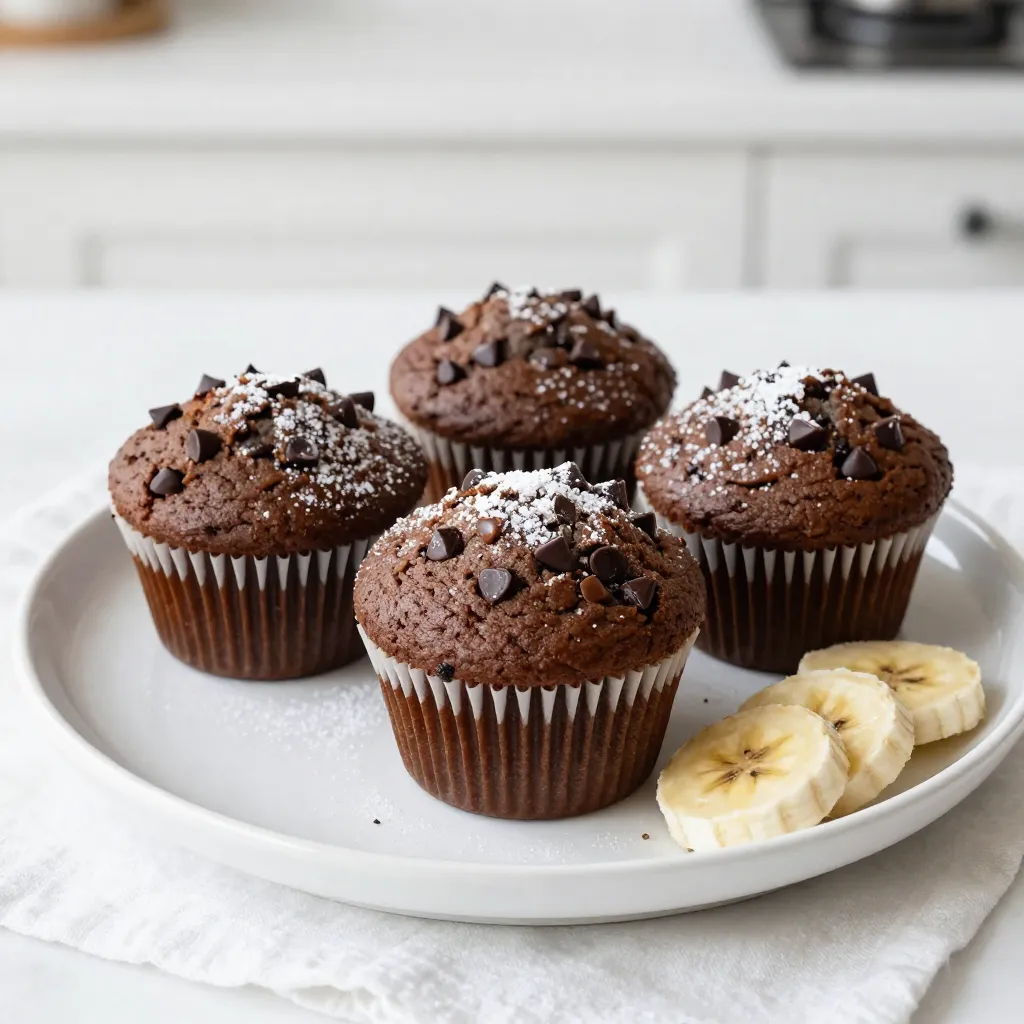
If you love chocolate and bananas, you’re in for a treat! My delicious double chocolate banana muffins are rich, moist,

To make these tasty sticky buns, gather the following ingredients: - 3 ½ cups all-purpose flour, plus extra for dusting - ¼ cup granulated sugar - 1 packet (2 ¼ teaspoons) active dry yeast - 1 teaspoon salt - ¼ teaspoon ground cinnamon - 1 cup whole milk, warmed - ¼ cup unsalted butter, melted - 2 large eggs - 1 teaspoon vanilla extract - 1 cup pecans, chopped - 1 cup brown sugar, packed - ½ cup maple syrup - ½ cup unsalted butter, softened - ½ teaspoon sea salt You can add extra flavors to these buns for a special touch: - 1 teaspoon vanilla extract (additional) - A sprinkle of nutmeg for warmth - A handful of raisins or dried cranberries If you need to swap ingredients, here are some ideas: - Use almond milk instead of whole milk for a dairy-free option. - Swap out all-purpose flour with gluten-free flour for a gluten-free version. - Maple syrup can be replaced with honey if you prefer. - For a nut-free version, use sunflower seeds instead of pecans. These swaps help you customize your sticky buns to fit your needs and tastes! {{ingredient_image_1}} Start by activating the yeast. Mix warm milk and granulated sugar in a small bowl. Sprinkle the yeast over the milk. Let it sit for 5-10 minutes until it gets frothy. This shows the yeast is ready. In a large bowl, whisk together 3 ½ cups of flour, salt, and cinnamon. Make a well in the center. Add the frothy yeast mixture, melted butter, eggs, and vanilla. Mix all these ingredients until a dough starts to form. Now, turn the dough onto a floured surface. Knead it for about 5-7 minutes. The goal is to make it smooth and elastic. If the dough feels sticky, add a little extra flour. Once the dough is ready, place it in a greased bowl. Cover it with a damp cloth. Let it rise in a warm spot for about 1 hour. It should double in size. While the dough rises, prepare the sticky mixture. In a separate bowl, mix softened butter, brown sugar, sea salt, and maple syrup until smooth. Spread this sticky paste evenly in a greased baking dish. Sprinkle chopped pecans over the mixture. When the dough has risen, punch it down. Roll it out on a floured surface to about ¼ inch thick. Spread a thin layer of softened butter on the dough. Sprinkle with sugar and cinnamon if you like. Starting from one edge, tightly roll the dough into a log. Slice the log into 12 equal pieces. Place the rolls cut-side down in the baking dish over the sticky mixture. Cover and let them rise for another 30 minutes. Preheat your oven to 350°F (175°C). Bake the buns for 25-30 minutes until they turn golden brown. After baking, let them cool for 5 minutes. Invert the buns onto a platter to let the sticky topping flow down. Enjoy your delicious maple pecan sticky buns! To get soft and fluffy dough, use warm milk. It should feel cozy, not hot. This warmth helps activate the yeast. Knead the dough for about 5-7 minutes. It should feel smooth and elastic. If it feels too sticky, add a bit more flour. This will help you avoid a gooey mess. Letting the dough rise in a warm spot is key. Cover it with a damp cloth to keep moisture in. You can prepare the sticky buns a day in advance. After shaping the rolls, cover and chill them overnight. This slows down the rise but keeps the flavor rich. The next day, let them sit at room temperature for about 30 minutes before baking. You can also freeze the unbaked rolls. Just make sure to wrap them well before freezing. When ready, let them thaw and rise before baking. Serve these sticky buns warm for the best taste. Drizzle extra maple syrup on top for sweetness. Add a sprinkle of chopped pecans for crunch. You can also enjoy them with cream cheese or vanilla ice cream. This makes a delightful treat for breakfast or dessert. Don't forget to share them with friends! Pro Tips Activate Yeast Properly: Ensure your milk is warm but not hot, as excessive heat can kill the yeast. A temperature around 110°F (43°C) is ideal for activating the yeast. Knead to Perfection: Knead the dough until it’s smooth and elastic. This develops the gluten, resulting in fluffy buns. If the dough sticks too much, sprinkle a little extra flour as needed. Don’t Rush the Rise: Allow the dough ample time to rise. A warm, draft-free environment will help it double in size, ensuring light and airy sticky buns. Serve Fresh: Sticky buns are best enjoyed warm right out of the oven. If making ahead, reheat gently to maintain their gooey texture and flavor. {{image_2}} You can make gluten-free maple pecan sticky buns using gluten-free flour. Look for a blend that works well for baking. Substitute the all-purpose flour in the recipe with your gluten-free mix, keeping the same measurements. This will give you a tasty option for those avoiding gluten. Ensure the yeast is gluten-free too. For a fun twist, add chocolate or dried fruits. You can sprinkle chocolate chips or dried cranberries over the dough before rolling it up. This will give your sticky buns a rich flavor and a chewy texture. Just be careful not to add too much, or the buns may become too sweet. For an apple twist, mix in chopped apples with the pecans. Use tart apples like Granny Smith for a balance of sweet and sour. Toss the apple pieces with a little cinnamon and sugar before adding them. This will enhance the flavor and give your buns a nice fruity bite. These variations keep the spirit of the original recipe while adding exciting new flavors. Each option lets you enjoy your buns in a fresh way. To keep your leftover sticky buns fresh, let them cool completely. Place them in an airtight container. You can also wrap them in plastic wrap. Store them at room temperature for up to 2 days. If you want to keep them longer, the fridge is an option, but they may dry out a bit. When you're ready to enjoy your sticky buns again, preheat your oven to 350°F (175°C). Place the buns on a baking sheet. Cover them with aluminum foil to prevent burning. Heat for about 10-15 minutes. This method keeps them soft and warm. You may also use a microwave. Heat them for 15-20 seconds, but this may make them a bit chewy. You can freeze sticky buns for up to 3 months. First, let them cool completely. Wrap each bun tightly in plastic wrap, then place them in a freezer bag. When you want to eat them, thaw them in the fridge overnight. Reheat as mentioned earlier for a warm, tasty treat. If your dough is sticky, don’t worry. You can fix it. Start by adding small amounts of flour. Sprinkle a little flour on your work surface. Knead the dough gently and gradually. Keep adding flour until the dough feels soft but not sticky. It should be smooth and easy to handle. Remember, don’t add too much flour at once. This can make the buns tough. Yes, you can make sticky buns without yeast. Instead of yeast, use baking powder or baking soda. This will create a quick dough. The buns will not rise as much, but they will still taste great. Mix the dry ingredients with milk and butter to make a batter. Pour it into the sticky mixture and bake. The result will be more like a cake than traditional sticky buns. To reheat sticky buns, use the oven for the best results. Preheat your oven to 350°F (175°C). Place the buns on a baking sheet. Cover them with foil to keep moisture in. Heat for about 10-15 minutes until warm. You can also use the microwave. Simply place the buns on a microwave-safe plate and heat for 15-20 seconds. Enjoy them warm, and don’t forget to drizzle with more maple syrup! This blog post covered everything you need for maple pecan sticky buns. We looked at main ingredients, optional add-ons, and substitutes. You learned step-by-step how to activate yeast, prepare dough, and bake buns. I shared tips for the best texture, timing, and serving suggestions. We also explored gluten-free options and fun variations. Lastly, I provided storage information and answered common questions. With this guide, you're ready to bake delicious sticky buns. Enjoy your sweet creation!

Maple Pecan Sticky Buns Fresh and Delicious Treat

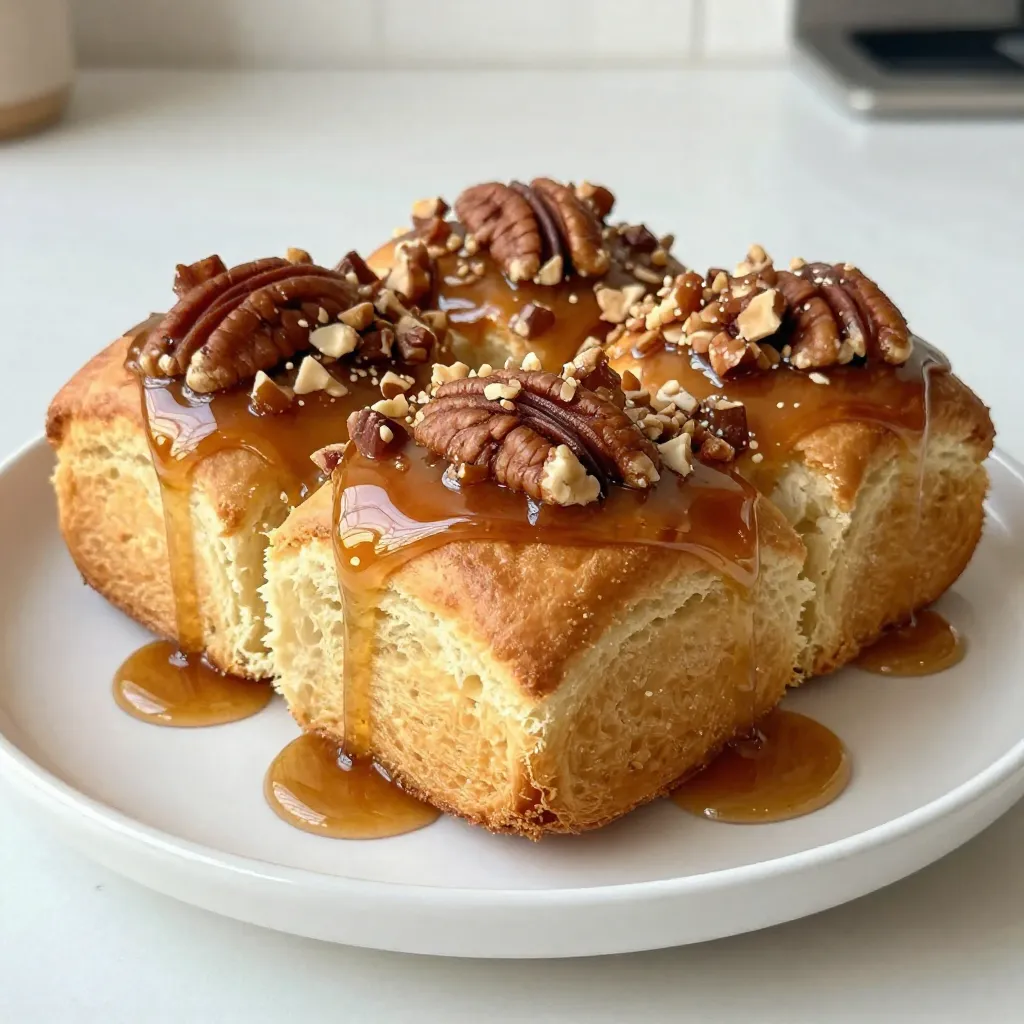
If you crave a sweet and nutty treat, you’re in for a delight! These Maple Pecan Sticky Buns promise to

For this recipe, I use 16 ounces of fresh baby portobello or cremini mushrooms. These types have a great flavor and texture. Make sure to clean them well and remove the stems. This step is key to getting the best results. To create a tasty coating, you'll need a few simple seasonings. Gather: - 1 cup grated Parmesan cheese - 1 teaspoon garlic powder - 1 teaspoon onion powder - 1 teaspoon dried oregano - 1 teaspoon paprika - Salt and pepper to taste Mix these ingredients in a bowl before adding them to the mushrooms. This blend of flavors will make the mushrooms shine. You also need 3 tablespoons of olive oil. This helps the coating stick and adds richness. Finally, for a pop of color, chop some fresh parsley to sprinkle on top when serving. This garnish not only looks good but adds a fresh taste too. Start by washing the fresh baby portobello or cremini mushrooms. Make sure to remove the stems. I prefer to use about 16 ounces, which is roughly 450 grams. Place the cleaned mushrooms in a large bowl. Next, add 3 tablespoons of olive oil. Toss the mushrooms in the oil until each one is well coated. This step is key for flavor and helps the cheese stick later. In another bowl, take 1 cup of grated Parmesan cheese. Add 1 teaspoon of garlic powder, 1 teaspoon of onion powder, 1 teaspoon of dried oregano, and 1 teaspoon of paprika. Don’t forget to season with salt and pepper to taste. Mix these ingredients well. This cheese coating gives the mushrooms their tasty, crispy layer. Before cooking, preheat your air fryer to 375°F (190°C) for about 5 minutes. Once it's hot, arrange the mushrooms in a single layer in the air fryer basket. Avoid crowding them to get even cooking. Cook the mushrooms for 10 to 12 minutes. Shake the basket halfway through to promote crisping. After cooking, remove the mushrooms and garnish with fresh chopped parsley. Enjoy your delicious, crispy treat! To get your mushrooms crispy, start with dry mushrooms. Any water left on them can make them soggy. Toss them well in olive oil. This helps the cheese stick and creates a nice crunch. Set your air fryer to 375°F (190°C) and preheat it for five minutes. This step is key! Arrange the mushrooms in a single layer. Overcrowding can lead to uneven cooking. Cook them for 10 to 12 minutes, shaking the basket halfway through for even crisping. Taste is personal. You can tweak the seasoning to match your likes. If you want more garlic flavor, add an extra pinch of garlic powder. For a little heat, sprinkle in some cayenne pepper. Don't forget to taste the cheese mix before adding it to the mushrooms. You may want more salt or pepper. Just remember to add small amounts. You can always add more, but it's hard to take it away! Want to prep in advance? You can clean and coat the mushrooms a few hours ahead. Just store them in the fridge until you're ready to cook. This way, you save time when guests arrive. You can also cook them and then store leftovers in an airtight container. Just reheat them in the air fryer for a few minutes to bring back the crisp. Enjoy these tasty treats anytime! {{image_2}} You can use many types of mushrooms for this dish. Baby portobello and cremini are great, but try button mushrooms for a milder taste. Shiitake mushrooms add a rich flavor, while oyster mushrooms bring a unique texture. Each type changes the dish's taste and feel. Experiment and find your favorite! Spices can make your mushrooms pop. Consider adding cayenne pepper for heat or Italian seasoning for a herby touch. If you like a smokier taste, try smoked paprika. You can also use fresh herbs like thyme or basil. Mix and match to discover new flavor profiles that excite your taste buds. If you're out of Parmesan, use other cheeses. Grated mozzarella gives a gooey texture, while cheddar offers a sharp flavor. Nutritional yeast is a great dairy-free option, adding a cheesy taste without the cheese. You can also mix in nuts, like finely chopped walnuts, for extra crunch and flavor. After enjoying your Air Fryer Parmesan Mushrooms, let them cool. Place them in an airtight container. Keep them in the fridge. They stay fresh for up to three days. If you want to enjoy them later, it’s best to store them quickly. To reheat, use your air fryer for the best results. Preheat it to 350°F (175°C). Place the mushrooms in the basket. Heat for about 5 minutes. This method keeps them crispy. You can also use a microwave, but they may lose some crunch. For the best flavor, eat the mushrooms soon after cooking. If you plan to keep them, don’t forget to seal them tight. Avoid stacking them to prevent sogginess. Enjoy them warm for the best taste! Yes, you can use other kinds of cheese. Mozzarella gives a gooey texture. Cheddar adds a sharp taste. You can also try gouda for a smoky flavor. Just remember, different cheeses melt in unique ways. Experiment and find your favorite! Cook the mushrooms for about 10 to 12 minutes. Preheat your air fryer to 375°F (190°C). Check for doneness by looking for a golden brown color. Shake the basket halfway through to ensure even cooking. This helps make them crispy all over. Air Fryer Parmesan Mushrooms can be a healthy snack. They use less oil than frying. Mushrooms are low in calories and high in nutrients. Parmesan cheese offers protein and calcium. Just watch the salt in the recipe to keep it healthy. This article covered how to make Air Fryer Parmesan Mushrooms. We discussed fresh mushrooms, seasonings, and the best olive oil to use. I shared step-by-step prep, mixing instructions, and the air frying process. You learned tips for crispness, seasoning, and making ahead. We also explored variations with different mushrooms and cheeses. Remember to store leftovers properly and reheating them the right way. These mushrooms are tasty, easy, and fun. Enjoy making them and sharing with others!

Air Fryer Parmesan Mushrooms Crispy and Tasty Treat

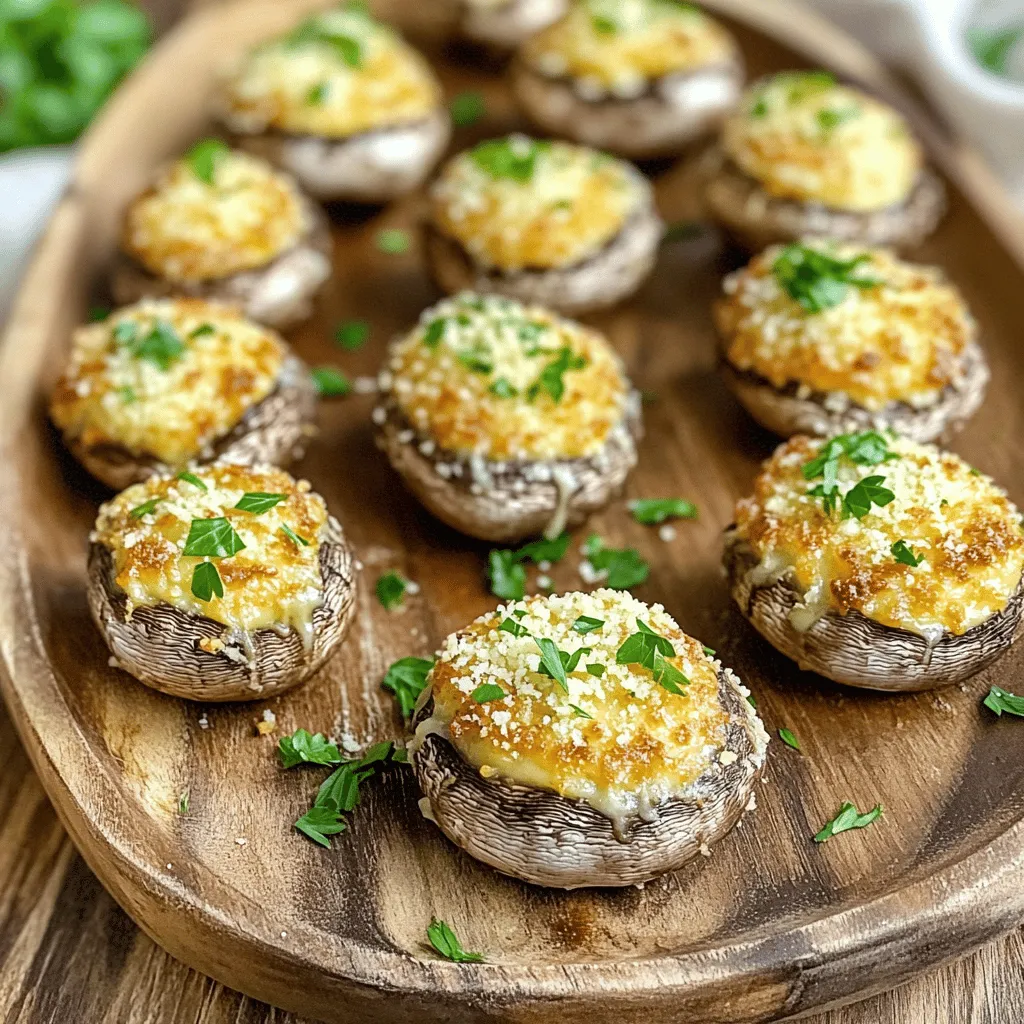
Are you ready to make a mouthwatering snack that’s both crispy and tasty? In this article, I’ll show you how

- 8 oz fettuccine pasta - 1 lb large shrimp, peeled and deveined - 4 tablespoons unsalted butter - 4 cloves garlic, minced - 1 cup heavy cream - 1 cup grated Parmesan cheese - Salt and pepper to taste - Fresh parsley, chopped (for garnish) - Lemon wedges (for serving) For Minute Garlic Butter Shrimp Alfredo, every ingredient plays a key role. Start with fettuccine pasta. It's thick and holds the sauce well. Next, you need large shrimp. They add a nice texture and flavor. The unsalted butter gives richness. Minced garlic brings that lovely aroma and taste. Heavy cream is essential for the sauce. It makes everything creamy and smooth. Grated Parmesan cheese adds a salty bite. Don’t forget salt and pepper to enhance all the flavors. Fresh parsley brightens the dish as a garnish. Lastly, lemon wedges add a fresh zing when served. These ingredients come together quickly, making this dish perfect for busy nights. Each one matters in creating a delicious meal. Start by boiling a large pot of salted water. Salt helps enhance the pasta's flavor. Once it boils, add 8 oz of fettuccine. Cook it for about 8 to 10 minutes, or until it is al dente. You want it to be firm yet tender. Before draining, save ½ cup of the pasta water. This water helps adjust your sauce later. Drain the fettuccine and set it aside. Next, heat a large skillet over medium heat. Add 2 tablespoons of unsalted butter to the skillet. Let the butter melt fully. Once melted, add 1 lb of large shrimp. Sprinkle some salt and pepper over the shrimp for flavor. Cook the shrimp for about 2 to 3 minutes on each side. They should turn pink and opaque. When done, remove the shrimp from the skillet and set them aside. In the same skillet, add the remaining 2 tablespoons of unsalted butter. Then, add 4 cloves of minced garlic. Sauté the garlic for about 1 minute. Watch closely to ensure it becomes fragrant, but do not let it brown. This step adds a rich flavor to your sauce. Lower the heat after the garlic is fragrant. Pour in 1 cup of heavy cream, stirring well. Gradually whisk in 1 cup of grated Parmesan cheese. Keep stirring until the cheese melts and the sauce becomes creamy. If your sauce is too thick, add the reserved pasta water slowly. This will help you reach the desired consistency. Now, add the cooked fettuccine and shrimp back into the skillet. Toss everything together gently. You want the pasta and shrimp to be well coated in the creamy sauce. Taste and adjust with more salt and pepper if needed. For plating, use a large bowl or plate. Spoon the shrimp Alfredo into the center. Sprinkle chopped parsley on top for a pop of color. Serve lemon wedges on the side for a fresh twist. Enjoy your Minute Garlic Butter Shrimp Alfredo! To get juicy shrimp, timing is key. Cook the shrimp for 2-3 minutes on each side. Look for that lovely pink color and opaque look. This means they are done and ready to shine in your dish. Adjust seasoning to your taste. A little extra salt or pepper can boost the flavor. You can even add a pinch of paprika for a hint of spice. To keep your sauce creamy, avoid clumping cheese. Gradually whisk in the Parmesan cheese. This helps it melt smoothly into the sauce. If the sauce gets too thick, use reserved pasta water. Add it slowly until you reach the desired creaminess. This simple trick keeps your sauce rich without losing its texture. For extra flavor, consider adding herbs. Fresh basil or thyme can elevate your dish. Just sprinkle them in when you combine the pasta and shrimp. For garnishes, try more than just parsley. Crushed red pepper flakes can add heat. Lemon zest brings brightness. Both make your dish look and taste even better. {{image_2}} You don't have to stick with fettuccine for this dish. Any long pasta can work well. Here are a few great options: - Spaghetti - Linguine - Penne Each type offers a unique texture and flavor. Try them out and see what you like best! Want to make your dish even healthier? Adding vegetables is a fantastic idea. Here are some veggies that pair well with shrimp Alfredo: - Broccoli florets - Spinach - Cherry tomatoes - Peas You can toss them in while cooking the shrimp. This adds color and nutrition to your meal. If you want to switch things up, use different seafood. Here are some tasty options for alternate proteins: - Scallops - Crab meat - Salmon These can bring new flavors and textures to your dish. Experiment and find your favorite! To keep your Minute Garlic Butter Shrimp Alfredo fresh, store it right. Place leftover pasta in an airtight container. Make sure it cools down before sealing. This will prevent moisture buildup. Use leftovers within three days for best taste. When reheating, keep the sauce creamy. Use a skillet over low heat. Add a splash of milk or cream as you warm it up. Stir gently to mix in the sauce. This prevents the sauce from thickening too much and keeps it smooth. You can freeze this dish, but it can change texture. To freeze, let it cool completely. Place it in a freezer-safe container. Label it with the date. It can last up to three months. To defrost, move it to the fridge overnight. Reheat slowly in a skillet, adding a bit of cream for creaminess. This dish is quick! It takes about 10 minutes to prepare and 10 minutes to cook. In total, you can have this meal ready in just 20 minutes. This makes it perfect for busy weeknights or when you want a tasty meal fast. Yes, you can use frozen shrimp. Just make sure to thaw them first. You can do this by placing them in cold water for about 15 to 20 minutes. Once thawed, follow the same steps in the recipe. This way, you save time and still enjoy great flavor. If you want a lighter version, you can use half-and-half instead of heavy cream. You can also try using whole milk mixed with a bit of cream cheese. This keeps the dish creamy without being too heavy. Adjust the measurements to taste. You can prep some parts in advance. Cook the fettuccine and shrimp ahead of time. Store them separately in the fridge. When you’re ready to eat, just heat everything and combine with the sauce. This makes it easy to enjoy a homemade meal with little fuss. This blog post guides you through making a tasty Garlic Butter Shrimp Alfredo. You learned about the main ingredients, key cooking steps, and tips for perfecting the dish. Don’t forget you can switch up the pasta or add veggies for variety. Storing leftovers is easy, and reheating can keep your meal fresh. Whether you enjoy cooking or just want a quick meal, this dish is sure to please. Dive into your kitchen and enjoy your new favorite recipe!

Minute Garlic Butter Shrimp Alfredo Quick and Simple Dish

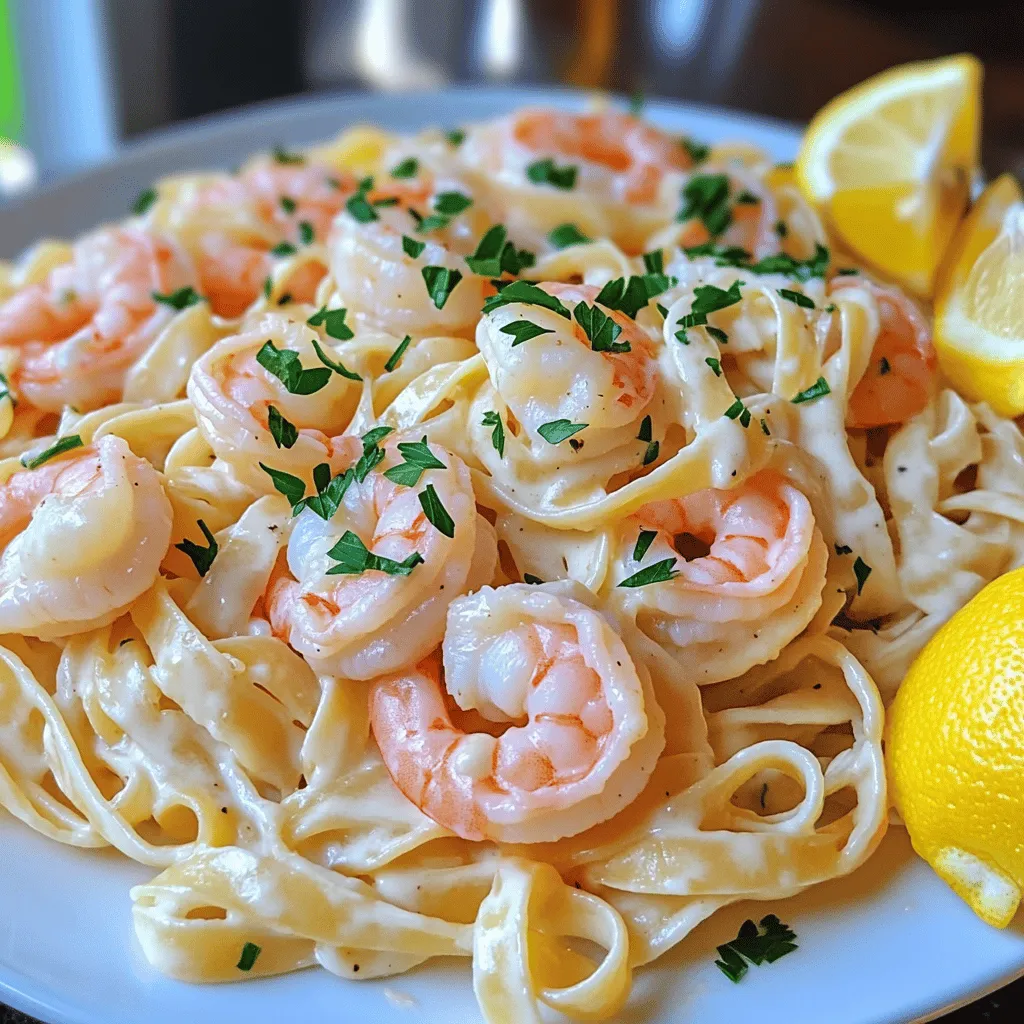
Craving a delicious dish that’s both quick and easy? You’re in luck! This Minute Garlic Butter Shrimp Alfredo brings bold

- 2 cups apple cider - 2 cups all-purpose flour - 1 teaspoon baking powder - 1 teaspoon baking soda - 1 teaspoon ground cinnamon - ½ teaspoon ground nutmeg - ½ teaspoon salt - ¾ cup granulated sugar - ½ cup brown sugar, packed - ¾ cup unsalted butter, softened - 3 large eggs - 1 teaspoon vanilla extract - ½ cup granulated sugar (for rolling) - 2 teaspoons ground cinnamon (for rolling) To make this cake, start with fresh apple cider. It gives the best flavor! Using good quality flour also helps. You want your cake to be soft and fluffy. Next, gather your sugars. Both granulated and brown sugar add sweetness. They also add a nice depth to the flavor. The brown sugar makes it moist too. Don’t forget the spices! Ground cinnamon and nutmeg bring warmth and depth. For the wet ingredients, butter adds a rich taste. Make sure it is softened for easy mixing. Eggs help to bind everything together and add fluffiness. Finally, a splash of vanilla extract gives a lovely aroma. The sugar and cinnamon for rolling adds that classic donut touch. It makes the cake irresistible! The crunchy outside pairs well with the soft inside. Now you have everything you need! Let’s get baking and enjoy this delicious treat together. To make your apple cider donut cake, first, reduce the cider. In a small saucepan, bring 2 cups of apple cider to a boil over medium-high heat. Once it boils, lower the heat and let it simmer. You want to reduce it to about 1 cup. This should take around 15 to 20 minutes. The cider is done when it looks syrupy and has a stronger flavor. Remove it from heat, and let it cool slightly before using it in the batter. Next, prepare your oven and pan. Preheat your oven to 350°F (175°C). This step is key for getting a nice rise in your cake. Choose a Bundt pan or a 9x13 inch baking dish for this recipe. Make sure to grease and flour the pan well. This helps the cake come out easily after baking. Now, let’s mix the batter. In a medium bowl, whisk together the dry ingredients: 2 cups of all-purpose flour, 1 teaspoon baking powder, 1 teaspoon baking soda, 1 teaspoon ground cinnamon, ½ teaspoon ground nutmeg, and ½ teaspoon salt. In a large mixing bowl, cream together ¾ cup of softened unsalted butter, ¾ cup of granulated sugar, and ½ cup of brown sugar until it is light and fluffy. This takes about 3 to 4 minutes. Add 3 large eggs one at a time, mixing well after each. Then, stir in 1 teaspoon of vanilla extract. Gradually mix in the reduced cider. Finally, add the dry ingredients to the wet mixture, stirring gently. Be careful not to over-mix; this keeps the cake soft. Now it's time to bake. Pour the batter into your prepared pan and smooth the top with a spatula. Bake in the preheated oven for 30 to 35 minutes. You can test if it's done by inserting a toothpick into the center. If it comes out clean, the cake is ready. Once baked, let the cake cool in the pan for about 10 minutes. Turn it out onto a wire rack to cool completely. After it cools, mix ½ cup of granulated sugar with 2 teaspoons of ground cinnamon in a shallow bowl. Roll the cake in this mixture for a sweet finish. To get a fluffy cake, start with soft butter. Let it sit at room temperature for about an hour. Cream the butter with both sugars until light and fluffy. This should take about 3-4 minutes. The air you whip into the butter helps the cake rise. Make sure your eggs are also at room temp. Cold eggs can make the batter dense. When mixing, add eggs one at a time. This helps them blend in well. To boost the taste, consider adding more spices. A touch of ginger or allspice can bring warmth. Think about adding a splash of maple syrup for extra sweetness. For toppings, whipped cream adds a nice touch. A scoop of vanilla ice cream pairs well too. You can also sprinkle more cinnamon sugar on top. This adds texture and flavor. For a cozy look, serve slices on a wooden board. Dust extra cinnamon sugar on each slice for a pop. To wow your friends on social media, slice the cake and show the inside. A drizzle of caramel or a dollop of whipped cream can make it shine. Bright colors and fun plates catch the eye. {{image_2}} To make a gluten-free version, use a gluten-free flour blend. Look for one that has xanthan gum. This will help with the cake's structure. You may need to add a bit more liquid. Gluten-free flour can absorb more moisture. If the batter seems too thick, add a splash of apple cider. You can mix in other fruits for added flavor. Chopped pears pair well with apple cider. You can also add nuts or chocolate chips for a tasty twist. Try walnuts for crunch or chocolate chips for sweetness. Adding spices like ginger or cloves can also enhance the flavor. This gives the cake a warm, cozy feel. For mini cakes, use a cupcake tin or mini Bundt pan. Fill each cup about two-thirds full with batter. Bake for about 18-20 minutes. Check for doneness with a toothpick. If it comes out clean, your mini cakes are ready. These smaller portions are perfect for sharing at parties or gatherings. To keep your cake fresh, wrap it well. Use plastic wrap or foil. Store the cake in the fridge. This stops it from drying out. The cake stays fresh for about 3 to 5 days. Want to save some for later? You can freeze the cake! First, let it cool completely. Then, slice it into pieces. Wrap each slice in plastic wrap. Place the slices in a freezer bag. This helps prevent freezer burn. The cake can last up to 3 months in the freezer. To thaw, take the slices out and leave them at room temperature. You can also warm them briefly in the microwave. Enjoy your cake anytime! Yes, you can use store-bought apple cider. However, homemade cider often has a fresher taste. Store-bought cider can be sweeter. Make sure to choose a quality brand. Look for cider with no added sugars or preservatives. This choice makes your cake taste better and more natural. To check if the cake is done, use a toothpick. Insert it into the center of the cake. If it comes out clean, the cake is ready. You can check it a few minutes before the baking time ends. If the toothpick has wet batter, bake for a few more minutes. This simple tip ensures a perfectly baked cake. To make the cake more moist, try a few tricks. First, use room temperature eggs and butter. This helps the batter mix well. You can also add a little applesauce. It adds moisture and flavor without making the cake heavy. Another option is to slightly under-bake the cake. This keeps it soft and tender. You learned how to make a delicious apple cider donut cake. We covered key ingredients, step-by-step instructions, and helpful tips. Remember to mix well and check doneness with a toothpick. You can also try variations like gluten-free or individual cakes. Store leftovers properly to enjoy later. Experiment with flavors to make it your own. Enjoy making this cake for special occasions or just because! Happy baking!

Apple Cider Donut Cake Irresistible Flavor Delight

Are you ready to indulge in a sweet treat that’s perfect for fall? Apple cider donut cake brings together rich

Older posts
Newer posts
← Previous Page1 … Page23 Page24 Page25 … Page84 Next →

dsad

© 2026 Lisa Dishes • Built with GeneratePress

Our Policies

  • Copyright Policy
  • Cookie Policy
  • GDPR Policy
  • Privacy Policy
  • Disclaimer
  • Terms Of Use

More Information

  • Home
  • About
  • Contact
  • Appetizers
  • Dessert
  • Dinner
  • Drinks
©2026, Lisa Dishes About Back To Top