Skip to content
DisclaimerTerms Of UseGDPR PolicyCookie Policy

Lisa Dishes

  • Home
  • Drinks
  • Appetizers
  • Dinner
  • Dessert
  • About
  • Contact
  • Privacy Policy
DisclaimerTerms Of UseGDPR PolicyCookie Policy

NO-ING-IMG

- Potato gnocchi - Unsalted butter - Garlic - Heavy cream - Grated Parmesan cheese - Italian seasoning - Salt and pepper - Fresh parsley To make Minute Creamy Garlic Butter Gnocchi, gather these simple ingredients. - Potato gnocchi is the star of the dish. It cooks quickly and has a soft texture. - Unsalted butter adds richness. It helps create a velvety sauce. - Garlic gives the dish a bold flavor. Fresh minced garlic works best for a strong taste. - Heavy cream makes the sauce creamy and smooth. It brings everything together in a delicious way. - Grated Parmesan cheese adds a salty, nutty flavor. It also helps thicken the sauce. - Italian seasoning brings in herbs that match well with garlic and cheese. - Salt and pepper enhance all the flavors. Use them to taste. - Fresh parsley adds a nice touch of color. Plus, it gives a fresh flavor on top. Make sure you have all these ingredients ready. Each one plays an important role in this quick meal. - Fill a large pot with salted water and bring it to a boil. - Once boiling, add a package of potato gnocchi. Cook for 2-3 minutes. The gnocchi will float to the top when done. - Drain the gnocchi in a colander and set it aside for later. - In a large skillet, place 4 tablespoons of unsalted butter over medium heat. - Once the butter melts, add 4 cloves of minced garlic. Sauté for 1-2 minutes. Watch it closely to avoid burning. - Pour in 1 cup of heavy cream and stir well to combine. Let it simmer for a couple of minutes to thicken. - Gradually whisk in 1 cup of grated Parmesan cheese. Mix until smooth and creamy. - Season with 1 teaspoon of Italian seasoning, salt, and pepper to taste. - Add the cooked gnocchi to the skillet. Gently toss to coat the gnocchi in the creamy sauce. Heat for an additional 1-2 minutes. - Remove from heat and garnish with fresh chopped parsley before serving. To get the right creaminess, you can adjust the amount of cream. If you want a richer sauce, add more cream. Start with one cup, then taste. If it needs more, go for it! You can also add extra cheese for flavor. Burnt garlic can ruin your sauce. To avoid it, keep an eye on your heat. Sauté the garlic on medium heat. Stir it often. Once it smells good, it's done. Don't let it turn brown. Garnishes can make your dish look fancy. Fresh parsley adds color and flavor. Just chop it finely and sprinkle it on top. You can also try grated cheese or crushed red pepper for some heat. For extra protein, consider adding grilled chicken or shrimp. They cook fast and mix well with gnocchi. You can also add cooked sausage for a hearty meal. Just make sure to cook the protein first, then toss it in with the gnocchi. {{image_2}} You can easily change the cheese in this recipe. While Parmesan adds a nice flavor, you might try mozzarella or goat cheese instead. Each cheese brings a unique taste. Mozzarella will make the dish milder, while goat cheese gives it a tangy kick. If you want a lighter dish, swap butter for olive oil. Olive oil adds a fruity flavor and is a great option for those who want to cut back on dairy. Simply heat the olive oil in the skillet and follow the steps as usual. Want to add more color and nutrition? Toss in some vegetables! Spinach, cherry tomatoes, or peas work well. Just add them to the skillet when you sauté the garlic. They will cook quickly and add great flavor. If you like heat, sprinkle in some red pepper flakes. Start with a pinch and add more if you like it spicy. This simple add-in can really wake up the dish and make it more exciting. You can mix and match these ideas to find your perfect version! To store any leftover creamy garlic butter gnocchi, first let it cool. Place it in an airtight container. It will stay fresh in the fridge for up to three days. Make sure to use a clean spoon to scoop it out. This keeps the dish safe and tasty. If you want to save it for longer, you can freeze it. Portion out the gnocchi into freezer-safe bags. Remove as much air as you can before sealing. This helps prevent freezer burn. You can freeze it for up to three months. When it's time to enjoy your leftovers, reheating is easy. The best way is to use a skillet. Heat the skillet over medium heat. Add a splash of water or cream to help it warm up. Then, add the gnocchi and stir gently. You can also use the microwave. Place the gnocchi in a microwave-safe bowl. Add a little cream or water to keep it moist. Cover it loosely with a lid or plastic wrap. Heat in short bursts, stirring in between, until it’s warm. These methods keep the gnocchi creamy and delicious! This dish is quick! You need just 15 minutes. The prep time is only 5 minutes. Cooking takes about 10 minutes. Boil the water, cook the gnocchi, and make the sauce. It’s perfect for busy days or quick dinners. Yes, you can! Use coconut cream instead of heavy cream. For cheese, try a dairy-free Parmesan. There are many great brands out there. You can also use cashew cream for a rich taste. These swaps keep the dish creamy and delicious. There are many tasty sides! A fresh green salad pairs well. You can also serve garlic bread for a nice crunch. Roasted vegetables add color and flavor. For protein, grilled chicken or shrimp works great. Choose sides that you love! This blog post covered how to make creamy garlic butter gnocchi. We discussed the main ingredients and the simple steps for cooking. I shared tips for perfecting the sauce and adding variations to make it your own. Storing and reheating tips ensure you enjoy leftovers too. This dish is easy to make and fun to adjust to your taste. I hope you now feel ready to create a delicious meal that everyone will love. Enjoy your cooking!

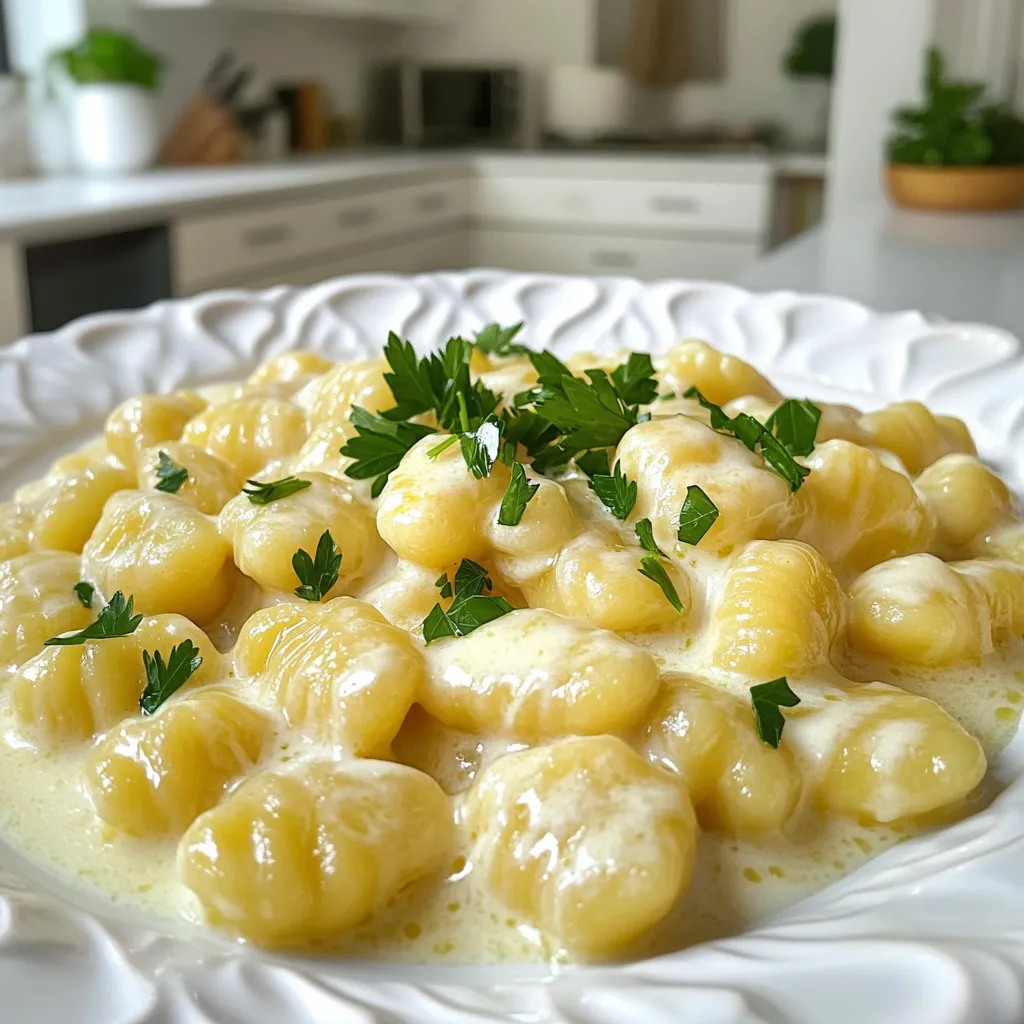
Minute Creamy Garlic Butter Gnocchi Quick and Easy Meal

Looking for a quick meal that packs flavor? Minute Creamy Garlic Butter Gnocchi is your answer! With just a handful

- 1 cup rolled oats - 1/2 cup natural peanut butter - 1/3 cup honey or maple syrup - 1/4 cup dark chocolate chips - 1/4 cup ground flaxseed - 1 teaspoon vanilla extract - A pinch of sea salt I love using rolled oats in this recipe. They add great texture and fiber. Natural peanut butter gives a rich taste without added sugars. Honey or maple syrup adds the perfect sweetness. I usually go for dark chocolate chips for a nice cocoa flavor. Ground flaxseed boosts nutrition and adds healthy fats. The vanilla extract rounds out all the flavors. A pinch of sea salt enhances the sweetness and balances everything. You can swap nut butters if you like. Almond butter or cashew butter work well too. For sweeteners, try agave syrup or coconut sugar. These swaps can change the flavor but keep it tasty. These energy balls have about 100 calories per serving. They are packed with protein and fiber. The oats provide energy and help with digestion. Peanut butter offers healthy fats and protein. Flaxseed is great for omega-3s. Each bite gives you a boost for your day! - Mixing dry ingredients: Start by taking a large mixing bowl. Add 1 cup of rolled oats, 1/4 cup of ground flaxseed, and a pinch of sea salt. Mix these well with a spoon. This step ensures all dry ingredients blend nicely. - Combining wet ingredients: In a separate bowl, scoop 1/2 cup of natural peanut butter. Add 1/3 cup of honey or maple syrup and 1 teaspoon of vanilla extract. Stir until smooth and creamy. This mixture will give your energy balls their sweet and nutty flavor. - Rolling technique: Take small portions of the mixture in your hands. Roll them into balls about 1 inch wide. This size is perfect for snacking. - Placement on baking sheet: After rolling, place the balls on a parchment-lined baking sheet. Make sure they have space between them. This helps prevent them from sticking together as they chill. - Recommended chill time: Once all the mixture is rolled into balls, put the baking sheet in the fridge. Chill for about 30 minutes. This helps the energy balls firm up and hold their shape. - Proper storage methods: After chilling, move the energy balls to an airtight container. They stay fresh in the fridge for up to a week. You can also freeze them for longer storage. Just remember to let them thaw before eating. To get the right texture for your energy balls, start with rolled oats. They provide a solid base. Ground flaxseed adds fiber and helps bind the mixture. If the mixture feels too dry, add a bit more peanut butter or honey. This will make it stick together better. For sweetness, taste the mixture before rolling. If you like it sweeter, add more honey or maple syrup. You can make these energy balls even better! Try adding a sprinkle of cinnamon or a dash of nutmeg. These spices give a warm flavor. Vanilla extract is already in the recipe, but adding a bit of almond extract can add a nice twist. If you want more texture, consider mixing in chopped nuts, dried fruit, or seeds. These extra ingredients can make each bite more fun. Making a big batch saves time. You can prepare multiple batches in one go. Store them in the fridge for quick snacks all week. For clean-up, use one bowl for dry ingredients and another for wet ingredients. This cuts down on dishes. Also, use a cookie scoop to portion the mixture. It keeps your hands clean and helps make uniform balls. {{image_2}} You can get creative with your chocolate peanut butter energy balls. Try these fun flavors: - Chocolate coconut energy balls: Add 1/2 cup of shredded coconut to the mix. This gives a tropical twist. - Peanut butter banana energy balls: Mash one ripe banana and mix it in. This adds natural sweetness and a fruity taste. Need to adjust for specific diets? Here are some tips: - Gluten-free options: Use certified gluten-free oats. This keeps the recipe safe for those avoiding gluten. - Vegan replacements: Swap honey for maple syrup. This makes the recipe fully plant-based. Change things up with the seasons: - Autumn spices: Add 1 teaspoon of cinnamon or nutmeg for a warm flavor. These spices make the balls cozy for fall. - Summer fruit additions: Mix in 1/4 cup of chopped dried fruits like apricots or cranberries. This gives a fresh taste to summer treats. To keep your chocolate peanut butter energy balls fresh, use an airtight container. Glass or plastic containers work well. These energy balls will stay good in the fridge for up to one week. You can enjoy them as a quick snack or a boost of energy. If you want to save some for later, freezing is a great option. Place the rolled energy balls in a single layer on a baking sheet. Freeze them for about one hour. After that, transfer them to a freezer-safe bag. They will stay fresh for up to three months. To eat, just take them out and let them thaw in the fridge for a few hours or at room temperature for about 30 minutes. Check your energy balls before eating. If they smell off or have a strange texture, it’s best to toss them. Look for any mold or unusual spots. Most of all, follow the best before date. If stored correctly, they should still be tasty and safe to eat. These energy balls can last up to one week in the fridge. To keep them fresh longer, freeze them. They will stay good for about three months in the freezer. Yes, you can make these energy balls nut-free. Use sunflower seed butter or soy nut butter instead of peanut butter. These swaps keep the flavor rich and delicious. Absolutely! You can use agave syrup, brown rice syrup, or even stevia if you prefer. Each sweetener adds its unique taste, so choose what you enjoy. You can mix in your favorite add-ins. Try dried fruit, seeds, or different types of chocolate. You can also add spices like cinnamon or a touch of coffee for extra flavor. Serve these energy balls chilled for the best taste. They make great snacks for kids and adults. You can also pack them for school or work for a quick energy boost. These energy balls are easy to make with simple ingredients. We covered how to mix, roll, and chill them for tasty snacks. Don't forget to try different flavors and storage tips to keep them fresh. Remember, you can swap ingredients to fit your taste. Whether you want a nut-free option or a special flavor, there’s a choice for everyone. Enjoy making and sharing these fun snacks that fit your needs!

Chocolate Peanut Butter Energy Balls No Bake Treat

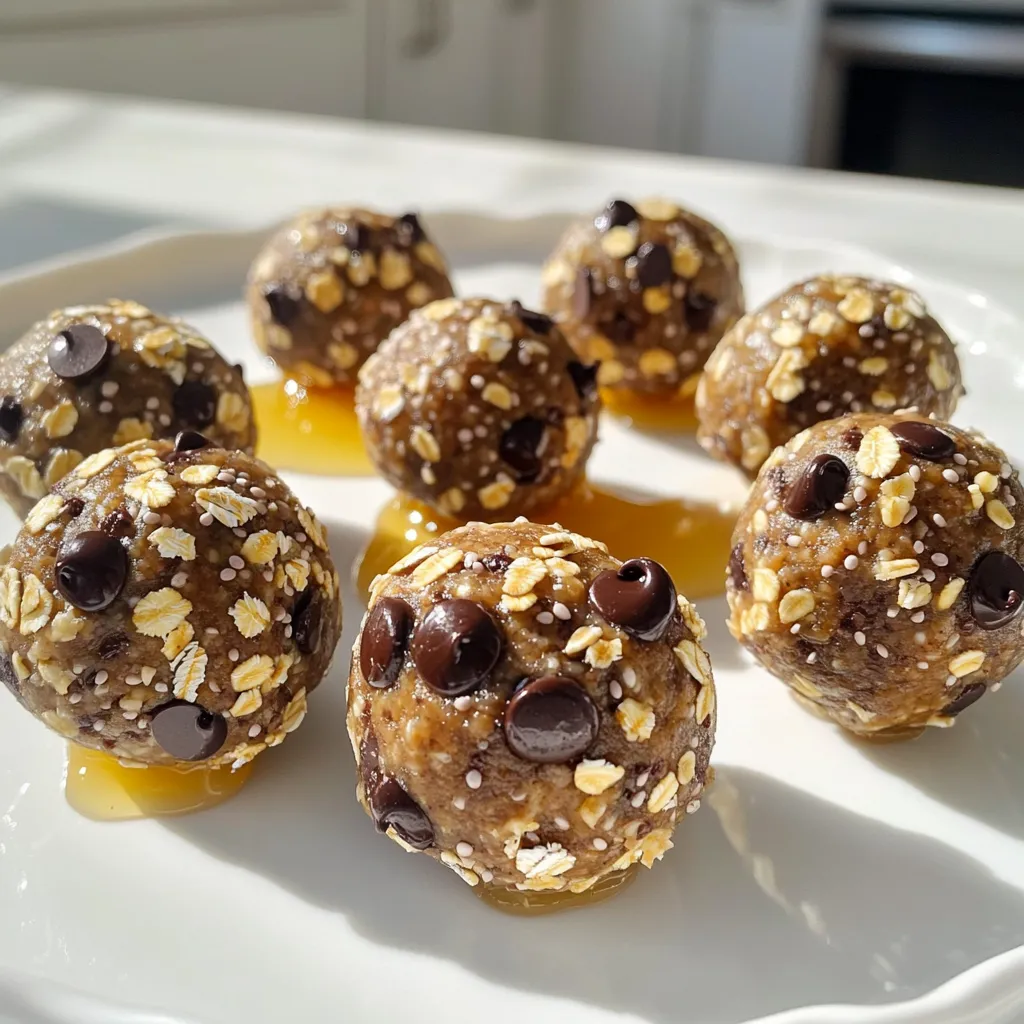
Are you looking for a quick and easy snack that’s both tasty and healthy? You’re in the right place! My

- 2 cups all-purpose flour - 1 cup granulated sugar - 1/2 cup unsalted butter, softened - 2 large eggs - 1/2 cup buttermilk - 1 teaspoon baking powder - 1/2 teaspoon baking soda - 1 teaspoon ground cinnamon - 1/2 teaspoon salt - 1 large apple, peeled, cored, and diced - 1/2 cup brown sugar (for the filling) - 1 tablespoon ground cinnamon (for the filling) - 1/4 cup chopped walnuts or pecans (optional) This recipe uses simple measurements. You will need: - Flour: 2 cups gives a nice base. - Sugar: 1 cup granulated sugar keeps it sweet. - Butter: 1/2 cup adds richness. - Eggs: 2 large eggs help bind the mix. - Buttermilk: 1/2 cup keeps it moist. - Baking Powder and Baking Soda: These help the bread rise. - Cinnamon and Salt: 1 teaspoon and 1/2 teaspoon, respectively, add flavor. - Apples: Use 1 large apple for sweetness and texture. - Brown Sugar and Cinnamon for Filling: 1/2 cup and 1 tablespoon give it a sweet swirl. - Nuts: 1/4 cup of walnuts or pecans is optional but tasty. - Flour: Use fresh all-purpose flour for the best rise. - Sugar: Granulated sugar should be fine and free of clumps. - Butter: Softened butter blends easily. Look for unsalted for better control of salt. - Eggs: Fresh eggs improve texture and flavor. - Buttermilk: If you don’t have buttermilk, mix milk with a splash of vinegar. - Apples: Granny Smith or Honeycrisp work best. They add a nice tartness. - Nuts: If you use nuts, chop them finely for even distribution. These ingredients are key for a tasty Apple Cinnamon Bread. Use quality items for the best results. 1. Preheat your oven to 350°F (175°C). Grease a loaf pan or line it with parchment. 2. In a bowl, cream together the softened butter and sugar. Mix until fluffy. 3. Add the eggs, one at a time. Mix well after each egg. Stir in buttermilk last. 4. In another bowl, whisk flour, baking powder, baking soda, cinnamon, and salt. 5. Gradually add dry mix to the wet mix. Stir until just combined. 6. Fold in the diced apple and optional nuts. Make sure they are evenly spread. 7. In a small bowl, mix brown sugar and cinnamon for the filling. 8. Pour half of the batter into the loaf pan. Sprinkle half of the cinnamon sugar on top. 9. Add the rest of the batter. Top with the remaining cinnamon sugar mixture. 10. Use a knife to swirl the batter. This creates a nice marbled look. 11. Bake for 50-60 minutes. Check if a toothpick comes out clean from the center. 12. Allow the bread to cool in the pan for about 10 minutes. 13. Carefully transfer the bread to a wire rack. Let it cool completely before slicing. To get that perfect bakery-style texture, start with room temperature butter. Softened butter helps blend well with sugar. This makes your bread light and airy. Use fresh ingredients for the best rise. Mix your dry and wet ingredients separately first. This prevents lumps in your batter. Fold in the apples gently to keep their shape. Lastly, don’t overmix the batter. This keeps your bread tender and fluffy. When you mix, cream the butter and sugar until light. This adds air to the mix. Add eggs one at a time to ensure even blending. Use a spatula to scrape down the bowl. This helps combine all ingredients thoroughly. Preheat your oven to the right temperature. This step is key for even baking. Place your loaf pan in the center of the oven. This allows for the best heat circulation. If your bread is dense, you may have overmixed the batter. This can lead to a tough texture. If it doesn't rise, check your baking powder and soda for freshness. Old leavening agents won't work well. For a burnt top, cover it with foil halfway through baking. If your bread sticks to the pan, let it cool longer before removing. Always grease the pan well or use parchment paper to prevent sticking. {{image_2}} You can easily adapt this recipe for allergies. If you need a gluten-free option, use gluten-free flour instead of all-purpose flour. For dairy-free bread, substitute the butter with coconut oil or a vegan butter spread. You can also replace buttermilk with almond or oat milk mixed with a bit of lemon juice. This keeps the texture light and moist. Always check labels to ensure products meet your specific allergy needs. To add more flavor, consider mixing in nuts. Chopped walnuts or pecans boost both taste and crunch. If you want a sweet glaze, mix powdered sugar with a bit of milk and pour it over the cooled bread. A dash of vanilla extract in the batter can also enhance the taste. You could even sprinkle some coarse sea salt on top for a sweet-salty twist. These additions make your bread feel more special. While apples are the star of this recipe, other fruits work well too. Pears offer a similar texture and sweetness. Ripe bananas can add moisture and a delightful flavor. Diced peaches or berries bring a nice twist to the bread. Always consider the fruit's moisture level, as it can change the final result. Experimenting with fruit keeps your baking fun and fresh! To keep your apple cinnamon bread fresh, wrap it tightly in plastic wrap. You can also use aluminum foil. Store it at room temperature for up to three days. If you want it to last longer, consider refrigerating it. This will help to keep it moist and tasty. If you have leftovers, you can freeze the bread. First, let it cool completely. Then, wrap it in plastic wrap and place it in a freezer bag. Make sure to remove as much air as possible. This bread will stay good for about three months in the freezer. When you are ready to enjoy it, simply thaw it at room temperature. For the best taste, reheat the bread before serving. You can do this in the oven or the microwave. If using the oven, preheat to 350°F (175°C). Place the bread on a baking sheet and heat it for about 10 minutes. If using a microwave, heat a slice for about 15-20 seconds. This will warm it up without drying it out. Enjoy warm for a delightful treat! Yes, you can use whole wheat flour or almond flour. Whole wheat flour adds fiber and a nutty taste. Almond flour makes the bread gluten-free. If you switch flours, adjust the liquid in the recipe. Whole wheat flour absorbs more liquid. Almond flour may need less buttermilk. To make apple cinnamon bread healthier, use less sugar and butter. You can replace some granulated sugar with honey or maple syrup. Use mashed bananas or unsweetened applesauce instead of butter. Add more apples for fiber and vitamins. You can also swap in whole grain flour for added nutrition. Serve apple cinnamon bread warm for the best flavor. Slice it thick and add a pat of butter on top. A sprinkle of powdered sugar can add a sweet touch. For a special treat, serve it with honey or a scoop of vanilla ice cream. This bread pairs well with coffee or tea, making it great for breakfast or dessert. In this post, I covered ingredients, steps, tips, and variations for apple cinnamon bread. You learned about ingredient quality, proper baking methods, and storage tips. Remember, small changes can yield great results. Experiment with flavors and textures to make it your own. With the right steps, you’ll bake not just bread, but also joy and warmth for your home. Enjoy your baking journey!

Apple Cinnamon Bread Bakery Style Delightfully Easy Recipe

If you love the warm, sweet smell of bakery-fresh bread, you’re in for a treat! Today, I’ll share my easy

- 1 pound shrimp, peeled and deveined - 1 cup orzo pasta - 1 tablespoon Cajun seasoning - 1 medium onion, diced - 2 cloves garlic, minced - 1 red bell pepper, diced - 1 zucchini, diced - 3 cups chicken broth - 1 cup heavy cream - 2 tablespoons olive oil - Salt and pepper to taste - Fresh parsley, chopped (for garnish) - Grated Parmesan cheese (for serving) This recipe serves four people. The shrimp should be fresh or thawed. The orzo adds a nice texture. Use medium-sized shrimp for the best bite. Diced vegetables add color and nutrition. The heavy cream brings richness, while chicken broth enhances flavor. Feel free to swap shrimp for chicken or sausage. You can use vegetable broth for a vegetarian option. If you want a lighter dish, choose half-and-half instead of heavy cream. Add spinach or mushrooms for more veggies. Start by heating 2 tablespoons of olive oil in a large pot over medium heat. Add 1 medium diced onion and sauté it until it turns soft and clear, about 3-4 minutes. Next, add 2 minced garlic cloves and stir for 1 minute. This will fill your kitchen with a lovely aroma. Then, toss in 1 diced red bell pepper and 1 diced zucchini. Cook those for about 5 more minutes until they soften. Now, sprinkle 1 tablespoon of Cajun seasoning over the veggies and mix it well. This spice blend gives the dish its bold flavor. Finally, add 1 pound of peeled and deveined shrimp. Cook until they turn pink, which takes about 2-3 minutes. Once done, take the mix out of the pot and set it aside. In the same pot, add 1 cup of orzo pasta and 3 cups of chicken broth. Bring this mixture to a boil. Once it boils, lower the heat and let it simmer. Stir occasionally for about 8-10 minutes until the orzo is al dente. This means it should be firm but cooked through. After the orzo is ready, pour in 1 cup of heavy cream and mix it well. Then, return the shrimp and veggie mix to the pot. Stir everything together until well combined. If needed, add salt and pepper to taste. Let it cook for 2 more minutes so it warms through. Serve this delicious dish hot. Garnish with fresh chopped parsley and a sprinkle of grated Parmesan cheese for extra flavor. Enjoy! To get the best Cajun flavor, use fresh spices. Start with a good Cajun seasoning mix. You can make your own by mixing paprika, garlic powder, onion powder, cayenne, and thyme. I suggest using about one tablespoon for this dish. If you want more heat, add a bit more cayenne. Taste as you go to find your perfect balance. Fresh herbs like parsley can brighten the dish, too. When cooking shrimp, keep it simple. Use high heat to cook them quickly. They only need 2-3 minutes until they turn pink. Don’t overcrowd the pan; this can steam them instead of sear them. If you want a nice golden color, cook them in batches. Always use fresh shrimp for the best taste. Frozen shrimp works too, just thaw them first. You can easily adjust the creaminess. If you want a lighter dish, use less heavy cream. You can also mix in some chicken broth instead. For more spice, add a pinch of crushed red pepper flakes or more Cajun seasoning. Just remember to taste each time you add more. This will help you get it just right for your family. {{image_2}} You can switch the shrimp for chicken, sausage, or tofu. Chicken works well when cut into small pieces and cooked just like the shrimp. Sausage adds a hearty flavor. Use smoked sausage for that extra kick. Tofu is great for a plant-based option. Just cube it, sauté until golden, and add it in. Feel free to throw in extra veggies to boost flavor. Spinach wilts nicely into the dish. Add it in just before serving for a bright color. Mushrooms bring an earthy taste. Cook them with the onions for a rich base. You could also add peas or corn for sweetness. If you need a gluten-free option, look for gluten-free orzo. Many brands make it from rice or quinoa. These alternatives cook just like regular orzo. This way, you can enjoy the dish without worry. Always check the package for cooking times, as they may vary. To keep your Creamy Cajun Shrimp Orzo fresh, first let it cool. Place it in an airtight container. Make sure to store it in the fridge. It will stay good for about 3 to 4 days. Label the container with the date. This way, you can remember when you made it. When you’re ready to enjoy the leftovers, use a pot or microwave. If using a pot, add a little water or broth. Heat it over low heat, stirring often. This will help it warm up evenly. In the microwave, cover the dish with a damp paper towel. Heat it in 30-second bursts, stirring in between. This keeps it creamy and prevents drying out. If you want to keep it longer, freezing is a great option. Place the cooled orzo in a freezer-safe container. Leave some space at the top for expansion. It can last up to 2 months in the freezer. When you’re ready to eat, thaw it overnight in the fridge. Reheat as mentioned above for the best flavor and texture. Yes, you can make Creamy Cajun Shrimp Orzo in advance. It tastes great even after a day in the fridge. Cook the dish, let it cool, and store it in an airtight container. When you are ready to eat, reheat it on the stove. Add a splash of broth if it seems too thick. This keeps the meal creamy and delicious. You can serve this dish with many sides. Here are some tasty options: - Garlic bread - A fresh green salad - Roasted vegetables - Corn on the cob These sides balance the rich flavors of the orzo and shrimp. They make the meal more fun and filling. Yes, this recipe works well for meal prep. It keeps well in the fridge for up to three days. You can portion it into containers for easy lunches or dinners. Just remember to reheat it gently to keep the shrimp tender. This dish is perfect for busy weeks! This recipe for Creamy Cajun Shrimp Orzo blends rich flavors with simple steps. You learned the key ingredients, cooking methods, and tips for perfect seasoning. The variations allow for creativity while maintaining that Cajun kick. Storing leftovers ensures you can enjoy this dish later. Remember, you can make it your own with different proteins or add-ins. Cooking should be fun and rewarding, so experiment and enjoy every bite. Your kitchen can be a space for delicious meals and memories.

Creamy Cajun Shrimp Orzo One Pot Delight

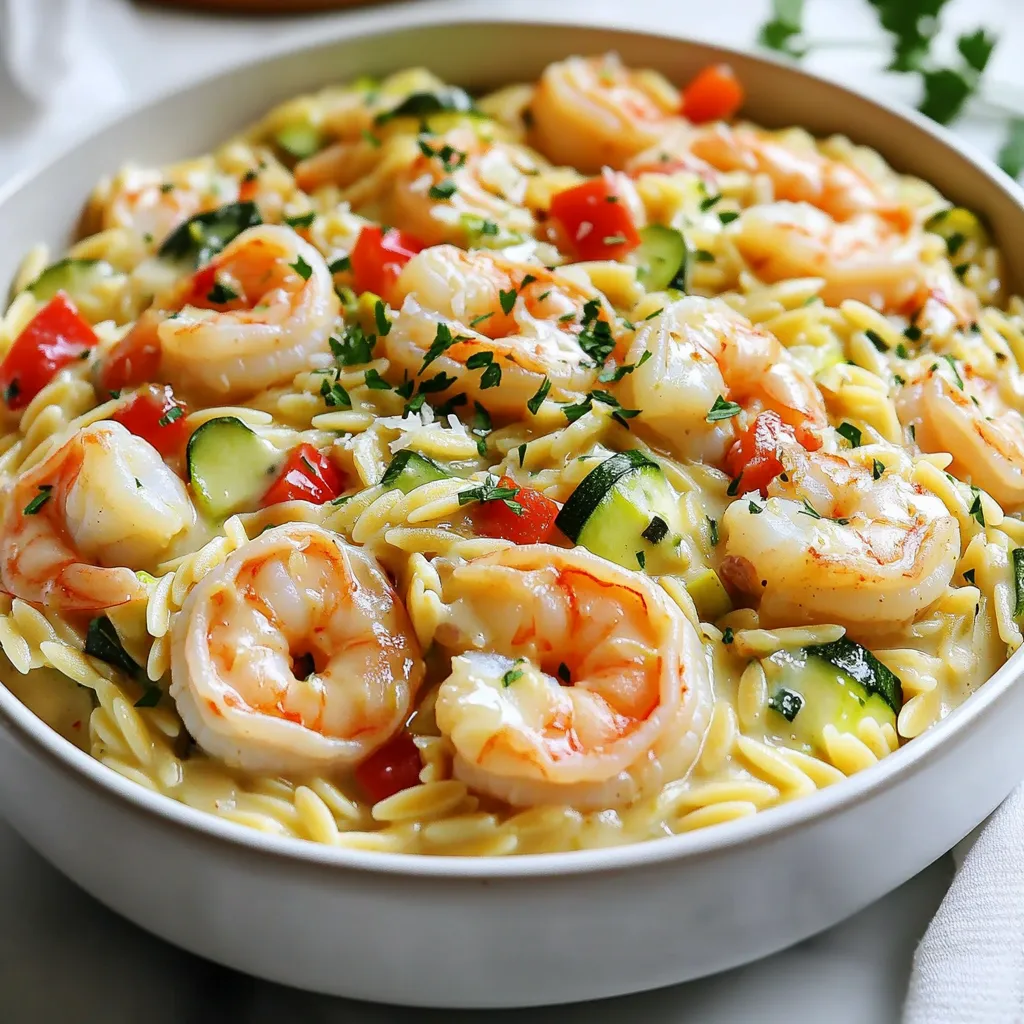
Welcome to your new favorite dish: Creamy Cajun Shrimp Orzo! This one-pot delight combines bold flavors with creamy goodness, making

- 3 large russet potatoes - 4 tablespoons olive oil - 4 cloves garlic, minced - ½ cup grated Parmesan cheese - 1 teaspoon dried Italian herbs - ½ teaspoon smoked paprika - Salt and pepper - Fresh parsley for garnish The key to great garlic Parmesan potato wedges lies in the ingredients. First, choose 3 large russet potatoes. They are perfect for making crispy wedges. Wash them well and cut them into thick wedges. Next, we need 4 tablespoons of olive oil. This oil helps the wedges crisp up in the air fryer. Then, grab 4 cloves of garlic. Mince them finely to release their strong flavor. Now, let’s add cheese! Use ½ cup of grated Parmesan cheese for a rich taste. It sticks well to the potatoes when cooked. For some herb flavor, include 1 teaspoon of dried Italian herbs. A mix of oregano, basil, and thyme works great here. To add a hint of smokiness, I like to use ½ teaspoon of smoked paprika. Finally, season with salt and pepper to taste. Don’t forget fresh parsley! It adds a nice touch of color and flavor when you serve. These simple ingredients make the best garlic Parmesan potato wedges. Each bite is packed with flavor, and they are super easy to prepare. First, preheat your air fryer to 400°F (200°C). This step helps cook the potato wedges evenly. A hot air fryer makes the wedges crispy. It only takes a few minutes to reach the right temperature. Next, wash the russet potatoes well. Cut them into equal-sized wedges, about 1-inch thick. This size ensures they cook evenly. Place the wedges in a large bowl and pour in the olive oil. Toss them until they are well coated. In a separate small bowl, mix the minced garlic, grated Parmesan cheese, and dried Italian herbs. Add smoked paprika, salt, and pepper to this mixture. Stir well to combine all the flavors. This mix will give the wedges a delicious taste. Now, take the oiled potato wedges and sprinkle the garlic-Parmesan mixture over them. Toss again to coat each wedge evenly. Place the seasoned wedges in the air fryer basket in a single layer. Avoid overcrowding the basket; cook in batches if needed. Air fry for 15-18 minutes. Shake the basket halfway through cooking. This helps them brown and crisp up nicely. Once they are golden brown and crispy, remove the wedges from the air fryer. If you like, sprinkle with more Parmesan cheese for extra flavor. Finally, garnish with chopped fresh parsley for a touch of color. Serve them hot and enjoy this tasty delight! To get that perfect crunch, follow these steps. First, soak the potato wedges in water for 30 minutes. This removes extra starch. After soaking, dry them well with a towel. Moisture can make them soggy. Coat them evenly with olive oil. This helps them crisp up in the air fryer. Lastly, do not overcrowd the basket. This allows hot air to circulate freely, making your wedges crispy all around. Seasoning is key to great flavor. In a small bowl, mix garlic, Parmesan cheese, herbs, smoked paprika, salt, and pepper. Toss this mix with your oiled potato wedges. Make sure each wedge gets coated well. You can adjust the salt and pepper to your taste. Feel free to add more herbs if you like a stronger flavor. If you have a lot of wedges, cook them in batches. This ensures they cook evenly. Place a single layer of wedges in the air fryer. Cook them until golden brown and crispy. Once the first batch is done, keep them warm in the oven on low heat. This way, you can serve all your wedges hot and fresh at once. {{image_2}} You can switch up the cheese for a new taste. Try using cheddar for a sharp flavor. Feta cheese adds a tangy kick. If you want a creamier vibe, go for mozzarella. Each cheese gives the wedges a unique twist. You can mix two or more cheeses for an extra cheesy delight. Spices can elevate these wedges. Add cayenne pepper for heat. Try garlic powder for more garlic flavor. You can also use onion powder for a savory note. If you like herbs, fresh rosemary works well. A pinch of cumin can bring warmth and depth. Feel free to experiment with your favorite spices. To make this dish vegetarian, just skip the cheese or use a vegetarian option. For a vegan twist, try nutritional yeast instead of cheese. This gives a cheesy flavor without dairy. You can also use a vegan parmesan substitute. Ensure the olive oil and spices are also vegan-friendly. After enjoying your garlic Parmesan potato wedges, let them cool first. Place the cooled wedges in an airtight container. Keep them in the fridge for up to three days. This way, they stay fresh and tasty. To reheat, use your air fryer for the best results. Set it to 350°F (175°C). Place the wedges in the basket for about 5-7 minutes. This makes them crispy again. You can also use a microwave, but they may become soft. You can freeze the potato wedges before cooking them. Spread the raw, coated wedges on a baking sheet. Freeze them for a few hours until firm. Then, transfer them to a freezer bag. They will last for up to three months. Just remember to cook them straight from frozen, adding a few extra minutes to the cooking time. Yes, you can use other types of potatoes. Yukon Gold or sweet potatoes work well too. Each type gives a unique taste and texture. Just adjust cooking times if needed, as some potatoes may cook faster. To add spice, include red pepper flakes or cayenne pepper. You can mix in some spicy seasoning blends. Try adding jalapeños for a fresh kick. Start with a little and taste before adding more. These wedges pair well with many dishes. Serve them alongside burgers or grilled chicken. They also go great with a fresh salad or dipping sauces like ranch or ketchup. You can make them a fun snack at parties too! Check the wedges at 15 minutes. They should be golden and crisp. If they’re not done, cook for a few more minutes. You can test them with a fork. It should go in easily when they are ready. This blog post showed you how to make garlic Parmesan potato wedges in an air fryer. We covered the ingredients, steps, tips, variations, storage, and FAQs. Each part can help you create tasty, crispy wedges at home. Use my tips to make it your own. Get creative with spices and cheeses. Enjoy your wedges fresh or as leftovers. These simple guidelines will help you impress your family and friends every time you cook!

Garlic Parmesan Potato Wedges Air Fryer Delight

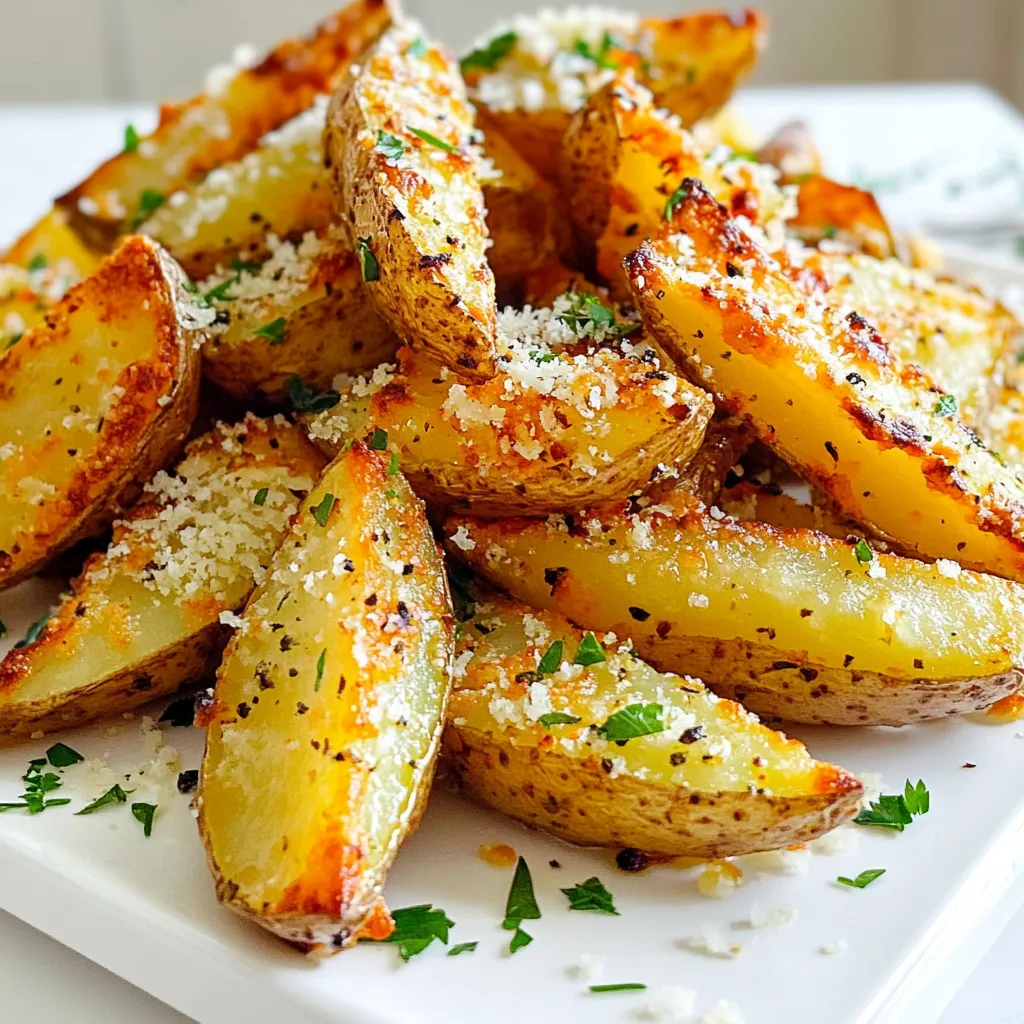
If you’re craving a tasty, crispy snack, try my Garlic Parmesan Potato Wedges made in the air fryer. With just

- 1 pound ground beef (or turkey) - 1 medium onion, diced - 2 cloves garlic, minced - 1 can (15 oz) kidney beans, drained and rinsed - 1 can (15 oz) black beans, drained and rinsed - 1 can (14.5 oz) diced tomatoes with green chilies These ingredients form the base of the dish. Ground beef or turkey gives a rich flavor. You can choose turkey for a lighter option. The diced onion and minced garlic add a nice aroma and taste. Beans are a great source of protein and fiber. The diced tomatoes bring a slight sweetness and a bit of heat. - 1 packet chili seasoning mix - 4 cups beef broth - Salt and pepper to taste The chili seasoning mix is key here. It blends spices for a deep flavor. Beef broth adds richness and moisture to the dish. You can adjust salt and pepper to suit your taste. - 2 cups elbow macaroni, uncooked - 1 cup shredded cheddar cheese - 1 cup corn (frozen or canned) - Fresh cilantro or green onions for garnish Elbow macaroni makes this dish hearty and filling. The cheese melts and makes it creamy. Corn adds a sweet crunch. Garnishes like cilantro or green onions brighten the dish. They give a fresh taste and a pop of color. First, you need to brown the ground beef or turkey. Heat a skillet over medium heat. Add the meat and break it apart with a spoon. Cook until it is no longer pink. This usually takes about 5 to 7 minutes. Once the meat is cooked, drain any excess fat. This keeps your dish from becoming greasy. Transfer the browned meat to the slow cooker. Next, add the diced onion and minced garlic to the slow cooker with the meat. These add great flavor. Then, stir in the kidney beans and black beans. Make sure to drain and rinse them first. Add the can of diced tomatoes, including the juice. Sprinkle in the chili seasoning mix for that bold taste. Now, it’s time for the pasta. Add the uncooked elbow macaroni to the mix. Pour in the beef broth and stir everything together. Add corn, salt, and pepper to taste. Ensure all the ingredients are well combined. This helps every bite to be full of flavor. Set your slow cooker to low for 6 to 8 hours. If you are short on time, set it to high for 3 to 4 hours. The macaroni should become tender and soak up the flavors as it cooks. Near the end of the cooking time, stir in the shredded cheddar cheese. This will melt and blend into the dish. Taste your chili mac and adjust the seasoning if needed. Once it’s hot and cheesy, it’s ready to serve. Enjoy your loaded chili mac! To make your Loaded Chili Mac even better, use the right seasonings. Chili seasoning mix is a must. It adds depth and warmth. You can also add cumin or smoked paprika for extra flavor. Want to adjust the spice level? Add more chili mix for heat. If you prefer mild, use less. You can also add diced bell peppers. They bring sweetness and color without adding spice. Cooking times matter. For a thicker dish, cook on low for 8 hours. If you like it soupier, 3-4 hours on high works well. Always check the macaroni towards the end. It should be tender but not mushy. To ensure the macaroni cooks properly, stir it well into the broth. This helps it absorb the flavors. If you find it too firm, add a little more broth and cook longer. Pair your Loaded Chili Mac with a simple side salad. A fresh green salad adds crunch and balance. You could also serve it with cornbread for a comforting combo. For garnishing, fresh cilantro or sliced green onions work great. They add a pop of color and fresh taste. A dollop of sour cream can also cool down the heat. Enjoy your meal! {{image_2}} You can swap ground beef for other meats. Ground turkey works well. It gives a leaner option. If you want a meatless dish, try lentils or mushrooms. They add great texture and flavor. For beans, use what you have. Pinto beans or chickpeas are great choices. They bring their own taste. You can also switch pasta types. Try penne or shells instead of elbow macaroni. Each type adds a fun twist to the dish. Add veggies to boost nutrition. Bell peppers, zucchini, or spinach can mix in easily. Just chop them small before adding to the slow cooker. They soften and blend well with the chili mac. Toppings can change the game. Besides cheese, think about sour cream or avocado. You could also sprinkle crushed tortilla chips for crunch. Fresh herbs, like cilantro or green onions, add color and freshness too. To make it vegetarian, switch the beef broth for vegetable broth. You can also use plant-based ground meat. Many brands offer tasty options. They mimic the texture of meat well. For a vegan dish, skip the cheese or use a dairy-free version. Nutritional yeast can add a cheesy flavor. It also gives a boost of nutrients. Enjoy your loaded chili mac in any style you like! After you enjoy your Loaded Chili Mac, store any leftovers in an airtight container. This keeps it fresh and safe. Make sure it cools down first. You can keep it in the fridge for about 3 to 4 days. Always check for any signs of spoilage before eating. If you want to save some for later, freezing is a great option. First, let the dish cool completely. Then, scoop the chili mac into freezer-safe bags or containers. Be sure to leave some space for expansion. It can last in the freezer for up to 3 months. To reheat, move it to the fridge the night before to thaw. When it’s time to eat again, you have a few choices for reheating. You can use the microwave or the stovetop. For the microwave, heat it in short bursts, stirring in between. This helps it heat evenly. If you prefer the stovetop, warm it in a pot over medium heat. Add a splash of beef broth or water to keep it moist. Stir often to prevent sticking. Enjoying your Loaded Chili Mac again should be easy and tasty! Yes, you can cook Loaded Chili Mac on the stove or in the oven. For the stove, brown the meat in a big pot. Then, add all the other ingredients. Let it simmer until the macaroni cooks. This method takes about 30 minutes. If you want to use an oven, transfer the mixture to a baking dish. Bake at 350°F for about 30 minutes. This gives a nice, baked flavor. To add heat, mix in some diced jalapeños or a dash of hot sauce. You can also use spicier chili seasoning. If you like it really hot, add crushed red pepper flakes. Start small, then taste and add more if you want. This dish pairs well with a fresh salad or warm cornbread. You can also serve it with tortilla chips for crunch. For a fun twist, top it with sour cream and avocado slices. Fresh cilantro or green onions also make a great garnish. This article shows you how to make Loaded Chili Mac easily. We covered key ingredients like ground beef, beans, and delicious toppings. I shared step-by-step instructions, tips for better flavor, and ways to customize the dish. Remember, you can tweak the recipe by changing ingredients and flavors. Whether you enjoy it spicy or mild, this meal is a crowd-pleaser. Packed with taste and comfort, it’s perfect for any day. Try it out and savor each bite!

Loaded Chili Mac Slow Cooker Comfort Dish Delight

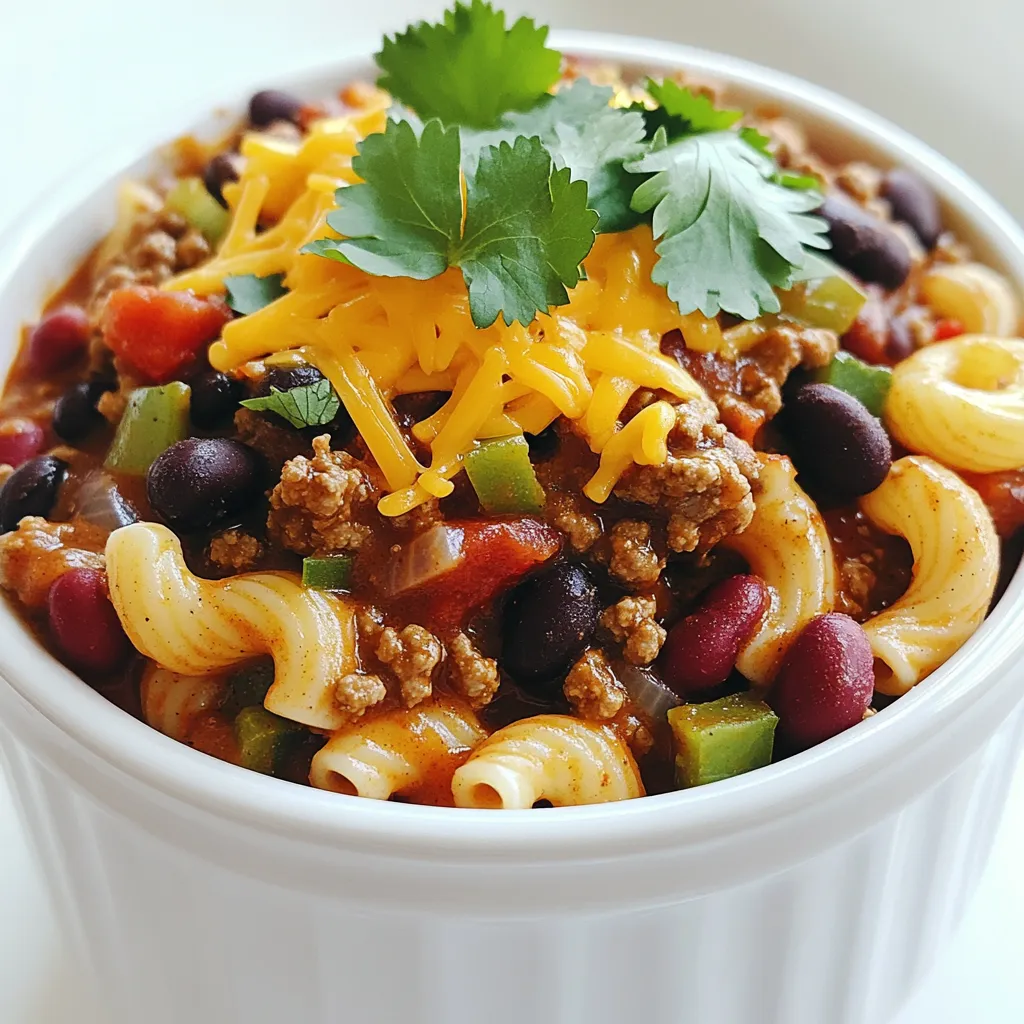
Are you ready to make a warm and tasty meal that everyone will love? The Loaded Chili Mac Slow Cooker

- 8 oz chow mein noodles - 1 lb beef sirloin, thinly sliced - 2 tablespoons soy sauce - 2 tablespoons oyster sauce - 1 tablespoon hoisin sauce Chow mein noodles are key for this dish. They provide that perfect chewy texture. You can find them in most grocery stores. Next, beef sirloin adds great flavor. Slice it thin for quick cooking. The sauces — soy, oyster, and hoisin — give depth. Each sauce brings a unique taste that makes this dish shine. - 1 cup bean sprouts - 1 cup mixed bell peppers, sliced (red, yellow, green) - 1 cup napa cabbage, shredded Bean sprouts add crunch. They cook fast and keep a nice bite. Mixed bell peppers add color and sweetness. You can use red, yellow, or green ones. Napa cabbage is tender and delicious. It wilts down nicely but stays crisp. - 1 teaspoon sesame oil - 2 cloves garlic, minced - 1 tablespoon ginger, minced - Salt and pepper to taste Sesame oil gives a nutty flavor. Use it sparingly; it's strong. Minced garlic and ginger add warmth and zest. These aromatics are the heart of many Asian dishes. Finally, season with salt and pepper. This simple step lifts the overall taste. To start, bring a large pot of water to a boil. Make sure the water is bubbling well. Next, add your chow mein noodles. Cook them according to the package instructions. This usually takes about 3 to 5 minutes. When they are just tender, drain them. Rinse with cold water to stop the cooking. Set the noodles aside for later. While the noodles cook, let’s marinate the beef. In a bowl, combine the sliced beef with soy sauce, sesame oil, and a pinch of salt and pepper. Mix well to coat the beef evenly. Allow it to marinate for about 15 minutes. This will help the beef absorb all the great flavors. Now, let’s prepare the sauce. In a small bowl, whisk together the oyster sauce and hoisin sauce. Make sure they blend well. Set this mixture aside; it will add a delicious depth of flavor to your dish. In a large skillet or wok, heat 1 tablespoon of vegetable oil over medium-high heat. Once it’s hot, add the minced garlic and ginger. Cook them for about 30 seconds. Stir quickly to avoid burning. You want to release their fragrant aroma. Next, raise the heat to high. Add the marinated beef to the skillet. Cook for about 3 to 4 minutes, stirring occasionally. You want the beef to brown and be cooked through. Once done, remove the beef and set it aside. In the same skillet, add the remaining tablespoon of vegetable oil. Toss in the mixed bell peppers and napa cabbage. Stir-fry for 2 to 3 minutes. The veggies should be crisp-tender, adding great texture to the dish. Now, return the cooked beef to the pan. Add the cooked chow mein noodles and bean sprouts. Pour in the sauce mixture. Toss everything together for about 2 to 3 minutes. Make sure everything is heated through and well mixed. Finally, add the chopped green onions. Toss gently to combine. Taste and adjust the seasoning with salt and pepper if needed. This dish is now ready to serve! - Using High-Quality Soy Sauce High-quality soy sauce adds rich flavor. Look for a dark variety for deeper taste. It enhances the umami notes in your dish. - Importance of Marination Marinating the beef is key. Let it sit for at least 15 minutes. This adds layers of flavor and makes the meat tender. - Using a Wok vs. Skillet A wok is best for stir-frying. It heats quickly and cooks evenly. If you use a skillet, keep the heat high for good results. - Maintaining Crispness in Vegetables Cook vegetables quickly over high heat. Stir-fry for just 2-3 minutes. This keeps them crisp and colorful, adding great texture. - Serving in Bowls Serve the chow mein in large bowls. This makes it easy to enjoy and looks inviting. - Garnishing with Green Onions and Sesame Seeds Top with chopped green onions and sesame seeds. This adds a fresh look and extra crunch. It makes your dish pop visually and tastefully. {{image_2}} You can swap beef with chicken for a lighter dish. Chicken chow mein is a great choice. Use thin slices of chicken breast, marinate them the same way, and follow the same steps. For a vegetarian option, replace the beef with tofu. Firm tofu works best. Press it to remove water, then cut it into cubes. Marinate like you would the beef. Sauté it until golden before adding to the noodles. This adds a nice texture and flavor. Adding broccoli or snow peas can boost nutrition and flavor. Broccoli adds crunch and color. Snow peas bring a sweet taste. Stir-fry these veggies for a few minutes until bright and tender. You can also use seasonal vegetables like zucchini or carrots. They add variety and freshness to your chow mein. Just slice them thinly and cook them quickly with the other veggies. You can customize the sauce to fit your taste. If you want a sweeter dish, add more hoisin sauce. For a tangy twist, include a splash of rice vinegar. If you like heat, sprinkle in some red pepper flakes or Sriracha. Start with a little, then taste and adjust. These tweaks make your chow mein truly your own. - Recommended Containers: Use airtight containers to store your beef chow mein. Glass or plastic containers work well. Make sure they seal tightly to keep the flavors fresh. - Cooling and Refrigerating: Allow the dish to cool at room temperature before storing. Once cool, place the containers in the fridge. Enjoy your leftovers within three days for the best taste. - Best Methods (Microwave vs. Stovetop): You can reheat beef chow mein in the microwave or on the stovetop. For the microwave, use a microwave-safe dish. Heat in 1-minute intervals, stirring in between. For stovetop, warm in a skillet over medium heat, adding a splash of water to keep it moist. - Tips to Maintain Texture: To keep the noodles from getting mushy, avoid overheating. Stir gently while reheating. This helps the flavors blend without losing that perfect texture. - Suitable for Freezing?: Yes, beef chow mein can be frozen. It holds its flavor and texture well. Just make sure to use freezer-safe containers. - Thawing Process for Reheat: When you're ready to eat, thaw your chow mein in the fridge overnight. For a quicker method, you can use the microwave's defrost setting. After thawing, reheat it as mentioned above. Yes, you can make this dish gluten-free. Use gluten-free soy sauce or tamari instead of regular soy sauce. For the noodles, look for gluten-free chow mein noodles or rice noodles. These swaps will keep the flavor while making the dish safe for gluten-free diets. To keep your noodles from sticking, follow these tips: - Cook noodles just until tender, not overcooked. - Rinse cooked noodles with cold water immediately after draining. This stops the cooking and removes excess starch. - Toss the noodles with a little oil to help keep them separate. Absolutely! You can use chicken, pork, or even shrimp. Adjust cooking times based on the meat you use: - Chicken: Cook for 4-5 minutes until no longer pink. - Pork: Cook for about 3-4 minutes until cooked through. - Shrimp: Cook for just 2-3 minutes until they turn pink. To boost flavor, consider adding: - A splash of rice vinegar for tang. - Chili paste for heat. - Fresh herbs like cilantro or basil for freshness. Experiment with these to find your favorite taste. Prepared chow mein lasts about 3-4 days in the fridge. Store it in an airtight container to keep it fresh. When ready to eat, just reheat it on the stovetop or in the microwave until hot. This recipe guide for delicious beef chow mein covers all you need. We explored the key ingredients, from chow mein noodles to sauces. I shared step-by-step instructions to ensure you cook like a pro. Tips for achieving authentic flavors and variations let you customize it to your taste. Finally, I provided storage and reheating advice to keep leftovers fresh. With these insights, you can enjoy a tasty meal any day! Dive in, have fun, and savor every bite of your homemade chow mein!

Better Than Takeout Beef Chow Mein Simple Comfort Meal

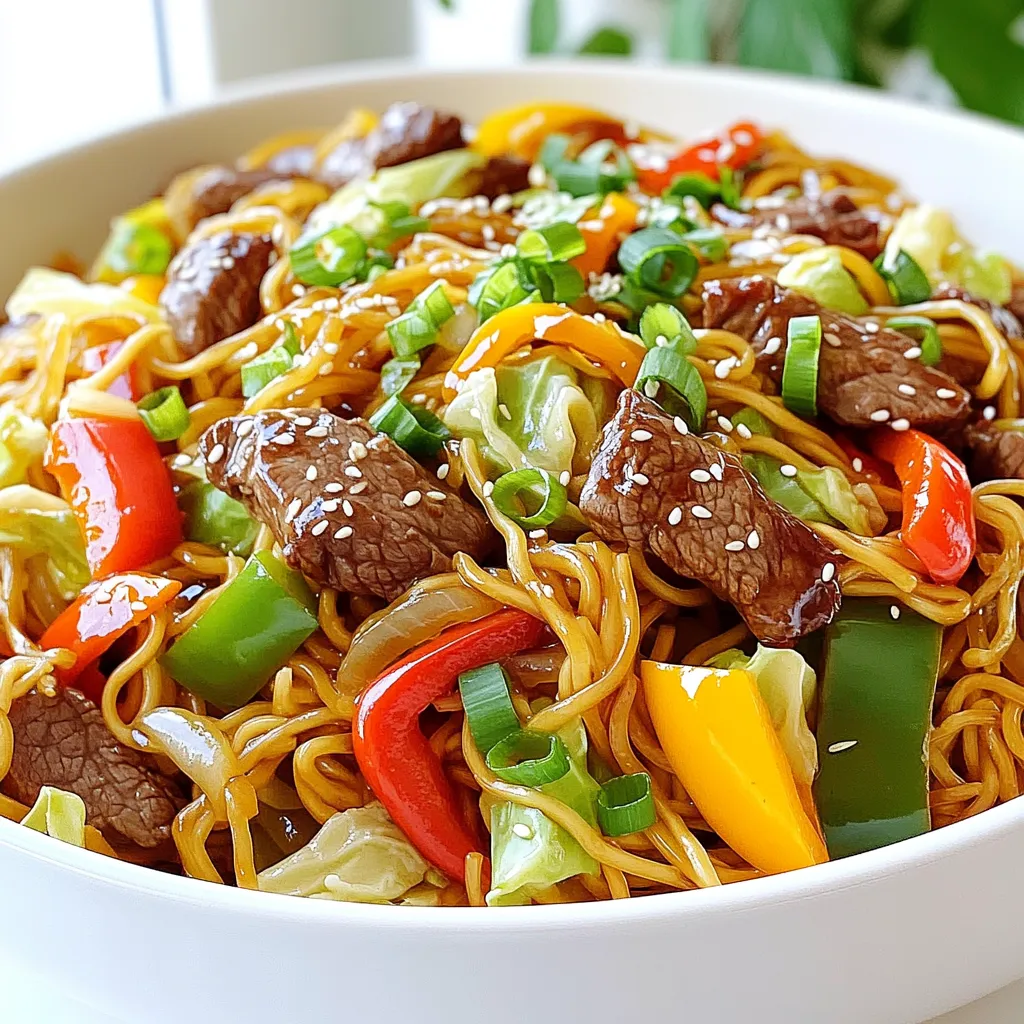
Looking for a cozy meal that beats takeout? This Better Than Takeout Beef Chow Mein is your answer! Packed with

- 4 boneless, skinless chicken thighs - 3 tablespoons olive oil - 4 tablespoons lemon juice - 4 cloves garlic, minced - 1 teaspoon paprika - 1 teaspoon dried oregano - Salt and pepper to taste These ingredients make the base of your flavorful dish. The chicken thighs stay moist and tender. Olive oil adds richness, while lemon juice gives a tangy kick. Garlic brings depth and aroma, making each bite pop. The spices, paprika and oregano, enhance the overall taste, creating a balanced flavor profile. - 2 cups broccoli florets - 1 cup cherry tomatoes, halved - 1 cup cooked quinoa (or brown rice) Adding veggies not only boosts nutrition but also adds color. Broccoli florets roast well, becoming slightly crisp and tender. Cherry tomatoes burst with sweetness, making the dish bright and fresh. Quinoa or brown rice serves as a hearty base, soaking up the juices for extra flavor. - Fresh parsley, chopped for garnish - Lemon wedges for serving Garnishes add a finishing touch. Fresh parsley gives a pop of color and freshness. Lemon wedges offer a zesty twist, allowing you to customize each bowl. Together, these garnishes elevate your lemon garlic chicken bowls, making them look as good as they taste. First, I preheat my oven to 425°F (220°C). This high heat helps cook the chicken and veggies fast. Next, I line a large sheet pan with parchment paper. This makes cleanup easy and keeps food from sticking. In a small bowl, I whisk together the olive oil, lemon juice, minced garlic, paprika, oregano, salt, and pepper. This mix will be the marinade that adds flavor to the chicken and veggies. I place the chicken thighs in a large bowl. Then, I pour half of the marinade over the chicken. It’s key to coat each piece well. I let the chicken marinate for at least 20 minutes. This time allows the flavors to soak in. While the chicken marinates, I prepare the veggies. In another bowl, I toss broccoli florets and halved cherry tomatoes with the remaining marinade. I want them to be evenly coated too. After marinating, I arrange the chicken thighs on the sheet pan. I place the broccoli and tomatoes around the chicken. Then, I bake everything for about 25-30 minutes. I check that the chicken reaches an internal temperature of 165°F (75°C). The veggies should be tender and slightly caramelized at this point. To make the best marinade, you can add spices. Try adding a pinch of red pepper flakes for heat. You can also try fresh herbs like thyme or basil for more flavor. Marinate your chicken for at least 20 minutes. For deeper flavor, marinate for up to 2 hours. Just keep it in the fridge while it soaks. Sheet pan cooking is great for this dish. It cooks everything evenly and saves time. Spread the chicken and veggies in a single layer. This helps them roast nicely. To check if the chicken is done, use a meat thermometer. The chicken should reach 165°F. If you don't have a thermometer, cut a piece open. The meat should be white, not pink. You can pair these bowls with many sides. A simple green salad works well. You can also serve it with crusty bread. For bowl assembly, start with a base of quinoa or rice. Add slices of chicken on top. Then, pile on roasted broccoli and tomatoes. Finish with fresh parsley and a lemon wedge for extra zing. {{image_2}} You can switch the chicken thighs for chicken breasts. Chicken breasts will cook quicker, so keep an eye on them. If you want a vegetarian option, use tofu. Press the tofu to remove excess water, then cut it into cubes. Marinate it just like the chicken. Seasonal veggies add great taste. In spring, try asparagus or snap peas. In fall, use sweet potatoes or Brussels sprouts. You can also mix in bell peppers, zucchini, or carrots based on what you like. Get creative and make it your own! Want some spice? Add chili flakes to the marinade for heat. You can also mix in fresh herbs. Try basil, thyme, or rosemary. These will boost the flavor even more. Experiment with what you have on hand. Each change can make a new dish! After enjoying your Lemon Garlic Chicken Bowls, let the leftovers cool down. This step is key to keeping the chicken and veggies fresh. Once cool, store the food in airtight containers. Glass or BPA-free plastic containers work well. Make sure to divide the bowls into portions. This way, you can grab them easily for lunch or dinner. When it's time to enjoy your leftovers, you have a few options. You can reheat the chicken and veggies in the oven. Set it to 350°F (175°C) and heat for about 15 minutes. This keeps the chicken juicy and the veggies crisp. The microwave is another option. Heat in short bursts of 30 seconds, stirring in between. This helps to maintain flavor and texture. How long can you keep leftovers? In the fridge, they last about three to four days. Always check for signs of spoilage before eating. If you want to store them for longer, freezing is a great choice. Wrap portions in plastic wrap and place them in freezer bags. They will stay good for about three months. Just remember, always label your bags with the date! For the best flavor, I suggest marinating chicken for at least 20 minutes. This allows the chicken to soak up the lemon and garlic. If you have more time, try marinating it for up to 2 hours. The longer you marinate, the more intense the flavor will be. Yes! You can swap in many vegetables. Try bell peppers, zucchini, or asparagus. Carrots and snap peas also work well. Just remember to cut them into even pieces for even cooking. This keeps your meal colorful and fun. I love pairing these bowls with a fresh salad or crusty bread. You can also serve them with roasted potatoes for a heartier meal. For drinks, try a light white wine or sparkling water with lemon. These sides add balance to the dish and enhance the flavors. This blog post covers how to make delicious Lemon Garlic Chicken Bowls with easy steps. You learned about essential ingredients like chicken, garlic, and fresh veggies. I provided tips for marinating and cooking to enhance flavor. Remember, you can switch proteins or veggies based on your taste. Storing and reheating tips help you enjoy leftovers safely. By trying these recipes, you can create a healthy and satisfying meal at home. Enjoy cooking and experimenting with flavors to make it your own!

Lemon Garlic Chicken Bowls Sheet Pan Fresh and Flavorful

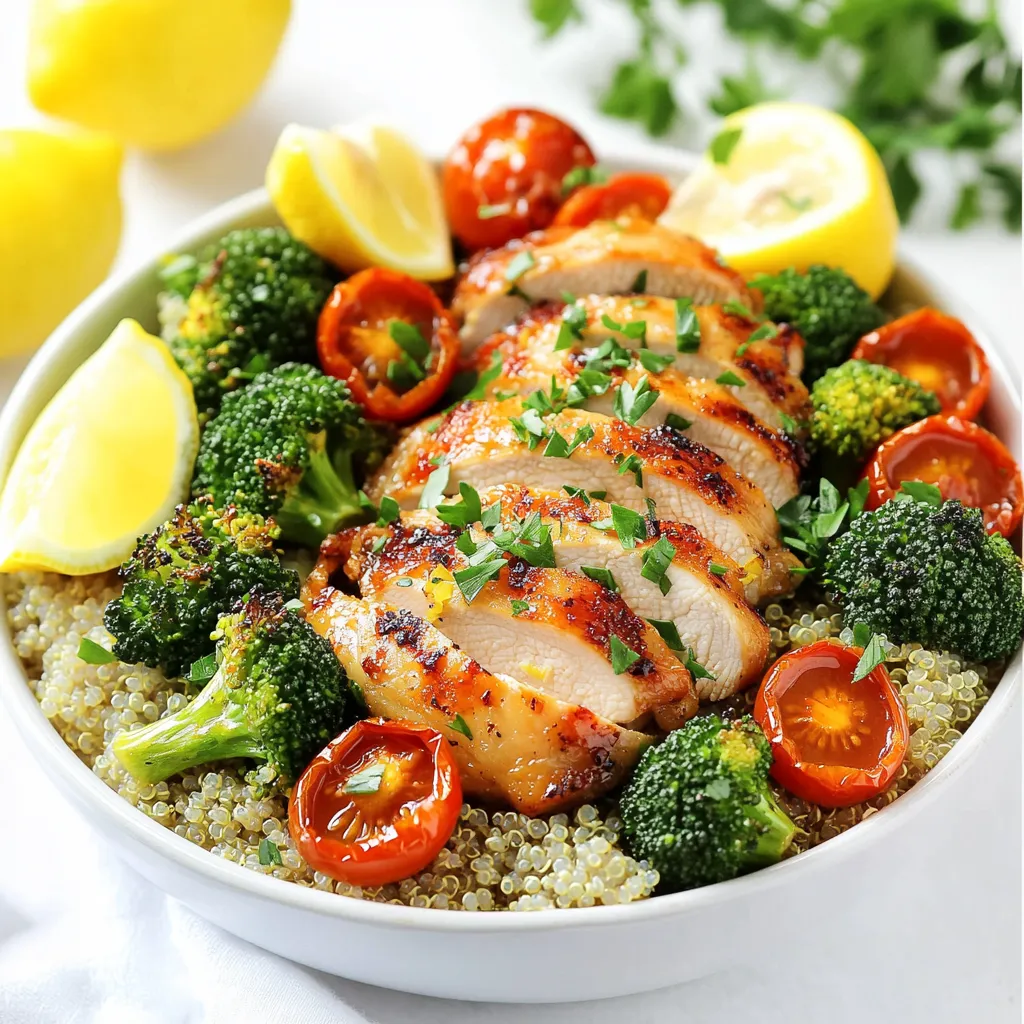
Looking for a fresh, flavorful meal that’s easy to make? You’ll love these Lemon Garlic Chicken Bowls! Using just one

- 1 cup pumpkin puree (canned or roasted) - 1/2 cup cream cheese, softened - 1/2 cup granulated sugar - 1/2 cup brown sugar, packed - 3 large eggs - 1/3 cup vegetable oil - 1 cup all-purpose flour - 1/2 cup whole wheat flour - 1 teaspoon baking soda - 1 teaspoon baking powder - 1 teaspoon ground cinnamon - 1/2 teaspoon ground nutmeg - 1/2 teaspoon ground ginger - 1/4 teaspoon salt - 1 teaspoon vanilla extract - 1/4 cup chopped pecans or walnuts (optional) You can add chopped nuts like pecans or walnuts to the loaf for extra crunch. Chocolate chips also make a tasty addition if you want a sweet surprise. For a twist, try adding dried cranberries or raisins to enhance the flavor. If you don't have pumpkin puree, you can use applesauce. This gives a similar texture and moisture. Instead of cream cheese, Greek yogurt works well for a lighter filling. Use coconut oil or melted butter in place of vegetable oil if you prefer. If you need a gluten-free loaf, swap all-purpose flour for almond flour or a gluten-free blend. Start by preheating your oven to 350°F (175°C). This step is key for even baking. Next, take a 9x5 inch loaf pan. Grease it and dust it with flour. You can also line it with parchment paper for easy removal. This will help the loaf come out smoothly. In a mixing bowl, add 1/2 cup of softened cream cheese. Then, mix it with 1/4 cup of granulated sugar. Beat them together until the mixture is smooth and creamy. Set this aside for later. This filling makes the loaf rich and tasty. Grab a large bowl and add 1 cup of pumpkin puree. Then, mix in the remaining 1/4 cup of granulated sugar, 1/2 cup of brown sugar, and 3 large eggs. Next, pour in 1/3 cup of vegetable oil and 1 teaspoon of vanilla extract. Stir until everything is well combined. This mixture brings warmth and flavor. In another bowl, whisk together 1 cup of all-purpose flour, 1/2 cup of whole wheat flour, 1 teaspoon of baking soda, and 1 teaspoon of baking powder. Add 1 teaspoon of ground cinnamon, 1/2 teaspoon of ground nutmeg, 1/2 teaspoon of ground ginger, and 1/4 teaspoon of salt. This dry mix adds texture and spice to your loaf. Gradually add the dry mix to the pumpkin batter. Stir just until combined, being careful not to overmix. If you like, fold in 1/4 cup of chopped pecans or walnuts for a crunchy twist. Pour half of the pumpkin batter into your prepared loaf pan. Then, add dollops of the cream cheese mixture on top. Spread it out a bit but don’t mix it in yet. Next, pour the remaining pumpkin batter over the cream cheese layer. This creates the beautiful swirl effect. Use a knife or skewer to gently swirl the cream cheese into the batter. This step makes for a lovely marbled look. Place the loaf in your preheated oven. Bake for 50-60 minutes. To check if it’s done, insert a toothpick in the center. If it comes out clean, your loaf is ready. Once baked, let the loaf cool in the pan for 10 minutes. Then, transfer it to a wire rack to cool completely. When ready to serve, slice it up. Enjoy it warm or at room temperature. For a fancy touch, dust it with powdered sugar. A dollop of whipped cream on the side makes it even better! To make the best pumpkin cream cheese swirl loaf, watch for these mistakes: - Overmixing the batter: Mix just until combined. This keeps the loaf soft. - Not softening the cream cheese: Cream cheese must be soft for a smooth mix. - Skipping the flouring step: Greasing and flouring the pan helps the loaf release easily. Creating a beautiful swirl is easy if you follow these steps: - Pour half of the batter in the pan first. - Add dollops of cream cheese mixture on top. - Pour the rest of the batter over the cream cheese. - Use a knife or skewer to gently swirl. Don't stir too much. This method gives you a lovely marbled look. Pumpkin puree adds moisture, so balance is key: - If your batter seems too wet, add a bit more flour. - If too dry, a splash of milk or more oil can help. - Check the loaf while baking. A toothpick should come out clean or with a few crumbs. These tips ensure your loaf stays moist but not soggy. Enjoy your baking! {{image_2}} You can change the pumpkin cream cheese swirl loaf with other flavors. For a chocolate twist, add 1/2 cup of cocoa powder to the dry mix. This gives the loaf a rich, dark taste. You can also add chocolate chips to the batter for extra sweetness. For a spice blend, try adding cardamom or allspice. Just a teaspoon can create a warm, cozy flavor. Don’t forget to adjust the sugar if you add more spices. You want a balance that tastes great! If you need a gluten-free option, switch the flours. Use a gluten-free all-purpose flour blend instead of regular flour. Make sure your baking powder and other ingredients are also gluten-free. This way, everyone can enjoy this tasty loaf. You may need to add a bit more liquid because gluten-free flours can absorb more moisture. Start with an extra tablespoon of oil or water to keep it moist. To make a vegan version, replace the eggs with flax eggs. Mix 1 tablespoon of ground flaxseed with 2.5 tablespoons of water. Let it sit for 5 minutes to thicken. This works great as a binder. Use a dairy-free cream cheese for the filling. Look for options made from nuts or soy. You can also swap the vegetable oil for coconut oil. Melt it first, and it will blend well with the other ingredients. These variations keep the loaf fun and exciting! Each option brings a unique taste while keeping the beloved pumpkin flavor. To store your leftover pumpkin cream cheese swirl loaf, first let it cool completely. Wrap the loaf tightly in plastic wrap. This keeps it fresh and moist. You can also place it in an airtight container. Store it at room temperature for up to three days. If you want to keep it longer, consider freezing it. To freeze the loaf, slice it first. This makes it easy to grab a piece later. Wrap each slice in plastic wrap, then place them in a freezer bag. Press out as much air as possible before sealing. Label the bag with the date. The loaf can stay in the freezer for up to three months. When you're ready to enjoy, just thaw it in the fridge overnight. To reheat your pumpkin cream cheese swirl loaf, you have a few options. For the best taste, use the oven. Preheat it to 350°F (175°C). Place the loaf or slices on a baking sheet. Heat for about 10-15 minutes. If you're in a hurry, you can use the microwave. Heat slices for 15-20 seconds at a time until warm. Just be careful not to overheat, or it can get dry. Enjoy your delicious loaf warm! You can use butternut squash puree or sweet potato puree. Both give a similar flavor and texture. Just make sure they are smooth and cooked well. If you want a lighter option, try using applesauce. It adds moisture but changes the taste a bit. Check the loaf with a toothpick. Insert it into the center. If it comes out clean or with a few crumbs, it's done. The top should look golden brown and spring back when touched. If it still looks wet, bake for a few more minutes. Yes, you can! Bake the loaf and let it cool completely. Then wrap it tightly in plastic wrap or foil. Store it in the fridge for up to five days. You can also freeze it for up to three months. Just thaw it overnight before serving. Serve it warm or at room temperature. A dusting of powdered sugar adds a nice touch. You can also serve it with whipped cream for extra flavor. A cup of coffee or tea pairs well too. It's perfect for breakfast or a cozy snack! This blog post covered everything you need to make a delicious pumpkin cream cheese swirl loaf. We discussed the key ingredients, step-by-step instructions, and tips to avoid mistakes. You learned about variations to suit different diets and how to store leftovers properly. Enjoy experimenting with flavors and share your tasty results with friends. Baking can be fun and simple, and each slice offers a taste of fall. Happy baking!

Pumpkin Cream Cheese Swirl Loaf Irresistible Recipe

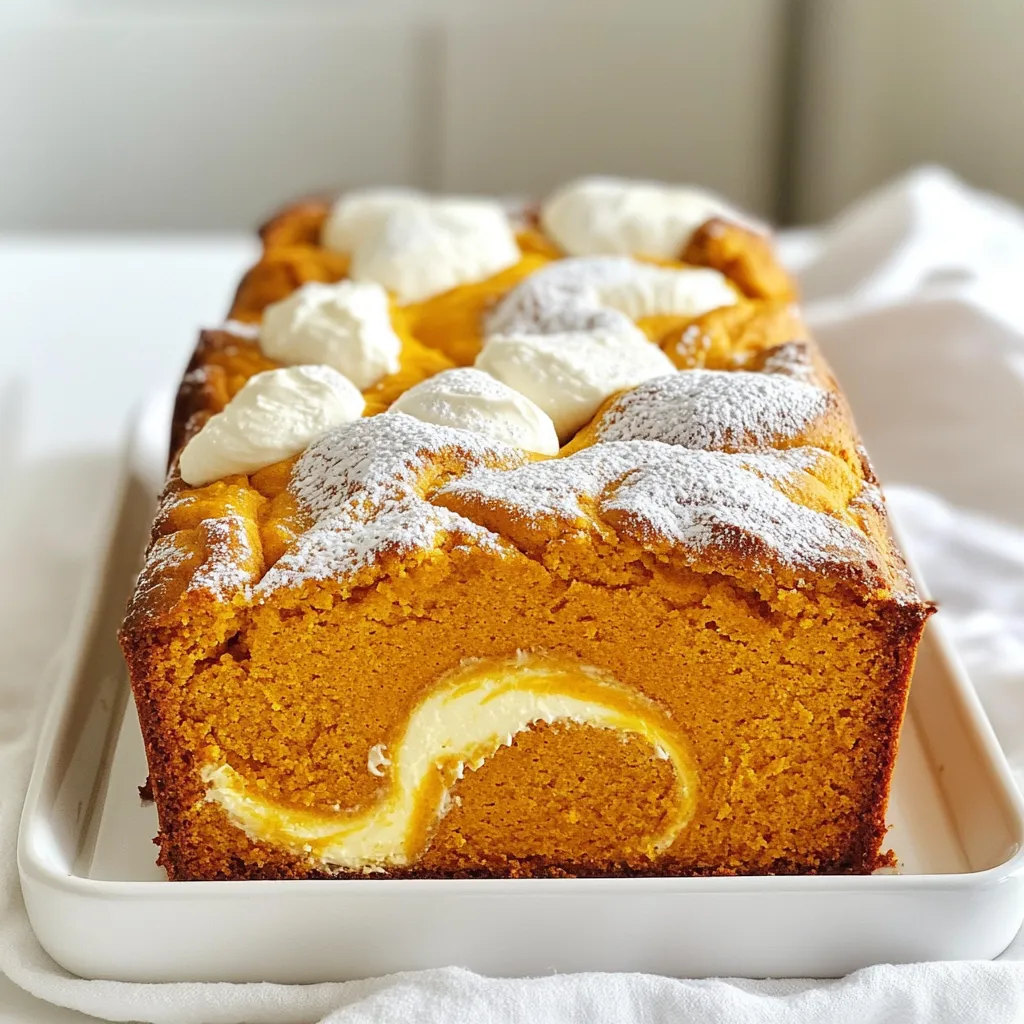
Welcome to my kitchen! Today, I’m sharing a delicious Pumpkin Cream Cheese Swirl Loaf recipe that you simply can’t resist.

- 8 oz rice noodles - 1 lb shrimp, peeled and deveined - 1 tablespoon vegetable oil - 2 cups mixed stir-fry vegetables (like bell peppers, broccoli, and snap peas) - 1/4 cup teriyaki sauce - 2 green onions, chopped - 1 teaspoon sesame seeds (for garnish) - Salt and pepper to taste - Skillet or wok - Measuring cups and spoons - Strainer Finding the right ingredients is key. Start with rice noodles. They cook fast and soak up flavor well. Shrimp brings a sweet taste and a nice texture. Use fresh or frozen shrimp; both work great. Vegetable oil helps cook the shrimp and veggies without sticking. Mixed stir-fry vegetables add color and crunch. You can choose bell peppers, broccoli, and snap peas for a tasty mix. For the optional ingredients, green onions add a fresh, sharp flavor. Sesame seeds give a nice crunch and look pretty on top. Don't forget salt and pepper to taste; they make everything pop. When it comes to tools, a skillet or wok is best. You can heat them quickly and get a good sear on the shrimp. Measuring cups and spoons help you get the amounts just right. Finally, a strainer is handy for draining the rice noodles after cooking. With these ingredients and tools ready, you can whip up this meal in no time! - Start by cooking 8 oz of rice noodles. - Follow the package instructions for the best results. - Once cooked, drain the noodles and set them aside. - Heat 1 tablespoon of vegetable oil in a skillet over medium-high heat. - Add 1 lb of peeled and deveined shrimp. - Season lightly with salt and pepper. - Cook the shrimp for about 2-3 minutes until they turn pink. - Next, add 2 cups of mixed stir-fry vegetables to the skillet. - Stir frequently and cook for 3-4 minutes until the veggies are tender yet crisp. - Pour in 1/4 cup of teriyaki sauce. - Toss everything together to coat well. - Finally, add the cooked rice noodles and mix until combined. To make your Minute Teriyaki Shrimp Noodles burst with taste, start with good seasoning. I recommend using salt and pepper on the shrimp before cooking. This simple step makes a big difference. Next, be selective with your teriyaki sauce. A high-quality sauce can elevate your dish. Look for one with natural ingredients and rich flavor. Cooking can feel rushed, but you can manage your time well. While the noodles cook, heat your skillet. This keeps everything moving smoothly. Chop your vegetables before you start. Prepping in advance saves time and helps you focus on cooking. Having everything ready makes a fun and fast meal. Making your dish look great is easy. Serve your noodles in deep bowls. This adds a nice touch. Top them with extra green onions and a sprinkle of sesame seeds. These add color and crunch. A well-presented dish makes it more enjoyable to eat. {{image_2}} You can swap shrimp for chicken or tofu. Chicken adds a hearty taste. Just cut it into small pieces and cook as you would the shrimp. Tofu works well for a vegetarian option. Use firm tofu, and be sure to press it to remove extra moisture. This helps it brown nicely. Feel free to get creative with your veggies. Use seasonal produce like zucchini, asparagus, or carrots. These add different textures and flavors. You can also add extra greens like spinach or kale for a nutritious boost. They cook quickly and mix well with the noodles. If you want a twist, try other sauces. Soy sauce, hoisin sauce, or sweet chili sauce can work great. Each brings a unique flavor. You can also make your own teriyaki sauce at home. Just mix soy sauce, honey, garlic, and ginger in a pan over low heat. Stir until it's smooth and thick. This gives you a fresh taste that’s hard to beat. To store your leftover Minute Teriyaki Shrimp Noodles, let them cool first. This helps keep moisture in check. Use these simple guidelines: - Place leftovers in an airtight container. - Make sure the lid seals well to avoid spills. - Store in the fridge for up to three days. When it's time to enjoy your leftovers, here’s how to reheat them: - Use a skillet over medium heat for even warming. - Add a splash of water or teriyaki sauce to keep the noodles moist. - Stir frequently to avoid overcooking the shrimp. - You can also use a microwave. Heat in short bursts, stirring in between. Yes, you can freeze your teriyaki shrimp noodles! Here’s how to do it right: - Let the noodles cool completely before packing. - Use freezer-safe bags or containers, removing as much air as possible. - Label the bags with the date. To thaw, place them in the fridge overnight before reheating. This keeps the texture nice. It takes about 10 minutes to prep and 15 minutes to cook. The total time is 25 minutes. This quick meal serves four people, making it perfect for busy nights. You can have a delicious meal ready in no time. Yes, you can use frozen shrimp. Just thaw them first. Place the shrimp in cold water for about 15 minutes. Using frozen shrimp can save time. Make sure to drain them well before cooking. Fresh shrimp often taste better, but frozen works too. You can serve teriyaki shrimp noodles with a fresh salad or steamed rice. Try adding spring rolls or dumplings for an extra treat. These sides will complement the flavors of the dish. You can also add pickled vegetables for a tangy taste. Enjoy your meal! In this post, I shared a simple way to make teriyaki shrimp noodles. We explored the key ingredients, such as rice noodles, shrimp, and stir-fry veggies. I also went over cooking tips, variations, and storage methods. This dish can fit any taste with easy swaps. Remember, cooking can be fun and easy. With the right tools and ingredients, you can enjoy tasty meals anytime. Now, go ahead and make your own delicious teriyaki shrimp noodles!

Minute Teriyaki Shrimp Noodles Quick and Flavorful Meal

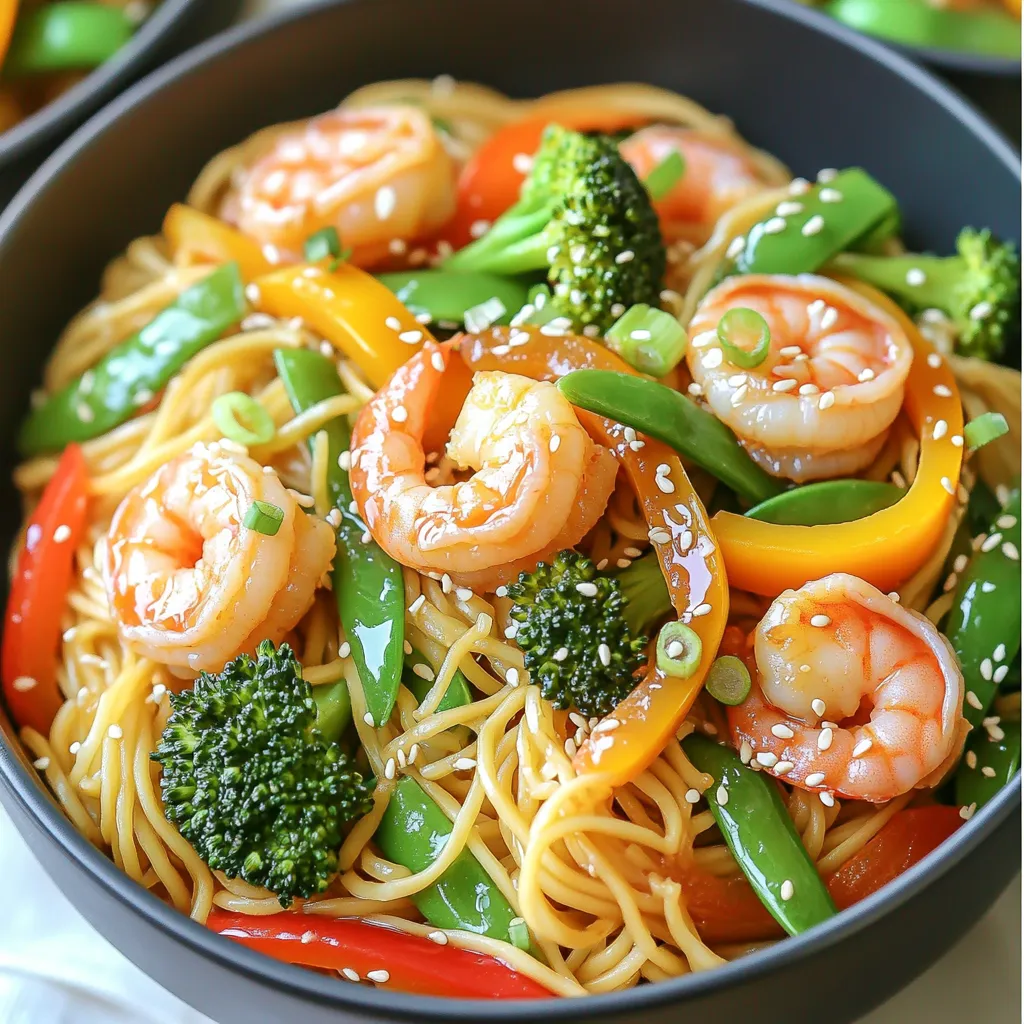
Craving a quick and delicious meal? You’re in for a treat! This Minute Teriyaki Shrimp Noodles recipe is perfect for

Older posts
Newer posts
← Previous Page1 … Page7 Page8 Page9 … Page84 Next →

dsad

© 2026 Lisa Dishes • Built with GeneratePress

Our Policies

  • Copyright Policy
  • Cookie Policy
  • GDPR Policy
  • Privacy Policy
  • Disclaimer
  • Terms Of Use

More Information

  • Home
  • About
  • Contact
  • Appetizers
  • Dessert
  • Dinner
  • Drinks
©2026, Lisa Dishes About Back To Top