


Latest & Greatest
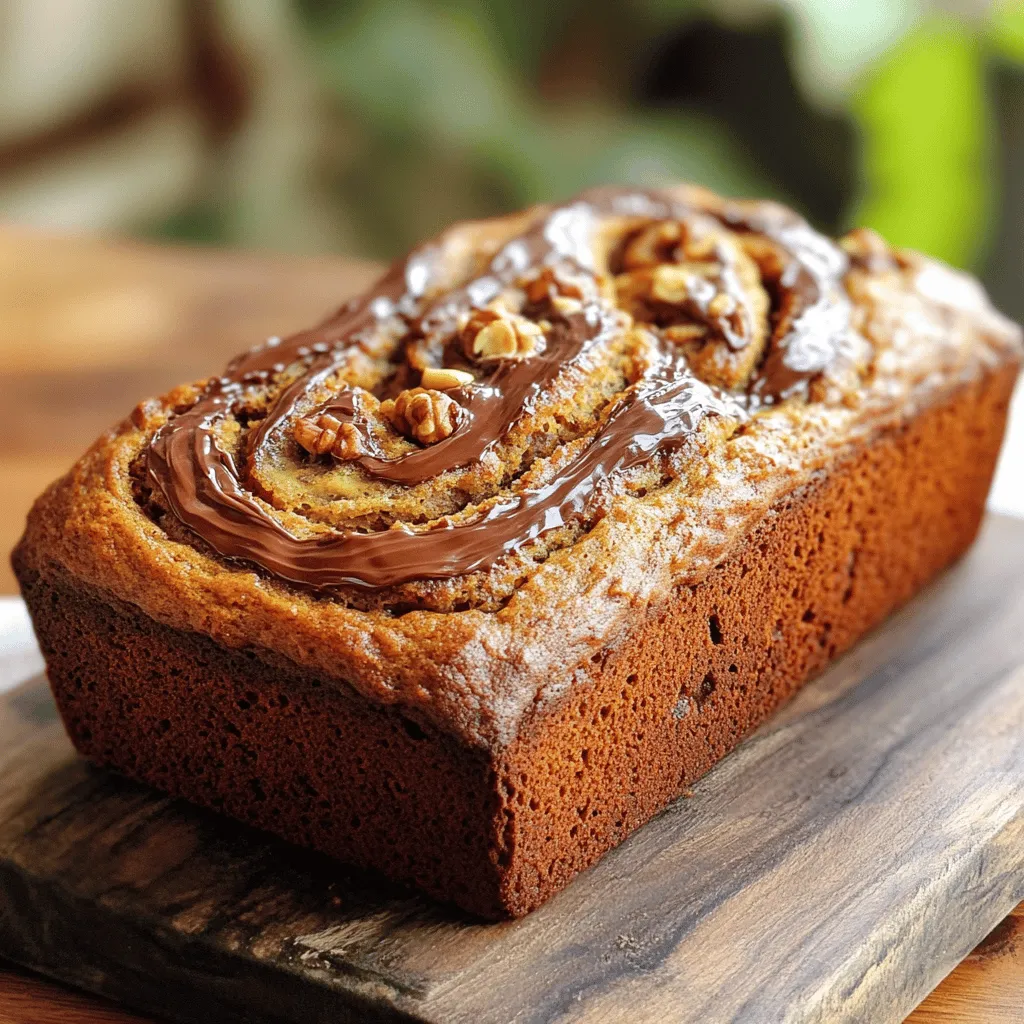
Nutella Banana Bread Delightful and Moist Recipe
Are you ready to elevate your banana bread game? My Nutella Banana Bread recipe is both delightful and moist, making
Read more…
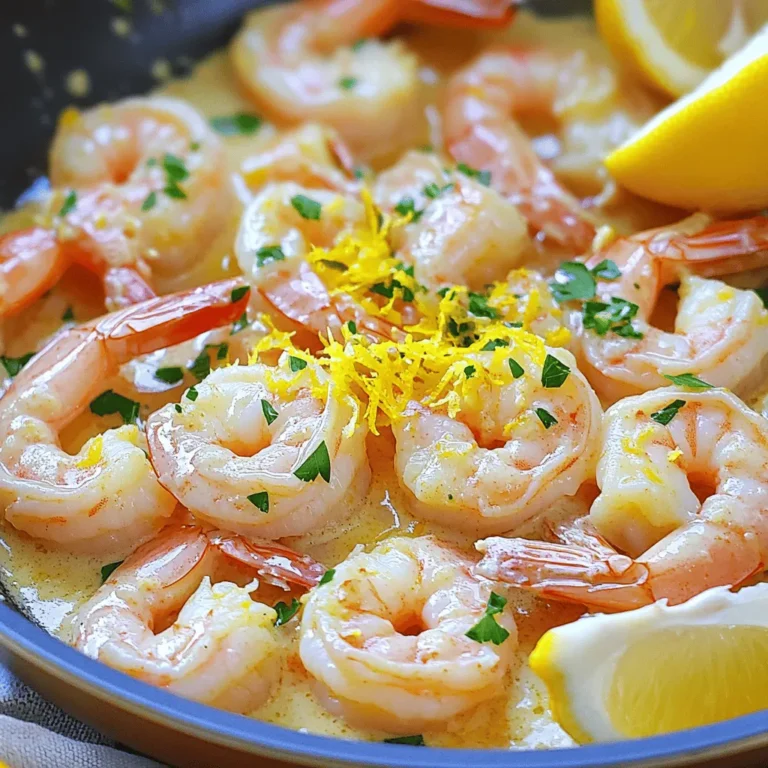
Creamy Cajun Chicken Pasta Flavorful Dinner Delight
Are you ready to impress at dinnertime? My Creamy Cajun Chicken Pasta is a flavorful delight you won’t want to
Read more…
Homemade Salsa Verde Flavorful and Fresh Recipe
Are you ready to elevate your salsa game? Homemade salsa verde is fresh, vibrant, and packed with flavor. With a
Read more…
Lemon Garlic Roasted Asparagus Savory and Fresh Dish
Ready to elevate your veggies? This Lemon Garlic Roasted Asparagus is fresh, zesty, and oh-so-savory. In this blog, I’ll walk
Read more…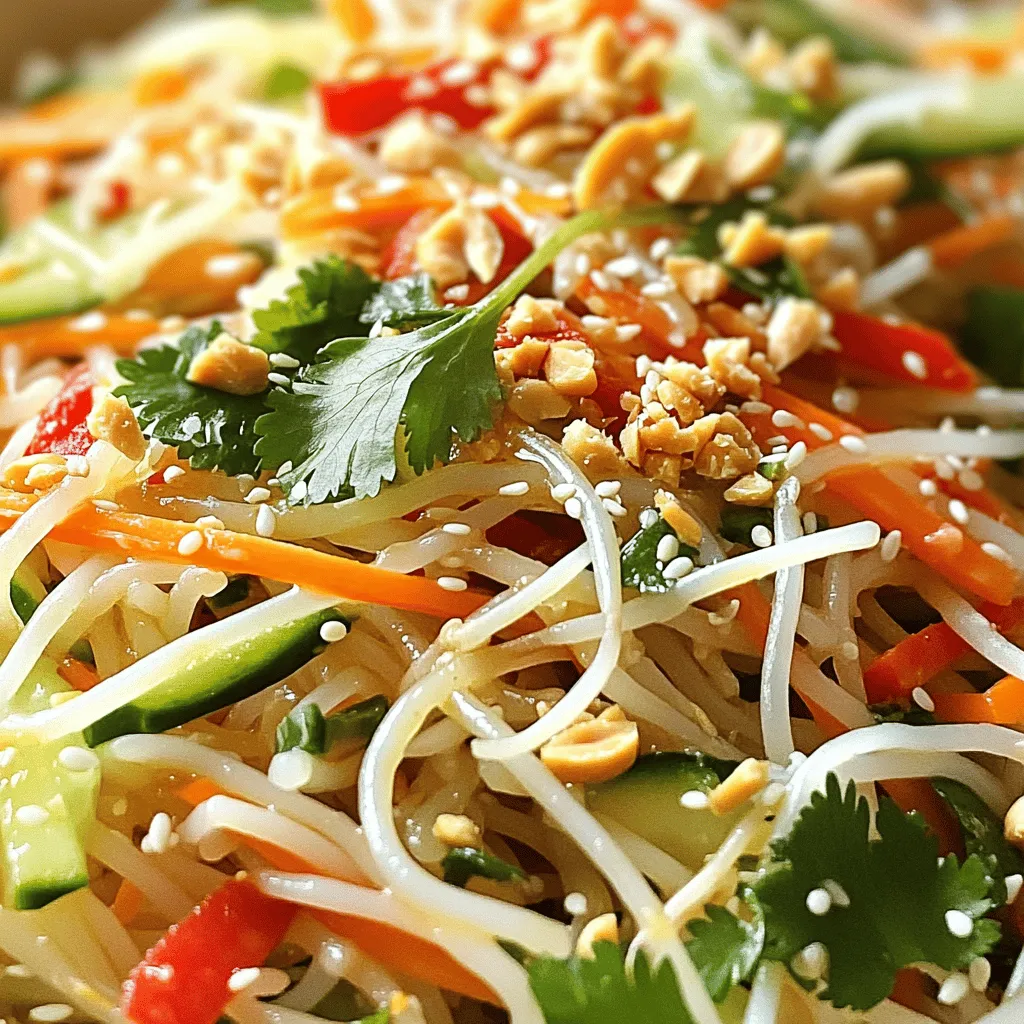
Spicy Thai Noodle Salad Flavorful and Refreshing Dish
Looking for a dish that’s bursting with flavor and freshness? This Spicy Thai Noodle Salad hits the spot! Packed with
Read more…
Chocolate Chip Banana Bread Easy and Delicious Recipe
Welcome to the sweetest part of your day! In this post, I’ll share my easy and delicious Chocolate Chip Banana
Read more…
Savory Instant Pot Chicken Tikka Masala Recipe
Looking for a quick and tasty dinner? My Savory Instant Pot Chicken Tikka Masala is here to save the day!
Read more…
Cinnamon Sugar Churros Irresistible and Easy Recipe
Cinnamon sugar churros are a treat that combines crispy exteriors with soft, warm centers. If you’ve ever wanted to make
Read more…browse recipes


Mini Pineapple Upside Down Cakes Delightful Treats
Are you ready for a sweet twist on a classic dessert? Mini Pineapple Upside Down Cakes are easy, fun, and perfect for sharing at…
My Latest Desserts

Mango Coconut Chia Pudding Delicious and Nutritious Treat
Are you ready to treat yourself to something truly delicious and nutritious? Mango Coconut Chia Pudding is the perfect way Read Full Recipe-
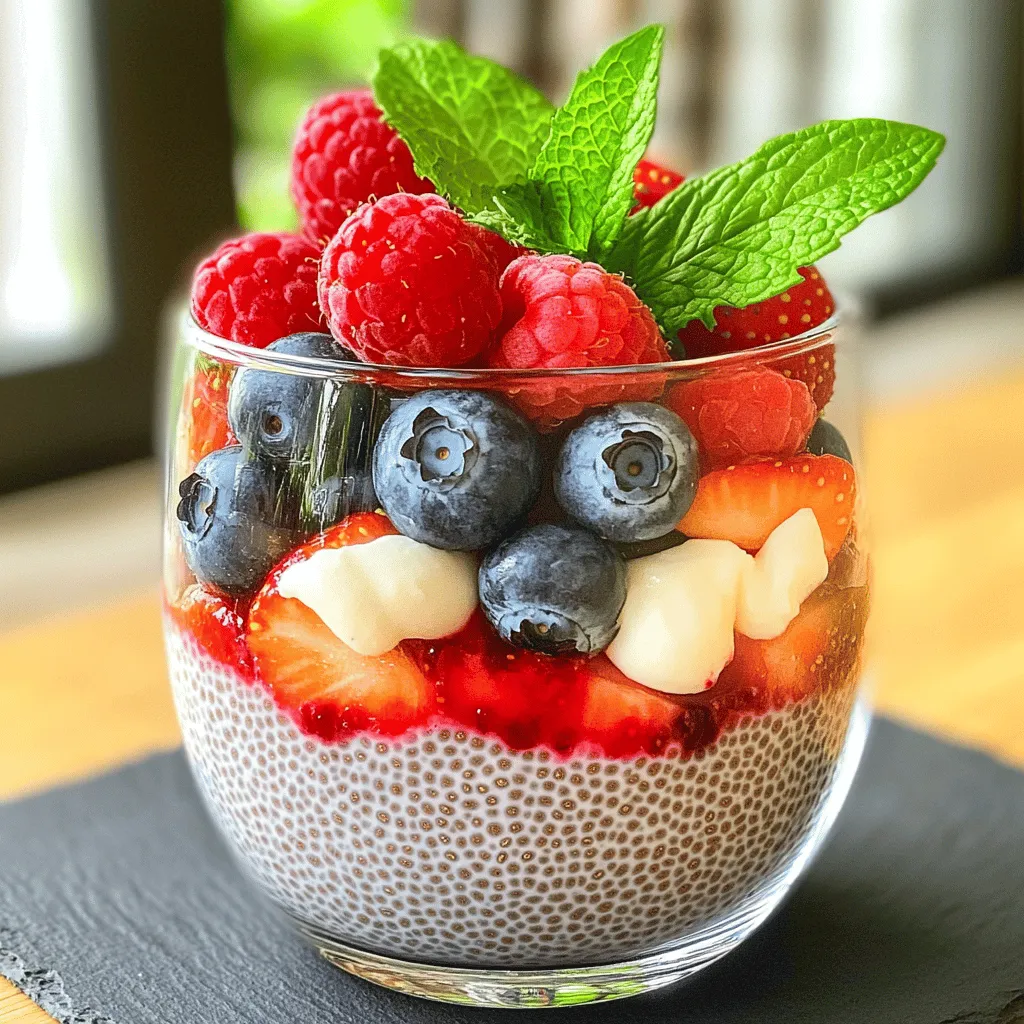
Berry Chia Pudding Simple and Healthy Delight
Berry Chia Pudding is a simple and healthy treat that packs a punch. With just a few easy ingredients, you Read Full Recipe -
Pumpkin Spice Energy Bites Tasty and Healthy Snack
Looking for a tasty and healthy snack to fuel your day? This Pumpkin Spice Energy Bites recipe is your answer! Read Full Recipe -
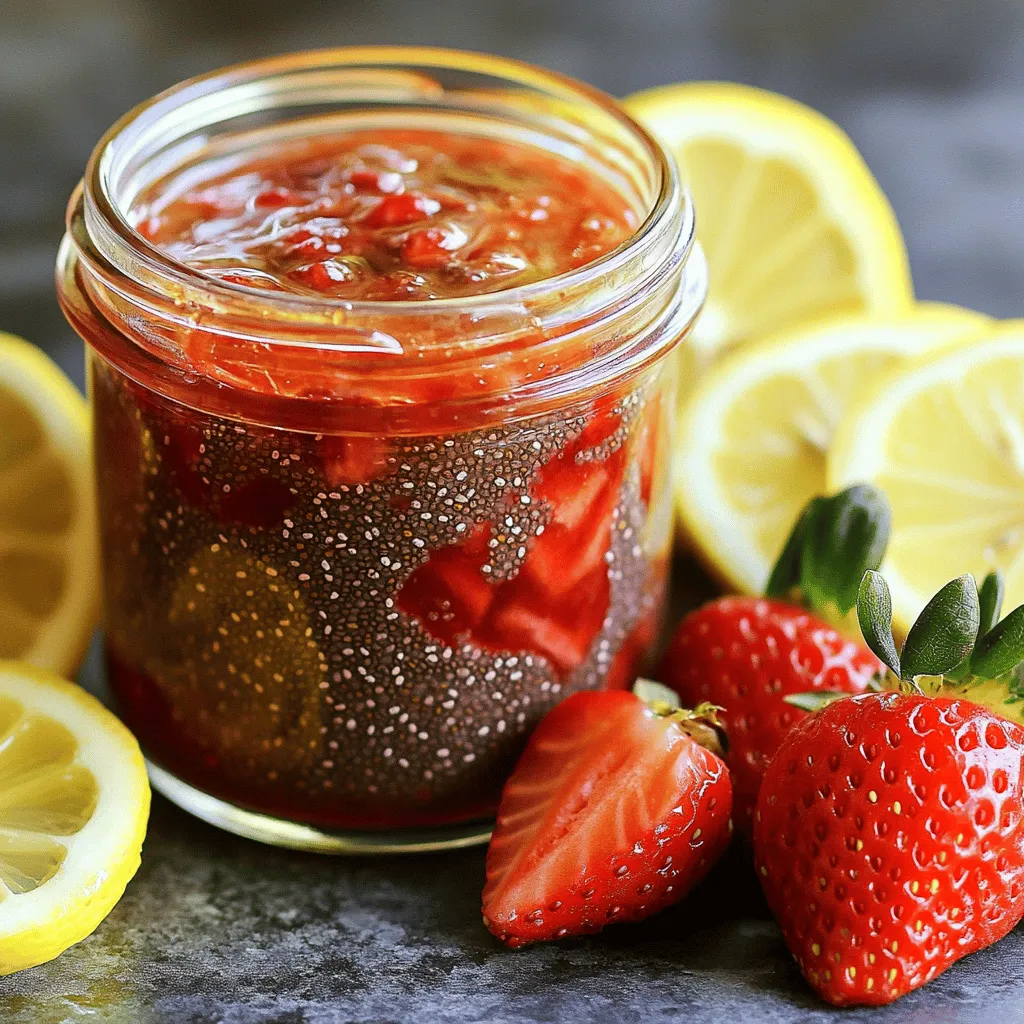
Strawberry Chia Seed Jam Tasty and Healthy Treat
If you’re craving a sweet treat that’s also good for you, I’ve got just the thing: Strawberry Chia Seed Jam! Read Full Recipe -
Pumpkin Spice Muffins Warm and Cozy Fall Treat
Fall is the perfect time for warm and cozy treats, and nothing says autumn like pumpkin spice muffins. These fluffy Read Full Recipe -
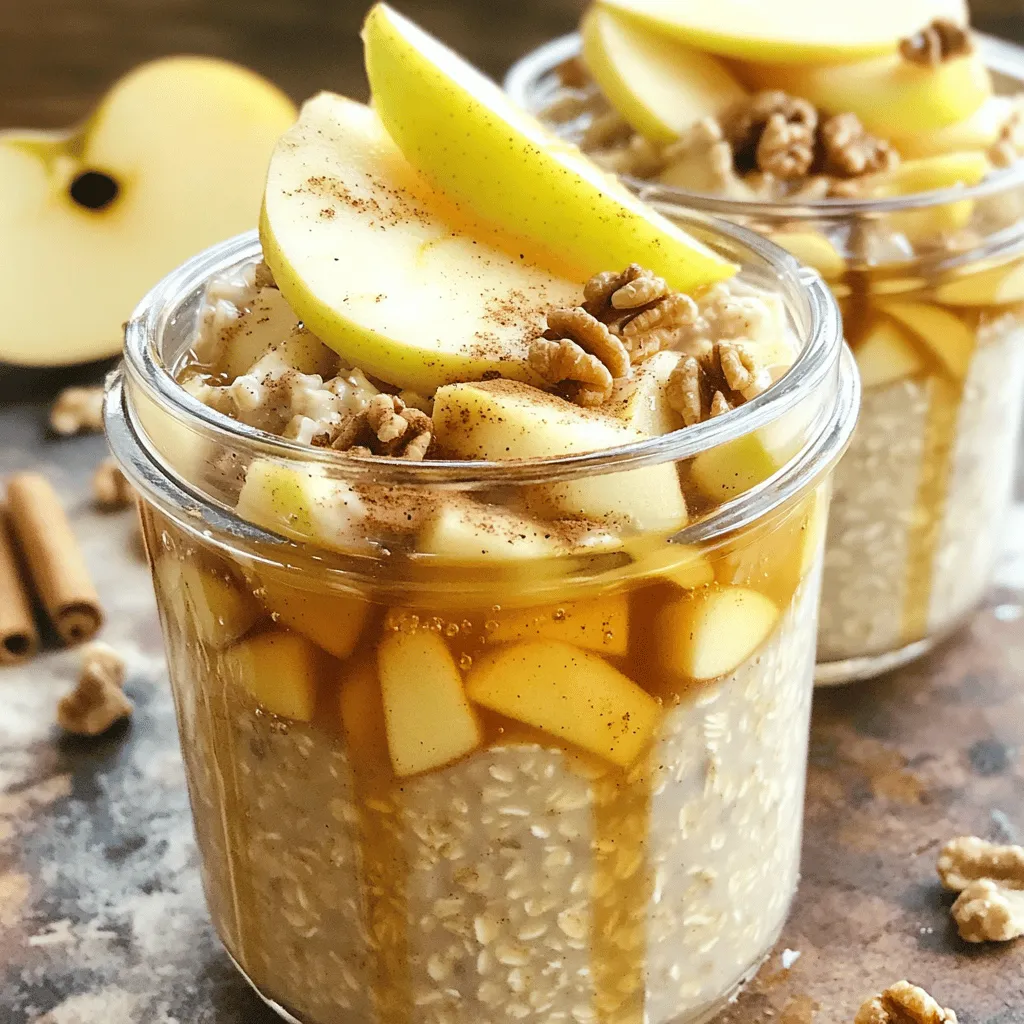
Apple Cinnamon Overnight Oats Healthy Breakfast Option
Looking for a quick and healthy breakfast? You’ve found it! Apple Cinnamon Overnight Oats are the perfect choice for busy Read Full Recipe -
Raspberry Almond Shortbread Bars Simple and Tasty Treat
Looking for a sweet treat that’s easy to make and perfect for any occasion? Raspberry Almond Shortbread Bars are your Read Full Recipe -
Chocolate Covered Strawberry Pops Delightful Treats
Are you ready for a sweet treat? Chocolate Covered Strawberry Pops are delicious and fun to make. I’ll guide you Read Full Recipe -
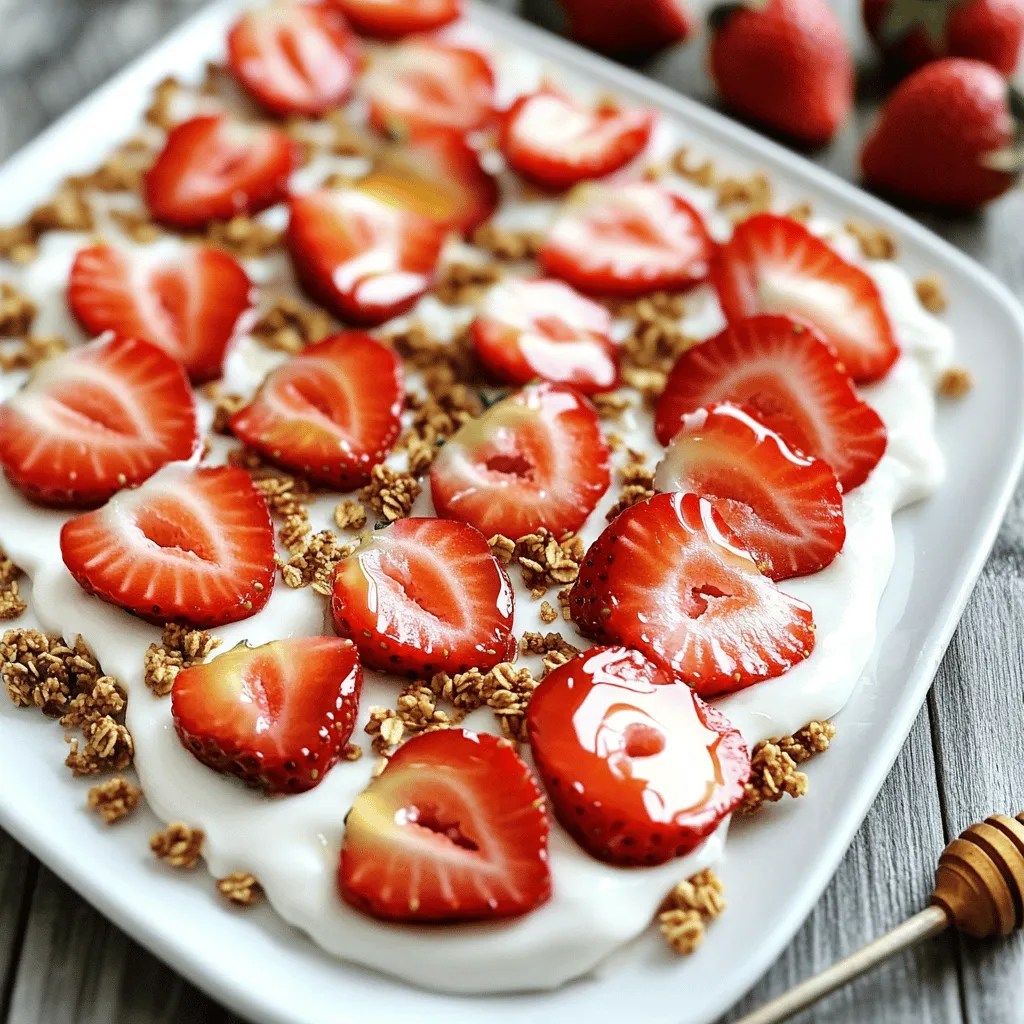
Fresh Strawberry Yogurt Bark Delicious and Easy Treat
Looking for a quick and tasty treat? Fresh Strawberry Yogurt Bark is your answer! This easy recipe combines creamy Greek Read Full Recipe -
No-Bake Snickers Bars Simple and Decadent Treat
Indulge in a simple and delicious treat with my No-Bake Snickers Bars recipe! These bars come together fast and need Read Full Recipe -
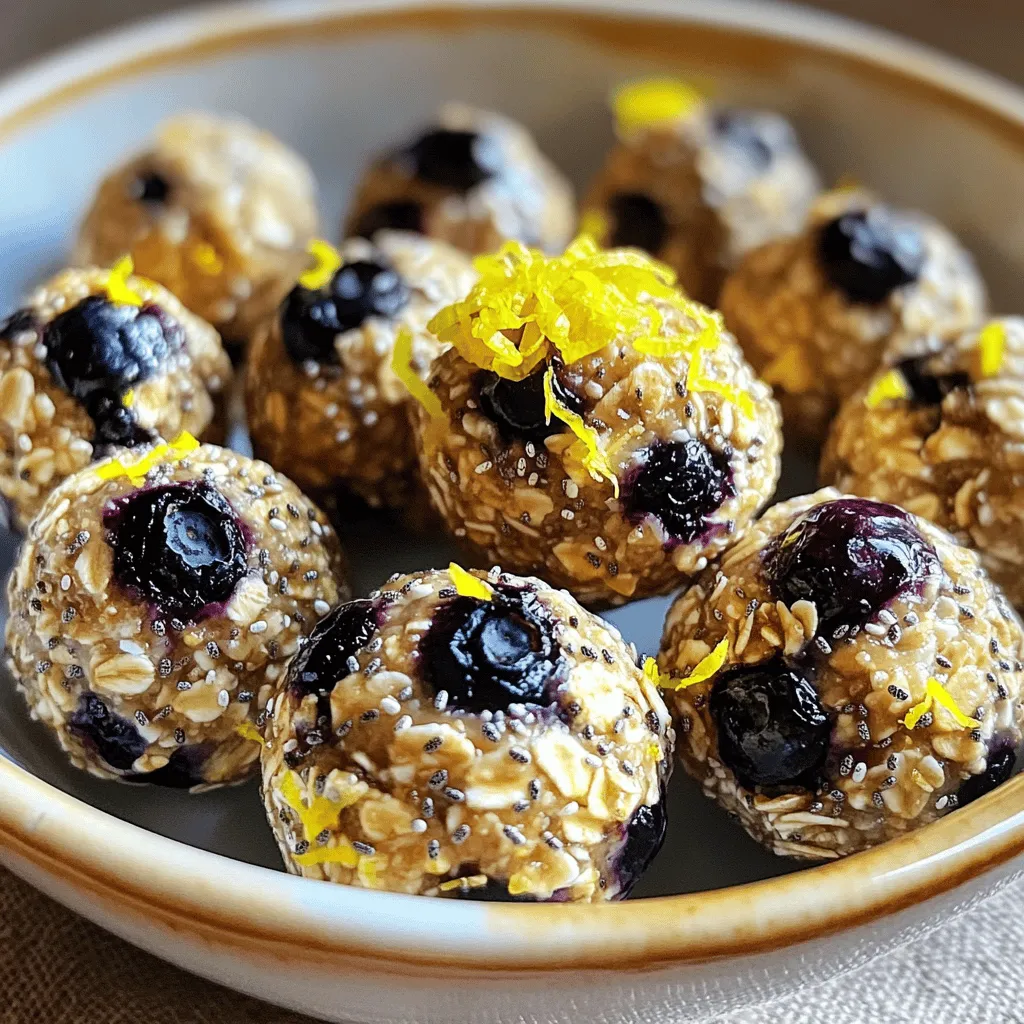
Lemon Blueberry Energy Bites Nourishing Snack Idea
Looking for a tasty, energy-packed snack? Try my Lemon Blueberry Energy Bites! These little balls are the perfect blend of Read Full Recipe -
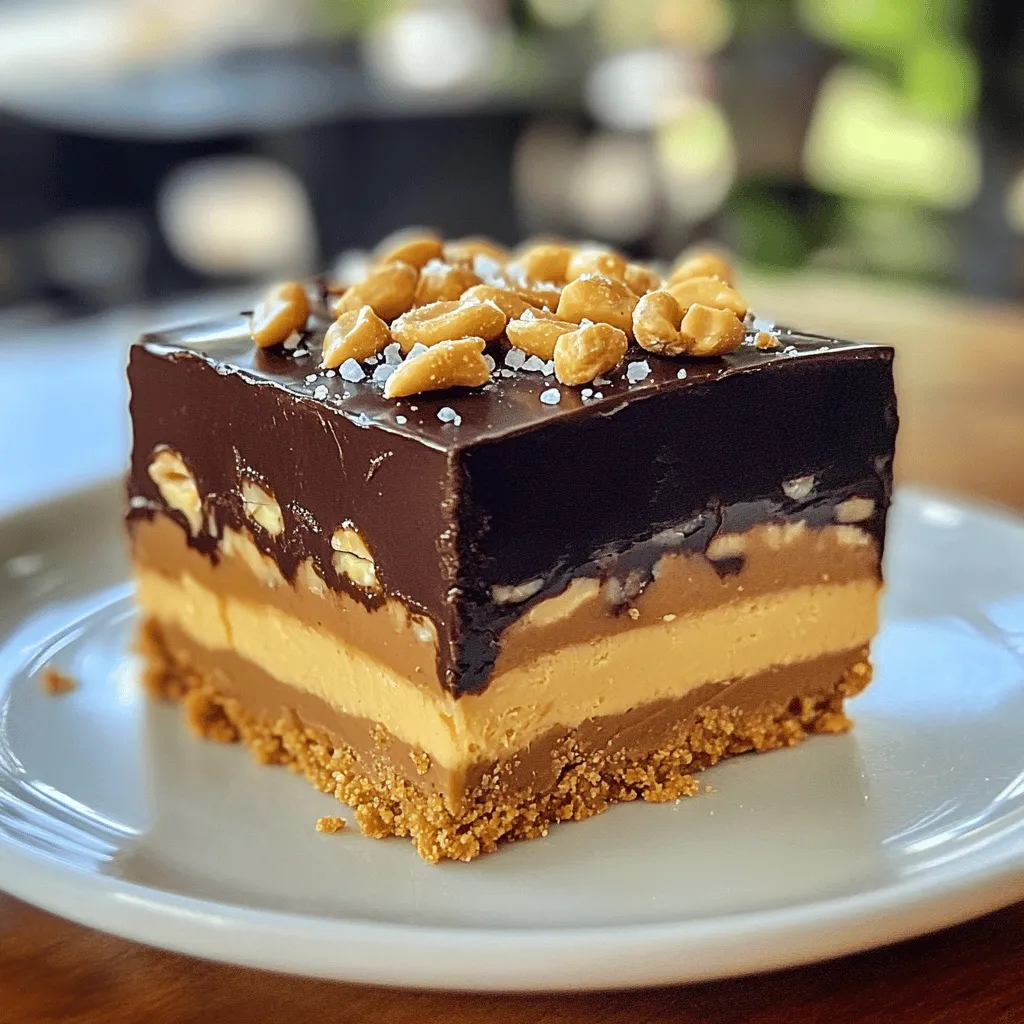
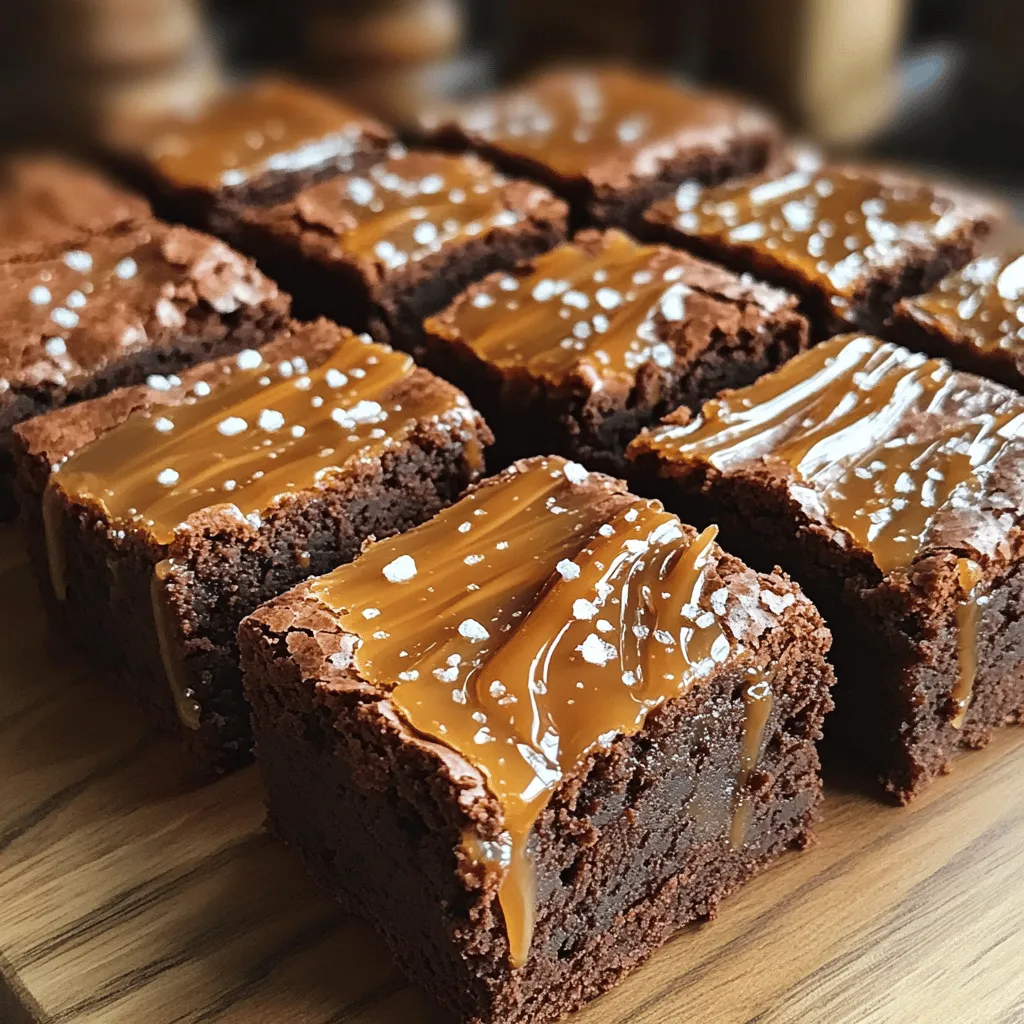
Fudgy Salted Caramel Brownies Rich and Indulgent Treat
Love brownies? Get ready to elevate your dessert game with these Fudgy Salted Caramel Brownies! They combine rich chocolate with Read Full Recipe


hey,
i’m !
I’m so happy you’re here!
Each recipe I share is a little piece of love from my kitchen. May they fill your heart and home with warmth. Let’s cook up something wonderful together.
![- Chicken: 4 boneless, skinless chicken breasts - Marinade: 1/4 cup olive oil, 2 lemons (juice and zest), 4 cloves garlic, minced - Fresh Herbs: 1 tablespoon each of rosemary, thyme, and parsley - Seasoning: Salt and pepper to taste - Garnish: Lemon slices and herb sprigs When I make Lemon Herb Grilled Chicken, I love using fresh ingredients. They make a big difference in taste. I choose boneless, skinless chicken breasts. They cook evenly and stay juicy. The marinade is the key. It blends olive oil, lemon juice, zest, garlic, and herbs. This mix makes the chicken flavorful. I prefer using fresh herbs like rosemary, thyme, and parsley. They add bright flavors to the dish. It is so easy to chop them up. You can use dried herbs, but fresh ones give a better taste. Don't forget the salt and pepper! They enhance the flavors of the chicken. I suggest using a good quality olive oil. It adds richness to the marinade. For a beautiful finish, I like to garnish the chicken with lemon slices and herb sprigs. It makes the plate look lovely and inviting. You can find the full recipe above. It covers everything you need to know for this dish. Enjoy cooking! To make the marinade, start by whisking together the following ingredients: - 1/4 cup olive oil - Juice and zest of 2 lemons - 4 cloves garlic, minced - 1 tablespoon fresh rosemary, finely chopped - 1 tablespoon fresh thyme, finely chopped - 1 tablespoon fresh parsley, finely chopped - Salt and pepper to taste Whisk these ingredients in a bowl until they blend well. This mix brings a bright flavor to the chicken. Next, place the chicken breasts in a resealable plastic bag or a shallow dish. Pour the marinade over the chicken. Seal the bag or cover the dish and put it in the fridge. Let it marinate for at least 1 hour, but if you can, let it sit for up to 4 hours. This time helps the flavors soak in. Now, it’s time to grill! First, preheat your grill to medium-high heat. This step ensures the chicken cooks evenly. Take the chicken out of the marinade. Let any extra marinade drip off, then discard the marinade. Place the chicken on the hot grill. Cook it for about 6-8 minutes on each side. You want the chicken to reach an internal temperature of 165°F (74°C). Look for nice grill marks, too. After grilling, take the chicken off the grill. Let it rest for a few minutes. This step keeps it juicy. For a beautiful presentation, slice the chicken and arrange it on a platter. Add some fresh lemon slices and herb sprigs as garnishes. These small touches make your dish pop visually. For the complete recipe, check the [Full Recipe]. How long should I marinate the chicken? Marinate the chicken for at least 1 hour. For the best flavor, aim for 4 hours. Longer marinating lets the herbs and lemon soak in. This makes each bite full of taste. What temperature is best for marinating? Always marinate in the fridge. Keeping chicken cold prevents bacteria growth. Room temperature is not safe. How do I maintain grill temperature? Preheat your grill to medium-high heat. This gives a nice sear. Keep the lid closed while cooking to hold the heat. You want a steady temperature for even cooking. How do I ensure juiciness in chicken breasts? Let the chicken rest after grilling. This keeps the juices inside. Cutting right away makes juices spill out. What additional spices can I use? Try adding paprika or cumin for a warm flavor. You can also use a pinch of red pepper flakes for a kick. These spices add depth to the marinade. Can I use different meats? Yes, you can use pork or turkey. Just adjust the cooking time. Chicken is great, but other meats can also shine with this marinade. For the full recipe, check out my Lemon Herb Grilled Chicken section! {{image_2}} You can change the taste of the chicken by using different herbs. Try substituting rosemary or thyme with basil or cilantro. Each herb brings its own flavor. For example, basil adds a sweet note, while cilantro gives a fresh taste. You can also mix different herbs. Combining rosemary, thyme, and parsley creates a rich flavor. Feel free to get creative! The more herbs you try, the more unique your dish will be. Think about adding fruit-based marinades for a twist. You can use orange juice or peach puree. These fruits add sweetness and a new flavor profile. If you like heat, add spices or peppers. A pinch of red pepper flakes can bring warmth. You can also use jalapeños for a spicy kick. Adjust the heat based on your taste. You can make this dish even if you don’t have a grill. Baking the chicken in the oven is an easy option. Preheat your oven to 400°F (200°C). Place the marinated chicken on a baking tray. Bake for about 25-30 minutes. Make sure to check that it reaches 165°F (74°C). Stovetop cooking is another great choice. Heat a pan with some olive oil over medium heat. Cook the chicken for about 6-8 minutes on each side. This method helps keep the chicken juicy and flavorful. For the full recipe, refer to the section above. To keep your leftover Lemon Herb Grilled Chicken fresh, store it properly. Place the chicken in an airtight container. You can also wrap it tightly in plastic wrap or aluminum foil. Make sure the chicken cools down first. This way, it won't create steam inside the container. Leftovers stay good in the fridge for about 3 to 4 days. If you plan to eat them later, consider freezing them. Freezing grilled chicken is easy. First, let the chicken cool completely. Then, place it in a freezer-safe bag or container. Remove as much air as possible before sealing it. Label the bag with the date. This helps you keep track of how long it’s been frozen. You can freeze the chicken for up to 3 months. When you’re ready to eat it, thaw it in the fridge overnight. Reheat it in the oven or on the stovetop for best results. To check if your chicken has gone bad, look for a few signs. If it smells sour or off, it’s time to toss it. Also, check for a change in color. Fresh chicken should look pink, while spoiled chicken may appear gray or dull. If you see any slime on the surface, this is another red flag. Always wash your hands and surfaces after handling raw chicken. This helps prevent the spread of germs. You should marinate the chicken for at least 1 hour. This allows the chicken to soak in all the great flavors from the marinade. For the best taste, aim for 4 hours. If you can, marinate overnight in the fridge. This extra time really helps the herbs and lemon infuse into the meat. You can serve Lemon Herb Grilled Chicken with many tasty sides. Here are some great options: - Grilled vegetables, like zucchini or bell peppers - Steamed rice or quinoa for a filling base - A fresh green salad with lemon vinaigrette - Roasted potatoes or sweet potatoes for a crispy side - Garlic bread for a fun touch These sides pair well with the bright flavors of the chicken. Yes, you can use frozen chicken breasts. Just make sure to thaw them first. The safest way is to leave them in the fridge overnight. If you’re short on time, you can also use the microwave. After thawing, follow the recipe as usual. Just remember, if the chicken is still a bit icy, it might not marinate as well. For the best result, always marinate thawed chicken. For the full recipe, check out the details above. Lemon Herb Grilled Chicken is easy and packed with flavor. You learned about the key ingredients and how to make a perfect marinade. I shared tips for grilling and serving your chicken. Plus, you discovered variations and storage tips for leftovers. Cooking should be fun, and this recipe helps you enjoy it. Whether you grill, bake, or adjust flavors, you can create something great. Keep experimenting, and enjoy every bite.](https://lisadishes.com/wp-content/uploads/2025/05/c67e325a-8bae-4f67-945e-8b4bbe019271-300x300.webp)


![To make these tasty vegan cinnamon roll bites, you need simple ingredients. Here’s what you will need: - 1 cup all-purpose flour - 1/4 cup coconut sugar - 1/2 tablespoon baking powder - 1/4 teaspoon salt - 1/2 cup almond milk (or any plant-based milk) - 2 tablespoons coconut oil, melted - 1 teaspoon vanilla extract - 3 tablespoons brown sugar (for filling) - 1 tablespoon ground cinnamon - 2 tablespoons chopped pecans or walnuts (optional) - 1 tablespoon maple syrup (for drizzling) These ingredients come together to create a soft, chewy texture and a rich flavor that you will love. You can customize your vegan cinnamon roll bites by adding fun extras. Here are some ideas: - Chopped nuts (like pecans or walnuts) for crunch - Dried fruit (like raisins or cranberries) for sweetness - A sprinkle of powdered sugar for a nice look - A drizzle of melted dark chocolate for extra indulgence Feel free to mix and match these options based on what you enjoy! If you have dietary needs, you can adjust the recipe easily. Here are some substitutes: - Use whole wheat flour instead of all-purpose flour for more fiber. - Swap coconut sugar for maple sugar if needed. - If you are nut-free, use oat milk instead of almond milk. - Replace the coconut oil with applesauce for a lower-fat option. These substitutions can help you enjoy the bites while meeting your needs. For the full recipe, check out the link! To start, gather all your ingredients. You will need: - 1 cup all-purpose flour - 1/4 cup coconut sugar - 1/2 tablespoon baking powder - 1/4 teaspoon salt - 1/2 cup almond milk (or any plant-based milk) - 2 tablespoons coconut oil, melted - 1 teaspoon vanilla extract - 3 tablespoons brown sugar (for filling) - 1 tablespoon ground cinnamon - 2 tablespoons chopped pecans or walnuts (optional) - 1 tablespoon maple syrup (for drizzling) First, preheat your oven to 350°F (175°C). Line a baking sheet with parchment paper for easy cleanup. In a mixing bowl, combine the flour, coconut sugar, baking powder, and salt. Mix it well to blend the dry ingredients. In another bowl, whisk the almond milk, melted coconut oil, and vanilla extract until smooth. Pour this mixture into the dry ingredients. Stir just until it forms a dough. Next, roll out your dough on a lightly floured surface. Aim for a rectangle about 1/4 inch thick. In a small bowl, combine the brown sugar, ground cinnamon, and chopped nuts if you choose to add them. Spread this mixture evenly over the rolled-out dough. Starting from one edge, carefully roll the dough into a log shape, like a classic cinnamon roll. Now, cut the rolled dough into bite-sized pieces, around 1-2 inches thick. Place these pieces on your prepared baking sheet. Bake for 15-20 minutes or until the edges turn golden brown. The smell will fill your kitchen with a sweet aroma! For a soft and fluffy texture, be careful not to overmix your dough. Mix just until everything comes together. If your dough feels too sticky, add a little more flour. If it’s too dry, a splash of almond milk can help. Remember, rolling the dough to the right thickness is key. Too thick and it won’t cook through; too thin and it may dry out. These small tips can make a big difference in the final taste of your vegan cinnamon roll bites. After baking, drizzle the warm bites with maple syrup for that extra touch of sweetness. Enjoy them fresh out of the oven for the best flavor! When making vegan cinnamon roll bites, avoid overmixing the dough. This can make your bites tough. Also, do not forget to preheat the oven. A hot oven helps the bites rise and bake evenly. Lastly, make sure to measure your ingredients correctly. Too much flour can lead to dry bites. To boost flavor, try adding a pinch of nutmeg along with cinnamon. This gives a warm spice note. You can also use different plant-based milks. Almond milk, oat milk, or soy milk can change the taste slightly. Adding a bit of vanilla extract enhances the overall flavor too. For a crunchy texture, mix in chopped pecans or walnuts. They add a delightful crunch that pairs well with the soft dough. Serve these bites warm for the best taste. Arrange them on a nice platter and sprinkle with powdered sugar. Drizzle with maple syrup just before serving for extra sweetness. You can also serve them with a side of dairy-free yogurt or ice cream. This makes for a fun and tasty dessert. For a special touch, add fresh fruit like strawberries or blueberries around the plate. You can find the full recipe in the earlier sections. {{image_2}} You can make gluten-free vegan cinnamon roll bites easily. Simply swap all-purpose flour with a gluten-free blend. Make sure your blend works for baking. This change keeps the flavor while making the bites safe for those with gluten issues. Want to switch things up? Try new fillings! Chocolate chips add richness, while fresh fruits like berries give a nice twist. Spread your favorite jam or nut butter for more flavor. Each filling creates a unique taste experience. Play around with these options to find your favorite! If you love mini treats, make smaller versions of these bites. Cut the rolled dough into smaller pieces, about one inch thick. This size is perfect for snacking or sharing. You can also create a variety pack, mixing different flavors in one batch. For the full recipe and step-by-step instructions, check out the [Full Recipe]. To keep your vegan cinnamon roll bites fresh, let them cool completely. Place them in an airtight container. Store them at room temperature for up to three days. If you want them to last longer, refrigerate them. They can stay fresh in the fridge for about a week. When you're ready to enjoy these bites again, reheating is easy. You can use a microwave for quick warming. Heat them for 10-15 seconds at a time until warm. If you want a crispy texture, use an oven. Preheat it to 350°F (175°C) and place the bites on a baking sheet. Warm them for about 5-7 minutes. This method keeps them nice and tasty. If you want to freeze your vegan cinnamon roll bites, place them in a single layer on a baking sheet. Freeze them for about an hour until solid. Then, transfer them to a freezer-safe bag. They can stay frozen for up to three months. When you’re ready to eat, take them out and thaw them in the fridge overnight. Reheat as described above. This way, you can enjoy a delicious treat anytime! For the full recipe, check out the details above. Yes, you can use different types of flour. Whole wheat flour adds more fiber and a nutty taste. Almond flour makes the bites gluten-free and adds a light texture. Just remember, each flour may change the texture slightly. You might need to adjust the liquid if you use a nut flour. You can find pre-made vegan cinnamon roll bites at many health food stores. Look in the frozen section or the bakery area. Some grocery chains also carry them. Online shops like Thrive Market or Amazon have options too. Always check the ingredients to ensure they are fully vegan. These vegan cinnamon roll bites stay fresh for about two days at room temperature. If you store them in an airtight container, they can last up to a week in the fridge. For longer storage, freeze them for up to three months. Just reheat them in the oven for a warm treat later. You learned about making tasty vegan cinnamon roll bites. We covered the key ingredients, useful tips, and different variations. You can try gluten-free versions or add various flavors. Remember to store them right and reheat properly for the best taste. Enjoy making these bites as a fun treat! I hope you feel ready to create your own delicious versions at home. Happy baking!](https://lisadishes.com/wp-content/uploads/2025/06/bb4f9a54-d448-43fd-a639-52bb16ded2a6-300x300.webp)
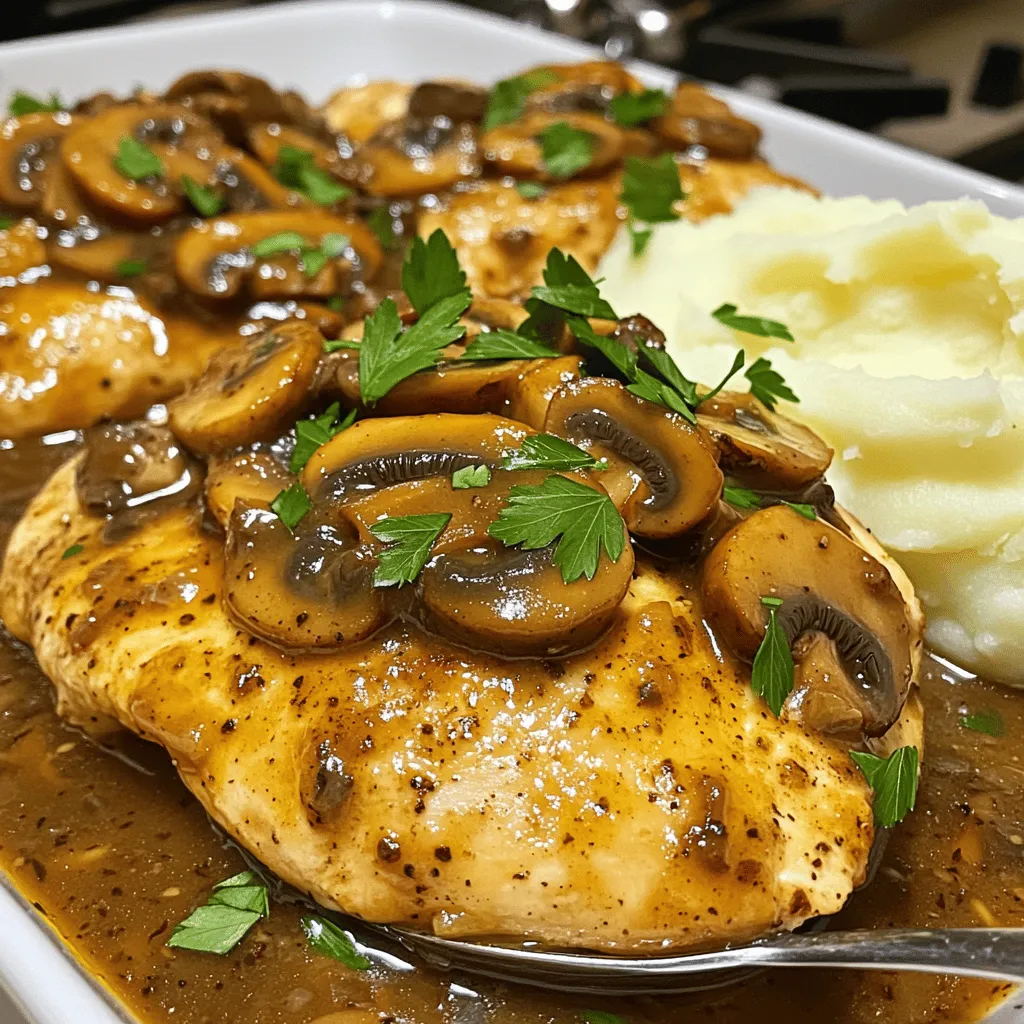
Easy Chicken Marsala Flavorful Recipe Made Simple
Ready to impress at your next meal? My Easy Chicken Marsala recipe is simple and packed with flavor. You’ll love how the juicy chicken…
My Latest Dinners
-
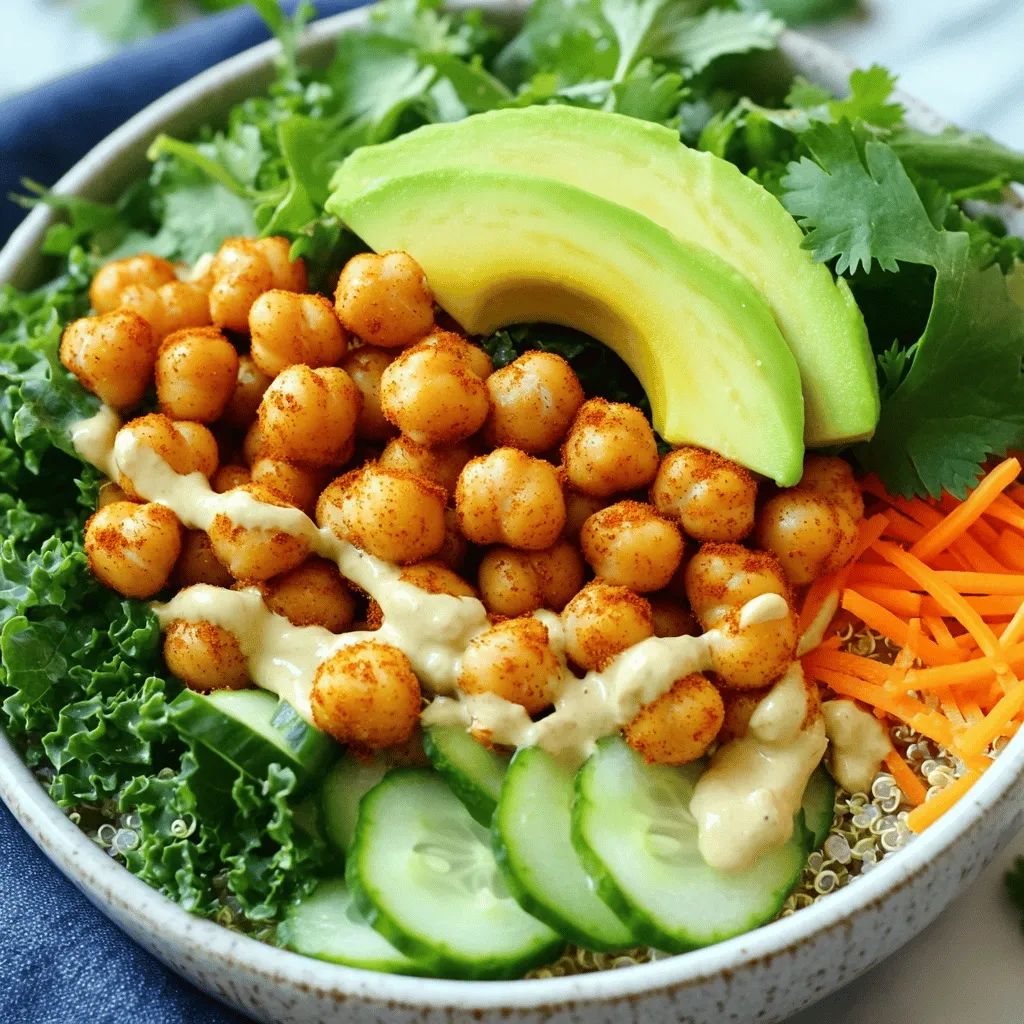
Crispy Chickpea Buddha Bowl Energizing and Nutritious
Looking for a delicious, energizing meal? Try my Crispy Chickpea Buddha Bowl! Packed with protein, fresh veggies, and a zesty Read Full Recipe -
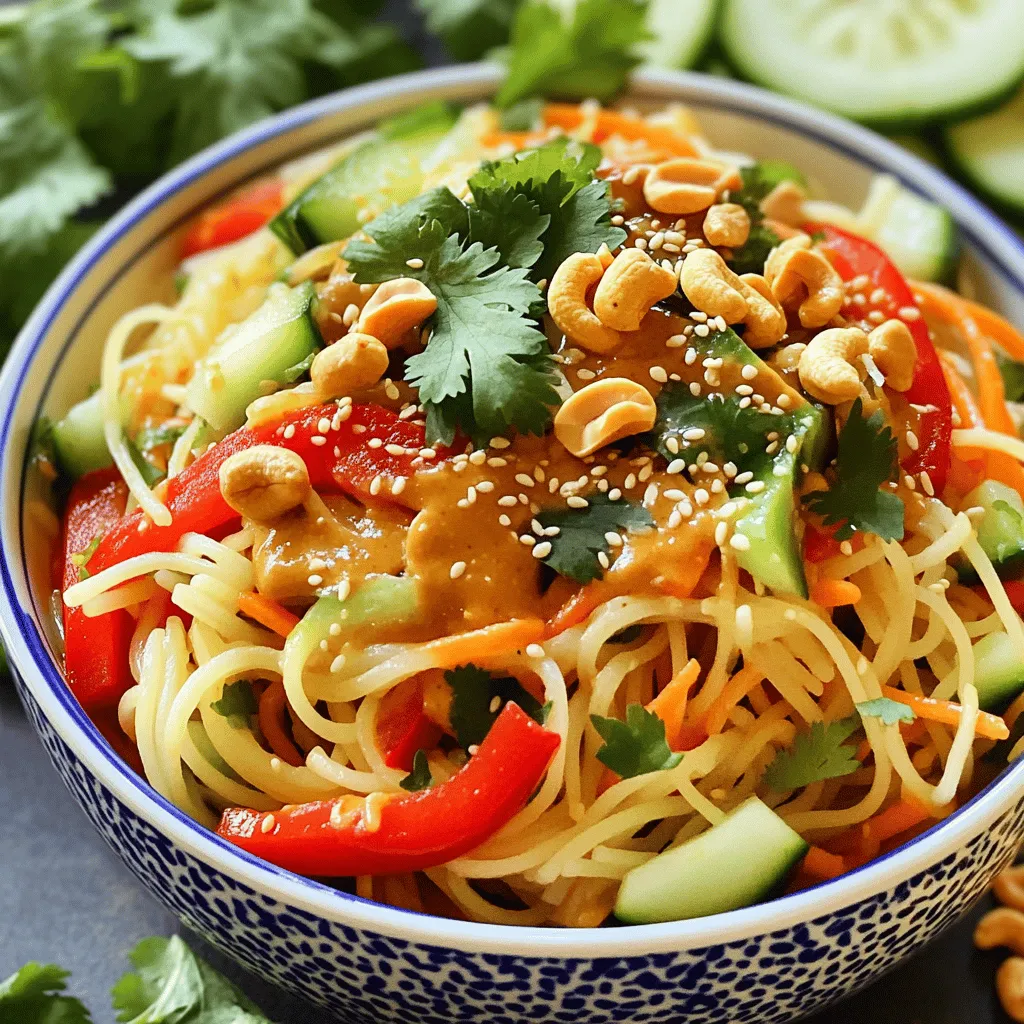
Spicy Cashew Noodle Salad Tasty and Simple Recipe
Are you ready to enjoy a tasty dish that packs a flavorful punch? My Spicy Cashew Noodle Salad is not Read Full Recipe -
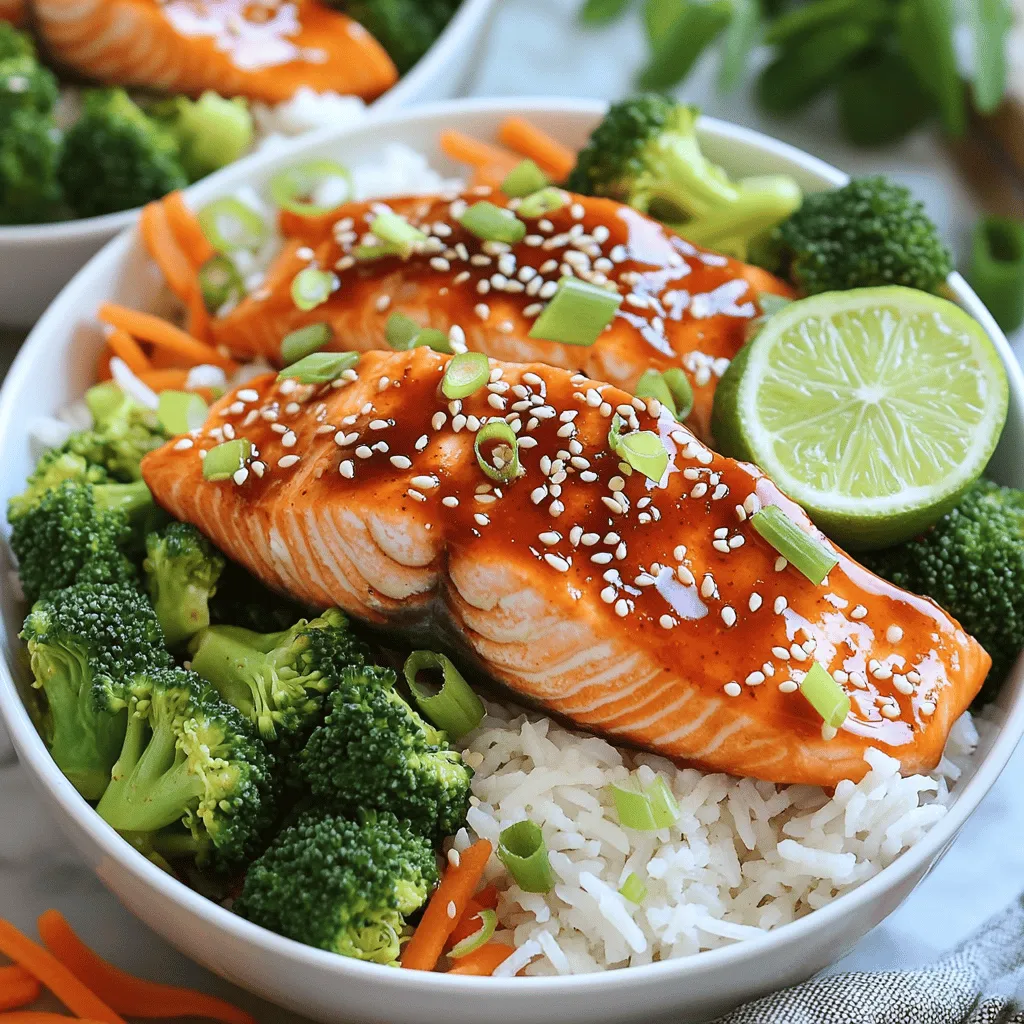
Sweet Chili Salmon Bowls Healthy and Flavorful Meal
Looking for a quick, healthy meal that’s bursting with flavor? Sweet Chili Salmon Bowls are the answer! I’ll walk you Read Full Recipe -
Chicken Taco Soup Flavorful and Simple Recipe Guide
Looking for a quick and tasty meal? I’ve got the perfect solution: Chicken Taco Soup! This flavor-packed recipe is easy Read Full Recipe -
Baked Lemon Garlic Tilapia Simple and Tasty Meal
Are you ready to whip up a meal that’s both simple and bursting with flavor? Baked Lemon Garlic Tilapia is Read Full Recipe -
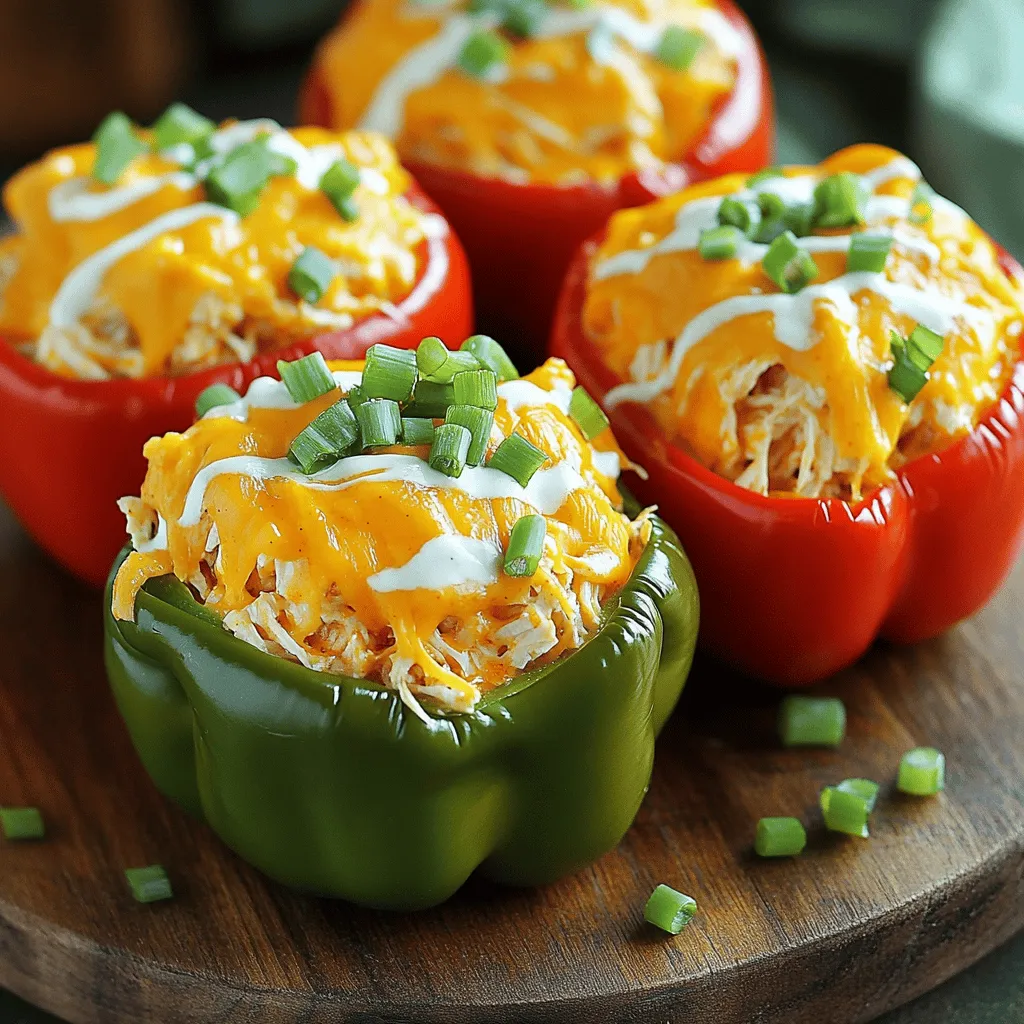
Buffalo Chicken Stuffed Peppers Tasty and Easy Recipe
Are you craving a meal that’s both tasty and easy to make? Look no further! This Buffalo Chicken Stuffed Peppers Read Full Recipe