Skip to content
DisclaimerTerms Of UseGDPR PolicyCookie Policy

Lisa Dishes

  • Home
  • Drinks
  • Appetizers
  • Dinner
  • Dessert
  • About
  • Contact
  • Privacy Policy
DisclaimerTerms Of UseGDPR PolicyCookie Policy

lisa

- 1 can (15 oz) chickpeas - 2 tablespoons tahini - 2 tablespoons olive oil - 2 tablespoons lemon juice - 1 garlic clove, minced - 1 teaspoon ground cumin - Salt, to taste - Fresh herbs (parsley and cilantro) Tahini adds a rich taste, but if you can't find it, use sunflower seed butter. You can also skip it altogether for a lighter dip. Fresh herbs like parsley and cilantro give great flavor. If you have dried herbs, use half the amount. For oils, feel free to use avocado oil or grapeseed oil instead of olive oil. This easy hummus recipe lets you be creative. You can mix and match ingredients based on what you have. You can find the full recipe above to guide you through. - Drain and rinse chickpeas: First, open the can of chickpeas. Pour them into a strainer. Rinse them under cold water. This helps remove extra salt and makes the hummus smoother. - Measure out tahini, olive oil, and lemon juice: Use a measuring spoon for the tahini, olive oil, and lemon juice. Two tablespoons of each will give great flavor. - Step-by-step blending process in a food processor: Add the drained chickpeas, tahini, olive oil, lemon juice, minced garlic, ground cumin, and salt into the food processor. - Tips for achieving the perfect consistency: Blend until smooth. Stop to scrape the sides of the bowl if needed. To make it creamier, add water one tablespoon at a time. This helps you control the thickness. - Incorporating herbs: Once blended, add the chopped parsley and cilantro. Pulse the food processor just a few times. This mixes in the herbs without fully blending them. - Adjusting flavor with salt and lemon: Taste your hummus. If it needs more flavor, add more salt or lemon juice. Adjust until it is just right. Now, you have a delicious, creamy hummus ready to enjoy! For the full recipe, check out the details above. To make hummus creamy, add water slowly. This step matters. Start with a tablespoon of water. Blend and check the texture. If it’s too thick, add more water. Keep blending until smooth. Reducing blending time also helps. Blend just enough to mix ingredients. Over-blending can make it too runny. To spice up your hummus, try adding spices. Ground cumin gives a warm flavor. You can also add smoked paprika for a smoky twist. Garlic is a must. You can use raw garlic for a strong taste. For a softer flavor, roast the garlic first. You can even blend in roasted veggies like red peppers for a unique taste. Garnishing makes your hummus look great. Sprinkle chopped parsley or paprika on top. A drizzle of olive oil adds shine and flavor. Serve your hummus with fresh dippers. Pita bread, veggie sticks, and crackers are perfect choices. Arrange them on a colorful platter. This way, your hummus becomes the star of the snack table. Check out the Full Recipe for a complete guide to delicious hummus! {{image_2}} You can easily change up your hummus for fun. Roasted red pepper hummus adds a sweet and smoky taste. Just blend in a jar of roasted red peppers with your basic hummus mix. It’s simple and adds great flavor. If you like spice, try a spicy hummus option. Add a pinch of cayenne pepper or some diced jalapeños. This gives the dip a nice kick. You can even use harissa, a North African chili paste, for a more complex heat. Making hummus that fits dietary needs is easy. For a vegan version, stick to the basic recipe. All the ingredients are plant-based. Use a good quality tahini and olive oil for the best taste. If you want nut-free hummus, there's no problem. Tahini is made from sesame seeds, not nuts. Just skip any nuts in your dippers, like pita chips. Fresh veggies or crackers work great! Adding global spices can take your hummus to the next level. Try mixing in cumin or smoked paprika for a warm, earthy flavor. You can also add za'atar, a Middle Eastern spice blend, for a unique twist. Mediterranean and Middle Eastern styles can differ. Mediterranean hummus often includes lemon and garlic. In contrast, Middle Eastern versions might use more tahini and spices. Both are tasty, and you can mix styles for something new. For the full recipe, check out the Creamy Herb-Infused Hummus section. To keep your hummus fresh, store it in the fridge. Use an airtight container. This helps keep the flavors strong and the texture smooth. You can also cover the top with a thin layer of olive oil. This adds flavor and keeps the air out. Leftover hummus should last about five days in the fridge. You can freeze hummus if you have extra. To freeze, put it in a freezer-safe container. Leave some space at the top, as it may expand. You can freeze it for about three months. When ready to eat, take it out and let it thaw in the fridge overnight. Stir well before serving. Hummus can go bad, so it's important to know the signs. If it smells sour or has a strange color, it might be spoiled. Check for mold or any separation in the texture. If you notice any of these signs, it’s best to throw it away. Homemade hummus has a shorter shelf life than store-bought. Always trust your senses! Homemade hummus stays fresh in the fridge for about five to seven days. Keep it in an airtight container. This keeps moisture out and helps it last. If you want to freeze hummus, it can stay good for up to three months. Just make sure to use a freezer-safe container. When ready to eat, thaw it in the fridge overnight. Yes, you can use dried chickpeas instead of canned. First, soak about one cup of dried chickpeas overnight. This helps them soften. The next day, drain and rinse them. Then, cook the chickpeas in boiling water for about 1 to 1.5 hours until they're tender. You may need to adjust the amount of water in the recipe. Dried chickpeas can make your hummus richer in flavor. Hummus pairs well with many foods. Pita bread, fresh veggies, and crispy crackers are the best. You can also try it with chips or spread it on sandwiches. For a fun twist, serve hummus with sliced apples or pears. Kids love it this way! Get creative and try different foods to dip. You now have all the tools to make great hummus. We covered essential and optional ingredients, step-by-step blending, and tips for creamy texture. Don't forget to try variations and know how to store leftovers. Hummus is easy to make and fun to customize. Explore flavors and enjoy your time in the kitchen. Healthy snacks await you with this tasty dip!

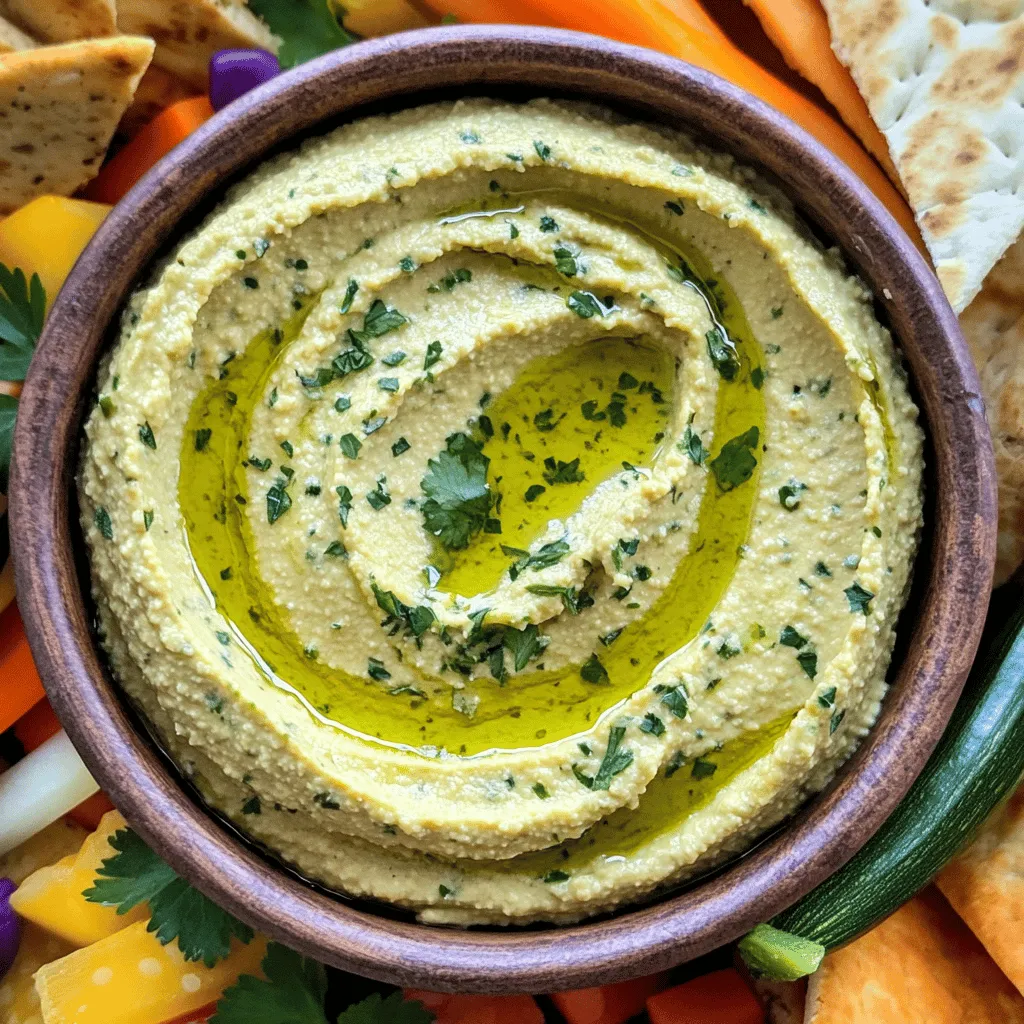
Easy Hummus Recipe Simple and Flavorful Delight

If you’re looking for a quick and tasty snack, this easy hummus recipe is perfect for you! I’ll show you

- 4 chicken thighs (bone-in, skin-on) - Olive oil and spices required for marination - Fresh herbs for the green sauce To make Peruvian chicken, start with the right chicken cuts. I prefer chicken thighs because they are juicy and flavorful. The skin keeps the meat tender during cooking. You will also need olive oil and a mix of spices. Paprika, cumin, garlic powder, onion powder, salt, and pepper create a rich flavor. Lime juice adds a bright touch. Marinating is key, so let the chicken soak in the mix. - Fresh cilantro and mint - Jalapeño and garlic for flavor - Mayonnaise and lime juice for creaminess The green sauce, or huacatay, brings fresh flavors to the chicken. Fresh cilantro and mint are essential for that vibrant taste. Jalapeño adds spice, while garlic gives it depth. I use mayonnaise for creaminess, along with lime juice to balance the flavors. This sauce is a must-have for your chicken. - Options for low-fat marinade - Vegetarian substitutes for chicken If you want a lighter option, try using Greek yogurt instead of mayonnaise. You can also reduce the oil in the marinade. For a vegetarian version, use tofu or portobello mushrooms. These options will still soak up the flavors and taste great. Adjust the spices to fit your chosen ingredient. The Full Recipe will guide you through these ideas. To marinate chicken well, start with a bowl. Mix olive oil, paprika, cumin, garlic powder, onion powder, lime juice, zest, salt, and pepper. Coat the chicken thighs in this mix. Cover the bowl and place it in the fridge. Let it marinate for at least one hour. For best flavor, marinate overnight. This step adds a depth of flavor. It helps the spices soak into the meat. For the green sauce, gather your fresh herbs and other ingredients. In a blender, add cilantro, mint, jalapeño, garlic, mayonnaise, lime juice, and salt. Blend until the mix is smooth. If the sauce is too thick, add a bit more lime juice. This sauce should be fresh and bright. You can taste and adjust the seasoning to your liking. Chill the sauce in the fridge until ready to serve. Now, let’s cook the chicken! You can oven roast or grill it. If you choose the oven, preheat it to 425°F. Place the marinated chicken thighs on a parchment-lined tray. Roast for 35-40 minutes. Make sure the internal temperature hits 165°F. You want crispy skin for a tasty finish. If grilling, cook each side for about 7-8 minutes. Both methods give great results, but roasting may be easier. Enjoy the delicious aroma as it cooks! To make your Peruvian chicken shine, use key spices. Paprika adds warmth and color. Cumin brings earthiness. Garlic powder and onion powder boost the taste. These spices make the chicken flavorful and aromatic. Fresh herbs are vital, too. They brighten the dish. Use a lot of fresh cilantro in the green sauce. Mint adds a nice touch, making it fresh and lively. When herbs are fresh, they enhance the flavors greatly. Getting the right temperature is key. Preheat your oven to 425°F (220°C). This high heat helps the skin get crispy. If you grill, aim for medium-high heat. To check if the chicken is done, use a meat thermometer. The chicken should reach 165°F (75°C). This ensures it is safe to eat and juicy inside. Always check the thickest part of the thigh. Garnishing makes your dish look great. Use fresh cilantro to top your chicken. It adds color and a burst of flavor. For side dishes, serve with rice or a green salad. These sides balance the meal well. You can also add roasted vegetables for a colorful plate. Enjoy your delicious Peruvian chicken with green sauce! For the full recipe, check the [Full Recipe]. {{image_2}} You can easily change the heat in your Peruvian chicken. If you like it spicy, keep the seeds in the jalapeño for the sauce. For a milder taste, remove them. You can also use a smaller jalapeño or even a bell pepper. When it comes to the green sauce, feel free to add more herbs or spices. You can try adding a bit of cumin for an extra kick. If you want less heat, use more mayo to balance the flavors. This way, you can make it just right for your taste buds. Want to explore different flavors? You can mix in spices from other cultures. For example, try adding curry powder or smoked paprika to the marinade. This will give your chicken a unique twist. You can also think about serving it with side dishes from other cuisines. Imagine pairing it with Mexican rice or Asian-style slaw. This makes your meal fun and exciting, while still keeping the base Peruvian flavors. You can serve your chicken in many ways. A classic choice is to pair it with fluffy rice. The sauce adds a nice touch to each bite. If you want something lighter, try a fresh salad. The green sauce works great as a dressing. You can also use the chicken in wraps or sandwiches. Just shred the chicken and add it to a tortilla or bread. Top it with the green sauce for a tasty lunch or snack. For the full recipe, check out the details above and enjoy your cooking! To keep your Peruvian chicken fresh, store it in the fridge. Use an airtight container to prevent moisture loss. Cut the chicken into pieces for quick cooling. Place the green sauce in a separate container. This keeps the sauce vibrant and tasty. Leftovers are best eaten within three days for optimal flavor. You can freeze cooked chicken and green sauce for later use. First, let the chicken cool completely. Wrap each piece tightly in plastic wrap. Then, place the wrapped chicken in a freezer bag. For the green sauce, pour it into an ice cube tray for easy portions. Once frozen, transfer the cubes to a freezer bag. When you are ready to eat, thaw the chicken in the fridge overnight. This keeps the flavor and texture intact. To reheat chicken, use the oven for best results. Preheat it to 350°F (175°C). Place the chicken on a baking sheet, covered with foil. Heat for about 15-20 minutes until hot. This method keeps the chicken juicy. For the green sauce, simply let it sit at room temperature for a few minutes. You can also microwave it for 15-20 seconds, stirring to keep it smooth. Enjoy your flavorful Peruvian chicken again! What's the history of Pollo a la Brasa? Pollo a la Brasa is a popular dish from Peru. It started in Lima in the 1950s. The dish features marinated chicken, roasted until crispy. It gained fame for its smoky flavor and juicy meat. Today, you can find it in many restaurants worldwide. This dish shows the love Peruvians have for good food. Can I use skinless chicken thighs? Yes, you can use skinless chicken thighs. However, the skin adds flavor and crunch. If you prefer skinless, adjust the cooking time. Check the chicken's internal temperature to ensure it's safe to eat. What can I substitute for mayonnaise? You can use Greek yogurt instead of mayonnaise. It gives a creamy texture and adds some tanginess. You can also try avocado for a healthier option. Just blend it with the other sauce ingredients for a smooth mix. How spicy is the green sauce, and can I tone it down? The green sauce has a mild heat from the jalapeño. If you want less spice, remove the seeds. You can also use a smaller jalapeño or substitute it with a bell pepper. This keeps the flavor without the heat. How long can leftovers be stored? Leftovers can be stored in the fridge for up to four days. Make sure to place them in an airtight container. This keeps the chicken and sauce fresh. What's the best way to serve this dish? Serve this dish with rice or a fresh salad. Drizzle the green sauce over the chicken for extra flavor. Garnish with fresh cilantro for a pop of color. Enjoy with family and friends for a delightful meal. For the complete recipe, check out the Full Recipe link. Peruvian chicken is a delight that blends flavor and tradition. We discussed key ingredients, from juicy chicken thighs to a green sauce full of fresh herbs. You learned how to marinate, cook, and serve this dish, plus ways to customize it. Remember, cooking is about fun and creativity. Use the tips and variations shared to make this dish your own. Don’t forget to store leftovers right to keep the flavors fresh. Enjoy your cooking journey, and share your tasty results!

Peruvian Chicken with Green Sauce Flavorful Delight

Are you ready to spice up your dinner routine? Peruvian Chicken with Green Sauce is bursting with flavor and sure

- 1.5 lbs chicken thighs, skinless and boneless - 1 cup buttermilk - 1 tablespoon hot sauce (adjust to taste) - 1.5 cups all-purpose flour - 1 cup regular breadcrumbs (for crunch) - 1 teaspoon garlic powder - 1 teaspoon onion powder - 1 teaspoon paprika - 1 teaspoon salt - ½ teaspoon black pepper - ½ teaspoon cayenne pepper (optional for extra heat) The main ingredients offer a tasty base. Chicken thighs are juicy and flavorful. The buttermilk and hot sauce marinade tenderizes the meat and adds spice. The blend of seasonings in the dry mixture gives the chicken its unique taste. - ½ cup honey - 2 tablespoons apple cider vinegar - 1 teaspoon chili flakes (for garnish) The hot honey sauce brings a sweet and spicy kick. Honey adds sweetness, while apple cider vinegar gives it a tangy twist. Chili flakes on top add heat and a pop of color. This sauce turns the chicken into a showstopper on your table. For the complete recipe, check out the [Full Recipe]. Marination is key for adding flavor. The buttermilk and hot sauce mix tenderizes the chicken. It also infuses it with a spicy, tangy taste. I suggest marinating for at least one hour. If you can, let it sit overnight in the fridge. This extra time boosts the flavor even more. Set your oven to 400°F (200°C) to preheat. In one shallow dish, mix together the flour and spices. You’ll add garlic powder, onion powder, paprika, salt, pepper, and cayenne pepper. Next, place the breadcrumbs in a second shallow dish. These steps set up a great breading station for the chicken. Once breaded, place the chicken on a wire rack over a baking sheet. This helps it cook evenly. Bake the chicken for about 25-30 minutes. The goal is for it to reach 165°F (75°C) inside and turn golden brown outside. While it bakes, make the hot honey sauce. In a small saucepan, mix honey and apple cider vinegar. Heat it gently and stir in chili flakes. Simmer for about 5 minutes. When the chicken is done, drizzle the hot honey sauce on top. Then, return it to the oven for another 5 minutes. This step ensures the glaze sticks. Enjoy this flavorful Baked Crunchy Hot Honey Chicken! For the complete guide, check out the Full Recipe. Marinating chicken is key for flavor. I suggest marinating for at least one hour. For the best results, let it sit overnight. This allows the buttermilk and hot sauce to tenderize the meat. The longer it marinates, the juicier and tastier it gets. Use a covered bowl in the fridge to keep it fresh. To get that crunchy coating, follow a few simple steps. First, use a wire rack for baking. This keeps the air flowing around the chicken, making it crispy. Also, press the breadcrumbs firmly onto the chicken. This helps them stick better. Lastly, avoid overcrowding the baking sheet. Each piece needs space to get crispy. You can customize the heat to fit your taste. If you like it mild, skip the cayenne pepper. For more spice, add extra hot sauce in the marinade. You can also increase the chili flakes in the hot honey sauce. Taste as you go to find your perfect balance. This dish can be as hot or mild as you want! {{image_2}} You can switch the chicken thighs for chicken breasts or wings. Each cut offers a unique texture and flavor. If you prefer plant-based options, try using tofu. Tofu will soak up the marinade well, yielding a tasty dish. Just press it to remove excess water before marinating. To add depth, consider using different sauces or spices. Try BBQ sauce for a smoky twist or teriyaki sauce for a sweet flavor. You can also mix in fresh herbs like rosemary or thyme. For those who love heat, add more hot sauce or use a spicy seasoning blend. This chicken pairs well with many sides. Try serving it with coleslaw for crunch and creaminess. Roasted vegetables, like carrots and broccoli, complement the sweet heat of the chicken. You can also serve it with rice or mashed potatoes to balance the flavors. For the full recipe, check out the details above! To store leftovers safely, let the chicken cool first. Place it in an airtight container. You can keep it in the fridge for up to three days. Make sure to separate pieces with paper towels. This will help keep the coating crunchy. To freeze baked chicken, let it cool completely. Wrap each piece in plastic wrap tightly. Then, place them in a freezer-safe bag. Squeeze out as much air as you can. You can freeze it for up to three months. For best results, label the bag with the date. To reheat, use the oven for the best texture. Preheat it to 375°F (190°C). Place the chicken on a baking sheet. Heat for about 15-20 minutes. You can also use an air fryer at 350°F (175°C) for about 10 minutes. This will help keep the chicken crispy. To make this dish gluten-free, use gluten-free flour and gluten-free breadcrumbs. These substitutes work well and keep the crunch. - Gluten-free flour (like almond or rice flour) - Gluten-free breadcrumbs (check the label) Switching to these options will help you enjoy the same great taste. Yes, you can prepare the chicken ahead of time. Marinate the chicken thighs the night before. This allows the flavors to really soak in. - Store the marinated chicken in the fridge. - Bread the chicken just before baking. This way, you save time and still get a delicious meal. Yes, air frying is a great option! Adjust the cooking time and temperature for the best results. - Preheat your air fryer to 375°F (190°C). - Cook the breaded chicken for about 15-20 minutes. Check the internal temperature to ensure it reaches 165°F (75°C). This method gives you a crispy finish without the extra oil. This blog post shared how to make delicious baked chicken with hot honey sauce. You learned about key ingredients, from chicken thighs to the sweet and spicy glaze. Marinating boosts flavor while the right breading creates crunch. Use our tips to adjust spice levels and try different proteins or sauces. Store leftovers safely and reheat them for the best texture. Enjoy experimenting with this recipe, and make it your own. Happy cooking!

Baked Crunchy Hot Honey Chicken Delight Recipe

Get ready to spice up your dinner nights with my Baked Crunchy Hot Honey Chicken Delight! This easy recipe combines

For a great chicken noodle casserole, gather these main ingredients: - 3 cups cooked egg noodles - 2 cups cooked chicken, shredded - 1 cup cream of chicken soup - 1 cup sour cream - 1 cup shredded cheddar cheese These items form the base of your dish. The cooked egg noodles provide a soft texture. The shredded chicken adds protein and flavor. Cream of chicken soup and sour cream make the casserole creamy and rich. Finally, the cheddar cheese gives it a delicious cheesy taste. You also need a few seasonings and extras to enhance the flavor: - 1 teaspoon garlic powder - 1 teaspoon onion powder - 1/2 teaspoon black pepper - 1/2 teaspoon salt - 1 tablespoon olive oil - 1/2 cup breadcrumbs (for crunch) The garlic powder and onion powder add depth to the taste. Black pepper and salt balance the flavors. Olive oil helps keep the casserole moist. The breadcrumbs on top create a delightful crunch. These small details make a big difference in your meal. For the full recipe, follow my detailed steps and enjoy this simple yet tasty dish! - Preheat your oven to 350°F (175°C). - In a large mixing bowl, combine: - 3 cups cooked egg noodles - 2 cups cooked chicken, shredded - 1 cup frozen peas and carrots blend - 1 cup cream of chicken soup - 1 cup sour cream - 1 cup shredded cheddar cheese (plus extra for topping) - 1 teaspoon garlic powder - 1 teaspoon onion powder - 1/2 teaspoon black pepper - 1/2 teaspoon salt Mix all these ingredients well. This step ensures every bite is flavorful. - Transfer the mixture to a greased 9x13 inch baking dish. Spread it evenly. - In a small bowl, mix breadcrumbs with a little extra shredded cheddar cheese. - Sprinkle this mixture on top for a crunchy finish. - Cover the dish with aluminum foil and bake for 25 minutes. - After 25 minutes, remove the foil. Bake for an additional 15 minutes until the top is golden and bubbly. - Let the casserole cool for about 5 minutes. This helps the sauce thicken. - Serve hot, garnished with fresh parsley or chives for color. - Pair it with a side salad for a complete meal. This adds freshness and crunch. You can find the full recipe for this tasty dish if you want all the details! To elevate your chicken noodle casserole, try adding fresh herbs. Fresh thyme or parsley can brighten the dish. You can also use spices like paprika for warmth. Mixing different cheese varieties can add depth. Consider using mozzarella for stretch or pepper jack for a kick. To ensure even cooking, mix your ingredients well before baking. Spread the mixture evenly in the dish. This helps heat circulate and cook all parts evenly. Avoid sogginess by not overcooking the noodles. They should be firm, as they will soften while baking. If your casserole turns out dry, don’t worry! Add a splash of chicken broth to moisten it. Stir it gently before serving. If it’s overcooked, cover it with a creamy sauce or more cheese. This will help mask the dryness and keep it tasty. For the full recipe, check out the Full Recipe section for step-by-step guidance! {{image_2}} You can make this dish vegetarian by using plant-based proteins. Try replacing chicken with cooked lentils, chickpeas, or tofu. These options add texture and protein without meat. A mix of your favorite veggies like bell peppers or broccoli can enhance the flavor too. Use vegetable broth instead of cream of chicken soup for a richer taste. If you need a gluten-free version, choose gluten-free noodles. Many brands offer good options that taste great. You can also use a gluten-free cream soup or make your own from scratch. Just blend some cooked cauliflower with broth to create a creamy texture. This swap keeps your casserole hearty and satisfying. Feel free to get creative with your ingredient choices. If you love spice, add diced jalapeños for heat. Use Greek yogurt instead of sour cream for a tangy twist. Want extra flavor? Swap in different cheeses like Monterey Jack or pepper jack. These swaps let you personalize the casserole to fit your taste. For the full recipe, including cooking instructions, check out the Full Recipe section. To keep your chicken noodle casserole fresh, store it in an airtight container. Place it in the fridge. This helps to lock in moisture and flavor. Make sure to eat the leftovers within three to four days. If you want to reheat, add a splash of water or broth to keep it moist. Cover it with foil to avoid drying out. You can freeze the casserole for later. First, let it cool completely. Then, wrap it tightly in plastic wrap. After that, place it in a freezer bag. This helps prevent freezer burn. It can last up to three months in the freezer. To reheat, thaw it in the fridge overnight. Bake it in the oven at 350°F (175°C) until hot, usually about 30-40 minutes. Check it often to ensure it heats evenly. Leftovers are best when eaten within a few days. Store them safely in the fridge for up to four days. If frozen, they can last up to three months. Always check for any signs of spoilage before eating. If it smells off or looks strange, throw it away. Enjoy your meal with peace of mind! Can I make this casserole ahead of time? Yes, you can prepare this casserole a day before. Just mix the ingredients and store it in the fridge. When you’re ready, bake it straight from the fridge. This saves time on busy nights. What can I use instead of cream of chicken soup? You can use cream of mushroom soup or a homemade white sauce. If you need a dairy-free option, try a blended cashew cream. These options keep the dish creamy and tasty. How to prevent the casserole from becoming dry? To keep your casserole moist, use enough cream and sour cream in your mix. Adding a drizzle of olive oil helps too. Cover the dish while baking for part of the time, then uncover to brown the top. Caloric content and serving sizes This casserole serves about six people. Each serving has around 350 calories. This can vary based on your ingredients. Healthy swaps for lower-calorie options You can use whole wheat noodles for added fiber. Try low-fat cheese and sour cream to cut calories. Using veggies instead of some chicken adds nutrients without many calories. Lactose-free or dairy-free adaptations For lactose-free options, choose lactose-free cheese and sour cream. You can also use a cashew cream as a substitute for dairy products. This keeps the flavors without the lactose. Options for those with nut allergies If you have nut allergies, avoid any nut-based cream or cheese. Stick to traditional dairy or dairy-free options that do not contain nuts. Always check labels for hidden allergens. For the full recipe, refer to the [Full Recipe]. You’ve learned how to make a tasty chicken noodle casserole. We covered main ingredients, seasonings, and useful tips. Variations can help you meet different diets. I shared easy storage methods for leftovers, so nothing goes to waste. With these steps, your casserole can shine at any meal. Enjoy experimenting and making this dish your own. Happy cooking!

Savory Chicken Noodle Casserole Easy Family Meal

Looking for an easy, delicious dinner that your whole family will love? You’ve found it! This Savory Chicken Noodle Casserole

For this parfait, use fresh berries. I love a mix of: - 1 cup strawberries, hulled and sliced - 1 cup blueberries, plump and juicy - 1 cup raspberries, tart and sweet - 1 cup blackberries, bold and delicious These berries bring bright colors and fresh flavors. You can mix and match based on what is in season or what you like best. Yogurt is key to a creamy parfait. Choose from: - 2 cups Greek yogurt, plain for tang - 2 cups Greek yogurt, vanilla for sweetness Greek yogurt adds thickness and protein. If you pick plain yogurt, add: - 2 tablespoons honey or maple syrup, to sweeten - 1 teaspoon vanilla extract, for extra flavor Granola adds crunch to your parfait. I recommend: - 1 cup nutty granola, for rich taste - You can also try other types like fruity or chocolate granola Granola adds a nice texture and blends well with the creamy yogurt and juicy berries. Feel free to choose your favorite! For the full recipe, check out Spring Berry Parfait. Start with fresh berries. Rinse them gently in cool water. Pat them dry with a soft towel. If you have strawberries, remove the green tops and slice them into smaller pieces. Keep the smaller berries whole. This adds texture and color to your parfait. Use a mix of strawberries, blueberries, raspberries, and blackberries for the best flavor. Grab a medium bowl. Add the Greek yogurt to it. If you want, use plain yogurt or vanilla yogurt. Next, add honey or maple syrup to the yogurt. Start with two tablespoons. You can adjust it to your taste. If you chose plain yogurt, add one teaspoon of vanilla extract. Mix everything until it is smooth and creamy. Now, let’s build your parfait! Take clear serving glasses or bowls. Start with a layer of yogurt. Use about 1/4 cup of yogurt for each serving. Then, sprinkle about 2 tablespoons of granola on top. This gives a nice crunch. Next, add a layer of mixed berries. Use about 1/3 cup for this layer. Make it colorful and fun! Repeat these layers until your glass is full. Finish with a layer of mixed berries on top. To make it special, add a fresh mint leaf for garnish. This gives a nice pop of green. If you want, chill the parfaits for about 30 minutes. This helps the flavors blend together. Enjoy this fun and tasty Spring Berry Parfait with your friends and family. For the full recipe, check the recipe card! Use clear glass cups for your parfaits. This lets you see the bright colors of the berries and layers. Aim for neat, even layers. Start with yogurt, then granola, and top with berries. A little mint leaf adds a nice touch. This small detail makes your dish look fancy. Chilling your parfaits enhances their taste. If you have time, let them sit for about 30 minutes in the fridge. This helps the flavors mix and taste even better. The yogurt gets a little firmer too, which is nice for texture. You can serve the parfaits as a snack, breakfast, or dessert. Pair them with a warm drink for breakfast or serve them after dinner. Each parfait is easy to grab, making them great for parties. You can also offer a variety of toppings for guests to choose from. This lets everyone customize their parfait just the way they like it. For the complete recipe, check out the full recipe section. {{image_2}} You can switch up the berries in this parfait for other fruits. Try using sliced bananas for a creamy texture. Peaches add a sweet, fragrant taste. Mango chunks bring a tropical twist. Pineapple can add a zingy flavor. Mix and match fruits for fun combinations. Just remember to keep the balance of sweet and tart. If you want a dairy-free parfait, there are great choices. Use coconut yogurt or almond yogurt instead of Greek yogurt. Both options offer a creamy base without any dairy. You can also try cashew yogurt for a rich taste. These swaps keep your parfait delicious and friendly for those avoiding dairy. To boost flavor, consider adding spices or extracts. Cinnamon or nutmeg can bring warmth to the yogurt. A splash of orange juice adds brightness. You could also fold in some lemon zest for a refreshing touch. These simple changes make each bite exciting and unique. For extra crunch, try adding nuts or seeds between the layers. Find the complete recipe for this delightful Spring Berry Parfait [Full Recipe]. You can keep your Spring Berry Parfait in the fridge for up to two days. Just cover the parfaits with plastic wrap or a lid. This helps keep them fresh and tasty. The berries will stay firm, and the yogurt will remain creamy. For long-term storage, consider freezing the layers separately. You can freeze the yogurt in an airtight container. The berries can also go into a freezer bag. Granola should stay dry, so keep it in a separate container. You can assemble the parfait later when ready to eat. To keep your parfait fresh, layer right before serving. If you make it ahead, add the granola just before you eat. This way, it stays crunchy. Always store your parfaits in the coldest part of the fridge. This helps keep flavors bright and delicious. For full details on making this recipe, refer to the Full Recipe. Yes, you can use frozen berries in your parfait. Just make sure to thaw them first. Thawing helps keep the texture nice. It also allows the berries to release some juice, which adds flavor. Keep in mind that frozen berries can be softer than fresh ones. If you want a firmer bite, use fresh berries. To make a vegan parfait, swap the Greek yogurt for coconut yogurt or almond yogurt. You can also use maple syrup instead of honey. These options keep the parfait creamy and sweet. The fruits will still shine through, providing fresh taste. You won’t miss the dairy at all. If you don’t have granola, try nuts or seeds. Chopped almonds or walnuts add crunch. You can also use toasted coconut for a sweet twist. If you prefer a lighter option, use puffed rice or oats. Each choice will bring its own flavor and texture to the parfait. For the full recipe, check out the comprehensive guide above. This blog post shared key steps to make a delicious parfait. We explored fresh berries, yogurt choices, and granola options. I explained how to prepare, sweeten, and layer your parfait. We discussed tips for good looks, chilling, and serving ideas. You learned about variations like using different fruits and dairy-free options. Lastly, I covered storage tips to keep your parfait fresh. Enjoy your parfait adventure, and feel free to experiment with flavors!

Spring Berry Parfait Delightful and Easy Recipe

Spring is here, and it’s the perfect time to enjoy fresh fruits! One of my favorite treats is a Spring

Chicken and Herbs - 2 boneless, skinless chicken breasts - 1 teaspoon dried oregano - 1 teaspoon garlic powder - 1 teaspoon paprika - 1 tablespoon olive oil - Salt and pepper to taste The chicken breasts serve as the protein base. I use a simple mix of herbs for flavor. Dried oregano gives it a classic Greek taste. Garlic powder adds depth, while paprika adds a bit of warmth. Olive oil helps the chicken stay moist during cooking. Quinoa and Vegetables - 1 cup quinoa, rinsed - 2 cups vegetable broth - 1 cup cherry tomatoes, halved - 1 cucumber, diced - 1/2 red onion, thinly sliced - 1 cup kalamata olives, pitted and halved Quinoa acts as a nutritious grain in this bowl. It is high in protein and fiber. I cook it in vegetable broth for extra flavor. Fresh vegetables like cherry tomatoes and cucumber provide crunch and color. Red onions add a mild bite, while kalamata olives give a briny touch. Toppings and Dressings - 1 cup feta cheese, crumbled - 1/4 cup fresh parsley, chopped - 1/4 cup tzatziki sauce (store-bought or homemade) Feta cheese offers a creamy component. It adds saltiness and richness to the dish. Fresh parsley brightens the flavors and adds a pop of color. Finally, tzatziki sauce brings coolness and tang, making each bite refreshing. You can check the Full Recipe for the complete step-by-step instructions. Enjoy crafting your Greek chicken bowls! Preparing the Marinade To make the marinade, mix these ingredients in a small bowl: - 1 teaspoon dried oregano - 1 teaspoon garlic powder - 1 teaspoon paprika - 1 tablespoon olive oil - Salt and pepper to taste This blend gives the chicken great flavor and aroma. Coating and Marinating Time Coat the chicken breasts with the marinade. Make sure to cover all parts well. Let the chicken sit for at least 15 minutes. This allows the flavors to soak in. How to Cook Quinoa Perfectly In a saucepan, bring 2 cups of vegetable broth to a boil. Then, add 1 cup of rinsed quinoa. Lower the heat, cover, and simmer for about 15 minutes. The quinoa is ready when all the liquid is absorbed. Fluffing and Letting it Sit After cooking, use a fork to fluff the quinoa. This step makes it light and airy. Set it aside for now. Temperature and Timing Preheat your grill or grill pan over medium-high heat. Grill the marinated chicken for about 6-7 minutes on each side. Checking for Doneness Check the chicken's internal temperature. It should reach 165°F to be safe to eat. Let it rest for a few minutes before slicing it. This keeps the juices in. Combining Ingredients In a large bowl, mix the cooked quinoa with: - 1 cup cherry tomatoes, halved - 1 cucumber, diced - 1/2 red onion, thinly sliced - 1 cup kalamata olives, pitted and halved - 1/2 cup feta cheese, crumbled Toss gently to combine. This creates a colorful, tasty base. Serving Suggestions To assemble, place a generous portion of the quinoa salad in each bowl. Top with sliced grilled chicken. Add a dollop of tzatziki sauce, remaining feta cheese, and sprinkle with fresh parsley. Enjoy your Greek chicken bowls for a healthy meal! For the complete recipe, see the Mediterranean Flavor Bomb Chicken Bowls. Marinating Tips Marinating the chicken is key to great flavor. Use a mix of dried oregano, garlic powder, and paprika for a punchy taste. Make sure to coat the chicken evenly with the marinade. Let it sit for at least 15 minutes. If you have more time, marinate it longer in the fridge. This gives the chicken even more flavor. Cooking Tips for Quinoa Cooking quinoa is simple with the right method. Rinse the quinoa first to remove its bitter coating. Use vegetable broth for cooking to add more flavor. Bring the broth to a boil, then lower the heat and cover. Let it simmer for about 15 minutes. Fluff the quinoa with a fork once done. This makes it light and fluffy. Arranging Ingredients When serving, think about how to make it look good. Start with a base of quinoa. Then add the colorful veggies like cherry tomatoes and cucumber on top. Place the sliced chicken neatly over the veggies. This not only looks nice but also makes it easy to eat. Adding Garnishes Garnishes can elevate your dish. Sprinkle crumbled feta cheese and fresh parsley on top. A lemon wedge on the side adds a splash of color and a zesty kick. These small touches make your Greek chicken bowls look and taste gourmet. Nutritional Value of Quinoa Quinoa is a super grain packed with protein and fiber. It has all nine essential amino acids. This makes it a great choice for a healthy meal. Plus, it is gluten-free, making it suitable for many diets. Benefits of Mediterranean Diet The Mediterranean diet is known for being heart-healthy. It includes lots of fruits, veggies, and healthy fats like olive oil. Eating this way can lower the risk of heart disease and improve overall health. The balance of flavors and nutrients in these bowls makes them a smart choice for any meal. {{image_2}} Alternative Proteins You can switch the chicken for other proteins. Try shrimp, beef, or lamb. Each adds a unique taste. If you want a lighter option, use tofu or tempeh. They absorb flavors well and pair nicely with Mediterranean spices. Vegetarian Versions For a vegetarian bowl, skip the meat. Use chickpeas or lentils instead. They are packed with protein. You could also add grilled vegetables like bell peppers, zucchini, or eggplant. This keeps the meal colorful and full of nutrients. Adding Spices Spices can change the flavor of your bowl. Consider adding cumin or coriander for warmth. A pinch of cayenne or chili flakes gives heat. You can also add fresh herbs like mint or dill for a fresh taste. Creative Toppings and Sauces Think outside the box with toppings. Try roasted nuts for crunch or avocado for creaminess. You can mix different sauces too. A drizzle of balsamic reduction or a spicy harissa can add a kick. Experiment until you find your favorite flavor combos. Using Fresh Produce Fresh produce makes your Greek chicken bowls shine. Use ripe tomatoes in summer or sweet squash in fall. Seasonal fruits like peaches or pomegranates can add sweetness. Always look for what’s fresh at your market. Adapting to Available Ingredients You don’t need all the exact ingredients. If you don’t have quinoa, use rice or couscous. If you can’t find feta, try goat cheese or a dairy-free alternative. Adapt your bowl based on what you have at home for delicious results. - Storing Leftovers: Allow your Greek chicken bowls to cool completely. Once cooled, place them in airtight containers. This keeps the bowls fresh and tasty. Store in the fridge for up to three days. - Best Practices for Meal Prepping: When prepping, make sure to portion out your meals. Use clear containers to see what's inside. You can also prep ingredients separately. This way, you keep them fresh longer. - How to Reheat Safely: To reheat your bowls, use the microwave or oven. If using a microwave, cover the bowl to avoid drying out the food. Heat for one to two minutes, checking often. For the oven, place in a covered dish at 350°F for about 10-15 minutes. - Maintaining Flavor and Texture: To keep the chicken juicy, add a splash of broth or water when reheating. This step helps retain moisture and flavor. Stir your quinoa and veggies before serving to mix in the flavors. - How Long Can You Store the Bowls?: Your Greek chicken bowls can last in the fridge for three days. If you freeze them, they can last up to three months. Just be sure to thaw in the fridge before reheating. - Signs of Spoilage: Check for any off smells or changes in color. If the quinoa looks mushy or the chicken feels slimy, it's best to throw it out. Always trust your senses when it comes to food safety. For a full recipe, check out the Mediterranean Flavor Bomb Chicken Bowls. Yes, you can use boneless thighs. They add moisture and flavor. However, cooking time will change. Thighs may need a few extra minutes on the grill. Aim for an internal temperature of 165°F, just like with breasts. If you want a grain swap, consider brown rice or couscous. Both are easy to prepare and tasty. You could also use farro or bulgur for a nutty flavor. Each option brings a different texture and taste to your bowl. Making tzatziki is simple and quick. Combine these ingredients in a bowl: - 1 cup Greek yogurt - 1 cucumber, grated and drained - 1 clove garlic, minced - 1 tablespoon olive oil - 1 tablespoon lemon juice - Salt to taste Mix well and chill for a bit. This sauce will elevate your Greek chicken bowls. Yes, Greek chicken bowls are a balanced meal. They have lean protein, healthy fats, and lots of veggies. Quinoa adds fiber and nutrients. Together, these ingredients provide energy and satisfaction. This meal aligns well with a healthy diet. To make Greek chicken bowls vegan, swap chicken for chickpeas or tofu. Both options are great protein sources. Use a vegan feta cheese for creaminess. You can still enjoy the delicious flavors with these simple swaps. For the complete guide, check out the Mediterranean Flavor Bomb Chicken Bowls. You now know how to make Greek chicken bowls from start to finish. We covered the main ingredients, steps, and helpful tips. You can customize the bowls to suit your taste and needs. Think about the health benefits too; these meals fit well into a balanced diet. Remember to store leftovers safely and reheat them properly. With your new skills, you'll create tasty bowls that impress and nourish. Enjoy the process and get creative with flavors and ingredients!

Greek Chicken Bowls Tasty and Balanced Meal Option

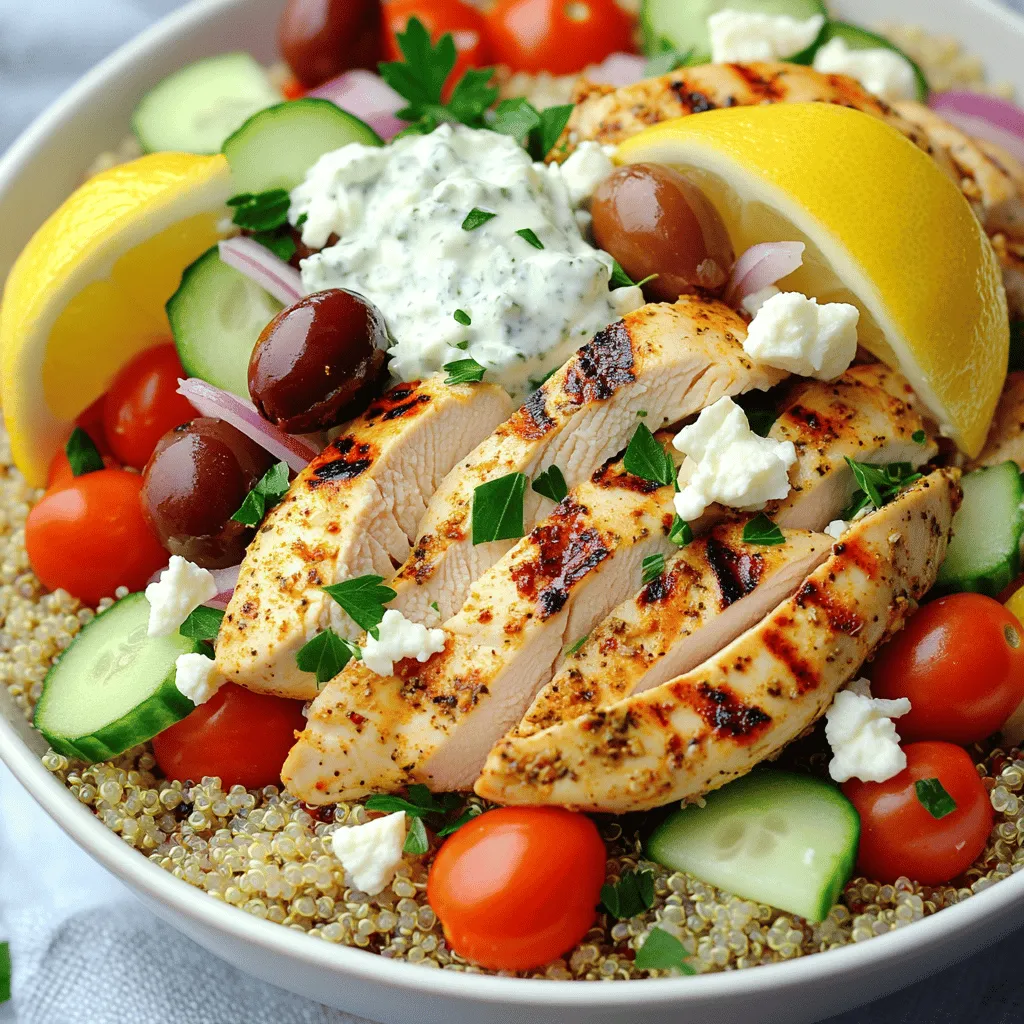
Looking for a tasty and balanced meal? Greek Chicken Bowls are your answer! This dish combines tender marinated chicken with

To make garlic knots that satisfy any craving, gather these simple ingredients: - 2 cups all-purpose flour - 1 teaspoon instant yeast - 1 teaspoon sugar - ¾ teaspoon salt - ¾ cup warm water (about 110°F) - 2 tablespoons olive oil (plus extra for brushing) - 4 cloves garlic, minced - ¼ cup unsalted butter, melted - 2 tablespoons fresh parsley, chopped - ½ teaspoon dried oregano - ½ teaspoon red pepper flakes (optional) - Grated Parmesan cheese for garnish (optional) These ingredients work together to create tender knots that burst with flavor. The all-purpose flour gives the right texture, while instant yeast ensures a quick rise. Sugar feeds the yeast, helping the dough become light and airy. Warm water activates the yeast, making the dough rise perfectly. Olive oil adds richness, and garlic brings that strong, savory kick. Fresh parsley and dried oregano boost the taste, while red pepper flakes give a little heat if you like. Finally, Parmesan cheese can elevate the dish, adding a salty finish when you sprinkle it on top. For full preparation details, don't forget to check the Full Recipe. 1. Mixing and forming the dough: Start by taking a big bowl. Add 2 cups of all-purpose flour, 1 teaspoon of instant yeast, 1 teaspoon of sugar, and ¾ teaspoon of salt. Mix these dry ingredients well. Now, slowly pour in ¾ cup of warm water and 2 tablespoons of olive oil. Stir until you see a soft dough form. 2. Kneading and rising process: Place your dough on a lightly floured surface. Knead it for about 5 minutes until it feels smooth and elastic. Next, put the dough in a greased bowl. Cover it with a clean kitchen towel. Let it rise in a warm spot for about 1 hour or until it doubles in size. 3. Shaping the garlic knots: Once your dough has risen, punch it down gently. Move it to a floured surface and divide it into 12 equal pieces. Roll each piece into a rope about 6-8 inches long. Tie each rope into a knot and place them on a baking sheet lined with parchment paper. 1. Preheat the oven: While the dough rises, preheat your oven to 425°F (220°C). This helps the knots bake evenly. 2. Baking times and visual cues for doneness: Place the knots in the oven and bake them for 12-15 minutes. Look for a golden brown color on the knots. This is your sign that they are ready! 1. Applying the garlic butter mixture: In a small bowl, combine ¼ cup of melted unsalted butter, 4 cloves of minced garlic, 2 tablespoons of chopped fresh parsley, ½ teaspoon of dried oregano, and ½ teaspoon of red pepper flakes if you want a kick. Brush this mixture generously over the knots right after they come out of the oven. 2. Optional garnishes: For an extra touch, sprinkle some grated Parmesan cheese on top of the knots. You can also add more chopped parsley for color. Enjoy these tasty garlic knots and share them with friends or family! For more details, check the Full Recipe. Kneading your dough is key for great garlic knots. It helps develop gluten, which gives the knots their chew. Knead for about five minutes until smooth. Letting the dough rise is just as important. Place it in a warm spot, around 75-80°F. This helps the yeast grow and makes your knots light and fluffy. You can play with herbs and spices to make your knots unique. Try adding fresh basil or thyme for a twist. Red pepper flakes can add a nice kick if you like spice. Customizing your garlic butter mixture is also fun. Mix in some grated Parmesan or a dash of lemon zest. These little changes can make a big difference in flavor. Serve your garlic knots warm for the best taste. Place them in a breadbasket lined with a soft napkin. This keeps them cozy and inviting. Get creative with serving ideas. Offer dips like marinara sauce or garlic aioli. This adds a fun element and enhances the eating experience. For the full recipe, check the complete guide to making flavorful garlic knots. {{image_2}} You can play with garlic knots in fun ways. One tasty option is to add cheese. Try stuffing the dough with mozzarella. As the knots bake, the cheese melts and makes the center gooey. You’ll love the stretchy cheese paired with garlic. Another fun twist is to make spicy garlic knots. Just add more red pepper flakes to the garlic butter mix. This will give your knots a nice kick. You can also add jalapeños for extra heat. These spicy knots are perfect for those who enjoy bold flavors. If you need a gluten-free option, try using gluten-free flour. Look for blends that can replace all-purpose flour. They work well and keep the texture light. You may need a bit more water, so adjust as needed. For vegan garlic knots, simply swap out the butter with olive oil. Use a plant-based cheese if you're adding cheese. This way, you can enjoy the same great taste while sticking to your diet. Garlic knots have a few regional twists. In New York, you often find them served with marinara sauce. This tasty dip adds a nice touch to the soft knots. In Italy, you might see them served with fresh herbs or different cheeses. Each culture brings its own flair to this classic treat. For a complete guide, check out the Full Recipe. To keep your garlic knots fresh, store them right. First, let them cool completely. This step helps prevent steam from making them soggy. - Refrigeration tips: Place the cooled knots in an airtight container. They stay fresh for up to three days in the fridge. If you want to enjoy them longer, consider freezing. - Freezing instructions: Wrap the knots tightly in plastic wrap. Then, put them in a freezer-safe bag. They can last for up to three months in the freezer. When you're ready to eat them, just thaw and reheat. To enjoy your garlic knots again, reheating is key. You want them warm and soft, not dry. - Best ways to reheat for optimal taste: The oven works best. Preheat the oven to 350°F (175°C). Place the knots on a baking sheet and heat for about 10 minutes. This method keeps them crispy on the outside. - Avoiding sogginess: If you use a microwave, be careful. Heat them for just 10-15 seconds. Too much time can make them chewy and soggy. If you want to avoid this, cover them with a paper towel to help keep some moisture away. For more delicious meals, check out the Full Recipe for flavorful garlic knots! How to prevent garlic knots from becoming tough? To keep your garlic knots soft, knead the dough gently. Over-kneading can make them tough. Also, ensure you let the dough rise until it doubles in size. This helps the knots stay light. Can I make dough ahead of time? Yes! You can make the dough and let it rise. After the first rise, cover it and place it in the fridge. Use it within 24 hours. Just let it come to room temperature before shaping. What can I serve garlic knots with? Garlic knots pair well with marinara sauce for dipping. They also go great with soups and salads. Try serving them with a fresh garden salad for a complete meal. Why are my garlic knots flat? Flat garlic knots may come from not enough rising time. Make sure your dough doubles in size. Also, if you roll the knots too thin, they won't puff up while baking. How to adjust for high altitude baking? At high altitudes, you may need to reduce yeast slightly. Increase the flour by a couple of tablespoons to achieve the right dough consistency. Monitor the rising time, as it can vary. In this post, we covered how to make delicious garlic knots. You learned about the ingredients, the step-by-step process, and key tips for perfect results. Remember to knead well for the right texture and feel free to customize with your favorite herbs. Whether you want to store them or create variations, the options are endless. Enjoy your warm garlic knots with dips or as a side. With a bit of practice, you can impress friends and family anytime. Happy baking!

Garlic Knots That Will Satisfy Any Craving

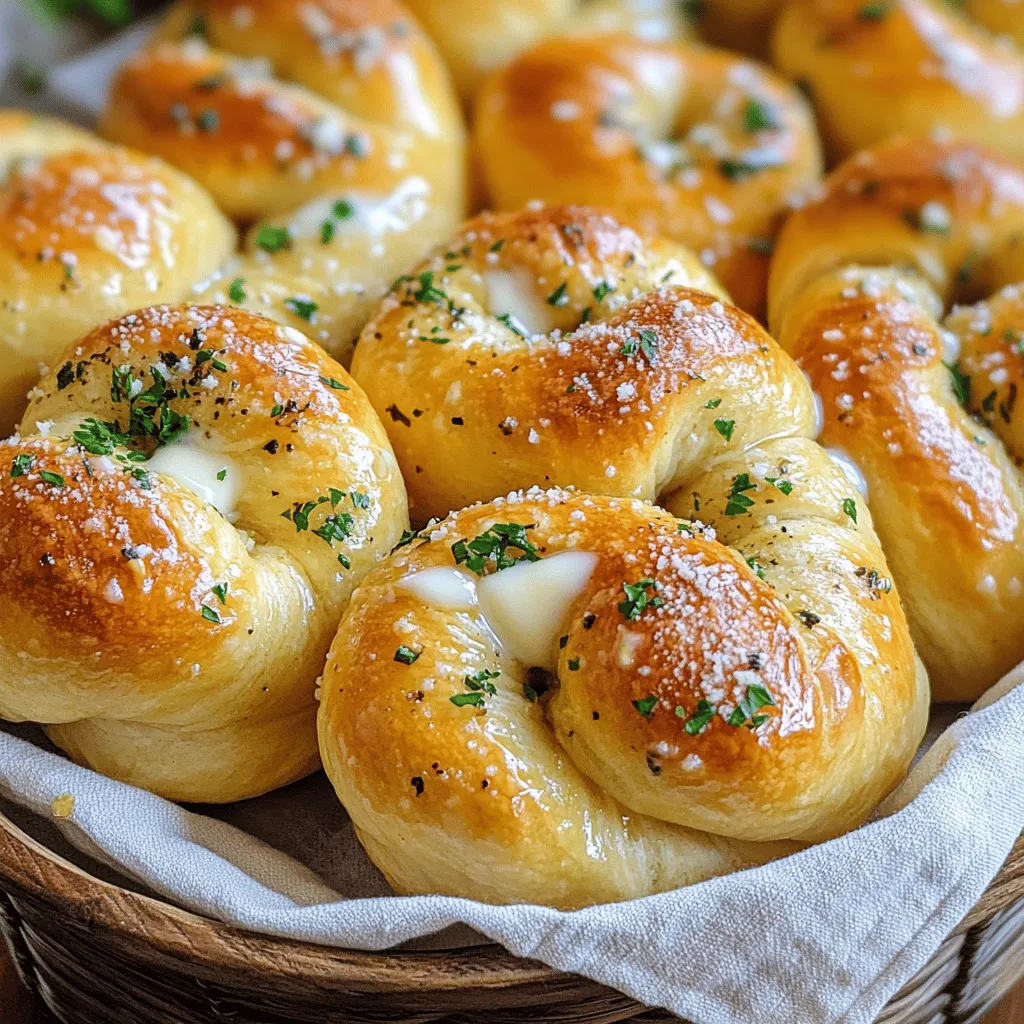
Are you ready to impress your friends and family with mouthwatering garlic knots? These soft, buttery delights are not only

- 1 pound boneless, skinless chicken breasts, cut into bite-sized pieces - 1 cup buttermilk (or plain yogurt as a substitute) - 1 cup all-purpose flour - 1 teaspoon garlic powder - 1 teaspoon onion powder - 1 teaspoon smoked paprika - ½ teaspoon black pepper - ½ teaspoon salt - 1 cup breadcrumbs (panko preferred for extra crunch) - ½ teaspoon cayenne pepper (optional, for heat) - Vegetable oil for frying Each ingredient plays a key role in making tasty crispy chicken nuggets. The chicken is the main star, providing protein and flavor. Buttermilk or yogurt tenderizes the chicken, making it juicy. Flour helps the coating stick and gives a nice crunch. Garlic and onion powders add depth and zest to the flavor. Smoked paprika gives a hint of smokiness, enhancing the taste. Black pepper and salt bring out the flavors in the chicken. Lastly, breadcrumbs (especially panko) create that perfect crispy texture we all love. If you don’t have buttermilk, plain yogurt works well. For flour, whole wheat flour can be used but will change the flavor slightly. You can swap garlic and onion powder for fresh minced garlic and onion, but it may alter the texture. If you're out of smoked paprika, regular paprika is a good choice. For a gluten-free option, use gluten-free breadcrumbs and flour. This way, everyone can enjoy these delicious nuggets. For the full recipe, check it out [here](Full Recipe). Start by cutting your chicken breasts into bite-sized pieces. Place the chicken in a large bowl. Pour in the buttermilk or yogurt. Mix the chicken and buttermilk well. Cover the bowl and let it sit in the fridge for at least one hour. This step makes the chicken tender and juicy. You can also marinate it overnight for more flavor. Set up two shallow dishes on your counter. In the first dish, mix the flour, garlic powder, onion powder, smoked paprika, black pepper, salt, and cayenne pepper. Stir well to combine. In the second dish, add the breadcrumbs. I like to use panko breadcrumbs for extra crunch. This setup makes it easy to coat the chicken. After marinating, take the chicken out of the fridge. Let any excess liquid drip off. Dredge each chicken piece in the flour mixture, fully coating it. Then dip it back into the flour for a thick layer. Finally, press the chicken into the breadcrumbs until completely covered. Heat about half an inch of vegetable oil in a large skillet over medium heat. To test if the oil is ready, drop in a small piece of bread. It should bubble right away. Carefully add the breaded chicken to the hot oil in batches. Fry them for three to four minutes on each side. Look for a golden brown color and make sure they are cooked through. The internal temperature should reach 165°F. If the oil gets too hot, lower the heat. Once cooked, place the nuggets on a paper towel-lined plate to drain excess oil. This keeps them crispy. Serve the crispy chicken nuggets with your favorite dipping sauces. Honey mustard, BBQ sauce, or ranch dressing are great choices. You can also serve them in a fun basket with parchment paper. Add some fresh parsley for a pop of color. For the full recipe, check out the details above. Enjoy your delicious meal! To get that perfect crunch on your chicken nuggets, follow these steps: - Use panko breadcrumbs. They add a great texture. - Double-dip the chicken. First, coat with flour, then breadcrumbs. - Press the breadcrumbs firmly onto the chicken. This helps them stick. - Fry in small batches. Crowding the pan can make the nuggets soggy. The oil should be hot enough. Drop a small piece of bread in the oil. If it bubbles right away, you're good to go. Fry until both sides are golden brown. For frying chicken nuggets, I recommend these oils: - Vegetable oil - Canola oil - Peanut oil These oils have high smoke points. They help achieve that crispy exterior without burning. Here are some common mistakes you should avoid: - Not marinating the chicken. This step adds flavor and tenderness. - Skipping the double-dipping. It gives you a thicker, crunchier coating. - Using cold oil. Always heat your oil properly before frying. - Overcrowding the pan. This can make your nuggets soggy. By keeping these tips in mind, you can make crispy chicken nuggets that are tasty and fun to eat! For the complete recipe, check out the Full Recipe. {{image_2}} You can easily spice up your chicken nuggets. Add cayenne pepper to the flour mix for heat. Try using hot sauce in the buttermilk marinade. This will give your nuggets a kick. You can also toss cooked nuggets in buffalo sauce for a zestier flavor. If you love spicy food, this variation is for you! Fried chicken nuggets are crispy and golden. They have a rich flavor and crunch. Baking nuggets is a healthier option. Preheat your oven to 400°F and place breaded nuggets on a baking sheet. Spray them lightly with oil. Bake for about 20 minutes, flipping halfway. You’ll get a nice crunch without frying. Both methods offer tasty results, so choose what you like best! Want a healthier version of chicken nuggets? Try using whole wheat flour instead of all-purpose flour. You can also use ground oats for breading. This adds fiber and nutrients. Consider baking instead of frying for fewer calories. Another option is using chicken thighs for more flavor and moisture. These small changes make a big difference without losing taste. For the full recipe, check out the main section! After enjoying your crispy chicken nuggets, you might have some left. Store them in an airtight container. This keeps them fresh and tasty. Place them in the fridge for up to three days. Make sure they cool down first. If you want to keep them longer, consider freezing. To reheat your nuggets, use the oven for the best texture. Preheat your oven to 400°F. Spread the nuggets on a baking sheet. Heat for about 10-15 minutes. This warms them up and keeps them crispy. You can also use an air fryer for a quick option. Just set it to 375°F and heat for about 5-7 minutes. Freezing is a great way to save your chicken nuggets. First, let them cool completely. Then, arrange them in a single layer on a baking sheet. Freeze for about 1-2 hours. After they are solid, transfer them to a freezer bag. They can last for about 2-3 months in the freezer. When you're ready to eat, just reheat straight from the freezer. Enjoy your homemade nuggets anytime! You can enhance your crispy chicken nuggets with tasty dipping sauces. Here are some great options: - Honey mustard - BBQ sauce - Ranch dressing - Ketchup - Sweet and sour sauce These sauces add flavor and make each bite fun. You can mix and match them for variety. Yes, you can make gluten-free chicken nuggets. Simply swap the all-purpose flour and breadcrumbs for gluten-free versions. Look for gluten-free flour blends and panko. They work well and keep the nuggets crispy. Homemade chicken nuggets last about 3 to 4 days in the fridge. Store them in an airtight container. For best taste, reheat them in an oven or air fryer. This keeps them crispy and delicious. Pair your chicken nuggets with these great side dishes: - French fries - Sweet potato fries - Coleslaw - Macaroni and cheese - Mixed vegetables These sides make a complete meal and please your guests. Enjoy mixing and matching! In this blog post, we explored the key ingredients for chicken nuggets and their importance. We detailed the step-by-step process from marinating to frying. You learned tips and tricks to achieve the perfect crunch and discover common mistakes to avoid. We also discussed fun variations, storage tips, and answered common questions. Understanding each part helps you make better chicken nuggets. Enjoy cooking and share your tasty results!

Crispy Chicken Nuggets Easy and Tasty Recipe Guide

Craving Crispy Chicken Nuggets? You’ve found the right spot! In this easy and tasty guide, I’ll walk you through the

To make fluffy biscuits, you will need: - 2 cups all-purpose flour - 1 tablespoon baking powder - 1/2 teaspoon baking soda - 1 teaspoon salt - 1/2 cup cold unsalted butter, cubed - 3/4 cup buttermilk (or make your own by mixing milk with a splash of vinegar) You can add fun flavors with these options: - 1 tablespoon honey (for a touch of sweetness) - 1/2 teaspoon garlic powder (for a savory twist) - Fresh herbs like rosemary or chives, finely chopped (for extra flavor) If you run out of an ingredient, try these swaps: - Use whole wheat flour instead of all-purpose flour for a nutty flavor. - Swap buttermilk with regular milk, adding a splash of vinegar. - Margarine can replace butter, but the taste may change slightly. These ingredients help create soft, fluffy biscuits that are easy to make. Don’t forget to check the Full Recipe for more details! Start by preheating your oven to 450°F (232°C). This high heat helps the biscuits rise and become fluffy. While the oven heats, line a baking sheet with parchment paper. This keeps the biscuits from sticking and makes cleanup easy. Next, grab a large mixing bowl. Add 2 cups of all-purpose flour, 1 tablespoon of baking powder, 1/2 teaspoon of baking soda, 1 teaspoon of salt, and 1/2 teaspoon of garlic powder if you want a savory touch. Whisk these together until they mix well. If you’re using fresh herbs, add them now too. Now, it's time to add the butter. Cut 1/2 cup of cold unsalted butter into small cubes. Add these cubes to your flour mix. Use a pastry cutter or your fingers to mix until you see coarse crumbs. Don’t worry if some pieces are larger; they add to the biscuit's flakiness. Next, make a well in the center and pour in 3/4 cup of buttermilk and 1 tablespoon of honey if you're feeling sweet. Stir gently until just combined. Overmixing can make your biscuits tough. Turn the dough onto a floured surface. Knead it gently 3-4 times until it comes together. Pat it into a rectangle about 1-inch thick. Use a floured biscuit cutter or a glass to cut out biscuits. Place them on the prepared baking sheet. Gather any scraps, knead gently, and cut out more biscuits. Bake them in the preheated oven for 10-12 minutes. They should turn golden brown on top. Enjoy them warm, right from the oven! For the full recipe, check the earlier section. To make your biscuits fluffy, use cold butter. This helps create steam as it melts in the oven. Cut the butter into the flour until it looks like coarse crumbs. This keeps the butter from melting before baking. Also, use buttermilk for moisture and acidity. It reacts with baking soda, giving lift. Remember to avoid overmixing your dough. Mix until just combined to keep the texture light. One common mistake is using warm butter. It makes the biscuits dense instead of fluffy. Another issue is overworking the dough. Knead it just a few times. If you roll it out too thin, your biscuits won’t rise well. Lastly, not preheating the oven can lead to flat biscuits. Always ensure your oven is at 450°F (232°C) before baking. Knead the dough gently on a floured surface. Aim for just 3-4 folds to keep the layers. When cutting your biscuits, use a sharp biscuit cutter. Press down firmly without twisting. Twisting seals the edges and prevents rising. Once cut, place them close together on the baking sheet. This helps them rise and stay fluffy. For the best results, bake them right after cutting. {{image_2}} Using buttermilk makes your biscuits extra fluffy. The acid in buttermilk helps the dough rise. It gives a slight tang that regular milk lacks. If you don't have buttermilk, mix milk with a splash of vinegar. This simple swap makes a great substitute. Both versions work well, but buttermilk often wins for flavor. You can make biscuits sweet or savory. For sweet biscuits, add sugar or honey. A touch of cinnamon also works great. Sweet biscuits pair well with jam or honey. For a savory twist, try adding garlic powder. You can even mix in cheese for extra flavor. Both types are delicious, and it’s fun to switch things up! Herbs and spices can elevate your biscuits. Fresh herbs like rosemary or chives add depth. Simply chop them finely and mix into the dough. You can also try dried herbs for a different taste. Experiment with spices like paprika or black pepper. This adds warmth and complexity to each bite. Your biscuits will become a favorite at the table. For the complete recipe, check the full recipe section! To keep your leftover biscuits fresh, place them in an airtight container. You can also wrap them in plastic wrap or foil. Store them at room temperature if you plan to eat them soon. For longer storage, refrigerate them. This helps keep them soft and tasty. When you want to enjoy your leftover biscuits, reheating them properly is key. The oven is best for this. Preheat your oven to 350°F (175°C). Place the biscuits on a baking sheet. Cover them with aluminum foil to prevent drying out. Heat for about 10-15 minutes. You can also use the microwave. Wrap each biscuit in a damp paper towel. Heat for 15-20 seconds. This method keeps them soft, but they might not be as crispy. If you want to save biscuits for later, freezing is a great option. Let them cool completely first. Wrap each biscuit tightly in plastic wrap. Then, place them in a freezer bag. They will stay fresh for up to three months. When you're ready to eat them, thaw in the fridge overnight. Reheat as described above for the best taste. Enjoy your homemade biscuits anytime! For the full recipe, check the link provided. You can use regular milk instead of buttermilk. Just add a splash of vinegar or lemon juice. This will mimic the tangy flavor of buttermilk. Mix one cup of milk with one tablespoon of vinegar. Let it sit for five minutes. Then, use it in your biscuit recipe as you would buttermilk. This trick works well and keeps your biscuits fluffy! Tough biscuits often come from overmixing the dough. When you mix too much, you develop gluten, which makes the biscuits dense. Always mix until just combined. Another reason could be using too much flour. Measure your flour correctly and spoon it into the measuring cup. Level it off with a knife to avoid adding too much. Yes, you can make biscuits ahead of time! You have two good options. First, you can prepare the dough and freeze it. Just cut out the biscuits and place them on a baking sheet. Freeze them until firm, then transfer to a bag. Bake them straight from the freezer when needed. Second, you can bake them ahead and store them in an airtight container. Reheat them in the oven for a few minutes before serving. The best way to serve homemade biscuits is warm and fresh out of the oven. Brush them with melted butter for extra flavor. You can also serve them with honey or jam for a sweet touch. For savory options, try adding fresh herbs or garlic powder into the dough. Place them in a basket lined with a cloth for a nice presentation. You can find the full recipe for fluffy buttermilk biscuits above. It includes all the ingredients and steps needed to create these delicious treats. You now know how to make tasty biscuits. We covered the main ingredients and some optional ones. You learned key steps to prepare and bake them right. Tips helped you avoid common mistakes while adding your twist. Storage ideas ensure your leftovers stay fresh. Biscuits can be easy and fun to make. Now, get in the kitchen and start baking! Enjoy the delicious results.

Homemade Biscuits Fluffy and Easy to Make

Want to make homemade biscuits that are fluffy and simple? You’re in the right place! I’ll guide you through each

- 1 cup graham cracker crumbs - 4 tablespoons unsalted butter, melted - 8 oz cream cheese, softened - ½ cup granulated sugar - 1 cup sour cream - 12 maraschino cherries - Additional crushed pineapple When making mini pineapple upside-down cheesecakes, you need to gather all your ingredients first. The graham cracker crumbs form a buttery base. You’ll melt the unsalted butter and mix it with the crumbs. This creates a crust that is both crunchy and sweet. Cream cheese is the star of this dessert. It gives the cheesecake its rich and creamy texture. Adding granulated sugar will help sweeten the filling. Don't forget the sour cream. It adds a nice tang and helps to balance the sweetness. For a fun touch, maraschino cherries make a great topping. They add a pop of color and flavor. You can also sprinkle some extra crushed pineapple on top. This makes your mini cheesecakes even more tropical and delicious. If you want to dive deeper into the recipe, check out the Full Recipe for all the steps and tips. Happy baking! - Preheat the oven: Start by preheating your oven to 325°F (160°C). - Line muffin tins with paper liners: Grab a muffin tin and place paper liners in each cup. This makes it easy to remove the cheesecakes later. - Combine graham cracker crumbs, butter, and sugar: In a medium bowl, mix 1 cup of graham cracker crumbs, 4 tablespoons of melted butter, and 1 teaspoon of sugar. Stir until everything blends well. - Press into muffin liners and baking time: Now, take this mixture and press it into the bottom of each muffin liner. Make it tight! Bake the crust for 8 to 10 minutes until it is lightly browned. After baking, let it cool. - Mix cream cheese and sugar: In a large bowl, beat 8 oz of softened cream cheese with ½ cup of granulated sugar. Use an electric mixer until the mix turns smooth and creamy. - Add vanilla, sour cream, and eggs: Next, add 1 teaspoon of vanilla extract, 1 cup of sour cream, and 2 large eggs. Mix on low speed after each egg until just combined. Be careful and don’t overmix. - Fold in crushed pineapple: Finally, gently fold in 1 cup of drained crushed pineapple. This gives your cheesecake its tropical flavor. These steps will set you up for a delicious treat! For the complete recipe, check out the Full Recipe. To make the best mini cheesecakes, avoid overmixing the eggs. This keeps the texture smooth. Overmixing can add too much air, which may cause cracks. Mix the eggs just until they blend in. Achieving the right cheesecake texture is key. You want them creamy but firm. Bake them just until the centers jiggle slightly. They will firm up as they cool. Chill your cheesecakes for at least two hours. This helps them set properly. For a delightful touch, serve them cold. Garnishing ideas can elevate your dessert. A maraschino cherry on top adds color. You can also sprinkle crushed pineapple around for a fun look. Watch out for crust issues. If your crust is too crumbly, it may fall apart. Make sure to press it firmly into the muffin liners. Filling too runny is another mistake. Drain the crushed pineapple well before adding it. This keeps the filling thick and creamy. {{image_2}} You can make these mini cheesecakes even more fun by changing the fruit. Try using crushed peaches or cherries instead of pineapple. You can also add seasonal fruits like strawberries or blueberries for a fresh twist. These choices add unique flavors to your treat and keep things interesting. Want to change the flavor? You can mix in some coconut or vanilla bean for a tropical vibe. If you love chocolate, drizzle some melted chocolate on top. This adds a rich taste that pairs well with the creamy cheesecake. Both options can elevate your mini cheesecakes to new heights. Switch up the crust for a new experience. Instead of graham crackers, use digestive biscuits or even oatmeal cookies. They bring a different taste and texture. If you need a gluten-free option, try almond flour or gluten-free cookies. These alternatives will still give you a delicious base for your cheesecake. For the Full Recipe, check the link to find detailed steps and ingredients. You can keep your mini pineapple upside-down cheesecakes in the fridge for about five days. Make sure they are in an airtight container. This helps keep them fresh and tasty. For best results, do not stack them. Place each cheesecake flat to avoid any damage. Freezing these mini treats is easy. First, let them cool completely. Then, wrap each cheesecake in plastic wrap. After that, place them in a freezer-safe bag. This method helps prevent freezer burn. You can freeze them for up to three months. When you are ready to eat them, take them out and put them in the fridge. Let them thaw overnight. This way, they stay creamy and delicious. Enjoy your sweet treat any time! For the full recipe, check out the Full Recipe link. To keep your cheesecakes smooth and crack-free, avoid overmixing. Mix until just combined. Bake them gently. A water bath helps keep the heat soft. Let them cool gradually in the oven with the door ajar. Yes, you can prepare these mini cheesecakes ahead of time. Make them one day before your event. Once they cool, cover them well and refrigerate. This makes them even tastier as flavors blend. If you need a substitute for sour cream, use Greek yogurt or silken tofu. Both options work well. They keep the creaminess but lower the fat. Yogurt also adds a slight tang like sour cream. Absolutely! Using fresh pineapple is a great idea. Just peel and chop it into small pieces. Drain off any excess juice before mixing it in. This keeps your cheesecake from becoming too wet. Each mini cheesecake is one serving. The recipe makes 12 cheesecakes, perfect for sharing. You can also cut them in half for smaller bites. Guests will love these cute, tasty treats. You can find the Full Recipe for these delightful cheesecakes online. It contains all the steps and tips you need to create this tasty dessert. Enjoy the process and happy baking! In this post, we explored the delightful mini pineapple upside-down cheesecakes. We began with the essential ingredients like graham cracker crumbs and cream cheese. I provided step-by-step instructions to guide you through making the perfect crust and filling. I also shared tips to avoid common mistakes and offered variations to suit your taste. With these easy steps, you can impress friends and family. Enjoy experimenting with flavors and toppings. Happy baking!

Mini Pineapple Upside-Down Cheesecakes Delightful Treat

If you love the classic taste of pineapple upside-down cake but want a fun twist, these Mini Pineapple Upside-Down Cheesecakes

Older posts
Newer posts
← Previous Page1 … Page49 Page50 Page51 … Page53 Next →

dsad

© 2025 Lisa Dishes • Built with GeneratePress

Our Policies

  • Copyright Policy
  • Cookie Policy
  • GDPR Policy
  • Privacy Policy
  • Disclaimer
  • Terms Of Use

More Information

  • Home
  • About
  • Contact
  • Appetizers
  • Dessert
  • Dinner
  • Drinks
©2025, Lisa Dishes About Back To Top