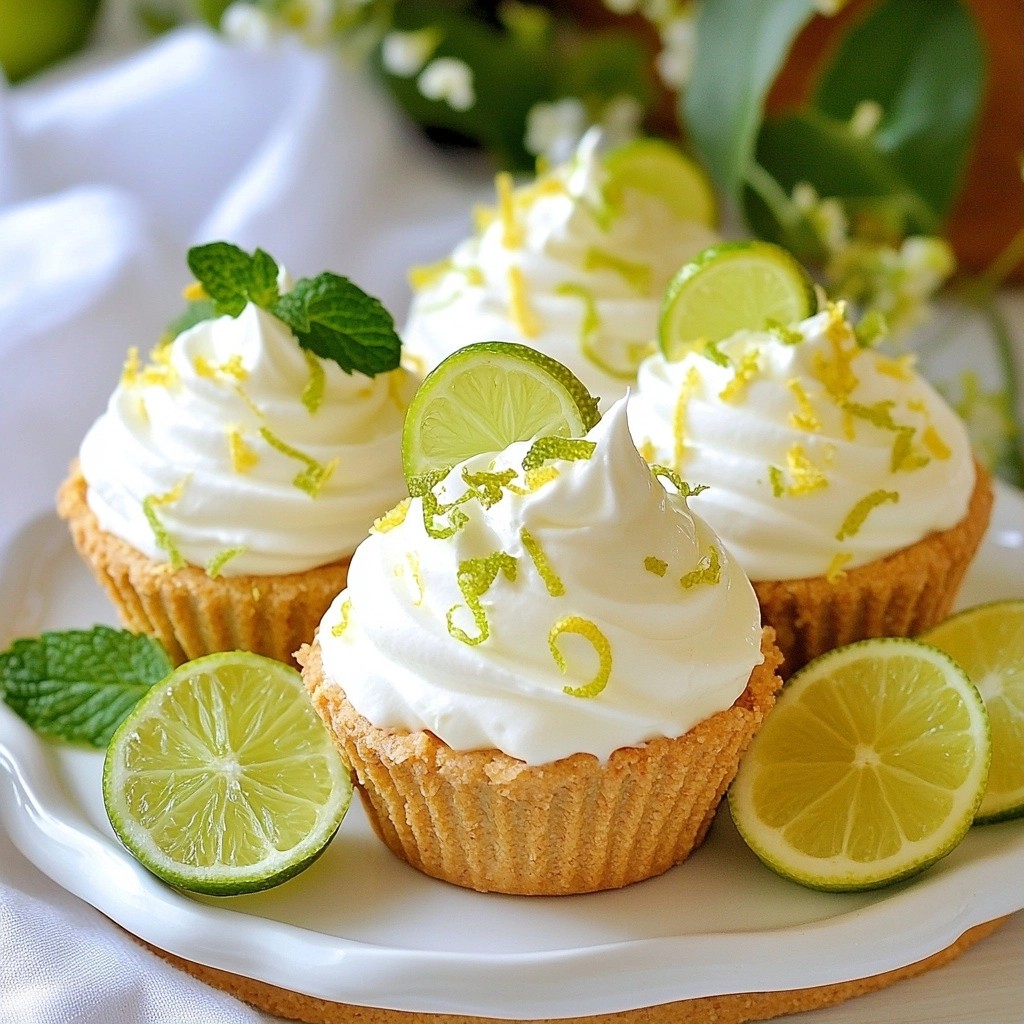
Looking for a delightful treat that’s both easy and refreshing? You've come to the right place! My Zesty No-Bake Lime Cream Cups are a breeze to whip up and perfect for any occasion. With just a few simple ingredients, you can create a light dessert that bursts with citrus flavor. Join me as I guide you through this fun and delicious recipe that’s sure to impress your friends and family!
Why I Love This Recipe
- Refreshing Flavor: The zesty lime adds a burst of freshness, making these cups perfect for warm weather or any occasion that calls for a light dessert.
- No-Bake Convenience: No need for an oven! This recipe is quick and easy, allowing you to whip up a delightful treat without the hassle of baking.
- Beautiful Presentation: The vibrant colors of lime and mint make these cups visually appealing, impressing your guests before they even take a bite.
- Customizable Delight: You can easily modify the recipe by adding different flavors or toppings, allowing for endless variations to suit your taste.
Ingredients
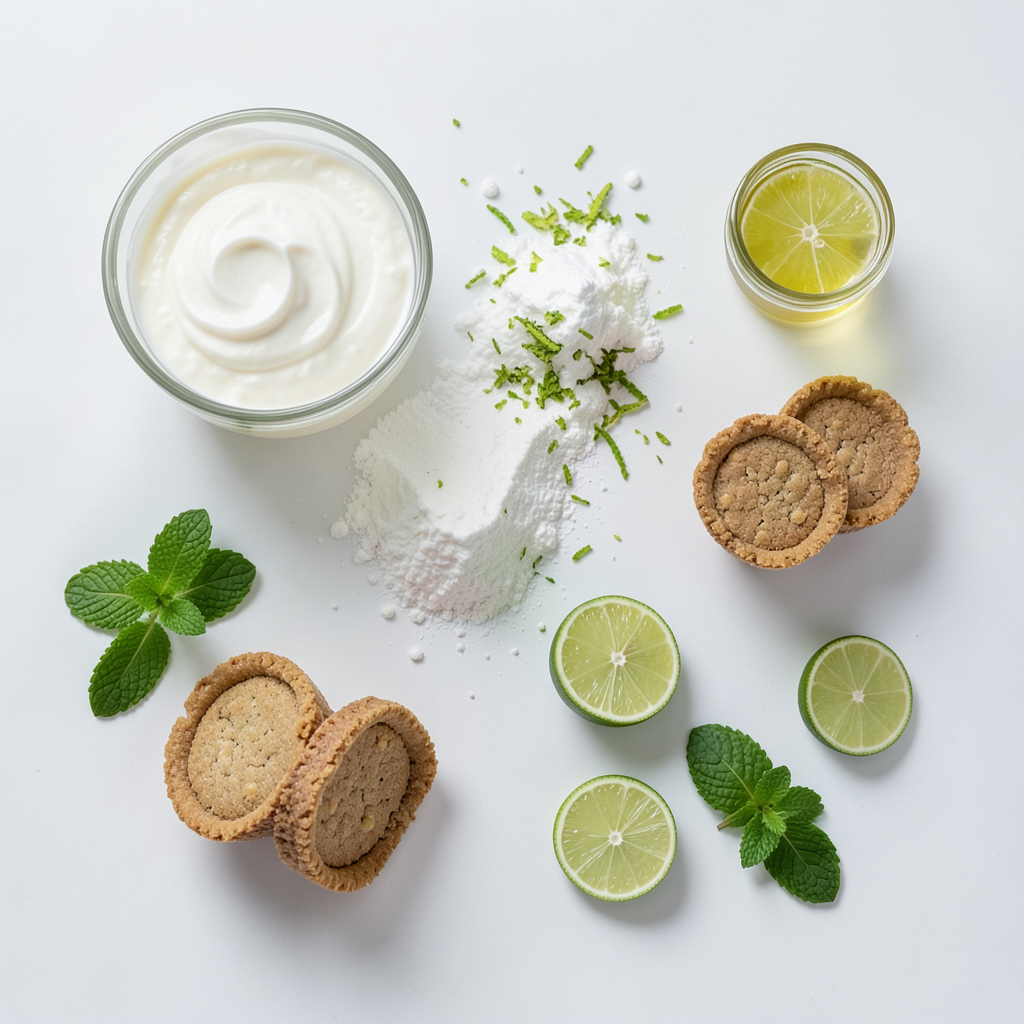
Main ingredients for Zesty No-Bake Lime Cream Cups
To make Zesty No-Bake Lime Cream Cups, you need a few key ingredients:
- 1 cup heavy whipping cream
- 1/2 cup cream cheese, softened
- 1/2 cup powdered sugar
- Zest of 2 limes
- 1/4 cup fresh lime juice
- 1 teaspoon vanilla extract
- 12 mini graham cracker cups (or any small dessert cups)
These ingredients work together to create a smooth and creamy filling. The heavy cream gives it a light texture, while the cream cheese adds richness. The lime zest and juice bring a bright and zesty flavor.
Optional decorations and garnishes
You can make your cups look extra nice with some simple garnishes:
- Lime slices
- Fresh mint leaves
These add a pop of color and a fresh touch. You can also sprinkle a bit of lime zest on top for extra flair. It makes the cups more inviting and fun!
Suggested ingredient swaps or alternatives
If you want to mix it up, try some of these swaps:
- Use Greek yogurt instead of cream cheese for a lighter option.
- Replace heavy whipping cream with coconut cream for a dairy-free treat.
- Use lemon juice and zest for a different citrus flavor.
These changes keep the recipe tasty while fitting different diets. Feel free to experiment and find what you love best!
Step-by-Step Instructions
Preparing the whipped cream
Start by grabbing a mixing bowl. Add 1 cup of heavy whipping cream. Use a hand mixer or a stand mixer. Beat it on medium speed. Whip for about 3-4 minutes. You want soft peaks to form. This means the cream should hold its shape but still be smooth. Set this bowl aside for now.
Making the lime cream mixture
In another bowl, mix 1/2 cup of softened cream cheese and 1/2 cup of powdered sugar. Stir until it becomes smooth and creamy. Next, add the zest of 2 limes and 1/4 cup of fresh lime juice. Don’t forget the 1 teaspoon of vanilla extract! Mix well until everything is combined. This mixture should taste bright and zesty.
Assembling the cream cups
Now, gently fold the whipped cream into the lime mixture. Do this in three parts. Be careful not to deflate the whipped cream. Once it’s all mixed together, take 12 mini graham cracker cups. Spoon the lime cream mixture into each cup. Fill them generously—don’t be shy! Finally, place the filled cups in the fridge. Let them chill for at least 2 hours. This helps them set nicely. Before serving, add a slice of lime and a mint leaf on top for a pop of color.
Tips & Tricks
How to achieve the perfect whipped cream
To make perfect whipped cream, start with cold heavy cream. Cold cream whips better and faster. Use a clean bowl and beaters to avoid any grease. Mix on medium speed until soft peaks form. This takes about 3 to 4 minutes. Do not over-whip, or it will turn to butter. Soft peaks should hold their shape but still be smooth.
Essential tips for folding ingredients
Folding is key to keeping air in your whipped cream. Add one-third of the whipped cream to the lime mixture. Use a rubber spatula to gently mix. Scoop from the bottom and fold over the top. Repeat this two more times. Do not stir hard. You want to keep the fluffiness. The mixture should look light and airy when done.
Best practices for chilling and setting
Chilling is important for the cream cups to set. After filling the cups, cover them with plastic wrap. Place them in the fridge for at least two hours. This allows the flavors to blend well. For a firmer texture, chill them longer. Always garnish right before serving to keep your mint and lime fresh.
Pro Tips
- Use Fresh Limes: Always opt for fresh limes for the best flavor. Bottled lime juice lacks the bright, zesty punch that fresh juice offers.
- Chill Your Ingredients: For a fluffier whipped cream, chill your mixing bowl and beaters in the freezer for about 10 minutes before whipping.
- Gently Fold: When combining the whipped cream with the lime mixture, use a gentle folding technique to maintain the airy texture.
- Customize Your Cups: Feel free to add a layer of crushed graham crackers at the bottom of each cup for added texture and flavor.
Variations
Alternative flavors for lime cream cups
You can easily change the flavors of these lime cream cups. Try replacing lime with lemon for a tangy twist. You can also use orange for a sweeter, citrusy taste. If you want something unique, consider using passion fruit. Just replace the lime juice and zest with the new flavor. Your guests will love these fun surprises.
Using different crusts or bases
Graham cracker cups are great, but you can switch it up. Use crushed Oreos for a chocolatey base. This adds a rich taste that pairs well with the lime. You could also try using shortbread cookies for a buttery flavor. For a gluten-free option, use gluten-free cookies. Each variation gives a new twist to the dessert.
Dairy-free or vegan adaptations
You can make these cups dairy-free or vegan. Use coconut cream instead of heavy cream for a rich texture. Replace cream cheese with vegan cream cheese or silken tofu. For sweetness, use maple syrup or agave nectar instead of powdered sugar. These swaps keep the flavor while making it suitable for everyone.
Storage Info
How to store leftover Zesty Lime Cream Cups
To store leftover Zesty Lime Cream Cups, place them in a sealed container. Make sure to cover each cup tightly with plastic wrap or a lid. This keeps the cups fresh and prevents them from absorbing other smells in the fridge. You can store them in the fridge for up to three days.
Freezing options for lime cream cups
You can freeze these lime cream cups if you want to save some for later. First, let them set in the fridge for at least two hours. Then, wrap each cup in plastic wrap and place them in a freezer-safe bag. They can last in the freezer for about one month. When you want to eat them, move the cups to the fridge to thaw overnight.
Shelf life and best practices for freshness
The shelf life for these cups is about three days in the fridge. To keep them fresh, store them away from strong-smelling foods. If you notice any changes in texture or smell, it’s best to discard them. Always serve them cold for the best taste and texture.
FAQs
Can I make these cups in advance?
Yes, you can make these cups ahead of time. Prepare them a day before your event. Just chill them in the fridge. They will stay fresh and tasty for about two days. This makes serving easy and stress-free.
What can I use instead of graham cracker cups?
If you don’t have graham cracker cups, try using mini phyllo cups. They add a nice crunch. You can also use cookie cups or even small tart shells. Each option gives a unique twist to the dessert.
How do I prevent the cream from deflating?
To keep the cream fluffy, fold gently. Use a spatula and mix in three parts. Start with the cream cheese mix, then add the whipped cream. Be careful not to stir too fast. This keeps the air in the whipped cream.
Is there a way to make these cups less sweet?
You can reduce the sugar in the recipe. Use only 1/4 cup of powdered sugar. You can also add more lime juice to balance the taste. This adds a nice tang without too much sweetness.
Zesty No-Bake Lime Cream Cups are fun and easy to make. You learned about key ingredients, how to prepare them, and tips to enhance your results. You can even try different flavors or options for special diets. Make sure to store leftovers properly to keep them fresh. With these ideas and steps, you can enjoy tasty treats whenever you like. Happy cooking!