Skip to content
DisclaimerTerms Of UseGDPR PolicyCookie Policy

Lisa Dishes

  • Home
  • Drinks
  • Appetizers
  • Dinner
  • Dessert
  • About
  • Contact
  • Privacy Policy
DisclaimerTerms Of UseGDPR PolicyCookie Policy

NO-ING-IMG

- 1 pound large shrimp, peeled and deveined - 1 ripe mango, diced - 1 red bell pepper, thinly sliced - 1/2 red onion, finely chopped - 2 cloves garlic, minced - 1 jalapeño, minced (optional for extra heat) - Fresh cilantro for garnish - Sliced radishes for garnish (optional) - Juice of 2 limes - 2 tablespoons olive oil - 1 teaspoon smoked paprika - 1 teaspoon ground cumin - Salt and pepper to taste Gather these ingredients for a colorful and tasty meal. The blend of sweet mango and spicy shrimp makes each bite a delight. Using fresh ingredients helps bring out the best flavors. A ripe mango adds a juicy sweetness, while the shrimp gives a nice texture. Don't skip the garlic; it adds depth to the dish. You can choose to add jalapeño if you want more heat. Make sure to check the spices too! Smoked paprika and cumin will give your tacos a warm, rich flavor. Fresh lime juice brightens everything up, making each bite refreshing. Olive oil helps to cook the shrimp and veggies nicely. Salt and pepper round out the flavors, making them pop. For more details, you can follow the Full Recipe. Enjoy the cooking process! Start with one pound of shrimp. In a medium bowl, mix the shrimp with minced garlic, lime juice, smoked paprika, ground cumin, salt, and pepper. Toss well to coat the shrimp. Let them sit for about 15 minutes. This allows the flavors to blend and makes the shrimp taste great. While the shrimp marinates, heat one tablespoon of olive oil in a skillet over medium-high heat. Add the thinly sliced red bell pepper and finely chopped red onion. If you want more heat, add minced jalapeño. Cook for about 3 to 4 minutes until the veggies soften. Once done, remove them from the skillet and set aside. Next, add the remaining tablespoon of olive oil to the same skillet. Heat it until shimmering. Add the marinated shrimp to the hot skillet. Cook each side for about 2 to 3 minutes until the shrimp turns pink and is fully cooked. Keep an eye on them; overcooked shrimp can be tough. While the shrimp cooks, warm your tortillas. You can do this in a separate pan or microwave. Heat them until they are soft and pliable. This step is key for making tasty tacos. Now for the fun part! Place a few shrimp in each tortilla. Add a generous scoop of diced mango and the sautéed vegetables on top. Finish by garnishing with fresh cilantro and sliced radishes, if you like. Serve these tacos right away with extra lime wedges for a zesty touch. For the full recipe, check out the details above. To keep shrimp tender, avoid overcooking. Shrimp cook quickly, usually in just a few minutes. Cook them until they turn a bright pink color. Remove them from heat right away. This way, they stay juicy and delightful. Marinating shrimp is key to adding flavor. I suggest letting the shrimp marinate for at least 15 minutes. This allows the spices and lime juice to soak in. If you have time, marinate longer for an even bolder taste. You can boost the flavor of your tacos by using extra spices. Consider adding a pinch of cayenne for heat. A little chili powder or chipotle powder can also work well. If you want a twist, try using fresh herbs like basil or mint. Each option will give your dish a unique taste. If you love crunch, add some shredded cabbage. It contrasts well with the creamy mango. You can also try pineapple instead of mango for a different flavor. A great taco looks as good as it tastes. Use bright colors for your garnishes. Fresh cilantro adds a green touch and fresh flavor. Sliced radishes give a pop of red and a nice crunch. Arrange the tacos on a colorful platter for a fun display. For a finishing touch, drizzle lime juice over the assembled tacos. It adds a zesty brightness. Also, serve lime wedges on the side for extra flavor. For the full recipe, check out the details above. {{image_2}} You can add different peppers to change the heat. Try serrano or habanero for more kick. Each pepper brings its own flavor. If you want mild spice, skip the jalapeño. For a fiery taste, add two or more peppers. Adjust the heat to your taste. You can easily make these tacos vegetarian. Instead of shrimp, use jackfruit or tofu. These options soak up flavors well. Season them like you would shrimp. You can also try chickpeas for a protein boost. This way, everyone can enjoy tasty tacos. Toppings make your tacos shine. You can add fresh salsa for a burst of flavor. Guacamole pairs well too. Consider crumbled feta or queso fresco for creaminess. Don't forget about lime crema or a spicy mayo. Each topping adds a new layer of taste. For the full recipe, check out the details above. To store leftover tacos, wrap each taco tightly in plastic wrap or foil. Place them in an airtight container. This keeps them fresh for up to two days. If you want to keep the shrimp and toppings separate, store them in different containers. This helps maintain the taco's texture. Reheat tacos on the stovetop for the best taste. Heat a skillet over medium heat. Place the tacos in the skillet for about 2-3 minutes on each side. This method warms the tacos evenly. If you prefer a microwave, use it for about 30 seconds. Check to avoid overheating, which can make them tough. To freeze tacos, first, separate the shrimp and toppings. Place the shrimp in a freezer-safe bag, and squeeze out excess air. For toppings, use a separate container. Tacos can last up to three months in the freezer. When ready to eat, thaw in the fridge overnight. Reheat as mentioned above for the best results. For the full recipe, check the details above. For tacos, I recommend using large shrimp. They hold their shape well and offer a nice bite. You can also use jumbo shrimp for a bigger taste. Look for shrimp that are wild-caught for the best flavor and quality. If you want a more sustainable option, consider shrimp from responsible farms. Always check labels to ensure you buy the best shrimp for your tacos. Yes, you can make these tacos ahead of time. Prepare the shrimp and veggies in advance. Store them separately in airtight containers in the fridge. You can also make the mango salsa ahead of time. Just be sure to assemble the tacos right before serving to keep the tortillas fresh and warm. This method helps save time when you are ready to eat. Great sides include black beans, corn salad, or a fresh green salad. These add more color and flavor to your meal. You can also serve tortilla chips with salsa or guacamole for a nice crunch. A light Mexican rice pairs well, too. These sides balance the spice and sweetness of the tacos. The spice level can vary based on your choice of ingredients. If you add jalapeño, the tacos will have more heat. If you want less spice, simply skip the jalapeño. The smoked paprika adds flavor without a lot of heat. You can always adjust the spice to suit your taste. I love to keep it fun by letting everyone add their own heat. Yes, you can use frozen shrimp. Just make sure to thaw them first. Place them in the fridge overnight or run them under cold water for a quick thaw. Frozen shrimp can be just as tasty as fresh shrimp when cooked properly. Check the package for cooking times, as they may differ. This makes it easy to enjoy tasty tacos anytime. For the complete guide on making these tacos, check out the Full Recipe! These tasty Spicy Mango Shrimp Tacos are easy to make and full of flavor. We covered key ingredients, from shrimp to spices, and shared the steps to cook them just right. You learned tips to enhance flavors and present your tacos beautifully. Remember, you can adapt this recipe to fit your taste. Try new spices, choose vegetarian options, or experiment with toppings. Enjoy crafting these delicious tacos at home. Each bite brings a burst of flavor you’ll love!

Spicy Mango Shrimp Tacos Flavorful and Fresh Delight

Ready to spice up your taco night? These Spicy Mango Shrimp Tacos offer fresh flavors that dance on your taste

- 2 cups cooked chicken, shredded - 1/2 cup buffalo sauce - 1/4 cup cream cheese, softened - 1/2 cup ranch dressing - 1/2 cup celery, finely chopped - 1/2 cup shredded lettuce - 1/2 cup shredded cheddar cheese - 4 large flour tortillas - Fresh cilantro, for garnish (optional) When I make Buffalo Chicken Wraps, I always start with the right ingredients. Each one plays a key role in the flavor. First, you need cooked chicken. I often use leftovers, which saves time. Shredded chicken mixes well with the spicy buffalo sauce. I use about half a cup for a nice kick. Next, cream cheese makes the mix creamy. It cools down the heat from the buffalo sauce. I like to soften it first, so it blends easily. Ranch dressing adds a tangy taste. It pairs perfectly with buffalo sauce. I also add chopped celery for crunch. This gives the wraps texture and freshness. Lettuce and cheddar cheese add more flavor and color. Finally, I wrap everything in large flour tortillas. They hold the filling well. - Alternatives for buffalo sauce: If you want less heat, use a mild sauce or BBQ sauce. - Cream cheese alternatives: You can swap cream cheese with Greek yogurt or vegan cream cheese. - Substituting chicken with other proteins: Try using turkey, tofu, or chickpeas for a different twist. - Best side dishes for Buffalo Chicken Wraps: Pair with carrot sticks, celery sticks, or a fresh salad. - Ideal beverages to serve: I recommend iced tea, soda, or a light beer to cool the heat. These ingredients and options make your wraps tasty and fun to eat. You can mix and match based on your taste. For the full recipe, check the section above. To prepare the chicken, start with cooked chicken. I like to use shredded rotisserie chicken for ease. Place the shredded chicken in a large bowl. Pour in 1/2 cup of buffalo sauce. Mix well until the chicken is coated. This gives it that spicy flavor we love. Next, fold in 1/4 cup of softened cream cheese. This makes the chicken creamy and smooth. Make sure to blend it well so every bite is rich. Now, add 1/2 cup of finely chopped celery and 1/2 cup of ranch dressing. Mix everything together until well combined. This adds crunch and coolness to balance the heat. Lay out 4 large flour tortillas on a clean surface. Take a good scoop of the buffalo chicken mixture. Spread it evenly on each tortilla, leaving space at the edges. This helps when you roll them up. Add shredded lettuce and 1/2 cup of shredded cheddar cheese on top. These toppings add freshness and flavor. To roll the wraps, start at one end and fold tightly. Tuck in the sides as you go. This keeps the filling from spilling out. After rolling, cut each wrap in half diagonally. This makes them easier to eat. Arrange them neatly on a platter for serving. For a nice touch, garnish with fresh cilantro. It adds color and a burst of flavor. Enjoy these wraps as a fun, easy dinner. They are packed with taste and sure to please! Using fresh, high-quality ingredients is key for great taste. Fresh chicken makes a big difference. Choose a buffalo sauce that suits your heat preference. If you want milder wraps, use less sauce or mix it with ranch dressing. This balances the heat and adds creaminess. To store leftover wraps, wrap them tightly in plastic wrap. This keeps them fresh in the fridge for up to two days. When you want to eat them again, reheat in a microwave. Heat for about 30 seconds, then check. If they need more time, heat in 15-second bursts. This way, they stay tasty and warm. You can prep for Buffalo Chicken Wraps ahead of time. Shred the chicken and mix it with the buffalo sauce. Store this in the fridge for up to three days. For even more convenience, you can freeze the filling. When you’re ready, just thaw it overnight in the fridge. Once it’s thawed, assemble the wraps and enjoy. {{image_2}} You can make Buffalo chicken wraps spicy or mild. If you love heat, use extra buffalo sauce. For a milder flavor, reduce the sauce. You can add cheeses like blue cheese or mozzarella for a twist. Each cheese brings its unique taste, enhancing the wrap's flavor. Not a meat eater? Use plant-based chicken substitutes. These options have a similar texture and absorb flavors well. For creaminess, try vegan cream cheese. It blends perfectly with buffalo sauce, giving you a rich taste without dairy. Get creative by using local ingredients. If you love southwestern flavors, add black beans and corn. If you're in New England, try some apple slices for sweetness. Each region has flavors to explore, making your wraps unique. Enjoy trying these variations for a fun twist on a classic dish! For the Full Recipe, refer to the earlier section. To store your Buffalo Chicken Wraps in the refrigerator, wrap them tightly in plastic wrap. This keeps them fresh and prevents them from drying out. I recommend using airtight containers. They work well to maintain the taste and texture of the wraps. You can freeze Buffalo Chicken Wraps for up to three months. To do this, wrap each wrap in foil or plastic wrap. Place them in a freezer-safe bag. When you want to eat them, take them out and let them thaw in the fridge overnight. Reheat them in a microwave or oven until hot. This way, they taste just as good as fresh! Buffalo Chicken Wraps stay fresh for about three days in the fridge. After that, they may lose their flavor and texture. Watch for signs of spoilage, like a sour smell or a change in color. If you see these signs, it’s best to toss them out. Enjoy your delicious wraps while they are fresh! Buffalo Chicken Wraps come from Buffalo, New York. The original dish is Buffalo wings, created in the 1960s. The wrap evolved to be a hand-held meal. It combines the classic flavors of buffalo wings with fresh veggies. This dish gained popularity for its taste and ease. Today, you can find it in many restaurants and homes. Yes, you can make Buffalo Chicken Wraps in advance. Prep the chicken and mix it with sauce and cream cheese. Store the chicken mixture in the fridge. Wraps can stay fresh for up to two days. Assemble them right before serving for the best taste. You can also store leftover wraps in an airtight container. Buffalo Chicken Wraps can be as spicy as you want. The spice level comes from the buffalo sauce. Many brands offer mild, medium, and hot sauces. You can choose based on your taste. If you prefer less heat, use a mild sauce or mix it with ranch. Adjust the spice to suit you and your family. In this blog post, we explored how to make delicious Buffalo Chicken Wraps. We covered key ingredients, substitutions, and pairings to enhance your meal. I shared step-by-step instructions for preparation and assembly, along with tips for flavor and storage. Finally, we looked at variations, including vegetarian options and regional twists. With these ideas, you can create wraps to suit your taste. Enjoy your cooking adventure!

Savory Buffalo Chicken Wraps Easy Dinner Delight

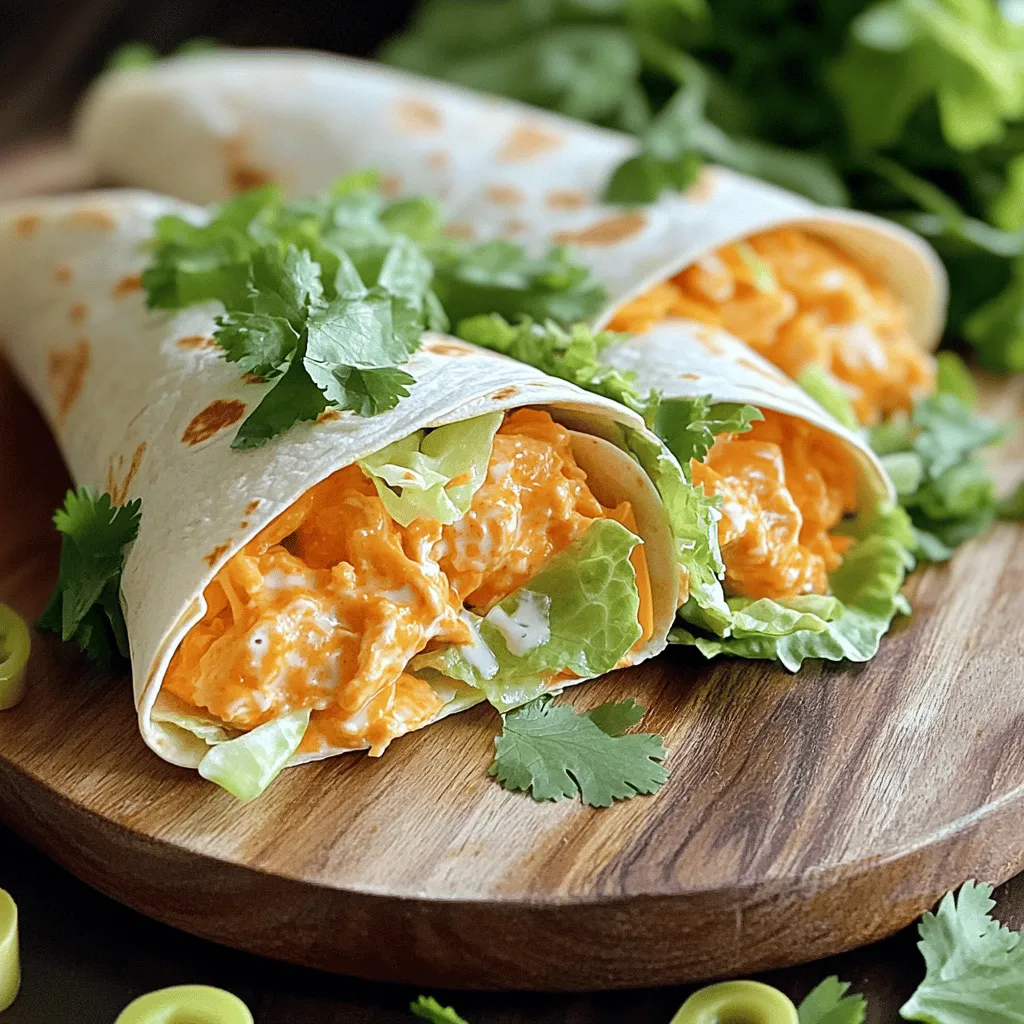
Are you ready for a dinner that packs a punch? These Savory Buffalo Chicken Wraps are both easy to make

To make peanut butter energy bites, you need simple and tasty ingredients. Here’s what to gather: - 1 cup rolled oats - 1/2 cup creamy peanut butter - 1/3 cup honey or maple syrup - 1/4 cup ground flaxseed - 1/4 cup mini chocolate chips - 1/4 cup shredded coconut - 1 teaspoon vanilla extract - A pinch of sea salt Each ingredient adds flavor and nutrition. Rolled oats provide fiber, which keeps you full. Peanut butter gives protein and healthy fats. Honey or maple syrup adds sweetness. Ground flaxseed boosts omega-3s. Mini chocolate chips bring joy, and shredded coconut offers a tropical twist. Vanilla extract enhances the bites' flavor, while sea salt balances the sweetness. This mix creates a delightful snack. You can enjoy these bites any time of day, whether you need energy for a workout or a sweet treat after lunch. Once you gather the ingredients, you’ll be ready to make these tasty bites. For the full recipe, check out the steps to create your own batch of peanut butter power bites! - Step 1: Mix dry ingredients First, take a large bowl. Add 1 cup of rolled oats, 1/4 cup of ground flaxseed, 1/4 cup of unsweetened shredded coconut, and a pinch of sea salt. Mix them well. You want them to be even. - Step 2: Prepare peanut butter mixture In another bowl, combine 1/2 cup of creamy peanut butter, 1/3 cup of honey or maple syrup, and 1 teaspoon of vanilla extract. Stir until it is smooth and creamy. This mix gives the bites their rich flavor. - Step 3: Combine wet and dry ingredients Pour your peanut butter mix into the dry ingredients. Stir until everything is combined. The mix should feel sticky but still hold its shape. You want it to come together nicely. - Step 4: Add chocolate chips Now, fold in 1/4 cup of mini chocolate chips. Make sure they are spread evenly throughout the mixture. These bits of chocolate add a sweet surprise in each bite. - Step 5: Shape into bites Scoop about 1 tablespoon of the mixture with your hands. Roll it into a ball. Keep doing this until all the mixture is gone. You should make around 12 to 15 bites. - Step 6: Chill (optional) Place the energy bites on a plate lined with parchment paper. If you want them to set a bit, put them in the fridge for 30 minutes. You can eat them right away, too! They are tasty either way. For the complete recipe with all details, check the Full Recipe section. When making peanut butter energy bites, follow these tips for the best results: - Ensure ingredients are at room temperature: This helps the peanut butter mix well. Cold ingredients can make mixing hard. - Use a cookie scoop for even portioning: This keeps all your bites the same size. It makes them look nice and cook evenly. - Experiment with sweeteners: Honey and maple syrup work great. Try different sweeteners to find your favorite taste. Storing your energy bites properly keeps them fresh and tasty. Here’s how: - Best way to store energy bites: Place them in an airtight container. They can stay in the fridge for up to a week. This keeps them chewy and delicious. - How to freeze for later use: For longer storage, freeze the bites. Lay them on a baking sheet first. Once frozen, place them in a freezer bag. They can last for a month this way. Enjoy them anytime you need a quick snack! For the full recipe, check out the details above. {{image_2}} You can change up the taste of your peanut butter energy bites easily. For a warm flavor, add cinnamon. Just a teaspoon will do! You can also mix in cocoa powder for a chocolate twist. This gives a rich taste and pairs well with peanut butter. If you want to try a different nut flavor, consider using almond or cashew butter. These nut butters bring a unique taste and creamy texture. You can even mix different nut butters together for even more flavor fun. Swapping ingredients can keep things fresh. If you want a different sweetener, use agave syrup instead of honey. This will make the bites vegan and still sweet. For added crunch, toss in some chopped nuts or seeds. Options like almonds, walnuts, or sunflower seeds work well. These not only add texture but also boost nutrition. With these simple swaps, you can make your energy bites truly your own! Peanut butter energy bites are tasty and packed with nutrients. Each bite has about 100 calories. They contain healthy fats, protein, and fiber. Here’s a quick look at their macronutrient breakdown: - Calories: 100 per bite - Protein: 3 grams - Fat: 6 grams - Carbohydrates: 10 grams - Fiber: 1 gram Now, let’s talk about the key ingredients. Ground flaxseed is a superfood. It has omega-3 fatty acids, which are good for your heart. These fats help lower bad cholesterol. Flaxseed also adds fiber, which aids digestion. Coconut is another important ingredient. It contains healthy fats called medium-chain triglycerides (MCTs). MCTs can boost energy and support brain health. Plus, coconut adds a sweet taste without extra sugar. Peanut butter energy bites are a great snack for many diets. They fit well into vegetarian and gluten-free plans. The oats provide whole grains, while peanut butter gives protein. This combo keeps you full longer. For gluten-free eaters, just check your oats. Some brands may contain gluten. Use certified gluten-free oats to be safe. You can also swap out peanut butter for almond or sunflower seed butter. This change makes these bites nut-free. These energy bites are perfect for a quick snack. You can grab one before a workout or enjoy it with coffee. They are simple to make and store well in the fridge. You can find the full recipe above to get started! How long do homemade energy bites last? Homemade energy bites can last about one week in the fridge. Store them in an airtight container to keep them fresh. You can also freeze them for up to three months. Just thaw before eating. Can I make these vegan? Yes, you can make these vegan! Just replace honey with maple syrup. Use plant-based chocolate chips too. This way, you keep the taste and make it vegan-friendly. Are peanut butter energy bites healthy for weight loss? Peanut butter energy bites can support weight loss. They are high in protein and fiber, which help you feel full. Just watch your serving size. Enjoy them as a snack between meals. What’s the best way to customize these bites? You can easily customize these bites. Add cinnamon for spice or swap in different nut butters. You can also mix in nuts or dried fruits for added texture and flavor. Can I use crunchy peanut butter instead of creamy? Absolutely! Crunchy peanut butter adds a nice texture. Just be sure it’s natural and doesn’t have added sugar. The taste will still be rich and delicious, making your bites extra fun. For the full recipe, check the section above. These peanut butter energy bites are easy to make and tasty. You have learned the ingredients, step-by-step instructions, and helpful tips. These snacks fit into many diets and offer health benefits. You can customize them in various ways to suit your taste. Enjoy making your own energy bites! They are fun for kids and adults. Try different ingredients and flavors. These snacks can give you energy and satisfaction whenever you need them.

Peanut Butter Energy Bites Healthy Snack Delight

Are you looking for a tasty snack that fuels your day? Peanut Butter Energy Bites are the perfect treat! Packed

- 4 medium zucchini, spiralized into noodles - 3 tablespoons olive oil - 4 cloves garlic, minced - 1/2 teaspoon red pepper flakes (optional) - 1/2 cup grated Parmesan cheese - Salt and pepper to taste - 2 tablespoons fresh parsley, chopped (for garnish) Garlic Parmesan Zoodles are simple yet full of flavor. Let’s talk about the ingredients. First, we use four medium zucchinis. Zucchini is low in calories and great for making zoodles. Spiralizing them creates fun noodles. You can use a spiralizer to make this easy. Next, we have three tablespoons of olive oil. This oil gives a rich taste and helps cook the garlic. Speaking of garlic, we need four cloves, minced. Garlic adds a strong flavor. It makes the dish smell amazing too. If you like a little heat, add half a teaspoon of red pepper flakes. This step is optional, but it gives your zoodles a nice kick. Don’t forget the star of the show: half a cup of grated Parmesan cheese. This cheese melts well and coats the zoodles beautifully. Finally, we season with salt and pepper to taste. For a bright finish, we add two tablespoons of fresh parsley, chopped. This adds color and freshness to each serving. For the full recipe, check out the details above. With these ingredients, you will make a dish that is simple and tasty! To start, you need to spiralize the zucchini. Take four medium zucchinis and use a spiralizer to make them into noodles, or zoodles. This fun tool turns veggies into pasta shapes. Set your zoodles aside in a bowl. They will be the base of this dish. Next, grab a large skillet and heat three tablespoons of olive oil over medium heat. Once the oil is warm, add four minced garlic cloves. Cook them for one to two minutes. Watch closely so the garlic does not burn. If you like a bit of heat, add a half teaspoon of red pepper flakes and stir for another minute. Now, it’s time to add your zoodles. Toss them in the skillet, mixing them with the garlic oil. Sauté for three to four minutes. You want them to soften slightly but still stay crunchy. Remove the skillet from the heat. Now, it’s time for the star of the show: half a cup of grated Parmesan cheese. Sprinkle it over the zoodles and toss well. The heat will help the cheese melt and coat the zoodles nicely. Season with salt and pepper to taste. Serve your Garlic Parmesan Zoodles hot, garnished with two tablespoons of fresh chopped parsley. This adds a lovely color and fresh taste. Enjoy your meal! For the full recipe, check the details above. To make zoodles, you need a spiralizer. A good spiralizer creates even noodles. Start with firm zucchini for the best texture. Cut off the ends of each zucchini. Place it in the spiralizer and twist. This motion creates long, thin strands. Aim for noodles about the size of spaghetti. If you don’t have a spiralizer, you can use a vegetable peeler. Just peel strips along the zucchini length. Cook zoodles quickly to keep them from getting soggy. Heat your skillet over medium heat before adding oil. Olive oil adds a nice flavor. Add minced garlic first for a fragrant base. Sauté it for just 1-2 minutes. Then, add the zoodles and toss them gently. Cook until they are tender but still have a bite. This usually takes about 3-4 minutes. Remember, zoodles cook fast, so don't walk away! To melt cheese well, remove the skillet from heat first. Grate the Parmesan cheese right into the hot zoodles. Toss them quickly so the cheese coats every strand. The heat from the zoodles will melt the cheese perfectly. If you notice the cheese clumping, just keep tossing. A little patience goes a long way. Enjoy that cheesy goodness! For the full recipe, check out the detailed instructions above. {{image_2}} You can make Garlic Parmesan Zoodles even better by adding protein. Chicken and shrimp work great. For chicken, use cooked, diced pieces. Just toss them in with the zoodles. For shrimp, sauté them in the garlic oil until they turn pink. This adds flavor and makes the meal more filling. If you want a veggie boost, add spinach or mushrooms. Spinach wilts nicely and adds color. Just stir it in during the last minute of cooking. Mushrooms bring a nice earthy taste. Slice them and sauté them with garlic before adding the zoodles. Both options keep the dish fresh and healthy. You can switch up the sauce to keep things fun. Try pesto for a fresh twist. It pairs well with the zucchini. You can also use a creamy Alfredo sauce for a rich flavor. Just remember, each sauce changes the taste, so choose what you love. This keeps your meals exciting and full of variety. Check out the Full Recipe for more ideas. You can store leftover zoodles in a sealed container. Make sure they are cool before you cover them. Keep them in the fridge. This will help them stay fresh for up to three days. If you have extra sauce, store it separately. This keeps the zoodles from becoming too soggy. To reheat your zoodles, use a skillet. Heat it on medium-low. Add a splash of olive oil to help them warm up. Toss the zoodles gently for about two to three minutes. This helps them heat evenly. If they seem dry, you can add a bit more olive oil. Avoid using the microwave, as it can make the zoodles mushy. You can freeze zoodles if you have too many. First, blanch them in boiling water for one minute. This step keeps their bright color and texture. After blanching, cool them quickly in ice water. Drain and pat them dry. Place in freezer bags, removing as much air as you can. They will last for about three months. When ready to use, just thaw in the fridge before cooking. Enjoy your Garlic Parmesan Zoodles anytime with this easy method! For the complete recipe, you can refer to the Full Recipe section above. Zoodles are zucchini noodles created by spiralizing zucchini. They are a great low-carb option. Zoodles have a fresh, mild taste that pairs well with many sauces. Unlike pasta, zoodles cook quickly and offer fewer calories. They have a crunchy texture, which makes them fun to eat. Yes, you can prep Garlic Parmesan Zoodles ahead of time. Spiralize the zucchini and store it in an airtight container. Keep it in the fridge for up to two days. Cook the zoodles just before you plan to eat. This keeps them fresh and tasty. The cooking time is quick, making it easy to enjoy a fast meal. If you need a substitute for Parmesan cheese, try nutritional yeast. It has a cheesy flavor and is dairy-free. Grated pecorino or Romano cheese also works well. For a vegan option, use cashew cheese or a store-bought vegan cheese. Each choice adds a unique taste to the dish, so feel free to experiment. You can find the full recipe for Garlic Parmesan Zoodles in the main article. In this blog post, we explored how to make Garlic Parmesan Zoodles. We discussed ingredients, steps, and tips for perfecting your dish. You learned how to add proteins or go vegetarian. We also shared storage tips for leftovers. In closing, zoodles are a tasty and healthy alternative to pasta. Experiment with flavors and toppings to make it your own. Enjoy your cooking!

Garlic Parmesan Zoodles Simple and Tasty Recipe

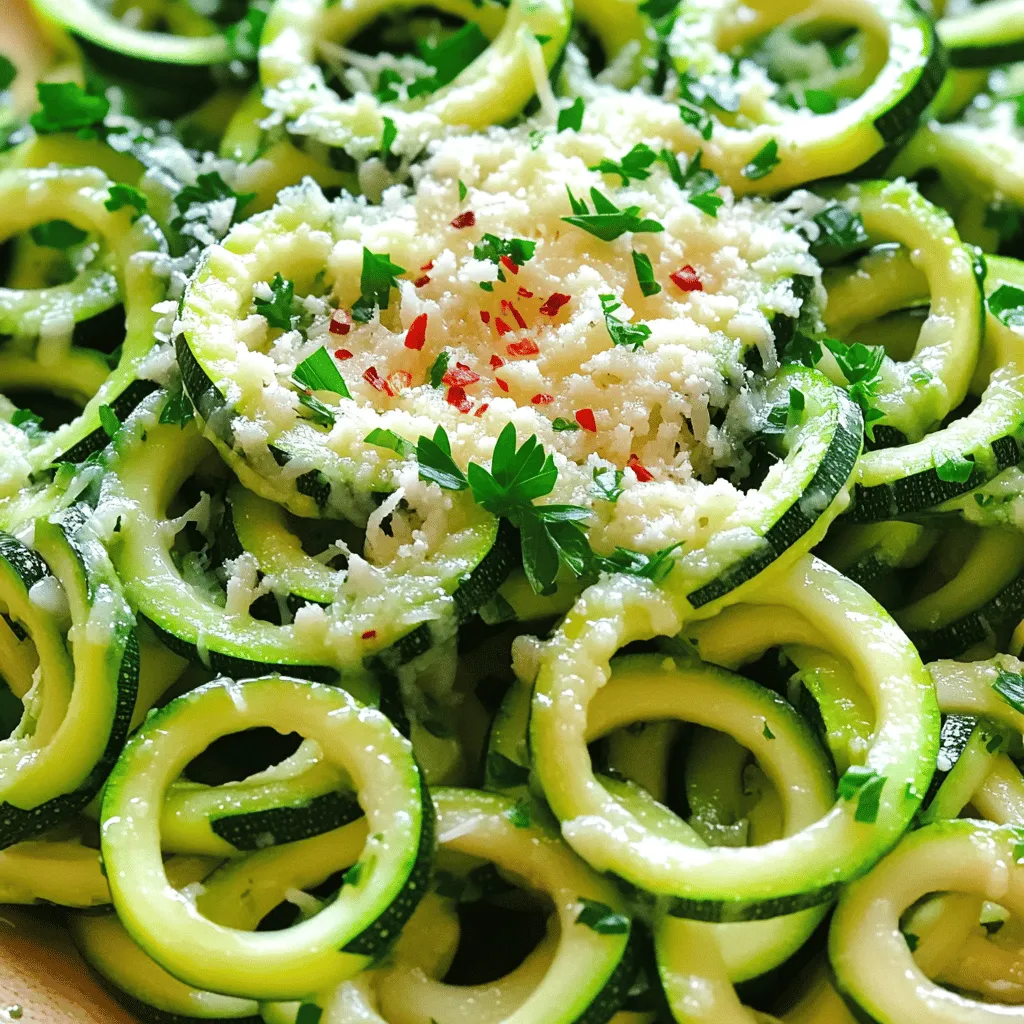
If you’re looking for a quick, healthy, and tasty meal, Garlic Parmesan Zoodles are a perfect choice! This simple recipe

- 4 boneless, skinless chicken breasts - 1 ripe mango, diced - 1 small red onion, finely chopped - 1 red bell pepper, diced - 1 jalapeño, seeded and minced - 1/4 cup fresh cilantro, chopped - Juice of 2 limes - 2 tablespoons olive oil - 1 teaspoon ground cumin - Salt and pepper to taste Mango Salsa Chicken is healthy and balanced. Each serving has about: - Calories: 300 - Protein: 30g - Fat: 12g - Carbohydrates: 20g - Fiber: 2g Mango Salsa Chicken bursts with fresh flavors. The chicken is juicy and tender. The mango adds sweetness, while the jalapeño gives a spicy kick. The lime juice brightens the dish. Each bite mixes sweet, spicy, and tangy. The salsa's crunch from the onion and bell pepper balances the chicken's softness. This dish feels like a sunny day on a plate! For the full recipe, check out the detailed instructions. 1. Preheating the grill Start by preheating your grill to medium-high heat. This helps the chicken cook evenly and get those nice grill marks. 2. Preparing the mango salsa In a medium bowl, mix the diced mango, chopped red onion, diced red bell pepper, minced jalapeño, and chopped cilantro. Squeeze the juice of one lime over the mix. Add salt and pepper to taste, then stir well. Set this aside while you prepare the chicken. 1. Coating chicken breasts with olive oil mixture In a separate bowl, mix two tablespoons of olive oil, the juice of the second lime, ground cumin, salt, and pepper. Rub this mixture evenly over each chicken breast. This adds flavor and helps keep the chicken moist. 2. Grilling instructions Place the coated chicken on the grill. Cook for about 6-7 minutes on each side. The chicken should reach an internal temperature of 165°F (75°C). You want it to be nicely charred on the outside but juicy inside. 1. How to plate the dish Slice the grilled chicken after letting it rest for 5 minutes. Serve it on a colorful plate. Top generously with the mango salsa for a burst of flavor. 2. Recommended garnishes Add some lime wedges on the side and sprinkle extra cilantro on top. These little touches make the dish look fresh and vibrant. For the full recipe, you can refer back to the main section. Enjoy your Mango Salsa Chicken! To ensure your chicken is cooked right, use a meat thermometer. Aim for 165°F (75°C) at the thickest part. This keeps the meat safe and juicy. To keep chicken moist, marinate it in olive oil and lime juice. This adds flavor and helps it stay tender on the grill. Choosing the right mango is key for great flavor. Look for a fruit that feels slightly soft and smells sweet. This means it's ripe and ready to eat. To enhance the salsa, try adding a pinch of salt. You can also mix in a dash of chili powder or cumin for extra flavor. To store leftover chicken and salsa, place them in airtight containers. Keep them in the fridge for up to three days. If you want to store the chicken longer, freeze it. Just make sure to wrap it well. Salsa can be frozen, too, but it might lose some crunch. Enjoy the full recipe for tasty Mango Salsa Chicken! {{image_2}} You can easily switch the chicken for shrimp or tofu. Both options work well and add their own taste. Shrimp cooks fast and gets a nice char. Tofu is great for a plant-based meal. Just marinate it like the chicken for flavor. For the salsa, you can swap the mango with other fruits. Pineapple or peaches add a sweet twist. You could also try papaya for a tropical touch. Each fruit brings a different flavor and texture. Adjust the spice level to fit your taste. If you like mild, skip the jalapeño or use just a little. For medium heat, keep the jalapeño with seeds. If you want it hot, add diced serrano peppers or a pinch of cayenne. You can also serve extra spicy salsa on the side. This lets everyone control their heat level at the table. Serve Mango Salsa Chicken in fun ways. Tacos are a great option. Just slice the chicken and pile it into tortillas with salsa. You can add avocado, cheese, or sour cream for extra flavor. Another option is to serve it over a fresh salad. Use mixed greens, cherry tomatoes, and cucumber. This creates a light, colorful meal. For a bigger meal, plate it as a platter. Arrange the chicken and salsa with lime wedges and extra cilantro. This makes a beautiful display for a gathering. For the full recipe, check out the details above. To keep your Mango Salsa Chicken fresh, store it in an airtight container. For best results, place it in the fridge. Make sure the chicken is cool before sealing it up. You can also freeze leftovers. Wrap the chicken tightly in plastic wrap and then in foil. This keeps the chicken safe for up to three months. Leftover Mango Salsa Chicken lasts for about three to four days in the fridge. If you freeze it, you can keep it for about three months. Always check for any off smells or changes in color before eating leftovers. If it looks or smells funny, throw it away. To reheat, the best method is to use the oven. Preheat it to 350°F (175°C). Place the chicken in a baking dish and cover with foil. Heat for about 15-20 minutes. This keeps the chicken moist. You can also use a microwave. Place the chicken on a microwave-safe plate and cover it. Heat in short bursts, checking often. This helps avoid drying out the chicken. For the full recipe, check out the Mango Salsa Chicken 🥭 section above. Yes, you can prepare Mango Salsa Chicken ahead of time. You can marinate the chicken breasts in the olive oil mixture for up to 24 hours. This step makes the chicken extra tasty. The mango salsa can also sit in the fridge for up to 2 days. Just keep it in an airtight container. The flavors will blend well together. Always remember to store them separately until you are ready to serve. Mango Salsa Chicken pairs well with many sides. Here are my top picks: - Rice: White or brown rice works well. - Beans: Black beans or pinto beans add protein. - Vegetables: Grilled or roasted veggies add color and nutrients. - Salad: A fresh green salad balances the dish. - Tortillas: Serve with warm tortillas for a fun twist. These sides add variety and flavor to your meal. Yes, this recipe is healthy! Here are some reasons why: - Lean protein: Chicken breasts are low in fat and high in protein. - Fresh ingredients: The mango, peppers, and onions are full of vitamins. - Healthy fats: Olive oil provides good fats that are heart-friendly. - Low in carbs: This dish has fewer carbs, making it light. Mango Salsa Chicken is a balanced meal that tastes great and nourishes your body. For the full recipe, check out the earlier section! Mango Salsa Chicken is a fun dish filled with vibrant flavors. You learned about the fresh ingredients and how they come together. The steps to prepare, cook, and serve are simple and clear. Tips and tricks help ensure your chicken stays moist and tasty. Whether you keep it mild or turn up the heat, it’s a delightful meal. Remember to store leftovers properly for later enjoyment. This dish is not just healthy, it's also easy to share with family and friends. Enjoy crafting this recipe and making it your own!

Mango Salsa Chicken Flavorful Grilled Delight

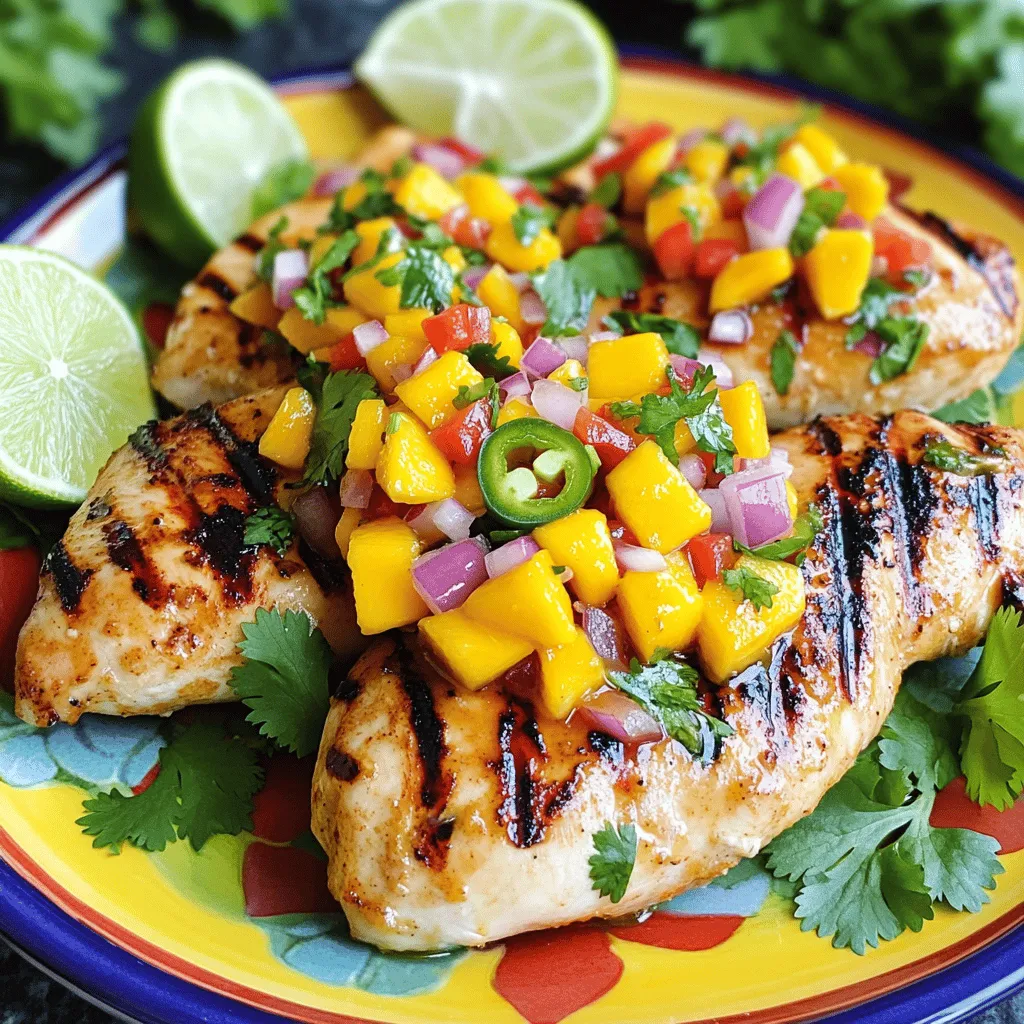
Get ready to savor the taste of summer with my Mango Salsa Chicken! This dish combines juicy grilled chicken with

Here’s what you need for an easy Chicken Marsala. Gather these simple items to get started: - 2 boneless, skinless chicken breasts - 1/2 cup all-purpose flour - Salt and pepper, to taste - 2 tablespoons olive oil - 1 tablespoon butter - 8 oz mushrooms, sliced (button or cremini) - 1 cup chicken broth - 1 tablespoon balsamic vinegar - 2 cloves garlic, minced - 1 teaspoon dried oregano - Fresh parsley, chopped (for garnish) These ingredients make a tasty dish that’s both filling and flavorful. The chicken breasts give you protein, while the mushrooms add a nice earthiness. The balsamic vinegar brings a tangy twist. You can find most of these items in your pantry or local store. If you want to make this dish your own, try using different kinds of mushrooms or adding herbs you love. For the full recipe, check out the detailed steps that follow. To start, you need to flatten the chicken breasts. Use a meat mallet or a rolling pin. Make them about 1/2 inch thick for even cooking. Next, season the flour with salt and pepper. Place the flour in a shallow dish. Dredge each chicken breast in the seasoned flour. Shake off any extra flour. Now, heat olive oil and butter in a large skillet. Set the heat to medium-high. Wait until the butter melts and becomes bubbly. Add the chicken breasts to the skillet. Cook each side for about 4-5 minutes until golden brown. Make sure they are cooked through. Once done, remove the chicken and set it aside. In the same skillet, add the sliced mushrooms. Cook them until they are tender and browned, which takes about 5-7 minutes. Then, stir in the minced garlic and cook for one more minute. The smell will be amazing! Pour in the chicken broth and balsamic vinegar. Scrape up any browned bits from the bottom. Add the dried oregano and bring the mixture to a simmer. Return the chicken to the skillet. Let it simmer in the sauce for an additional 2-3 minutes. This helps the chicken absorb all the great flavors. Taste the sauce and adjust the seasoning if needed. Once heated through, garnish the dish with fresh parsley. Enjoy your delicious Easy Chicken Marsala! You can find the full recipe above for more details. To make your chicken marsala shine, follow these cooking tips: - Cooking Times: Cook each chicken breast for about 4-5 minutes on each side. This helps them turn golden and stay juicy. Check with a meat thermometer; the chicken should reach 165°F (75°C). - Sautéing Mushrooms: When you sauté mushrooms, give them space in the pan. This helps them brown well. Cook them for about 5-7 minutes until they are tender. Stir them often to avoid burning. Plating can make your dish more appealing: - Attractive Plating: Place the chicken on the plate first. Spoon the rich mushroom sauce over the top. Add some fresh parsley for a pop of color. - Ideal Side Dishes: Serve chicken marsala with creamy mashed potatoes or steamed veggies. Both pair well with the savory sauce. Avoid these common errors to enhance your dish: - Overcooking Chicken: Watch the clock! Overcooked chicken becomes dry. Stick to the recommended cooking times. - Not Seasoning Adequately: Season your flour well with salt and pepper. This step adds flavor right from the start. Don’t skip it! {{image_2}} You can switch up the mushrooms in this recipe. Button and cremini mushrooms work well, but you can also try shiitake or portobello for a deeper flavor. Each type brings its own taste to the dish. For the sauce, consider using different liquids. If you don’t have chicken broth, vegetable broth is a good choice. You can even use a splash of apple juice for a sweet twist. If you need a gluten-free option, use almond flour instead of all-purpose flour. It works well for dredging the chicken. You will still get a nice crust and flavor. For those watching their carbs, you can skip the flour altogether. Just season the chicken with salt and pepper before cooking. This keeps it low-carb while still tasty. Want to add more flavor? Try using fresh herbs like thyme or rosemary. They give the dish a fresh, vibrant taste. You can also add a pinch of red pepper flakes for a little heat. Instead of chicken broth, consider using white wine. It adds a rich depth to the sauce. Just be sure to let it simmer to cook out the alcohol. This change makes the dish even more special. For the full recipe, check out the savory Chicken Marsala. To keep your Chicken Marsala fresh, store leftovers in an airtight container. Make sure to let the dish cool down before sealing it. This helps prevent moisture buildup. In the fridge, Chicken Marsala lasts for up to three days. If you want to save it for longer, freezing is a great option. To freeze Chicken Marsala, place it in a freezer-safe container. Use a portion that you can eat in one meal. This way, you can thaw only what you need. It can stay good for up to three months in the freezer. When you're ready to eat, just thaw it in the fridge overnight before reheating. When it's time to reheat your Chicken Marsala, you want to keep it tasty. I recommend using a skillet for the best results. Heat it over medium-low heat, and add a splash of chicken broth to keep it moist. Stir often to prevent sticking. If you prefer the microwave, use a microwave-safe dish. Cover it with a microwave-safe lid or wrap. Heat in short bursts, about one minute at a time. Check the temperature between bursts. Aim for an internal temperature of 165°F to ensure it's hot all the way through. Reheating Chicken Marsala this way helps maintain its rich flavor and texture. Enjoy your meal just as you did the first time! What to serve with Chicken Marsala? You can serve Chicken Marsala with creamy mashed potatoes or steamed vegetables. Both sides add nice balance and flavor. A fresh salad also works well. Can I replace chicken with another protein? Yes, you can use pork or turkey. These proteins can soak up the sauce and still taste great. Just adjust cooking times based on the protein you choose. How long does it take to make Chicken Marsala? It takes about 30 minutes from start to finish. This includes prep and cooking time. It’s quick and perfect for busy nights. Is Chicken Marsala a healthy recipe? Yes, Chicken Marsala can be healthy. It features lean protein and mushrooms. You can cut down on fat by using less butter or oil. Can I make Chicken Marsala ahead of time? Yes, you can prepare Chicken Marsala ahead. Just store the chicken and sauce separately. Reheat before serving for the best taste. How do I thicken the sauce if needed? To thicken the sauce, mix a bit of cornstarch with water. Stir it into the sauce and simmer until it thickens. What's the best way to ensure chicken stays juicy? Flattening the chicken helps it cook evenly. Don't overcook it, as this can dry it out. Always check for doneness with a meat thermometer. Aim for 165°F (75°C). We covered how to make Chicken Marsala step by step. You learned about the main ingredients, cooking methods, and common errors to avoid. I also shared tips on serving and variations for different diets. This dish is rich in flavor and easy to prepare. With practice, you’ll impress family and friends. Enjoy your cooking and have fun with this classic meal!

Easy Chicken Marsala Flavorful Recipe Made Simple

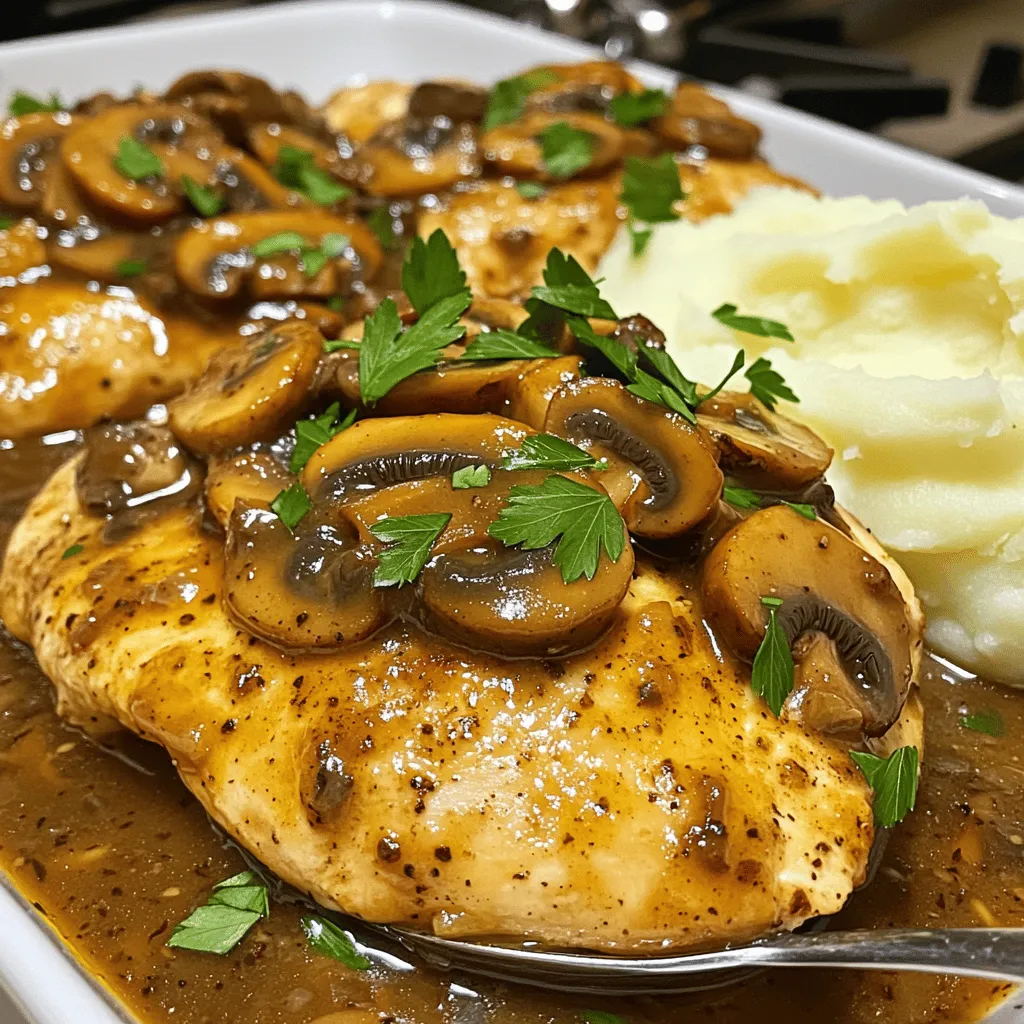
Ready to impress at your next meal? My Easy Chicken Marsala recipe is simple and packed with flavor. You’ll love

- 4 large bell peppers (any color), diced - 1 lb ground turkey or beef - 1 cup quinoa, rinsed - 1 can (15 oz) diced tomatoes, undrained - 4 cups vegetable broth - 1 medium onion, chopped - 2 cloves garlic, minced - 1 tsp Italian seasoning - Salt and pepper to taste - 1 cup shredded mozzarella cheese (for topping) - Fresh parsley, chopped (for garnish) To make a great stuffed bell pepper soup, focus on the ingredients. You need fresh bell peppers for color and crunch. I love using different colors for a vibrant dish. Ground turkey or beef gives the soup heartiness. Quinoa adds texture and is packed with protein. Diced tomatoes bring a juicy, tangy flavor. Vegetable broth forms the soup's base, making it rich and warm. Next, sauté a chopped onion and minced garlic. This step builds a great aroma and adds depth. Italian seasoning ties all the flavors together. Salt and pepper boost the taste. Don’t forget the toppings! Shredded mozzarella becomes melty and delicious on top. Fresh parsley adds a bright finish. This mix of flavors and textures makes each bite of the soup a delight. Enjoy the process of gathering these ingredients; they set the stage for a lovely dish. {{ingredient_image_1}} - Heat olive oil in a large soup pot. - Sauté onion and garlic until soft. Start by heating olive oil over medium heat in your pot. This gives the soup a rich base. Add the chopped onion and minced garlic. Cook them for about 3 to 5 minutes. You want them soft and fragrant. This step builds a great flavor for your soup. - Add ground turkey or beef, cook until browned. - Drain excess fat if necessary. Next, add the ground turkey or beef to the pot. Cook it until browned, which should take about 5 to 7 minutes. Break up the meat with a spoon as it cooks. If there’s too much fat, drain it. This keeps your soup light and tasty. - Stir in diced bell peppers and cook briefly. - Add quinoa, diced tomatoes, vegetable broth, and seasonings. - Bring to a boil and then simmer until cooked. Now, stir in the diced bell peppers. Cook them for about 5 minutes until they start to soften. Then, add quinoa, diced tomatoes (with juice), and vegetable broth. Don’t forget the Italian seasoning, salt, and pepper! Bring the pot to a boil. Cover it and reduce the heat to let it simmer. Cook for 20 to 25 minutes. This lets the flavors mix well and the quinoa to cook. Taste the soup and adjust the seasoning if needed. To make your soup extra tasty, try adjusting the seasoning. Start with salt and pepper. Taste as you go. You can also add more Italian seasoning for a bolder flavor. If you like it spicy, sprinkle in some crushed red pepper. For the right soup texture, aim for a balance between thick and brothy. If your soup is too thick, add more vegetable broth. If it's too thin, let it simmer longer without a lid. This will help reduce excess liquid. If you want a change from quinoa, use rice or farro. Both grains add a nice chew. You can also try lentils for a protein boost and unique texture. For meat, ground turkey and beef are great, but you can use ground chicken or pork. If you prefer a meatless option, try lentils or plant-based meat. Both options keep the soup hearty and filling. Get creative with toppings! Try adding sour cream or Greek yogurt for creaminess. A sprinkle of fresh herbs like cilantro or chives adds flavor. You can also add avocado slices for a rich touch. Pair your soup with crusty bread or a light salad. A simple mixed greens salad complements the flavors well. For a heartier meal, serve it with garlic bread or cheesy toast. Pro Tips Use Fresh Herbs: Fresh parsley or basil can brighten the flavors of your soup. Add them just before serving to maintain their vibrant taste. Customize the Protein: Feel free to swap ground turkey for chicken, or even plant-based meat alternatives for a vegetarian version. Add Spice: For a kick of heat, consider adding red pepper flakes or diced jalapeños to the mix while cooking. Make it Ahead: This soup tastes even better the next day! Prepare it in advance and store it in the fridge for up to 3 days. {{image_2}} You can make this soup vegetarian by swapping ground meat for plant-based protein. Try using lentils or crumbled tofu. These options add protein while keeping the soup tasty. You can also add more veggies like zucchini, corn, or carrots. This makes the soup heartier and boosts nutrition. Want some heat? Add jalapeños or crushed red pepper flakes to your soup. Start with a little and taste as you go. This way, you control the spice level. You can also add your favorite hot sauce for extra kick. Just a few dashes can bring bold flavors to your bowl. To give your soup a Mexican twist, add black or pinto beans. This makes the soup filling and savory. You can also use taco seasoning for more flavor. If you’re feeling adventurous, try adding curry spices for an Asian-inspired flavor. Using cumin, turmeric, or coriander can change the soup's taste in a delightful way. To store leftover stuffed bell pepper soup, let it cool first. Transfer the soup to an airtight container. Make sure to seal it tightly. You can keep it in the refrigerator for up to four days. This way, you can enjoy a warm bowl later in the week. If you want to freeze the soup, use a freezer-safe container. Leave some space at the top for expansion. The soup can last up to three months in the freezer. When you're ready to eat, thaw it in the fridge overnight. To reheat, warm it on the stove or in the microwave. Stir well to heat evenly. Enjoy your cozy meal! It takes about 45 minutes to cook stuffed bell pepper soup. You spend 15 minutes prepping the ingredients. Then, you cook the soup for about 30 minutes, which includes the simmering time. This soup is quick to make and full of flavor. Yes, you can make this soup ahead of time. It stores well in the fridge for 3 to 4 days. To prep, cook the soup and let it cool. Then, store it in an airtight container. You can also freeze it for up to 3 months. Just thaw it overnight in the fridge before reheating. If your soup is too thick, you can add more broth. Start with one cup of vegetable broth and stir well. If it still seems thick, add more broth until you reach the right consistency. You can also add water if you don't have broth. Just make sure to adjust the seasoning to keep the flavor strong. In this post, we explored how to make stuffed bell pepper soup. You learned about key ingredients, like bell peppers and quinoa, and discovered tips to enhance flavor. We also discussed variations, from vegetarian options to international twists, ensuring you can customize the dish. Plus, I shared storage tips to keep your soup fresh. This soup is simple, tasty, and perfect for sharing. Dive in, create your version, and enjoy every hearty spoonful. Happy cooking!

Stuffed Bell Pepper Soup Flavorful and Hearty Dish

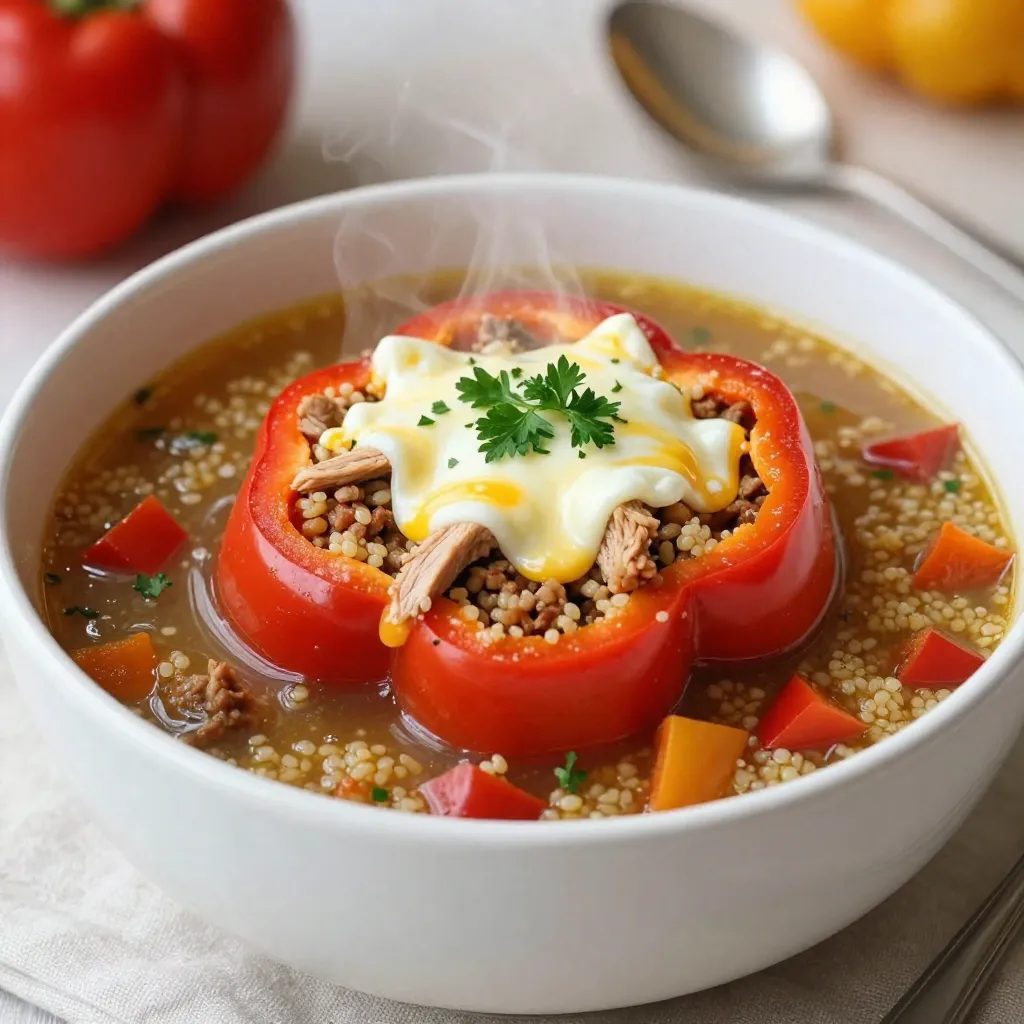
Looking for a cozy meal that warms the soul? Stuffed Bell Pepper Soup might just be your new favorite dish!

To make tomato basil bruschetta, gather these fresh ingredients. They are key to rich flavor and texture. - Bread type and selection: Use 1 baguette, sliced diagonally into 1/2 inch pieces. - Fresh produce essentials: You need 4 ripe tomatoes, diced, 1/4 cup fresh basil leaves, finely chopped, and 2 cloves garlic, minced. - Condiments and seasonings: Use 3 tablespoons extra-virgin olive oil, 1 tablespoon balsamic vinegar, and salt and black pepper to taste. - Optional garnishes for presentation: Add Parmesan shavings for garnish if you like. These ingredients come together to create a simple yet flavorful dish. The Fresh tomatoes and basil make this bruschetta bright and refreshing. To enhance it, good olive oil and balsamic vinegar add depth. If you're looking for the full recipe, check the earlier sections for complete details. 1. Preheat your oven. Set it to 400°F (200°C). This helps the bread get crisp. 2. Prepare your baking sheet. Line it with parchment paper or just use it as is. 3. Brush the baguette slices. Use 1 tablespoon of olive oil. Lightly coat each slice. This adds flavor and helps with crisping. 4. Bake the bread. Place the slices in the oven for 5-7 minutes. Flip them halfway. Look for a golden color. 1. Dice the tomatoes. Cut them into small pieces. This helps them mix well. 2. Chop the basil. Finely slice the leaves. Fresh basil gives a nice aroma. 3. Mix in garlic. Add minced garlic for extra flavor. 4. Balance the flavors. Stir in balsamic vinegar and remaining olive oil. Add salt and pepper to taste. Toss gently until mixed. 1. Top the toasted bread. Spoon the tomato basil mix generously onto each slice. 2. Presentation tips. Arrange the bruschetta on a large platter. Garnish with whole basil leaves for color. Serve with a bowl of extra balsamic vinegar for drizzling. Enjoy your delicious Tomato Basil Bruschetta! For the full recipe, check out the full recipe section. Choosing ripe tomatoes is key. Look for tomatoes that feel heavy for their size. They should have a deep color and slight give when you press them. Fresh basil is also important. Select bright green leaves without brown spots. Smell the basil; it should smell strong and sweet. Quality olive oil enhances flavor. Always use extra-virgin olive oil for the best taste. This oil has a rich flavor that makes your bruschetta shine. Balancing acidity and seasoning is crucial. You want the tomatoes to taste bright and fresh. Add balsamic vinegar slowly. Taste as you mix to find the right tartness. Adjust salt and pepper to your liking. If you prefer less acidity, add a bit more olive oil. If you want more zest, add a dash of lemon juice. These small changes can make a big difference. Serving style matters. Arrange your bruschetta on a large platter. Layer them in rows for a clean look. Garnish with whole basil leaves for color. A sprinkle of Parmesan on top adds elegance. For an extra touch, serve with a small bowl of balsamic vinegar. This lets guests drizzle more on their bruschetta. A beautiful presentation makes the dish even more appealing. {{image_2}} You can switch up your bruschetta with different toppings. Try adding creamy avocado slices for richness. Fresh mozzarella gives a nice, soft texture. You can also use seasonal ingredients. Roasted peppers add a sweet, smoky flavor. Artichokes bring a unique taste to the mix. The options are endless! If you need a gluten-free choice, use corn or rice-based bread. You can also try slices of grilled eggplant or zucchini. These options keep the dish tasty while fitting dietary needs. For some heat, add diced jalapeños or crushed red pepper flakes. If you want a gourmet twist, think about using truffle oil instead of olive oil. You could also add sun-dried tomatoes for a deeper flavor. These changes make your bruschetta stand out and impress your guests. To keep leftover bruschetta fresh, store it in an airtight container. This helps avoid sogginess. You want to keep the bread and tomato mixture separate. This way, the bread stays crispy, and the topping remains juicy. If you have extra baguette slices, wrap them in plastic wrap or foil. Store them at room temperature for the best taste. Freezing bruschetta is tricky. I do not recommend freezing the whole bruschetta. The bread will get mushy when thawed. However, you can freeze the tomato basil mixture. Place it in a freezer-safe bag or container. It can last up to three months in the freezer. When ready to use, just thaw it in the fridge overnight. Reheating bruschetta requires care. I suggest reheating the bread separately. Preheat your oven to 350°F (175°C). Place the toasted bread on a baking sheet. Warm it for about 5 minutes. This keeps the bread crispy. After that, add the tomato mixture on top. Enjoy your bruschetta warm, just like the first time. Homemade bruschetta tastes best fresh. If you store it, it lasts about one day in the fridge. Keep the toppings and bread separate. The bread gets soggy fast when mixed with the topping. You can prepare the tomato basil mixture ahead. Store it in the fridge for up to two days. Just wait to top the bread until you are ready to serve. This keeps the bread nice and crunchy. Bruschetta pairs well with many dishes. Here are some great ideas: - A fresh green salad - Charcuterie board with meats and cheeses - Grilled vegetables for a hearty side - A bowl of olives for a salty bite For the full recipe, check out [Full Recipe]. Making bruschetta involves choosing the right bread, fresh produce, and seasonings. I shared preparation steps, topping tips, and presentation ideas. You can enjoy variations that suit your taste, whether gluten-free or spicy. Store leftovers properly to keep them fresh. Bruschetta is easy to make and great for sharing. Experiment with your favorite ingredients and impress your friends. Enjoy the process of creating a dish that tastes as good as it looks.

Tomato Basil Bruschetta Simple and Flavorful Recipe

Tomato basil bruschetta is a simple yet flavorful dish that brings joy to any table. With fresh ingredients and easy

- 2 lbs Yukon Gold potatoes - 1 whole head of garlic - 4 tablespoons unsalted butter - ½ cup heavy cream (or milk) - Salt and pepper to taste - 2 tablespoons fresh chives - 1 teaspoon olive oil Yukon Gold potatoes work best. They give a creamy texture and a sweet taste. Roasting garlic adds a rich flavor. You'll squeeze the soft garlic into the mash. - You can use different types of potatoes like Russet or red potatoes. - If you want it dairy-free, try coconut milk or vegan butter. - Adding herbs like rosemary or thyme can brighten the taste. These options let you customize your dish. Feel free to experiment based on what you have at home or your taste. For the full recipe, check the section above. Roasting the garlic Start by preheating your oven to 400°F (200°C). Take a whole head of garlic, slice the top off, and drizzle with olive oil. Wrap it in aluminum foil and place it on a baking sheet. Roast it for about 30-35 minutes. The garlic will become soft and fragrant. Preparing the potatoes While the garlic roasts, take 2 lbs of Yukon Gold potatoes. Peel them and cut them into quarters. Place them in a large pot and cover with cold water. Add a generous pinch of salt. This helps flavor the potatoes from the start. Boiling the potatoes until tender Turn the heat on high and bring the pot to a boil. Cook the potatoes for 15-20 minutes. They should become fork-tender. This means a fork goes in easily without resistance. Mashing the potatoes Once the potatoes are cooked, drain them well. Return them to the pot. Squeeze the roasted garlic cloves out of their skins and add them to the potatoes. Then, add 4 tablespoons of unsalted butter. Use a potato masher to mash everything together until smooth. Mixing in cream and butter Next, pour in ½ cup of heavy cream (or milk for a lighter option). Mix until you reach a creamy texture. If you want them extra fluffy, use an electric mixer. Don’t forget to season with salt and pepper to taste. Adjusting seasoning Taste your mashed potatoes and adjust the seasoning if needed. A little more salt can really enhance the flavor. Serving suggestions and garnishing with chives Serve your roasted garlic mashed potatoes hot. For a beautiful finish, garnish them with 2 tablespoons of finely chopped fresh chives. This adds a nice touch and a pop of color. Enjoy your creamy comfort dish! For the complete guide, see the Full Recipe. For the best mashed potatoes, decide if you want them smooth or chunky. - Smooth potatoes: Use a potato ricer or an electric mixer. - Chunky potatoes: A simple potato masher works great. Each tool gives a different feel. A ricer makes them silky, while a masher keeps some bite. You can add herbs to change the flavor. Fresh rosemary or thyme works well. Roasted garlic shines in many dishes. You can mix it into sauces or spreads too. Be sure to cook the potatoes just right. Overcooked potatoes turn watery, while undercooked ones stay hard. Always use warm butter and cream. Cold ingredients can make your mash heavy and lumpy. For a full experience, check out the Full Recipe for Roasted Garlic Mashed Potatoes. {{image_2}} When you make roasted garlic mashed potatoes, the fun doesn’t stop with the basic recipe. You can mix it up in many tasty ways. Adding cheese can take your dish to a new level. Try grated parmesan for a sharp taste or cheddar for a more creamy flavor. If you want to add some color and taste, mix in roasted vegetables like carrots or bell peppers. They bring a sweet twist to the dish. If you follow a vegan diet, you can still enjoy these mashed potatoes. Use plant-based butter and swap the heavy cream for almond or oat milk. This keeps the dish creamy and delicious. For those who need gluten-free options, this recipe is already safe. Just make sure your butter and cream are gluten-free. Change things up with seasonal herbs. In spring, add fresh parsley or dill. For a warm winter dish, sprinkle in some thyme or rosemary. These herbs can elevate the flavor and make your mashed potatoes shine for any season. You can also think about using spices like nutmeg for fall or a pinch of paprika for summer dishes. For more ideas and details, check out the Full Recipe. To keep roasted garlic mashed potatoes fresh, place them in a sealed container. Make sure the container is airtight. This helps prevent the potatoes from absorbing other smells in the fridge. Store them in the refrigerator for up to three days. If you think you won’t eat them in that time, consider freezing. Reheating mashed potatoes can be tricky. You want to keep them creamy, not dry. To do this, add a splash of milk or cream when reheating. Stir it in as you warm them. You can use the microwave or a pot on the stove. If using the microwave, heat in short bursts of 30 seconds, stirring in between. On the stove, heat over low heat, stirring gently. Aim for a warm center, around 165°F. Freezing mashed potatoes is easy, but you need to do it right. First, let them cool completely. Then, use a freezer-safe container or bag. Remove as much air as possible before sealing. This helps keep the flavor and texture. When you are ready to eat, thaw them overnight in the fridge. Reheat as mentioned before. You might need to add a little liquid to bring back the creaminess. Enjoy your delicious leftovers! To roast garlic, start by preheating your oven to 400°F (200°C). Cut the top off a whole head of garlic. Drizzle it with olive oil and wrap it in aluminum foil. Place the wrapped garlic on a baking sheet and roast it for about 30-35 minutes. The garlic should be soft and fragrant when done. Once roasted, squeeze the cloves out of their skins to use in your mashed potatoes. Yes, you can prepare roasted garlic mashed potatoes in advance. Cook the potatoes and mash them as usual. Allow them to cool, then store them in an airtight container in the fridge for up to three days. When ready to serve, reheat them gently on the stove. Add a splash of cream or milk to restore creaminess as you stir. Roasted garlic mashed potatoes pair well with many dishes. They complement roasted meats like chicken, beef, or lamb beautifully. You can also serve them with grilled vegetables or a rich mushroom gravy. They make a great side dish for a cozy family dinner or a festive gathering. Heavy cream makes the mashed potatoes richer and creamier. It adds a velvety texture and a deeper flavor. Milk, on the other hand, lightens the dish and makes it less rich. If you want a lighter version, milk is a great choice, but it will yield less creamy potatoes. Both options can be delicious, so choose based on your taste! In this blog post, we covered how to make roasted garlic mashed potatoes. You learned about the key ingredients, like Yukon Gold potatoes and garlic, and various alternatives. I shared step-by-step instructions, tips for perfect texture, and fun variations. Remember, you can customize this dish based on your taste and dietary needs. Enjoy exploring flavors and sharing this comforting dish with others. With these insights, you're all set to create delicious mashed potatoes that everyone will love.

Roasted Garlic Mashed Potatoes Creamy Comfort Dish

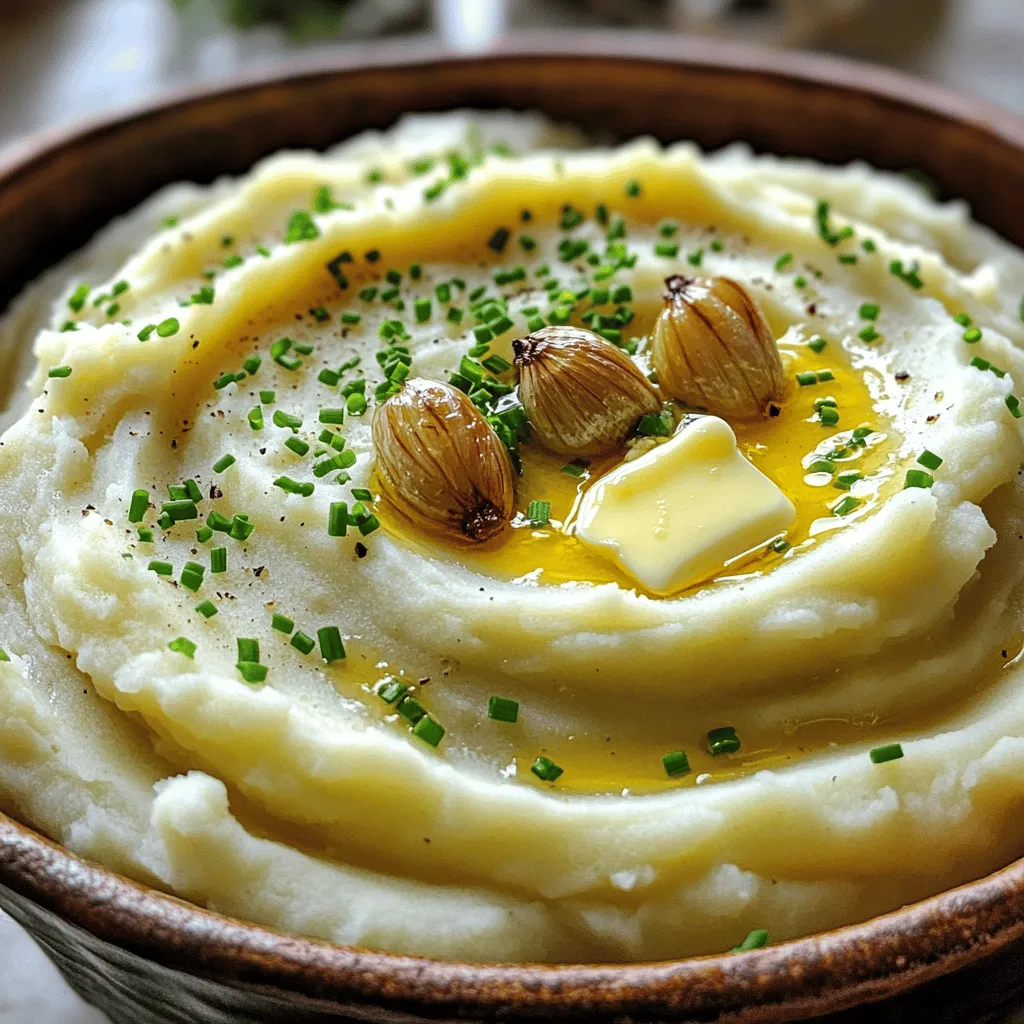
Are you ready to elevate your mashed potatoes to a whole new level? Roasted Garlic Mashed Potatoes are creamy, rich,

Honey Lemon Glazed Chicken is a simple dish that bursts with flavor. This recipe uses fresh ingredients to create a sweet and tangy glaze. You can enjoy it grilled or pan-fried. It’s perfect for family dinners or quick weeknight meals. - 4 boneless, skinless chicken thighs - 1/4 cup honey - 1/4 cup fresh lemon juice - 2 tablespoons soy sauce - 2 garlic cloves, minced - 1 teaspoon fresh ginger, grated - Salt and pepper to taste - 2 tablespoons olive oil - Zest of 1 lemon - Fresh parsley, for garnish Gather these ingredients before you start. The sweet honey and bright lemon juice will make your chicken shine. The garlic and ginger add depth and warmth. Don’t skip the lemon zest; it boosts the flavor. Each bite will be a tasty treat! First, grab a mixing bowl. Add the honey, fresh lemon juice, soy sauce, minced garlic, and grated ginger. Don’t forget the lemon zest! This mix gives the chicken its bright flavor. Whisk until everything blends well. Taste it. If you want, adjust the salt and pepper. This glaze is the star of the dish. Next, take your chicken thighs. Place them in a resealable bag or a shallow dish. Pour the glaze over the chicken. Make sure each piece gets coated well. Seal the bag or cover the dish. Let it marinate in the fridge for at least 30 minutes. If you have time, let it sit for up to 2 hours. The longer it sits, the more flavor it will soak up. You can cook this chicken in two great ways: grilling or pan-frying. - Grilling: Preheat your grill to medium-high. Brush the grill grates with olive oil. Remove the chicken from the marinade, letting the excess drip off. Place the chicken on the grill. Cook for about 5-7 minutes on one side. Flip the chicken, and brush it with some reserved marinade. Cook for another 5-7 minutes. It’s done when it reaches 165°F (75°C). - Pan-Frying: Heat a pan over medium-high heat and add olive oil. Follow the same steps as grilling for removing the chicken from the marinade. Cook the chicken for 5-7 minutes on one side. Flip it, brush with marinade, and cook for another 5-7 minutes. Again, aim for that 165°F (75°C) mark. Both methods give you juicy chicken with a sweet and tangy glaze. Enjoy the cooking! For the complete recipe, check out the Full Recipe above. To get that shiny glaze, mix honey and lemon juice well. The soy sauce adds depth. When you cook, brush more glaze on the chicken. This gives it a nice coat. Use a whisk to blend the mixture until smooth. The lemon zest adds a bright touch that pops. Cooking chicken thighs right is key. They should be juicy and tender. Use medium-high heat for cooking. This helps the chicken brown nicely. Flip the chicken only once to keep it moist. Always check the internal temperature. It should reach 165°F (75°C) for safety. Let the chicken rest before slicing. This keeps all the juices inside. Pair this dish with simple sides. Rice goes well with the honey lemon flavor. Roasted veggies also add color and taste. A fresh salad can lighten the meal. Try garlic bread for a crunchy contrast. These sides make the meal complete and satisfying. {{image_2}} You can add fresh herbs for a tasty twist. Try thyme or rosemary. Chop them finely and mix into the glaze. This change brings a bright flavor to the chicken. It also adds a lovely aroma as it cooks. Use about one tablespoon of chopped herbs. This simple addition makes your dish feel special. Want some heat? Add red pepper flakes to your glaze. Start with 1/2 teaspoon and adjust to your taste. The spice balances the sweet and tangy flavors. You can also use sriracha for a different kick. Brush some extra sriracha on the chicken while cooking. This will give you a nice, spicy finish. If you don't have chicken thighs, use chicken breasts instead. They cook well and stay moist with the glaze. You can also use bone-in chicken pieces. Just be sure to adjust your cooking time. Bone-in pieces usually take longer to cook through. Always check for an internal temperature of 165°F (75°C). You can enjoy this honey lemon glaze with other meats too, like pork or salmon. It’s a versatile sauce that works well with many proteins. After enjoying your honey lemon glazed chicken, store any leftovers in an airtight container. Keep the container in the fridge. This way, the chicken stays fresh for up to three days. If you have extra glaze, you can store it separately, too. Just make sure to cover it well. If you want to keep the chicken longer, freezing is a great option. First, let the chicken cool completely. Then, wrap it tightly in plastic wrap or foil. Place it in a freezer-safe bag to avoid freezer burn. You can freeze the chicken for up to three months. Label your bag with the date, so you know when to use it. To reheat your honey lemon glazed chicken, you have a few options. You can use the oven, microwave, or stovetop. For the oven, preheat it to 350°F (175°C). Place the chicken in a baking dish and cover it with foil. Heat for about 15-20 minutes. For the microwave, put the chicken on a plate, cover it, and heat it for 1-2 minutes. If you want to use the stovetop, heat a pan over medium heat and add a splash of water. Cook the chicken for about 5 minutes, turning it to heat evenly. Enjoy your meal again! You can use maple syrup as a sweet option. It has a similar texture and sweetness. Agave nectar is another choice. It is also sweet but has a milder taste. Brown sugar mixed with water may work too. It will give a different flavor but still tastes good. Yes, you can prepare the marinade a day before. Just mix all the ingredients and store it in the fridge. You can marinate the chicken up to two hours before cooking. This lets the flavors soak in well. It’s a great way to save time on a busy day. Marinate the chicken for at least 30 minutes. This helps the flavors blend in. For a deeper flavor, try 2 hours. Just remember, don’t marinate too long. The acid in the lemon juice can make the chicken tough if left too long. This blog post outlined a simple recipe for honey lemon chicken. We talked about the key ingredients, step-by-step cooking methods, and helpful tips. You learned how to achieve a perfect glaze and cook chicken just right. Plus, we shared variations and storage tips to help you plan ahead. This dish is versatile and easy to make, so don’t hesitate to try it. I hope this helps you create a delightful meal everyone will enjoy!

Honey Lemon Glazed Chicken Quick and Flavorful Dish

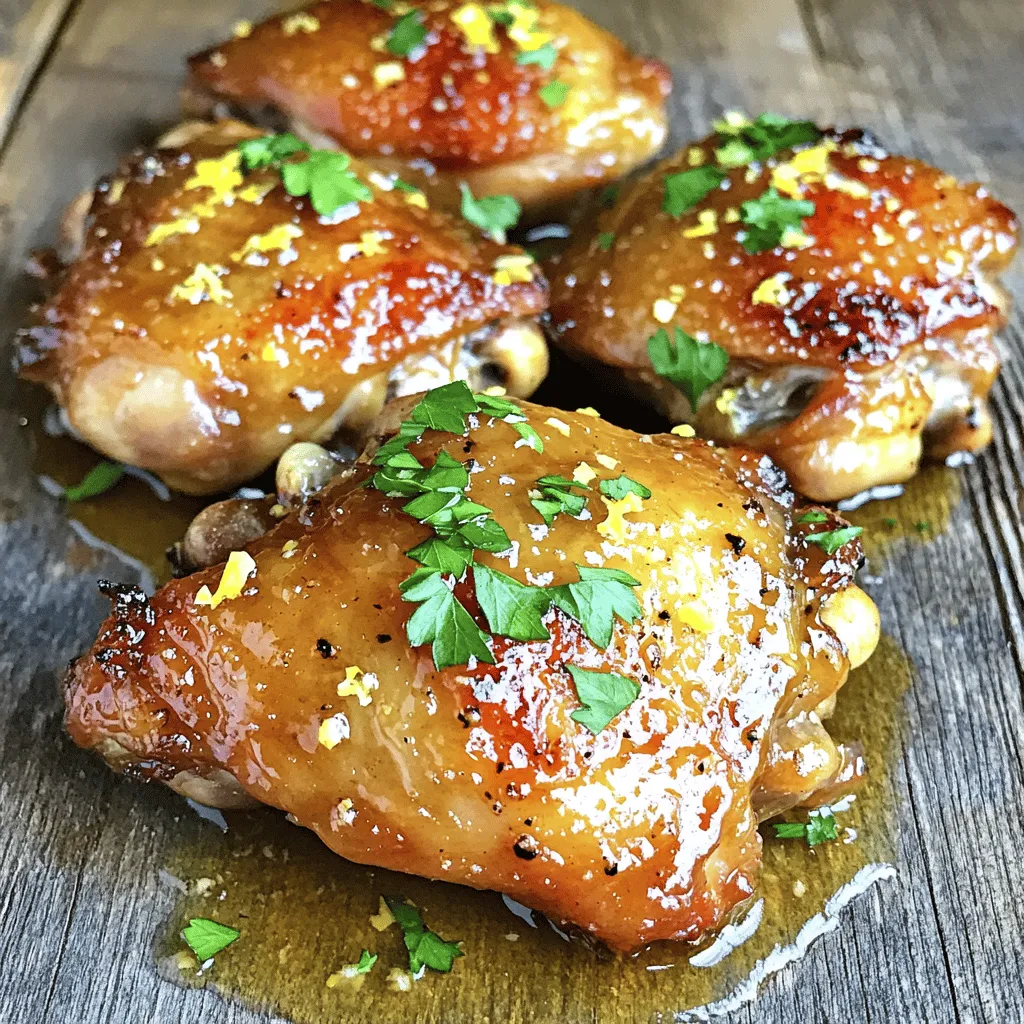
Looking to impress with a quick and delicious meal? Try my Honey Lemon Glazed Chicken! This yummy dish combines sweet

Newer posts
← Previous Page1 … Page83 Page84

dsad

© 2026 Lisa Dishes • Built with GeneratePress

Our Policies

  • Copyright Policy
  • Cookie Policy
  • GDPR Policy
  • Privacy Policy
  • Disclaimer
  • Terms Of Use

More Information

  • Home
  • About
  • Contact
  • Appetizers
  • Dessert
  • Dinner
  • Drinks
©2026, Lisa Dishes About Back To Top