Skip to content
DisclaimerTerms Of UseGDPR PolicyCookie Policy

Lisa Dishes

  • Home
  • Drinks
  • Appetizers
  • Dinner
  • Dessert
  • About
  • Contact
  • Privacy Policy
DisclaimerTerms Of UseGDPR PolicyCookie Policy

NO-ING-IMG

The right ingredients make this dish shine. Here’s what you need for Zucchini Apple Crumble. - 2 medium zucchinis, grated - 2 large apples, peeled, cored, and diced (such as Granny Smith or Honeycrisp) - 1 cup rolled oats - 1/2 cup all-purpose flour - 1/2 cup brown sugar - 1/4 cup granulated sugar - 1 teaspoon ground cinnamon - 1/4 teaspoon nutmeg - 1/2 cup unsalted butter, melted - 1/2 teaspoon vanilla extract - Pinch of salt - Optional: Chopped nuts (walnuts or pecans) for added crunch To take your crumble to the next level, consider these options: - Add a tablespoon of lemon juice for brightness. - Toss in some raisins or dried cranberries for a chewy texture. - Use a splash of maple syrup for extra sweetness. For the best flavor, choose apples with a good balance of sweet and tart. Granny Smith apples offer a nice bite, while Honeycrisp adds sweetness. For zucchini, look for medium-sized ones. They tend to be more tender and flavorful. Fresh, firm zucchinis work best in this dish. You can also try yellow squash for a twist. For the full recipe, check out the detailed instructions on how to prepare this delicious dessert! Start by washing your zucchinis. Grate both zucchinis using a box grater. Place the grated zucchini in a bowl and set it aside. Next, peel and core your apples. Dice them into small pieces. I like using Granny Smith or Honeycrisp apples. They add a nice tart flavor that balances the sweet crumble. In a large mixing bowl, combine the grated zucchini and diced apples. Sprinkle a little cinnamon and sugar over the mixture. Toss the zucchini and apples gently with your hands. This helps them blend well. Once mixed, set the bowl aside. The flavors will start to meld together. In another bowl, mix the rolled oats and flour. Add the brown sugar, granulated sugar, cinnamon, and nutmeg. Pour in the melted butter and vanilla extract. Use a fork or your hands to mix until the mixture looks like coarse crumbs. This will be your delicious crumble topping. Now, grease a baking dish with butter. Spread the zucchini and apple mixture evenly in the dish. Then, sprinkle the oat crumble topping over the fruit layer. If you like, add chopped nuts for extra crunch. Bake in a 350°F (175°C) oven for 30-35 minutes. You want the topping to be golden brown and the fruit to bubble. For the complete recipe, check out the [Full Recipe]. To create a great crumble topping, start with cold butter. Cut it into small pieces and mix it with your dry ingredients. Use your fingers or a fork to blend until it looks like coarse crumbs. Avoid over-mixing. You want some texture in your topping. If you like crunch, add chopped nuts like walnuts or pecans. They enhance the flavor and add a nice bite. One common mistake is using too much liquid from the zucchini. Grated zucchini can hold a lot of water. Make sure to pat it dry before mixing it with the apples. Another mistake is not letting the dish cool before serving. If you dive in too soon, the juices can be very hot. Let it sit for a few minutes for the flavors to settle. Serve your Zucchini Apple Crumble warm for the best taste. A scoop of vanilla ice cream on top adds a creamy touch. You can also sprinkle a bit of cinnamon for extra flavor. For a fun twist, try drizzling caramel sauce over the ice cream. If you have leftovers, they make a great breakfast too! Enjoy it cold or warm, paired with yogurt or milk. {{image_2}} You can easily make Zucchini Apple Crumble gluten-free. Just replace all-purpose flour with gluten-free flour. Many brands offer blends that work well for baking. You can also use almond flour for a nutty taste. Check your oats too; make sure they are certified gluten-free. This helps you enjoy this dessert without worry. Want to change things up? Add a few unique ingredients to your crumble. Try mixing in some chopped nuts, like walnuts or pecans, for extra crunch. You can also add dried fruits, like raisins or cranberries, for sweetness. Spices can make a big difference too. A dash of ginger or cardamom can give your dish a warm twist. Experiment with different flavors until you find your favorite mix! If you want a vegan version, it’s simple to adjust the recipe. Substitute the unsalted butter with coconut oil or a plant-based butter. You can also use maple syrup instead of granulated sugar for a natural sweetener. This keeps the crumble tasty while making it plant-based. Enjoy a delicious dessert that fits your diet with these easy changes! To keep your Zucchini Apple Crumble fresh, store it in an airtight container. Let it cool completely before sealing it. This helps avoid moisture buildup, which can make the crumble soggy. You can also wrap it tightly with plastic wrap or aluminum foil. When stored properly, Zucchini Apple Crumble lasts about 3 to 5 days in the fridge. If you want it to last longer, consider freezing it. In the freezer, it can stay good for about 2 to 3 months. Just make sure to label your container with the date. To reheat your Zucchini Apple Crumble, preheat your oven to 350°F (175°C). Place the crumble in an oven-safe dish, covering it loosely with foil. Bake for about 15 to 20 minutes or until warmed through. You can also microwave individual portions for a quick treat. Heat for 30 seconds to 1 minute, checking regularly. Enjoy your dessert just like the first time! For the complete recipe, check the Full Recipe section. Yes, you can use frozen zucchini or apples. Just make sure to thaw them first. Drain any extra liquid to keep the crumble from being soggy. Frozen fruits may be softer, but they still taste great in this dish. You can use white sugar if you don't have brown sugar. To mimic the flavor of brown sugar, mix white sugar with a bit of molasses. Honey or maple syrup are also good options. Just adjust the liquid in the recipe to balance it out. Zucchini Apple Crumble can be a healthy dessert option. Zucchini adds fiber and keeps the dish moist. Apples provide vitamins and natural sweetness. Using less sugar and whole grains, like oats, boosts its health benefits. Enjoy it in moderation for a tasty treat! For the complete process, check the Full Recipe. In this blog post, we explored how to make a delicious Zucchini Apple Crumble. We covered the key ingredients, step-by-step instructions, and helpful tips to create the perfect dish. I shared variations to fit different diets and how to store leftovers properly. Remember, with the right apples and zucchini, your crumble will shine. Don't hesitate to try new flavors and enjoy this treat fresh from the oven. Your friends and family will love it, and so will you!

Zucchini Apple Crumble Flavorful and Simple Dessert

Looking for a dessert that is both simple and bursting with flavor? Let me introduce you to Zucchini Apple Crumble!

Ripe Peaches: Selection and Preparation Choosing ripe peaches is key for a great jam. Look for peaches that are soft but not mushy. Their skin should be slightly fuzzy and fragrant. Wash them under cold water to remove dirt. Peel and dice the peaches into small pieces. This helps them cook evenly and release their juices. Sugar: Role in Flavor and Preservation Sugar is important for flavor and preservation. It adds sweetness and helps the jam thicken. It also keeps the jam from spoiling too fast. Use granulated sugar for the best results. You will need about 2 cups for this recipe. Additional Ingredients: Lemon Juice, Water, Pectin, Vanilla, Salt - Lemon Juice: 1 tablespoon adds brightness and helps balance the sweetness. - Water: 1/4 cup helps dissolve the sugar and fruit. - Pectin: 1 packet (1.75 oz) is key for thickening the jam. - Vanilla Extract: 1 teaspoon adds a warm flavor note. - Salt: A pinch enhances all the flavors in the jam. These ingredients come together to create a fresh and tasty peach jam. For the full recipe, check out the detailed steps later in the article. Washing and Dicing Peaches Start by washing your peaches under cool water. This removes dirt and pesticides. Next, peel the peaches with a knife. Slice them into small pieces. Dicing helps the fruit break down during cooking. Aim for about six ripe peaches for this recipe. Combining Ingredients in a Pot In a large pot, add the diced peaches, two cups of sugar, one tablespoon of lemon juice, and a quarter cup of water. Stir gently until the sugar starts to dissolve. Let this mixture sit for about thirty minutes. This allows the peaches to release their natural juices, making your jam extra flavorful. Boiling and Dissolving Sugar Place the pot on medium heat. Bring the mixture to a boil while stirring often. This step prevents the mixture from sticking to the bottom of the pot. Boil for about five minutes, until the mixture thickens and bubbles. Adding Fruit Pectin: Timing and Techniques Once the mixture is boiling, add the fruit pectin. Stir it in well and keep boiling for another five minutes. Stir constantly to ensure the pectin dissolves evenly. This step is key for getting the perfect jam consistency. Filling Jars: Headspace and Techniques After cooking, remove the pot from heat. Stir in the vanilla extract and a pinch of salt. Then, skim off any foam from the surface. Pour the hot peach jam into sterilized jars. Leave about a quarter inch of headspace at the top of each jar. This space allows for expansion during sealing. Processing in a Boiling Water Bath Seal the jars tightly with lids. If you want to preserve your jam long-term, process the jars in a boiling water bath for ten minutes. This step helps seal the jars and keeps your jam fresh. After processing, let the jars cool completely at room temperature before storing. For the full recipe, check out the details above! Ripeness Indicators Choose peaches that are slightly soft. They should smell sweet and fruity. Look for a golden hue, not green. Avoid hard or bruised peaches. When you press gently, they should yield a little. Organic vs. Conventional Peaches Organic peaches are often more flavorful. They are grown without harmful chemicals. If possible, choose organic for the best taste. Conventional peaches can also be good, but check for freshness. Methods for Sterilizing Jars and Lids To keep your jam safe, you must sterilize jars. Boil jars and lids in water for 10 minutes. Let them air dry on a clean towel. You can also run them through a hot dishwasher. Dealing with Foaming or Separation Foaming can happen when you cook the jam. To reduce foam, skim it off with a spoon. If your jam separates, stir it gently to mix again. Proper cooking time is key to avoid this. {{image_2}} You can change the taste of your homemade peach jam in fun ways. One great mix is peach-mango jam. Just add diced mango to your peach mixture. This adds a sweet and tropical twist. You will love how the flavors blend! Another option is spiced peach jam. Add a sprinkle of cinnamon or nutmeg to your mix. This gives your jam a warm, cozy flavor. It’s perfect for fall mornings or holiday treats. If you want to try different sweeteners, honey or maple syrup work well. They add a unique taste to your jam. Use about 1.5 cups of honey or maple syrup instead of sugar. This will change the flavor slightly, but it will still be sweet and delicious. You have two main methods for preserving your jam: freezing or canning. Freezing is simple and keeps your jam fresh. Just pour it into freezer-safe containers, leaving space at the top. It will last for up to a year in the freezer. Canning is another great option. It allows you to store your jam at room temperature. After filling your jars, process them in a boiling water bath for about 10 minutes. This will help kill any bacteria and seal the jars tight. Both methods keep your peach jam tasty and safe to eat! Store your homemade peach jam in a cool, dark place. You can keep it at room temperature. If you open a jar, always put it in the fridge. The cold helps keep it fresh for longer. How long does it last? If sealed well, your jam can last for up to a year. Once opened, it stays good for about three weeks in the fridge. Check for any off smells or colors. If you see mold on the top, throw it away. A change in texture can also mean it's time to discard the jam. Always trust your senses. You can tell if the jam sets by doing a simple test. Take a small spoon of the hot jam and place it on a cold plate. Let it sit for a minute. Then, run your finger through the jam. If it holds its shape and does not run back together, it has set well. If it’s still runny, cook it for a few more minutes. It’s important to stir often as it cooks to prevent burning. Yes, you can use frozen peaches. Just make sure to thaw them completely before use. Drain any excess liquid that comes from thawing. Frozen peaches may be softer than fresh ones, but they still work well for jam. The flavor will be good, and you can enjoy peach jam any time of the year. Homemade peach jam offers many benefits. Here are some key points: - Fresh Flavor: You can taste the real peach flavor without extra preservatives. - Control over Ingredients: You know exactly what goes into your jam. - Customization: You can adjust sweetness and flavors to your liking. - Satisfaction: Making jam can be a fun and rewarding kitchen project. - Sustainability: Using local and seasonal peaches supports farmers and reduces waste. For a delightful peach jam, follow this full recipe: Peachy Paradise Jam Ingredients: - 6 ripe peaches, peeled and diced - 2 cups granulated sugar - 1 tablespoon lemon juice - 1/4 cup water - 1 packet (1.75 oz) fruit pectin - 1 teaspoon vanilla extract - Pinch of salt Instructions: 1. Begin by thoroughly washing the peaches, then peel and dice them into small pieces. 2. In a large pot, combine the diced peaches, sugar, lemon juice, and water. Stir gently until the sugar is mostly dissolved. 3. Let the mixture sit for about 30 minutes to allow the peaches to release their juices. 4. Over medium heat, bring the mixture to a boil. Stir frequently to prevent sticking. 5. Once boiling, add the fruit pectin and continue to boil for an additional 5 minutes, stirring constantly. 6. Remove the pot from heat and stir in the vanilla extract and a pinch of salt. 7. Skim off any foam that may have formed on the top of the jam. 8. Pour the hot peach jam into sterilized jars, leaving about 1/4 inch headspace at the top. 9. Seal the jars tightly and process them in a boiling water bath for 10 minutes for preservation (optional). 10. Allow the jars to cool completely at room temperature before storing. This jam makes about 4 cups and can brighten any meal! Making your own peach jam is a fun and rewarding task. We covered essential ingredients like ripe peaches and sugar, step-by-step cooking methods, and useful tips. Explore flavor variations and learn how to store your jam properly. Remember, homemade jam tastes better and gives you control over what goes in it. With this guide, you can enjoy delicious, fresh peach jam all year round. Get started and enjoy the sweet taste of summer in every jar!

Homemade Peach Jam Easy Recipe for Fresh Flavor

Are you ready to make your own delicious peach jam? With just a few simple ingredients, you can capture the

- Ripe mango - Large cucumber - Red bell pepper - Small red onion - Jalapeño - Fresh lime juice - Honey or agave syrup - Salt and pepper - Fresh cilantro The key to a great Spicy Mango Cucumber Salad is in the fresh ingredients. Each one adds a layer of taste and texture. - Additional spices for extra flavor - Avocado for creaminess - Other colorful peppers You can always mix things up. Add spices for heat or choose different peppers for color. Avocado can bring a rich creaminess to balance the spice. Each ingredient plays a role in making this salad a delightful dish. If you want to explore a full recipe, check out the [Full Recipe]. How to peel and dice mango To start, grab a ripe mango. Hold it upright on your cutting board. Use a sharp knife to slice off the skin. Be careful not to cut too deep. Once peeled, cut the mango into thin slices. Then, chop these slices into small cubes. Place these cubes in a large bowl. Dicing cucumber and red bell pepper Next, take a large cucumber. Cut off both ends and slice it in half lengthwise. Scoop out the seeds if you prefer less moisture. Now, chop the cucumber into small pieces. For the red bell pepper, remove the stem and seeds. Dice it into small bits, similar in size to the mango. Chopping red onion and mincing jalapeño Chop a small red onion into fine pieces. This adds a nice bite to your salad. For the jalapeño, cut off the top and slice it in half. Use a spoon to remove the seeds for less heat. Then, mince it finely, adjusting the amount based on your spice preference. Add both the onion and jalapeño to the bowl with the mango, cucumber, and red bell pepper. Making the lime dressing In a separate bowl, squeeze fresh lime juice. You will need about two tablespoons. Add one tablespoon of honey or agave syrup. Whisk these together until they blend smoothly. This dressing will add a bright, zesty flavor to the salad. Tossing the salad ingredients Pour the lime dressing over the mixed salad ingredients. Use a spatula to gently toss everything together. Make sure all the pieces are coated with the dressing. This step brings all the flavors to life. Seasoning with salt and pepper Once mixed, season your salad with a pinch of salt and pepper. Taste it to adjust the seasoning. Toss the salad again to ensure the seasoning is even. Allowing flavors to meld Let the salad sit for about 10 minutes. This waiting time helps the flavors meld together. The result is a more vibrant and tasty dish. When ready to serve, garnish with freshly chopped cilantro for an extra pop. Enjoy your Spicy Mango Cucumber Salad! For the full recipe, visit the [Full Recipe]. To get the best flavor, you need ripe mango and cucumber. Look for a mango that feels a bit soft when you press it gently. It should smell sweet near the stem. For cucumber, choose one that is firm with a bright skin. Store any leftovers in an airtight container in the fridge. This keeps it crisp and fresh for up to two days. Do you want a mild salad? Just skip the jalapeño or use a little bit. If you like it spicy, add more jalapeño. You can also swap jalapeño for other peppers like serrano for extra heat or use bell pepper for no spice at all. Adjust to fit your taste! Serving is part of the fun! You can use a large bowl or individual plates. For a colorful touch, add lime wedges next to the salad. Garnish with more chopped cilantro on top. This adds a nice pop of green. You can also sprinkle some sesame seeds for a bit of crunch. Enjoy your beautiful dish! {{image_2}} You can change the flavors of this salad by swapping ingredients. For a tropical twist, use pineapple instead of mango. Pineapple adds a sweet and tangy taste that works well with cucumber. You can also add protein for a heartier salad. Shrimp or chicken can make it a meal. Simply grill or sauté the protein and mix it in. Both options add great flavor and make the salad more filling. If you're looking to make the salad vegan or vegetarian, skip the honey and use agave syrup instead. This keeps the sweetness without animal products. For gluten-free options, this salad is already a safe choice. All the ingredients are naturally gluten-free. Just ensure any added dressings or sauces are also gluten-free. Adding nuts or seeds can give your salad a delightful crunch. Try chopped peanuts, cashews, or sunflower seeds. They add texture and healthy fats. You can also infuse fresh herbs like mint for a refreshing lift. Mint pairs well with the sweetness of mango and the coolness of cucumber. Just chop a few leaves and mix them in before serving. For the complete recipe, check out the Full Recipe. To keep your Spicy Mango Cucumber Salad fresh, use an airtight container. Glass containers work great, but plastic containers are fine too. Make sure the lid fits tightly. This will help keep out air and moisture. Store the salad in the fridge to maintain its crispness. If you have leftovers, try to eat them within a few days for the best taste. Your salad stays fresh in the fridge for about 3 days. After that, the ingredients may start to break down. Look for signs of spoilage like a sour smell or mushy veggies. If the colors fade or the mango becomes too soft, it's best to toss it. You can freeze Spicy Mango Cucumber Salad, but it may change texture. To freeze, place the salad in a freezer-safe bag. Remove as much air as you can. When you're ready to eat, thaw it in the fridge overnight. Keep in mind, the salad might not be as crunchy after freezing. Enjoy it fresh whenever possible, but freezing is a good backup plan! You can serve this salad with grilled meats or seafood. The sweet and spicy notes of the salad pair well with chicken, shrimp, or fish. Try grilled chicken skewers or fish tacos for a tasty combo. This salad also works well as a side dish for barbecues. Yes, you can prep this salad ahead of time. Chop the mango, cucumber, and other veggies and store them in the fridge. Make the lime dressing and keep it separate until you are ready to serve. Just mix it all together before eating. This way, the salad stays fresh and crisp. If mango is not your favorite, try using pineapple or peach instead. These fruits add a nice sweetness and work well with the other ingredients. You can also skip the fruit and add more veggies like bell peppers or carrots for crunch. To add more heat, include extra jalapeños or use a spicier pepper, like serrano. You can also sprinkle in some red pepper flakes for a kick. Start with a little and taste as you go to get the spice just right. For the full recipe, check the article above. This blog post covered the vibrant Spicy Mango Cucumber Salad. You learned about the key ingredients, step-by-step preparation, and helpful tips. We discussed easy variations and storage methods to keep your salad fresh. The recipe is simple and full of flavor. Whether you enjoy it as a side or main dish, it fits many diets. Experiment with your favorite ingredients. Get creative and make the salad your own!

Spicy Mango Cucumber Salad Refreshing and Flavorful Mix

Are you ready to ignite your taste buds? My Spicy Mango Cucumber Salad is a vibrant dish that combines juicy

To make delicious air fryer zucchini coins, you need simple ingredients. Here’s what you’ll need: - 2 medium zucchinis, sliced into 1/4-inch coins - 1 cup breadcrumbs (panko for extra crunch) - 1/2 cup grated Parmesan cheese - 1 teaspoon garlic powder - 1 teaspoon onion powder - 1 teaspoon Italian seasoning - Salt and pepper to taste - 2 large eggs, beaten - Cooking spray or olive oil spray These ingredients combine to create a crispy, flavorful snack that is sure to please. You can enhance the flavor of your zucchini coins with extra seasonings. Here are some suggestions: - Paprika for a smoky touch - Cayenne pepper for heat - Fresh herbs like parsley or basil for brightness - Lemon zest for a fresh pop Feel free to mix and match based on your taste. If you have dietary needs, you can still enjoy these zucchini coins. Here are some easy swaps: - Use gluten-free breadcrumbs for a gluten-free option. - Replace Parmesan with nutritional yeast for a vegan version. - Substitute eggs with a flaxseed mixture (1 tablespoon flaxseed meal + 2.5 tablespoons water) for a vegan option. These substitutions allow you to customize the recipe to fit your needs while keeping it tasty. For the full recipe, check out the complete guide. Start with two medium zucchinis. Wash them well to remove dirt. Slice the zucchinis into 1/4-inch coins. This size helps them cook evenly. You can use a sharp knife for clean cuts. If you want, you can peel the zucchinis, but I like the skin for added texture. In a shallow bowl, mix breadcrumbs, Parmesan cheese, garlic powder, onion powder, Italian seasoning, salt, and pepper. Stir well until all ingredients blend together. In another bowl, beat two large eggs until smooth. Dip each zucchini coin into the beaten eggs. Make sure excess egg drips off. Next, coat the zucchini coins in the breadcrumb mix. Press gently to ensure a good cover. This step gives them that nice crunchy layer. Preheat your air fryer to 400°F (200°C). Arrange the coated zucchini coins in a single layer in the basket. You might need to cook them in batches if your air fryer is small. Lightly spray the tops with cooking spray; this adds crispiness. Air fry for 8 to 10 minutes. Flip halfway for even cooking. Once they turn golden brown and crispy, they are ready. Let them cool slightly before serving. Enjoy your crispy, delicious snack! For the full recipe, check out the details. To get that perfect crunch, start with dry zucchini. Pat the slices with a towel to remove moisture. This helps the coating stick. Use panko breadcrumbs for extra crunch. They make a big difference in texture. Remember to lightly spray the tops with oil before cooking. This gives that golden finish we all love. A common mistake is overcrowding the air fryer. If you add too many coins, they won’t cook evenly. Cook in batches if needed. Another issue is not preheating the air fryer. Always set it to 400°F (200°C) before you start. It helps the coins crisp up faster. Finally, don’t skip the flipping halfway through. This ensures both sides get nice and crunchy. Serve your crispy zucchini coins on a big platter. Dipping sauces add fun! Try a yogurt-based ranch or tzatziki. Fresh herbs like parsley or basil make it pop. You can also pair them with a light salad for a tasty snack. For more flavor, sprinkle some extra cheese on top. Enjoy this simple yet delightful dish! For the full recipe, check out the details above. {{image_2}} You can make your air fryer zucchini coins even tastier with spices and herbs. For a spicy kick, add cayenne pepper or chili powder to the breadcrumb mix. If you love a fresh taste, try mixing in chopped fresh herbs like basil or dill. You can also switch things up by using smoked paprika for a smoky flavor. Feel free to experiment and find your favorite blend! While panko breadcrumbs give a great crunch, you can use other coatings too. Try crushed cornflakes for a sweeter crunch. If you're gluten-free, almond flour or crushed nuts work well. You can also use seasoned flour for a simple yet delicious coating. Each option brings a new texture and taste to your zucchini coins. Dips can make your zucchini coins shine! A yogurt-based ranch or tzatziki pairs well with the crispiness. For a spicy twist, serve with sriracha mayo or a spicy ketchup. You can even try a classic marinara sauce for a fun twist. These dips add flavor and make each bite exciting. Find your favorite dip and enjoy! To keep your zucchini coins fresh, place them in an airtight container. You can store them in the fridge for up to three days. If you have a lot of leftover coins, you can separate layers with parchment paper. This will help prevent them from sticking together. Always let the coins cool completely before sealing the container. For the best taste, I recommend reheating your zucchini coins in the air fryer. Preheat the air fryer to 350°F (175°C). Place the coins in a single layer and heat for about 3-5 minutes. This method keeps them crispy and tasty. You can also use an oven at the same temperature for 5-7 minutes. You can freeze zucchini coins for longer storage. First, arrange the cooked coins on a baking sheet in a single layer. Freeze them for about 1-2 hours until firm. Then, transfer them to a freezer bag or container. They will last up to three months. When ready to eat, thaw them overnight in the fridge. Reheat them in the air fryer to restore crispness. Enjoy your crispy air fryer zucchini coins anytime! For the full recipe, check out the full recipe section. To keep zucchini coins crispy, start by slicing them evenly. Thin slices help them cook faster. After slicing, sprinkle salt on them and let them sit for about 10 minutes. This draws out moisture. Pat them dry with a paper towel before breading. Use panko breadcrumbs for extra crunch. Lastly, do not overcrowd the air fryer basket. This allows hot air to circulate freely. Yes, you can use many vegetables in the air fryer! Bell peppers, eggplant, and carrots all work well. Just slice them into even pieces. Adjust cooking times for each type to ensure they cook evenly. Remember to season them like the zucchini for flavor. You can have fun mixing different veggies for a colorful snack. To reheat leftover zucchini coins, use the air fryer. Preheat it to 350°F (175°C). Place the coins in a single layer and heat for about 3-5 minutes. This helps restore their crispiness. You can also use an oven, but the air fryer works best for keeping them crunchy. Avoid the microwave, as it may make them soggy. For more details, check the Full Recipe of crispy air fryer zucchini coins. In this post, we covered how to make air fryer zucchini coins. We discussed key ingredients, like seasonings and substitutions. You learned the step-by-step process from prep to cooking. Tips to ensure crispiness and avoid mistakes helped too. We explored flavor variations and serving ideas, plus storage and reheating methods. Keep experimenting with different spices and dips to make this dish your own. Enjoy your crispy, tasty zucchini coins!

Air Fryer Zucchini Coins Crispy and Delicious Snack

If you’re looking for a quick, tasty snack, Air Fryer Zucchini Coins are here to save the day! These little

To make a tasty summer squash and corn chowder, you need a few key ingredients. These will create a warm and comforting dish. Here’s what you’ll need: - 2 medium summer squashes, diced - 1 cup fresh corn kernels (or frozen) - 1 medium onion, chopped - 2 cloves garlic, minced - 1 large potato, peeled and diced - 4 cups vegetable broth - 1 cup coconut milk - 1 teaspoon smoked paprika - 1 teaspoon thyme - Salt and pepper to taste - 2 tablespoons olive oil - Fresh basil leaves for garnish Each ingredient plays an important role. Summer squash brings a sweet, mild flavor. Corn adds a burst of sweetness. Onion and garlic give depth and aroma. The potato thickens the chowder and makes it hearty. Vegetable broth provides a savory base, while coconut milk adds creaminess and a hint of sweetness. Smoked paprika and thyme infuse the dish with warmth and earthiness. Salt and pepper enhance all the flavors. Finally, fresh basil leaves add a bright finish. You can find the full recipe [here](#). Enjoy gathering these ingredients for a delightful cooking experience! Sautéing the Vegetables Start with a large pot. Heat two tablespoons of olive oil over medium heat. Add one chopped onion. Sauté it for about 4-5 minutes. Wait until the onion turns soft and clear. Add two minced garlic cloves next. Cook for another minute. This will make the kitchen smell great! Cooking the Chowder Base Now, stir in two diced medium summer squashes and one peeled, diced potato. Cook this mix for about 5 minutes. Stir it often to avoid burning. Then, add one cup of fresh corn kernels. Pour in four cups of vegetable broth. Season with one teaspoon of smoked paprika and one teaspoon of thyme. Add salt and pepper to taste. Bring this mixture to a boil. Once it boils, reduce the heat. Let it simmer for 20 minutes. The vegetables should be tender when done. Blending the Mixture After simmering, stir in one cup of coconut milk. Cook for another 5 minutes to heat through. Now, use an immersion blender to blend the chowder. Blend it until you reach your desired texture. If you prefer a chunkier chowder, blend just half. Pour the blended mixture back into the pot. Taste the chowder and adjust the seasoning if needed. Enjoy this comfort food with fresh basil on top! You can find the full recipe [here]. Achieving the Right Consistency To get the right chowder thickness, blend part of the soup. Use an immersion blender for easy mixing. If you want a chunky texture, just blend half. This gives you a nice balance of smooth and solid. Flavor Enhancements Add a splash of lemon juice for a fresh taste. You can also stir in fresh herbs like parsley or cilantro. They brighten the flavors and make your chowder even better. A pinch of cayenne pepper gives a nice kick without being too spicy. Timing for Adding Ingredients Add the corn in the last few minutes of cooking. Corn cooks fast and keeps its sweet flavor. When you add coconut milk, do it at the end. This keeps it creamy and delicious. For more details on making this tasty dish, check the Full Recipe. {{image_2}} When making summer squash and corn chowder, you can switch up some ingredients. This helps tailor the dish to your taste. Dairy-Free Options If you want a creamy chowder without dairy, coconut milk is great. You can also use almond milk or oat milk for a lighter choice. They keep the dish rich without dairy. Adding Protein To make it heartier, add cooked chicken, shrimp, or bacon. Just stir them in before serving. They bring extra flavor and make the chowder more filling. Spice Level Adjustments Want a kick? Add a pinch of cayenne pepper or some diced jalapeños. For a milder taste, skip the spices or use sweet paprika instead. Adjust the heat to what makes your taste buds happy. Feel free to explore these variations to create your perfect bowl of summer squash and corn chowder. Check out the Full Recipe to get started! After enjoying your chowder, store leftovers properly to keep them safe and tasty. Refrigeration Guidelines Let the chowder cool down to room temperature. Transfer it to an airtight container. Store it in the fridge. It will stay fresh for about 4 to 5 days. Make sure to label the container with the date. Freezing Instructions If you want to keep it longer, freezing is a great option. Pour the cooled chowder into freezer-safe containers. Leave space at the top for expansion. It can last for about 2 to 3 months in the freezer. Thaw it in the fridge before reheating. Reheating Chowder Safely When you’re ready to enjoy your leftovers, reheat them slowly. You can use a pot on the stove over low heat. Stir often to avoid sticking. If it seems thick, add a little broth or water. You can also use a microwave. Heat in short bursts, stirring in between. Always check the temperature to make sure it’s hot all the way through. For the full recipe, check out Sunny Summer Squash & Corn Chowder. Can I use frozen vegetables? Yes, you can use frozen vegetables in this recipe. Frozen corn works great. Just add it at the same time as fresh corn. The flavor stays good, and the chowder will taste fresh. How long does it last in the fridge? This chowder lasts about 3 to 4 days in the fridge. Store it in an airtight container. Make sure to let it cool before sealing. It’s a perfect make-ahead meal for busy days. Can I substitute coconut milk with something else? You can swap coconut milk for almond milk or regular milk. They add creaminess too. However, the flavor will change a bit. Coconut milk gives a nice tropical taste to the chowder. If you want to keep it dairy-free, stick with almond milk. For the full experience, check out the Full Recipe. This article covered how to make a tasty summer squash and corn chowder. We discussed the needed ingredients, from fresh veggies to coconut milk. I shared step-by-step instructions to help you cook and blend the chowder. You also learned tips for the best texture and flavor, plus fun variations for different diets. Finally, the storage section will help keep your leftovers fresh. Now you can enjoy this easy, rewarding dish anytime you want!

Summer Squash and Corn Chowder Tasty Comfort Food

Are you craving a warm bowl of comfort food? Let me introduce you to my Summer Squash and Corn Chowder!

For this pie, you need fresh peaches. I use about 5 cups of ripe peaches. Peel them and slice them thin. Look for peaches that are firm yet slightly soft. This gives the best flavor and texture for your pie. Next, we need sweeteners. I like to use 1 cup of granulated sugar. This makes the peaches sweet and yummy. I add 1/4 cup of all-purpose flour, which helps thicken the filling. A pinch of salt brings out the flavors too. You can also add 1 teaspoon of ground cinnamon for a warm touch. For the crust, I often use a package of refrigerated pie crusts. It comes with 2 crusts, which is perfect for this recipe. You can also make your own crust if you prefer. A homemade crust gives a lovely flaky texture. To add extra flavor, I use 1 tablespoon of lemon juice. It brightens the peach taste. I also dot the filling with 1 tablespoon of unsalted butter, cut into small pieces. This gives the pie a rich flavor. Finally, I brush the top with a beaten egg for a golden finish. You can find the full recipe with detailed steps to make this classic peach pie! Start by washing your fresh peaches. I love using ripe, juicy peaches for the best flavor. Peel and slice them into thin pieces. In a large mixing bowl, add the sliced peaches, granulated sugar, flour, ground cinnamon, lemon juice, and a pinch of salt. Gently toss everything together. Let the mixture sit for about 15-20 minutes. This time allows the peaches to release their sweet juices. While your peaches rest, preheat your oven to 425°F (220°C). A hot oven helps the pie to bake evenly and gives a nice golden crust. It’s key to get this right for the best results. Now, take one of your pie crusts and roll it out. Fit it into a 9-inch pie pan, letting the edges hang over. Pour the peach filling into the crust. Be sure to discard any excess juices to avoid a soggy pie. Dot the filling with small pieces of butter for added richness. Roll out the second crust and place it on top of the filling. Cut slits in the top crust to let steam escape. Trim the excess crust and crimp the edges to seal. Before baking, brush the top crust with a beaten egg. This gives the pie a beautiful golden color. Place your pie in the preheated oven. Bake for 45-50 minutes. Keep an eye on it, and look for a golden crust and bubbling juices. Once done, let it cool on a wire rack for at least 2 hours before slicing. This cooling period helps the filling set, making it easier to serve. Enjoy your peach pie with a scoop of vanilla ice cream for a perfect treat! For the complete recipe, check out the Full Recipe. To make a great peach pie, you need ripe peaches. Look for peaches that feel slightly soft when you squeeze them. They should have a sweet smell. Avoid peaches with bruises or dark spots. The best peaches are in season during summer. Choose yellow or white peaches for the best flavor. A flaky crust makes your pie special. Use cold butter when making your crust. Cold butter creates steam, which helps the crust puff up. Don’t overwork the dough; mix until just combined. Chill the dough for at least 30 minutes before rolling it out. This helps to keep it flaky. A soggy bottom is a common problem. To avoid this, you can use a few tricks. First, pre-bake the bottom crust for about 10 minutes. This helps it start cooking before you add the filling. Second, sprinkle a thin layer of flour or cornmeal on the crust before adding the peaches. This layer absorbs extra juices. Lastly, be sure to drain any excess juice from the peach filling before pouring it in the crust. For the full recipe, follow my detailed steps. {{image_2}} A lattice crust adds charm to your peach pie. It looks fancy but is easy to make. Start by rolling out your dough for the top crust. Cut it into long strips, about an inch wide. Lay half of the strips across the filled bottom crust. Then, weave the other half over and under the first strips. This creates a beautiful pattern. Just remember to seal the edges well. If you prefer a different texture, try a crumble topping. Mix flour, brown sugar, oats, and butter until crumbly. You want it to look like wet sand. Spread this topping over the peach filling instead of using a top crust. Bake as you would with a regular pie. The crumble gives a nice crunch and adds a sweet, buttery flavor. Add some spice for a warm twist on classic peach pie. Try adding nutmeg or cardamom to your filling. Just a pinch can elevate the flavor. You can also mix in some fresh ginger for a zing. These spices pair perfectly with the sweetness of the peaches. Don’t forget to use the Full Recipe for the best results! After you enjoy your peach pie, store any leftovers properly. Let the pie cool completely at room temperature. Cover the pie with plastic wrap or foil. This keeps it fresh and prevents drying out. You can store the pie in the fridge for up to four days. If you have a pie server, use it to slice and serve. If you want to save the pie for later, freezing works great. First, let the pie cool completely. Wrap the entire pie tightly in plastic wrap. Then, wrap it again in aluminum foil. This double-wrapping helps avoid freezer burn. You can freeze the pie for up to three months. When you're ready to eat it, thaw the pie in the fridge overnight. To enjoy your peach pie warm, reheat it in the oven. Preheat your oven to 350°F (175°C). Place the pie on a baking sheet to catch any drips. Heat for about 20 to 30 minutes, or until it’s hot inside. For a quick option, you can microwave a slice. Heat it for 30 seconds, check, then heat more if needed. Enjoy your peachy delight warm, topped with ice cream or whipped cream! Yes, you can use canned peaches. Just make sure they are in light syrup or juice. Drain them well to remove excess liquid. This step keeps your pie from becoming too runny. Canned peaches save time and still taste great. The pie is done when the crust turns golden brown and the juices bubble. You should see steam escaping from the slits on top. A good rule is to bake for 45-50 minutes. Keep an eye on it to avoid burning. Peach pie shines when served warm or at room temperature. I love pairing it with vanilla ice cream. A dollop of whipped cream also adds a nice touch. Fresh mint leaves can brighten the plate and flavor. Yes, you can prepare the filling in advance. Mix the peaches, sugar, flour, and spices, then store it in the fridge. This step saves time on baking day. Just remember to let it sit out for a few minutes before filling your pie crust. Check the full recipe for more details. You now know how to make a delicious peach pie from scratch. We covered fresh ingredients, step-by-step baking instructions, and handy tips for the best results. You can also explore fun variations and smart storage ideas. My final thought? Don’t be afraid to get creative! Enjoy the fruits of your labor and share this treat with others. Your homemade peach pie is sure to impress.

Classic Peach Pie Irresistible Homemade Delight

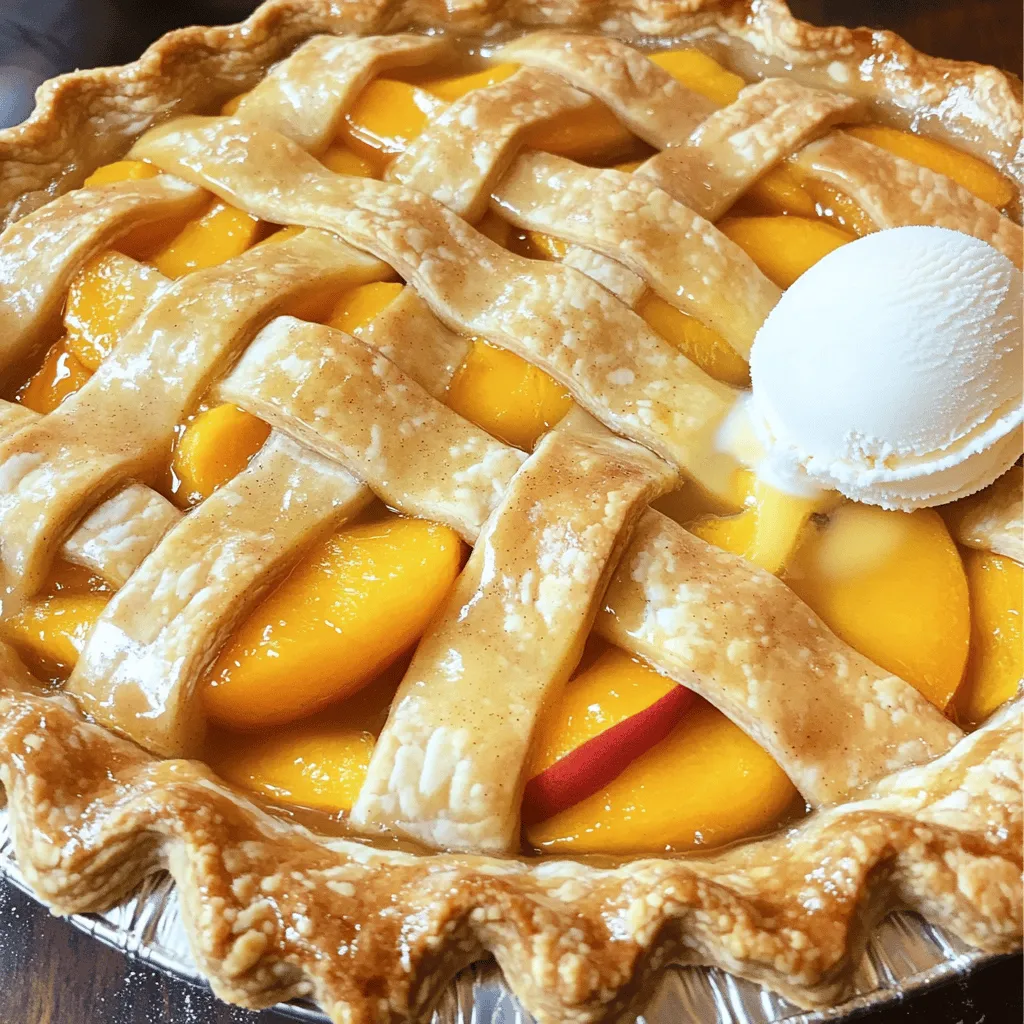
Are you ready to indulge in a classic peach pie that’s simple yet delicious? I’ll guide you through making a

To make the best Garden Fresh Zucchini Salsa, you need the following: - 2 medium zucchinis, finely diced - 1 medium red bell pepper, diced - 1 medium yellow onion, finely chopped - 2 ripe tomatoes, diced - 1 jalapeño, seeded and minced (adjust to taste) - 1/4 cup fresh cilantro, chopped - 2 cloves garlic, minced - Juice of 2 limes - 1 tablespoon olive oil - Salt and pepper to taste Each ingredient adds a unique flavor. The zucchini gives a nice crunch. The bell pepper adds sweetness, while the onion adds depth. Tomatoes bring juiciness, and jalapeño gives that kick. Cilantro adds freshness, and garlic packs in flavor. Lime juice brightens the dish, and olive oil brings it all together. You can switch things up in this salsa. Here are a few ideas: - Use a different pepper, such as poblano or banana pepper, for varied heat. - Try cherry tomatoes or heirloom varieties for more color and flavor. - Swap cilantro for parsley or basil if you prefer different herbs. These changes can make your salsa truly unique and cater to your taste. This salsa is not just tasty; it’s also healthy! Each serving has about 45 calories. You get a good dose of vitamins A and C from the peppers and tomatoes. Zucchini adds fiber, which is great for digestion. You also benefit from potassium and other minerals. Enjoy this tasty treat while knowing it's good for you! To make the best Garden Fresh Zucchini Salsa, start by preparing your veggies. Here’s how to properly dice zucchini and other vegetables: - Zucchini: Cut off both ends. Slice the zucchini in half lengthwise, then slice each half into thin strips. Finally, chop these strips into small, even pieces. This gives a nice texture. - Bell Pepper: Cut around the seeds and core. Dice the flesh into small cubes. This adds sweet flavor. - Onion: Peel and chop into small pieces. A sharp knife will help you get clean cuts. This enhances the taste. - Tomatoes: Cut them into small pieces. Use ripe, juicy tomatoes for better flavor. - Jalapeño: Slice and remove the seeds for less heat. Mince it finely. Adjust the amount for your taste. Fresh ingredients make all the difference. Use ripe veggies for the best taste and nutrition. Fresh herbs like cilantro add a bright flavor too. Now, let’s mix the ingredients step-by-step: 1. In a large bowl, add the diced zucchini, bell pepper, onion, diced tomatoes, minced jalapeño, chopped cilantro, and minced garlic. 2. Drizzle the juice of two limes and olive oil over the mix. The lime juice adds freshness, while the olive oil brings richness. 3. Gently fold all the ingredients together. Use a spatula to combine without smashing the veggies. 4. Season with salt and pepper. Taste as you go. This helps you find the right balance of flavors. For the best flavor balance, let your taste buds guide you. A bit more lime or jalapeño can make a big difference. Let the salsa rest for at least 30 minutes in the fridge. This step is crucial. Allowing the flavors to meld creates a more delicious dish. When you serve, choose a colorful bowl. Add a sprinkle of cilantro on top for a nice touch. This salsa pairs perfectly with tortilla chips. You can also use it as a topping on grilled chicken or fish. Enjoy every bite of your Garden Fresh Zucchini Salsa with friends and family. For the full recipe, check out the section above. To make the best zucchini salsa, start with your knife skills. Use a sharp knife for clean cuts. Dice the zucchini into small, even pieces. This helps the salsa mix well. When your pieces are uniform, they blend better in flavor and texture. Next, keep your ingredients at room temperature. Cold veggies can mute the flavors. Let your zucchinis, peppers, and tomatoes sit out for a bit before mixing. This makes a big difference in taste. To kick up the flavor, think about herbs and spices. Fresh basil or oregano can add a nice touch. They pair well with the other ingredients. Don’t be afraid to experiment! Adjusting the heat with jalapeño is also key. If you like it spicy, add more jalapeño. If you prefer mild, use less. Always taste as you go to find your perfect balance. One common mistake is over-dicing. If the veggies are too small, they lose crunch. Aim for a nice bite in every scoop. Another mistake is under-seasoning. Taste your salsa and adjust the salt and lime juice. Lastly, don’t rush the resting time. Letting the salsa sit for at least 30 minutes helps the flavors meld. Patience is key for a delicious result. Make sure to check out the Full Recipe for more tips! {{image_2}} To make your zucchini salsa spicy, add more jalapeño. Start with one finely minced jalapeño. If you want more heat, add another one. You can also use hot sauces or chili powders. These add a kick without changing the salsa's texture. For a different twist, try using serrano peppers. They pack a punch and add unique flavor. Chipotle peppers in adobo sauce are another option. These add both heat and a smoky taste that you will love. To create a sweet zucchini salsa, consider adding fruits like mango or peach. Start with half a cup of diced fruit. This will balance the heat and add a nice touch. Adjust the acidity with sweet ingredients too. A splash of honey or agave syrup can work wonders. This helps to soften the tartness of the lime juice. It creates a blend that is both sweet and savory. For a low-sodium version, reduce the salt in the recipe. Start with a pinch and taste as you go. You can also use herbs for flavor, like oregano or cumin. Instead of salt, try using lemon zest or lime zest. These add a bright flavor without extra sodium. Fresh herbs like basil or parsley can also enhance the taste. They keep your salsa fresh and tasty. These variations let you enjoy zucchini salsa in many ways. Try each one to see which you like best! For a full recipe, check out the Garden Fresh Zucchini Salsa. To keep your zucchini salsa fresh, use glass or plastic containers with tight lids. These containers help keep air out and flavors in. You can also use freezer bags if you want to save space. Always label your containers with the date. This way, you can track how long it has been stored. You can store your salsa in the fridge or the freezer. The fridge is great for short-term use. The freezer works well for longer storage. Just remember to thaw it in the fridge before serving. In the fridge, your zucchini salsa will last about 3 to 5 days. If you see any signs of spoilage, like mold or an off smell, it's best to throw it away. Trust your senses; they guide you well. If you want to keep your salsa for a long time, consider canning it. You can use a hot water bath canning method. This is a simple way to seal jars and keep salsa fresh for months. Freezing is another great option. For best results, pour the salsa into airtight containers or freezer bags. Leave some space at the top for expansion. This method helps lock in flavor and texture. Explore these options to enjoy your Garden Fresh Zucchini Salsa anytime! You can store Garden Fresh Zucchini Salsa in the fridge for about 3 to 5 days. Keep it in a sealed container to keep it fresh. If you see any signs of spoilage, like a bad smell or off color, it’s best to throw it out. For longer storage, you can freeze the salsa. Just make sure to use a freezer-safe container. Frozen salsa will last for about 2 to 3 months. When you are ready to eat it, simply thaw it in the fridge overnight. Absolutely! You can swap out some veggies for others you enjoy. Try adding corn for sweetness or cucumber for crunch. Diced carrots can add color and a nice bite. You can even use different types of peppers, like poblano or Anaheim, to change the flavor. Just remember to keep the balance of flavors in mind. Zucchini Salsa is very versatile! You can serve it with tortilla chips for a tasty snack. It also goes great on grilled chicken or fish, adding bright and fresh flavor. Use it as a topping for tacos or burritos. Try it with scrambled eggs for a fun breakfast twist. The options are endless! Yes, making salsa ahead of time is a great idea! The flavors get better as they sit. I recommend making it at least 30 minutes before you serve it. This allows the veggies to soak up the lime juice and spices. Store it in the fridge in a covered container. If you want to make it even earlier, you can prep it a day in advance. Just give it a good stir before serving to mix everything well. In this blog post, we covered making a fresh and tasty zucchini salsa. We discussed the key ingredients, from zucchini to lime juice, plus optional substitutions. The step-by-step instructions helped you prepare the veggies and mix them for flavor. We shared tips for storage, shelf life, and common mistakes to avoid. Remember, experimenting with spices and ingredients can lead to unique salsa for you. Enjoy trying the variations and serving it your way! Your homemade salsa will impress everyone.

Garden Fresh Zucchini Salsa Flavorful and Healthy Treat

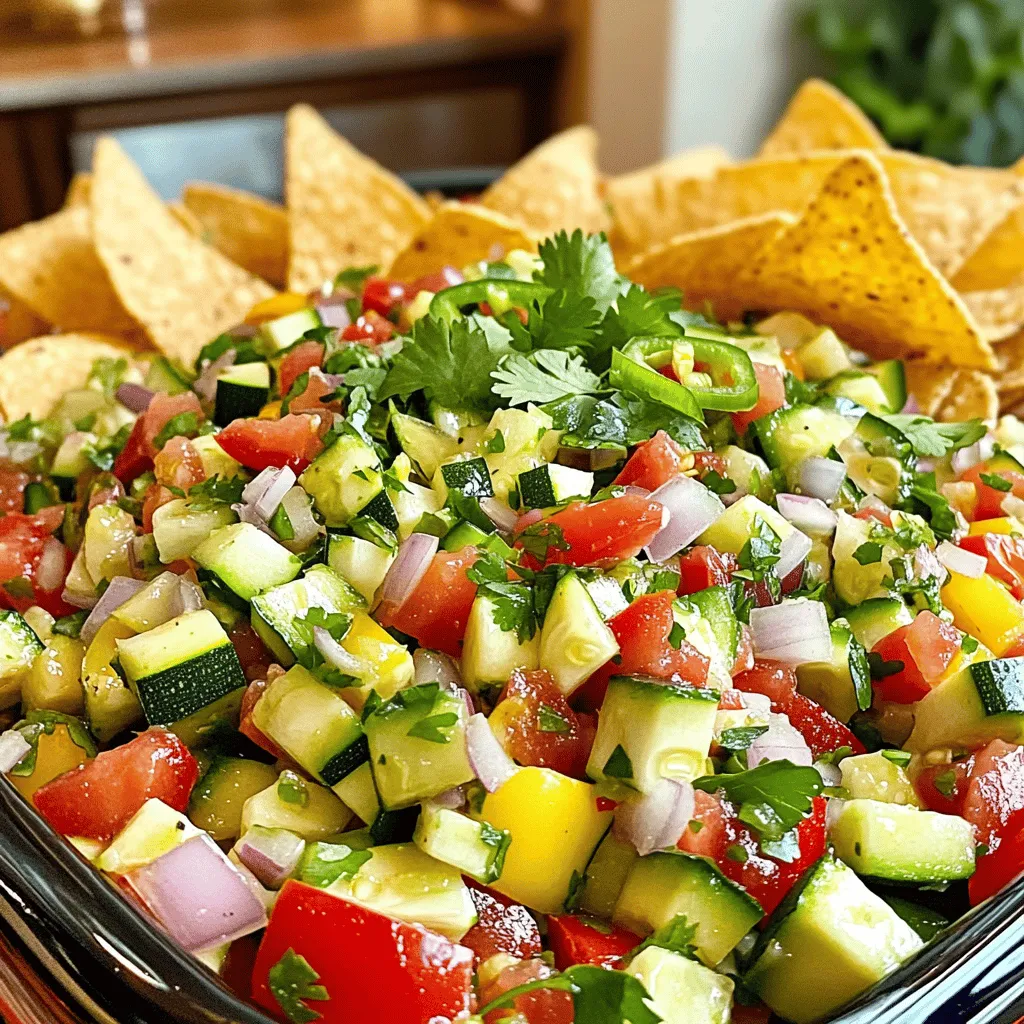
Are you ready to revamp your salsa game? Garden Fresh Zucchini Salsa is the perfect blend of vibrant flavors and

For crispy cornmeal zucchini chips, gather these items: - 2 medium zucchinis - 1 cup cornmeal - ½ cup all-purpose flour - 1 teaspoon garlic powder - 1 teaspoon paprika - ½ teaspoon salt - ¼ teaspoon black pepper - 2 large eggs - 1 tablespoon milk - Olive oil spray (for baking) You can adjust measurements if needed. If you want a gluten-free option, try using almond flour instead of all-purpose flour. You can also switch the cornmeal for a gluten-free cornmeal. For a bit of heat, add cayenne pepper to the spice mix. This can add a spicy kick. When picking zucchinis, look for ones that are firm and smooth. They should feel heavy for their size. The skin should have a deep green color. Avoid zucchinis that have soft spots or wrinkles, as these may be old. If you find smaller zucchinis, they tend to be sweeter and more tender. Always wash them well before slicing. For the full recipe, check the complete instructions provided. Start by washing the zucchinis under cold water. This removes dirt and any pesticides. Slice the zucchinis into thin rounds, about ¼ inch thick. This thickness helps them cook evenly and become crispy. You can use a sharp knife or a mandoline for even slices. Set the zucchini slices aside on a clean kitchen towel to remove excess moisture. This step is key for crispiness. In a shallow bowl, mix the dry ingredients. Combine 1 cup of cornmeal, ½ cup of all-purpose flour, 1 teaspoon of garlic powder, 1 teaspoon of paprika, ½ teaspoon of salt, and ¼ teaspoon of black pepper. Stir well until the mix is uniform. The cornmeal gives the chips a great crunch. You can also adjust spices based on your taste. If you want a kick, add a pinch of cayenne pepper. In another bowl, whisk together 2 large eggs and 1 tablespoon of milk until well blended. Dip each zucchini slice into the egg mixture, letting the excess drip off. Then, coat it in the cornmeal mixture. Press gently to help the coating stick. Place the coated slices on a baking sheet lined with parchment paper. Make sure they don’t touch each other. This allows them to crisp up nicely. Preheat your oven to 425°F (220°C). Once ready, bake the zucchini chips for 20-25 minutes. Flip them halfway through to ensure even cooking. Look for a golden brown color when they are done. Remove them from the oven and let them cool slightly. These crispy cornmeal zucchini chips are now ready to enjoy! For the full recipe, check the earlier section. To make your zucchini chips super crispy, follow these tips. First, slice the zucchinis thinly, about ¼ inch thick. Thinner slices cook faster and get crunchier. Second, sprinkle a bit of salt on the slices after cutting. This draws out moisture. Let them sit for about 10 minutes, then pat them dry with a paper towel. Lastly, use olive oil spray lightly on the chips before baking. This helps them brown nicely. Avoid these common mistakes for the best chips. Don’t skip drying the zucchini slices. Excess moisture leads to soggy chips. Also, make sure not to overcrowd the baking sheet. Lay the chips in a single layer. If they touch, they won’t crisp up well. Lastly, remember to flip the chips halfway through baking. This ensures even cooking and crispness. To boost the flavor of your chips, try these ideas. Add your favorite spices to the cornmeal mixture. Options like cayenne pepper or onion powder can add a nice kick. You can also mix in grated cheese to the coating for a cheesy flavor. For a fresh touch, sprinkle herbs like oregano or thyme on top before baking. Experiment and find your favorite combinations! For the full recipe, check out the detailed instructions above. {{image_2}} For a kick, add heat to your chips. Mix in cayenne pepper or chili powder with the cornmeal. Start with half a teaspoon and adjust to your taste. You can also serve these spicy chips with a cool dip, like yogurt or sour cream. This balance makes each bite exciting. If you love cheese, this variation is for you. Mix grated parmesan or cheddar cheese into the cornmeal. Use about ½ cup of cheese for a rich flavor. It adds a crunchy, cheesy layer to the chips. Just remember, cheese can brown faster, so watch them closely while baking. Get creative with coatings! Try using panko breadcrumbs for extra crunch. You can also switch up the flour. Almond flour or coconut flour works well for a nutty taste. For a gluten-free option, use gluten-free breadcrumbs or flours. Each coating changes the taste and texture, making it fun to experiment. For the full recipe, check out the detailed instructions on making these crispy cornmeal zucchini chips. To keep your leftover crispy cornmeal zucchini chips fresh, let them cool down first. Place them in an airtight container. If you stack them, use parchment paper between layers. This helps prevent sogginess. Store them in the fridge for up to three days. They will lose some crispness but can still taste great. When you want to enjoy your chips again, preheat your oven to 350°F (175°C). Spread the chips on a baking sheet in a single layer. Bake for about 10 minutes or until they are hot and crispy again. Avoid using the microwave, as it can make them chewy. If you want to save your chips for later, freezing is a good option. Place the cooled chips in a single layer on a baking sheet. Freeze them for about an hour, then transfer them to a freezer bag. Make sure to remove as much air as possible. They can stay fresh for up to three months. When ready to eat, follow the reheating instructions for best results. Yes, you can use other veggies! Try eggplant, sweet potatoes, or carrots. Each veggie adds a unique taste. Just slice them thin like zucchinis. Keep the cooking time similar, so they crisp up nicely. To make these chips gluten-free, swap the all-purpose flour. Use almond flour or a gluten-free blend. Check your cornmeal, too, to ensure it is gluten-free. This way, everyone can enjoy these tasty snacks! Dipping sauces can enhance your chips! I love ranch dressing for a classic touch. Spicy aioli is great for a kick. You can also try tzatziki or salsa for fresh flavors. Mix it up and find your favorite! To keep your chips crispy, store them in an airtight container. Avoid stacking them, as that can lead to sogginess. If you have leftovers, reheat them in the oven for a few minutes. This helps regain that crunch! This blog post covered how to make delicious zucchini chips. We discussed the best ingredients, measurements, and tips for choosing fresh zucchini. You learned step-by-step instructions for preparation, coating, and baking. I shared tips to make your chips extra crispy and avoid common mistakes. We explored fun variations and storage methods to keep them fresh. Remember, cooking is about having fun and being creative. Enjoy your tasty snacks!

Crispy Cornmeal Zucchini Chips Simple and Tasty Snack

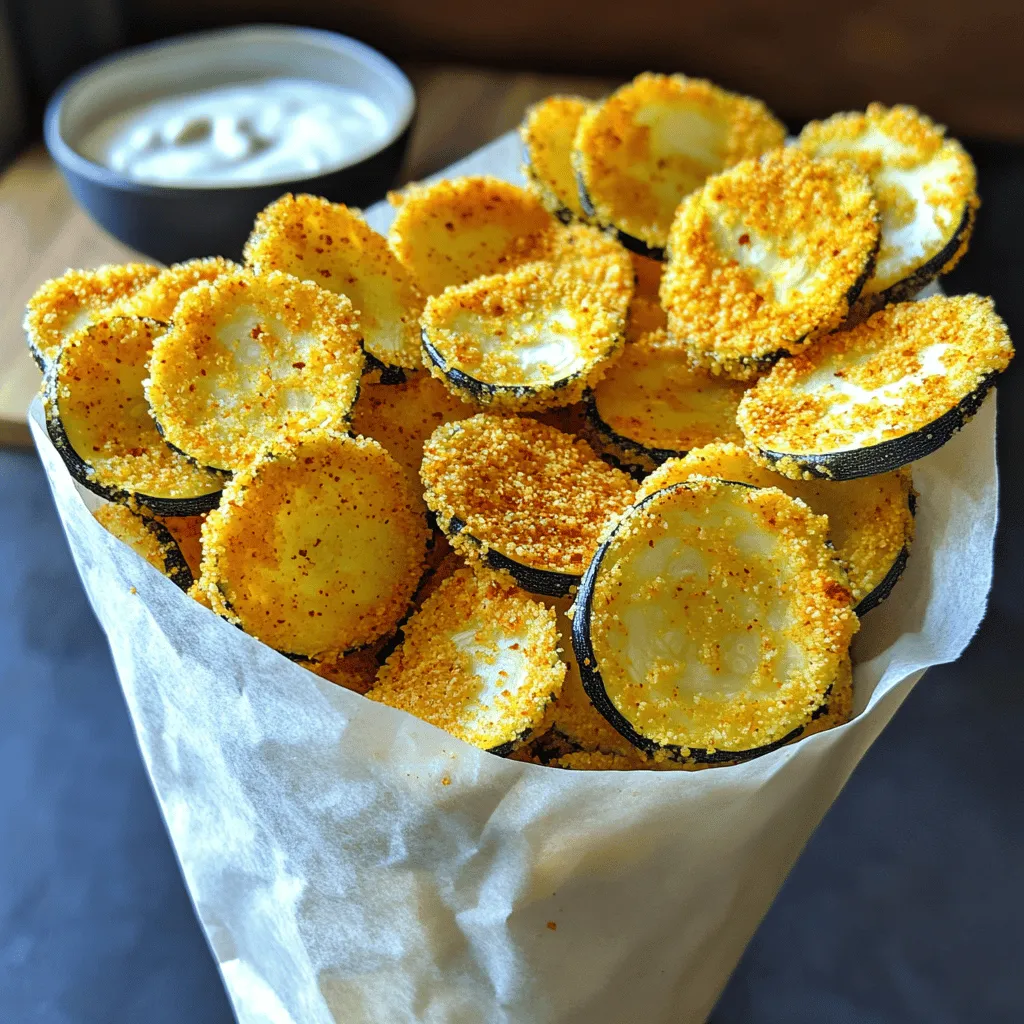
If you’re looking for a fun and crunchy snack, crispy cornmeal zucchini chips are the answer! These tasty bites are

- 1 lb boneless, skinless chicken thighs - Bell peppers (red, yellow, green), sliced - 1 cup pineapple chunks (fresh or canned) - 1 cup broccoli florets - 1 medium red onion, sliced - 3 cloves garlic, minced - 1/4 cup soy sauce - 1/4 cup apple cider vinegar For this dish, I love using boneless, skinless chicken thighs. They stay juicy and tender while cooking. The bright colors from the bell peppers add a nice touch. Pineapple gives a sweet twist, while broccoli adds a healthy crunch. Don’t forget the garlic; it packs in flavor! - 1/4 cup honey - 1 tablespoon cornstarch - 1 teaspoon grated ginger - 2 tablespoons sesame oil - Salt and pepper to taste The secret to a great sauce is the mix! Honey balances the tang of apple cider vinegar. Cornstarch thickens the sauce nicely. Ginger adds warmth. Use sesame oil for a nutty flavor. Adjust salt and pepper to your taste; it makes a big difference! - Cooked rice or quinoa, for serving - Additional toppings or garnishes Serve this sweet and sour chicken over rice or quinoa. Both soak up the sauce well. You can also add green onions or sesame seeds on top for extra flair. Adding fresh herbs like cilantro can brighten it up, too! {{ingredient_image_1}} First, preheat your oven to 400°F (200°C). This temperature helps cook everything evenly. Next, line a large baking sheet with parchment paper. This step makes cleanup easy. Now, let’s make the sauce. In a small bowl, whisk together the soy sauce, apple cider vinegar, honey, cornstarch, ginger, sesame oil, and a pinch of salt and pepper. Mix until everything blends well. Place the cut chicken thighs in a large bowl. Pour the sauce over the chicken. Toss the chicken pieces until they are fully coated in the sauce. This step adds flavor to the meat. Spread the marinated chicken on one side of the prepared baking sheet. On the other side, arrange the sliced bell peppers, pineapple chunks, broccoli florets, and red onion. Drizzle a little olive oil over the vegetables and season them with salt and pepper. This gives the veggies extra flavor. Now, it’s time to bake! Place the sheet pan in the preheated oven. Bake for 25 to 30 minutes. Stir the chicken and vegetables halfway through cooking. This helps them cook evenly. When done, the chicken should be cooked through, and the veggies should be tender. Serve the sweet and sour chicken over cooked rice or quinoa. Drizzle the pan juices over everything for added flavor. To get crispy chicken and tender veggies, follow these tips: - Use chicken thighs: They stay juicy and tender. - High heat: Bake at 400°F for best results. - Don’t crowd the pan: Space out chicken and veggies for even cooking. - Toss halfway: Stirring halfway through helps crisp up the chicken. - Oven-safe vegetables: Use broccoli and bell peppers, as they cook well without losing crunch. You can make this dish lighter by swapping some ingredients: - Chicken breast: Use chicken breast instead of thighs for fewer calories. - Low-sodium soy sauce: This reduces sodium without losing flavor. - Honey substitutes: Try maple syrup or agave for a lower-calorie sweetener. - Fresh veggies: Use more fresh veggies to boost fiber and vitamins. Prep ahead to save time on busy nights: - Chop vegetables early: Slice bell peppers and onion the night before. - Marinate chicken: Marinate the chicken in the sauce overnight for deeper flavor. - Use pre-cooked rice or quinoa: This saves time during cooking. - One-pan clean-up: Line your baking sheet with parchment paper for easy clean-up. Pro Tips Marinate for More Flavor: For an even richer taste, let the chicken marinate in the sauce for at least 30 minutes or up to overnight in the refrigerator. Use Fresh Ingredients: Whenever possible, opt for fresh vegetables and pineapple to enhance the flavor and texture of the dish. Customize Your Vegetables: Feel free to swap in your favorite vegetables like snap peas, carrots, or zucchini for a personal touch. Perfectly Cooked Chicken: To ensure the chicken cooks evenly, try to cut the pieces into uniform sizes. {{image_2}} You can change the protein in this dish easily. Instead of chicken thighs, use chicken breast for a leaner option. Chicken breast cooks quickly, so watch it closely. If you want a plant-based choice, try tofu. Cut firm tofu into cubes. Marinate it the same way as chicken for flavor. Shrimp is another great swap. Use large shrimp, peeled and deveined. Shrimp cooks fast, so adjust the baking time to around 15-20 minutes. The veggies in this dish are flexible. If you don’t have bell peppers, try carrots. Slice them thinly for even cooking. Snap peas add a nice crunch, too. Zucchini works well and so does cauliflower. You can mix and match your favorites. Just keep the colors bright for a fun plate. Fresh or frozen vegetables both work, but fresh always tastes best. You can change the sauce to switch up the taste. Add some spice with chili paste or hot sauce. If you like a tangy kick, try adding lime juice. For a sweeter sauce, add more honey or maple syrup. Experiment with different sauces like teriyaki or sweet chili sauce. Each sauce gives a new twist to the dish. This way, you can keep it fresh and exciting every time you make it. After a tasty dinner, store any leftovers in an airtight container. This keeps the food fresh. You can refrigerate the dish for up to three days. If you want to keep it longer, freeze it. To freeze, place the chicken and veggies in a freezer-safe container. It’s best to separate the rice or quinoa, so they stay fluffy. When it’s time to eat your leftovers, reheat them gently. You can use the microwave or the oven. If using the microwave, place the food in a bowl and cover it. Heat in 30-second intervals until warm. For the oven, preheat it to 350°F (175°C) and bake for about 15-20 minutes. This helps keep the chicken juicy and the veggies tender. This dish can last a few days in the fridge. After three days, the quality may drop. In the freezer, it can stay good for up to three months. Just make sure to label your container with the date. This way, you won’t forget it is there! Always check for any strange smells or colors before eating. If in doubt, throw it out. You can add heat easily. Try adding hot sauce or chili flakes to your sauce. Start with a small amount. Taste it, then add more if you like. This method lets you control the spice level. You can also use spicy ginger or even sriracha for a different kick. Yes! You can prep this dish the night before. Cut the chicken and veggies, then store them in the fridge. Mix the sauce and keep it separate. Just before cooking, toss everything together. This makes cooking quick and easy on busy nights. If you need a soy sauce substitute, try tamari for gluten-free. You can also use coconut aminos, which is lower in sodium. Another option is to mix water with a bit of Worcestershire sauce. Each option brings a unique flavor. Choose what fits your needs best! This sheet pan meal combines chicken, colorful veggies, and tasty sauce. You learned how to marinate chicken, prepare vegetables, and bake everything for a delicious dish. Remember, you can swap proteins and adjust flavors to fit your taste. Cook once, and enjoy leftovers easily with my tips for storing and reheating. Keep experimenting with ingredients for new twists. Take this recipe and make it your own.

Sheet Pan Sweet and Sour Chicken Easy Family Meal

Looking for a quick and tasty meal the whole family will love? This Sheet Pan Sweet and Sour Chicken recipe

- 4 ears of sweet corn, husked - 1 red bell pepper, diced - 1 cucumber, diced - 1 small red onion, finely chopped - 1 cup cherry tomatoes, halved - 1/4 cup fresh cilantro, chopped - 1 avocado, diced - 3 tablespoons olive oil - 2 tablespoons lime juice - 1 teaspoon honey - Salt and pepper to taste - 1/2 teaspoon smoked paprika - Grill - Sharp knife - Mixing bowls When making grilled corn salad, fresh produce is key. Sweet corn packs a burst of flavor. Choosing ripe, colorful veggies makes your salad pop. The dressing is simple yet adds depth. It combines olive oil, lime juice, honey, and smoked paprika for a tasty finish. Gather your equipment. You need a grill for that smoky flavor. A sharp knife helps with cutting veggies easily. Mixing bowls are great for combining everything. For the full recipe, check out Sunny Grilled Corn Salad. Enjoy the vibrant tastes and colorful presentation that this dish brings to your table! - Preheat the grill to medium-high heat. - Grill the husked corn for about 10-12 minutes. Turn it often for an even char. You want that nice, smoky flavor. - Once the corn cools, cut the kernels off the cob and add them to a bowl. - Mix in the diced red bell pepper, cucumber, red onion, cherry tomatoes, and cilantro. This mix brings bright colors and fresh tastes to your salad. - In a small bowl, whisk together olive oil, lime juice, honey, smoked paprika, salt, and pepper. - Pour the dressing over the salad and toss gently to coat everything. The dressing gives the salad a zesty kick. For the complete details on this vibrant dish, check out the Full Recipe. To grill corn well, turn it often. This helps it cook evenly and char nicely. Aim to grill the corn for about 10 to 12 minutes. You want some nice brown spots, but not too much. Keep an eye on it to avoid burning. To boost flavor, try adjusting seasonings. A pinch of salt goes a long way. You can also add fresh herbs for a burst of taste. Cilantro works well, or try basil for something different. If you like heat, add a dash of cayenne pepper. This gives your salad an exciting kick! Serve the salad at room temperature for the best taste. It’s fresh and vibrant that way. For a great look, use a large, colorful bowl. Garnish with extra cilantro and a lime wedge. This makes it pop and look even more appetizing. Enjoy your sunny grilled corn salad! For the full recipe, check out the earlier section. {{image_2}} You can add many vegetables to your grilled corn salad. Try diced zucchini, chopped bell peppers, or even cherry tomatoes for a fresh twist. Each vegetable brings its own taste and texture. For those who prefer a crunch, consider adding radishes or jicama. If you want more greens, mix in baby spinach or arugula. These options give you the chance to play with flavors. They can also cater to different dietary needs. Changing the dressing can transform your salad. A zesty vinaigrette adds a bright kick. You might enjoy a creamy avocado dressing for a rich flavor. A yogurt-based dressing can bring a nice tang. These dressings pair well with the sweetness of corn. Each one highlights the salad's fresh ingredients in a new way. You can also try a honey mustard or garlic dressing for added depth. Adding protein makes this salad a fuller meal. Grilled chicken or shrimp work great with the corn. They add a savory taste and texture. If you prefer a meatless option, try black beans or chickpeas. These beans are nutritious and filling. They boost the salad's protein content while keeping it light. A handful of crumbled feta cheese can also add flavor. This choice makes your meal more satisfying. To keep your grilled corn salad fresh, store it in an airtight container. This helps to lock in moisture and flavor. Place it in the fridge right after serving. The salad stays fresh for about 3 days. If you see any signs of spoilage, like odd smells or colors, throw it away. You won’t need to reheat the salad. Instead, if you want to enjoy it warm, grill some extra corn and mix it in. If the salad feels dry after being in the fridge, add a splash of lime juice or olive oil. This will help refresh the flavors before serving. You can freeze grilled corn salad, but it may change texture. Corn might become mushy when thawed. If you want to freeze it, do so without the avocado. When ready to eat, thaw overnight in the fridge. Add fresh avocado just before serving for the best taste. To make grilled corn salad vegan, swap out non-vegan items. Use agave nectar instead of honey. Replace any cheese with a vegan alternative or simply skip it. This keeps the salad fresh and plant-based. You still get all the vibrant flavors from the veggies and dressing! Grilled corn salad pairs well with many dishes. Try it with grilled chicken or fish for a tasty meal. You can also serve it with tacos or burgers for a fun twist. It works great as a side dish at summer barbecues or picnics. Grilling corn takes about 10 to 12 minutes. Start with a preheated grill on medium-high heat. Turn the corn every few minutes for an even char. Look for a nice golden color on the kernels as a sign it is ready. You can prep this salad ahead of time! Chop the veggies and grill the corn in advance. Mix everything except the avocado and dressing. Store it in the fridge. Just add the dressing and avocado right before serving for the best flavor. Check out the Full Recipe for more details! In this blog post, we explored how to make a delicious grilled corn salad. We covered fresh ingredients, easy steps, and tips for perfect grilling. You can also try different variations by adding protein or changing the dressing. Remember, this salad is best served fresh but can be stored or prepped in advance. Exploring these methods will help you enjoy this dish anytime. Enjoy making your grilled corn salad and impress your friends and family!

Grilled Corn Salad Fresh and Flavorful Recipe

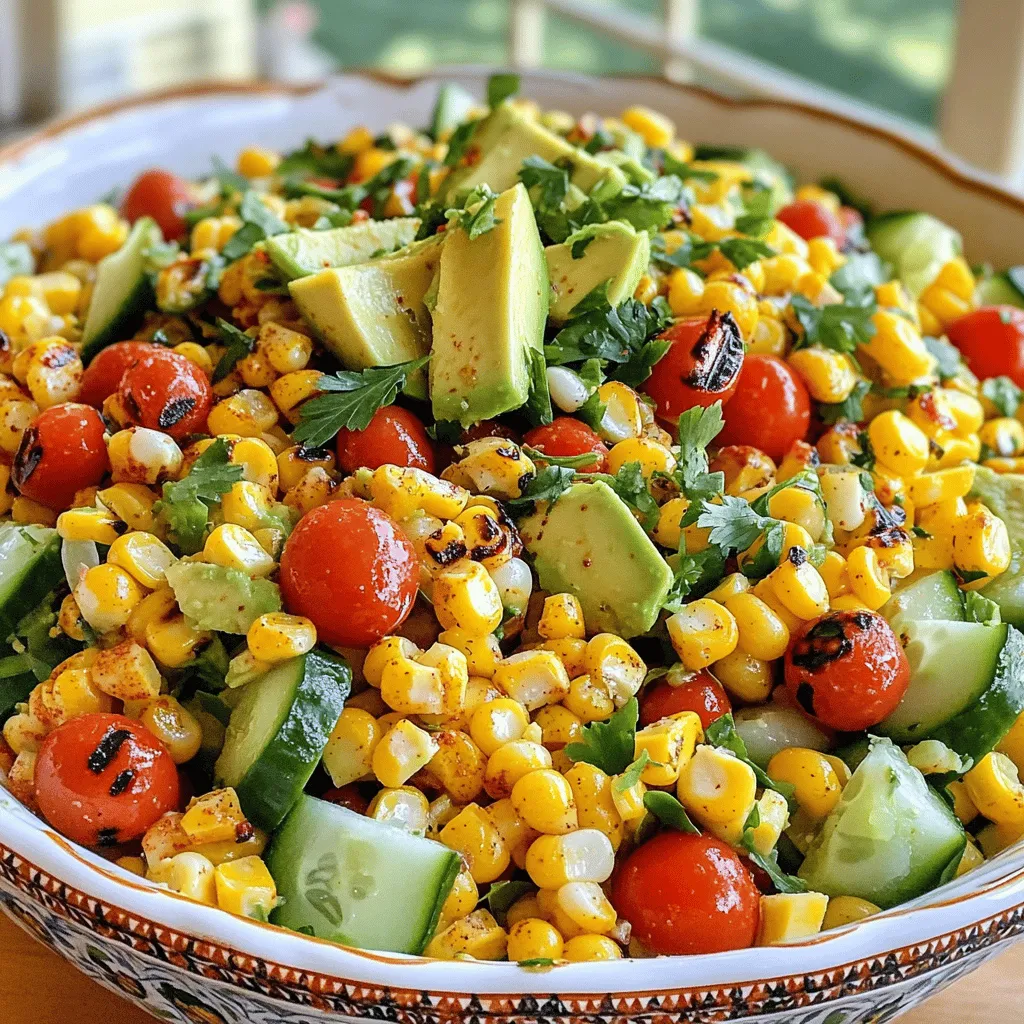
Summer is the perfect time for fresh flavors, and this Grilled Corn Salad brings them all! Sweet corn, vibrant veggies,

Older posts
Newer posts
← Previous Page1 … Page58 Page59 Page60 … Page84 Next →

dsad

© 2026 Lisa Dishes • Built with GeneratePress

Our Policies

  • Copyright Policy
  • Cookie Policy
  • GDPR Policy
  • Privacy Policy
  • Disclaimer
  • Terms Of Use

More Information

  • Home
  • About
  • Contact
  • Appetizers
  • Dessert
  • Dinner
  • Drinks
©2026, Lisa Dishes About Back To Top