Skip to content
DisclaimerTerms Of UseGDPR PolicyCookie Policy

Lisa Dishes

  • Home
  • Drinks
  • Appetizers
  • Dinner
  • Dessert
  • About
  • Contact
  • Privacy Policy
DisclaimerTerms Of UseGDPR PolicyCookie Policy

NO-ING-IMG

- 1 pound mixed mushrooms (cremini, shiitake, or button) - 4 cloves garlic, minced - 2 tablespoons fresh parsley, chopped - 1 tablespoon fresh thyme leaves - 1 tablespoon olive oil - 1 teaspoon balsamic vinegar - Salt and pepper to taste - Zest of 1 lemon Using fresh herbs is key to this dish. They add bright flavors that dried herbs can’t match. Fresh parsley brings a clean taste, while thyme adds earthiness. Together, they make the mushrooms pop. Balsamic vinegar is also important. It enhances the mushrooms' natural sweetness. Just a teaspoon adds depth and a slight tang. This balance makes every bite exciting and full of flavor. You can use other mushrooms, like portobello or oyster. Each type brings its own unique taste. If you don’t have fresh herbs, dried ones can work, but use less. Dried herbs are stronger, so adjust to your taste. {{ingredient_image_1}} 1. Preheat the oven. Set your oven to 400°F (200°C). This step is key for even roasting. 2. Clean and trim mushrooms. Rinse your mixed mushrooms under cold water. Use a brush or cloth to wipe off any dirt. Trim the stems if they are tough. 1. Combine mushrooms with garlic and herbs. In a large bowl, add the cleaned mushrooms. Toss in the minced garlic, chopped parsley, and thyme leaves. 2. Proper seasoning tips. Drizzle the olive oil and balsamic vinegar over the mushrooms. Toss well to coat every piece. Then, add salt, pepper, and lemon zest. Mix again until all ingredients are combined. 1. Spread on baking sheet. Line a baking sheet with parchment paper. Spread the mushrooms in a single layer. This helps them roast evenly. 2. Roasting guidelines and timing. Place the baking sheet in the preheated oven. Roast for 20 to 25 minutes. Stir halfway through for even cooking. The mushrooms are done when they are tender and golden brown. Mix the mushrooms halfway through cooking. This helps them cook evenly. Stirring ensures all sides get that nice golden color. Look for a deep brown hue and a tender feel when they are done. The mushrooms should also release their juices. Garnish the mushrooms with fresh herbs and a sprinkle of lemon zest. This adds color and a bright taste. Pair them with grilled chicken or serve over pasta. You can also add them to a salad for extra flavor. Always preheat your oven before roasting. This step is key for the best results. Avoid overcrowding the baking sheet, too. If the mushrooms are too close, they will steam instead of roast. Give each piece room to cook properly. Pro Tips Use Fresh Herbs: Fresh herbs like parsley and thyme add vibrant flavor. Dried herbs can be used in a pinch, but fresh is always best for this dish. Experiment with Mushrooms: Different types of mushrooms bring unique flavors and textures. Mixing varieties like shiitake and cremini enhances the dish. Don’t Crowd the Pan: Give the mushrooms space on the baking sheet to ensure they roast evenly and develop a nice golden color. Drizzle with Extra Olive Oil: For an even richer flavor, drizzle a little extra olive oil before serving to enhance the dish's overall taste. {{image_2}} You can spice up Garlic Herb Roasted Mushrooms in many fun ways. - Add spices: Try paprika for warmth or chili flakes for heat. - Incorporate cheese or nuts: Sprinkle parmesan for creaminess or add chopped walnuts for crunch. These simple tweaks can create new flavors and textures. You can easily adapt this dish to fit your diet. - Make it vegan: Skip cheese and use only plant-based oils. - Gluten-free option: This recipe is naturally gluten-free, so enjoy without worry. - Low-sodium seasoning: Use fresh herbs and lemon zest instead of salt for flavor. These changes help everyone enjoy this dish. Leftover roasted mushrooms can find new life in other meals. - Repurpose in other dishes: Toss them into salads, omelets, or pasta. - Creative ways to use grilled or roasted mushrooms: Blend into soups for depth or use as a pizza topping. These ideas help minimize waste and add flavor to your meals. After you enjoy your Garlic Herb Roasted Mushrooms, store the leftovers right away. Use an airtight container or a resealable plastic bag. This keeps them fresh and helps maintain their flavor. Place the container in the fridge. Your mushrooms will taste best if used within three days. When reheating, you want to keep the mushrooms tasty and tender. The best method is to use the oven. Preheat it to 350°F (175°C). Spread the mushrooms on a baking sheet and heat for about 10 minutes. Check them often to avoid drying out. You can also use them in new recipes. Add them to pasta, omelets, or soups for extra flavor. Yes, you can freeze Garlic Herb Roasted Mushrooms! First, let them cool completely. Then, place them in a freezer-safe container or bag. Remove as much air as you can. When you're ready to enjoy them, thaw the mushrooms overnight in the fridge. To reheat, use the oven as mentioned above. This helps keep their great taste and texture. You can use mixed mushrooms like cremini, shiitake, or button. These types have great flavor and texture. Cremini mushrooms are rich and earthy. Shiitake mushrooms add a nice umami kick. Button mushrooms are mild and tender. Mix them for a balanced taste in your dish. Garlic Herb Roasted Mushrooms can last in the fridge for about three to five days. Store them in an airtight container. Make sure they cool down before sealing. Check for any signs of spoilage before eating. If they smell off or look slimy, throw them out for safety. Yes, you can prepare Garlic Herb Roasted Mushrooms ahead of time. Clean and season the mushrooms as directed. Store them in the fridge for up to a day before roasting. When you're ready, just roast them in the oven. They reheat well and still taste great. Enjoy them warm for the best flavor! This blog post covered how to make Garlic Herb Roasted Mushrooms. I shared key ingredients and their benefits, like fresh herbs and balsamic vinegar. We explored preparation steps and roasting techniques to achieve the perfect texture. I also provided tips to avoid common mistakes and suggested how to use leftovers. In conclusion, making Garlic Herb Roasted Mushrooms is simple and rewarding. Enjoy experimenting with flavors and variations to make this dish your own!

Garlic Herb Roasted Mushrooms Flavorful and Easy Recipe

Are you ready to elevate your side dish game? My Garlic Herb Roasted Mushrooms recipe is flavorful, easy, and packed

- 1 cup all-purpose flour - 1 cup granulated sugar - 1/2 cup unsweetened cocoa powder - 1 tsp baking powder - 1/2 tsp baking soda - 1/4 tsp salt - 1/2 cup unsalted butter, softened - 2 large eggs - 1 tsp vanilla extract - 1/2 cup buttermilk - 1/2 cup creamy peanut butter - 1/4 cup chocolate chips - 1/4 cup chopped peanuts (for topping) - All-purpose flour: This gives structure to your cupcakes. It helps them rise and stay fluffy. - Granulated sugar: This sweetens your cupcakes, making them delicious. It also helps with texture. - Cocoa powder: This adds rich chocolate flavor. Unsweetened cocoa keeps the cupcakes balanced. - Baking powder and baking soda: These are leavening agents. They help your cupcakes rise and become light. - Salt: Even a little salt enhances the sweet flavors. It balances the taste. - Unsalted butter: Softened butter adds richness and moisture. It helps create a fluffy batter. - Eggs: Eggs add moisture and help bind ingredients. They also aid in leavening. - Vanilla extract: This adds a warm flavor that complements chocolate well. - Buttermilk: Buttermilk keeps the cupcakes moist and adds a slight tang. - Creamy peanut butter: This gives a strong peanut taste. It keeps the cupcakes moist and rich. - Chocolate chips: These add bursts of chocolate. They make each bite extra special. - Chopped peanuts: These are for topping. They add a nice crunch and extra peanut flavor. - All-purpose flour: You can use whole wheat flour for a nuttier taste. - Granulated sugar: Brown sugar can give a deeper flavor. - Unsweetened cocoa powder: You can use Dutch-processed cocoa for a milder taste. - Unsalted butter: Coconut oil is a good dairy-free option. - Buttermilk: Mix milk with vinegar or lemon juice for a quick substitute. - Creamy peanut butter: Crunchy peanut butter works well for added texture. - Chocolate chips: Use dark chocolate or white chocolate for variety. {{ingredient_image_1}} First, you need to prep your kitchen. Start by preheating your oven to 350°F (175°C). This step ensures your cupcakes bake evenly. Next, line a muffin tin with cupcake liners. This makes it easy to remove the cupcakes later. In a large bowl, sift together the dry ingredients. This includes 1 cup of flour, 1 cup of sugar, 1/2 cup of cocoa powder, 1 tsp of baking powder, 1/2 tsp of baking soda, and 1/4 tsp of salt. Mixing these well helps avoid lumps. In another bowl, beat 1/2 cup of softened butter with an electric mixer until creamy. Gradually add your sugar mixture while mixing. Keep beating until it looks light and fluffy. This process adds air, giving your cupcakes a nice rise. Now, add 2 large eggs one at a time, mixing well after each. Then, stir in 1 tsp of vanilla extract. Mix until everything is fully blended. Next, add the dry ingredients to the butter mixture. Alternate adding 1/2 cup of buttermilk. Start and end with the dry mix. Be careful not to over-mix; just combine until smooth. Gently fold in 1/2 cup of creamy peanut butter and 1/4 cup of chocolate chips. This gives your cupcakes a rich flavor. Use a spoon to fill each cupcake liner about two-thirds full. This allows space for the cupcakes to rise. Then, bake them for 18 to 20 minutes. Check for doneness by inserting a toothpick in the center. If it comes out clean, they are done. Let the cupcakes cool in the pan for 5 minutes. After that, transfer them to a wire rack. Allow them to cool completely. Once cooled, you can finish by swirling some extra peanut butter on top and sprinkling with chopped peanuts. Enjoy your delicious treats! When making chocolate peanut butter cupcakes, avoid overmixing the batter. This can lead to tough cupcakes. Mix until just combined to keep them soft. Also, don’t skip the cooling step. If you frost them too warm, the frosting will melt. Lastly, ensure your oven is preheated. A cold oven can affect baking time and texture. For perfect cupcakes, measure your ingredients carefully. Use a scale for accuracy, especially with flour and sugar. Room temperature ingredients blend better and create a smooth batter. I recommend using an ice cream scoop to fill the liners for even size. This helps them bake uniformly. Always check for doneness with a toothpick. It should come out clean or with a few crumbs. To make your cupcakes look great, swirl a bit of peanut butter on top. It adds a nice touch. Sprinkle chopped peanuts for crunch and a pop of color. Place the cupcakes on a pretty platter or stand for serving. You can also add a drizzle of melted chocolate for extra appeal. These small touches make your cupcakes irresistible! Pro Tips Use Room Temperature Ingredients: Allow your butter and eggs to sit out for about 30 minutes before baking. This helps create a smoother batter and ensures even baking. Don’t Overmix the Batter: Once you combine the wet and dry ingredients, mix just until incorporated. Overmixing can lead to dense cupcakes. Check for Doneness: Instead of relying solely on baking time, use a toothpick to check the center of a cupcake. If it comes out clean, they’re ready! Cool Completely Before Topping: Allow the cupcakes to cool fully before adding the peanut butter and chopped peanuts. This prevents the toppings from melting and ensures a nice presentation. {{image_2}} You can easily make vegan chocolate peanut butter cupcakes. Just swap out a few ingredients. Use 1 cup of almond milk instead of buttermilk. Replace the eggs with 1/2 cup of unsweetened applesauce. For the butter, use coconut oil or a vegan butter. These swaps keep the flavor rich and delicious while being plant-based. If you need gluten-free cupcakes, use a gluten-free flour blend. Just replace the all-purpose flour with 1 cup of your favorite gluten-free mix. Check the label to make sure it contains xanthan gum. This helps the cupcakes rise and stay soft. The rest of the recipe stays the same, giving you tasty treats without gluten. Frosting can take your cupcakes to the next level. You can use classic chocolate frosting or a creamy peanut butter frosting. To make peanut butter frosting, beat together 1 cup of creamy peanut butter, 1/2 cup of powdered sugar, and 1/4 cup of almond milk until smooth. For toppings, try chopped peanuts for crunch. You can also sprinkle mini chocolate chips or drizzle melted chocolate on top. Get creative and mix and match your favorite flavors! Store your chocolate peanut butter cupcakes in an airtight container. This keeps them fresh. Place a piece of parchment paper between layers to avoid sticking. Cupcakes stay good at room temperature for up to three days. If you need more time, the fridge is a good choice. They last about a week in the fridge. Just remember, cold can change the texture a bit. Freezing cupcakes is easy and great for saving extras. First, let the cupcakes cool completely. Then, wrap each one in plastic wrap. Place them in a freezer-safe bag or container. This prevents freezer burn. You can freeze them for up to three months. When you are ready to enjoy, move them to the fridge overnight. This helps them thaw evenly. If you want to warm your cupcakes, try this method. Preheat your oven to 350°F (175°C). Place the cupcakes on a baking sheet. Heat them for about 5 to 7 minutes. This brings back their soft texture and fresh taste. For a quick warm-up, use the microwave. Heat each cupcake for about 10-15 seconds. Be careful not to overheat, or they may become dry. Enjoy your delicious cupcakes like they are fresh from the oven! To make cupcakes moist, use buttermilk. Buttermilk adds richness and keeps the cake soft. Mixing in the right amount of butter also helps. Don't overmix the batter; mix just until combined. Bake them until a toothpick comes out clean. If you bake too long, they will dry out. Yes, you can use crunchy peanut butter! It will add texture and extra flavor. The chunks of peanut will give each bite a fun crunch. Just replace the creamy peanut butter with the crunchy kind. This small change makes your cupcakes even more interesting. The best way to frost cupcakes is to use a piping bag. Fill a piping bag with your frosting and use a round tip. Start at the center and swirl outwards. This gives a beautiful look. If you don’t have a piping bag, you can use a knife. Just spread the frosting on top and create swirls. For extra fun, add chopped peanuts on top! In this guide, I covered the entire process for making chocolate peanut butter cupcakes. We discussed ingredients, detailed steps, and helpful tips to ensure your cupcakes turn out great. Remember to avoid common mistakes and explore variations like vegan or gluten-free options. Store your cupcakes well to keep them fresh. Whether you’re a novice or an expert, these cupcakes are sure to impress. You can bake with confidence and enjoy delicious treats that everyone will love.

Chocolate Peanut Butter Cupcakes Irresistible Recipe

Get ready to delight your taste buds with my irresistible Chocolate Peanut Butter Cupcakes! This recipe combines rich chocolate and

- 1 cup broccoli florets - 1 cup bell peppers (mixed colors), sliced - 1 carrot, julienned - 1 cup snap peas - 1 small zucchini, sliced Fresh veggies make your stir fry colorful and tasty. Broccoli adds a great crunch. Bell peppers add sweetness and color. Carrots bring a nice texture. Snap peas add a fresh snap. Zucchini becomes tender and soft. Using a mix of these vegetables creates a fun dish. - 3 cloves garlic, minced - 1 tablespoon fresh ginger, minced - 3 tablespoons soy sauce (or tamari for gluten-free) - 1 tablespoon sesame oil - 1 teaspoon honey or maple syrup Aromatics like garlic and ginger add depth. They bring a warm flavor that lifts the dish. Soy sauce gives that umami taste. If you need it gluten-free, use tamari. Sesame oil adds richness and a nutty flavor. Honey or maple syrup balances the saltiness with sweetness. - Sesame seeds, for garnish - 2 green onions, chopped, for garnish - Cooked rice or quinoa, for serving Garnishes make your dish pop. Sprinkle sesame seeds on top for crunch. Green onions add a fresh taste. Serve your stir fry over cooked rice or quinoa. This pairing makes a filling meal. For details, check the Full Recipe. Start by washing all the veggies. Use cold water to remove dirt. After washing, chop them as listed in the ingredients. - 1 cup broccoli florets - 1 cup bell peppers (mixed colors), sliced - 1 carrot, julienned - 1 cup snap peas - 1 small zucchini, sliced Cut each type of vegetable to the same size. This helps them cook evenly. If some pieces are bigger, they will take longer to cook. Uniform size brings out the best flavor and texture. Heat a large non-stick skillet or wok over medium-high heat. Add 1 tablespoon of sesame oil. Wait until the oil shimmers but does not smoke. Next, add minced garlic and ginger. Stir-fry them for about 30 seconds. This step makes your kitchen smell amazing. Be careful not to burn the garlic and ginger, or the taste will turn bitter. Now it's time to add the vegetables. Start with the broccoli, bell peppers, and carrots. Stir-fry these for about 3-4 minutes. They should begin to soften. Then, add snap peas and zucchini. Cook for an additional 2-3 minutes, stirring often. In a small bowl, mix soy sauce and honey (or maple syrup) together. Pour this sauce over the veggies and toss to coat. Cook for another 2-3 minutes. This lets the sauce thicken slightly, making everything tasty. Taste your stir fry. Adjust the seasoning if needed. You might want more soy sauce or honey for flavor. Finally, serve the stir fry over cooked rice or quinoa. Don’t forget to sprinkle sesame seeds and chopped green onions on top for a fun finish. For the full recipe, check the ingredients and steps listed above. Enjoy your vibrant veggie stir fry! When making a veggie stir fry, medium-high heat is key. This heat cooks the veggies fast, keeping them crisp. A hot pan helps lock in flavors. It also helps maintain bright colors. To stir-fry evenly, add vegetables in stages. Start with the ones that take longer to cook, like broccoli and carrots. Add quicker-cooking veggies, like snap peas and zucchini, later. This way, everything cooks just right. Prep your veggies ahead of time. Chop them the day before and store them in the fridge. This makes cooking faster and easier. Frozen veggies are another great option. They are often pre-washed and chopped. Just toss them in the pan when you’re ready to cook. This can cut your prep time in half. Don’t be afraid to play with flavors! Try different spices, like chili flakes or five-spice powder. You can also mix up the sauces. A splash of rice vinegar or lime juice can add a nice zing. Adjust sweetness and saltiness to your taste. If you like it sweeter, add more honey or maple syrup. For salty flavors, a bit more soy sauce works well. Just remember to taste as you go. For the full recipe, check out the vibrant veggie stir fry section. {{image_2}} You can switch up the veggies based on the season. In summer, use fresh zucchini and bell peppers. In fall, consider adding squash or sweet potatoes. You can also mix in leafy greens like spinach or kale. They cook quickly and add great color. To create your own veggie mix, think about your favorites. Carrots, green beans, and mushrooms are all great options. Just remember to cut them all the same size. This helps them cook evenly. Tofu or tempeh are excellent protein choices for your stir fry. Tofu absorbs flavors well and adds a nice texture. Tempeh has a nutty taste that pairs well with sauces. You can cube them and add them at the start of cooking. Adding nuts or seeds brings a lovely crunch. Try cashews or sesame seeds. They add flavor and make your meal more filling. Just sprinkle them on top before serving. You can make homemade stir fry sauces to match your taste. A simple mix of soy sauce, garlic, and lime juice works well. Or try adding peanut butter for a richer flavor. If you need gluten-free options, use tamari instead of soy sauce. For lower sodium, look for low-sodium soy sauce. You can also skip the honey and use agave syrup for sweetness. To store leftovers from your veggie stir fry, use an airtight container. This keeps the flavors fresh and reduces spoilage. Place the stir fry in the fridge within two hours of cooking. This way, it stays safe to eat later. To keep veggies fresh, store them whole until you're ready to cook. Wash and chop only what you need. Use a damp paper towel to wrap greens like broccoli and zucchini. This keeps them crisp and moist for longer. To freeze your stir fry, let it cool completely. Then, place it in a freezer-safe bag. Remove as much air as possible to prevent freezer burn. Label the bag with the date and use it within three months for best quality. When ready to eat, thaw the stir fry in the fridge overnight. To reheat, use a skillet over medium heat. Add a splash of water or soy sauce to help it heat evenly. Stir until it’s warm, and enjoy! In the fridge, your veggie stir fry lasts about 3 to 4 days. Check it for signs of spoilage, like a sour smell or slimy texture. If you see any mold or off-color spots, it’s best to toss it out. Always trust your senses when it comes to food safety. You can use many veggies for stir fry. I love broccoli, bell peppers, carrots, snap peas, and zucchini. These vegetables add color and crunch. - For beginners, start with: - Broccoli florets - Bell peppers (mixed colors) - Carrots, sliced thin - Snap peas, whole - Zucchini, sliced thin - Cooking times vary: - Broccoli: 3-4 minutes - Bell peppers: 3-4 minutes - Carrots: 3-4 minutes - Snap peas: 2-3 minutes - Zucchini: 2-3 minutes Cook the firmer vegetables first, then add the softer ones. This way, all veggies cook evenly. Yes, you can make this stir fry vegan. Just skip any animal products. - To avoid animal products: - Use soy sauce or tamari instead of oyster sauce. - Choose maple syrup over honey for sweetness. - Alternative ingredients: - Try tofu for protein. - Use more veggies like mushrooms or eggplant. These swaps keep the dish tasty and plant-based. Adjusting the recipe is easy. You can halve or quarter the ingredient amounts. - For halving: - Use ½ cup broccoli - Use ½ cup bell peppers - Use ½ carrot - Adjust all ingredients similarly. - For cooking time: - Keep the same cooking times, but check for doneness sooner. - Stir often to ensure even cooking. This way, you can make the perfect amount for your needs. In this post, we explored stir fry essentials, from choosing the right veggies to cooking tips. You learned how to prep your ingredients for the best taste and texture. I shared methods to add flavor and variations to make your dish unique. Proper storage advice helps keep your leftovers fresh. With these steps, you can create meals that are fun and easy. Remember, cooking should be enjoyable, and experimenting with flavors can lead to great discoveries. Enjoy your stir fry adventures!

Easy Veggie Stir Fry Flavorful and Fast Recipe

Looking for a quick meal that bursts with flavor? This Easy Veggie Stir Fry is your solution! It’s packed with

To make Parmesan Crusted Tilapia, you will need these simple ingredients: - 4 tilapia fillets - 1 cup grated Parmesan cheese - 1 cup breadcrumbs (preferably panko for extra crunch) - 1 teaspoon garlic powder - 1 teaspoon onion powder - 1 teaspoon dried Italian herbs (oregano, basil, thyme) - 1/2 teaspoon black pepper - 1/4 teaspoon salt - 2 large eggs - 2 tablespoons fresh lemon juice - 2 tablespoons melted butter or olive oil For the best results, I suggest using these brands: - Parmesan Cheese: Grana Padano or Parmigiano-Reggiano give great flavor. - Breadcrumbs: For crunch, try Kikkoman Panko or Ian's. - Spices: McCormick offers reliable garlic and onion powders. - Eggs: Choose organic or free-range for better taste. If you have dietary restrictions, here are some easy swaps: - Gluten-Free: Use gluten-free breadcrumbs instead of regular. - Egg-Free: Replace eggs with a mixture of 1 tablespoon flaxseed meal and 3 tablespoons water per fillet. - Dairy-Free: Substitute Parmesan with a vegan cheese or nutritional yeast. - Low-Sodium: Reduce or omit the salt for a healthier option. Feel free to check out the Full Recipe for more details on making this dish! Start by gathering your ingredients. You will need: - 4 tilapia fillets - 1 cup grated Parmesan cheese - 1 cup breadcrumbs (preferably panko for extra crunch) - 1 teaspoon garlic powder - 1 teaspoon onion powder - 1 teaspoon dried Italian herbs (oregano, basil, thyme) - 1/2 teaspoon black pepper - 1/4 teaspoon salt - 2 large eggs - 2 tablespoons fresh lemon juice - 2 tablespoons melted butter or olive oil Preheat your oven to 400°F (200°C). Lightly grease a baking sheet with cooking spray, butter, or olive oil. This will help the fish cook evenly and keep it from sticking. In a large bowl, mix the Parmesan cheese, breadcrumbs, garlic powder, onion powder, Italian herbs, black pepper, and salt. Stir well to blend all the flavors. In another bowl, whisk together the eggs and lemon juice until they are well combined. This mixture will help the coating stick to the tilapia. Take each tilapia fillet and dip it into the egg mixture. Make sure it is fully coated on both sides. Let any extra egg drip off. Then, place the fillet into the cheese and breadcrumb mix. Press gently to ensure the coating sticks well. Repeat this for all fillets and arrange them on your greased baking sheet. Drizzle melted butter or olive oil on top of each fillet for added crispiness. Now it's time to bake the fish. Place the baking sheet in the preheated oven. Bake for 15 to 20 minutes. The fish is done when it is flaky and the crust is golden brown. For an extra crispy finish, switch the oven to broil for 1 to 2 minutes. Keep a close eye to avoid burning. Once done, remove the tilapia from the oven. Let the fillets sit for a couple of minutes before serving. This allows them to firm up a bit. Enjoy this tasty dish! For the complete recipe, check out the Full Recipe. To get that perfect crispy crust, use panko breadcrumbs. They are light and airy. This gives your tilapia a nice crunch. Make sure to coat the fish well. Press the breadcrumb mix onto the fillets. This helps it stick during baking. Drizzling melted butter or olive oil adds flavor and crunch. For an extra crispy finish, broil for a minute or two at the end. You can boost the flavor in many ways. Add fresh herbs like parsley or dill for a bright taste. A touch of red pepper flakes gives it a spicy kick. You can also swap out the cheese. Try using Romano or Asiago for a different twist. Lemon zest adds a fresh zing. You can get creative with your spices too. Experiment with smoked paprika or even a bit of cayenne. One common mistake is not drying the fish. Pat your tilapia dry with paper towels. This helps the coating stick better. Another mistake is overcrowding the baking sheet. Give each fillet space to cook evenly. Lastly, don't skip the broiling step. It makes the crust golden and appealing. For the full recipe, follow the steps closely for the best results. {{image_2}} You can switch up the cheese in this recipe. While Parmesan gives a nice flavor, you can try other cheeses. Pecorino Romano adds a sharp taste. For a milder flavor, use mozzarella. You can even mix cheeses for a unique twist. Just keep the amount the same to maintain texture. Baking is easy, but you can try other methods too. Air frying gives a crispy finish with less oil. Simply follow the same coating steps, then set your air fryer to 375°F and cook for 10-12 minutes. If you like grilling, you can grill the fillets. Use a grill pan or wrap them in foil to prevent sticking. Pair your tilapia with tasty sides. Roasted vegetables or a fresh salad work great. You can serve it over rice or quinoa for a filling meal. Add lemon wedges for a zesty kick. For something special, drizzle a light herb sauce on top. This dish looks and tastes best when you present it well. Try serving the fillets on a bed of sautéed spinach or alongside roasted veggies. For the best experience, check out the Full Recipe for more tips. Store any leftover Parmesan crusted tilapia in the fridge. Use an airtight container to keep it fresh. This will help it last for 2 to 3 days. When ready to eat, check for any off smells or changes in color. These signs mean it’s best to discard it. You can freeze Parmesan crusted tilapia if you want to save it for later. Wrap each fillet tightly in plastic wrap. Then place them in a freezer-safe bag or container. This helps prevent freezer burn and keeps it fresh. The tilapia can stay in the freezer for up to 2 months. When you're ready to eat, thaw it in the fridge overnight before reheating. To reheat, use the oven for the best results. Preheat it to 350°F (175°C). Place the fillets on a baking sheet and cover loosely with foil. Heat for about 10 to 15 minutes. Check to see if the fish is warm throughout. You can also use the microwave, but this may make the crust less crispy. For the crispy crust, broil it for 1 to 2 minutes after reheating. Enjoy your meal! You can make Parmesan crusted tilapia healthier by changing a few things. First, use whole wheat breadcrumbs instead of regular ones. This adds fiber and nutrients. You can also use less cheese. Try cutting the Parmesan in half. Adding more herbs and spices will boost flavor without extra calories. Lastly, bake instead of frying to keep it light. Yes, you can use frozen tilapia fillets. Just make sure to thaw them first. Place the fillets in the fridge overnight or run them under cold water. Pat them dry before coating. This helps the mixture stick better. Cooking time may be the same, but check for doneness to ensure they are flaky. Many sides go well with Parmesan crusted tilapia. Here are a few tasty options: - Sautéed spinach - Roasted vegetables - Steamed asparagus - Quinoa or rice - A fresh garden salad These sides bring different colors and textures to your plate. They also add more nutrients to your meal, making it a balanced feast. For the full recipe, check out the complete guide. This blog post covered everything you need for Parmesan crusted tilapia. We explored the ingredients, including top brands and substitutes for diets. I walked you through prepping, coating, and baking the fish. We shared tips for a crispy crust and flavor boosts while avoiding common mistakes. You learned about variations, storage, and reheating guidelines. Lastly, we answered key FAQs to enhance your cooking. With this knowledge, you can confidently create a delicious meal that satisfies everyone. Enjoy your cooking adventure!

Parmesan Crusted Tilapia Tasty and Simple Recipe

Looking for a quick and tasty dinner idea? Parmesan crusted tilapia checks all the boxes. It’s easy to make, uses

- 1 lb Brussels sprouts, halved - 4 cloves garlic, minced - 3 tablespoons olive oil - 1 teaspoon fresh thyme leaves - 1 teaspoon fresh rosemary, chopped - 1/2 teaspoon smoked paprika - Salt and pepper to taste - Zest of 1 lemon - 2 tablespoons grated Parmesan cheese (optional) These ingredients make the perfect mix for Garlic Herb Roasted Brussels Sprouts. The fresh herbs bring out the best in the sprouts. Garlic adds a rich flavor that makes this dish shine. The smoked paprika gives a warm kick. If you want, the Parmesan cheese adds a nice touch at the end. When selecting Brussels sprouts, look for firm, green ones. Avoid any yellow or wilted leaves. Fresh garlic will also boost the taste. Use high-quality olive oil for the best flavor. Fresh herbs like thyme and rosemary are key for that garden taste. You can find the full recipe [here](#). Use these ingredients to create a dish that is both tasty and healthy. Enjoy the cooking process, and get ready to impress your family or friends! First, preheat your oven to 425°F (220°C). This high heat makes the Brussels sprouts crisp and tasty. Next, rinse the Brussels sprouts under cold water. Trim the ends off and cut each sprout in half lengthwise. This helps them cook evenly and lets the flavors seep in. In a large bowl, combine the halved Brussels sprouts with minced garlic, olive oil, thyme, rosemary, smoked paprika, lemon zest, salt, and pepper. Use your hands to toss everything together. Make sure the Brussels sprouts get coated well. A good mix brings out all the flavors. Now, arrange the sprouts on a baking sheet. Place them cut-side down for the best caramelization. Roast in the oven for 20-25 minutes. Stir the sprouts halfway through to ensure even cooking. They should turn golden brown and tender. If you choose, add grated Parmesan cheese in the last five minutes. This gives them a cheesy finish. For the full recipe, check out the instructions listed earlier. To get the best flavor, place the cut sides down. This helps them caramelize nicely. Caramelization gives a rich, sweet taste. After 20-25 minutes, check them for tenderness. The sprouts should feel soft with a nice golden color. If they look brown and crisp, they are ready! You can add more herbs for extra flavor. Try oregano or sage for a twist. A pinch of red pepper flakes can add heat. If you love cheese, sprinkle Parmesan in the last five minutes. This gives a creamy, savory finish that melts beautifully. These Brussels sprouts pair well with roasted chicken or fish. For a veggie meal, serve with quinoa or a fresh salad. When serving, arrange them on a colorful plate. A sprinkle of lemon zest on top makes it look fancy. Enjoy your Garlic Herb Roasted Brussels Sprouts as a tasty side or a main dish! For the full recipe, click here. {{image_2}} You can change the flavor of your garlic herb roasted Brussels sprouts easily. Try using different herbs like oregano or parsley. These herbs add fresh notes and a new twist. You can also add balsamic vinegar for a tangy kick. This adds depth and brightness to the dish. If you want to switch things up, consider alternative oils for roasting. Avocado oil or coconut oil work well. They bring their own unique taste and health benefits. If you prefer a vegan option, you can skip the Parmesan cheese or use a vegan alternative. Nutritional yeast can give that cheesy flavor without dairy. Incorporate seasonal vegetables for added color and flavor. Carrots, sweet potatoes, or even cauliflower can be great choices. They roast well and mix beautifully with Brussels sprouts. You can also use citrus variations, like orange or lime zest, for a bright and fresh twist. This adds a zesty layer that complements the garlic and herbs. To keep your Garlic Herb Roasted Brussels Sprouts fresh, place them in an airtight container. This helps lock in flavor and moisture. You can store them in the fridge for about 3 to 5 days. If you want to keep them longer, consider freezing them. Just remember to use a freezer-safe bag or container. Frozen sprouts can last for about 2 months. When reheating, you want to keep that nice texture. The best way is to use the oven. Preheat it to 350°F (175°C) and place the sprouts on a baking sheet. Bake them for about 10-15 minutes. This way, they will stay crispy. You can also use a skillet on low heat. Just give them a toss to avoid sogginess. Avoid the microwave if you can, as it can make them mushy. Enjoy your delicious leftovers! To make Brussels sprouts taste better, I suggest a few easy tips. First, always roast them for a nice caramelized flavor. Second, use fresh garlic and herbs like thyme and rosemary for a strong taste. Third, add a squeeze of lemon juice for brightness. Finally, a sprinkle of Parmesan cheese at the end can add a savory touch. These simple changes make a big difference. Yes, you can use frozen Brussels sprouts. However, fresh ones taste better. If you use frozen, thaw them first and drain excess water. This helps avoid sogginess. Adjust the roasting time to about 30 minutes, stirring often to ensure even cooking. Frozen sprouts may not get as crispy, but they still taste good. The best temperature to roast Brussels sprouts is 425°F (220°C). This high heat ensures they roast quickly and brown well. At this temperature, the outside gets crispy while the inside stays tender. Make sure to spread them out in a single layer on the baking sheet for even cooking. For more details, check out the full recipe. This post shared a simple way to make tasty roasted Brussels sprouts. You learned about fresh ingredients, preparation steps, and how to bake them for the best flavor. Remember to check for tenderness and try different herbs for variety. Storing leftovers well will keep them fresh. By following these tips, you can enjoy a healthy dish that shines during any meal. Now, get cooking and enjoy every bite!

Garlic Herb Roasted Brussels Sprouts Savory Delight

Craving a tasty veggie side that impresses? Look no further than my Garlic Herb Roasted Brussels Sprouts. This savory delight

- 2 cups rotini pasta - 1 cup cooked chicken breast, diced - 1/2 cup cherry tomatoes, halved - 1/4 cup grated Parmesan cheese - 3 cups romaine lettuce, chopped - 1/4 cup Caesar salad dressing (store-bought or homemade) - 1/4 teaspoon garlic powder - Salt and black pepper to taste - Croutons for garnish - Fresh parsley, chopped (for garnish) To make the Chicken Caesar Pasta Salad, you need fresh and high-quality ingredients. The rotini pasta gives the salad a fun twist. It holds the dressing well and adds a nice texture. Using cooked chicken breast makes it hearty. You can use leftover chicken for a quick meal too. Cherry tomatoes bring a burst of color and flavor. They add sweetness, balancing the savory taste of the Caesar dressing. Grated Parmesan cheese adds a rich and nutty taste. It melts slightly into the warm pasta, creating a creamy feel. Romaine lettuce adds crunch and freshness. This salad is not just tasty; it looks good too. The colors from the ingredients make it appealing. You can pick a Caesar dressing you enjoy. Store-bought is fine, but homemade can be even better. Garlic powder adds depth to the dressing, enhancing the overall flavor. Don’t forget salt and black pepper! They help bring all the flavors together. Croutons add an extra crunch on top, making every bite exciting. Lastly, fresh parsley gives a pop of color and a hint of herbal flavor. For the full recipe, you can check the detailed instructions. 1. Bring salted water to a boil in a large pot. 2. Add 2 cups of rotini pasta. 3. Cook until the pasta is al dente, usually about 8-10 minutes. 4. Drain the pasta and rinse it under cold water. This stops the cooking. 1. In a large bowl, mix 1 cup of diced cooked chicken, 1/2 cup of halved cherry tomatoes, 1/4 cup of grated Parmesan cheese, and 3 cups of chopped romaine lettuce. 2. Add the cooled rotini pasta to the bowl. 1. In a small bowl, whisk together 1/4 cup of Caesar dressing, 1/4 teaspoon of garlic powder, salt, and pepper. 2. Taste and adjust seasoning as necessary. 1. Pour the dressing over the salad mixture in the bowl. 2. Toss gently until everything is well coated with dressing. 1. Cover the salad and refrigerate for at least 30 minutes. This helps the flavors mix. 2. Just before serving, garnish with croutons and chopped parsley for extra crunch and color. For the full recipe, check out the details above. To make great pasta, start with a big pot. Use plenty of water and add salt. This helps the pasta taste better. Cook the rotini until it is al dente. This means it should be firm but not hard. You can check this by tasting a piece. After cooking, rinse the pasta under cold water. This stops the cooking process and keeps it from getting mushy. Rinsing also helps cool it down for your salad. Feel free to add other tasty ingredients. You might try diced bell peppers for color or olives for a salty kick. Avocado can make it creamy. Just remember to keep any extra ingredients in balance. If you want a vegan version, swap the chicken for chickpeas. You can also use a plant-based dressing. For a gluten-free option, choose gluten-free pasta. There are many choices that taste great! To boost the taste of your dressing, add fresh lemon juice. A dash of Worcestershire sauce can add depth. You can also mix in some Dijon mustard for a zing. For herbs, try fresh basil or parsley. These add freshness. Sprinkle some black pepper for a little heat. These simple steps can really lift your Chicken Caesar Pasta Salad. For the full recipe, check out the detailed instructions above. {{image_2}} You can swap the chicken for many other proteins. Shrimp works great. Just cook it quickly in a pan. Tofu is another option. It soaks up flavors well. You can also use leftover chicken from another meal. This makes cooking fast and easy. While Caesar dressing is classic, there are many other choices. You can try ranch, blue cheese, or vinaigrette. Each brings a different taste. If you want to make your own, blend Greek yogurt, lemon juice, and herbs. This gives a fresh twist. Using seasonal veggies can brighten your salad. In summer, add bell peppers, cucumbers, or corn. They add crunch and color. For winter, try roasted squash or Brussels sprouts. These veggies add warmth and depth. You can always mix and match. Enjoy the flavors of each season in your salad! After enjoying Chicken Caesar Pasta Salad, you might have some leftovers. To store them, use an airtight container. Make sure the salad is cool before sealing. This keeps it fresh and prevents sogginess. You can store it in the fridge for up to three days. However, for the best taste, try to eat it within two days. Can you freeze Chicken Caesar Pasta Salad? It’s not the best idea. When frozen, the dressing can separate, and the lettuce will get mushy. If you still want to freeze it, consider freezing the pasta and chicken separately. This helps maintain their texture. When ready to eat, thaw everything in the fridge overnight. Mix fresh lettuce and dressing before serving. This way, you keep the salad fresh and tasty. Chicken Caesar pasta salad mixes pasta with chicken, lettuce, and Caesar dressing. It combines the classic Caesar salad with pasta. This dish likely comes from the need to add heartiness to a traditional salad. It’s perfect for lunch or a light dinner. Yes, you can make this salad ahead of time. Prepare it a few hours before you eat. Just keep it in the fridge to stay fresh. The flavors blend better when it chills. However, wait to add croutons until just before serving. They stay crispy this way. This salad pairs well with many sides. You can serve it with garlic bread or a light soup. A simple fruit salad also makes a good match. If you want something more filling, add grilled veggies or roasted potatoes. Yes, this recipe is quite healthy. It includes lean chicken, fresh veggies, and pasta. Chicken adds protein, while romaine lettuce offers fiber and vitamins. The dressing gives flavor but can be adjusted for fewer calories. Use less dressing or a lighter version if desired. To boost the flavor, try adding fresh herbs like basil or parsley. You can also squeeze some lemon juice over the salad. This adds brightness. If you like a bit of heat, sprinkle in some red pepper flakes. Taste as you go to find your favorite balance. If you want an alternative, use ranch or yogurt-based dressings. A simple vinaigrette can also work. For a homemade option, mix olive oil, lemon juice, and garlic. These substitutes give you a new spin while keeping the salad tasty. This blog post covered how to make a tasty Chicken Caesar Pasta Salad. You learned about the ingredients, cooking steps, and storage tips. You can customize the salad with different proteins and dressings. Don't be afraid to experiment with seasonings and seasonal veggies. In the end, this salad is easy to make and perfect for any meal. Enjoy making it your own!

Chicken Caesar Pasta Salad Fresh and Tasty Meal

Looking for a fresh, tasty meal that’s easy to prepare? You’re in the right place! Chicken Caesar Pasta Salad combines

- 1 loaf of brioche bread, cut into 1-inch cubes - 6 large eggs - 2 cups whole milk - 1/2 cup granulated sugar - 1 tablespoon vanilla extract - 1 teaspoon ground cinnamon - 1/4 teaspoon nutmeg - 1/4 teaspoon salt - 1/2 cup maple syrup (for drizzling) - Fresh berries (for garnish) - Powdered sugar (for dusting) You can switch the brioche for challah or whole wheat bread. For a dairy-free version, try almond or oat milk. Use agave or honey instead of sugar if you want a different sweetener. Using fresh and high-quality ingredients makes a big difference. Good brioche gives a soft, rich base. Fresh eggs add creaminess. Whole milk enhances flavor and texture. Quality spices like cinnamon and nutmeg bring warmth. Each ingredient plays a role in making your casserole taste amazing. First, preheat your oven to 350°F (175°C). This temperature helps the casserole cook evenly. While the oven heats, grease a 9x13-inch baking dish. You can use butter or cooking spray. This step stops the bread from sticking. Next, take your loaf of brioche bread and cut it into 1-inch cubes. Spread the bread evenly in the greased dish. This helps every piece get soaked. In a large bowl, whisk together 6 large eggs, 2 cups of whole milk, and 1/2 cup of granulated sugar. Add 1 tablespoon of vanilla extract, 1 teaspoon of ground cinnamon, 1/4 teaspoon of nutmeg, and 1/4 teaspoon of salt. Mix until smooth. Pour this egg mixture over the bread, covering every piece. Press down gently with a spatula to help the bread absorb the liquid. Once everything is soaked, cover the baking dish with plastic wrap or aluminum foil. Refrigerate it for at least 2 hours. If you have time, let it sit overnight. This gives the bread more flavor. When you are ready to bake, take the dish out and let it sit for about 15 minutes to warm up. Then, place it in the oven. Bake uncovered for 35 to 40 minutes. Look for a golden brown top and a set center. Let the casserole cool slightly before serving. Drizzle with maple syrup and add fresh berries and powdered sugar on top. Enjoy this sweet morning treat! For the complete instructions, check the Full Recipe. Soaking your bread overnight is key. This step helps the bread soak up all the egg mixture. It makes each bite rich and flavorful. When bread sits, it absorbs the milk, eggs, and spices fully. This leads to a creamy texture that people love. If you are short on time, soak it for at least 2 hours. However, overnight is best for maximum flavor. To check if your casserole is done, look for two signs. First, the top should be golden brown. Second, the center must be set, not jiggly. You can insert a knife into the middle. If it comes out clean, it's ready. If not, let it bake a bit longer. Keep an eye on it to avoid overbaking. There are many fun ways to serve your French toast casserole. For a festive touch, dust it with powdered sugar. You can also drizzle warm maple syrup over the top. Fresh berries add color and taste, making the dish pop. Want to be fancy? Serve it with whipped cream or yogurt on the side. Each option makes it feel special and delicious! For the full recipe, check this out: [Full Recipe]. {{image_2}} You can make your French toast casserole even more fun. Adding chocolate chips is a sweet option. Mix in some chopped nuts for a great crunch. You can also add citrus zest, like lemon or orange, for a fresh twist. If you need gluten-free options, use gluten-free bread. For a vegan twist, swap eggs with flaxseed and milk with almond or oat milk. You can also reduce sugar or use a sugar-free sweetener for a low-sugar version. In summer, try adding fresh berries like strawberries or blueberries. They add color and flavor. In fall, spices like pumpkin pie spice or even apple slices can give your casserole a warm, cozy feel. These small changes can make each bite a new delight! To keep your French toast casserole fresh, store it in the fridge. Place it in an airtight container. If you want to freeze it, wrap it tightly in plastic wrap, then foil. This helps avoid freezer burn. Make sure to cool it completely before storing. This way, you keep the best taste and texture. When you want to enjoy your leftovers, reheat them in the oven. Preheat your oven to 350°F (175°C). Place the casserole in an oven-safe dish. Cover it with foil to keep it moist. Heat for about 20 minutes, or until hot. You can also use the microwave, but it may change the texture. If you microwave, cover the dish and heat in short bursts. Your French toast casserole lasts about 3-4 days in the fridge. If you freeze it, it can last up to 2-3 months. After that, the taste may change. Always check for any off smells or signs of spoilage before eating. For the best taste, enjoy it sooner rather than later. Yes, you can prepare this casserole the night before. Just follow the steps and cover it well. Place it in the fridge overnight. This gives the bread time to soak in the egg mixture. The next morning, just bake it. You’ll enjoy a tasty breakfast with little effort. Brioche bread is ideal for this casserole. It’s soft and sweet, making it perfect for soaking. You can also try challah or French bread. These types hold up well and give a great texture. Avoid using plain bread, as it may not absorb the flavors as well. Yes, you can use different kinds of milk. Almond, soy, or oat milk are good dairy-free choices. If you want a creamier texture, try whole milk or half-and-half. Just keep in mind that the flavor may change slightly, but it will still taste great. Many toppings work well with this casserole. Fresh berries add color and flavor. You can also use whipped cream for a rich touch. Nuts, like pecans or walnuts, add crunch. For a sweet twist, drizzle honey or chocolate sauce. Feel free to mix and match your favorites! In this blog post, we've covered how to make a delicious French toast casserole. We explored key ingredients like brioche and maple syrup, along with tasty substitutions. Quality ingredients boost flavor, making your dish special. You learned the step-by-step process, from prep to bake, plus tips for perfect results. Variations and storage tips help you customize and preserve your casserole. Remember, a bit of creativity can turn a simple dish into a favorite. Enjoy making this treat!

Easy French Toast Casserole Delicious Morning Treat

Start your day off right with my Easy French Toast Casserole! This simple recipe turns classic French toast into a

- Cucumbers - Salt - Rice vinegar - Fresh lime juice - Sugar - Sesame oil - Red pepper flakes - Garlic - Fresh cilantro I love using fresh cucumbers for this dish. They add a nice crunch. The salt helps to draw out moisture, making them crispier. Rice vinegar gives a tangy flavor. Fresh lime juice adds brightness and freshness. Sugar balances the tanginess. Sesame oil provides a nutty taste. Red pepper flakes add spice, but feel free to adjust them to your liking. Garlic gives depth, and fresh cilantro adds a fragrant touch. - Other vegetables (carrots, bell peppers) - Fresh herbs (mint, dill) - Spices (ginger, black pepper) You can also get creative! Adding carrots or bell peppers for color makes the dish pop. Fresh herbs like mint or dill can change the flavor profile. If you want extra warmth, try ginger or black pepper. These add-ins make the dish even more exciting and flavorful. For the full recipe, check out the instructions that follow! Start with two large cucumbers. Slice them thinly. Place them in a colander and sprinkle salt over them. This step draws out moisture. Let the cucumbers rest for about 15 minutes. You will see water pooling below. This process keeps them crispy. After 15 minutes, rinse the cucumbers under cold water. This removes the excess salt. Gently pat them dry with paper towels. You want them to be dry to soak up the marinade well. In a mixing bowl, combine rice vinegar, fresh lime juice, sugar, sesame oil, red pepper flakes, and minced garlic. Whisk these ingredients together until the sugar dissolves. Taste the mixture. If you want it sweeter or tangier, adjust the sugar or lime juice. Finding the right balance is key. Now, combine the cucumbers and the marinade in a large bowl. Toss them well to coat every slice. Cover the bowl with plastic wrap. Place it in the refrigerator. Let the cucumbers marinate for at least 30 minutes. For the best flavor, let them sit for up to 2 hours. Before serving, give the cucumbers a gentle toss again. Garnish with fresh cilantro for a nice touch. Enjoy this fresh and flavorful dish! To make your marinated cucumbers pop, you can adjust the spice levels. If you love heat, add more red pepper flakes. For a milder taste, use less. You can also switch to chili oil for a different kick. Adding other seasonings makes your dish special. Try a dash of soy sauce for depth or a splash of sesame oil for nuttiness. Fresh herbs like mint or dill can brighten the flavor. Experiment with what you like best. These cucumbers pair well with many dishes. Serve them alongside grilled meats or as a side to rice dishes. They also work great in salads, adding crunch and zest. For the best taste, serve them cold. Take them out of the fridge just before eating. This keeps them crisp and fresh, making every bite enjoyable. Garnishing your dish can make it look even better. Sprinkle some chopped cilantro over the cucumbers for a pop of green. You can also add sesame seeds for a nice crunch. For serving, you have options. Present them in individual bowls for a personal touch or lay them out on a platter for family-style dining. This allows everyone to help themselves and enjoy your tasty creation. For the complete recipe, check out the full recipe section. {{image_2}} You can easily change the flavor of your marinated cucumbers. For a sweet twist, try adding honey or maple syrup to the marinade. Just a tablespoon can bring a nice balance to the tangy vinegar. This sweetness pairs well with the crispness of the cucumbers. If you like heat, consider adding chili oil. A drizzle can ignite the taste and add spicy excitement. Adjust the amount based on how spicy you want it. You can mix both sweet and spicy for a unique flavor profile. You can make this dish fit various diets too. For gluten-free options, ensure your rice vinegar is certified gluten-free. This way, everyone can enjoy the dish without worry. If you follow a vegan diet, you’re in luck! The recipe is naturally vegan. Just stick to the ingredients as is, and you have a tasty and fresh side dish. Customize it to suit your needs while keeping it flavorful and fun! For the full recipe, check out the detailed instructions mentioned earlier. To keep marinated cucumbers fresh, use a glass jar or airtight container. These containers help keep the cucumbers crisp. Make sure the lid fits tightly. The cucumbers need a cool spot in the fridge. Store them on a shelf, not in the door. The door can get too warm, which affects freshness. When stored properly, marinated cucumbers last about one week. You will know they are fresh if they still look bright and crunchy. If they begin to look dull or mushy, it’s time to toss them. A sour smell also means they have gone bad. Always check before using them in your meals. If your cucumbers taste too salty, don't worry! You can balance the flavors easily. Here are some tips: - Rinse the cucumbers under cold water to remove excess salt. - Add more marinade to dilute the saltiness. - Mix in fresh cucumber slices to balance the taste. - Consider adding a touch of sugar or vinegar to counteract salt. These steps can help make your dish more enjoyable. The time you marinate cucumbers can change the flavor. The best practices are: - Marinate for at least 30 minutes for good flavor. - For a stronger taste, marinate up to 2 hours. - Avoid marinating for more than 2 hours, as cucumbers may become too soft. Finding the right time helps you enjoy the best taste! Yes, you can use various cucumber types! Here are some recommendations: - English cucumbers offer a mild taste and fewer seeds. - Persian cucumbers are smaller and very crunchy. - Kirby cucumbers are great for pickling and add a nice crunch. Experimenting with different cucumbers can add fun to your dish. In this article, we explored the simple steps to create tasty marinated cucumbers. We covered ingredients, optional add-ins, and effective methods to prepare and serve them. Remember, customize your dish with spices and fresh herbs for extra flavor. Store your marinated cucumbers properly to keep them fresh for longer. Enjoy your crunchy, zesty treat! With these tips, you can ensure every bite is satisfying and delicious. Keep experimenting to find your favorite variations and serve them with flair.

Quick Marinated Cucumbers Fresh and Flavorful Dish

If you’re looking for a fresh and tangy side dish, Quick Marinated Cucumbers are a must-try! Packed with flavor, these

- 1 pound large shrimp, peeled and deveined - 4 cloves garlic, minced - 1 teaspoon smoked paprika - 1 teaspoon red pepper flakes (adjust to taste) - 1 tablespoon olive oil - 1 tablespoon lemon juice - Salt and pepper, to taste - 1 cup cherry tomatoes, halved - 1 medium zucchini, sliced - Fresh parsley, chopped, for garnish The key to my One-Pan Garlic Roasted Shrimp lies in the quality of the ingredients. Fresh, large shrimp are essential. They soak up the flavors well. Fresh garlic adds depth, while smoked paprika gives a warm touch. I like to use red pepper flakes for a bit of heat. You can adjust this to your taste. Olive oil and lemon juice help to marry the flavors. Cherry tomatoes and zucchini add color and nutrients. The fresh parsley on top brightens the dish. - Baking sheet - Mixing bowl - Measuring spoons You only need a few tools for this recipe. A baking sheet helps the shrimp roast evenly. A mixing bowl combines the flavors nicely. Measuring spoons ensure you get the right amounts of each ingredient. - Serve with crusty bread - Pair with a fresh salad To make the meal complete, I suggest serving it with crusty bread. This lets you soak up all the tasty juices. A fresh salad adds a nice crunch and balance. The Full Recipe details how to make this dish in just about 22 minutes. Enjoy! - Preheat your oven to 400°F (200°C). - In a large mixing bowl, combine shrimp and seasonings. To prepare, first, you need to warm up the oven. Set it to 400°F (200°C). This step ensures your shrimp cooks perfectly. Next, grab a big mixing bowl. Here, you'll add the shrimp, minced garlic, smoked paprika, red pepper flakes, olive oil, lemon juice, salt, and pepper. Mix everything well. Make sure the shrimp is coated in the tasty mixture. - Spread the shrimp on a baking sheet and arrange vegetables around them. - Roast in the oven for 10-12 minutes. Now, take a large baking sheet. Spread the seasoned shrimp in the center. This helps them cook evenly. Next, take the halved cherry tomatoes and sliced zucchini. Place them around the shrimp. Drizzle a bit more olive oil over the veggies. Season them with salt and pepper. Now, it's time to roast. Place the baking sheet in the oven. Cook for 10 to 12 minutes. The shrimp will turn pink and the veggies tender. - Let cool briefly before garnishing with parsley. - Suggestions for serving directly or plating. Once done, take the baking sheet out of the oven. Let it cool for a couple of minutes. This step helps prevent burns. Then, add fresh chopped parsley on top for color. You can serve the shrimp right from the pan for a fun look. If you want, transfer it to a platter. Squeeze some extra lemon juice on top for a zesty finish. For the full recipe, check the section above. - How to select fresh shrimp: Look for shrimp that feel firm and smell like the sea. The shells should be shiny and not sticky. Avoid any shrimp with black spots, as this can indicate spoilage. - Techniques for even cooking: Spread the shrimp in a single layer on your baking sheet. This helps them cook evenly. Don't crowd the shrimp; give them space to roast and caramelize. - Add citrus zest for brightness: Adding lemon zest to the mix brightens the dish. It adds a fresh flavor that complements the garlic and shrimp. - Consider swapping spices for variations: You can experiment with spices. Try Italian herbs or curry powder for a twist. This can change the whole vibe of the dish. - Serving directly from the pan: For a rustic touch, serve the dish straight from the pan. This makes it easy and fun for guests to scoop their portions. - Ideas for garnishing with herbs or extra lemon juice: Fresh herbs like parsley or cilantro add color and flavor. A squeeze of lemon juice just before serving elevates the taste. It adds a refreshing note that balances the richness. You can find more details in the Full Recipe. {{image_2}} You can switch up the veggies in this dish. Try using bell peppers or asparagus. Both add color and taste. You can also use other spices. Italian seasoning gives a nice twist to the garlic flavor. If you need gluten-free, this recipe works well. Just make sure to check your spices. For a low-carb option, skip the pasta and serve it with zucchini noodles. If you want a vegetarian dish, use mushrooms or chickpeas. They soak up all the tasty flavors. Transform this dish into a pasta delight. Just toss cooked pasta with shrimp and veggies. You can also serve it over rice or quinoa. Both grains soak up the juices and add more texture to the meal. For more ideas, check out the Full Recipe. To store leftovers, let the dish cool first. Place it in an airtight container. You can keep it in the fridge for up to three days. Ensure the shrimp and veggies stay fresh by sealing them well. If you wait too long, the shrimp may lose texture. If you want to freeze cooked shrimp, use a freezer-safe bag. Remove as much air as possible. This helps prevent freezer burn. You can freeze the shrimp for up to three months. When ready to eat, thaw in the fridge overnight or use cold water for a quick thaw. To reheat the dish, use a skillet on low heat. This keeps the shrimp from overcooking. Stir gently to warm evenly. For the veggies, add a splash of water to help them stay crisp. Avoid the microwave, as it may make the shrimp rubbery. For the best flavor and texture, use large shrimp. They hold up well during cooking. I recommend using wild-caught shrimp if you can find them. They taste better and are more sustainable. Yes, you can prep the shrimp and veggies ahead of time. Just store them in the fridge for up to two hours. When ready to cook, simply toss them in the seasoning and roast. This saves time and keeps the flavor fresh. This dish pairs well with a few options. Try serving it with crusty bread to soak up the juices. A fresh salad also works great. You can even serve it over rice or quinoa for a complete meal. To add heat, increase the red pepper flakes. Start with an extra half teaspoon and taste. You can also use fresh chili peppers or hot sauce. Just add a little at a time to control the spice level. Yes, you can use garlic powder if you don't have fresh garlic. Use about 1/2 teaspoon of garlic powder for each clove. Keep in mind that fresh garlic gives a stronger flavor, but powder works in a pinch. For the full recipe, check out the earlier section. In this blog post, we explored a simple and tasty One-Pan Garlic Roasted Shrimp recipe. I shared the key ingredients, step-by-step cooking instructions, and helpful tips to enhance your meal. You can easily swap ingredients for variations and learn how to store leftovers. By bringing these flavors together, you can enjoy a delightful dish. Experiment with your ideas and make this recipe your own!

Flavorful One-Pan Garlic Roasted Shrimp Delight

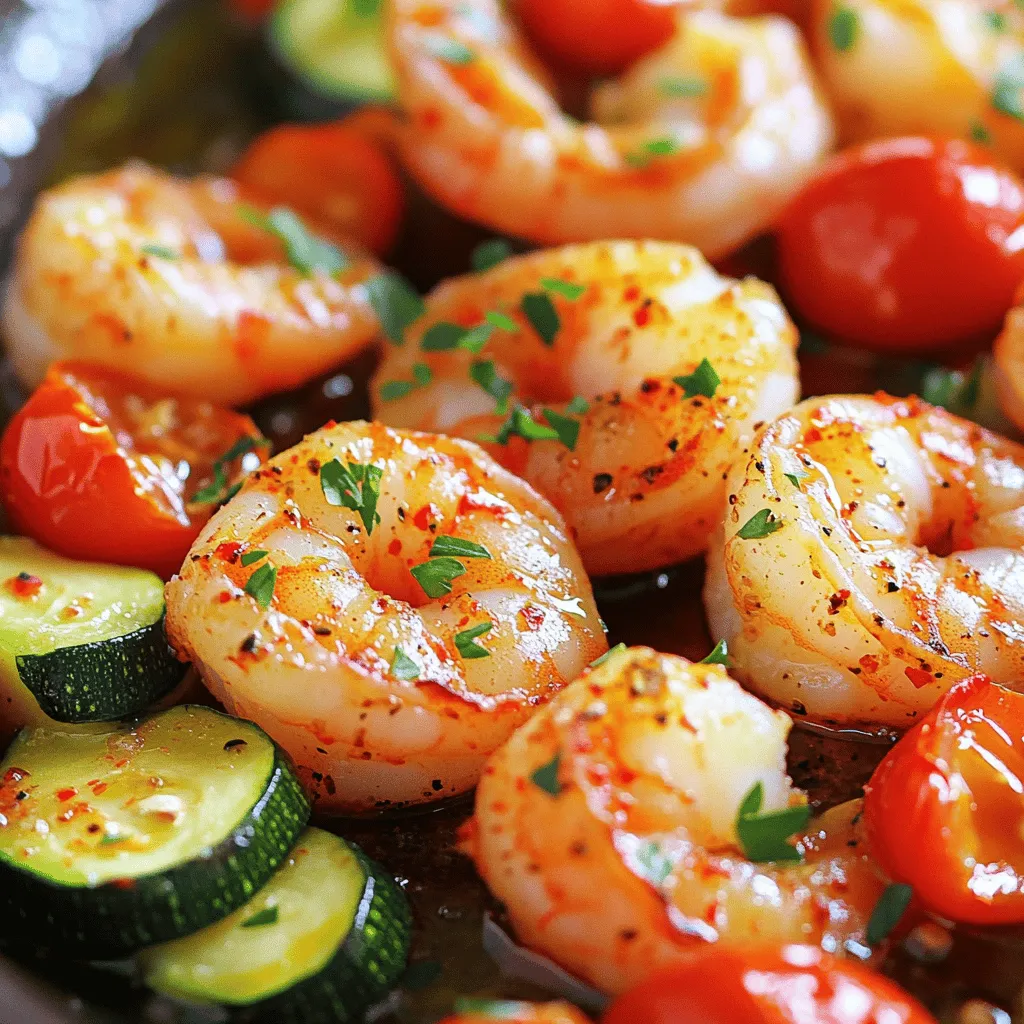
If you’re looking for a quick, tasty dinner, you’re in for a treat! My One-Pan Garlic Roasted Shrimp is a

To make these delightful bagels, gather the following: - 4 cups all-purpose flour - 1 tablespoon salt - 1 tablespoon sugar - 2 teaspoons instant yeast - 1 ½ cups warm water (about 110°F) - 1 tablespoon honey (for boiling) - Sesame seeds, poppy seeds, or everything bagel seasoning (for topping) - Optional: 1 egg (for egg wash) If you need to adjust, you can use whole wheat flour instead of all-purpose flour. This adds a nutty taste. You can replace sugar with honey if you prefer a different sweetener. For the yeast, active dry yeast can work, but it needs to be proofed first. Just mix it with warm water and sugar, then wait for bubbles to form. This shows the yeast is alive and ready to use. Toppings make your bagels fun and unique. Try sesame seeds for a classic touch. Poppy seeds add a nice crunch. Everything bagel seasoning brings a mix of flavors that many love. You can also go wild with toppings like cheese or herbs. For a sweet twist, consider cinnamon sugar or even chocolate chips. Enjoy experimenting to find your favorite combination! Start by gathering all your ingredients. This makes the process smooth. You need all-purpose flour, salt, sugar, and instant yeast. Warm water is key too, around 110°F. Mix these dry ingredients in a large bowl. Slowly pour in the warm water. Use a wooden spoon to mix until you see a shaggy dough. Next, turn the dough out onto a lightly floured surface. Knead the dough for about 10 minutes. You want it smooth and elastic. This step is crucial for that chewy texture. After kneading, place the dough in a lightly oiled bowl. Cover it with a damp cloth. Let it rise in a warm spot for about 1 hour. It should double in size. Once the dough has risen, it’s time to shape your bagels. Punch it down and divide into 10 pieces. Roll each piece into a ball. Poke a hole in the center with your finger. Gently stretch it to form the bagel shape. Now, place them on a baking sheet. Bring a large pot of water to a boil. Add 1 tablespoon of honey to the water. Boil each bagel for 1 minute on each side. This helps create the classic chewy texture. Use a slotted spoon to remove them and place back on the baking sheet. If you want a shiny finish, brush each bagel with whisked egg. Sprinkle your favorite toppings on top. Preheat your oven to 425°F. Bake the bagels for 20-25 minutes. Look for that golden brown color. Let them cool on a wire rack before you dig in. Follow this step-by-step guide for a great homemade bagel experience. For the full recipe, refer to the Bagel Bliss: A Chewy Delight. To get that chewy bagel texture, focus on the dough. Use high-protein all-purpose flour. This type of flour gives bagels strength. Knead the dough well for about ten minutes. This builds gluten. Gluten makes the bagels chewy. Don’t skip the boiling step. Boiling creates a crust that holds in moisture. One common mistake is not measuring ingredients accurately. Use a kitchen scale for precise results. Another mistake is skipping the rise time. Let the dough rise until it doubles in size. This helps the bagels become light and airy. Also, avoid overcrowding during boiling. Boil only a few bagels at a time. You will need some basic tools for bagel-making. Here’s a quick list: - Large mixing bowl - Wooden spoon - Clean surface for kneading - Parchment paper for baking - Large pot for boiling - Slotted spoon for removal - Optional: kitchen scale for measuring These tools help ensure success in your bagel-making journey. For the best results, keep everything organized and ready to go. For the full recipe, check out Bagel Bliss: A Chewy Delight. {{image_2}} You can easily change the taste of your bagels. Mix in herbs or spices for a fun twist. Try adding garlic powder or dried onion for a savory kick. If you love cheese, blend in shredded cheddar or parmesan. For a sweet bagel, consider cinnamon and sugar. Each of these additions makes your bagels unique and exciting. Bagels are great with many toppings. Instead of just sesame seeds, try different flavors. You can use poppy seeds, onion flakes, or even everything bagel seasoning. For a sweet touch, sprinkle brown sugar and cinnamon. You can also add fresh herbs like rosemary or thyme. Get creative and make each bagel a new experience. If you need gluten-free bagels, don’t worry! You can use gluten-free flour blends. Look for ones that include xanthan gum to help with texture. Follow the same steps in the recipe, but adjust water as needed. Your bagels will still be chewy and tasty, just like the original. Enjoy your homemade bagels, no matter your dietary needs! For more details on making these delicious treats, check out the Full Recipe. To keep your homemade bagels fresh, you need to store them right. If you plan to eat them within a few days, place them in a paper bag. This keeps them soft and tasty. Avoid plastic bags, as they make bagels soggy. For longer storage, wrap them in foil and place them in an airtight container. If you made too many bagels, freezing is a great option. First, let them cool completely on a wire rack. Then, wrap each bagel tightly in plastic wrap. After that, place the wrapped bagels in a freezer bag. They can stay fresh for up to three months. When you're ready to eat them, just take them out and let them thaw. To enjoy your bagels again, reheating is easy. For a crispy result, preheat your oven to 350°F (175°C). Place the bagels on a baking sheet and heat for about 5 to 10 minutes. If you like them softer, you can microwave them for 15 to 20 seconds. This way, you keep that fresh taste. For extra flavor, add your favorite toppings before reheating. Remember, to keep the deliciousness alive, store, freeze, and reheat wisely! If you're interested in making these bagels, check out the Full Recipe for detailed steps. Homemade bagels last about 2 to 3 days at room temperature. Store them in a paper bag for best results. You can freeze them for up to 3 months. Just wrap them well in plastic wrap before freezing. Yes, you can make bagel dough ahead of time. Prepare the dough and let it rise. Then, cover it tightly and place it in the fridge. It can stay there for 1 to 2 days. When ready to use, let it come to room temperature before shaping. Bagels are chewy due to the high gluten content in the flour. When you knead the dough, gluten develops and creates a strong structure. Boiling the bagels also helps enhance their chewiness. Yes, you can use bread flour instead of all-purpose flour. Bread flour has a higher protein content, which gives bagels a firmer texture. This can make your bagels even chewier and more delicious. To get a shiny crust, brush the bagels with an egg wash before baking. This gives them a nice golden color. Boiling them in honey water also helps create that glossy finish. Bagels have roots in Jewish culture, specifically from Poland. They are believed to date back to the 17th century. They were made for special occasions and have become a beloved food worldwide. For a delightful experience, try making them using the Full Recipe. Making bagels at home is fun and easy. We covered key ingredients, precise measurements, and tasty toppings. I shared step-by-step instructions to help you knead, rise, boil, and bake like a pro. You also learned handy tips for great texture and common mistakes to avoid. Don’t forget the fun variations and storage tips to keep your bagels fresh. Now, you’re ready to create delicious bagels. Enjoy the process and share your tasty results!

Homemade Bagels Fresh and Simple Delight Recipe

Are you ready to bake your own bagels at home? With my Homemade Bagels Fresh and Simple Delight Recipe, you

Older posts
Newer posts
← Previous Page1 … Page56 Page57 Page58 … Page84 Next →

dsad

© 2026 Lisa Dishes • Built with GeneratePress

Our Policies

  • Copyright Policy
  • Cookie Policy
  • GDPR Policy
  • Privacy Policy
  • Disclaimer
  • Terms Of Use

More Information

  • Home
  • About
  • Contact
  • Appetizers
  • Dessert
  • Dinner
  • Drinks
©2026, Lisa Dishes About Back To Top