Skip to content
DisclaimerTerms Of UseGDPR PolicyCookie Policy

Lisa Dishes

  • Home
  • Drinks
  • Appetizers
  • Dinner
  • Dessert
  • About
  • Contact
  • Privacy Policy
DisclaimerTerms Of UseGDPR PolicyCookie Policy

NO-ING-IMG

- 1 large head of cauliflower, cut into florets - 1 tablespoon olive oil - 1 tablespoon pickle juice - 1 tablespoon ranch seasoning - 1 teaspoon garlic powder - ½ teaspoon onion powder - Salt and pepper to taste - Fresh dill or parsley for garnish - Optional: Sliced pickles for topping The ingredients for Pickle Ranch Roasted Cauliflower are simple yet flavorful. You start with a large head of cauliflower, cut into bite-sized florets. This form helps the cauliflower cook evenly and become crispy. Next, you’ll need olive oil, which adds a rich flavor and helps the seasonings stick. Pickle juice adds a tangy punch, making this dish unique. Ranch seasoning is the star here. It mixes with garlic powder and onion powder to create a savory base. Salt and pepper add extra flavor, so taste as you go. For a burst of color and freshness, garnish with dill or parsley after roasting. If you want to take it up a notch, add sliced pickles on top for a fun twist. This dish is perfect for a snack or a side. You can find the complete method in the Full Recipe section. - Preheat oven to 425°F (220°C). - Line a baking sheet with parchment paper. Start by heating your oven. The high temperature helps the cauliflower get crispy. Lining the baking sheet makes cleanup easy. You do not want to miss out on that crunchy texture! - Combine olive oil, pickle juice, ranch seasoning, garlic powder, onion powder, salt, and pepper. In a big bowl, mix the olive oil, pickle juice, ranch seasoning, garlic powder, onion powder, salt, and pepper. This marinade gives the cauliflower its tasty kick. The pickle juice adds a nice tang that works so well with the ranch flavor. - Toss cauliflower florets in the pickle ranch mixture. - Spread cauliflower evenly on the baking sheet. Add the cauliflower florets to your bowl. Toss them well in the pickle ranch mixture until they are all coated. Next, spread the florets in a single layer on your baking sheet. This step ensures even roasting and crispiness. - Roast for 25-30 minutes, stirring halfway. - Check for tenderness and golden brown spots. Put the baking sheet in the oven and roast for 25-30 minutes. Stir the cauliflower halfway through. This helps it cook evenly. When done, it should be tender with golden brown spots. That’s when you know it’s ready to enjoy! To boost the taste of your Pickle Ranch Roasted Cauliflower, you can add more ranch seasoning. This gives your dish a stronger, more zesty flavor. You can also try different pickle brines. Each brine adds a unique twist, making your dish interesting and new. Cut the cauliflower florets evenly. This helps them cook at the same rate. A high oven heat is key for a crispy texture. Roast your cauliflower at 425°F (220°C) for the best results. The high heat helps achieve that perfect crunch. This dish works well as a side, snack, or appetizer. You can serve it with dipping sauces like ranch or spicy mayo. The extra sauce enhances the flavor and makes it even more enjoyable. For a fun twist, top with fresh dill or sliced pickles before serving. This adds color and extra taste, making the dish pop. For the complete experience, check out the Full Recipe. {{image_2}} You can change the flavor of your Pickle Ranch Roasted Cauliflower easily. Try adding smoked paprika for a rich, smoky taste. If you like heat, substitute cumin or cayenne pepper. These spices add warmth and depth to the dish. You don’t have to stick with just cauliflower. Broccoli or Brussels sprouts work great too! You can also mix different veggies for a colorful dish. Cut them into similar sizes so they cook evenly. If you need a vegan or gluten-free dish, check your ranch seasoning. Many brands offer gluten-free options. For a plant-based version, use vegan ranch. This way, everyone can enjoy this tasty treat! For the full recipe, click [Full Recipe]. Store any leftover Pickle Ranch Roasted Cauliflower in an airtight container. This keeps it fresh and tasty. Aim to eat it within 3-4 days for the best flavor. After that, it may lose some of its crunch and zest. You can freeze the uncooked coated cauliflower if you want to save it for later. It’s a great way to have a quick snack or side dish ready. Just place the florets on a baking sheet and freeze until solid. Then, transfer them to a freezer bag. When you’re ready to eat, roast them straight from the freezer, adding a few extra minutes to the cooking time. If you have cooked cauliflower left, you can reheat it in the oven or an air fryer. This way, it stays crispy and delicious! Approximately 25-30 minutes at 425°F (220°C). This time gives you a nice, crisp texture. Yes, you can prepare and roast it in advance. Just store it properly in the fridge. You can use a mix of dried herbs such as dill, chives, and garlic powder. This blend gives a fresh taste. Yes, it’s low in carbs. This makes it perfect for your keto-friendly meals. Combine dried herbs, garlic powder, onion powder, and buttermilk powder for a DIY blend. This way, you control the flavor. Yes, you can sprinkle cheese on the cauliflower during the last few minutes of roasting. This gives it a cheesy twist. This recipe showcases how to make roasted cauliflower with a tangy pickle ranch flavor. You learned about key ingredients, how to prepare them, and important tips for the best taste and texture. I encourage you to experiment with seasonings and different vegetables. Whether as a side dish or snack, this dish is fun and easy to make. Enjoy your cooking adventure, and don’t hesitate to share your results!

Pickle Ranch Roasted Cauliflower Savory and Crisp Treat

Looking for a tasty way to enjoy cauliflower? Try my Pickle Ranch Roasted Cauliflower! This savory and crisp treat combines

- 1 cup ricotta cheese - 1 cup all-purpose flour - 1/2 cup milk - 2 large eggs The main ingredients for these pancakes are simple yet key. The ricotta cheese adds creaminess and flavor. All-purpose flour creates a nice structure. Milk keeps the batter smooth, while eggs help bind everything together. - Zest of 1 lemon - 1 tablespoon lemon juice - 2 tablespoons sugar Zest and juice from the lemon bring bright flavors. The zest gives you aromatic oils, while the juice adds tartness. Sugar balances the flavors and enhances sweetness, making the pancakes delightful. - 1 teaspoon baking powder - 1/2 teaspoon baking soda - 1/4 teaspoon salt Baking powder and baking soda work together to make the pancakes fluffy. They produce gas bubbles that rise the batter. A pinch of salt sharpens the flavors, making every bite taste better. - Butter or oil for cooking Butter or oil is crucial for cooking these pancakes. It helps prevent sticking and adds flavor. I prefer using butter for its rich taste, but oil works great too. For the full recipe, check the detailed instructions to create these fluffy delights! First, grab a large mixing bowl. Beat the eggs until they are frothy. Next, add the ricotta cheese, milk, lemon juice, and lemon zest. Whisk these ingredients together until they blend well. In another bowl, combine the flour, sugar, baking powder, baking soda, and salt. Mix these dry ingredients well to spread the flavors evenly. Now it's time to mix the dry ingredients with the ricotta mixture. Pour the dry mix into the wet mix gradually. Stir gently until they just come together. It's okay if some lumps remain; overmixing can make the pancakes tough. Heat a non-stick skillet or griddle over medium heat. Lightly grease the surface with butter or oil. Pour 1/4 cup of batter onto the skillet for each pancake. Cook for about 2-3 minutes. Look for bubbles forming on the surface and edges that look set. Flip the pancakes and cook for another 2-3 minutes until they turn golden brown. Once cooked, transfer the pancakes to a plate. Keep them warm while you finish the rest. Stack the pancakes and dust with powdered sugar. For a colorful touch, add lemon slices and fresh berries. This makes for a beautiful presentation. Enjoy your fluffy and delicious Lemon Ricotta Pancakes! For the Full Recipe, check the recipe section above. To make your lemon ricotta pancakes fluffy, start with room temperature ingredients. Cold ingredients can lead to dense pancakes. Let your eggs and ricotta sit out for about 30 minutes before mixing. This small step makes a big difference. Next, use the right cooking temperature. Heat your skillet over medium heat. If it is too hot, pancakes will burn outside and remain raw inside. A perfect medium heat allows even cooking. One common mistake is overmixing the batter. When you mix too much, gluten forms, and pancakes can become tough. Mix until just combined. It’s okay if you see some lumps. Another mistake is skipping the resting time. Let the batter rest for about 10 minutes. This allows the flour to hydrate and helps the pancakes rise better. You can enhance the flavor by adding vanilla extract or spices. A teaspoon of vanilla gives a warm, sweet note. You can also try a pinch of cinnamon for depth. For toppings, fresh berries work well. Strawberries, blueberries, or raspberries add sweetness and color. You can also drizzle maple syrup or honey for extra flavor. For a fun twist, try a dollop of whipped cream on top. If you want the full recipe, you can find it in the recipe section. Enjoy your cooking! {{image_2}} To make gluten-free lemon ricotta pancakes, swap all-purpose flour for a gluten-free blend. Many blends work well, like almond or oat flour. Just ensure they have a binding agent, like xanthan gum. This will help keep the pancakes light and fluffy. You might also consider using coconut flour, but remember it absorbs more liquid, so adjust the milk accordingly. For a vegan twist, you can replace ricotta cheese with silken tofu blended until smooth. Use plant-based milk, like almond or oat milk, instead of regular milk. Instead of eggs, try using ground flax seeds. Mix one tablespoon of flax seeds with three tablespoons of water and let it sit for five minutes to thicken. This will act as a great egg substitute. Cook the pancakes on low heat to avoid burning them. You can boost flavor by adding fruits or nuts. Blueberries or chopped bananas mix well in the batter. For a crunchy texture, add walnuts or pecans. You can also change the zest to match the season. In winter, try orange zest, while in summer, fresh berries can be a bright touch. This adds new layers of taste and keeps your pancakes exciting. To keep your leftover pancakes fresh, place them in an airtight container. This helps prevent them from drying out. You can store them in the fridge for up to three days. If you want to enjoy them later, freezing is the best option. To freeze pancakes, let them cool fully. Then, stack them with parchment paper in between. This way, they won't stick together. Wrap the stack tightly in plastic wrap, then place it in a freezer bag. Store them in the freezer for up to two months. When you are ready to eat them, take out as many as you need. Reheat them in the toaster, or microwave for about 30 seconds. If you want the best texture, use a skillet over low heat. This keeps them fluffy and warm. Enjoy your pancakes anytime! Yes, you can make Lemon Ricotta Pancakes ahead of time. To do this, cook the pancakes and let them cool. Then, stack them with parchment paper in between to prevent sticking. Place them in an airtight container and store them in the fridge. They will stay fresh for about 3 days. When you’re ready to eat, reheat them in a toaster or microwave. This method keeps them fluffy and tasty. To check if your pancakes are cooked, look for bubbles forming on the surface. This means they're ready to flip. After flipping, cook until they turn golden brown. The edges should also look set. If the pancake feels firm to the touch, it's done. You can also use a toothpick; if it comes out clean, the pancakes are ready to enjoy. You can serve these pancakes with many delicious sides and toppings. Here are some ideas: - Fresh berries like strawberries, blueberries, or raspberries - A sprinkle of powdered sugar - Maple syrup or honey - Whipped cream for extra indulgence - Slices of lemon for a tangy touch You can find the Full Recipe for Lemon Ricotta Pancakes on our site. The recipe provides detailed steps and tips to help you make these fluffy pancakes perfectly. Lemon Ricotta Pancakes are simple and tasty. We explored the ingredients needed, from ricotta to leavening agents. I shared step-by-step instructions for perfect pancakes, with tips on flavor and common mistakes to avoid. You can store extra pancakes easily or make freezer-friendly batches. With variations for diets and flavors, there's something for everyone. Enjoy making these pancakes for breakfast or brunch. They are sure to impress your friends and family!

Lemon Ricotta Pancakes Fluffy and Delicious Breakfast

Start your day with a burst of flavor! Lemon Ricotta Pancakes are not just a treat; they’re also light and

- 2 ripe bananas, frozen - 2 tablespoons creamy peanut butter - 1 cup unsweetened almond milk (or milk of choice) The main ingredients are simple and tasty. Frozen bananas give the smoothie a nice chill and sweetness. Creamy peanut butter adds protein and rich flavor. Almond milk keeps it light and creamy. You can also use any milk you like. - 1 tablespoon honey or maple syrup - 1/2 teaspoon vanilla extract - 1 tablespoon chia seeds - A pinch of cinnamon Optional ingredients can make your smoothie even better. Honey or maple syrup sweetens it up. Vanilla extract brings a lovely aroma. Chia seeds add fiber and omega-3s. A pinch of cinnamon gives a warm spice note. - Blender - Measuring cups and spoons - Glasses for serving You only need a few tools to make this smoothie. A blender is key for blending everything smoothly. Measuring cups and spoons help get the right amounts. Finally, use glasses for serving and enjoying your drink. For the full recipe, check out the Creamy Peanut Butter Banana Bliss 🥜 section. This smoothie is quick, tasty, and perfect for breakfast or a snack. - Peel and break frozen bananas. - Measure out all ingredients. To start, peel the frozen bananas. This makes them easier to blend. Break the bananas into smaller pieces to speed up the blending process. Next, measure out the other ingredients. You need 2 tablespoons of creamy peanut butter, 1 cup of almond milk, and any optional items you want. Having everything ready will help you make the smoothie quickly. - Combine ingredients in the blender. - Adjust consistency as needed. Now, it’s time to blend! Place the banana pieces into the blender. Add the peanut butter, almond milk, honey or maple syrup, vanilla extract, and chia seeds. For a flavor boost, sprinkle in a pinch of cinnamon. Blend on high until the mix is smooth and creamy. If it’s too thick, add more almond milk a little at a time. Blend again until you get the right consistency. - Pour into glasses. - Optional garnishes like chia seeds and banana slices. Once your smoothie is ready, pour it into glasses. This recipe makes two servings, perfect for sharing or enjoying later. For a fun touch, add a sprinkle of chia seeds on top. You can also place a slice of banana on the rim of the glass. This adds a nice look and extra flavor. Enjoy your creamy peanut butter banana bliss! To make your smoothie just right, adjust the almond milk. If you want it thicker, use less milk. If you like it thinner, add more milk. Blend longer for an ultra-smooth texture. This will help mix all the ingredients well. You can boost the flavor by trying different nut butters. Almond or cashew butter can add a new twist. If you love chocolate, add cocoa powder. This gives your smoothie a rich, deep taste. Pre-frozen bananas save time. You can freeze ripe bananas in advance. This makes your smoothie cold and creamy right away. Prepare all your ingredients beforehand. It makes blending quick and easy. For the full recipe, check the details above. {{image_2}} You can take your peanut butter banana smoothie to new heights with some fun flavors. One great option is the Chocolate Peanut Butter Banana Smoothie. Simply add 1-2 tablespoons of cocoa powder to the original recipe. This gives your smoothie a rich chocolate taste that pairs perfectly with peanut butter and banana. Another tasty twist is the Tropical Peanut Butter Banana Smoothie with pineapple. Just add 1 cup of fresh or frozen pineapple chunks. This will make your smoothie bright, fresh, and full of tropical vibes. There are many ways to adjust your smoothie for different diets. For a vegan option, use plant-based milk like almond or coconut milk, and skip the honey. Instead, try maple syrup or agave for sweetness. If you need a nut-free alternative, sunflower seed butter works great. It has a similar taste and texture as peanut butter but is safe for those with nut allergies. Want to make your smoothie even healthier? Try adding spinach for a boost of greens. It blends well and gives you extra vitamins without changing the taste much. You can also use protein powder. This turns your smoothie into a protein shake, perfect for a post-workout snack. Just add one scoop to the blender with your other ingredients. For the full recipe, check out the earlier section. Enjoy exploring these variations to find your favorite! Store your smoothie in an airtight container. This keeps it fresh and tasty. You can refrigerate it for up to 24 hours. If you want it cold, drink it soon after making it. To freeze for later, pour the smoothie into ice cube trays. This way, you can use just the right amount later. When you want to enjoy it, place the cubes in a blender. Add a little almond milk to help blend. Bananas stay fresh for about two to three days. Peanut butter can last for months if sealed tight. Almond milk lasts about a week after opening. Keep an eye on all your ingredients to enjoy the best flavor. To make a peanut butter banana smoothie, follow these simple steps: 1. Peel and break 2 frozen bananas into smaller pieces. 2. Add the banana pieces to a blender. 3. Measure and add 2 tablespoons of creamy peanut butter. 4. Pour in 1 cup of unsweetened almond milk (or your choice of milk). 5. Optional: Add 1 tablespoon of honey or maple syrup for sweetness. 6. Include 1/2 teaspoon of vanilla extract and a pinch of cinnamon. 7. Blend on high until smooth and creamy. This method guarantees a delicious drink in just five minutes! Yes, you can easily customize your smoothie! Here are some fun ideas: - Add 1 tablespoon of chia seeds for extra nutrition. - Swap peanut butter for almond or cashew butter. - Include a handful of spinach for a green boost. - Toss in some cocoa powder for a chocolate flavor. Feel free to mix and match based on your taste or what you have at home! This smoothie offers many health benefits, thanks to its key ingredients: - Bananas provide potassium and fiber, aiding digestion and heart health. - Peanut butter is high in protein and healthy fats, keeping you full. - Almond milk is low in calories and adds calcium. - Chia seeds boost omega-3s and antioxidants. Together, these ingredients make a nutritious and filling snack or meal! Using unripe bananas is fine, but it changes the taste and texture. Unripe bananas are firmer and less sweet. This can make your smoothie thicker and less creamy. If you prefer a sweeter flavor, ripe bananas are best. However, if you only have unripe ones, don’t worry! They still work well in your smoothie. This blog post shared a simple peanut butter banana smoothie recipe. It covered main and optional ingredients, step-by-step instructions, and helpful tips. You can customize this smoothie to fit your taste and dietary needs. In the end, enjoy creating your perfect drink. With simple steps and tasty ingredients, you can make your mornings brighter and healthier. So gather your items, blend away, and sip something delicious today!

Peanut Butter Banana Smoothie Healthy and Simple Recipe

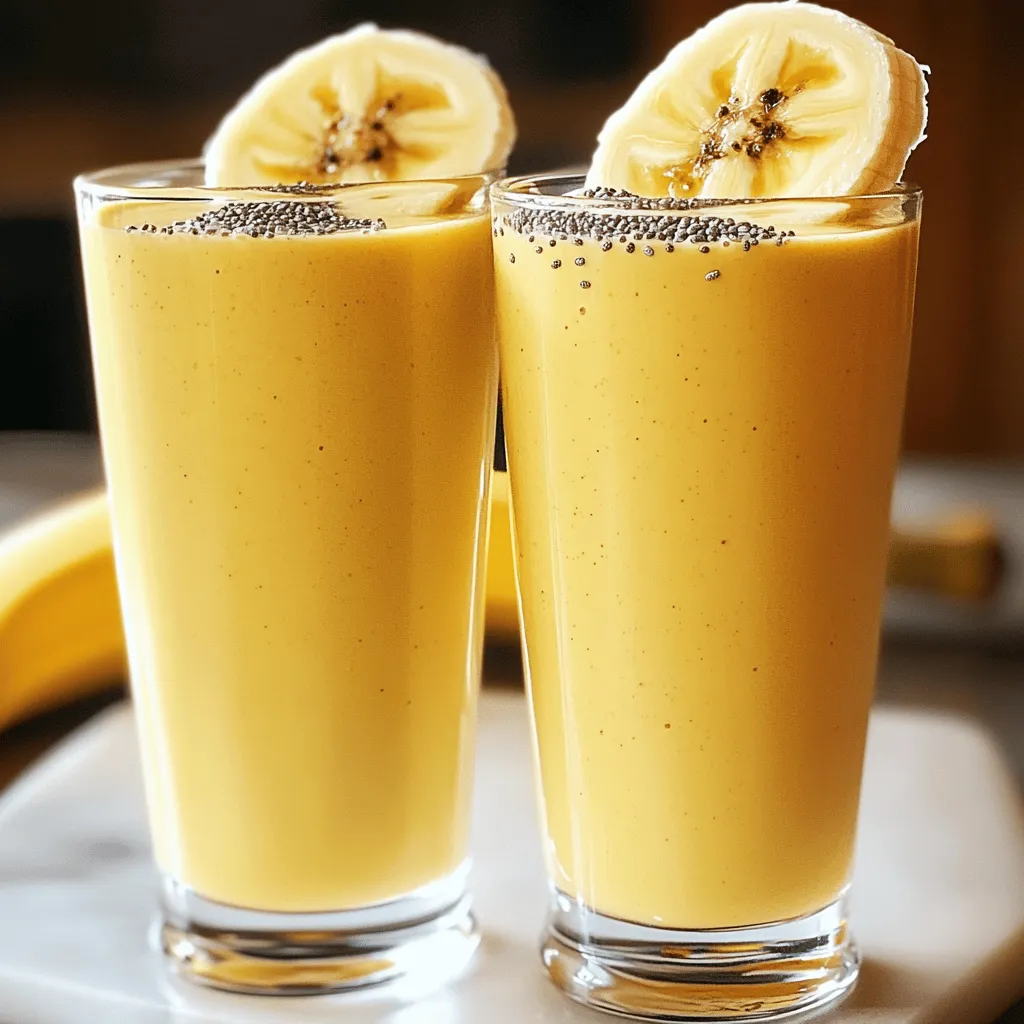
If you’re looking for a quick, tasty way to fuel your day, this Peanut Butter Banana Smoothie is perfect for

- 2 large sweet potatoes - 2 tablespoons olive oil - 1 teaspoon paprika - 1 teaspoon garlic powder - 1/2 teaspoon cayenne pepper (optional) - Salt and pepper to taste - 1/2 cup mayonnaise - 1-2 tablespoons chipotle peppers in adobo sauce - 1 tablespoon lime juice - 1 clove garlic - Salt to taste To make sweet potato fries, you need fresh sweet potatoes. I use two large ones for this recipe. The olive oil helps them crisp up nicely in the oven. Paprika adds a warm flavor, and garlic powder gives them a nice kick. If you like heat, add cayenne pepper. For the chipotle mayo, I love using mayonnaise as a base. It’s creamy and rich. Chipotle peppers in adobo sauce bring that smoky flavor. A touch of lime juice brightens it up. Don’t forget to mince the garlic for the best taste. Check out the Full Recipe for more details on the steps. Enjoy your cooking! 1. Preheat your oven to 425°F (220°C). This step is key for crispy fries. 2. Cut the sweet potatoes into fry shapes. Aim for uniform sizes for even cooking. 1. In a large bowl, toss the sweet potato fries with olive oil and spices. Use 2 tablespoons of olive oil, 1 teaspoon of paprika, 1 teaspoon of garlic powder, and a pinch of cayenne pepper if you want heat. Don’t forget to add salt and pepper to taste. 2. Spread the fries on a baking sheet. Make sure they lie flat and do not overlap. This helps them crisp up nicely. 3. Bake for 20-25 minutes. Flip the fries halfway through cooking to ensure a golden color on all sides. 1. In a small bowl, combine 1/2 cup of mayonnaise with 1-2 tablespoons of minced chipotle peppers from adobo sauce. This gives it a smoky kick. 2. Add 1 tablespoon of lime juice and 1 minced clove of garlic. Mix well. 3. Taste and adjust the salt if needed. You want a rich, zesty dip to enjoy with your fries. For the full recipe, check the previous section. Enjoy your cooking! To make your sweet potato fries crispy, avoid overcrowding the baking sheet. When fries sit too close together, they steam instead of bake. This makes them soggy. Spread the fries out in a single layer. Give them space to breathe and crisp up nicely. Flipping the fries halfway through cooking is also key. This helps them cook evenly on both sides. Set a timer to remind yourself to flip them. You’ll know they’re done when they are golden brown and crisp. For extra flavor, try adding more spices to your fries. Consider using cumin or chili powder for a bold twist. You can also sprinkle some fresh herbs like rosemary or thyme before baking. These will bring a fresh taste to your dish. If you want alternatives for the chipotle mayo, try mixing plain yogurt with lime juice and hot sauce. This gives you a tangy dip that is lighter. You can also blend avocado with lime and garlic for a creamy, healthy option. Each of these dips pairs well with the sweet potato fries. For the full recipe, check out the recipe section above! {{image_2}} You can change up the flavor of your sweet potato fries easily. For a sweet twist, sprinkle cinnamon and a bit of brown sugar. This adds a nice caramel-like flavor. A pinch of nutmeg complements the sweetness too. These blends work well for a fun, dessert-style fry. If you crave heat, try adding chili powder or smoked paprika. These spices give a warm kick. You can also mix in some taco seasoning for a zesty touch. Adjust the heat level to match your taste. While chipotle mayo is a delight, you can explore other fun dips. Try a garlic aioli for a rich, creamy flavor. You can make it by mixing mayonnaise, garlic, and lemon juice. It pairs well with sweet potato fries. For something lighter, whip up a yogurt dip. Combine plain yogurt with fresh herbs and a squeeze of lemon. This dip is refreshing and healthy. Another option is a spicy ketchup. Just mix ketchup with a bit of hot sauce. This gives your fries a tangy and spicy kick. With all these options, you can enjoy sweet potato fries in new ways. Check out the Full Recipe for more ideas! To keep your sweet potato fries crispy, store them in an airtight container. Place a paper towel at the bottom to absorb moisture. This helps stop sogginess. You can keep them in the fridge for up to three days. When it's time to eat leftovers, use an oven or an air fryer. Preheat the oven to 400°F (200°C) and spread the fries on a baking sheet. Bake for about 10 minutes. This method keeps them crispy. In an air fryer, set it to 375°F (190°C) and heat for 5-7 minutes. Both methods maintain their great taste and texture. For the best flavor, serve with the chipotle mayo from the Full Recipe. Sweet potato fries are a tasty treat. One serving of my sweet potato fries contains about 180 calories. The total calorie count can change based on the amount of oil and spices you use. The chipotle mayo adds extra calories, around 100 per serving. If you want to track calories, check the [Full Recipe] for specific amounts. Yes, you can use an air fryer to make sweet potato fries. Here’s how: 1. Cut the sweet potatoes into fries as usual. 2. Toss them with olive oil and spices. 3. Place the fries in the air fryer basket in a single layer. 4. Cook at 400°F (200°C) for 15-20 minutes. 5. Shake the basket halfway through for even cooking. This method will give you crispy fries without using much oil. If you want a dairy-free or lighter option, try these substitutes for mayonnaise: - Greek yogurt adds creaminess and protein. - Avocado gives a rich, smooth texture. - Silken tofu can create a creamy base too. Mix your choice with chipotle peppers, lime juice, and garlic for a tasty dip. To keep your sweet potato fries crispy, follow these tips: - Cut the fries evenly for uniform cooking. - Soak the cut fries in cold water for 30 minutes. This helps remove excess starch. - Dry the fries well with a towel before seasoning. - Avoid overcrowding the baking sheet; give them space to crisp up. Following these steps will help you achieve the perfect crunch! This blog post showed you how to make tasty sweet potato fries and chipotle mayo. You learned simple steps for baking and seasoning. I also shared tips for keeping fries crispy and flavor variations to try. These sweet potato fries are a healthy snack or side. With the right mix, you can wow your taste buds. Experimenting with dips and seasonings adds fun to your meal. Enjoy creating and tasting these delicious treats!

Savory Sweet Potato Fries with Chipotle Mayo Recipe

Get ready to spice up your snack game with my Savory Sweet Potato Fries with Chipotle Mayo! These crispy, golden

- Spinach: Use 4 cups of fresh baby spinach. This is the base of the salad. It adds crispness and nutrients. - Strawberries: You need 1 cup of strawberries. Hull and slice them. They bring sweetness and color. - Red Onion: Use 1/4 cup of thinly sliced red onion. It adds a nice bite and flavor. - Walnuts: You will need 1/2 cup of toasted walnuts. They give a crunchy texture and nutty taste. - Feta Cheese: Use 1/4 cup of crumbled feta cheese. It adds creaminess and a salty contrast. - Balsamic Vinaigrette: You need 1/4 cup of balsamic vinaigrette. This dressing ties all the flavors together. - Salt and Pepper: Season to taste. These add essential flavor to the salad. - Honey (optional): If you like sweetness, add 1 tablespoon of honey. It enhances the dressing's flavor. For the full recipe, check the link provided. This salad is fresh and easy to make. First, wash and dry the fresh baby spinach. This step is key to keep the leaves crisp. Next, hull and slice the strawberries. Aim for thin slices to let their sweet flavor shine. Toast the walnuts in a dry pan over medium heat. This brings out their rich flavor. Keep an eye on them to avoid burning. In a large bowl, combine the spinach and strawberries. Mix them gently to create a colorful base. Then, add the toasted walnuts and crumbled feta cheese. These ingredients add texture and taste. Incorporate thinly sliced red onion for a nice contrast. The onion adds a bit of bite to balance the sweetness. In a small bowl, mix the balsamic vinaigrette with honey. This adds a touch of sweetness to the dressing. Drizzle this mixture over the salad. Make sure to cover all the ingredients evenly for the best flavor. Gently combine all the ingredients. Be careful not to bruise the spinach or strawberries. This will keep your salad looking fresh. Finally, season with salt and pepper to taste. Enjoy your Spinach Strawberry Walnut Salad as a fresh and flavorful delight! For the full recipe, check the [Full Recipe]. To make your salad pop, focus on texture. First, be gentle when handling spinach and strawberries. Avoid bruising them as this can spoil their fresh look. Use only the best baby spinach for a crisp bite. Slice strawberries carefully to keep them intact. Next, toast your walnuts before adding them. This step brings out their rich flavor and adds a satisfying crunch. Simply heat them in a pan for a few minutes until they are golden. To elevate the flavor, you may want to adjust the sweetness. If you like a hint of honey, add a tablespoon to your dressing. This small step can make your salad sing! Feel free to explore different dressings too. While balsamic vinaigrette is a classic choice, you can try lemon vinaigrette or creamy options for a twist. Each dressing will bring a unique taste to your salad. For a stunning presentation, serve your salad in a big bowl or on individual plates. Add extra strawberry slices and walnuts on top to make it look beautiful. You can also pair this salad with proteins. Grilled chicken or shrimp works well. This way, you create a complete meal that satisfies both taste and hunger. For the full recipe, check the Spinach Strawberry Walnut Salad section above. {{image_2}} You can make your spinach strawberry walnut salad even more fun. Try adding other fruits. Blueberries bring a nice pop of color. Apples add crunch and sweetness. These fruits work well with strawberries. You can also change the cheese. Goat cheese has a creamy taste that pairs nicely. It adds a tangy twist to your salad. Feel free to mix and match these fruits and cheeses for a unique touch. If you want to switch things up, change the base greens. Arugula is a great choice. It has a peppery taste that can spice things up. Kale is another option. It adds a hearty texture while still being nutritious. You can also swap out the walnuts. Pecans offer a sweeter, softer crunch. Almonds add a nice crunch and slight nuttiness. These swaps let you tailor the salad to your taste. The dressing can change the whole flavor. A lemon vinaigrette is refreshing. It brightens up the salad with a zesty kick. You can also try creamy dressings. They add richness and can balance the tartness of the strawberries. Feel free to experiment with different dressings. You’ll find the perfect match for your taste. For the full recipe, check out the complete guide. After you make your Spinach Strawberry Walnut Salad, store any leftovers in the fridge. It is best to keep it in an airtight container. This will help keep the salad fresh for up to two days. If you can, store the dressing separately. This helps the spinach stay crisp. Use a glass or plastic container with a tight seal. For long-term storage, freezing this salad isn't ideal. Fresh ingredients like spinach and strawberries do not freeze well. However, you can freeze walnuts if you want to use them later. Place them in a freezer bag, and they will keep for about six months. Always check for freshness before adding back to your salad. Keeping fresh ingredients means shopping for them often, but it guarantees better taste and texture. Enjoy your salad fresh! To keep your salad fresh, store it in an airtight container. Use a container that has a good seal. Place a paper towel inside to absorb moisture. This keeps the greens crisp. Keep the dressing separate until you are ready to serve. This prevents sogginess. Yes, you can make this salad ahead of time. Prep the spinach and strawberries, but don’t dress the salad yet. Store the dry ingredients in the fridge. Add the dressing just before serving. This keeps the salad fresh and tasty. This salad pairs well with grilled chicken or fish. You can also serve it with a light soup. For a vegetarian option, add quinoa or chickpeas. These add protein and make the meal more filling. Try serving it as a side dish at picnics or barbecues. For the full recipe, check out the Spinach Strawberry Walnut Salad. This blog post explored making a Spinach Strawberry Walnut Salad. We discussed fresh ingredients like spinach, strawberries, walnuts, and feta cheese. You learned how to prep, assemble, and dress the salad. Tips were shared for improving texture and enhancing flavor. Variations include other fruits and dressings, making this salad versatile. To wrap up, enjoy the freshness and nutrition of this salad. It’s perfect for any meal and easy to customize. Try it out and make it your own!

Spinach Strawberry Walnut Salad Fresh and Flavorful Delight

Looking for a bright and tasty salad that packs a punch? Meet the Spinach Strawberry Walnut Salad! This fresh delight

- 1 cup cherry tomatoes, halved - 1 red bell pepper, chopped - 1 zucchini, sliced - 1 medium red onion, diced - 1 cup broccoli florets - 3 tablespoons olive oil - 4 tablespoons balsamic vinegar - 2 teaspoons honey (or maple syrup) - Salt and pepper to taste - 1 teaspoon garlic powder - 1 teaspoon dried oregano - 1 cup cooked quinoa (or brown rice) - Fresh basil leaves for garnish These Balsamic Roasted Veggie Bowls are not just tasty. They are also healthy! Each serving provides a good mix of vitamins and minerals. Here’s a rough breakdown: - Calories: 350 - Protein: 10g - Carbs: 50g - Fiber: 8g - Fat: 15g This meal is rich in fiber and plant-based protein. It helps you feel full and satisfied. Want to switch things up? Here are some fun ideas: - Use asparagus instead of broccoli. - Swap cherry tomatoes for diced bell peppers. - Try sweet potatoes instead of quinoa or brown rice. - Use maple syrup if you want a vegan option. These swaps can change flavors and textures, keeping your meals exciting. Try the Full Recipe for the best results! To start, gather all your ingredients. You will need: - 1 cup cherry tomatoes, halved - 1 red bell pepper, chopped - 1 zucchini, sliced - 1 medium red onion, diced - 1 cup broccoli florets - 3 tablespoons olive oil - 4 tablespoons balsamic vinegar - 2 teaspoons honey (or maple syrup) - Salt and pepper to taste - 1 teaspoon garlic powder - 1 teaspoon dried oregano - 1 cup cooked quinoa (or brown rice) - Fresh basil leaves for garnish Next, preheat your oven to 425°F (220°C). In a large bowl, mix the cherry tomatoes, red bell pepper, zucchini, red onion, and broccoli. Drizzle the olive oil and balsamic vinegar over the veggies. Add honey, salt, pepper, garlic powder, and oregano. Toss everything well so the veggies get coated. Spread the vegetable mix on a large baking sheet. Make sure the veggies are in a single layer. This helps them roast evenly. Place the sheet in your preheated oven. Roast for 20-25 minutes. Stir them halfway to ensure even cooking. The veggies should be tender and slightly caramelized when done. While the veggies roast, cook your quinoa or brown rice. Follow the instructions on the package. Once the veggies are ready, take them out and let cool for a few minutes. To make your bowls, start with a scoop of quinoa or brown rice at the bottom. Then, add a generous serving of the roasted vegetables on top. Finish by garnishing with fresh basil leaves. This adds a pop of color and flavor. Enjoy your healthy and filling Balsamic Roasted Veggie Bowls! For the full recipe, check the previous sections. To make your veggies tasty, choose fresh ones. Cut them into equal sizes. This helps them cook evenly. Use a large bowl to mix the vegetables. This gives them space to toss well. When you add oil, vinegar, and spices, coat all the pieces. A single layer on the baking sheet ensures good roasting. Stir halfway to avoid burning. Roasting at 425°F gives a nice caramelized finish. Serve your Balsamic Roasted Veggie Bowls warm. Start with a base of cooked quinoa or brown rice. Then, pile on the roasted veggies. Add fresh basil leaves for color. You might drizzle extra balsamic vinegar on top for flavor. For a creamy touch, you can add a dollop of yogurt or a sprinkle of feta cheese. This makes each bite delightful. You can make these bowls heartier by adding protein. Grilled chicken pairs well with the veggies. For a plant-based option, try chickpeas or black beans. Tofu or tempeh also works great. Cook them with your favorite spices for more taste. This will add nutrition and make the meal more filling. Enjoy the mix of warm veggies and proteins in each bite! {{image_2}} You can easily make this recipe vegetarian or vegan. To keep it vegetarian, stick to the original recipe. For vegan options, swap the honey with maple syrup. This change keeps the dish sweet and plant-based. You can also add more veggies like kale or spinach for extra nutrients and flavor. Seasonal vegetables can change your dish. In summer, use zucchini, eggplant, and bell peppers. In fall, swap in Brussels sprouts, butternut squash, and carrots. Each season brings different tastes. This keeps the meal fresh and exciting. You can even try root veggies like beets or parsnips in winter. These swaps add color and nutrition. To boost flavor, think about adding herbs and spices. Try fresh thyme, rosemary, or a pinch of red pepper flakes. These can make your veggies pop. Adding a sprinkle of feta cheese gives a nice salty touch. For a tangy twist, drizzle some lemon juice before serving. These enhancements make every bite more delicious. You can find the full recipe to explore these variations. You can store leftover Balsamic Roasted Veggie Bowls in the fridge. Use an airtight container for best results. The veggies will stay fresh for about 3-5 days. Make sure to let them cool before sealing. This keeps the moisture out and helps the veggies stay crisp. If you want to save some for later, freezing is a great option. Allow the roasted veggies to cool completely first. Then, place them in a freezer-safe bag or container. They can last up to 3 months in the freezer. Remember to label the bags with the date. That way, you’ll know when to use them. When it’s time to eat, you can reheat your veggie bowls easily. For the best taste, use the oven. Preheat it to 350°F (175°C) and spread the veggies on a baking sheet. Heat for about 10-15 minutes or until warm. You can also use the microwave if you’re in a hurry. Just heat in short bursts to avoid soggy veggies. Enjoy your meal! To make Balsamic Roasted Veggie Bowls vegan, simply swap honey with maple syrup. This keeps the dish sweet and vegan-friendly. Honey usually adds a nice touch, but maple syrup works just as well. You can also add a touch of nutritional yeast for a cheesy flavor. If you don't have balsamic vinegar, you can use red wine vinegar or apple cider vinegar. Both options bring a tangy flavor to the dish. Add a bit of honey or maple syrup to mimic the sweetness of balsamic. You can also try a mix of soy sauce and a sweetener for a unique twist. Yes, you can use frozen vegetables for Balsamic Roasted Veggie Bowls. Just make sure to thaw and drain them first. This helps to avoid excess moisture when roasting. Keep in mind that frozen veggies may cook faster, so check them a few minutes earlier. The flavor might differ slightly, but they will still taste great. In this post, we explored how to make delicious Balsamic Roasted Veggie Bowls. We covered key ingredients, step-by-step cooking methods, and helpful tips. You learned how to adapt the dish to fit different diets and how to store any leftovers. Remember, with these simple steps, you can create tasty meals that fit your needs. Enjoy experimenting with flavors and make this dish your own!

Balsamic Roasted Veggie Bowls Healthy and Filling Meal

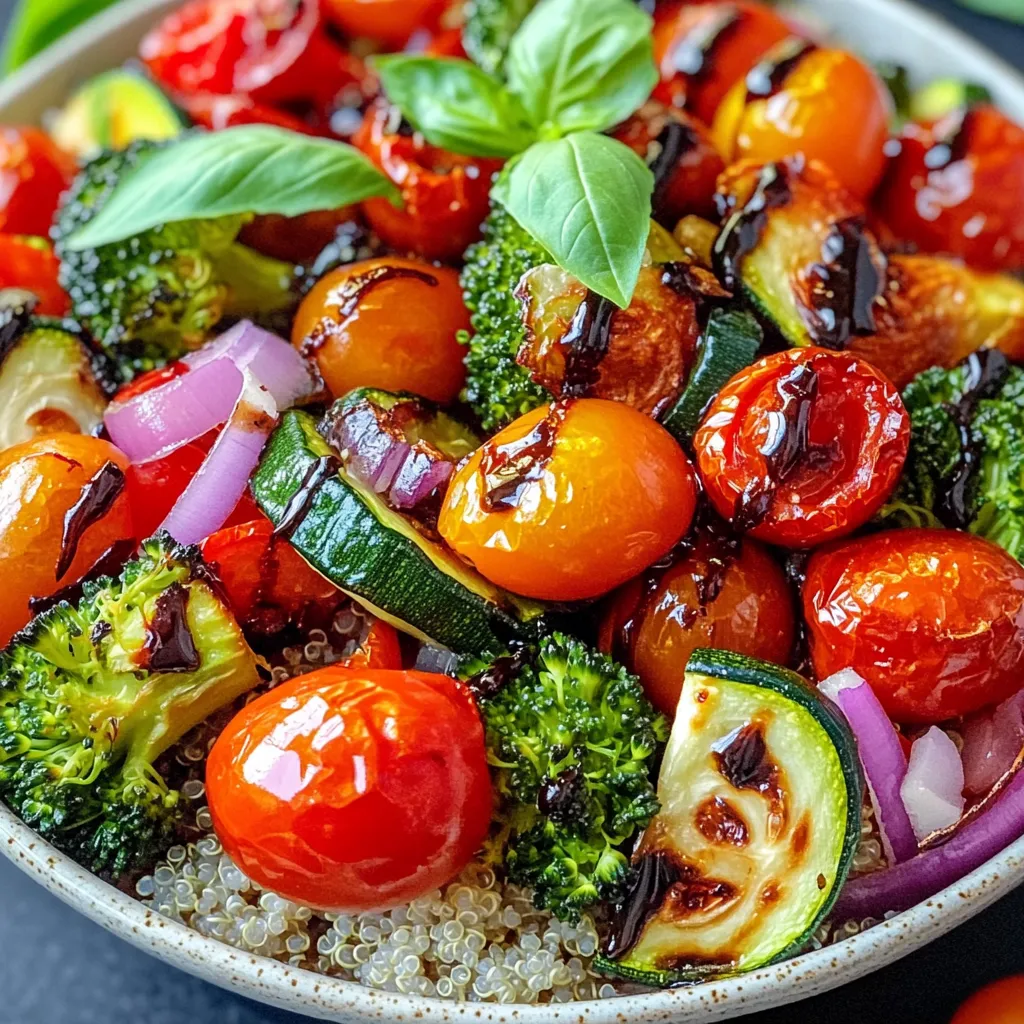
Looking for a healthy meal that’s also filling? Balsamic Roasted Veggie Bowls are the answer! Packed with vibrant flavors and

- 2 cans (8 oz each) refrigerated cinnamon roll dough with icing - 4 large eggs - 1 cup milk - 1 teaspoon vanilla extract The main ingredients create a rich and delightful base for this dish. The refrigerated cinnamon roll dough gives you that sweet, fluffy texture. The eggs help bind everything together and make it custardy. Milk adds creaminess, while vanilla extract gives a warm, sweet aroma. - 1 teaspoon ground cinnamon - 1/4 teaspoon nutmeg - 1/4 cup maple syrup (plus more for serving) Flavor enhancements boost the overall taste. Ground cinnamon adds depth and warmth. Nutmeg brings a hint of spice that complements the cinnamon. Maple syrup sweetens the dish, making it perfect for breakfast or brunch. - Powdered sugar - Fresh berries Optional toppings let you customize your bake. A sprinkle of powdered sugar adds a touch of sweetness and looks beautiful. Fresh berries provide a burst of flavor and color, making your dish even more appealing. You can find the full recipe for this Cinnamon Roll French Toast Bake in the main article. Enjoy the easy and delicious treat! - Preheat your oven to 375°F (190°C). - Grease a 9x13-inch baking dish with cooking spray or butter. - Open the cans of cinnamon rolls. - Cut each roll into quarters. - Place the roll pieces evenly in the prepared dish. - In a mixing bowl, whisk together the eggs. - Add milk, vanilla extract, ground cinnamon, nutmeg, and maple syrup. - Mix until everything is well combined. - Pour the egg mixture over the cinnamon roll pieces. - Make sure all pieces are coated. - Press down gently on the mixture with a spatula. - Let it sit for about 5 minutes to soak. - Place the dish in the preheated oven. - Bake for 25-30 minutes. - Look for a golden brown top and cooked-through rolls. - While it cools slightly, microwave the icing for 10-15 seconds. - Drizzle the melted icing over the top of the bake. - To serve, cut into squares. - Top with powdered sugar, fresh berries, and extra maple syrup if desired. For the full recipe, check the details above. Enjoy this easy and delicious treat! To get the best results, you should adjust the baking time for your oven. Every oven is a bit different. Check your bake at 25 minutes. It may need a few extra minutes. Look for a golden brown top. Also, ensure even soaking of your cinnamon rolls. Pour the egg mixture evenly and press down gently. This step helps each piece soak up the flavor. This dish tastes best when served warm. The warmth brings out the flavors. You can pair it with extra maple syrup for a sweet touch. Fresh berries also add a nice pop of color and flavor. They bring a fresh taste that complements the rich cinnamon rolls. Watch out for over-soaking the rolls. If you let them sit too long, they may turn mushy. Just a few minutes is enough. Another mistake is not preheating the oven. A hot oven ensures your bake cooks evenly. Always preheat to 375°F (190°C) before baking. Following these tips will help you create a perfect Cinnamon Roll French Toast Bake. For the full recipe, check out the details provided earlier. {{image_2}} You can make this dish even better with a few fun tweaks. First, try adding chocolate chips or nuts. Chocolate chips give a sweet surprise. Nuts add a nice crunch. Both make each bite more fun. You can also mix in different spices. Try using cardamom for a unique twist. Or, add a pinch of ginger for warmth. These small changes can make a big impact. If you want to make this dish gluten-free, look for gluten-free cinnamon rolls. Many brands now offer tasty options. They work just as well in this bake. For those who want a dairy-free version, use dairy-free milk alternatives. Almond milk or oat milk are great choices. They will still keep the dish creamy and delicious. You can change the flavors based on the season. In the fall, add fall spices like pumpkin spice. It gives a cozy taste that many love. You can also include seasonal fruits. Sliced apples or pears work well in fall. In the summer, fresh berries add brightness. These additions keep your dish fun and fresh. For the full recipe, you can check out the Cinnamon Roll French Toast Bake . To keep your Cinnamon Roll French Toast Bake fresh, let it cool first. Place leftovers in an airtight container. Use glass or plastic containers with tight lids. This keeps moisture in, which helps maintain flavor. Store in the fridge for up to three days. When reheating, you have two options: the microwave or the oven. The microwave is quick, but it can make the bake soggy. Use a low power setting and heat in short bursts. The oven takes longer but keeps the texture nice. Preheat it to 350°F (175°C), then heat for about 10-15 minutes. You can freeze this treat for later. Cut the bake into squares and wrap each piece in plastic wrap. Then, place them in a freezer-safe bag. Make sure to label the bag with the date. To thaw, move it from the freezer to the fridge overnight. You can also reheat it straight from the freezer, but it will take longer. Cinnamon Roll French Toast Bake can last up to three days in the fridge. Store it in an airtight container to keep it fresh. If you have leftovers, just reheat them in the oven or microwave. This dish tastes great even after a day or two! Yes, you can prepare this dish ahead of time. Just follow the steps up to pouring the egg mixture over the cinnamon rolls. Cover the dish and place it in the fridge overnight. In the morning, simply bake it as directed. This saves time and makes for an easy breakfast! If you need an egg substitute, you can use applesauce or mashed bananas. For each egg, use 1/4 cup of applesauce or 1/4 cup of mashed banana. You can also use a commercial egg replacer. Just follow the package instructions for the right amount. To make this dish healthier, consider using whole grain cinnamon rolls. You can also reduce the amount of maple syrup or use a sugar substitute. Add extra fruits like berries or bananas for added nutrients and natural sweetness. These changes help make it a more balanced meal! Absolutely! Homemade cinnamon rolls work great in this recipe. Just make sure they are fully baked before cutting them up. This way, you can enjoy your favorite homemade flavors in this easy breakfast bake. Cinnamon Roll French Toast Bake is easy and tasty. You learned about ingredients, preparation, and tips. Remember to mix the egg mixture well and adjust baking time as needed. Now, you have many ways to make this dish your own, from toppings to flavor twists. Use this guide to impress friends and family. Enjoy every bite and share your creations!

Cinnamon Roll French Toast Bake Easy and Delicious Treat

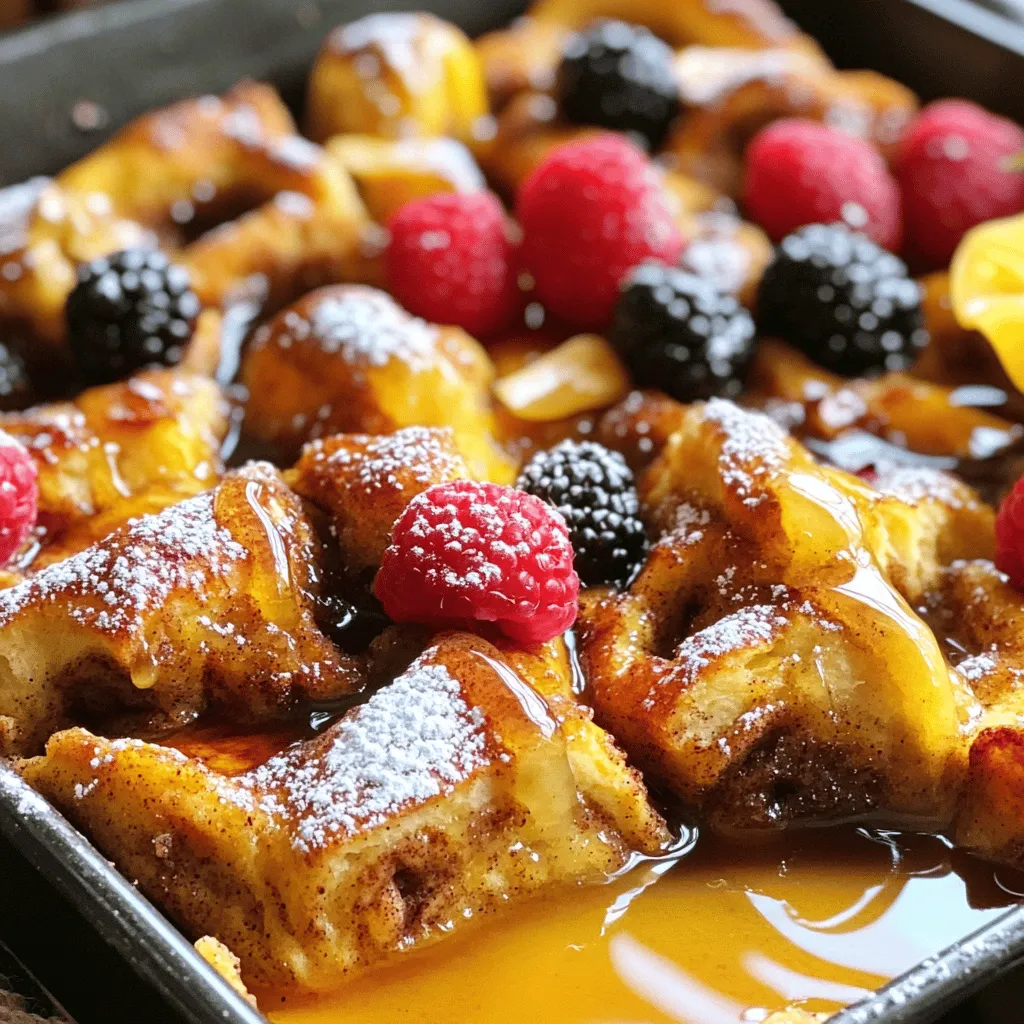
Are you ready to elevate your breakfast game? Cinnamon Roll French Toast Bake is not just easy; it’s a delightful

- 2 ripe avocados, diced - 2 cups cherry tomatoes, halved - 1 cup fresh mozzarella balls (bocconcini) - 1 cup fresh basil leaves, torn - 3 tablespoons extra virgin olive oil - 1 tablespoon balsamic glaze - Salt and pepper to taste - Large mixing bowl - Serving plates When you make a Caprese Avocado Salad, focus on freshness. Use ripe avocados for a creamy texture. Cherry tomatoes should be sweet and bright. Fresh mozzarella adds a delightful chewiness. The torn basil leaves bring a fragrant note. The dressing is simple yet flavorful. Extra virgin olive oil offers richness. Balsamic glaze adds sweetness and tang. Salt and pepper enhance all the flavors. To mix everything, grab a large bowl. This helps toss the ingredients gently. Make sure not to mash the avocados. Serve it on plates to show off the colors. For the full recipe, refer to the Caprese Avocado Salad instructions. 1. In a large bowl, combine diced avocados and halved cherry tomatoes. 2. Add fresh mozzarella balls to the bowl. 3. Toss gently to mix these ingredients. Be careful not to mash the avocados. 1. Next, add torn basil leaves into the bowl. 2. Drizzle extra virgin olive oil over the salad. 3. Follow with a drizzle of balsamic glaze. 4. Season with salt and pepper to taste. 1. Allow the salad to sit for a few minutes. This helps the flavors meld together. 2. Serve immediately for the best taste. Enjoy this fresh delight! For the full recipe, check out the earlier section! Choosing the right ingredients is key to a tasty Caprese Avocado Salad. Here are some tips: - Ripe avocados: Look for avocados that yield slightly when you press them. They should feel soft, but not mushy. If they are hard, leave them at room temperature for a few days. - Fresh mozzarella: Select mozzarella balls that are plump and moist. If possible, choose the ones packed in water. This keeps them fresh and tasty. - Sweet cherry tomatoes: Pick bright, plump tomatoes with smooth skin. Give them a little squeeze; they should feel firm yet slightly soft. If you can, buy them in a variety of colors for a vibrant salad. How you present your salad can make a big difference. Here’s how to serve it: - Presentation: Use a clear glass bowl to show off the colors. You can also plate the salad individually for a more elegant touch. - Pairings: Serve this salad with grilled chicken or fish for a full meal. It also pairs well with crusty bread or a light pasta dish. - Temperature: Serve the salad fresh and cool. It tastes best at room temperature or slightly chilled. You can boost the flavor of your salad in many ways. Here are some ideas: - Extra herbs: Consider adding fresh herbs like dill or chives for a unique twist. They can elevate the taste and add freshness. - Alternative dressings: Try a citrus vinaigrette or a yogurt-based dressing for a different flavor profile. These options can add a fun new taste. - Optional garnishes: A sprinkle of crushed red pepper or some toasted nuts can add a nice crunch and flavor. These garnishes can make your salad look even more appealing. For the full recipe, check out the Caprese Avocado Salad section. {{image_2}} You can make this salad your own with some simple swaps. Try using heirloom or grape tomatoes for a different taste. Heirloom tomatoes add unique colors and flavors. Grape tomatoes are sweeter and smaller, making them fun to eat. Instead of mozzarella, you can use burrata. Burrata is creamier and adds a rich flavor to the dish. It melts in your mouth and pairs nicely with the other ingredients. Feel free to mix in other greens like arugula or spinach. Arugula has a peppery bite that contrasts well with the creamy avocado. Spinach adds a mild flavor while boosting nutrition. If you want to make this salad dairy-free, just skip the cheese. You can use a dairy-free mozzarella or leave it out completely. The salad will still taste fresh and delicious. For vegan options, replace the mozzarella with grilled zucchini or marinated tofu. Both add great texture and flavor. They keep the salad hearty without any animal products. This salad is naturally gluten-free. You can enjoy it without worry if you are avoiding gluten. Just make sure your balsamic glaze does not contain any gluten. Want to amp up the flavor? Add protein like grilled chicken or shrimp. Both options make the salad more filling and add a savory touch. Nuts or seeds can add a nice crunch. Try adding sliced almonds or pumpkin seeds. They give the salad a delightful texture and boost nutrition. You can also toss in fruits like mango or peaches for a sweet twist. Their juicy flavors complement the creamy avocado and tangy dressing perfectly. To keep your Caprese Avocado Salad fresh, store it in an airtight container. This helps prevent air from making the ingredients soggy. If you have leftover salad, place it in the fridge right away. Use a glass or plastic container with a tight lid. Avoid metal containers, as they can affect the salad's taste. In the fridge, your salad will stay fresh for about one to two days. After that, the avocado may turn brown, and the tomatoes can lose their crunch. Watch for signs that the salad has gone bad. If it smells sour or looks mushy, it's best to throw it out. If you have leftover ingredients, don't waste them! You can make a tasty dip by mashing the avocado with garlic and lime juice. Use leftover mozzarella in a grilled cheese sandwich for a twist. For excess tomatoes, toss them into pasta or mix them into a soup. Get creative and use what you have! For the full recipe, refer to the Caprese Avocado Salad section above. Yes, you can prepare Caprese Avocado Salad ahead of time. I recommend making it no more than two hours before serving. This will keep the avocados fresh and tasty. If you need to store it, cover the salad tightly with plastic wrap. Store it in the fridge. Avoid letting it sit too long, as the avocado may brown. If you don't have balsamic glaze, you can use balsamic vinegar instead. Just drizzle a little more vinegar over the salad. Another option is to mix balsamic vinegar with honey or maple syrup. This adds sweetness and thickness. You can also try lemon juice for a bright, zesty flavor. To stop avocados from browning, use fresh lemon or lime juice. Squeeze the juice over the diced avocados right after cutting them. This helps slow down browning. You can also keep the pit in the salad until serving. It helps keep some of the avocado from turning brown too fast. This blog post covered a fresh Caprese Avocado Salad perfect for any meal. You learned how to choose the best ingredients, from ripe avocados to sweet cherry tomatoes. We walked through easy preparation steps and shared tips for flavor enhancements and storage. In the end, this salad offers endless possibilities for fun variations. Enjoy making it your own and delight in every bite. It's simple to prepare, tasty, and sure to please everyone at the table.

Caprese Avocado Salad Fresh and Flavorful Delight

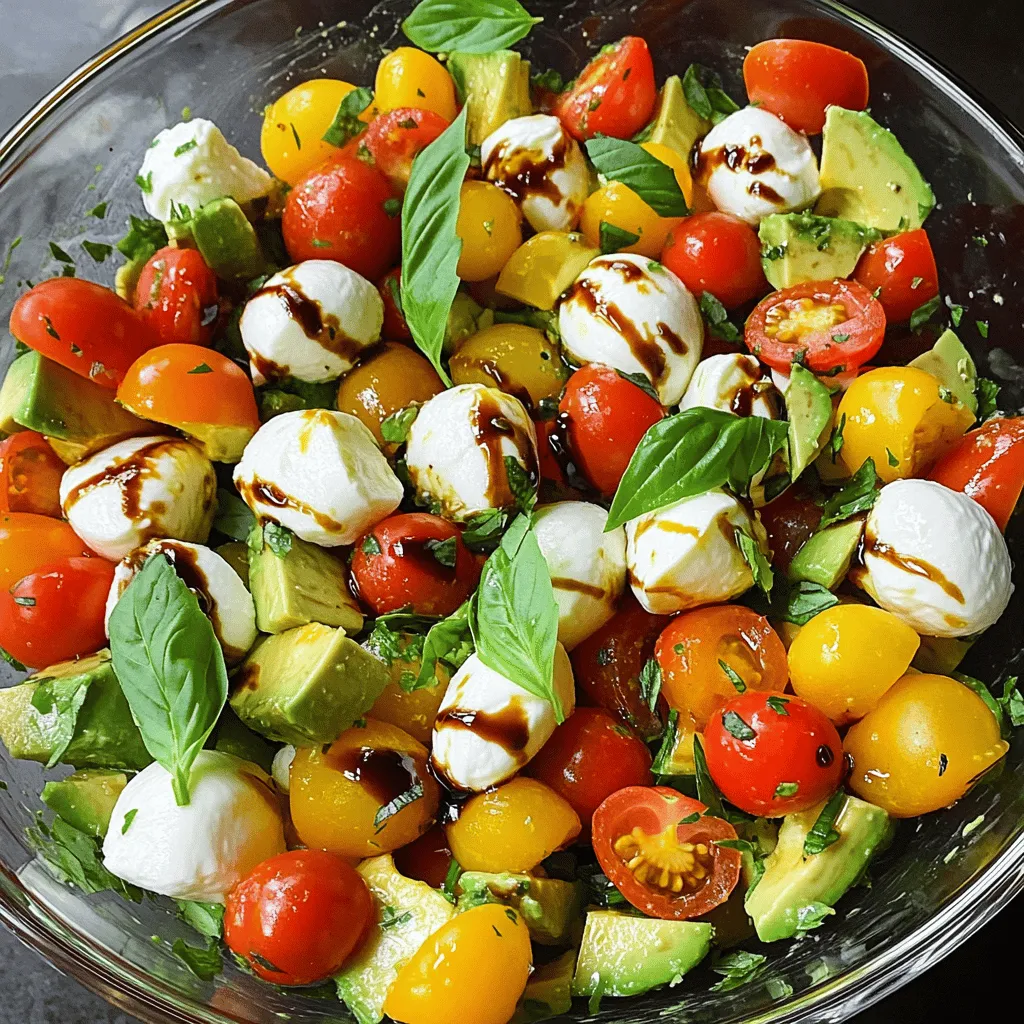
Looking for a fresh twist on a classic? This Caprese Avocado Salad combines creamy avocados, sweet cherry tomatoes, and rich

- 1 lb Brussels sprouts, trimmed and halved - 3 tablespoons olive oil - 2 tablespoons honey - 1 tablespoon Sriracha - 2 cloves garlic, minced The main ingredients for Honey Sriracha Brussels sprouts are simple yet tasty. First, you have the Brussels sprouts. I love using fresh ones. They should be trimmed and cut in half to get that nice caramelization. Olive oil adds richness and helps the flavors blend. Honey gives a sweet touch, while Sriracha adds heat. The garlic brings a punch that ties everything together. - Salt and pepper to taste - 1 tablespoon sesame seeds - Fresh cilantro, chopped For garnishes, salt and pepper are key. They enhance the dish’s flavors. Sesame seeds add crunch and a nutty taste. Fresh cilantro gives a pop of color and freshness. These optional garnishes take your Brussels sprouts to the next level. You can mix and match as you please. If you want to make this dish, check out the Full Recipe for more details! - Preheat your oven to 425°F (220°C). - In a large bowl, combine the halved Brussels sprouts, olive oil, minced garlic, honey, Sriracha, salt, and pepper. Toss everything well. Make sure each sprout is coated. - Spread the Brussels sprouts evenly on a baking sheet. Keep them in a single layer for best results. - Roast them for 20-25 minutes. Stir halfway through to ensure even cooking. Look for a nice, crispy texture. - Once done, transfer the Brussels sprouts to a serving dish. - Garnish with sesame seeds and fresh cilantro. This adds a nice crunch and flavor. For the full recipe, check the earlier section. To get those Brussels sprouts crispy, keep them in a single layer on the baking sheet. When they are crowded, they steam instead of roast. This can make them soggy, and we want crispy! Stirring halfway through cooking is key. It helps them brown evenly and adds to that delightful crunch. Just use a spatula to flip them over gently. You can adjust the Sriracha to change the heat level. If you prefer less spice, start with half a tablespoon. Taste the mix, and add more if you like it hotter. Remember, you can always add more spice, but you can't take it away! If honey isn't your thing, try other sweeteners. Maple syrup works well and adds a nice flavor. Brown sugar can also give a rich taste. Just remember to keep the balance of sweet and spicy right! These tips will help you make the best Honey Sriracha Brussels Sprouts! For the complete recipe, check out the Full Recipe section. {{image_2}} You can easily change the flavor of Honey Sriracha Brussels sprouts. One great addition is balsamic vinegar. This adds a nice tanginess that balances the sweet honey and spicy Sriracha. Just drizzle a tablespoon of balsamic over the sprouts before roasting. Another fun option is mixing in nuts. Nuts like almonds or pecans add crunch and depth. Toss a handful of nuts with the Brussels sprouts before roasting. This gives a satisfying texture that pairs well with the crispy, caramelized sprouts. If you need a vegan version, swap honey for maple syrup. This keeps the sweetness while making the dish plant-based. Use the same amount as honey for a smooth transition. For those who need gluten-free options, rest easy. The main ingredients are naturally gluten-free. Just double-check any sauces or extras you use. This way, you can enjoy your dish without worry. For the full recipe, check out the Honey Sriracha Brussels Sprouts section. To keep your Honey Sriracha Brussels sprouts fresh, store leftovers in the fridge. Use an airtight container to lock in moisture. Make sure the sprouts cool down before sealing the container. This helps prevent sogginess. When you're ready to enjoy your leftovers, reheating them right is key. You can use the oven or a skillet. For the oven, preheat it to 350°F (175°C). Place the Brussels sprouts on a baking sheet. Heat for about 10 minutes until warm. If using a skillet, add a little olive oil over medium heat. Stir the sprouts for a few minutes. This method helps keep them crispy and tasty. Avoid using the microwave, as it can make them soft and mushy. For the full recipe, check back to enjoy this flavorful dish again! Brussels sprouts take about 20 to 25 minutes to roast. Preheat your oven to 425°F (220°C). Spread the halved Brussels sprouts on a baking sheet in a single layer. This helps them cook evenly. Stir them halfway through the time to get that nice crispy texture. Yes, you can make Honey Sriracha Brussels sprouts ahead of time. Prepare the Brussels sprouts by mixing them with the honey and Sriracha. Store them in an airtight container in the fridge for up to two days. When ready to serve, just reheat them in the oven at 350°F (175°C) for about 10 minutes. You can also microwave them for a quicker option, but the oven keeps them crispier. Honey Sriracha Brussels sprouts pair well with many dishes. Try serving them alongside grilled chicken or pork for a tasty meal. They also work great as a side to rice bowls or tacos. If you want a vegetarian option, serve them with quinoa or a hearty salad. Feel free to mix and match to find your favorite combo! For the full recipe, check out the Honey Sriracha Brussels Sprouts section above. In this article, I covered the tasty Honey Sriracha Brussels sprouts recipe. We explored the key ingredients and how to prepare them. I shared tips for achieving a crispy texture and offered variations to suit your taste. We also discussed helpful storage and reheating methods. Brussels sprouts can be fun, easy, and delicious. Try this recipe to impress your family. You’ll enjoy the balance of sweet and spicy flavors. Cooking doesn’t need to be hard—simple steps can lead to great meals!

Honey Sriracha Brussels Sprouts Flavorful and Easy Dish

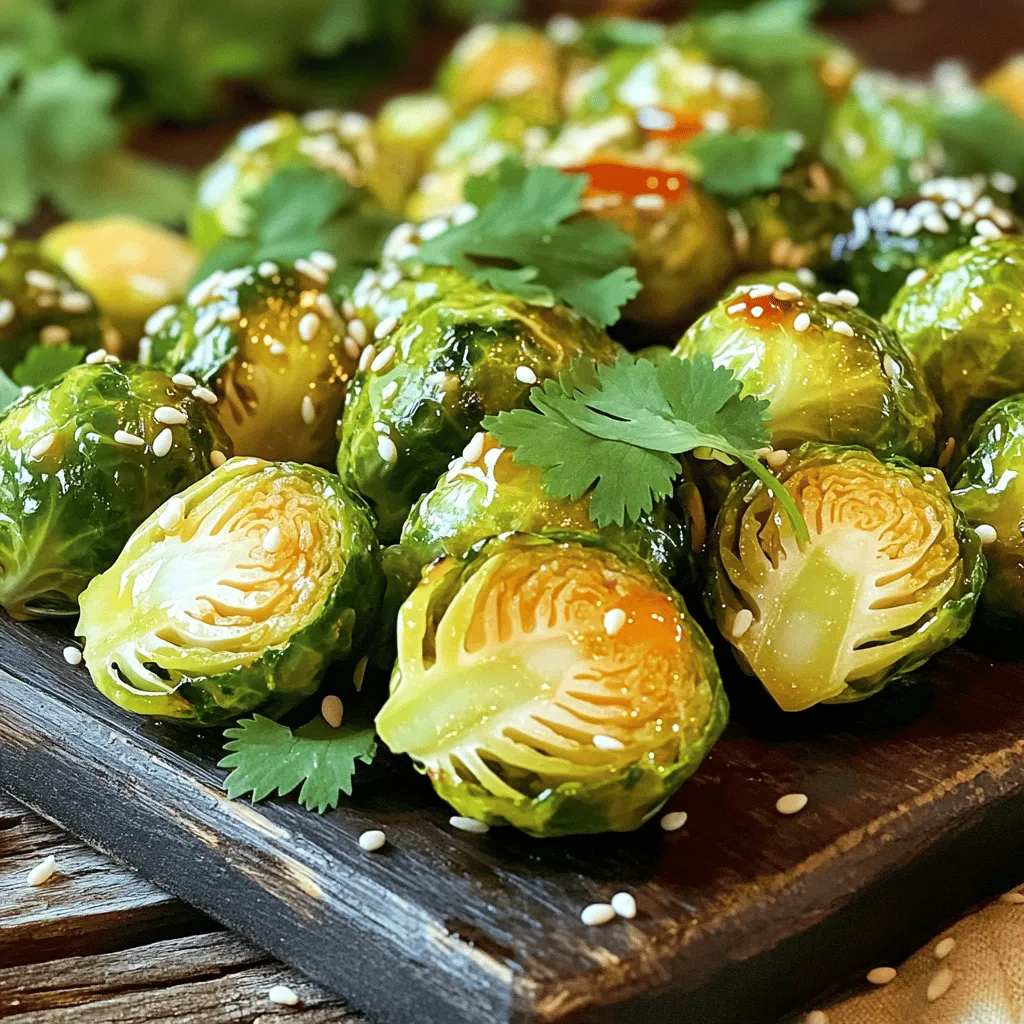
Are you ready to spice up your dinner table? These Honey Sriracha Brussels sprouts are super easy to make and

- 4 large flour tortillas - 1 cup shredded cheese (cheddar or mozzarella) - 1 cup bell peppers, thinly sliced (mixed colors) - 1 cup zucchini, thinly sliced - 1 cup mushrooms, sliced - 1 small red onion, thinly sliced - 1 teaspoon garlic powder - 1 teaspoon cumin - Salt and pepper, to taste - 2 tablespoons olive oil - Sour cream or Greek yogurt, for serving (optional) - Fresh cilantro, for garnish (optional) To create your easy veggie quesadillas, gather these fresh ingredients. The colorful bell peppers add crunch and sweetness. Zucchini and mushrooms bring a nice earthy flavor. Red onion gives a slight bite that balances the dish. I like to use both cheddar and mozzarella for cheese. Cheddar adds sharp flavor, while mozzarella melts beautifully. The spices, garlic powder and cumin, give warmth and depth to the mix. You can adjust the salt and pepper to fit your taste. Olive oil is key for sautéing the vegetables to perfection. Lastly, sour cream or Greek yogurt adds creaminess when served. Fresh cilantro is a nice touch on top. For the full recipe, check the details provided above. Enjoy cooking! First, I heat 2 tablespoons of olive oil in a large skillet over medium heat. Next, I add 1 cup of thinly sliced bell peppers, 1 cup of thinly sliced zucchini, 1 cup of sliced mushrooms, and 1 small sliced red onion. I sauté these vegetables for about 5-7 minutes. I want them to be tender but still crisp. After the veggies are tender, I sprinkle 1 teaspoon of garlic powder and 1 teaspoon of cumin over the mix. I add salt and pepper to taste. I stir everything well to combine and let it cook for another 2 minutes. This step brings out all the great flavors. Now, I take a flour tortilla and place it in a clean skillet over medium heat. On one half of the tortilla, I sprinkle a layer of 1 cup of shredded cheese. Then, I add a generous amount of my sautéed veggie mixture on top. I sprinkle a bit more cheese on the veggies to help hold it all together. Then, I fold the tortilla in half. I cook this quesadilla for about 3-4 minutes on each side. I want it to be golden brown and the cheese to melt perfectly. After cooking, I transfer the quesadilla to a cutting board and slice it into wedges. I love serving these warm with some sour cream or Greek yogurt. I also like to sprinkle fresh cilantro on top for a pop of color. If you want to see the details, check the Full Recipe. To make the perfect quesadilla, you want a crispy outside. Here’s how to achieve that ideal crispiness: - Use medium heat: Cooking on medium heat allows the tortilla to crisp without burning. - Oil the pan: Adding a little olive oil helps the tortilla brown nicely. For cheese melting, here are some tips: - Grate cheese: Grated cheese melts better than slices. - Cover while cooking: A lid traps heat and helps the cheese melt faster. To boost the taste of your quesadillas, try these spices and herbs: - Add chili powder: It gives a nice kick. - Use fresh herbs: Cilantro or parsley adds freshness. If you want to switch things up, consider these ingredient substitutes: - Swap bell peppers for spinach: Spinach offers a different texture. - Try feta cheese instead of cheddar: Feta brings a tangy flavor. For cooking quesadillas, the right pan matters: - Nonstick skillet: It helps prevent sticking and burning. - Cast iron skillet: This option provides even heat for great browning. Don’t forget to use a good spatula for flipping: - Wide spatula: It supports the quesadilla well when you flip. - Silicone spatula: It protects your pan's surface while flipping. These tips will help you make easy veggie quesadillas that taste great and look inviting. For the full recipe, check out the Easy Veggie Quesadillas section above. {{image_2}} You can boost your veggie quesadilla with protein. Black beans or refried beans work great. They add rich flavor and extra fiber. Grilled chicken is another option. It adds a nice texture and taste. If you prefer a plant-based option, try tofu. Just grill it with your veggies for a tasty twist. Cheese is the heart of any quesadilla. You can use different types for unique flavors. Cheddar gives a sharp taste, while mozzarella melts wonderfully. Mixing cheese types can create a fun flavor blend. Try combining pepper jack for heat with cheddar for creaminess. This mix will make your quesadilla even more delicious. Feel free to explore other vegetables in your quesadillas. Spinach, kale, or corn add nice colors and nutrients. You can even use leftover vegetables from your fridge. Seasonal veggies work well too. In summer, try fresh tomatoes or bell peppers. In winter, add roasted squash or sweet potatoes. Each season brings new flavors to enjoy. For more details on making these tasty quesadillas, check out the Full Recipe. To keep your leftover quesadillas fresh, place them in an airtight container. You can refrigerate them for up to three days. Make sure they cool before sealing. For longer storage, you can freeze them. Wrap each quesadilla in plastic wrap and then place them in a freezer-safe bag. They can last up to three months in the freezer. When you want to eat them, just pull them out and reheat. For the best taste, reheat quesadillas in a skillet. Heat on medium-low for around 5 minutes on each side. This method keeps them crispy. You can also use an oven. Preheat it to 350°F (175°C) and bake the quesadillas for about 10-15 minutes. If you want to keep them crispy, place them directly on the oven rack or on a baking sheet. Avoid microwaving, as this makes them soggy. Enjoy your easy veggie quesadillas just like fresh! You can prep these quesadillas a day in advance. Start by cooking the veggies as the recipe says. Once they cool, store them in an airtight container in the fridge. This saves time when you are ready to cook. When you want a quesadilla, just assemble it with cheese and your veggie mix. Cook as directed until golden and crispy. Yes, you can! Simply use gluten-free tortillas instead of flour ones. Many brands offer great options. Look for tortillas made from rice or corn. They work well and taste good too. Just follow the same cooking steps in the recipe. I love serving quesadillas with sour cream or Greek yogurt. They add creaminess and balance the flavors. You can also try salsa or guacamole for a fresh twist. Hot sauce or chipotle sauce adds a kick if you like spice. These sauces boost the flavor and make the meal more fun. For the complete recipe, check out the [Full Recipe]. You learned how to make tasty veggie quesadillas with simple steps. We covered ingredients, cooking tips, and even ways to store leftovers. You can mix flavors and add proteins to make this dish your own. Keep exploring with different vegetables and spices. Use this guide to impress your friends and family. Enjoy your cooking, and find joy in every bite of your quesadillas. Your kitchen skills will shine!

Easy Veggie Quesadillas Quick and Tasty Meal

Looking for a quick and tasty meal? Let me introduce you to easy veggie quesadillas! Packed with colorful veggies and

Older posts
Newer posts
← Previous Page1 … Page55 Page56 Page57 … Page84 Next →

dsad

© 2026 Lisa Dishes • Built with GeneratePress

Our Policies

  • Copyright Policy
  • Cookie Policy
  • GDPR Policy
  • Privacy Policy
  • Disclaimer
  • Terms Of Use

More Information

  • Home
  • About
  • Contact
  • Appetizers
  • Dessert
  • Dinner
  • Drinks
©2026, Lisa Dishes About Back To Top