Skip to content
DisclaimerTerms Of UseGDPR PolicyCookie Policy

Lisa Dishes

  • Home
  • Drinks
  • Appetizers
  • Dinner
  • Dessert
  • About
  • Contact
  • Privacy Policy
DisclaimerTerms Of UseGDPR PolicyCookie Policy

NO-ING-IMG

- 1 can chickpeas, drained and rinsed - 1 cucumber, diced - 1 cup cherry tomatoes, halved - 1/2 red onion, finely chopped - 1 bell pepper (red or yellow), diced - 1/4 cup Kalamata olives, pitted and sliced - 1/4 cup feta cheese, crumbled (optional) - 2 tablespoons fresh parsley, chopped - 3 tablespoons olive oil - 2 tablespoons red wine vinegar (or lemon juice) - 1 teaspoon dried oregano - Salt and pepper to taste Chickpeas are the star of this salad. They add protein and fiber. I always use canned chickpeas for ease. Just drain and rinse them well. This step removes extra salt and makes them taste fresh. Next, we have the vegetables. I love how colorful and crunchy they are! Diced cucumber brings a cool bite. Cherry tomatoes add sweetness and a burst of flavor. Red onion gives a sharp taste that balances the salad well. Choose a red or yellow bell pepper for a sweet crunch. Kalamata olives add a briny taste. They make the salad feel Mediterranean. If you like cheese, crumbled feta adds creaminess. It's optional but highly recommended! Fresh parsley brightens the dish and adds freshness. Finally, we have the dressing. Olive oil gives richness while red wine vinegar adds tang. You can swap it with lemon juice for a zesty twist. Dried oregano brings an earthy flavor that ties everything together. Don't forget to season with salt and pepper to your liking! Combining the base ingredients Start with a large bowl. Add one can of chickpeas, drained and rinsed. Next, toss in one diced cucumber, one cup of halved cherry tomatoes, and half a finely chopped red onion. Then, add one diced bell pepper, either red or yellow. Finally, mix in a quarter cup of sliced Kalamata olives. If you like, crumble in a quarter cup of feta cheese and sprinkle two tablespoons of freshly chopped parsley. Making the dressing In a smaller bowl, combine three tablespoons of olive oil with two tablespoons of red wine vinegar. You can swap the vinegar for lemon juice if you want a twist. Add one teaspoon of dried oregano, along with salt and pepper to taste. Whisk this mixture until it blends well. Mixing and marinating the salad Pour the dressing over the salad mix. Toss everything gently, ensuring all the ingredients coat well with the dressing. Cover the bowl and place it in the fridge for at least 30 minutes. This step lets the flavors meld together. When ready to eat, serve the salad chilled or at room temperature. Adjust the seasoning if needed. To make the best Mediterranean chickpea salad, let the flavors blend. After mixing, place the salad in the fridge for 30 minutes. This time lets the taste deepen and become more vibrant. Adjust the seasoning before you serve. Taste the salad and add more salt or pepper as needed. You can also add more olive oil or vinegar for a zestier kick. When serving, you can get creative. This salad goes well with grilled chicken or fish. You can also serve it with pita bread for a fun meal. Enjoy it at a picnic or a family dinner. {{image_2}} You can change up the Mediterranean chickpea salad easily. Adding proteins can make it heartier. Try grilled chicken or canned tuna for a filling meal. Both options mix well with the salad's fresh flavors. If you want to use different vegetables, go for it! You can add spinach, zucchini, or even carrots. Each veggie brings a new taste and texture. Don't forget about the dressing! While olive oil and red wine vinegar are great, you can try lemon juice for a zesty kick. You can also swap in tahini or yogurt for a creamier sauce. Each swap lets you create your own unique version of this dish. To keep your Mediterranean Chickpea Salad fresh, store it in the fridge. Use an airtight container. This helps keep the ingredients crisp. The salad stays good for about three days. If you want to save it longer, freezing is an option. However, some veggies may lose texture. To freeze, place the salad in a freezer-safe bag. Remove as much air as possible before sealing. When you’re ready to eat, thaw it in the fridge overnight. Here are some best practices for freshness: - Keep dressing separate: Store the dressing in another container. This keeps the salad from getting soggy. - Add fresh herbs last: If you use parsley, add it right before serving. This keeps it bright and flavorful. - Taste before serving: Check the seasoning after storage. You may need to add a little salt or pepper. These tips will help you enjoy your Mediterranean Chickpea Salad at its best! Yes, you can make this salad ahead of time. It tastes even better after a few hours. The flavors blend well when it sits. Just keep it in the fridge until you are ready to serve. Chickpeas are packed with protein and fiber. They help you feel full longer. They also provide vitamins and minerals like folate and iron. Eating chickpeas can support heart health and weight management. Absolutely! Canned chickpeas are a great choice. They save you time and effort. Just remember to drain and rinse them well before using. This helps remove extra salt and makes them fresh. You can pair this salad with grilled meats or fish. It also goes well with pita bread or hummus. For a light meal, serve it with a side of rice or quinoa. Enjoy this salad as a refreshing snack anytime! This post covered all you need to make a great Mediterranean Chickpea Salad. We talked about main ingredients like chickpeas and veggies. You learned how to prepare the salad and the dressing. I shared tips to help your flavors shine and ideas for swaps. Remember, store it right for fresh and tasty meals later. With this guide, you can make a delicious, healthy salad every time. Enjoy your cooking!

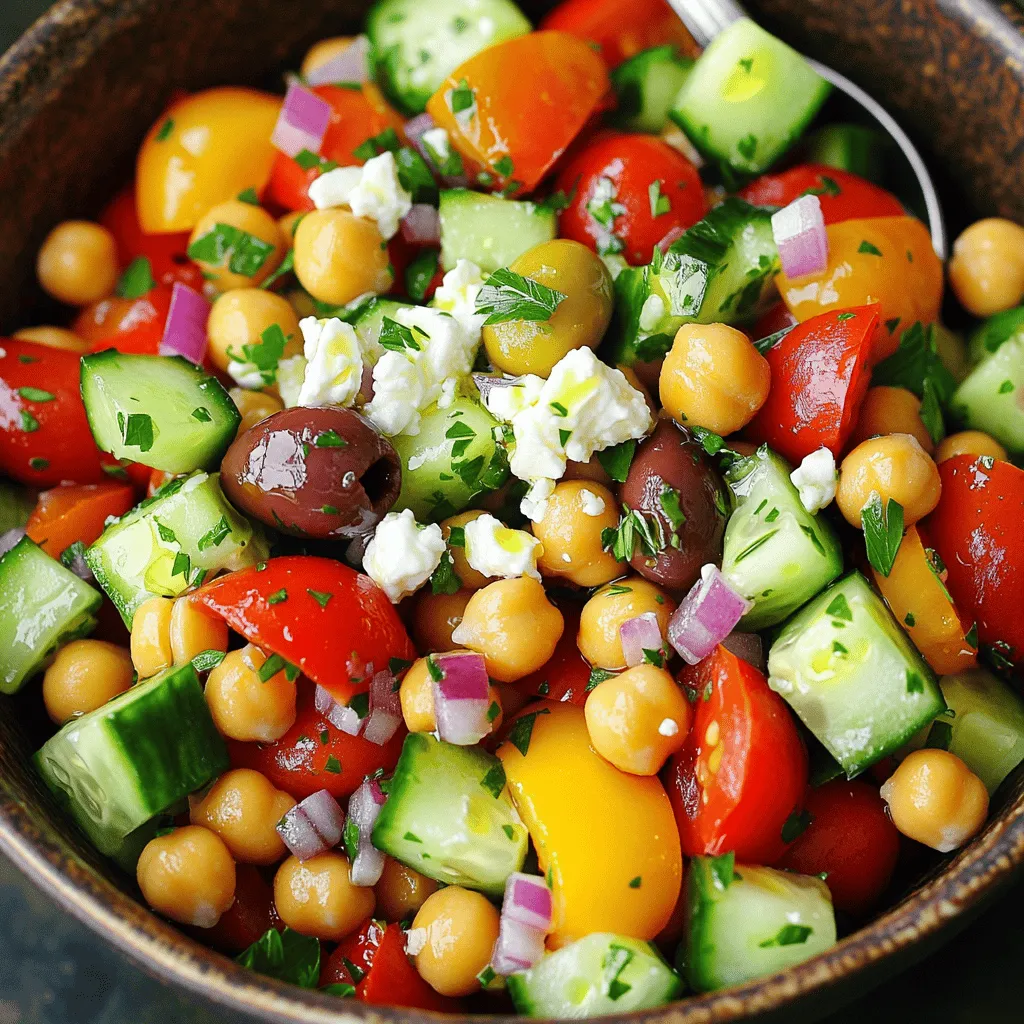
Mediterranean Chickpea Salad Fresh and Flavorful Dish

Looking for a fresh and tasty meal? This Mediterranean Chickpea Salad is packed with flavor! It’s easy to make and

- 1 lb baby carrots, peeled - 3 tablespoons maple syrup - 2 tablespoons brown sugar - 2 tablespoons unsalted butter - 1/2 teaspoon cinnamon - Salt and pepper to taste - 1 tablespoon fresh parsley, chopped (for garnish) To make Maple Brown Sugar Glazed Carrots, gather your ingredients first. You need one pound of baby carrots, peeled to show their bright color. Then, grab three tablespoons of pure maple syrup. This syrup adds sweetness and depth to your dish. Next, use two tablespoons of brown sugar. This sugar enhances the caramel flavor in the glaze. You will also need two tablespoons of unsalted butter. This butter helps create a rich sauce that coats the carrots perfectly. Don't forget the cinnamon! Just half a teaspoon will bring warmth and a hint of spice. You may want to add salt and pepper to taste, which balance the sweetness. Finally, for a pop of color, chop one tablespoon of fresh parsley. This herb makes your dish look appealing and adds freshness. With these ingredients, you're ready to create a side dish that shines on any plate. Each bite of these glazed carrots offers a sweet and savory experience that everyone will love. Enjoy the process and savor these delightful flavors! To start, grab a medium pot and add 1 lb of baby carrots. Cover them with cold water, adding a pinch of salt. This helps to season the carrots while they cook. Now, place the pot on the stove over medium-high heat. Bring the water to a boil. Once it starts bubbling, lower the heat to medium. Let the carrots simmer for about 5 to 7 minutes. You want them tender but still crisp. After they are done, drain the carrots and set them aside. Next, let’s make the sweet glaze. In the same pot, add 2 tablespoons of unsalted butter. Then, pour in 3 tablespoons of maple syrup and 2 tablespoons of brown sugar. Turn the heat to medium and stir. Watch as the butter melts and the mixture begins to bubble. This is where the magic happens! Once it’s ready, it’s time to add the cooked carrots to the pot. Toss them gently to coat in the glaze. Now, let’s add some flavor! Sprinkle in 1/2 teaspoon of cinnamon, along with salt and pepper to taste. Mix everything well to ensure all the carrots are evenly coated. Cook for about 3 to 5 minutes more. Stir occasionally, watching for the glaze to thicken and caramelize slightly. You want the carrots to glisten and shine. Once done, remove the pot from the heat. Transfer the carrots to a serving dish and garnish with freshly chopped parsley. Enjoy your sweet and savory side dish! Using baby carrots makes this dish easy and quick. They are tender and sweet. Baby carrots need no cutting. Just peel and cook them. If you prefer regular carrots, peel and slice them into thin circles. This way, they cook evenly. Thin slices help them absorb the glaze better. You can adjust the sweetness based on your taste. If you want it sweeter, add more maple syrup or brown sugar. If you like it less sweet, use less. For a glossy finish, make sure to stir the glaze well. Keep the heat medium to avoid burning. A good stir helps coat each carrot evenly. Maple brown sugar glazed carrots pair well with many dishes. They go great with roasted meats or grilled chicken. For a vegetarian meal, serve them with quinoa or a fresh salad. To make your dish look fancy, garnish with fresh parsley. The green color brightens up the plate and adds flavor. {{image_2}} You can make this dish even better by adding flavors. Try adding minced garlic for a savory touch. The garlic pairs well with the sweetness. You can also mix in fresh herbs like thyme or rosemary. These herbs add depth to the dish. For a bright twist, try adding citrus zest. Lemon or orange zest gives a fresh taste that brightens the glaze. If you want to switch things up, you can use different sweeteners. Honey is a great alternative to maple syrup. It brings a nice floral note to the carrots. Agave syrup is another option. It has a mild flavor that works well in this dish. If you want something less common, try brown rice syrup. It adds a unique taste and is a fun twist on the classic recipe. You can easily make this recipe fit your diet. To make it vegan, simply swap out the butter for vegan butter or olive oil. This keeps the dish rich without using animal products. If you need it gluten-free, check your maple syrup. Most brands are gluten-free, but always read labels. Enjoy your glazed carrots without any worry! To store your glazed carrots, let them cool first. Place them in an airtight container. This helps keep them fresh. You can keep them in the fridge for up to four days. When it's time to reheat, I suggest using the stovetop method. This keeps the carrots crisp. Just add the carrots to a pan over medium heat. Stir them gently until they are warm. To avoid sogginess, do not add extra water. If they seem dry, add a tiny bit of butter or oil. This will help bring back the glaze's shine. Enjoy your perfectly reheated Maple Brown Sugar Glazed Carrots! Glazed carrots can last about 4 to 5 days in the fridge. Store them in an airtight container to keep them fresh. Make sure they cool down before sealing. If you notice any off smell or mold, it’s best to toss them. Yes, you can use frozen carrots. They are convenient and quick to use. However, fresh carrots provide a better texture and taste. Frozen carrots may be softer after cooking. If you use frozen, cook them briefly to avoid mushiness. To reheat glazed carrots, use a skillet over low heat. Stir them gently until warmed through. This keeps their flavor and texture intact. You can also microwave them in short bursts. Add a splash of water to keep them moist. This article showed you how to make delicious Maple Brown Sugar Glazed Carrots. We covered the simple ingredients and steps to prepare them. You learned tips for choosing the best carrots and making the glaze perfect. We even discussed fun variations and how to store leftovers. Enjoy making this easy, tasty dish that will impress everyone at your table. These carrots are great next to many meals. I hope you feel inspired to try this recipe!

Maple Brown Sugar Glazed Carrots Delightful Side Dish

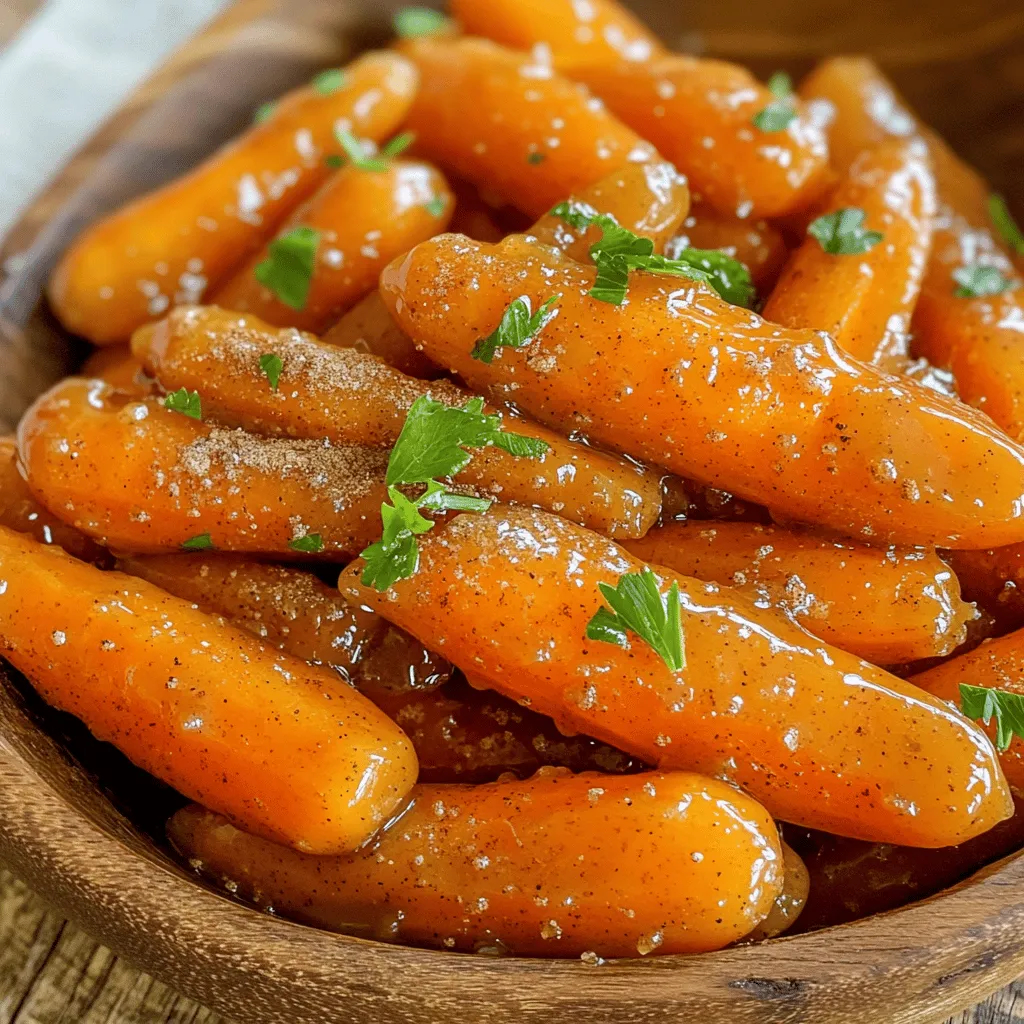
If you’re looking for a delightful side dish, Maple Brown Sugar Glazed Carrots are a must-try! These sweet, buttery, and

- 1 medium head of cauliflower, cut into florets - 1 cup all-purpose flour - 1 cup almond milk (or any plant-based milk) - 1 tablespoon garlic powder - 1 tablespoon smoked paprika - 1 teaspoon salt - 1 cup buffalo sauce (store-bought or homemade) - 8 small corn tortillas - 1 avocado, sliced - 1 cup shredded red cabbage - Fresh cilantro, for garnish - Lime wedges, for serving Each ingredient in Buffalo cauliflower tacos plays a key role in taste and texture. - Cauliflower: This is the star of the dish. It gives a hearty bite and soaks up flavors well. - Flour: This helps create a light, crispy coating for the cauliflower. - Almond milk: This adds moisture to the batter and keeps it plant-based. - Garlic powder: This brings a savory depth to the batter. - Smoked paprika: This adds a warm, smoky flavor that pairs well with buffalo sauce. - Salt: This enhances all the other flavors in the dish. - Buffalo sauce: This gives the dish its spicy kick and tangy flavor. - Corn tortillas: These provide a soft, chewy base for the tacos. - Avocado: This adds creaminess and balances the spice. - Red cabbage: This adds crunch and a pop of color. - Cilantro: This gives a fresh, herbal note to the dish. - Lime wedges: These add a zesty finish when squeezed on top. When choosing cauliflower, look for these signs of freshness: - Firmness: The head should feel solid and not soft. - Color: Choose white heads without dark spots or discoloration. - Leaves: Fresh leaves should be green and crisp, not wilted. - Size: Medium heads work best for this recipe. Too large may not cook evenly. By picking a fresh cauliflower, you ensure your tacos will taste their best! Start by washing your cauliflower. Cut it into small florets. This gives each piece a nice bite. Place the florets in a large bowl. This will help when you coat them. In the same bowl, mix one cup of flour and one cup of almond milk. Add one tablespoon of garlic powder and one tablespoon of smoked paprika. Sprinkle in one teaspoon of salt. Whisk it all together until it is smooth. This batter will stick well to the cauliflower. Preheat your oven to 450°F (230°C) and line a baking sheet with parchment paper. Dip each cauliflower floret into the batter. Let any extra batter drip off. Spread the florets on the baking sheet in a single layer. Bake for 20-25 minutes. Flip them halfway for even cooking. When they are golden and crispy, take them out. In a large bowl, toss the baked cauliflower with one cup of buffalo sauce. Make sure each piece is coated well. To get your cauliflower extra crispy, follow these steps: - Use a dry head of cauliflower. Make sure it is not wet. - Coat each floret well in the batter. This helps it stick. - Space the florets apart on the baking sheet. This allows hot air to circulate. - Flip the florets halfway through baking. This ensures even crispiness. For even better crunch, broil the cauliflower for 2-3 minutes at the end. Keep an eye on it to avoid burning. Layering your tacos correctly makes a big difference. Here’s how I do it: - Start with a warm tortilla. This keeps it pliable and easy to fold. - Add the buffalo cauliflower first. This helps it stay in place. - Next, layer on the avocado slices. They add creaminess and balance heat. - Finish with shredded red cabbage. It gives a nice crunch and color. For a fun twist, consider adding some cheese or pickled onions for extra flavor. Making your buffalo sauce at home is simple and fun. Here’s a quick guide: - Start with unsalted butter or a plant-based alternative. Melt it in a pan. - Mix in hot sauce of your choice. Adjust the heat to your liking. - Add a dash of garlic powder and a squeeze of lemon juice. This adds depth. Taste your sauce and adjust as needed. You can make it spicier or milder. Store any leftovers in a jar in the fridge. {{image_2}} You can swap cauliflower for other veggies or proteins. Try using chickpeas for a protein boost. They soak up flavor well. You can also use sweet potatoes. Roast them until they are soft and sweet. Zucchini is another great choice. Just slice it and grill it for a smoky taste. Each option adds a fresh twist to your tacos. If you need gluten-free tacos, replace all-purpose flour with a gluten-free blend. Many brands offer great options. You can also use almond flour for a nutty flavor. Always check the labels to ensure they are gluten-free. For the tortillas, choose corn tortillas. They are naturally gluten-free and work perfectly with the filling. Spices can take your tacos to the next level. Consider adding cayenne pepper for heat. A pinch will add a nice kick. You might enjoy smoked paprika for a deeper flavor. Cumin can also add warmth and richness. Mix and match spices to suit your taste. Don’t be afraid to experiment! To keep leftover buffalo cauliflower fresh, let it cool first. Place the cooled cauliflower in an airtight container. Store it in the fridge. It will last for about 3 to 4 days. Make sure to seal the container well to avoid moisture. When you are ready to eat the leftovers, you want them crispy again. Preheat your oven to 400°F (200°C). Spread the cauliflower on a baking sheet. Bake for about 10-15 minutes. This helps it regain its crunch. Avoid using the microwave as it can make the cauliflower soggy. Freezing buffalo cauliflower tacos is easy! First, let the tacos cool completely. Wrap each taco in plastic wrap tightly. Then, place them in a freezer-safe bag. You can freeze them for up to 2 months. To eat, thaw them in the fridge overnight and reheat in the oven for a crispy bite. Yes, you can use other flours. For gluten-free options, try almond or chickpea flour. These flours give a nice texture. Just keep in mind, the final taste might change a bit. Experiment with different types to find what you like best. To add heat, use more buffalo sauce. You can also mix in cayenne pepper or chili powder into the batter. Adding sliced jalapeños or a spicy salsa can boost the flavor too. If you like heat, don’t hold back. Great toppings include sliced avocado and shredded red cabbage. Fresh cilantro adds flavor and color. You can also try diced tomatoes, pickled onions, or a squeeze of lime for extra zing. Feel free to mix and match to find your favorite combo. To make Buffalo Cauliflower Tacos, gather these simple ingredients: - 1 medium head of cauliflower, cut into florets - 1 cup all-purpose flour - 1 cup almond milk (or any plant-based milk) - 1 tablespoon garlic powder - 1 tablespoon smoked paprika - 1 teaspoon salt - 1 cup buffalo sauce (store-bought or homemade) - 8 small corn tortillas - 1 avocado, sliced - 1 cup shredded red cabbage - Fresh cilantro, for garnish - Lime wedges, for serving This dish is easy to prepare and packed with flavor. 1. Preheat the oven: Set it to 450°F (230°C). Line a baking sheet with parchment paper. 2. Prepare the cauliflower: In a large bowl, mix the flour, almond milk, garlic powder, smoked paprika, and salt until smooth. 3. Coat the cauliflower: Dip each floret into the batter. Let excess batter drip off. Place florets on the baking sheet in a single layer. 4. Bake the cauliflower: Bake for about 20-25 minutes. Flip halfway for an even crisp. 5. Toss with buffalo sauce: Take the baking sheet out. In a bowl, mix the baked cauliflower with buffalo sauce. Toss gently to coat. 6. Warm the tortillas: Heat corn tortillas in a skillet over medium heat for 30 seconds on each side. 7. Assemble the tacos: On each tortilla, layer buffalo cauliflower, avocado slices, and shredded red cabbage. 8. Garnish and serve: Top with fresh cilantro and lime wedges for squeezing. This recipe makes four tacos. You can enjoy them in just 45 minutes! This blog post gave you a complete guide to Buffalo Cauliflower Tacos. We explored key ingredients, how to prep, and how to achieve crispiness. You learned some handy tips for selecting fresh cauliflower and enhancing flavor with spices. Remember to store leftovers properly to keep that great taste. Enjoy experimenting with variations like different proteins or gluten-free swaps. These tacos can be a fun dish for any meal. Dive into your kitchen and make your Buffalo Cauliflower Tacos today!

Buffalo Cauliflower Tacos Flavorful and Healthy Dish

Are you ready to spice up your dinner routine? Buffalo Cauliflower Tacos are a flavorful and healthy option that will

To make lemon ricotta pancakes, gather these key ingredients: - 1 cup ricotta cheese - 1/2 cup milk - 3 large eggs - Zest of 1 lemon - 2 tablespoons lemon juice - 1 cup all-purpose flour - 2 tablespoons sugar - 2 teaspoons baking powder - 1/2 teaspoon baking soda - 1/4 teaspoon salt - 2 tablespoons unsalted butter, melted - Maple syrup and fresh berries for serving You can swap some ingredients if needed. For ricotta cheese, try cottage cheese for a lighter option. Almond milk works well if you want a dairy-free choice. Instead of all-purpose flour, you can use whole wheat flour for added fiber. If you prefer less sugar, use honey or maple syrup to sweeten the batter. This recipe yields about four servings. Each serving contains: - Calories: 250 - Protein: 8g - Carbohydrates: 30g - Fat: 10g - Fiber: 1g - Sugar: 5g These pancakes are a tasty way to enjoy a balanced meal. The protein from the ricotta and eggs helps keep you full. The fresh lemon adds a nice zing while keeping it light. {{ingredient_image_1}} Start by gathering all the wet ingredients. In a large bowl, add 1 cup of ricotta cheese. Pour in 1/2 cup of milk and crack in 3 large eggs. Then, add the zest of 1 lemon and 2 tablespoons of lemon juice. Whisk everything together until the mixture is smooth and well combined. This step is key for fluffy pancakes. Next, take another bowl for the dry ingredients. Combine 1 cup of all-purpose flour with 2 tablespoons of sugar. Add in 2 teaspoons of baking powder, 1/2 teaspoon of baking soda, and 1/4 teaspoon of salt. Mix these dry ingredients well. This blend will help create the perfect pancake texture. Now, it’s time to cook! Gradually add the dry mix to the wet mixture. Stir until just combined. A few lumps are okay; don't overmix. Next, gently fold in 2 tablespoons of melted butter. Heat a non-stick skillet over medium heat. Lightly grease it with cooking spray or melted butter. Pour about 1/4 cup of batter onto the skillet for each pancake. Cook until bubbles form, about 2-3 minutes. Flip and cook for another 1-2 minutes until golden brown. Keep the pancakes warm on a plate while you cook the rest. Enjoy them topped with maple syrup and fresh berries! To get light and fluffy pancakes, use fresh ricotta cheese. It has a creamy texture that makes your pancakes soft. Avoid overmixing the batter. Stir until just combined; lumps are fine. This keeps the pancakes airy. Let the batter rest for a few minutes. This helps it thicken and improves texture. Add a pinch of vanilla extract for extra flavor. You can also mix in some lemon zest for a stronger lemon taste. If you love fruit, try adding blueberries or raspberries directly into the batter. They add color and flavor. For a twist, sprinkle in some cinnamon or nutmeg. These spices complement the lemon nicely. Don’t skip the baking powder. It helps the pancakes rise and stay fluffy. Make sure your skillet is hot before adding the batter. If it’s too cold, pancakes will cook unevenly. Also, avoid pressing down on the pancakes while they cook. This pushes out air and makes them dense. Lastly, be careful not to cook them too long. Golden brown is the perfect color. Pro Tips Use Fresh Ingredients: Opt for fresh lemon juice and zest to enhance the flavor of your pancakes. Fresh ingredients can make a significant difference in taste. Don't Overmix: When combining the wet and dry ingredients, mix until just combined. Overmixing can lead to tough pancakes. Check Griddle Temperature: Ensure your skillet is at the right temperature before pouring the batter. A drop of water should sizzle when the griddle is ready. Keep Pancakes Warm: As you cook each pancake, keep them warm in a low oven (about 200°F) to ensure they stay fluffy and delicious when serving. {{image_2}} You can add a twist to your lemon ricotta pancakes. Try mixing in fresh blueberries or chocolate chips. These fruits bring sweetness and a pop of color. For blueberries, toss them in a bit of flour before adding to the batter. This helps them stay suspended while cooking. If you love chocolate, add semi-sweet chips for a rich treat. Both options keep your pancakes bright and fun. If you need gluten-free pancakes, swap the all-purpose flour for a gluten-free blend. This keeps the texture light and fluffy. For a vegan option, use a plant-based ricotta or blended tofu. Replace eggs with flaxseed meal mixed with water. This gives a similar binding effect. Use almond or oat milk in place of regular milk. Both methods yield delicious pancakes that anyone can enjoy. Toppings can change your pancake game. Try a dollop of Greek yogurt for creaminess. Fresh berries add a fruity touch. You might also drizzle honey or maple syrup for sweetness. If you want something unique, sprinkle toasted nuts for crunch. A sprinkle of powdered sugar can make the dish look fancy. Each topping brings a new flavor, making every bite exciting. You can store leftover lemon ricotta pancakes in the fridge. Place them in an airtight container. They stay fresh for up to three days. If you want to keep them longer, freezing is a great option. To freeze pancakes, let them cool first. Then, stack them with a piece of parchment paper between each pancake. This helps to prevent them from sticking together. Place the stack in a freezer-safe bag or container. Pancakes can last for up to two months in the freezer. For reheating, you have a few options. You can use a microwave, oven, or skillet. If using a microwave, heat on medium for about 30 seconds. Check and heat more if needed. For the oven, preheat to 350°F (175°C) and warm pancakes for about 10 minutes. In a skillet, warm over medium heat for 1-2 minutes on each side. Enjoy your pancakes warm and fluffy! To make pancakes fluffy, use fresh baking powder. This helps create air bubbles in the batter. Mixing wet and dry ingredients separately also helps. When you combine them, stir gently. A few lumps are fine; this keeps the pancakes light. Letting the batter rest for a few minutes can also add to the fluffiness. Yes, you can use whole wheat flour. This choice makes the pancakes a bit denser. If you prefer a lighter texture, mix it with all-purpose flour. You might also need to add a bit more milk. This helps keep the batter from getting too thick. Serve your pancakes with maple syrup for sweetness. Fresh berries add color and flavor. Try strawberries, blueberries, or raspberries. You can also add a dollop of whipped cream for extra creaminess. A sprinkle of powdered sugar makes for a pretty finish. Yes, you can prepare the batter ahead of time. Keep it in the fridge for up to 2 hours. Just remember to stir it gently before cooking. If the batter thickens, add a splash of milk to loosen it. This way, you can enjoy fresh pancakes with less prep time. Pancakes are done when they are golden brown on both sides. Look for bubbles forming on the surface before flipping. This shows the batter is cooking through. You can also gently press the center with a spatula; it should spring back. If it does, your pancake is ready to eat! You now know about pancake ingredients, instructions, and tips for the best results. Use substitutions to match your needs and experiment with flavor. Paying attention to texture and avoiding common mistakes will help you make perfect pancakes. Try different variations and toppings for fun twists. Remember how to store leftovers and reheat them right. Keep these ideas in mind next time you cook. Enjoy the process and your delicious pancakes!

Lemon Ricotta Pancakes Bright and Fluffy Treat

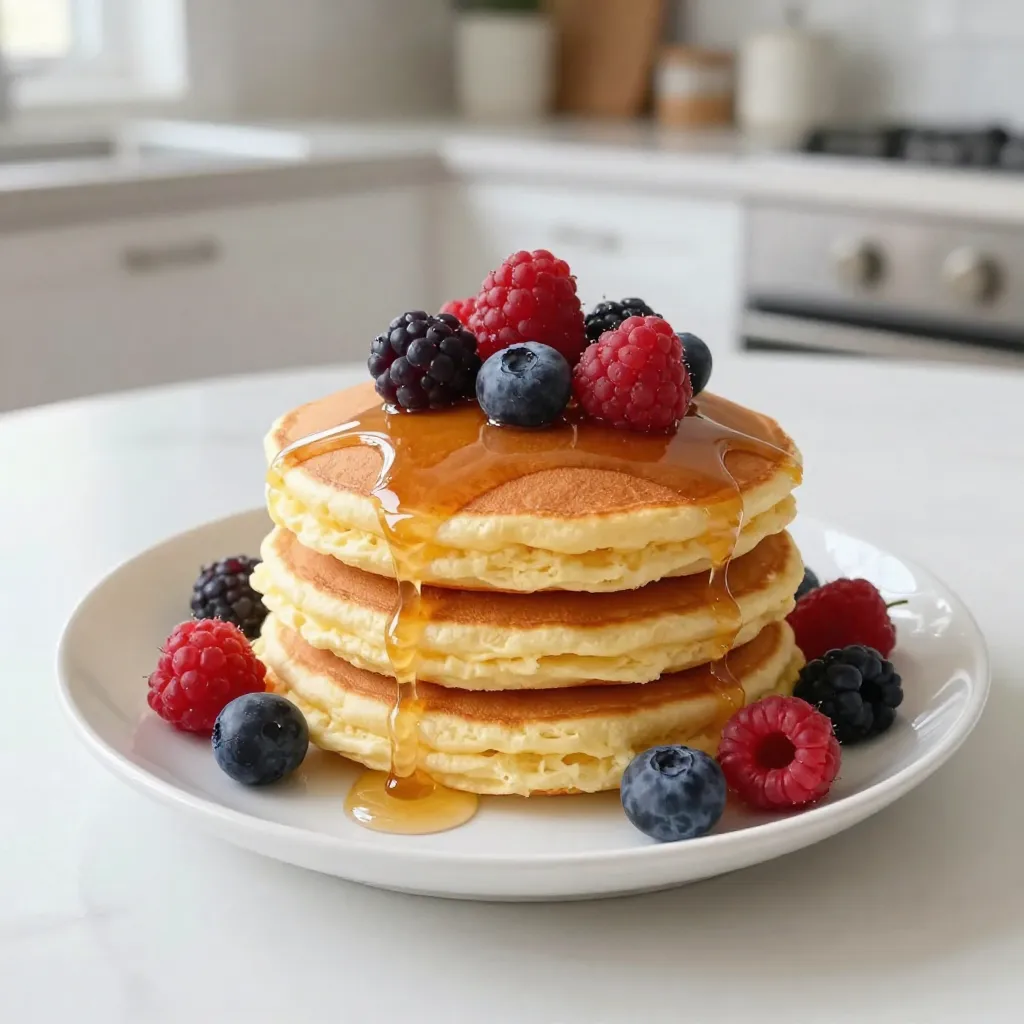
If you’re looking for a bright and fluffy treat, lemon ricotta pancakes are the answer! These pancakes are light, creamy,

- Tart Crust Components - 1 1/4 cups all-purpose flour - 1/2 cup unsalted butter, cold and cubed - 1/4 cup granulated sugar - 1/4 teaspoon salt - 1 large egg yolk - 2 tablespoons ice water - Apple Filling Ingredients - 4 medium apples (Granny Smith or Honeycrisp), peeled, cored, and sliced - 1 tablespoon lemon juice - 1/2 cup brown sugar - 1 teaspoon cinnamon - Caramel Sauce Ingredients - 1/4 cup heavy cream - 1/2 teaspoon vanilla extract - 1/4 teaspoon flaky sea salt Gather these ingredients before you begin. Each one plays a key role in making your salted caramel apple tart truly special. The tart crust is buttery and crisp. The apple filling adds a sweet and tangy burst. Lastly, the salted caramel sauce ties it all together with rich flavor. You will love how simple it is to create this delightful dessert! {{ingredient_image_1}} Start by gathering your dry ingredients. You need 1 1/4 cups of flour, 1/4 cup sugar, and 1/4 teaspoon salt. In a mixing bowl, combine these ingredients. Use a whisk to blend them well. Next, add 1/2 cup of cold, cubed butter. Use a pastry cutter or your hands to mix until it looks like coarse crumbs. Then, add 1 large egg yolk and 2 tablespoons of ice water. Mix until the dough comes together. Form the dough into a disk. Wrap it in plastic wrap and chill it in the fridge for at least 30 minutes. This helps the crust stay flaky. Now, move on to the apples. You need 4 medium apples, like Granny Smith or Honeycrisp. Peel, core, and slice them. In a large bowl, toss the apple slices with 1 tablespoon of lemon juice, 1/2 cup brown sugar, and 1 teaspoon cinnamon. Let the apples sit for about 10 minutes. This step allows the flavors to blend and the apples to soften. After the dough has chilled, preheat your oven to 375°F (190°C). On a floured surface, roll out the dough to fit a 9-inch tart pan. Press the dough into the pan and trim any excess. Prick the bottom with a fork to prevent bubbling. Place a sheet of parchment paper over the crust. Fill it with pie weights or dried beans. Bake for 15 minutes, then remove the weights. Bake for another 10 minutes until golden brown. Arrange the apple slices evenly over the baked crust. Drizzle half of the caramel sauce over the apples. Bake for another 20-25 minutes or until the apples are tender. Enjoy the fun of making this tart! You will love the sweet and salty blend of flavors. - Preventing Sogginess To avoid a soggy tart crust, blind bake it. This means you bake the crust without filling first. Use pie weights or dried beans on parchment paper to keep it flat. Bake for 15 minutes, then remove the weights. Bake again for 10 minutes until golden. This helps create a firm base for your tart. - Substitutions for Gluten-Free Crust If you need a gluten-free crust, use a gluten-free flour blend. You can also try almond flour or oat flour. Mix these with cold butter and sugar just like in the regular crust. Add an egg for binding. Chill the dough before rolling for best results. - Best Apple Varieties for Tartness For the best flavor, use Granny Smith or Honeycrisp apples. They give a nice balance of tartness and sweetness. These apples hold their shape well when baked too. - Combining Flavors for Depth Mixing apple varieties adds depth to your tart. Try pairing tart apples with sweeter ones like Fuji. This mix gives a more complex flavor. - Achieving the Right Thickness To get the perfect caramel sauce, keep the heat medium. Stir the brown sugar and cream until smooth. It should thicken in about 3-5 minutes. If it’s too thin, cook it a bit longer. - Adjusting Sweetness If you find the sauce too sweet, add a pinch of salt. This balances the flavors and enhances the caramel taste. You can also add more cream for a milder flavor. Pro Tips Chill the Dough: Ensure your dough is cold before rolling it out. This helps prevent it from shrinking during baking. Choose the Right Apples: Use a mix of tart and sweet apples for the best flavor. Granny Smith adds tartness while Honeycrisp offers sweetness. Caramel Consistency: Keep an eye on the caramel sauce while cooking; you want it thick but not burnt. Stir continuously for a smooth texture. Let It Cool: Allow the tart to cool slightly before serving. This helps the filling set and makes slicing easier. {{image_2}} - Adding Spices You can spice up your tart with a few simple additions. Try cloves or nutmeg for warmth. A pinch of allspice also adds a nice twist to the apple filling. Mix these spices in with the cinnamon for a more complex flavor. - Incorporating Nuts Add some crunch with nuts! Chopped pecans or walnuts give a great texture. Sprinkle them on top of the apples before baking. They will toast and bring a lovely nutty flavor to the tart. - Vegan Options To make a vegan version, swap the butter for coconut oil. Use a flax egg instead of the egg yolk. For the caramel sauce, use coconut cream and a plant-based milk. This keeps it rich while being dairy-free. - Gluten-Free Alternatives For a gluten-free crust, use almond flour or a gluten-free blend. Just make sure to adjust the liquid since these flours can act differently. This way, you can still enjoy your tart without gluten. - Serving with Ice Cream Serve your tart warm with a scoop of vanilla ice cream. The cold ice cream melts into the warm tart, creating a delightful mix of flavors. It’s a great way to enhance the dessert experience. - Garnishing Suggestions Add a sprinkle of flaky sea salt on top for a salty counterbalance. A few apple slices or a drizzle of extra caramel sauce can also make it look inviting. These small touches elevate the tart's presentation beautifully. Best Practices for Refrigeration To keep your salted caramel apple tart fresh, wrap it well. Use plastic wrap or foil to cover it tightly. Store it in the fridge. This will help it stay tasty for up to three days. The cold air prevents the apples from going soft. Freezing Tips If you have extra tart, you can freeze it. First, let it cool completely. Then, wrap it in plastic wrap and foil. Place it in a freezer-safe bag. This way, it can last for up to three months. When you're ready to eat, just thaw it in the fridge overnight. Oven vs. Microwave Methods For the best taste, reheat your tart in the oven. Preheat the oven to 350°F (175°C). Place the tart in for about 10-15 minutes. This helps keep the crust crisp. If you use a microwave, heat it for about 30 seconds. Be careful not to overheat, or the crust may become soggy. Tips for Maintaining Texture When reheating, cover the tart with foil if it's browning too fast. This protects the top. If you want extra flavor, drizzle a bit of caramel sauce on top before reheating. Enjoy your delicious tart warm and fresh! I recommend using Granny Smith or Honeycrisp apples. These apples balance sweet and tart flavors well. They hold their shape when baked, ensuring a great texture in your tart. Yes, you can prepare the tart crust in advance. Once you shape the dough into a disk, wrap it in plastic. Store it in the fridge for up to three days, or freeze it for up to three months. To stop apples from browning, toss them with lemon juice. The acid in lemon juice slows down oxidation. This keeps your apples looking fresh and bright as you prepare your tart. Absolutely! Store-bought caramel sauce saves time and works well. Just warm it slightly before drizzling over your tart. This way, it flows nicely over the apples. Yes, you can make a gluten-free version. Use a gluten-free flour blend in place of regular flour. Make sure your other ingredients, like the caramel, are also gluten-free. The salted caramel apple tart stays fresh for about three days at room temperature. If you refrigerate it, it can last up to a week. Just be sure to cover it well to keep it from drying out. Making a salted caramel apple tart is simple and fun. You learned about the right ingredients, like the best apples and caramel sauce. I shared step-by-step instructions to help you create a perfect tart. Follow the tips for a great crust and added flavors. Try out the variations to make this dessert your own. You can store leftovers for later, and I explained how. Enjoy your baking journey, and impress friends and family with your delicious creation!

Salted Caramel Apple Tart Delightful and Simple Recipe

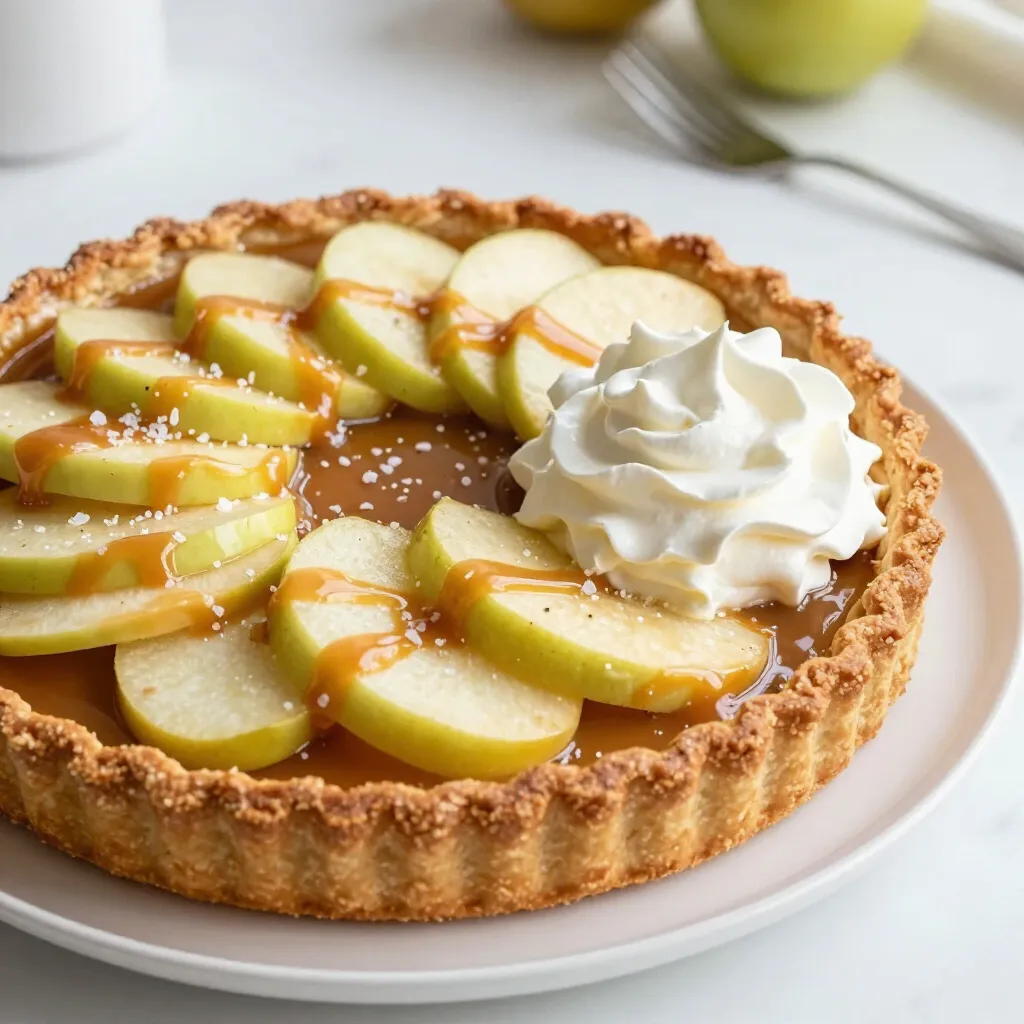
Are you ready to dive into a sweet treat that impresses without the fuss? My Salted Caramel Apple Tart is

- 4 bone-in, skin-on chicken thighs - 1/4 cup honey - 1/4 cup Dijon mustard - 2 tablespoons apple cider vinegar - 2 cloves garlic, minced - 1 teaspoon dried thyme - 1 teaspoon smoked paprika - Salt and pepper to taste - Fresh parsley, chopped (for garnish) To start, you need four bone-in, skin-on chicken thighs. The skin gives the dish a crispy texture while keeping the meat juicy. Next, mix equal parts honey and Dijon mustard, each at 1/4 cup. This ratio strikes a perfect balance between sweet and tangy. Add two tablespoons of apple cider vinegar. This ingredient brightens the flavor and adds a bit of zing. You will also need two cloves of minced garlic. Garlic adds depth and richness to the glaze. Season the chicken thighs with one teaspoon of dried thyme and one teaspoon of smoked paprika. These spices enhance the overall flavor profile. Don't forget to add salt and pepper to taste. Lastly, finish the dish with chopped fresh parsley for garnish. - Fresh herbs for garnish - Suggestions for side dishes For garnishes, fresh herbs like parsley work wonders. They add a pop of color and freshness. You can also pair this dish with side options like roasted vegetables or a simple salad. These sides complement the chicken beautifully. - Calories per serving - Macronutrient breakdown Each serving has around 350 calories. The chicken is high in protein, offering about 25 grams per serving. You also get healthy fats from the skin. This dish is not only tasty but also nourishing. - Prepping chicken thighs: Start by patting the chicken thighs dry with paper towels. This step helps the skin get crispy. Next, season both sides of the chicken with salt and pepper. Make sure to coat them well. - Whisking the honey mustard mixture: In a small bowl, combine 1/4 cup of honey, 1/4 cup of Dijon mustard, 2 tablespoons of apple cider vinegar, and 2 minced garlic cloves. Add 1 teaspoon of dried thyme and 1 teaspoon of smoked paprika. Mix well until the mixture is smooth. - Searing chicken thighs in a skillet: Heat a tablespoon of oil in a large oven-safe skillet over medium-high heat. Place the chicken thighs skin-side down in the skillet. Sear for about 5-7 minutes until the skin turns crispy and golden. - Baking instructions for optimal results: After searing, flip the chicken thighs over. Pour the honey mustard mixture on top, coating them evenly. Transfer the skillet to the preheated oven. Bake for 25-30 minutes. The chicken should reach an internal temperature of 165°F (75°C). - Resting time for chicken: Once baked, let the chicken rest for 5 minutes before serving. This resting time helps the juices settle, making the chicken more tender. - Serving suggestions: Garnish the chicken with freshly chopped parsley for a pop of color. Serve with your favorite sides, like roasted veggies or rice. This meal is a treat for any occasion! To get that crispy skin, start by patting the chicken thighs dry. This step removes moisture and helps the skin crisp up nicely. Next, use a hot skillet for searing. Heat a tablespoon of oil until it shimmers. Place the chicken thighs skin-side down and cook for 5-7 minutes. This browns the skin, making it golden and crunchy. Feel free to change the glaze! If you want a sweeter taste, add more honey. If you like heat, try adding a pinch of cayenne pepper or hot sauce. For Dijon mustard, you can swap it with honey mustard or whole grain mustard. Each will give a unique flavor twist. One big mistake is overcooking the chicken. Use a meat thermometer to check for doneness. The internal temperature should be 165°F (75°C). Another mistake is not seasoning enough. Make sure to season both sides with salt and pepper. This simple step boosts the flavor of your chicken. {{image_2}} You can make your meal even better by adding veggies. Roasting vegetables alongside the chicken adds flavor and nutrients. Try carrots, potatoes, or green beans. These veggies pair well with the sweet and tangy glaze. Cut them into uniform sizes for even cooking. You can change how you cook honey mustard chicken thighs. Grilling adds a nice smoky flavor. Just marinate the chicken in the honey mustard mix before grilling. Cook on medium heat until done. Slow cooking is another great option. Place the chicken in a slow cooker with the sauce. Cook on low for 6-8 hours for tender, juicy meat. If you don't have chicken thighs, you can use other proteins. Bone-in chicken breasts work well too. You can also try pork chops or turkey thighs. Adjust the cooking time based on the thickness of the meat. For fish lovers, salmon fillets can be a great swap. Just be careful, as fish cooks much faster than chicken. To keep your honey mustard chicken thighs fresh, use airtight containers. Glass or plastic containers with tight lids work best. Make sure to let the chicken cool before sealing it. This helps avoid steam buildup and soggy skin. When reheating, use an oven or skillet for the best results. Preheat your oven to 350°F (175°C). Place the chicken on a baking sheet and cover it with foil. Heat for about 15-20 minutes. This keeps the skin crispy and the meat juicy. If using a skillet, add a splash of water. Cover it and warm over low heat for about 10-15 minutes. You can freeze cooked or uncooked chicken thighs. If freezing cooked chicken, wrap it tightly in plastic wrap and then foil. This prevents freezer burn. When you’re ready to eat, thaw in the fridge overnight. For raw chicken, place it in a freezer bag. Remove as much air as you can. Thaw it in the fridge before cooking. This keeps the meat safe and maintains its quality. Yes, you can prepare honey mustard chicken thighs ahead of time. To do this, follow these steps: - Make the honey mustard glaze and coat the chicken thighs. - Place the chicken in a sealed container. - Store it in the fridge for up to 24 hours. This way, you save time on cooking day. When ready, just bake it as directed. Many sides go great with this dish. Here are some popular options: - Steamed broccoli - Roasted carrots - Garlic mashed potatoes - Quinoa salad These sides balance the flavors of the chicken and add nutrition. If you lack Dijon mustard, don’t worry! You can use these substitutes: - Yellow mustard for a milder taste. - Honey mustard for added sweetness. - Whole grain mustard for a crunchy texture. Adjust the other flavors in the glaze to match your choice. To check if the chicken is ready, use a meat thermometer. Insert it into the thickest part of the thigh. The safe internal temperature for chicken is 165°F (75°C). This ensures your meal is safe and juicy. Yes, this recipe is perfect for meal prep! Here are some tips: - Cook a batch of chicken thighs and let them cool. - Divide them into meal containers with your chosen sides. - Store in the fridge for up to four days. This makes it easy to enjoy a tasty meal throughout the week. In this article, we explored how to make honey mustard chicken thighs. We discussed essential ingredients, like the chicken, honey, and Dijon mustard. We also covered preparation, cooking steps, and tips for crispy skin. Furthermore, we highlighted storage and reheating methods. This dish offers tasty options and is fun to prepare. With simple adjustments, you can make it your own. Use these guidelines for a delicious meal that satisfies everyone. Enjoy cooking and sharing this delight!

Honey Mustard Chicken Thighs Delicious and Juicy Meal

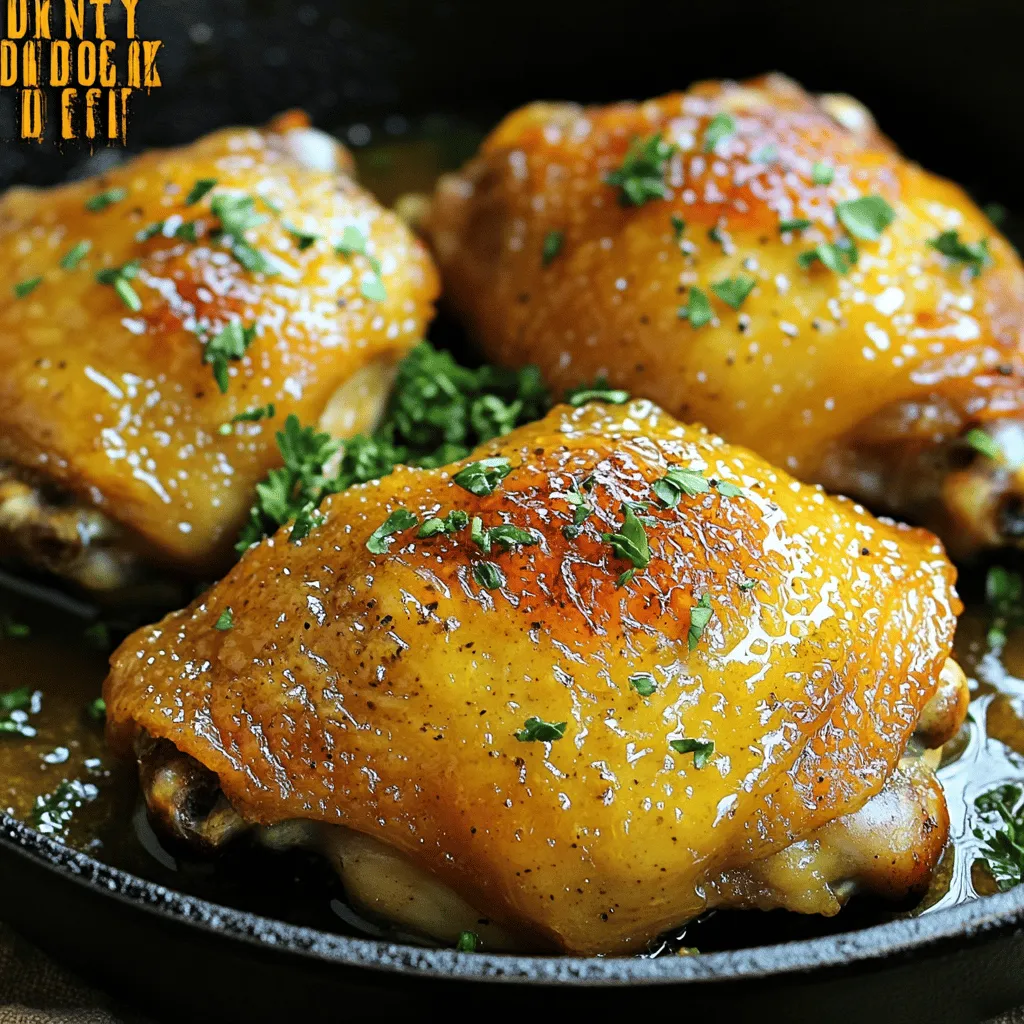
Ready to impress at dinner with a dish that’s both easy and mouthwatering? Honey mustard chicken thighs are your answer!

- 1 cup Oreo cookie crumbs - 4 tablespoons unsalted butter, melted - 8 oz cream cheese, softened - 1/2 cup powdered sugar - 1 teaspoon vanilla extract - 1 cup whipped cream (store-bought or homemade) - 6 Oreo cookies, chopped for filling - 1/2 cup chocolate chips (for drizzling) You can swap cream cheese with Greek yogurt for a lighter option. For a vegan choice, use coconut cream instead of whipped cream. If you need gluten-free options, try gluten-free Oreo cookies. These swaps keep the dessert tasty and fun while catering to different diets. 1. Combining Oreo crumbs and butter In a medium bowl, mix 1 cup of Oreo cookie crumbs with 4 tablespoons of melted butter. Stir until it looks like wet sand. This will be the base for our bites. 2. Preparing the mini muffin pan Line a mini muffin pan with mini cupcake liners. Take about 1 tablespoon of the cookie mixture. Press it into each liner firmly. Make sure it is packed down well for a solid crust. 1. Mixing cream cheese and powdered sugar In a large bowl, beat 8 oz of softened cream cheese until smooth. Use an electric mixer for this step. Add 1/2 cup of powdered sugar and 1 teaspoon of vanilla extract. Mix until combined well. 2. Folding in whipped cream and chopped Oreos Gently fold in 1 cup of whipped cream into the cream cheese mixture. Be careful not to deflate it. Next, add in 6 chopped Oreo cookies. Fold until they are evenly mixed in. 1. Filling the crust with cheesecake mixture Spoon the cheesecake filling into each crust until it’s full. You can also pipe it in for a neater look. If needed, use a spatula to smooth the tops. 2. Freezing time and tips Place the filled muffin pan in the freezer for at least 2 hours. This helps the bites set properly. For extra flavor, you can drizzle melted chocolate on top after they freeze. To get the right texture for your Oreo cheesecake bites, start with softened cream cheese. This helps create a smooth filling. Beat it well until it's creamy and free of lumps. When you fold in the whipped cream, do it gently. This keeps the mixture light and airy. For the chocolate drizzle, melt chocolate chips carefully. Stir every few seconds to avoid burning. Aim for a smooth consistency that flows easily. One common mistake is overmixing the cream cheese. This can make it too dense. Mix just until smooth. Another mistake is not compressing the crust well enough. If the crust is loose, it may crumble when you serve. Press it down firmly with a spoon or your fingers to make it solid. For garnishing, add extra chopped Oreos on top. You can also sprinkle cocoa powder for a nice touch. Serve these bites chilled for the best taste. When it comes to drinks, pair them with milk or coffee. They balance the sweetness perfectly and make each bite even more enjoyable. {{image_2}} You can switch up the flavors easily. Try using mint Oreos for a fresh twist. The mint flavor adds a nice zing to the creamy cheesecake. You can also mix in peanut butter for a rich taste. Simply fold in 1/4 cup of creamy peanut butter into the filling. It blends well with the cream cheese. For a chocolate lover's dream, add cocoa powder to the mix. Just a couple of tablespoons will enhance the chocolate flavor. If you want low-sugar bites, swap out the powdered sugar with a sugar substitute. This keeps the sweetness without all the sugar. For a dairy-free option, use vegan cream cheese and coconut whipped cream. These substitutes work well and keep the bites creamy. They still taste amazing, even without dairy! Serving style can change how your bites look. You can use mini mason jars for a cute touch. Layer the crust and filling inside for a fun view. For a party, place them on a large platter and decorate with sprinkles or chocolate shavings. Bite-sized desserts are perfect for events. You can make them smaller by using a mini muffin tray. This way, everyone can enjoy a little treat! To keep your Oreo Cheesecake Bites fresh, store them in an airtight container. Place parchment paper between layers to prevent sticking. You can store them in the refrigerator for easy access. If you want them to last longer, freeze them. For freezing, wrap each bite in plastic wrap before placing them in a freezer-safe container. This keeps them fresh and tasty. Oreo Cheesecake Bites last about five days in the fridge. In the freezer, they can last up to three months. Check for signs of spoilage before eating. If you notice any off smells or a change in texture, it's best to discard them. Fresh bites should feel firm but not hard. If you freeze your cheesecake bites, thaw them safely in the fridge overnight. Avoid thawing them at room temperature to keep them safe. Once thawed, serve them chilled for the best taste. You can drizzle some extra melted chocolate on top for a fun touch! You can easily mix by hand. First, use a sturdy bowl and a spatula. Start with softened cream cheese. Mix until smooth. Then, add the powdered sugar and vanilla. Keep stirring until everything is well combined. Finally, gently fold in the whipped cream and chopped Oreos using the spatula. This method takes a bit of effort, but it will work well! Yes! You can use many cookie types. Try golden Oreos for a lighter taste. Chocolate chip cookies add a fun twist. If you like mint, mint Oreos are a great choice. Even gluten-free cookies work well. Just crush them up as you would the regular Oreos. Serve these bites on a nice platter. Add some chopped Oreos on top for flair. A sprinkle of cocoa powder looks fancy too. Serve them chilled for the best flavor. You could even place them in mini cupcake liners for a cute touch! After freezing for at least 2 hours, check the bites. They should feel firm to the touch. If they are still soft or wobble, they need more time. Once they are set, they are ready to enjoy! Absolutely! You can make Oreo Cheesecake Bites a day ahead. Just store them in the freezer. Before serving, let them thaw in the fridge for a bit. This way, they stay fresh and tasty! You now have all the steps and tips needed to make Oreo Cheesecake Bites. Remember the key ingredients, like the creamy filling and crunchy crust. Explore variations and substitutions to suit your tastes. Always keep storage tips in mind for freshness. These bites are fun, easy, and perfect for any gathering. Trust me, they will impress everyone! Enjoy creating and sharing this delightful treat with your friends and family. Happy baking!

Oreo Cheesecake Bites Irresistible Dessert Delight

Are you ready to indulge in a sweet treat that’s easy to make? Oreo Cheesecake Bites combine creamy cheesecake and

- 2 medium sweet potatoes, peeled and diced - 1 can (15 oz) black beans, drained and rinsed - 1 can (14.5 oz) diced tomatoes (with juices) - 1 cup vegetable broth - 1 large onion, chopped - 2 cloves garlic, minced - 1 red bell pepper, chopped - 1 green bell pepper, chopped - 1 tablespoon chili powder - 1 teaspoon cumin - 1 teaspoon smoked paprika - ½ teaspoon salt - ½ teaspoon black pepper - 1 tablespoon olive oil - Fresh cilantro, for garnish - Avocado slices, for serving (optional) Sweet potatoes are rich in vitamins A and C. They boost your immune system and help your skin. Black beans provide protein and fiber, keeping you full. They also support heart health. Tomatoes are full of antioxidants that protect your cells. Onions and garlic can improve heart health and fight inflammation. Bell peppers add vitamins A and C, making this dish even healthier. If you can't find sweet potatoes, try using butternut squash. You can swap black beans for kidney beans. If you want a lower sodium option, use low-sodium vegetable broth. For a milder taste, use yellow bell peppers instead of red or green. If you prefer fresh tomatoes, use about 2 cups chopped tomatoes instead of canned. First, gather all your ingredients. You need sweet potatoes, black beans, diced tomatoes, and more. This makes cooking easier. Peel and dice the sweet potatoes. Chop the onion and bell peppers. Mince the garlic. This prep takes about 15 minutes. Heat olive oil in a large pot over medium heat. Add chopped onion and sauté for 5 minutes. The onion should be soft and clear. Next, add minced garlic and both bell peppers. Cook them for 3 to 4 minutes until they are soft. Now, stir in the spices: chili powder, cumin, smoked paprika, salt, and black pepper. Cook this mix for about 1 minute. It will smell great! Add the diced sweet potatoes, black beans, diced tomatoes, and vegetable broth. Mix everything well. Bring the chili to a boil. Once boiling, reduce heat to low and cover the pot. Let it simmer for 25 to 30 minutes. Stir it occasionally to stop sticking. After 30 minutes, check if the sweet potatoes are soft. Taste the chili and adjust the seasoning if needed. If you want it thicker, let it simmer uncovered for 5 to 10 more minutes. Serve the chili hot. Add fresh cilantro on top and avocado slices if you like. Enjoy your hearty meal! To boost the flavor of your chili, try these tips: - Use fresh spices. Fresh spices give a rich taste. - Add a squeeze of lime juice. This brings brightness to the dish. - Stir in a spoonful of maple syrup. It adds a nice sweetness. - Toss in some chopped jalapeños for heat. Adjust it to your taste. - Consider adding a dash of hot sauce. This can bring a new kick. Serve your chili in fun ways: - Top with fresh cilantro. It adds a burst of flavor. - Add slices of avocado on top. This gives a creamy texture. - Serve with warm corn tortillas. They are great for dipping. - Pair your chili with a side salad. It keeps the meal light. - Try it over rice or quinoa. This makes it heartier. Avoid these mistakes for the best chili: - Don’t skip the sautéing step. It builds flavor in the base. - Avoid overcooking the sweet potatoes. They should be tender, not mushy. - Don’t forget to taste as you go. Adjust the spices to your liking. - Avoid using canned beans without rinsing. This helps reduce sodium. - Don’t rush the simmering time. Letting it simmer helps flavors meld. {{image_2}} You can boost the protein in Sweet Potato Black Bean Chili. Tofu and tempeh are great choices. Cut tofu into small cubes. Sauté it with the onions and peppers for added flavor. Tempeh also works well. Crumble it and add it when you stir in the sweet potatoes. Both options make the chili heartier and more filling. If you like heat, make a spicy version. Add chopped jalapeños or serrano peppers. You can mix these in with the onions and peppers. For a smoky kick, add cayenne pepper or crushed red pepper flakes. Adjust the amount based on your spice level. You’ll enjoy a warming bowl that packs a punch! Serving the chili over rice or quinoa adds texture and makes it more filling. Cook the rice or quinoa while the chili simmers. Serve a scoop of chili on top of the grains. This combo makes a complete meal. Plus, the grains soak up the chili’s rich flavors. Enjoy this hearty and healthy dish any night of the week! To keep your sweet potato black bean chili fresh, let it cool first. Once cool, pour it into an airtight container. Store it in the fridge for up to five days. This meal tastes even better the next day as the flavors mix. You can freeze this chili for later. Use a freezer-safe container or a zip-top bag. Leave some space for expansion. It will keep well for up to three months. When you’re ready to eat, just thaw it in the fridge overnight. Reheat the chili on the stove over medium heat. Stir it often to keep it from sticking. You can also use a microwave. Heat it in short bursts, stirring in between. Add a splash of vegetable broth if it’s too thick. Enjoy your meal hot! Yes, you can! To make this chili in a slow cooker, start by sautéing the onion, garlic, and peppers in a pan. This step builds flavor. Then, add all the ingredients to the slow cooker. Stir well to mix everything. Cook on low for about 6 to 8 hours or on high for 3 to 4 hours. The sweet potatoes will become tender, and the flavors will meld beautifully. Yes, this recipe is gluten-free. All the ingredients are naturally gluten-free. The black beans, sweet potatoes, and spices do not contain gluten. Just be sure to check the labels on your vegetable broth and canned goods. Some brands may add gluten as a thickener. This chili lasts about 4 to 5 days in the fridge. Store it in an airtight container to keep it fresh. Make sure it cools down before you put it in the fridge. If you want to keep it longer, consider freezing it. This blog post covered the key ingredients, step-by-step cooking, and helpful tips for Sweet Potato Black Bean Chili. You learned about healthy ingredients and substitutions. I also shared ways to boost flavor and avoid common mistakes. Remember, you can easily adjust the recipe for your taste and diet. Store leftovers properly to enjoy them later. With these details, you'll create a delicious dish that you can proudly serve. Enjoy your cooking journey!

Sweet Potato Black Bean Chili Hearty and Healthy Meal

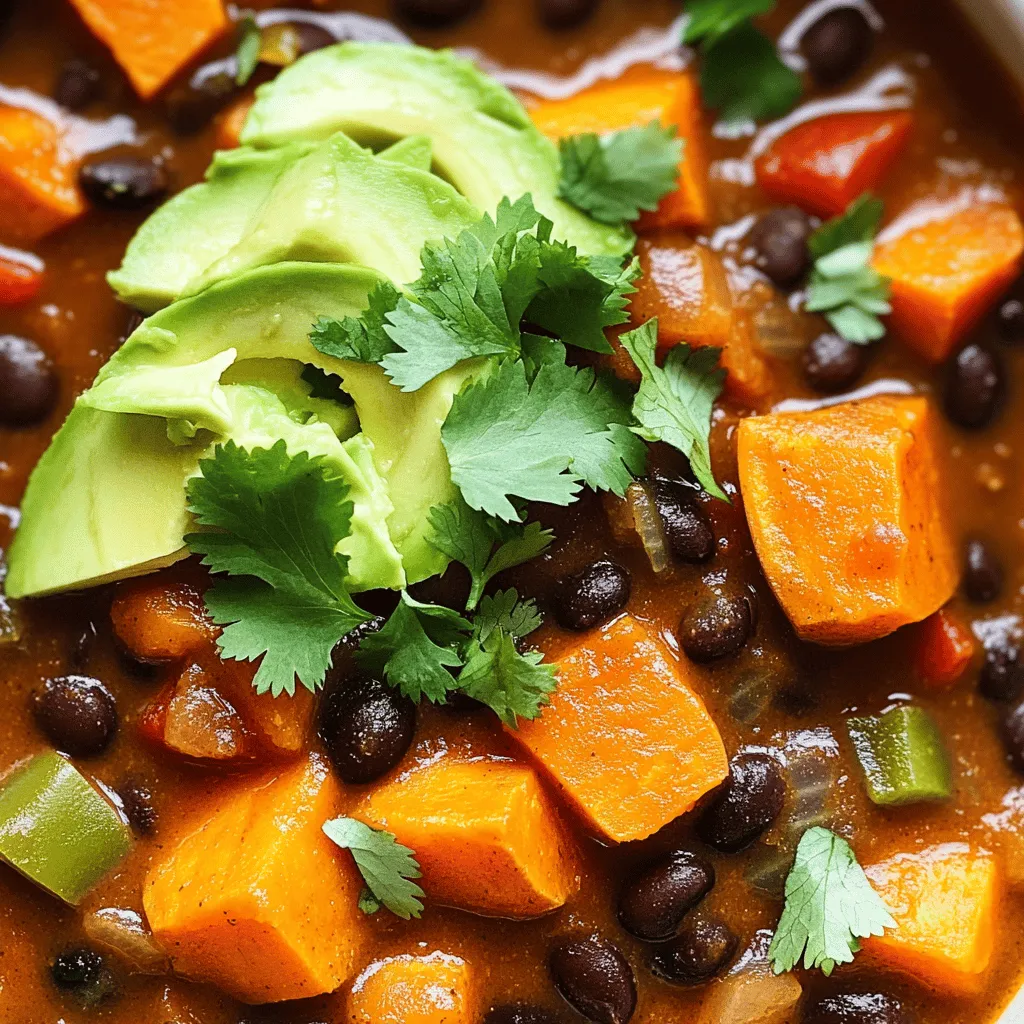
Are you ready to warm your soul with a delicious bowl of Sweet Potato Black Bean Chili? This hearty and

- 1 large apple (Granny Smith or Honeycrisp) - 1 banana (frozen) - 1/2 cup rolled oats - 1/4 teaspoon ground cinnamon - 1/4 teaspoon nutmeg - 1 cup almond milk (or milk of choice) - 1 tablespoon maple syrup (optional) - 1 tablespoon almond butter (optional) - A handful of ice cubes To create the perfect apple pie smoothie, start with fresh produce. Choose a large apple, like Granny Smith or Honeycrisp. These apples give the smoothie a crisp bite and a sweet-tart flavor. Next, grab a frozen banana. Frozen bananas add creaminess and sweetness, making your smoothie rich and delightful. For dry ingredients, rolled oats are key. They provide fiber and help thicken the smoothie. The ground cinnamon and nutmeg add that iconic apple pie flavor. Just a pinch of each will do. When it comes to liquids, almond milk works great. You can use any milk you like. For added sweetness, consider maple syrup. It gives the smoothie a lovely touch. If you want a creamier texture, almond butter is a wonderful choice. Lastly, don’t forget the ice cubes. They chill the smoothie, making it refreshing and enjoyable. To make your apple pie smoothie, start with the apple. Choose a large apple, like a Granny Smith or Honeycrisp. First, core the apple. This means removing the seeds and the center. Then, chop it into small pieces. This helps it blend better. Next, grab a banana. Use a banana that is already frozen. If you don't have one, peel a ripe banana and place it in the freezer for a few hours. This gives the smoothie a creamy texture and a cool taste. Now it's time to blend! In a blender, add the chopped apple, frozen banana, and rolled oats. Next, pour in one cup of almond milk. This adds a nice creaminess. Then, sprinkle in 1/4 teaspoon of ground cinnamon and 1/4 teaspoon of nutmeg. These spices give the smoothie that warm apple pie flavor. If you want a sweeter taste, add one tablespoon of maple syrup and one tablespoon of almond butter. The almond butter adds extra creaminess and flavor. Blend everything on high until smooth. You might need to stop and scrape the sides down. This helps mix everything well. Do you like your smoothie thicker? If yes, add a handful of ice cubes. Blend again until it reaches your favorite thickness. After blending, taste your smoothie. If you want it sweeter, add more maple syrup. This step lets you customize the flavor just for you. Using a frozen banana is key. It adds a thick, creamy feel. A frozen banana makes your smoothie cold and refreshing. Plus, it blends well, giving a nice texture. Always peel the banana before freezing. This makes it easier to blend later. Almond butter is another great choice for creaminess. It adds healthy fats and protein. This makes your smoothie more filling. Almond butter also adds a nutty flavor that pairs well with apples. If you want a creamier smoothie, consider adding more almond butter. You can enhance the flavor with extra spices. Try adding a pinch of ginger for a warm kick. Cloves can also add depth. Feel free to experiment with what you love. Make it your own! For dietary needs, you have options. If you are nut-free, use sunflower seed butter instead of almond butter. You can swap almond milk for oat milk if you want. These simple changes can still give you a great taste. Garnishing with cinnamon makes your smoothie look nice. Just sprinkle a little on top before serving. It also adds a lovely aroma. For serving, use a tall glass to show off the creamy color. You can also add a straw for a fun touch. Try placing a slice of apple on the rim for a decorative look. It makes the drink feel special and inviting. {{image_2}} You can easily make this smoothie dairy-free. Simply swap almond milk for coconut milk. Coconut milk adds a rich, creamy taste. It pairs well with apple and spices. You can also use plant-based protein powders. They boost protein without dairy. Look for powders made from peas or brown rice. These options keep your smoothie smooth and tasty. Want to mix it up? You can add other fruits like pears or peaches. They bring new flavors and sweetness. For a health boost, try adding spinach or kale. These greens add nutrients without changing the taste much. You won’t even notice them! Just a small handful works well. If you want to adjust the sweetness, there are many options. Try natural sweeteners like honey or agave syrup. They offer a different kind of sweetness. You can also use flavored yogurt instead of maple syrup. A cinnamon or vanilla yogurt adds extra flavor. This way, you can control how sweet you want your smoothie. To keep your apple pie smoothie fresh, store it in the fridge right away. Use an airtight container to trap moisture and flavors. Glass jars or BPA-free plastic containers work well. If you plan to drink it later, pour it into a mason jar for easy transport. Leave a little space at the top to allow for expansion. You can freeze the smoothie if you have leftovers. Pour it into ice cube trays or freezer bags. When you're ready to enjoy it again, take out the cubes and place them in a blender. Blend until smooth. This method keeps flavors intact and gives you a quick snack. To make ahead, blend the smoothie, pour it into containers, and freeze. Your smoothie lasts about 2 days in the fridge. After that, it may lose flavor and texture. Check for changes in smell or color. If it smells sour or looks off, it’s time to toss it. Always trust your senses to keep your food safe. An apple pie smoothie packs a punch of health. Here are the key benefits: - Nutritional highlights: This smoothie gives you fiber from oats and apples. It has potassium from bananas, keeping your heart happy. Almond milk adds calcium for strong bones. - Impact on digestion and energy: The fiber helps your tummy. It keeps you feeling full and aids digestion. Plus, the natural sugars from fruits give you a quick energy boost. Yes, you can prep this smoothie ahead. Here’s how: - Preparation tips and timing: Blend the smoothie and store it in the fridge for up to 24 hours. Use an airtight container. Just give it a shake before you drink it. If you want to make it even faster, chop the apple and freeze it. You can easily modify this recipe: - Options for vegans, gluten-free, or low-carb diets: For a vegan option, use almond milk. For gluten-free, ensure your oats are certified gluten-free. For low-carb, swap the banana for avocado for creaminess without the carbs. This blog post shared a simple apple pie smoothie recipe. We explored fresh and dry ingredients, plus optional add-ins. You learned how to prepare, blend, and enhance the smoothie’s flavors. We also covered variations for dietary needs. Storing tips helped you keep your smoothie fresh. Enjoy making and customizing this healthy treat. It’s a fun way to boost your nutrition. A tasty apple pie smoothie can fit into any diet, so blend away!

Apple Pie Smoothie Delightful Creamy Flavor Boost

Looking for a tasty and healthy treat? Dive into my Apple Pie Smoothie! This refreshing drink brings the warm flavors

- 1 can of refrigerated crescent roll dough - 1/2 cup chocolate hazelnut spread - 1/4 cup chopped hazelnuts (toasted if desired) - 1 egg (for egg wash) - 1 tablespoon milk - Powdered sugar (for dusting) - A pinch of sea salt - You can use almond butter or peanut butter instead of chocolate hazelnut spread. - Try walnuts or pecans in place of hazelnuts for a different crunch. - For a dairy-free egg wash, use a mixture of water and oil. These ingredients come together to create a treat that warms the heart. Each bite offers a mix of soft dough, rich chocolate, and crunchy nuts. You can easily swap ingredients to make these crescents fit your taste. Using different spreads or nuts can change the flavor in fun ways. 1. Preheating the oven and preparing the baking sheet First, heat your oven to 375°F (190°C). This step ensures that your crescents bake evenly. While the oven heats, line a baking sheet with parchment paper. This keeps the crescents from sticking and makes cleanup easy. 2. Unrolling and separating the crescent roll dough Next, grab your can of refrigerated crescent roll dough. Open the can carefully to avoid a surprise pop! Unroll the dough on a clean surface. You’ll see that it separates into triangles. Make sure to keep them distinct, as you will fill each one. 1. Adding filling to the dough triangles Now comes the fun part! Take a generous teaspoon of chocolate hazelnut spread and place it at the wide end of each triangle. Don’t be shy; you want a nice, gooey center! Then, sprinkle a few chopped hazelnuts on top. This adds crunch and flavor. Finally, add a pinch of sea salt to enhance the sweetness. 2. Rolling and sealing the crescents Starting at the wide end, roll each triangle toward the tip. Make sure to tuck the filling inside as you go. Press the edges lightly to seal them. This step keeps the yummy filling from leaking out while baking. 1. Applying egg wash and baking time In a small bowl, whisk together one egg and one tablespoon of milk. This mixture is called egg wash. Brush it over the tops of your crescents. This gives them a nice golden color as they bake. Place the stuffed crescents on your prepared baking sheet, leaving space between each one. 2. Cooling and dusting with powdered sugar Bake the crescents in your preheated oven for 12-15 minutes. Keep an eye on them until they turn golden brown and puff up. Once baked, remove them from the oven and let them cool for a few minutes. Just before serving, dust the tops with powdered sugar for a sweet finish. To make your Chocolate Hazelnut Stuffed Crescents great, start with the right oven temp. Preheat your oven to 375°F (190°C). This temperature helps the dough puff up nicely. Bake them for 12-15 minutes. Watch for a golden color; it means they are ready! To get a flaky texture, do not rush. Allow enough space between each crescent on the baking sheet. This space lets hot air flow. It helps them bake evenly and rise well. When serving, make it look pretty! Place the crescents on a rustic wooden board. You can also use a bright plate to make colors pop. Add fresh berries or mint leaves for a lovely touch. Pair your crescents with a glass of cold milk, coffee, or even hot chocolate. Each bite is better with a drink to balance the sweet flavors. Many people overfill their crescents. This can cause the filling to ooze out while baking. Stick to a generous teaspoon of chocolate hazelnut spread. Trust me, it is enough! Also, sealing the edges is key. If they are not sealed well, the filling escapes. Gently press the edges together after rolling. This step ensures a delicious surprise inside each bite. {{image_2}} You can change up the flavor of your Chocolate Hazelnut Stuffed Crescents in fun ways. Try using different chocolate spreads like white chocolate or dark chocolate. Each option gives a new taste twist. You can also infuse flavors with spices or extracts. A dash of cinnamon or a splash of vanilla can add warmth and depth to your treat. For those with dietary needs, there are easy swaps. Use gluten-free crescent roll options to make this treat safe for everyone. Many brands offer gluten-free dough that works just as well. For a vegan version, look for egg-free dough and a plant-based chocolate spread. These changes let more people enjoy these delicious crescents. The filling is where you can get really creative! Try adding fruits like sliced bananas or berries for a fresh pop. Cream cheese adds a rich and tangy flavor, too. You can even mix in some peanut butter for a nutty twist. The options are endless, and each one can make your crescents unique and tasty. To keep your Chocolate Hazelnut Stuffed Crescents fresh, place them in an airtight container. This will help prevent them from drying out. You can store them in the fridge for up to three days. If you want to keep them longer, consider freezing them. Just make sure to wrap each crescent well in plastic wrap before placing them in a freezer bag. They can last in the freezer for about a month. To reheat your crescents, the best method is to use an oven. Preheat your oven to 350°F (175°C). Place the crescents on a baking sheet and cover them loosely with foil. Bake for about 10 minutes. This will warm them through without making them soggy. If you want to restore their crispiness, remove the foil for the last few minutes of baking. You can also use an air fryer for a quick reheat. Set it to 350°F (175°C) and heat for 5 to 7 minutes. This will give them a nice crunch. Enjoy your delicious treats warm! It takes about 10 minutes to prep and 12-15 minutes to cook. The total time is around 25 minutes. You can enjoy these tasty treats in no time! Yes, you can freeze them! After baking, let them cool completely. Place them in an airtight container or freezer bag. They can last up to two months in the freezer. To thaw, just leave them in the fridge overnight or warm them in the oven at 350°F for a few minutes. You can serve them with fresh berries, whipped cream, or a scoop of ice cream. A drizzle of chocolate sauce also adds a fun touch. Pair them with coffee or tea for a lovely afternoon snack! You can find them at local bakeries or specialty stores that offer gourmet treats. Some grocery stores also carry pre-made options in their bakery section. Check online for local delivery or order from bakeries that ship nationwide. This blog post covered how to make Chocolate Hazelnut Stuffed Crescents. We explored each ingredient, from crescent dough to hazelnuts. You learned step-by-step how to prepare, assemble, and bake. I shared tips to avoid mistakes and variations to suit your taste. In summary, these crescents are easy to make and fun to customize. Enjoy serving them at any gathering or treat yourself! Happy baking!

Chocolate Hazelnut Stuffed Crescents Irresistible Treat

Welcome to your new favorite dessert—Chocolate Hazelnut Stuffed Crescents! These warm, flaky treats are perfect for any occasion. With just

Older posts
Newer posts
← Previous Page1 … Page38 Page39 Page40 … Page84 Next →

dsad

© 2026 Lisa Dishes • Built with GeneratePress

Our Policies

  • Copyright Policy
  • Cookie Policy
  • GDPR Policy
  • Privacy Policy
  • Disclaimer
  • Terms Of Use

More Information

  • Home
  • About
  • Contact
  • Appetizers
  • Dessert
  • Dinner
  • Drinks
©2026, Lisa Dishes About Back To Top