Skip to content
DisclaimerTerms Of UseGDPR PolicyCookie Policy

Lisa Dishes

  • Home
  • Drinks
  • Appetizers
  • Dinner
  • Dessert
  • About
  • Contact
  • Privacy Policy
DisclaimerTerms Of UseGDPR PolicyCookie Policy

NO-ING-IMG

- 1 cup pumpkin puree - 2/3 cup brown sugar - 1/3 cup granulated sugar - 1/2 cup vegetable oil - 3 large eggs - 1 teaspoon vanilla extract - 1 1/2 cups all-purpose flour - 1 teaspoon baking powder - 1 teaspoon baking soda - 1 teaspoon ground cinnamon - 1/2 teaspoon ground nutmeg - 1/4 teaspoon salt - 1 cup chopped pecans (toasted) - 1/2 cup powdered sugar (for glaze) - 2 tablespoons milk (for glaze) The ingredients for pumpkin pecan coffee cake bring rich flavors. Pumpkin puree provides moisture and a lovely color. The brown and granulated sugars add sweetness and depth. Vegetable oil keeps the cake soft and tender. Eggs help bind the ingredients together. Vanilla extract gives the cake a warm aroma. For the dry mix, we use all-purpose flour, baking powder, and baking soda for lift. Ground cinnamon and nutmeg add warmth and spice. Salt balances the sweetness and enhances the flavors. Finally, toasted pecans add crunch and a nutty taste. For the glaze, you need powdered sugar and milk. This adds a sweet finish to the cake. The glaze makes it look beautiful too! You can adjust the glaze’s thickness by adding more milk or sugar. Gather these ingredients to create a cozy fall treat. Each bite of this cake will remind you of autumn days. Whether with coffee or tea, this cake is perfect for any gathering. Enjoy the cooking process and the delicious results! First, set your oven to 350°F (175°C). This temperature helps the cake rise perfectly. While it warms up, grab a 9-inch round cake pan. Use cooking spray or butter to grease the pan well. This step stops the cake from sticking. In a large bowl, add 1 cup of pumpkin puree. Then, mix in 2/3 cup brown sugar and 1/3 cup granulated sugar. Next, pour in 1/2 cup vegetable oil. Crack in 3 large eggs and add 1 teaspoon of vanilla extract. Whisk everything until it's smooth and well combined. This mix gives the cake its rich flavor. In another bowl, take 1 1/2 cups of all-purpose flour. Add in 1 teaspoon baking powder, 1 teaspoon baking soda, 1 teaspoon ground cinnamon, 1/2 teaspoon ground nutmeg, and 1/4 teaspoon salt. Stir these until they are well mixed. This blend adds structure and taste to your cake. Now, slowly add the dry mix to the wet ingredients. Stir gently until they just come together. Be careful not to overmix; you want it to be light and fluffy. Next, fold in 1 cup of chopped pecans. These nuts add a nice crunch to each bite. Pour the batter into your prepared pan, spreading it out evenly. Bake the cake for 30-35 minutes. To check if it’s done, insert a toothpick in the center. If it comes out clean, your cake is ready. If not, give it a few more minutes. Once baked, let the cake cool in the pan for about 10 minutes. Then, transfer it to a wire rack to cool completely. While it cools, make the glaze. In a bowl, whisk together 1/2 cup powdered sugar and 2 tablespoons of milk. Mix until smooth. Drizzle this glaze over the cooled cake for a sweet finish. To test for doneness, use a toothpick. Insert it in the center of the cake. If it comes out clean, the cake is ready. If not, give it a few more minutes. Avoid overmixing the batter. This can make the cake tough. Mix until just combined, then fold in the pecans gently. This keeps the cake light and fluffy. You can add more spices for extra flavor. Try adding a pinch of ginger or cloves. This will give your cake a warm, cozy taste. You can also experiment with orange zest for a citrusy twist. Serve your coffee cake on a pretty cake stand. Sprinkle extra toasted pecans on top for a nice touch. For a special treat, pair it with a hot cup of coffee or tea. This makes your dessert even more delightful. {{image_2}} If you want a dairy-free glaze, use almond milk or coconut milk. These alternatives work well and keep the cake moist. Mix them with powdered sugar until smooth. This swap keeps the flavor rich without dairy. You can add chocolate chips or cream cheese to the batter. Chocolate chips give a sweet touch that pairs well with pumpkin. Cream cheese adds a rich, tangy flavor. Just fold them in before baking. Either choice will make your coffee cake unique and delicious. For gluten-free options, use almond flour or a gluten-free blend. These flours will keep the cake moist and fluffy. Make sure to adjust the quantity to match your chosen flour. This way, everyone can enjoy this tasty treat, no matter their diet. To keep your pumpkin pecan coffee cake fresh, wrap it tightly in plastic wrap. You can also use an airtight container. This helps keep moisture in and air out. If you plan to store it for more than a few days, freeze it. Cut the cake into slices, then wrap each slice in plastic wrap. Place the wrapped slices in a freezer bag. This way, you can enjoy a slice anytime. To reheat your coffee cake, preheat your oven to 350°F (175°C). Place the cake on a baking sheet. Cover it loosely with aluminum foil to keep it moist. Heat it for about 10-15 minutes. You can also use the microwave. Place a slice on a microwave-safe plate. Heat it for 15-20 seconds. This keeps the cake soft and warm. When stored properly, pumpkin pecan coffee cake lasts for about 4-5 days in the fridge. In the freezer, it can stay fresh for up to 3 months. Just remember, the longer it sits, the more it may lose its flavor and texture. Always check for freshness before serving. Yes, you can use fresh pumpkin. To prepare it, start by cutting a sugar pumpkin in half. Scoop out the seeds and stringy bits. Place the halves cut-side down on a baking sheet. Roast them at 350°F for about 45 minutes, or until tender. After cooling, scoop out the flesh and mash it until smooth. You will need about one cup for the recipe. This fresh pumpkin gives a great taste to your cake. To check if the coffee cake is ready, insert a toothpick into the center. If it comes out clean or with a few crumbs, your cake is done. Another sign is the edges pulling away from the pan. The top should look set and slightly spring back when touched. These tips ensure your coffee cake is perfect every time. Yes, you can prepare the coffee cake in advance. Bake it and let it cool completely. Wrap it tightly in plastic wrap or foil, then store it in the fridge for up to three days. You can also freeze it for longer storage. To serve, simply thaw it overnight in the fridge. This makes it easy to enjoy a tasty treat without the last-minute rush. Pumpkin pecan coffee cake pairs well with many drinks. A hot cup of coffee or tea complements its flavors nicely. You can also serve it with a scoop of vanilla ice cream for a sweet treat. For a refreshing twist, try a glass of apple cider. These options make your coffee cake even more enjoyable. This pumpkin pecan coffee cake is a delight for any occasion. We covered the key ingredients, mixing details, and baking steps to help you succeed. Make it unique with flavor swaps and enhance your presentation skills. Remember to store it well for later enjoyment. With simple techniques and tasty options, you can create a cake that’s both delicious and memorable. Now, roll up your sleeves and get baking!

Pumpkin Pecan Coffee Cake Delicious Fall Dessert Treat

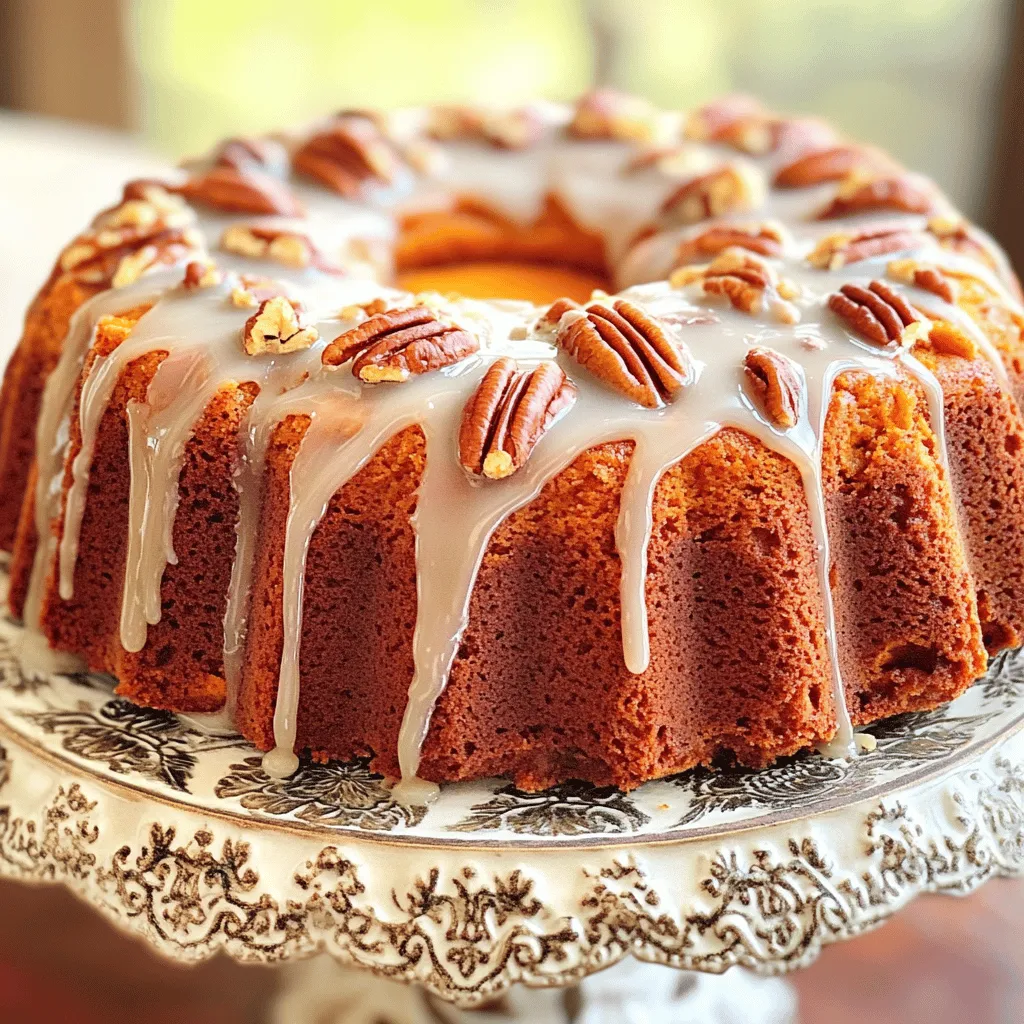
Fall is here, and it’s the perfect time to dive into cozy flavors. This Pumpkin Pecan Coffee Cake combines rich

To make Garlic Butter Shrimp Pasta, gather these key ingredients: - 8 oz spaghetti or linguine - 1 lb large shrimp, peeled and deveined - 4 tablespoons unsalted butter - 4 cloves garlic, minced - 1 teaspoon red pepper flakes - Zest of 1 lemon - 2 tablespoons fresh lemon juice - 1/4 cup fresh parsley, chopped - Salt and pepper to taste - Grated Parmesan cheese for serving (optional) Each ingredient plays an important role. The pasta forms the base, while the shrimp adds protein and flavor. Butter and garlic create a rich sauce, and lemon brightens the dish. Fresh parsley adds color and freshness. Adjust the red pepper flakes to control spice. Parmesan cheese is optional, but it can add a nice touch. Start by boiling a large pot of salted water. Add 8 oz of spaghetti or linguine. Cook it until it feels firm yet tender, about 8-10 minutes. Always check the package for exact times. When done, save 1/2 cup of the pasta water. This water helps mix the sauce later. Drain the pasta and set it aside. Heat a large skillet over medium heat. Melt 2 tablespoons of butter in the pan. Once hot, add 1 lb of large shrimp in a single layer. Cook for 2-3 minutes until they turn pink. Flip the shrimp and cook for another 1-2 minutes. They should be opaque and firm. Remove the shrimp from the skillet and set them aside. In the same skillet, add the rest of the butter. Once it melts, add 4 cloves of minced garlic and 1 teaspoon of red pepper flakes. Sauté for 1-2 minutes. Watch carefully to avoid burning the garlic. You want it fragrant but not brown. This step builds a rich flavor for your sauce. Return the shrimp to the skillet. Add the drained pasta next. Pour in the reserved pasta water, along with the lemon zest and 2 tablespoons of lemon juice. Gently toss everything together. Make sure everything is well mixed. Taste and adjust seasoning with salt and pepper. This step is key to making it delicious. Serve hot, topped with fresh parsley and optional Parmesan cheese. To cook shrimp just right, keep an eye on the time. Overcooking shrimp makes them tough. Cook them for about 2-3 minutes until they turn pink. Then flip them and cook for another 1-2 minutes. They should be bright pink and firm to the touch. For seasoning, a pinch of salt and pepper goes a long way. You can also add lemon juice or zest. This gives shrimp a fresh taste. If you like heat, sprinkle in some red pepper flakes. Just remember to adjust the amount to match your taste. Choosing the right pasta is key. Spaghetti or linguine work well for this dish. Both types hold the sauce nicely. Cook the pasta in a large pot of salted boiling water. Follow the package instructions for timing. Aim for al dente, which means the pasta should be firm but not hard. Remember to reserve some pasta water. This water helps to create a smooth sauce. It can also adjust the sauce's thickness. To make your garlic butter shrimp pasta even better, think about adding spices. Fresh herbs like basil or thyme can add depth. You can also try a dash of paprika or oregano for extra flavor. For a richer sauce, consider adding a splash of white wine. This adds a nice tang and depth. You can also mix in some grated cheese. Parmesan or pecorino can enhance the dish's taste and texture. {{image_2}} You can boost your Garlic Butter Shrimp Pasta with fresh veggies. Spinach and cherry tomatoes are great choices. Add spinach at the same time you mix in the shrimp. For cherry tomatoes, toss them in just before the garlic. They will soften and add a nice pop of color. If you want a change, use chicken or tofu instead of shrimp. For chicken, cut it into small pieces. Cook it until golden brown, about 5-7 minutes. For tofu, use firm tofu and sauté until it’s warm and slightly crispy. Adjust cooking time so your protein cooks well. You can switch the pasta type for variety. Try gluten-free pasta if you need it. Whole grain pasta adds a nutty flavor and is healthier. Different shapes like penne or fettuccine can change the dish's look and taste. Each type holds the sauce differently, so pick your favorite! After a tasty meal, store your leftovers in an airtight container. Glass or plastic containers both work well. Make sure to cool the pasta first. You can keep it in the fridge for up to three days. This keeps the flavors fresh and safe to eat. To reheat without losing taste, use a skillet. Heat it on low and add a splash of water. Stir gently and watch for steam. This method helps avoid overcooked pasta. You can also use the microwave, but do it in short bursts. Stir between each burst to keep the pasta moist. If you want to freeze it, cool the pasta first. Place it in a freezer-safe container. It’s best to eat frozen pasta within three months. When you're ready to eat, thaw it overnight in the fridge. Reheat it gently, adding a bit of water to keep it from drying out. This keeps the flavors intact and makes it just as delicious! It takes about 25 minutes from start to finish. You will spend 10 minutes prepping and 15 minutes cooking. This makes it a quick and easy meal for busy nights. Yes, you can make Garlic Butter Shrimp Pasta ahead of time. Cook the pasta and shrimp, then store them separately. Keep them in airtight containers in the fridge. This dish is great for meal prep! Store the pasta and shrimp in the fridge for up to three days. When you’re ready to eat, just reheat them gently. Yes, frozen shrimp work well! Just thaw them first. You can do this overnight in the fridge or quickly under cold water. This saves time and keeps the dish fresh. I suggest a simple side salad with mixed greens. Garlic bread pairs nicely too. For drinks, a chilled white wine or lemonade can complement the dish well. You now have all the tools to make Garlic Butter Shrimp Pasta. We covered essential ingredients, like shrimp and garlic. The step-by-step instructions help ensure that you cook the shrimp and pasta perfectly. I included tips to enhance your dish and variations for added fun. Remember, storing and reheating your leftovers is key for future meals. With this knowledge, you can create a tasty dish that impresses everyone. Enjoy your cooking adventure and savor each bite!

Garlic Butter Shrimp Pasta Tasty Weeknight Meal

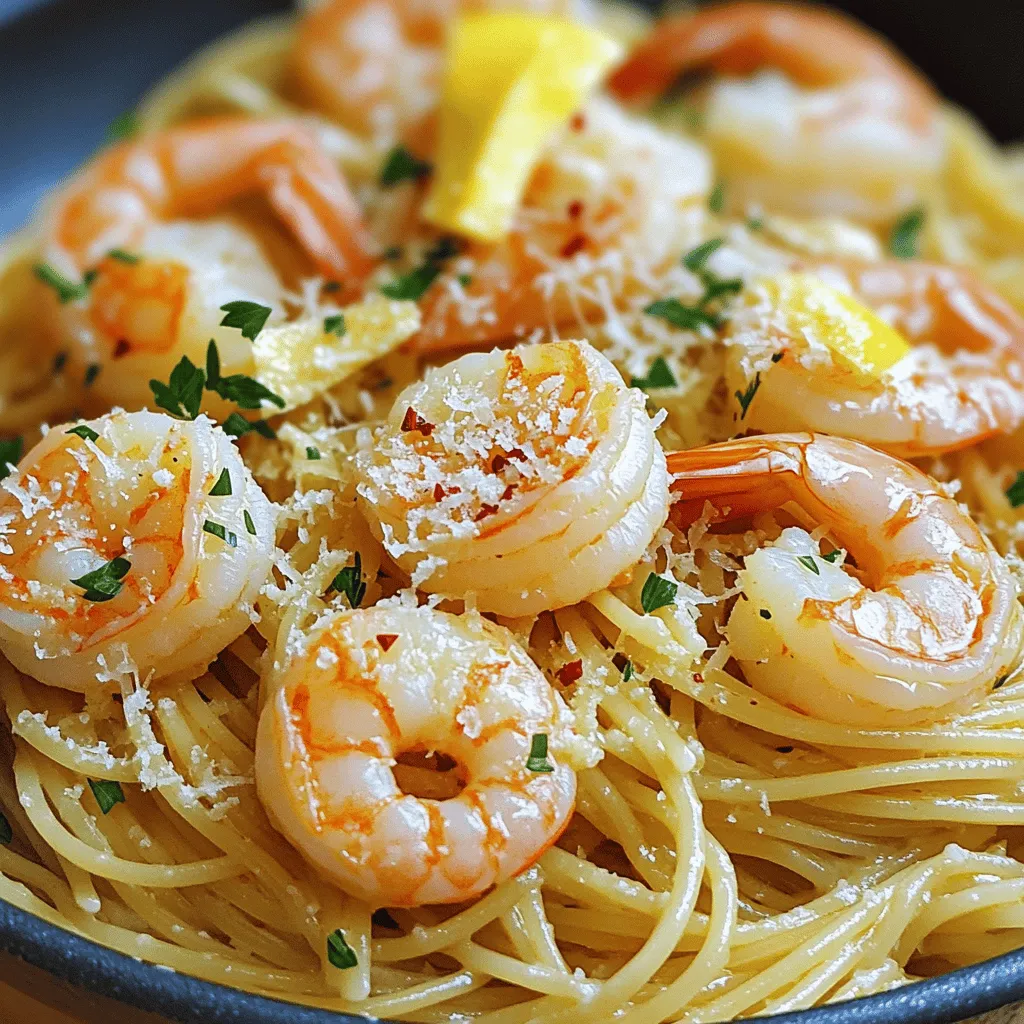
Ready for a quick and tasty dinner? Garlic Butter Shrimp Pasta is the perfect weeknight meal! With just a few

- 1 pound beef sirloin - 3 tablespoons soy sauce - 2 tablespoons oyster sauce - 4 cloves garlic, minced - 1 tablespoon fresh ginger, grated - 1 red bell pepper, sliced - 1 cup broccoli florets - 1 carrot, thinly sliced - 2 green onions, chopped The star of this dish is beef sirloin. It is tender and cooks quickly. Soy sauce and oyster sauce add depth and umami. Garlic and ginger give a fragrant kick. Fresh veggies like bell pepper, broccoli, and carrots make it colorful and healthy. - 1 tablespoon chili paste (adjust for spice level) - Sesame seeds for garnish Chili paste can heat things up, so use it based on your taste. If you like a bit of crunch, sprinkle sesame seeds on top. This adds texture and a nutty flavor. - 2 tablespoons vegetable oil - 1 tablespoon cornstarch Vegetable oil is great for high heat cooking. It helps the beef get nice and brown. Cornstarch is key for a silky sauce. It helps thicken the stir fry and keeps the beef juicy. Gather these ingredients to create a quick, flavorful meal that warms the heart and pleases the palate. To start, we need to marinate the beef to get great flavor. - In a bowl, combine: - 1 pound thinly sliced beef sirloin - 3 tablespoons soy sauce - 2 tablespoons oyster sauce - 1 tablespoon cornstarch - A pinch of black pepper - Mix everything well. Let it sit for about 15 minutes. This helps the beef soak up the flavors. When the beef is ready, it's time to cook it. - Heat 1 tablespoon of vegetable oil in a large skillet or wok on high heat. - Add the marinated beef. Stir-fry for about 3 to 4 minutes. You want it brown and cooked through. - Once browned, remove the beef from the skillet and set it aside. Now, let’s cook the veggies. This is where the color and crunch come in. - In the same skillet, add the remaining tablespoon of vegetable oil. - Quickly add: - 4 cloves minced garlic - 1 tablespoon grated fresh ginger - Stir for about 30 seconds until fragrant. - Then, add: - 1 sliced red bell pepper - 1 cup broccoli florets - 1 thinly sliced carrot - Stir-fry these for 3 to 5 minutes. We want them tender but still crisp. Now, we bring it all together. - Return the beef to the skillet with the veggies. - Add 1 tablespoon of chili paste, adjusting for spice as you like. - Toss everything to coat well and cook for another 2 to 3 minutes. - Taste and adjust seasoning with salt, pepper, or more chili paste if needed. - Finally, stir in chopped green onions. - Serve it up and sprinkle with sesame seeds for a nice touch. - Adjusting spice levels: Start with one tablespoon of chili paste. You can add more if you like it hotter. Taste as you go to find your perfect heat. - Balancing flavors with sauces: Use equal parts soy sauce and oyster sauce. This mix gives a rich, savory taste. If it's too salty, add a splash of water. - Best practices for stir-frying: Use high heat for quick cooking. This keeps the beef juicy and the veggies crisp. Stir constantly for even cooking. - Equipment recommendations: A large skillet or wok works best. A non-stick surface helps prevent sticking. Use a wooden spoon or spatula to toss the ingredients. - Pairing with rice or noodles: Serve the stir fry over steamed jasmine rice. Alternatively, try it with noodles for a different twist. - Presentation ideas: Garnish with chopped green onions and sesame seeds. This adds color and crunch. Use a wide, shallow dish to showcase the vibrant dish. {{image_2}} You can swap beef for chicken or tofu. Both options work well and taste great. - Chicken: Use boneless, skinless chicken breasts, sliced thin. Cook for about 5 minutes. Make sure it reaches a safe temperature of 165°F. - Tofu: Use firm or extra-firm tofu for the best texture. Press it to remove excess water and then cube it. Cook until golden brown, about 5-7 minutes. You can change the veggies based on the season or what you have. Here are some tasty swaps: - Zucchini: Slice it thin and add it for a fresh taste. - Snow Peas: Add these for a sweet crunch. - Mushrooms: They add a nice umami flavor. Mix and match your veggies to find your favorite flavor combos. Feel free to change up the sauces to suit your taste. Try these ideas: - Teriyaki Sauce: For a sweeter twist, swap some soy sauce for teriyaki. - Hoison Sauce: This adds a rich, sweet flavor. - Spice Level: Increase or decrease chili paste based on how spicy you want it. You can also add sriracha or hot sauce for more heat. Experimenting with these variations keeps your meals exciting and tailored to your taste! To store leftover stir-fry, let it cool first. Place it in an airtight container. This keeps the flavors fresh and the beef tender. Store the stir-fry in the fridge for up to three days. Use clear containers to see your food easily. The best way to reheat stir-fry is on the stove. Heat a non-stick skillet over medium heat. Add a splash of water or broth to keep it moist. Stir gently until heated through. Avoid the microwave, as it can make the beef tough. Always check the temperature to ensure it's hot. Yes, you can freeze Spicy Garlic Beef Stir Fry. Use a freezer-safe container or bag. Label it with the date to keep track of freshness. For best quality, eat within three months. To thaw, place it in the fridge overnight. Reheat on the stove as mentioned above. Yes, you can use other cuts for stir-frying. Here are some great options: - Flank steak: It is tender and flavorful. - Ribeye: This cut has good marbling for juiciness. - Sirloin: A lean cut that works well in this dish. - Chuck: This cut is affordable and has good flavor. Using these cuts will change the texture and taste, but they all work well. To make this dish low-carb, swap some ingredients. Here are some ideas: - Use zucchini noodles instead of rice. - Replace carrots with bell peppers or mushrooms. - Skip the cornstarch or use almond flour as a thickener. These changes will keep the flavors while cutting carbs. Soy sauce comes in different types, each with a unique taste: - Light soy sauce: It adds saltiness and enhances flavors. - Dark soy sauce: It gives a richer color and sweetness. - Tamari: This is gluten-free and has a strong flavor. For this recipe, light soy sauce works best for balance. If you prefer a deeper taste, mix in a little dark soy sauce. This blog covered all you need to know about Spicy Garlic Beef Stir Fry. You learned about the key ingredients, cooking steps, and helpful tips for great taste. I shared options to switch proteins or veggies and details on storage. Remember, cooking should be fun and creative. Use these ideas to make this dish your own. Happy cooking!

Spicy Garlic Beef Stir Fry Flavorful Quick Meal

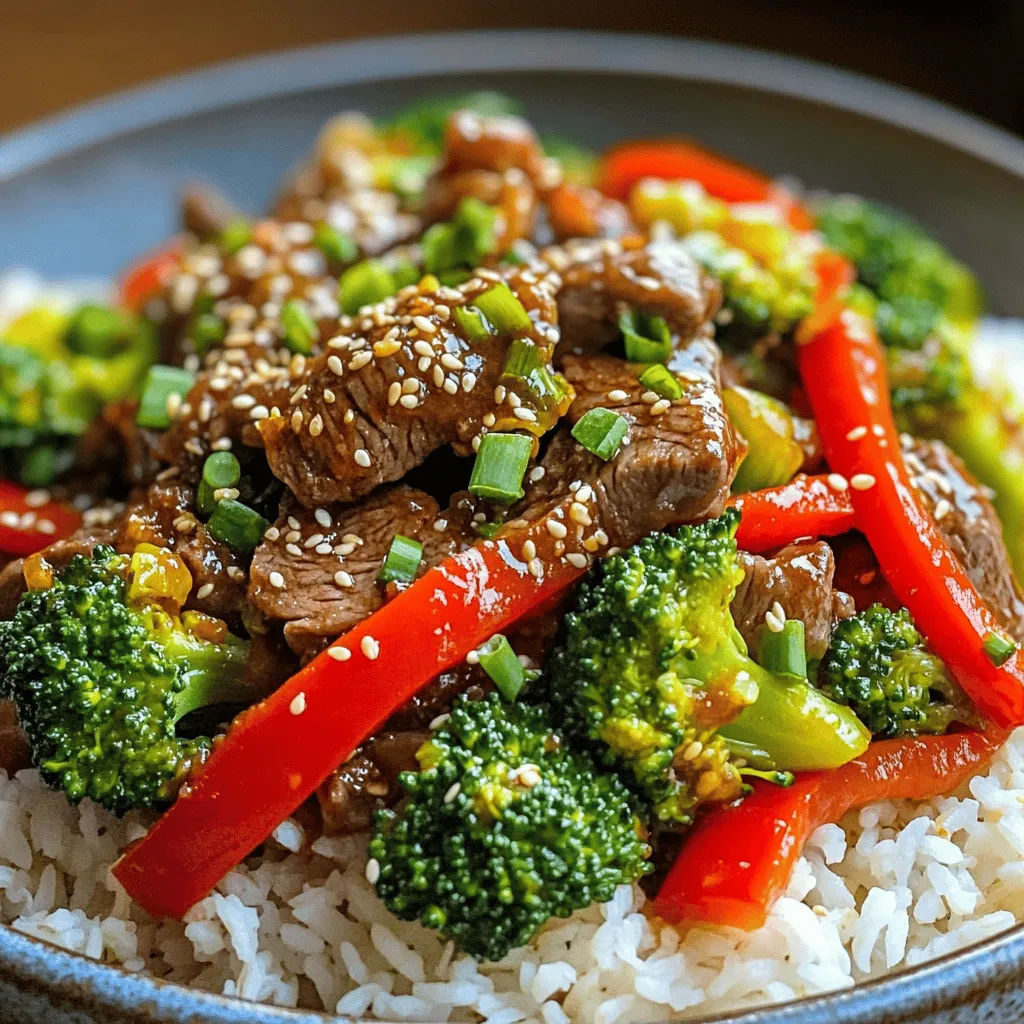
Are you ready to whip up a meal that packs a punch? The Spicy Garlic Beef Stir Fry is just

To make delicious Vanilla Chai Cupcakes, gather these essential ingredients: - 1 ½ cups all-purpose flour - 1 cup granulated sugar - ½ cup unsalted butter, softened - 2 large eggs - 1 teaspoon vanilla extract - 1 teaspoon baking powder - ½ teaspoon baking soda - ½ teaspoon salt - 1 cup buttermilk - 2 teaspoons chai spice blend (cardamom, cinnamon, ginger, cloves) - ½ teaspoon ground nutmeg These ingredients create a soft and flavorful cupcake. The chai spice blend brings warmth and depth to the cupcakes. Accurate measuring is key for great cupcakes. Use dry measuring cups for flour and sugar. For butter, pack it lightly into a measuring cup. This ensures you use the right amount. If you need substitutes, here are a few: - Use whole wheat flour instead of all-purpose flour for a nuttier taste. - Swap buttermilk with regular milk and add a splash of vinegar for acidity. - If you don’t have chai spice, mix equal parts of cinnamon, ginger, and cardamom. These swaps can change your cupcakes but keep them tasty. To elevate your Vanilla Chai Cupcakes, consider these toppings: - Cream cheese frosting adds a tangy flavor. - A simple buttercream frosting is sweet and rich. - For a unique touch, sprinkle extra chai spice on top. You can also garnish with a small cinnamon stick. It adds charm and hints at the flavors inside. {{ingredient_image_1}} Start by gathering your ingredients. Preheat your oven to 350°F (175°C). Line a 12-cup muffin pan with cupcake liners. This makes clean-up easy and helps the cupcakes pop out nicely. In a large bowl, add the softened butter and granulated sugar. Use a mixer to cream them together. Mix until the mixture is light and fluffy. This step is key for airy cupcakes. In a separate bowl, whisk together the all-purpose flour, baking powder, baking soda, salt, chai spice blend, and nutmeg. Mixing these dry ingredients well ensures even flavor in every bite. Gradually add the dry mix to the butter mixture. Alternate with the buttermilk in three parts. Start and end with the flour mix. Mix until just combined. Over-mixing can make the cupcakes dense. Fill each cupcake liner about two-thirds full with batter. Bake in the oven for 18-20 minutes. Check with a toothpick; it should come out clean. Cool in the pan for 5 minutes, then transfer to a wire rack. This helps them cool evenly. To get the best vanilla chai flavor, use a good chai spice blend. I like to mix cardamom, cinnamon, ginger, cloves, and nutmeg. Each spice adds warmth and depth. Adjust the spices based on your taste. If you love cinnamon, add a bit more. Fresh spices work best, so check their freshness before using. One common mistake is not measuring ingredients properly. Always use measuring cups and spoons. Too much flour can make cupcakes dry. Another mistake is overmixing the batter. Mix just until combined to keep your cupcakes light. Lastly, don't skip the cooling step. Let them cool fully before frosting for the best results. Decorating can transform your cupcakes. I suggest using cream cheese frosting for a rich taste. Add a sprinkle of chai spice on top for a lovely look. A small cinnamon stick can add a cute touch. You can even use edible flowers for color. Get creative and make them your own! Pro Tips Use Fresh Spices: For the best flavor, use freshly ground spices in your chai blend. This enhances the aroma and taste of your cupcakes. Room Temperature Ingredients: Ensure your butter, eggs, and buttermilk are at room temperature for a smoother batter and even baking. Don’t Overmix: Mix the batter just until combined to avoid dense cupcakes. Overmixing can lead to a tough texture. Cool Completely: Allow cupcakes to cool completely before frosting to prevent the frosting from melting and losing its shape. {{image_2}} You can easily make these cupcakes gluten-free. Replace all-purpose flour with a good gluten-free blend. Brands like Bob's Red Mill or King Arthur Flour work well. These blends often contain xanthan gum, which helps the cupcakes rise. Adjust baking time slightly, as gluten-free batters can sometimes need a bit longer to bake. Always check for doneness with a toothpick. Frosting is where you can get creative! Cream cheese frosting adds a tangy flavor. It pairs well with the warm spices of the cupcakes. To make it, simply mix cream cheese with butter and powdered sugar. On the other hand, buttercream is sweeter and smoother. It gives a classic look and taste. You can use vanilla or chai spices in either frosting for added flavor. Want to spice things up? You can add more chai spices to the batter. Try increasing the chai spice blend to three teaspoons. You could also add a little vanilla bean paste for a richer taste. Another idea is to fold in chocolate chips for a sweet surprise. The options are endless, and it’s all about what flavors you love! To keep your vanilla chai cupcakes fresh, start with airtight containers. Place them in one container, separated by parchment paper. This keeps them from sticking together. Store them at room temperature if you eat them within two days. If you want them to last longer, go for the fridge. Just remember to let them come to room temperature before serving. This helps restore their soft texture. Freezing these cupcakes is easy. Here’s how you do it: - Cool Completely: Let your cupcakes cool down fully. - Wrap Well: Wrap each cupcake tightly in plastic wrap. This prevents freezer burn. - Use a Container: Place the wrapped cupcakes in a freezer-safe bag or container. - Label and Date: Write the date on the bag. This helps keep track of freshness. You can freeze them for up to three months. When ready, thaw them in the fridge overnight. Homemade vanilla chai cupcakes last about two days at room temperature. If you store them in the fridge, they can last up to a week. Freezing extends their life to three months. Always check for any signs of spoilage before eating. If they smell off or look dry, it’s best to throw them away. Enjoy your treats while they are fresh and tasty! Yes, you can easily make these cupcakes dairy-free. Use plant-based butter or coconut oil instead of unsalted butter. For the buttermilk, mix one cup of almond milk with one tablespoon of vinegar. Let it sit for five minutes to thicken. This swap keeps the cupcakes moist and tasty. A great chai blend includes cardamom, cinnamon, ginger, cloves, and nutmeg. You can buy pre-mixed chai spice or make your own. Just mix equal parts of each spice for a rich flavor. This blend gives the cupcakes their warm, cozy taste. To make the cupcakes vegan, replace the eggs with flax eggs. Mix one tablespoon of ground flaxseed with three tablespoons of water for each egg. Also, use plant-based butter and non-dairy milk for the buttermilk, as mentioned earlier. These changes keep the cupcakes fluffy and delicious. For frosting, cream cheese frosting works well with these cupcakes. To make it, beat together softened cream cheese, butter, and powdered sugar. Add a splash of vanilla for extra flavor. Use a piping bag to swirl the frosting on top. A sprinkle of chai spice makes it even prettier! You learned how to make delicious vanilla chai cupcakes. We covered key ingredients, proper measuring, and fun frosting ideas. I shared tips to get the perfect flavor and avoid common mistakes. You can even try gluten-free options or different spices. Remember to store your cupcakes correctly to keep them fresh. I hope you're ready to bake and enjoy these treats. Happy baking!

Vanilla Chai Cupcakes Delightful and Flavorful Treat

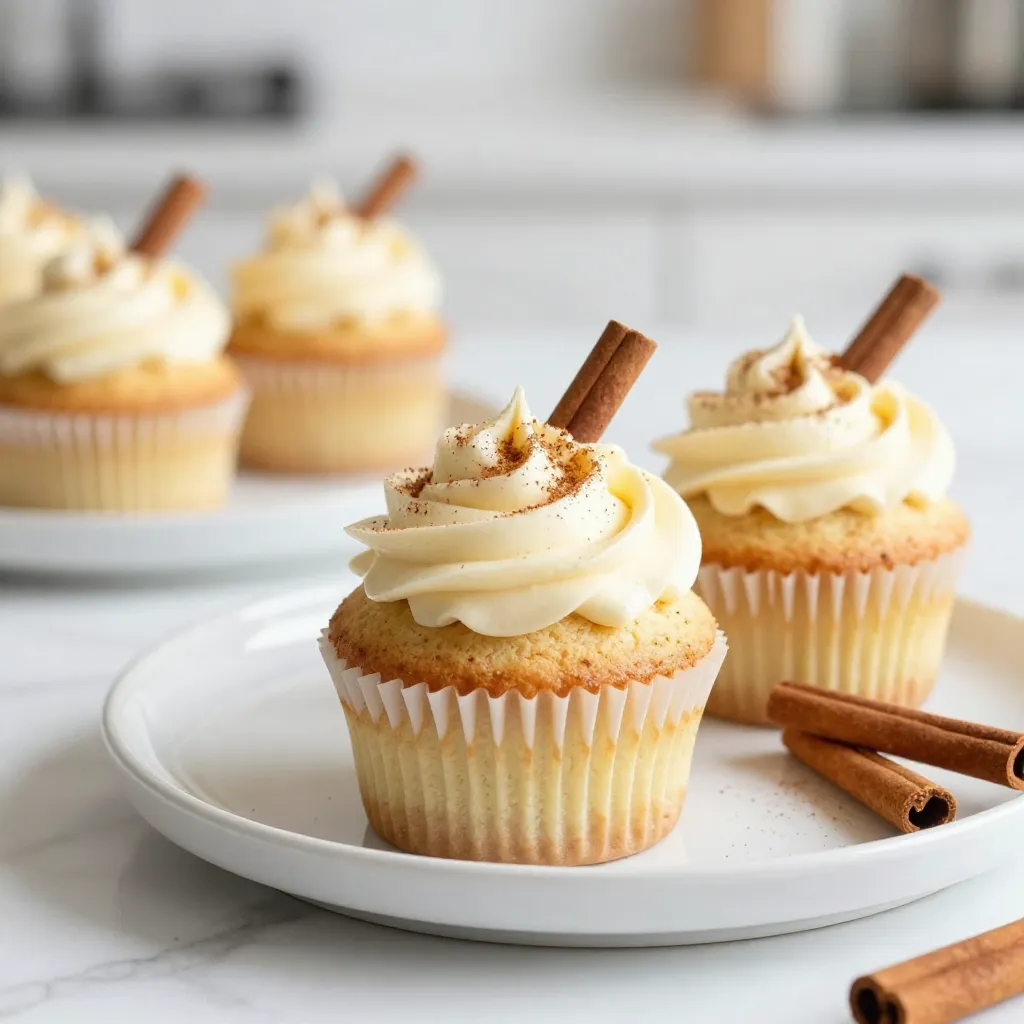
If you love warm, cozy flavors, then you’ll adore these Vanilla Chai Cupcakes! They blend sweet vanilla and spicy chai

To make Thai red curry meatballs, we need some basic and fresh items. Here’s the list: - 1 lb ground chicken or turkey - 1/2 cup breadcrumbs - 1/4 cup fresh cilantro, chopped - 2 green onions, finely sliced - 2 cloves garlic, minced - 1 tbsp ginger, grated These ingredients give the meatballs their great flavor and texture. You can change things up to fit your needs. Here are some ideas: - Use ground beef or plant-based proteins as a substitute. - If you want vegetarian meatballs, replace the meat with a mix of beans and lentils. These changes help everyone enjoy this dish, no matter their diet. The right condiments and spices make this dish pop. Here are the must-haves: - 2 tbsp red curry paste - 1 tsp fish sauce (or soy sauce for a vegetarian option) - 1 tsp sugar - 1 can (400ml) coconut milk - 2 tbsp lime juice - Salt and pepper to taste These ingredients create a rich, flavorful sauce that pairs perfectly with the meatballs. {{ingredient_image_1}} Mixing ingredients In a big bowl, mix 1 pound of ground chicken or turkey with 1/2 cup of breadcrumbs. Add 1/4 cup of chopped fresh cilantro, 2 finely sliced green onions, 2 minced garlic cloves, and 1 tablespoon of grated ginger. Stir in 2 tablespoons of red curry paste, 1 teaspoon of fish sauce (or soy sauce), and 1 teaspoon of sugar. Add salt and pepper to taste. Mix everything until well combined. Shaping the meatballs Once mixed, shape the mixture into small meatballs, about 1 inch wide. You should make around 20 meatballs. Make sure they are round and packed tightly to hold together while cooking. Browning techniques Heat a non-stick skillet over medium heat and add a little oil. When the oil is hot, add the meatballs in a single layer. Let them cook for 5 to 7 minutes, turning them to brown on all sides. This step gives the meatballs a nice crust and adds flavor. Importance of cooking in batches Do not overcrowd the skillet. Cooking the meatballs in batches ensures they brown evenly. If you add too many at once, they will steam instead of brown, leading to a less tasty dish. Simmering the veggies and coconut milk After browning the meatballs, remove them from the skillet. In the same skillet, pour in 1 can of coconut milk. Bring it to a gentle simmer. Add sliced red bell pepper and snap peas. Cook these for about 3 to 5 minutes until the veggies are slightly tender. Combining meatballs with sauce Return the browned meatballs to the skillet. Let them simmer in the sauce for another 10 minutes. This step allows the flavors to blend well. Just before serving, stir in 2 tablespoons of lime juice to brighten the dish. Serve the meatballs over jasmine rice and ladle extra sauce on top for added flavor. - Best practices for browning meatballs: Start with a hot skillet. Use a small amount of oil. This helps the meatballs brown well. Cook them in batches. Avoid overcrowding the pan. This way, they cook evenly and get a nice crust. - Adjusting cooking time for different meats: Ground turkey cooks quickly, similar to chicken. If using beef, cook a bit longer. Always check the meat's internal temperature. It should reach 165°F for safety. - Additional spices to elevate taste: Try adding a pinch of cumin or coriander. These spices bring warmth and depth. You might also enjoy a dash of chili powder for heat. - Using fresh herbs for garnish: Fresh herbs make a dish pop. Cilantro adds brightness and freshness. Consider adding Thai basil for a unique twist. - Serving suggestions with jasmine rice: Serve meatballs over a bed of fluffy jasmine rice. The rice soaks up the curry sauce, making each bite delicious. - Creative plating tips including garnishes: Use deep bowls for a comforting look. Add a lime wedge on the side for a fresh touch. Sprinkle extra cilantro on top for color and flavor. Pro Tips Use Fresh Ingredients: Fresh herbs and vegetables will enhance the flavors of your meatballs and sauce, giving a vibrant taste to the dish. Adjust Spice Level: If you prefer a milder flavor, reduce the amount of red curry paste. You can always add more to taste later! Make Ahead: These meatballs can be prepared in advance and stored in the fridge. They also freeze well, making them a great meal prep option. Serve with Sides: Pair the meatballs with fresh veggies or a simple cucumber salad to add a refreshing crunch to your meal. {{image_2}} You can swap ground chicken or turkey for different proteins. Ground beef works well if you prefer red meat. For a lighter option, use ground turkey. If you want a plant-based choice, try using lentils or chickpeas. These options add flavor and texture to the dish. You can also use firm tofu for a tasty vegetarian version. Just make sure to crumble it well and mix it with the other ingredients. Seasonal veggies can really enhance your dish. Try adding zucchini, carrots, or baby corn for a colorful touch. These vegetables cook quickly and add nutrients. You can even mix in some leafy greens like spinach or kale for extra health benefits. For side dishes, serve your meatballs with a fresh salad or steamed broccoli. These sides balance out the richness of the curry. Red curry is just one of many styles to explore. You can make a green curry by using green curry paste instead. This version has a brighter flavor. If you like it spicy, add some sliced chilies for heat. For a milder dish, reduce the amount of curry paste. You can always adjust the spice level to fit your taste. Each style offers a unique twist on the classic meatball dish. To keep your Thai red curry meatballs fresh, follow these tips. First, let the meatballs cool down to room temperature. Then, place them in airtight containers. This keeps air out and helps prevent spoilage. Store the containers in the fridge. They should last up to three days. For best taste, enjoy them within two days. Freezing meatballs is simple. Here’s how to do it step-by-step: 1. Prepare the meatballs: After cooking, let them cool. 2. Arrange on a baking sheet: Place meatballs in a single layer, not touching. 3. Freeze: Put the baking sheet in the freezer for about an hour. 4. Transfer to bags: Once firm, move the meatballs to freezer bags. 5. Seal and label: Remove excess air, label the bags with dates, and seal them well. When you want to eat them, take the meatballs out. Let them thaw in the fridge overnight. To reheat, you can bake them at 350°F for 15-20 minutes or heat them in a skillet with some sauce. How long do these meatballs last? In the fridge, they can stay fresh for three days. If frozen, they are good for up to three months. Always check for signs of spoilage. Look for off smells or changes in color. If you see any, it’s best to throw them away. Enjoy your meal safely! Yes, you can use different meats. Ground pork, beef, or lamb works well. If you prefer a lighter option, you can use ground turkey or chicken, as the recipe suggests. For a vegetarian choice, try using plant-based meat or even chickpeas. Just mash the chickpeas and mix them with breadcrumbs and spices. This keeps the flavor while making it meat-free. Red curry paste can be spicy, but it varies by brand. If you like heat, use it as is. If you prefer milder flavors, start with a smaller amount. You can always add more later. To balance the spice, add extra coconut milk. It helps cool the heat while keeping the flavor. Serve these meatballs with jasmine rice. The rice absorbs the sauce well. You might also consider serving a side of steamed veggies. Snap peas, bell peppers, or broccoli work nicely. For extra crunch, add a salad with fresh herbs. These sides enhance the meal and add color to your plate. This blog showed you how to make Thai red curry meatballs easily. We discussed key ingredients, step-by-step cooking, and helpful tips. You learned how to choose proteins, enhance flavors, and store leftovers. These meatballs can fit any diet. They are tasty, versatile, and fun to make. Now you can impress friends and family with a delicious dish. Enjoy cooking and let your creativity shine!

Thai Red Curry Meatballs Flavorful and Easy Recipe

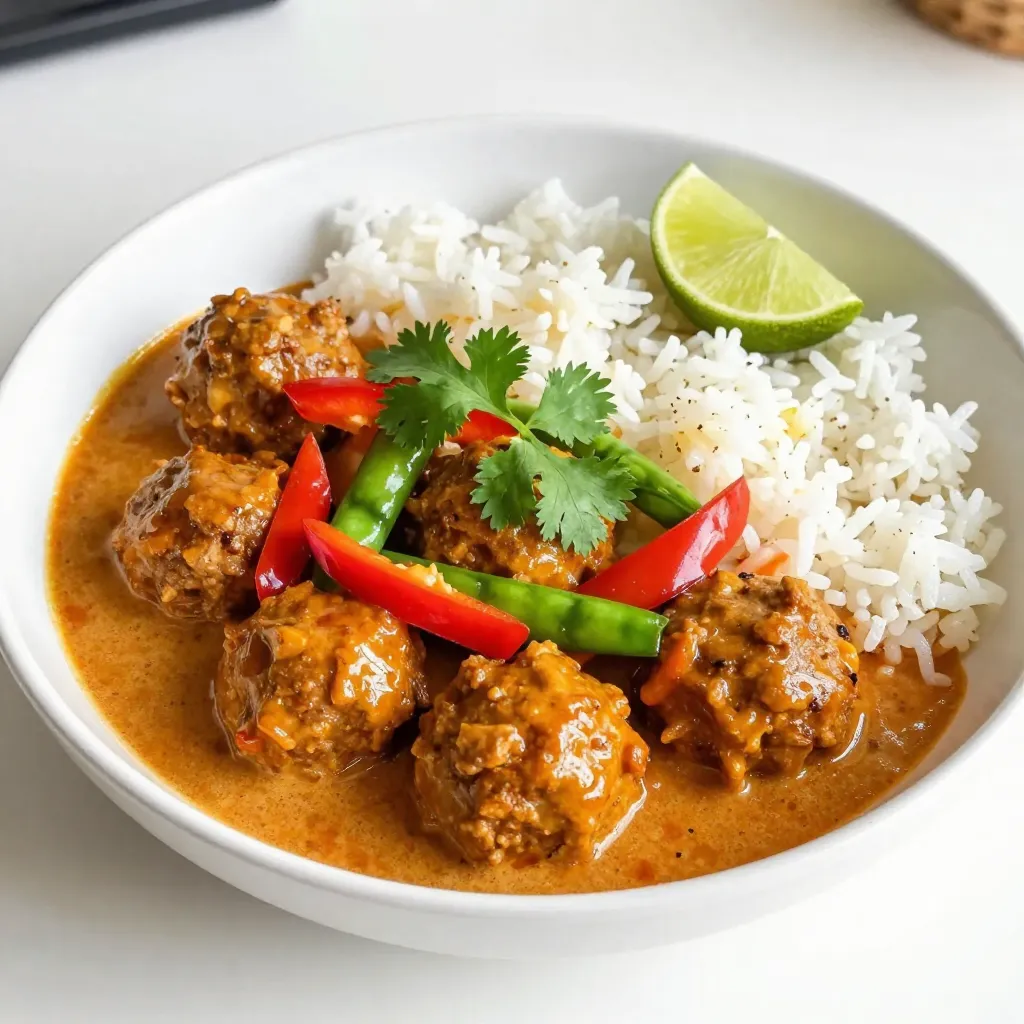
Are you ready to spice up dinner? Thai Red Curry Meatballs are a tasty and easy dish that will impress

To make a Hot Buttered Rum Mocktail Latte, gather these simple ingredients: - 1 cup unsweetened almond milk (or any milk of your choice) - 2 tablespoons unsalted butter, softened - 2 tablespoons brown sugar (or to taste) - 1/2 teaspoon vanilla extract - 1/2 teaspoon ground cinnamon - 1/4 teaspoon ground nutmeg - 1/2 cup brewed strong coffee (or decaf if preferred) - Whipped cream (for topping) - Extra cinnamon and nutmeg (for garnish) These ingredients work together to create a creamy and rich drink. Unsweetened almond milk keeps it light, while butter adds a wonderful richness. Brown sugar gives the drink sweetness, and vanilla extract brings warmth. Ground cinnamon and nutmeg add spice and depth. If you want to adjust the flavor, you can swap almond milk for oat or soy milk. The butter provides a smooth texture, but you can use coconut oil as a dairy-free option. This drink is perfect for cold days. The strong coffee wakes you up, while the creamy mixture makes it feel like a treat. The whipped cream on top adds even more indulgence. Start by pouring 1 cup of unsweetened almond milk into a small saucepan. Heat it over medium heat. Keep an eye on it until it steams, but do not let it boil. This should take about three to four minutes. The warm milk makes the drink cozy and creamy. While the almond milk heats up, grab a mixing bowl. Add 2 tablespoons of softened unsalted butter, 2 tablespoons of brown sugar, and 1/2 teaspoon of vanilla extract. Next, sprinkle in 1/2 teaspoon of ground cinnamon and 1/4 teaspoon of ground nutmeg. Use a fork or whisk to blend it all together. Mix until the mixture is smooth and creamy. This will add richness to your drink. Once your almond milk is hot, remove it from the heat. Carefully whisk in the butter mixture. Make sure to stir well until everything is fully combined. This will create a frothy, buttery milk that is the heart of your latte. Now, brew 1/2 cup of strong coffee in your favorite way. You can use a coffee maker, French press, or any method you prefer. If you want a caffeine-free option, use decaf coffee instead. The strong coffee balances the sweetness of the milk. In a heat-resistant mug, pour in the brewed coffee. Then, carefully add the buttery almond milk blend. Stir it well to mix everything together. You should see a lovely swirl of colors, and the drink will smell amazing. To finish, add a generous dollop of whipped cream on top. Then, sprinkle some extra cinnamon and nutmeg for a beautiful touch. This not only looks nice but also adds more flavor. Your Hot Buttered Rum Mocktail Latte is now ready to enjoy! You can control how sweet your drink is. Start with two tablespoons of brown sugar. Taste it after mixing. If you want it sweeter, add more sugar, one teaspoon at a time. This way, you get your perfect level of sweetness. To make sure your drink is creamy, use softened butter. Blend the butter with the sugar and spices until smooth. When you add this to the warm almond milk, it will mix well. If the milk is too hot, it might curdle. Keep it steaming, not boiling. Unsweetened almond milk works great, but you can use other milks too. Coconut milk adds a tropical twist. Oat milk is thicker and creamier. Use your favorite milk to make this drink perfect for you. Use strong brewed coffee for the best flavor. Dark roasts give a bold taste that pairs well with butter and spices. If you prefer decaf, that works too! The coffee adds depth to your mocktail latte. {{image_2}} You can easily make this drink dairy-free. Use any plant-based milk you like. Almond milk works well, but oat milk or coconut milk are great choices too. These options give a creamy texture without dairy. The flavor stays rich and tasty, just like the original. Want to spice things up? Add chocolate or caramel for a sweet twist. A scoop of chocolate syrup blends well with the buttery mix. You can also swirl in some caramel sauce for a sticky, sweet finish. Both choices add a new layer of flavor that makes the drink even more indulgent. Change it up with seasonal flavors! In fall, try pumpkin spice. Just add a teaspoon of pumpkin puree and a dash of pumpkin spice. For winter, peppermint is a fun choice. Mix in a few drops of peppermint extract for a refreshing kick. These variations make the drink perfect for any time of year. To store any leftovers, pour the drink into a clean jar. Seal it tightly and keep it in the fridge. This drink tastes best fresh, but you can store it for up to two days. When you want to enjoy your drink again, pour it into a saucepan. Heat it gently on low until warm. Stir well to mix everything again. Avoid boiling it, as this can change the texture. - Unsweetened almond milk: Check the date on the carton. Typically, it lasts about 7-10 days after opening. - Unsalted butter: It can stay fresh in the fridge for about a month. - Brown sugar: Store it in a cool, dry place. It lasts for months if kept sealed. - Vanilla extract: This can last indefinitely if stored in a cool, dark place. - Ground spices (cinnamon and nutmeg): They stay fresh for about 6 months if stored correctly. - Brewed coffee: Best used fresh, but can last in the fridge for up to 3 days. A hot buttered rum mocktail latte is a cozy drink. It combines warm almond milk, butter, and coffee. You get a rich taste with spices like cinnamon and nutmeg. This drink feels festive and indulgent. It is perfect for chilly days, offering comfort without alcohol. You can prepare some parts ahead of time. Mix the butter, sugar, and spices in advance. Store this mixture in the fridge. When you’re ready, just heat the almond milk and brew the coffee. Then, combine everything for a quick treat. If you want to change the milk, try oat milk or soy milk. Both options work well and keep the drink creamy. You can also use whole milk for a richer taste. Just pick what you enjoy the most! Yes, this drink is great for kids! It has no alcohol and includes yummy flavors. The spices make it fun and festive. Just control the sugar amount to keep it healthy. Kids will love the whipped cream topping, too. To make the drink vegan, use plant-based butter instead of regular butter. Make sure to use almond milk or any other vegan milk. This way, you keep all the flavors while sticking to a vegan diet. Enjoy your creamy, vegan hot buttered rum mocktail latte! This blog post guided you through creating a delicious hot buttered rum mocktail latte. We covered each step, from heating almond milk to serving garnished drinks. You learned about ingredient choices, tips for creamy texture, and ways to customize flavors. Remember, variations can make it seasonal or align with your taste. Whether for yourself or a family treat, this drink is fun to make and enjoy. Get creative and share your unique twist on this recipe!

Hot Buttered Rum Mocktail Latte Creamy Indulgence

Looking for a cozy drink without the alcohol? The Hot Buttered Rum Mocktail Latte is a creamy treat you will

- 8 ounces spaghetti or linguine - 1 pound large shrimp, peeled and deveined - 3 tablespoons olive oil - 4 cloves garlic, minced - Zest and juice of 1 large lemon - 1 teaspoon red pepper flakes (adjust to taste) - Salt and pepper to taste - ¼ cup fresh parsley, chopped - Grated Parmesan cheese for serving (optional) In this recipe, I use spaghetti or linguine as the base. Both are great for holding the sauce. The large shrimp adds a nice bite and cooks quickly. Olive oil is my go-to fat here, as it brings flavor without overpowering the dish. Fresh minced garlic gives the pasta a strong, fragrant aroma. For flavor, lemon zest and juice brighten the dish. I often add red pepper flakes for a little heat. A sprinkle of salt and pepper adds depth, while fresh parsley gives a burst of color. If you enjoy cheese, Parmesan adds a rich finish. First, you need a large pot. Fill it with water and add salt. Bring the water to a boil. This means the water should have big bubbles. Once it is boiling, add 8 ounces of spaghetti or linguine. Cook the pasta according to the package instructions. You want it to be al dente, which means it should still have a slight bite. This usually takes about 8 to 10 minutes. When done, save ½ cup of the pasta water. Then, drain the pasta and set it aside. Next, grab a large skillet. Heat 3 tablespoons of olive oil over medium heat. Add 4 cloves of minced garlic and 1 teaspoon of red pepper flakes. Sauté this mix for about 1 minute. You want to smell the garlic, but don’t burn it. Now, add the 1 pound of large shrimp, peeled and deveined. Sprinkle salt and pepper over the shrimp. Cook them for about 2 to 3 minutes on each side. They will turn pink when they are fully cooked. After the shrimp are cooked, lower the heat. Add the zest and juice of 1 large lemon to the skillet. Then, toss in the cooked pasta. If the pasta looks dry, use the reserved pasta water. Gradually add it until the pasta reaches your desired consistency. This will help the flavors mix well. Lastly, stir in ¼ cup of chopped fresh parsley. Taste and adjust seasoning with extra salt, pepper, or lemon juice if you like. When choosing shrimp, fresh is often best. Fresh shrimp have a sweet taste and firm texture. However, frozen shrimp can work well too. They are often frozen right after being caught, locking in flavor. Look for shrimp that are large and peeled. Large shrimp hold up better in the dish. Smaller shrimp can cook too quickly and may not be as satisfying. To get that perfect al dente pasta, cook it according to the package. This means firm but tender. Always use plenty of salted water. It helps flavor the pasta. Once cooked, reserve about half a cup of the pasta water before draining. This water can help make your dish saucy later. If pasta sticks together, try tossing it with a bit of olive oil after draining. This simple step keeps it from clumping. Lemon juice adds a bright taste, but balance is key. If you love a zing, add a bit more lemon juice. Red pepper flakes can kick up the heat. If you prefer less spice, start with a small sprinkle. You can always add more later. Taste as you go, and adjust flavors to your liking. This way, your Minute Lemon Garlic Shrimp Pasta will shine with your personal touch. {{image_2}} You can make this dish even better by adding vegetables. Spinach or cherry tomatoes work great. Spinach wilts down and adds nutrients. Cherry tomatoes burst with flavor and color. Both options make the dish more colorful and tasty. You can sauté them with the garlic before adding the shrimp. This adds a fresh twist and makes the meal healthier. If you want a change from shrimp, try chicken or tofu. Chicken adds a hearty bite, while tofu gives a nice texture for a vegetarian meal. Cook chicken breast in the same way as the shrimp. For tofu, press it first to get rid of extra moisture. Then sauté it until golden. Both options keep the dish delicious and satisfying. Changing the herbs and spices can create new flavors. You might try basil, thyme, or oregano for a different taste. You can also make the dish creamy by adding cheese or cream. Stir in some heavy cream or cream cheese after adding the lemon juice. This will give the dish a rich and velvety texture. Experimenting with flavors keeps this meal exciting and fresh. To keep your Minute Lemon Garlic Shrimp Pasta fresh, place it in an airtight container. This method helps prevent any odors from the fridge. The pasta stays good for three days in the fridge. If you notice any strange smells or colors, it's best to toss it out. You can freeze this dish for later meals. First, let the pasta cool completely. Then, place it in freezer-safe bags or containers. Remove as much air as possible to prevent freezer burn. This dish can last for up to three months in the freezer. When you want to enjoy it again, take it out and thaw it in the fridge overnight. To reheat, warm it in a skillet over low heat. You can add a splash of water or olive oil to help it heat evenly. Stir well to bring back that fresh taste. This dish is quick to make. It takes about 10 minutes to prep and 10 minutes to cook. You can have it on your table in just 20 minutes. Yes, you can! While spaghetti or linguine works best, you can use any pasta type. Penne, fettuccine, or even whole wheat pasta will taste great. Just adjust the cooking time as needed. This pasta pairs well with a fresh salad or garlic bread. A light white wine like Pinot Grigio complements the lemon flavor nicely. You could also serve it with steamed veggies for a balanced meal. This blog lays out a simple guide for making Minute Lemon Garlic Shrimp Pasta. You learned about key ingredients, steps for cooking, and some helpful tips. You can also explore tasty variations. With proper storage, your leftovers will stay fresh. Experiment and enjoy this easy dish. You now have the knowledge to make it great every time. Eating well doesn’t have to be hard. Dive into your kitchen and create something delicious today.

Minute Lemon Garlic Shrimp Pasta Quick and Tasty Meal

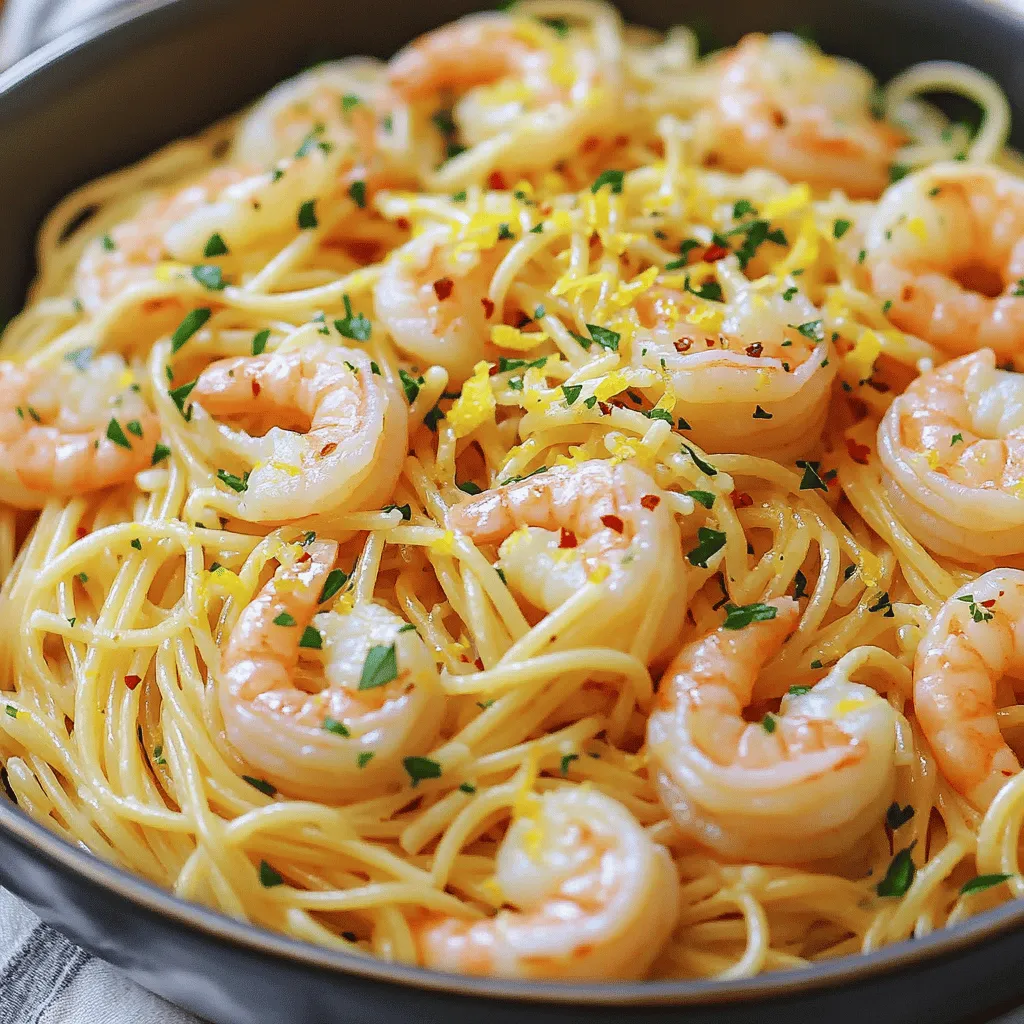
Are you ready for a meal that’s both quick and packed with flavor? My Minute Lemon Garlic Shrimp Pasta is

- 12 oz penne pasta - 2 cups butternut squash, peeled and diced - 1 tablespoon olive oil - 1 small onion, diced - 2 cloves garlic, minced - 1 teaspoon dried sage - 1 teaspoon thyme - 1 cup vegetable broth - ½ cup cream cheese (or vegan cream cheese) - Salt and pepper to taste - ¼ cup grated Parmesan cheese (optional, for serving) - Fresh parsley for garnish For this butternut squash pasta skillet, you need fresh, quality ingredients. The penne pasta forms the base of the dish. I love using penne because its ridges hold the sauce well. The butternut squash gives a sweet flavor and creamy texture. You can also use pumpkin if you’d like. The olive oil helps sauté the onion and garlic. It adds rich flavors that build the dish. I always choose a small onion for a more delicate taste. Garlic brings warmth and aroma to the meal. Herbs like sage and thyme enhance the butternut squash's natural sweetness. They also add depth to the flavor. Vegetable broth serves as the sauce's base, bringing everything together. Cream cheese gives the sauce its creamy texture. If you want a vegan option, use vegan cream cheese. Finally, salt and pepper add balance. Grated Parmesan is optional, but it adds a nice touch. Fresh parsley not only adds color but also a fresh taste. Keep these ingredients on hand, and you'll whip up this quick meal in no time! First, cook the penne pasta. Follow the package instructions to make it al dente. This means it should be firm but not hard. Once done, drain the pasta and set it aside. This step is key for a perfect texture in your dish. Now, let’s prepare the skillet. Heat 1 tablespoon of olive oil in a large skillet over medium heat. Add the diced onion and cook it until it turns translucent, about 3 to 4 minutes. Then, add the minced garlic and cook for another minute until it smells great. Next, stir in the diced butternut squash, dried sage, and thyme. Cook this mixture for about 5 to 7 minutes. Stir it occasionally. You want the squash to become tender but not mushy. Once your squash is tender, pour in 1 cup of vegetable broth. Bring this to a simmer. Cover the skillet and let it cook for about 10 minutes, or until the squash is soft. After that, use a fork or a potato masher to mash the squash slightly. This gives your sauce a creamy feel. Now, add ½ cup of cream cheese to the skillet. Stir it until it melts and blends with the squash. If your sauce seems too thick, add a bit more vegetable broth until it’s just right. It’s time to combine everything. Toss the cooked penne pasta into the skillet with the butternut squash sauce. Mix well until the pasta is fully coated. Season your dish with salt and pepper to taste. Enjoy the tasty blend of flavors in this quick meal! To cook pasta just right, follow these steps: - Use a large pot with water. - Add a pinch of salt to the water. - Bring the water to a boil before adding pasta. - Cook penne for 8-10 minutes until al dente. - Stir occasionally to avoid sticking. To avoid sticky pasta, make sure to: - Rinse the pasta under cold water after draining. - Toss it with a little olive oil. - Add it to your sauce right away. The best herbs to pair with butternut squash are: - Sage, which adds a warm, earthy taste. - Thyme, offering a light, fresh note. You can add spice for extra flavor by: - Mixing in a pinch of red pepper flakes. - Using smoked paprika for a deeper taste. For creamier options, consider: - Using coconut milk for a dairy-free choice. - Trying cashew cream for a nutty flavor. Adjust sauce thickness by: - Adding more vegetable broth if too thick. - Stirring in extra cream cheese for a richer texture. {{image_2}} For a vegan-friendly twist, swap the cream cheese for a plant-based option. You can use vegan cream cheese or even cashew cream. Both will add creaminess without dairy. Try blending soaked cashews with a bit of water and lemon juice for a homemade version. If you prefer gluten-free pasta, opt for substitutes like brown rice or chickpea pasta. These alternatives taste great and keep the dish light. Feel free to add more veggies to your skillet! Spinach, kale, or bell peppers work well. You could even toss in some roasted Brussels sprouts for extra crunch. Seasonal veggies like zucchini or asparagus bring a fresh touch too. Using vegetables that are in season makes your dish vibrant and tasty. Plus, it gives you a chance to experiment with flavors. Adding protein can make your meal heartier. For meat lovers, consider grilled chicken or shrimp. These can cook quickly in the skillet. If you want plant-based protein, try beans or lentils. They mix well with the butternut squash and add great texture. For a quick option, stir in some canned chickpeas. They add protein and fiber, making the dish even more filling. To store leftovers of your butternut squash pasta skillet, let it cool first. Then, place it in an airtight container. I recommend using glass or plastic containers that seal well. This keeps the flavors fresh. If you want to freeze the dish, use freezer-safe containers. Make sure to leave some space at the top for expansion. To reheat, thaw it in the fridge overnight. Heat it on the stove or microwave until hot. Stir it well to mix the sauce back in. In the fridge, your butternut squash pasta skillet will last about 3 to 5 days. If you notice any off smells or mold, it's best to throw it out. Always trust your senses when checking for spoilage. To make this dish, follow these steps: 1. Cook 12 oz of penne pasta until al dente. Drain it and set aside. 2. In a large skillet, heat 1 tablespoon of olive oil over medium heat. Add 1 small diced onion and sauté for about 3-4 minutes until it’s clear. 3. Add 2 minced garlic cloves and cook for 1 more minute. You want it fragrant. 4. Stir in 2 cups of diced butternut squash, 1 teaspoon of dried sage, and 1 teaspoon of thyme. Cook for 5-7 minutes until the squash softens. 5. Pour in 1 cup of vegetable broth and let it simmer. Cover the skillet for about 10 minutes until the squash is soft. 6. Mash the squash slightly with a fork to make it creamy. 7. Mix in ½ cup of cream cheese until it melts. If the sauce is thick, add more broth. 8. Toss the cooked penne pasta into the skillet. Coat it well with the sauce. 9. Season with salt and pepper to taste. 10. Serve hot, topped with ¼ cup of grated Parmesan cheese and some fresh parsley. Yes, you can use different pasta shapes. Bowtie, fusilli, or spaghetti all work well. Just make sure to adjust the cooking time according to package directions. The key is to cook pasta until it's al dente, so it holds up well with the sauce. Yes! Butternut squash is packed with nutrients. It is high in vitamins A and C, which support your immune system. It also has fiber, which helps digestion. Plus, it’s low in calories, making it a great choice for a healthy meal. If you need a substitute for cream cheese, try using Greek yogurt or silken tofu for a vegan option. Both provide creaminess without losing flavor. You can also use a vegan cream cheese to keep it dairy-free. Absolutely! You can prepare the butternut squash sauce ahead. Just store it in the fridge for up to three days. When you are ready to eat, cook the pasta and mix it with the sauce. This saves time and makes meal prep easy. This blog post shared a simple recipe for butternut squash pasta. You learned about the ingredients, cooking steps, and tips to make it perfect. It’s a great dish for all diets, including vegan. You can add your favorite veggies or protein for more flavor. Remember to store leftovers well so you can enjoy them later. Cooking doesn’t have to be hard. With this recipe, you can create a tasty meal easily. Enjoy the process and happy cooking!

Butternut Squash Pasta Skillet Quick and Tasty Meal

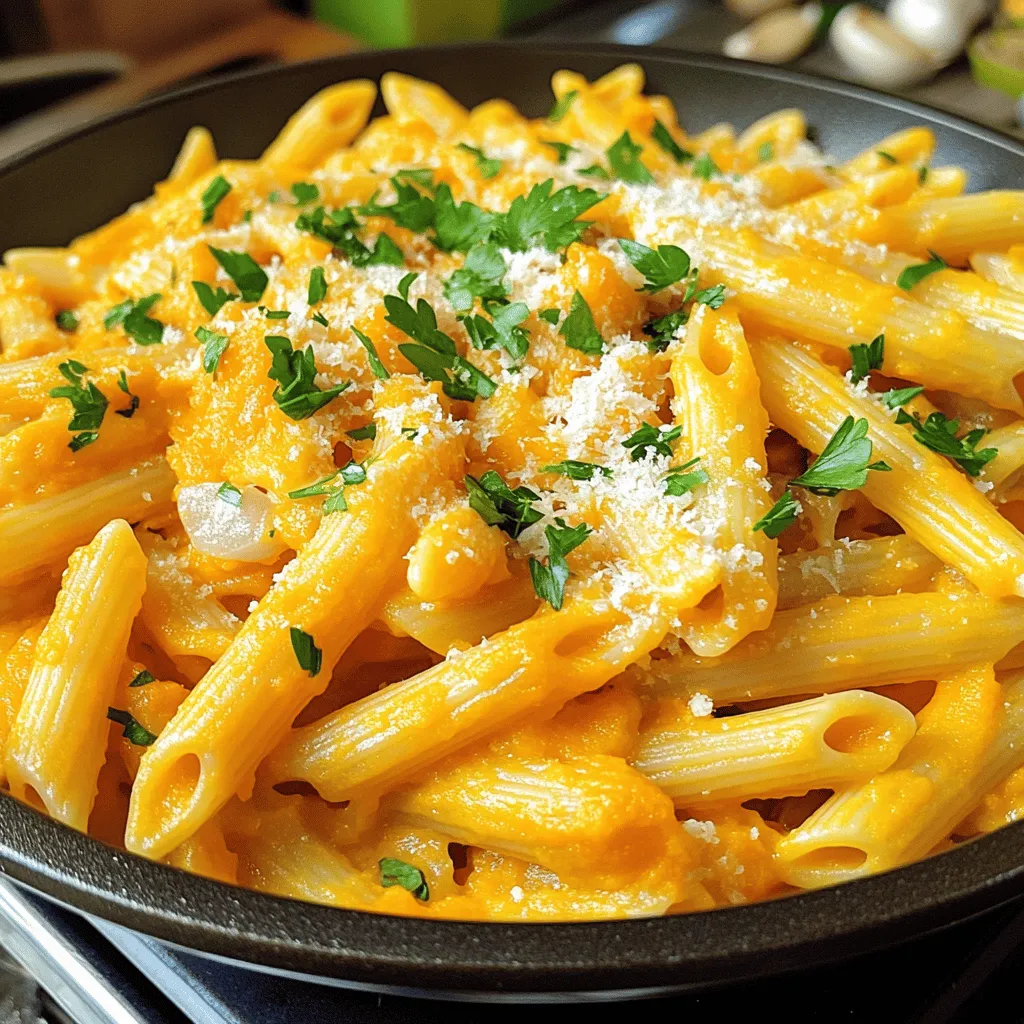
Looking for a quick and tasty meal? Let me introduce you to the Butternut Squash Pasta Skillet! This dish combines

This dish shines with fresh, vibrant veggies. Here’s what you’ll need: - 1 cup cherry tomatoes, halved - 1 red bell pepper, chopped - 1 yellow bell pepper, chopped - 1 zucchini, sliced into half-moons - 1 red onion, cut into wedges - 2 cups Brussels sprouts, halved These vegetables add color and flavor. Each one brings a unique taste that blends well. The balsamic vinaigrette gives the dish its tasty kick. You will need: - 3 tablespoons balsamic vinegar - 2 tablespoons olive oil - 2 cloves garlic, minced Balsamic vinegar adds sweetness and tang. Olive oil helps to roast the veggies. Garlic provides depth. Seasoning makes the dish pop. For that, gather: - 1 teaspoon dried oregano - 1 teaspoon dried thyme - Salt and pepper to taste - Fresh basil leaves for garnish Oregano and thyme bring earthiness. Salt and pepper enhance all the flavors. Fresh basil adds a fragrant touch at the end. First, preheat your oven to 425°F (220°C). This heat will help the veggies roast well. Gather your ingredients, including cherry tomatoes, red and yellow bell peppers, zucchini, red onion, and Brussels sprouts. Wash them well, and then chop them into the right sizes. Halve the cherry tomatoes and slice the zucchini into half-moons. Cut the red onion into wedges and halve the Brussels sprouts. Having these ready makes cooking easier. In a large mixing bowl, add all your chopped veggies. This includes the cherry tomatoes, bell peppers, zucchini, red onion, and Brussels sprouts. Then, add minced garlic for extra flavor. Next, drizzle in the olive oil and balsamic vinegar. Sprinkle the dried oregano and thyme on top. Don’t forget to add salt and pepper to taste! Use your hands to toss everything together until the veggies are well coated. This step is key for deep flavor. Spread the seasoned veggies evenly onto a large baking sheet. Make sure they are in a single layer. This helps them cook evenly. Place the sheet in your preheated oven and roast for about 25 to 30 minutes. Stir the veggies halfway through to ensure they cook well on all sides. You want them to be tender and slightly caramelized. When done, remove the sheet pan from the oven, and let it cool for a few minutes. Before serving, garnish with fresh basil leaves for a pop of color and flavor. To ensure even cooking, cut all veggies to similar sizes. This helps them cook at the same rate. For example, slice bell peppers and zucchini into pieces about one inch or less. Keep cherry tomatoes halved. Spread the veggies out on your sheet pan. Avoid crowding them. Use a large pan if needed. Stir the veggies halfway through roasting. This helps them cook evenly and brown nicely. To enhance caramelization, start by using high heat. Preheat your oven to 425°F (220°C). The balsamic vinegar also adds a sweet touch. The natural sugars in veggies release during roasting. Toss them in olive oil to help with browning. A little salt can help draw out moisture, making caramelization easier. Keep an eye on the veggies. Once they start to turn golden, they are almost ready. For a great look, serve the veggies straight from the pan. This adds a rustic feel. You can also transfer the veggies to a colorful platter. Drizzle some extra balsamic vinegar on top. Sprinkle freshly cracked pepper for a nice touch. Finish with fresh basil leaves for color. This not only looks appealing but also adds flavor. {{image_2}} You can easily swap out veggies based on what is fresh. For spring, try asparagus or peas. In summer, add eggplant or squash. Autumn calls for root veggies like carrots and parsnips. Winter offers sweet potatoes or kale. Each season brings new flavors. This keeps the dish fun and fresh. Want to make this dish a full meal? Add some protein. Cooked chicken or shrimp works great. You can also use chickpeas or tofu for a plant-based option. Toss the protein with the veggies before roasting. This adds heartiness and makes it more filling. Experiment with different seasonings for new tastes. For a spicy kick, add chili flakes. If you love herbs, try rosemary or basil. You can also use lemon juice instead of balsamic vinegar for a zesty touch. Each change brings a new vibe to the dish, making it exciting every time. After cooking your Sheet Pan Balsamic Veggie Medley, let it cool down. This step is key. Place the pan on a heat-safe surface. Allow the veggies to cool for about 10-15 minutes. This helps prevent moisture buildup in storage. Once the veggies are cool, store them in an airtight container. This keeps them fresh longer. You can keep them in the fridge for up to 3 days. If you want to store them longer, consider freezing. Use freezer-safe bags or containers. Just remember to label them with the date. To reheat, use the oven or microwave. For the oven, preheat to 350°F (175°C). Spread the veggies on a baking sheet. Heat for about 10-15 minutes or until warm. If you use the microwave, place them in a safe dish. Heat in short bursts of 30 seconds, stirring in between. Enjoy the flavors like they are fresh out of the oven! Yes, you can use other vinegars. Apple cider vinegar or red wine vinegar work well too. Each vinegar gives a different taste. Apple cider vinegar adds a fruity flavor. Red wine vinegar gives a slight tang. Experiment with what you have on hand. Just keep the same amount as in the recipe. The veggies are done when they look soft and slightly brown. You want them tender but not mushy. A fork should easily pierce them. Stir the veggies halfway through cooking for even roasting. If some are browner, that's okay; it adds flavor. This veggie medley pairs well with many dishes. Try it with grilled chicken or fish. It also complements quinoa or rice nicely. You can serve it with crusty bread for a lighter meal. Don’t forget to drizzle a bit of extra balsamic on top for added flavor! This blog post covered how to make a tasty roasted vegetable medley. We explored ingredients, from fresh veggies to balsamic vinaigrette. I shared step-by-step instructions for prepping, mixing, and roasting. Tips on cooking evenly and enhancing flavors add value. You can modify the recipe with seasonal veggies or proteins. I also discussed storing leftovers properly and answered common questions. Try these tips and enjoy a delicious meal that's easy to prepare!

Sheet Pan Balsamic Veggie Medley Flavorful Side Dish

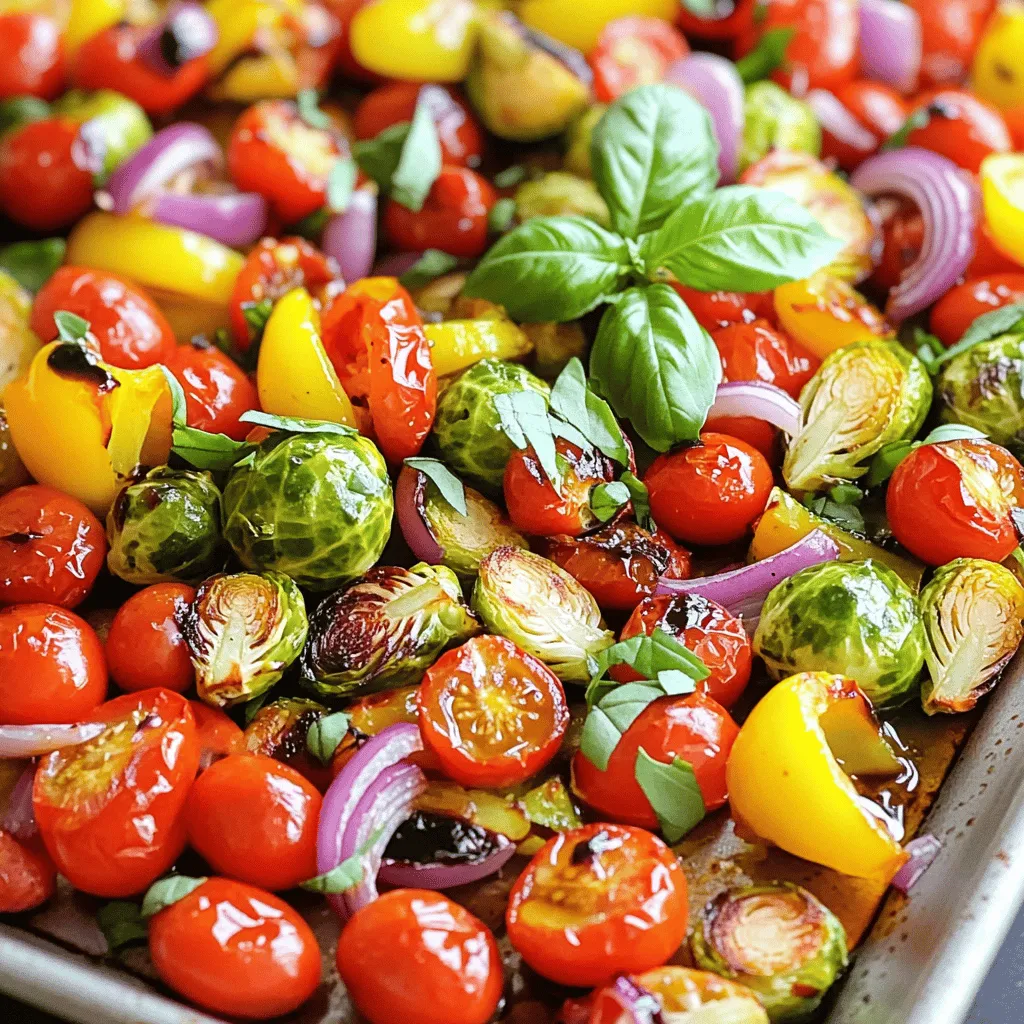
Looking for a quick and tasty side dish? The Sheet Pan Balsamic Veggie Medley is here to save your dinner!

To make Air Fryer Spicy Garlic Parmesan Wings, gather these items: - 2 pounds chicken wings - 2 tablespoons olive oil - 1 teaspoon garlic powder - 1 teaspoon onion powder - 1 teaspoon smoked paprika - 1 teaspoon cayenne pepper (adjust for spice level) - 1 teaspoon salt - 1 teaspoon black pepper - ½ cup grated Parmesan cheese - 2 tablespoons fresh parsley, chopped (for garnish) - 2 tablespoons hot sauce (optional, for extra heat) If you want to boost the flavor, consider these optional ingredients: - Lemon zest for a fresh kick - A splash of soy sauce for umami - A sprinkle of red pepper flakes for more heat You can easily swap some ingredients for different tastes: - Use chicken drumsticks instead of wings if desired. - Replace olive oil with avocado oil for a different flavor. - Use nutritional yeast instead of Parmesan for a vegan option. - For spice, try using chili powder instead of cayenne pepper. These swaps help cater to your taste and dietary needs. Start by rinsing your chicken wings under cold water. This helps clean them. Next, pat them dry with paper towels. Dry wings get crispy in the air fryer. Make sure they are well dried to avoid sogginess. In a large bowl, mix together 2 tablespoons of olive oil, 1 teaspoon of garlic powder, 1 teaspoon of onion powder, 1 teaspoon of smoked paprika, 1 teaspoon of cayenne pepper, 1 teaspoon of salt, and 1 teaspoon of black pepper. This mix gives the wings their spicy garlic flavor. Add the chicken wings to the bowl. Toss them well until each wing is coated with your seasoning blend. Preheat your air fryer to 390°F (199°C). Let it heat for about 5 minutes. Once it’s hot, arrange the seasoned wings in the air fryer basket. Make sure they are in a single layer. Avoid stacking them; this helps them cook evenly. Air fry the wings for 25-30 minutes. Halfway through, shake the basket to ensure they crisp up nicely. Once the wings are golden brown and crispy, remove them from the air fryer. Immediately toss them in a bowl with ½ cup of grated Parmesan cheese. The heat from the wings makes the cheese melt slightly, creating a delicious coating. For extra heat, drizzle some hot sauce over the wings and toss again. Finally, transfer the cheesy wings to a platter, sprinkle with 2 tablespoons of chopped parsley, and serve them hot. Enjoy your tasty delight! To make your wings super crispy, start with dry wings. Rinse them under cold water and pat them dry. Moisture is the enemy of crispiness. Next, use olive oil. It helps the skin get that perfect crunch. Don't skip the shaking! Shake the basket halfway through cooking. This helps the wings cook evenly and get crispy all over. Air frying is simple, but some rules help. First, preheat your air fryer. Set it to 390°F (199°C) for about 5 minutes. This ensures even cooking right from the start. Arrange the wings in a single layer. Crowding the basket can lead to soggy wings. You might need to cook them in batches if your air fryer is small. Avoid cooking wings straight from the freezer. They need time to thaw for best results. Also, don’t skimp on seasoning. The spice mix is key to flavor. Finally, resist the urge to open the basket too often. Each time you do, heat escapes and adds time to your cooking. Following these tips will help you make perfect wings every time! {{image_2}} You can change the spice level of your wings by adjusting cayenne pepper. If you like it hot, add more cayenne. Start with one teaspoon for a good kick. If you want milder wings, use less. You can even skip it if you prefer no heat. Remember, everyone has different taste buds. Feel free to mix in other spices for a unique twist. Here are a few options: - Garlic Salt: Use instead of garlic powder for a saltier punch. - Lemon Pepper: Add for a zesty flavor that brightens the dish. - Cumin: This adds a warm, earthy note that is very tasty. Experimenting with different seasonings can help you find your perfect flavor combo. Pair your spicy garlic parmesan wings with some great sauces. Here are a few ideas: - Ranch Dressing: A classic choice that cools the heat. - Blue Cheese Dressing: This adds a rich flavor that many love. - Buffalo Sauce: For those who want extra heat, drizzle on some buffalo sauce. These sauces can enhance your wings and give them a nice touch. Enjoy trying different combinations! To keep your leftover wings fresh, let them cool first. Place them in an airtight container. You can also use a resealable plastic bag. Store the wings in the fridge. They will stay good for about 3 to 4 days. Try to keep them away from other strong-smelling foods. When you’re ready to enjoy your wings again, I suggest reheating them in the air fryer. This helps restore the crispiness. Heat the air fryer to 350°F (175°C). Cook the wings for about 5 to 10 minutes. Be sure to check them often. You want them hot, not dried out. You can also use an oven for reheating, but the air fryer gives the best results. If you want to save wings for later, freezing is a great option. Place cooled wings in a freezer-safe bag. Be sure to remove as much air as possible. You can freeze them for up to 3 months. When you’re ready to eat, thaw them in the fridge overnight. Reheat them in the air fryer for a quick, tasty meal. It takes about 25 to 30 minutes to cook chicken wings in an air fryer. I recommend shaking the basket halfway through. This helps them cook evenly and become crispy. Check for a golden brown color as a sign they are ready. Yes, you can cook frozen wings in the air fryer. Just add a few extra minutes to the cooking time. Start at 30 to 35 minutes and check for doneness. Be sure to shake the basket halfway for the best results. Spicy garlic parmesan wings pair great with celery sticks and carrot sticks. You can also serve them with ranch or blue cheese dip. These sides balance the spice and add crunch. Consider serving them with a simple salad for a complete meal. To make your wings spicier, add more cayenne pepper to the seasoning mix. You can also drizzle extra hot sauce on top after cooking. Another option is to use spicy flavored sauces. These changes will kick up the heat and satisfy your taste buds. You learned how to make tasty air fryer spicy garlic parmesan wings. We covered ingredients, cooking steps, and helpful tips. Now you can get crispy wings with great flavor. Remember, you can tweak spice levels and try new sauces to make it just right. Store leftovers properly for future snacks. Enjoy your wings at your next meal or party! Happy cooking!

Air Fryer Spicy Garlic Parmesan Wings Tasty Delight

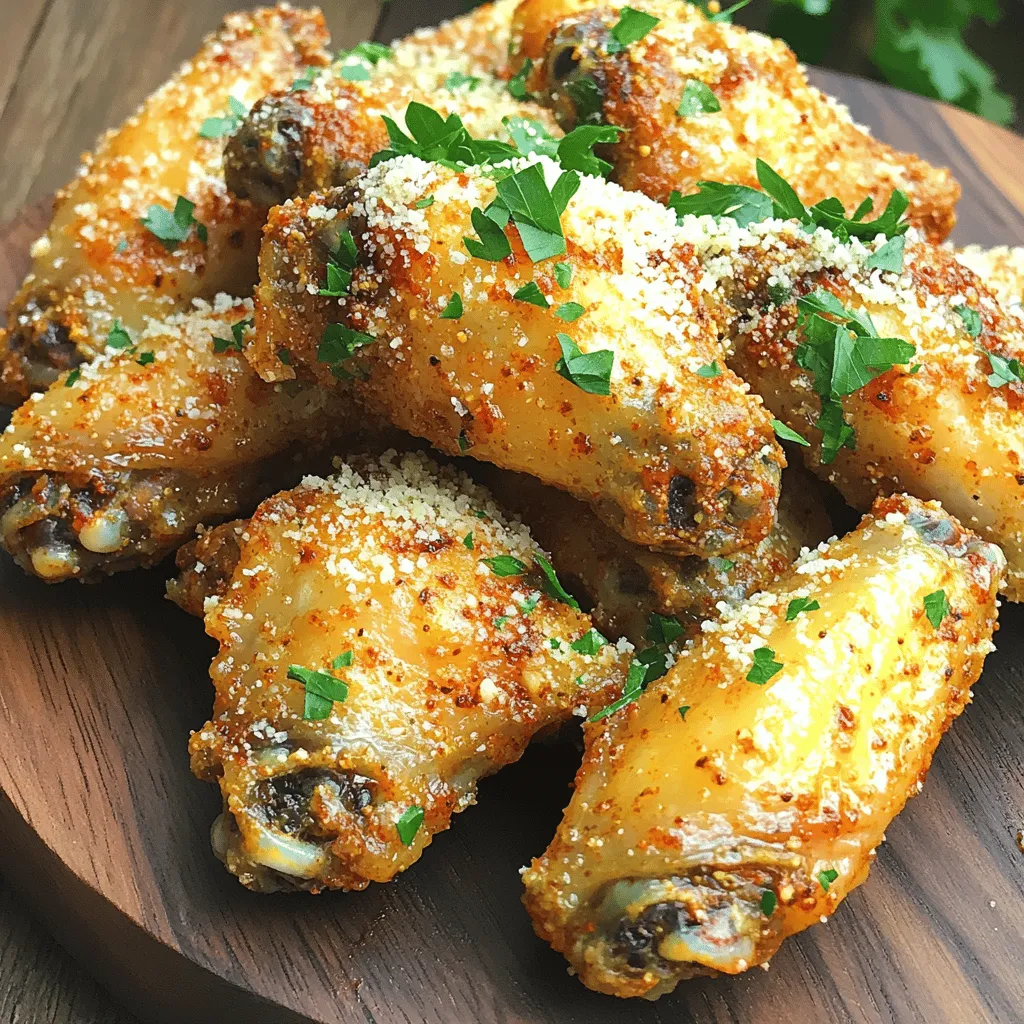
Are you ready to take your wing game to the next level? Air Fryer Spicy Garlic Parmesan Wings are a

Older posts
Newer posts
← Previous Page1 … Page25 Page26 Page27 … Page84 Next →

dsad

© 2026 Lisa Dishes • Built with GeneratePress

Our Policies

  • Copyright Policy
  • Cookie Policy
  • GDPR Policy
  • Privacy Policy
  • Disclaimer
  • Terms Of Use

More Information

  • Home
  • About
  • Contact
  • Appetizers
  • Dessert
  • Dinner
  • Drinks
©2026, Lisa Dishes About Back To Top