Skip to content
DisclaimerTerms Of UseGDPR PolicyCookie Policy

Lisa Dishes

  • Home
  • Drinks
  • Appetizers
  • Dinner
  • Dessert
  • About
  • Contact
  • Privacy Policy
DisclaimerTerms Of UseGDPR PolicyCookie Policy

NO-ING-IMG

- 1 can (15 oz) chickpeas, drained and rinsed - 1 cup cooked quinoa - 1 cup cherry tomatoes, halved - 1 cucumber, diced - 1/4 red onion, thinly sliced - 1/2 cup Kalamata olives, pitted and halved - 1/4 cup feta cheese, crumbled - 2 tablespoons fresh dill, chopped - Zest and juice of 1 lemon - 2 tablespoons olive oil - Salt and pepper to taste For this Greek Lemon Dill Chickpea Bowl, you will need simple, fresh ingredients. Start with a can of chickpeas. They give protein and fiber. You will also need cooked quinoa. It adds a nutty taste and more protein. Next, gather some cherry tomatoes. These will bring sweetness and color. A crisp cucumber adds a refreshing crunch. A little red onion gives a nice bite. Kalamata olives add briny flavor. Crumbled feta cheese makes it creamy and rich. Fresh dill is key for that bright taste. Don’t forget the lemon! You will use both zest and juice for a fresh zing. Olive oil helps bring everything together. Finally, salt and pepper will enhance all the flavors. This bowl is easy to make and so good for you! You can add garnishes like extra dill or lemon wedges for a pretty touch. Just mix all these ingredients, and you'll have a colorful and tasty meal ready in no time! 1. Combining ingredients for the base Start with a large mixing bowl. Add the drained and rinsed chickpeas. Next, include the cooked quinoa. Then, toss in the halved cherry tomatoes, diced cucumber, thinly sliced red onion, and halved Kalamata olives. This mix gives you a colorful and tasty base. 2. Mixing the dressing ingredients In a small bowl, whisk together the lemon zest and juice. Add olive oil, fresh dill, salt, and pepper. Whisk until the dressing is well mixed. This blend brings a bright flavor to your dish. 3. Tossing and marinating the salad Pour the dressing over the chickpea mixture. Gently toss it all together. Make sure every ingredient gets coated. Let the salad sit for 10 to 15 minutes. This time lets the flavors blend and deepen. 1. Presenting in bowls with feta cheese Spoon the chickpea mixture into colorful bowls. Top each bowl with crumbled feta cheese. This adds a creamy touch and enhances the taste. 2. Optional garnishes and enhancements For extra flair, garnish with additional dill sprigs. You can also add lemon wedges on the side. A drizzle of olive oil on top can enhance the flavor even more. Enjoy your fresh and simple meal! To enhance the lemon and dill flavor, I suggest using fresh herbs. Fresh dill adds a bright taste. You can also use lemon zest for an extra zing. This zest brings out the citrus flavor in a fun way. If you want a bit of heat, try adding a pinch of red pepper flakes. This will wake up the whole dish. Adding texture is key to a great bowl. I love using crunchy cucumbers and juicy cherry tomatoes. Kalamata olives add a nice briny bite. Consider adding roasted nuts for even more crunch. Almonds or pistachios work well here. They add a great nutty flavor that pairs nicely with the chickpeas. For cooking quinoa, rinse it first to remove bitterness. Use a 2:1 water-to-quinoa ratio for best results. Bring it to a boil, then lower the heat. Cover and let it simmer for about 15 minutes. Fluff it with a fork when done. When chopping vegetables, keep your knife sharp. This makes cutting easier and safer. For even pieces, cut tomatoes in half and cucumbers in small dices. Slice red onion thinly for a mild flavor. This will help all the flavors blend well in your bowls. {{image_2}} You can switch out chickpeas with black beans or lentils. Both offer a nice texture. If you want a grain swap, try brown rice or farro instead of quinoa. They bring a hearty feel to your bowl. For those who follow a vegan diet, you can skip the feta cheese. Instead, try using crumbled tofu or a nut-based cheese. These options keep the creamy taste while keeping it plant-based. Take your Greek Lemon Dill Chickpea Bowls up a notch with Mediterranean twists. Add roasted red peppers or artichokes for a new flavor. A sprinkle of za'atar spice can bring a warm, herby taste. You might also try mixing in different herbs. Fresh parsley or mint can add a refreshing twist. A dash of cumin offers warmth and depth. Be creative! Each change makes the dish uniquely yours. To keep your Greek Lemon Dill Chickpea Bowls fresh, use airtight containers. Glass or plastic containers work well. Make sure to cool the dish before sealing it. In the fridge, the leftovers stay good for about 3 to 4 days. If you want to keep it longer, freezing is a great option. Yes, you can freeze the chickpea mixture! Just pack it in a freezer-safe container. Leave some space at the top, as it will expand when frozen. For best taste, use it within 3 months. When you're ready to eat, place it in the fridge overnight to thaw. To reheat, warm it on the stove or in the microwave. Just add a splash of water to keep it moist. Enjoy your meal just like it was fresh! Can I make this recipe ahead of time? Yes, you can prepare this recipe in advance. Make the chickpea mix and dressing separately. Store them in the fridge. Combine them just before serving. This will keep the flavors fresh and bright. What can I serve with these bowls? These bowls pair well with pita bread or a side of hummus. You can also add grilled chicken or fish for extra protein. A light green salad would also complement the dish nicely. How long do chickpea bowls last in the refrigerator? These bowls last about 3 to 4 days in the fridge. Make sure to store them in an airtight container. Check for freshness before eating, especially if you added feta cheese. Calories in Greek Lemon Dill Chickpea Bowls Each serving of Greek Lemon Dill Chickpea Bowls has around 350 calories. This can vary based on your choice of extras. For a lighter meal, skip the feta cheese or use less olive oil. Health benefits of the ingredients used Chickpeas are high in protein and fiber. They help keep you full and satisfied. Quinoa is a great source of complete protein. The fresh veggies add vitamins and minerals. Dill is rich in antioxidants, and lemon juice boosts your vitamin C intake. Overall, this meal is nutritious and filling. You learned how to make Greek Lemon Dill Chickpea Bowls with fresh ingredients. We covered the detailed ingredient list, preparation steps, and serving suggestions. Tips on flavor combinations and variations added fun twists. You can also find storing methods and answers to common questions. Now, you have all you need to create this tasty dish. Enjoy exploring flavors and making it your own!

Greek Lemon Dill Chickpea Bowls Fresh and Simple Meal

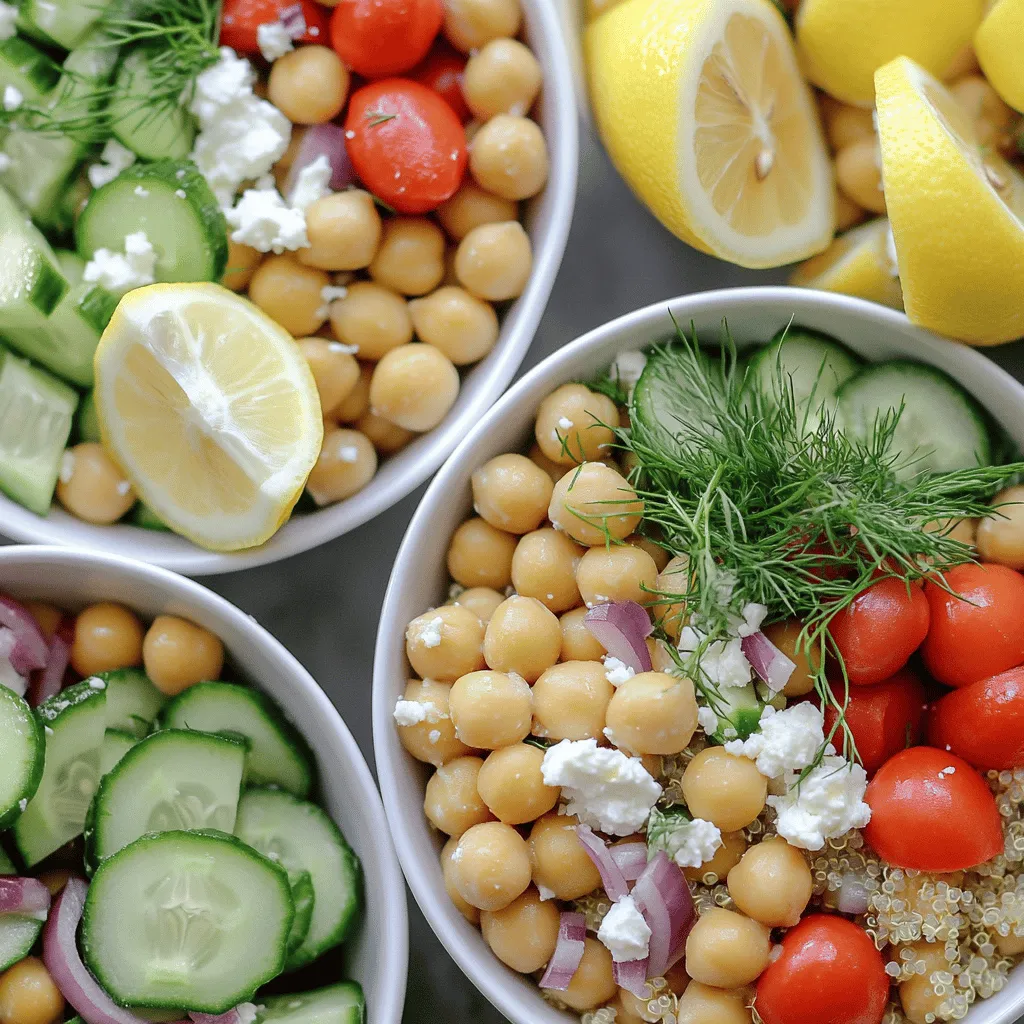
If you’re looking for a vibrant meal that’s both fresh and simple, Greek Lemon Dill Chickpea Bowls are your answer.

- 1 cup unsalted butter, melted - 1 cup packed brown sugar - 1/2 cup granulated sugar - 2 large eggs - 2 teaspoons vanilla extract - 2 cups all-purpose flour - 1 teaspoon baking powder - 1/2 teaspoon baking soda - 1/2 teaspoon salt - 1 cup chopped apples - 1/2 cup salted caramel sauce - Sea salt for sprinkling To make salted caramel apple blondies, you need simple ingredients. I find that using fresh apples enhances the flavor. You can use about one or two medium apples, depending on their size. The butter adds richness, while the sugars give it that sweet taste. The salt in the recipe balances the sweetness perfectly. Use quality vanilla extract for the best flavor. I often recommend checking the label for pure vanilla, as it makes a difference. Baking powder and baking soda help the blondies rise and stay soft. When you mix the ingredients, make sure to fold the apples in gently. This keeps the apples intact and makes the blondies more fun to eat. The salted caramel sauce adds a lovely layer of flavor. You can make it at home or buy it. Lastly, don't forget the sea salt for sprinkling. It gives that extra touch. This combination of flavors creates a delightful dessert treat. Enjoy making these blondies! First, preheat your oven to 350°F (175°C). This step is key for even baking. Next, take a 9x13 inch baking pan. Grease it well or line it with parchment paper. This will help you remove the blondies easily later. In a large mixing bowl, add 1 cup of melted unsalted butter. Then, mix in 1 cup of packed brown sugar and 1/2 cup of granulated sugar. Use a whisk to blend them until smooth. Now, crack in 2 large eggs. Whisk each egg in well before adding the next one. Finally, stir in 2 teaspoons of vanilla extract for flavor. In another bowl, whisk together 2 cups of all-purpose flour, 1 teaspoon of baking powder, 1/2 teaspoon of baking soda, and 1/2 teaspoon of salt. This mix adds structure to your blondies. Slowly fold the dry mix into the wet ingredients. Stop mixing when just combined; this keeps your blondies soft. Now it’s time to add some fun! Gently fold in 1 cup of chopped apples and 1/4 cup of salted caramel sauce. Use a spatula to mix carefully. Don't overmix; you want to keep those apple pieces intact for texture. Pour the batter into your prepared pan. Spread it evenly. Drizzle the remaining salted caramel sauce on top. Use a knife to swirl it into the batter. This adds flavor throughout. Bake for 25-30 minutes. Check with a toothpick; it should come out clean or with a few moist crumbs. Once baked, take the pan out of the oven. Let the blondies cool completely in the pan. This helps them set. Before serving, sprinkle sea salt on top. This adds the perfect touch of flavor to balance the sweetness. Enjoy your salted caramel apple blondies warm or at room temperature! To get that soft and chewy texture, use melted butter. It helps make the blondies rich. Do not overmix the batter. This causes them to become tough. Add the apples gently. They should blend in without breaking apart. Bake until just golden on top. This keeps them moist and delicious. To make your own salted caramel sauce, start with sugar. Heat it in a pan until it melts. Stir it gently to avoid burning. Once melted, add butter and mix well. Carefully pour in cream and stir until smooth. Finally, add a pinch of sea salt. This sauce is great for drizzling on your blondies. Cut the blondies into even squares. Arrange them on a rustic wooden board for a nice look. Drizzle extra salted caramel on top. A sprinkle of sea salt adds a nice touch. Serve with a scoop of vanilla ice cream. This makes the dessert extra special and inviting. {{image_2}} You can make your blondies even better by adding nuts or chocolate chips. Nuts like walnuts or pecans add crunch and flavor. You can also mix in chocolate chips for a sweet touch. Just fold in about 1/2 cup of your choice. This will create a fun flavor mix with the apples and caramel. If you want to switch it up, try different fruits. Pears or peaches work well in these blondies. You can also use berries like blueberries or raspberries. Just chop them into small pieces and mix them in. This change will give your blondies a unique taste while keeping them moist. For a gluten-free version, swap the all-purpose flour. Use a gluten-free flour blend instead. Make sure to check the blend contains xanthan gum. This will help keep your blondies soft and chewy. Follow the same steps as in the original recipe, and you will have a tasty gluten-free treat. To keep your salted caramel apple blondies fresh, store them in an airtight container. Place parchment paper between layers to avoid sticking. Blondies stay best at room temperature for up to three days. If you want them to last longer, refrigerate them. They can last up to a week in the fridge. Freezing blondies is easy and a great way to save them. First, let them cool completely. Then, cut them into squares. Wrap each square tightly in plastic wrap. Place the wrapped blondies in a freezer bag or container. They will stay fresh for up to three months in the freezer. To enjoy, just thaw them overnight in the fridge. When you want to enjoy your blondies again, reheating them is simple. Preheat your oven to 350°F (175°C). Place the blondies on a baking sheet and heat for about 10 minutes. This warms them up nicely and brings back the gooey caramel. You can also use a microwave. Heat each blondie for 15-20 seconds. Just be careful not to overheat them, or they may get dry. You can tell when blondies are done by checking the center. Insert a toothpick into the middle. If it comes out clean or with a few moist crumbs, they are ready. If there is wet batter, bake them a little longer. This ensures a soft and chewy texture. Yes, you can use many types of apples in this recipe. Sweet apples like Fuji or Gala work well. Tart apples like Granny Smith add a nice contrast. Feel free to mix different apples for a fun twist. Using fresh eggs is generally safe for most people. However, if you have concerns, look for pasteurized eggs. They reduce the risk of foodborne illness while still giving you that rich flavor. Salted caramel apple blondies can last up to a week. Store them in an airtight container at room temperature. If you want them to last longer, keep them in the fridge. Just remember to let them warm up before eating for the best taste. Yes, you can substitute brown sugar with coconut sugar or a light granulated sugar. Using honey or maple syrup can also work, but it may change the texture. Adjust the liquid in the recipe if you use a liquid sweetener. You can whip up tasty salted caramel apple blondies with simple steps. First, gather the ingredients and follow the easy instructions. Mix your wet and dry items, then fold in apples and caramel. Don't forget the fun tips for texture and presentation! You can even try variations with nuts or gluten-free options. Store any leftovers well to enjoy later. Overall, these blondies are a crowd-pleaser and fun to make. Enjoy every bite of your sweet creation!

Salted Caramel Apple Blondies Delightful Dessert Treat

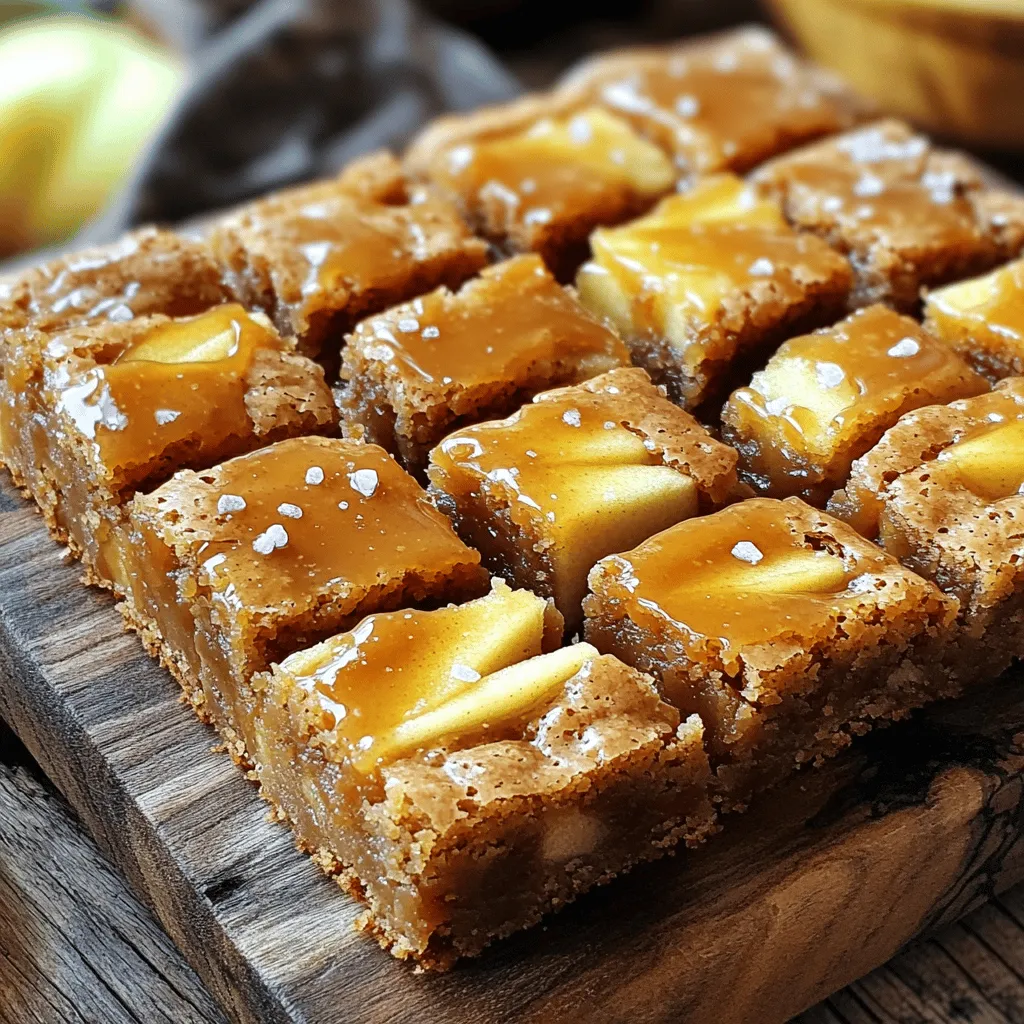
Craving a sweet treat that marries the cozy flavors of fall? Discover my recipe for Salted Caramel Apple Blondies! These

- 14 oz (400g) firm tofu, drained and pressed - 2 tablespoons cornstarch - 3 tablespoons vegetable oil - 3 cloves garlic, minced - 1 tablespoon fresh ginger, minced - 1 red bell pepper, sliced - 1 yellow bell pepper, sliced - 1 cup broccoli florets - 2 green onions, chopped (white and green parts separated) - 2 tablespoons soy sauce - 1 tablespoon chili paste (adjust for heat preference) - 1 teaspoon sesame oil - Salt and pepper to taste The main ingredients in this dish shine through their flavors. Firm tofu is the star. It soaks up all the sauce and adds a nice texture. The fresh vegetables provide crunch and color. The garlic and ginger bring warmth to every bite. You can adjust the chili paste to control the heat. This recipe lets you balance flavors perfectly. - Sesame seeds - Chopped green onions Adding garnishes makes your dish pop. Sesame seeds add a nice crunch. Chopped green onions give a fresh taste. You can sprinkle them on top just before serving. These small touches elevate the whole meal. They make it look and taste even better. Start by cutting the pressed tofu into bite-sized cubes. This size helps them cook evenly. Pat the cubes dry with a paper towel. Getting them dry is key for nice crispy tofu. Next, toss the cubes in a bowl with cornstarch. Make sure each piece gets a good coating. This will form a crisp layer when you fry them. Now it’s time to fry the tofu. Heat vegetable oil in a large skillet or wok over medium-high heat. Once the oil is hot, carefully add the tofu cubes in a single layer. Fry them for about 3-4 minutes on each side. Look for a golden brown color and a crispy texture. When done, remove the tofu from the skillet and set it aside. In the same skillet, add minced garlic and ginger. Sauté them for about 30 seconds. Keep an eye on them to avoid burning. The aromas will fill your kitchen and signal it’s time for the next step. Now, add sliced red and yellow bell peppers and broccoli florets to the skillet. Stir-fry these for about 4-5 minutes. You want the veggies to be tender but still crisp. Next, return the crispy tofu to the skillet and mix it well with the vegetables. In a small bowl, whisk together soy sauce, chili paste, and sesame oil. Pour this sauce over the tofu and veggies. Stir to coat everything well. Cook for an extra 2-3 minutes to heat through. This melds all the flavors beautifully. Finally, season with salt and pepper to taste. Add the chopped green onion's white parts for an extra flavor punch. Now you’re ready to serve! Garnish with sesame seeds and the green parts of the chopped green onions. Enjoy this tasty meal! To get crispy tofu, start by drying it well. Press the tofu to remove extra moisture. This step is key. Wet tofu will steam instead of fry, so use a clean towel. Next, coat the tofu cubes in cornstarch. This helps create a crunchy crust. Make sure each piece is covered evenly. When frying, use hot oil and don’t crowd the pan. Frying in batches will help them cook better and stay crispy. You can adjust the spice levels with chili paste. If you like it hot, add more. If you prefer mild, use less. This way, you control the heat to fit your taste. For sauces, soy sauce is great, but you can mix it with others. Try adding hoisin sauce for a sweet touch. You can also use oyster sauce for depth. Each sauce gives a new twist to the dish. Don’t be afraid to experiment! {{image_2}} You can swap in many veggies for this stir fry. Here are some ideas: - Snap peas: These add a nice crunch. - Carrots: Thinly sliced, they bring a sweet flavor. - Zucchini: Cut into half-moons for a juicy bite. - Mushrooms: Use shiitake or button for umami depth. Consider the season when choosing vegetables. In spring, use fresh asparagus. In fall, try sweet squash. You can mix and match based on what you like or what you have at home. Tofu is great, but you can try other proteins too. Here are some options: - Chicken: Cut into small pieces and cook until golden. - Shrimp: Fast to cook; add them just before the sauce. - Tempeh: A firmer plant-based choice, full of protein. - Seitan: A wheat-based meat alternative, perfect for texture. If you want it fully plant-based, stick with more tofu or tempeh. You can also add nuts like cashews for a crunchy twist. This keeps your meal hearty and satisfying. To keep your chili garlic tofu stir fry fresh, let it cool first. Transfer it to an airtight container. This method helps keep out air and moisture. Your stir fry will last about 3-4 days in the fridge. Make sure to label the container with the date for easy tracking. When you’re ready to enjoy leftovers, there are quick ways to reheat. Use a microwave for about 1-2 minutes. Stir halfway for even heating. You can also use a skillet over medium heat. Add a splash of water or oil to help maintain moisture. This keeps your tofu crispy, so it tastes just as good as when it was first made. No, soft tofu does not work well here. It is too delicate and will break apart. Firm tofu holds its shape better during cooking. It also gets crispy when fried. Using firm tofu gives you a nice texture. You can use tamari for a gluten-free option. Coconut aminos is another great choice. Both options add flavor without soy. Just remember, they may taste a bit different. Adjust the amount to suit your taste. Yes, this dish is great for meal prep. It stores well in the fridge for about 3 days. Keep the tofu and veggies in separate containers to maintain crispness. Reheat in a skillet for best texture. You can also add fresh greens when serving to keep it vibrant. Absolutely! Feel free to add your favorite veggies. Snap peas, carrots, or zucchini make great additions. Just be sure to adjust cooking times for different veggies. You want everything to stay crisp and tasty. You can control the spice by changing the chili paste amount. Start with less if you prefer mild. You can always add more spice later. Adding fresh chilies can also boost heat if desired. If you need a substitute, consider using olive oil or any neutral oil. While they won't have the same flavor, they will work for cooking. You might miss that nutty taste, so add a sprinkle of sesame seeds for extra flavor. In this article, we covered how to make a tasty stir-fry using firm tofu, fresh veggies, and key seasonings. I shared tips for achieving crispy tofu and ways to enhance flavor. You can also explore alternative veggies and proteins for variety. Proper storage and reheating will keep your leftovers fresh. Enjoy your cooking journey with this simple and healthy dish!

Chili Garlic Tofu Stir Fry Flavorful and Easy Recipe

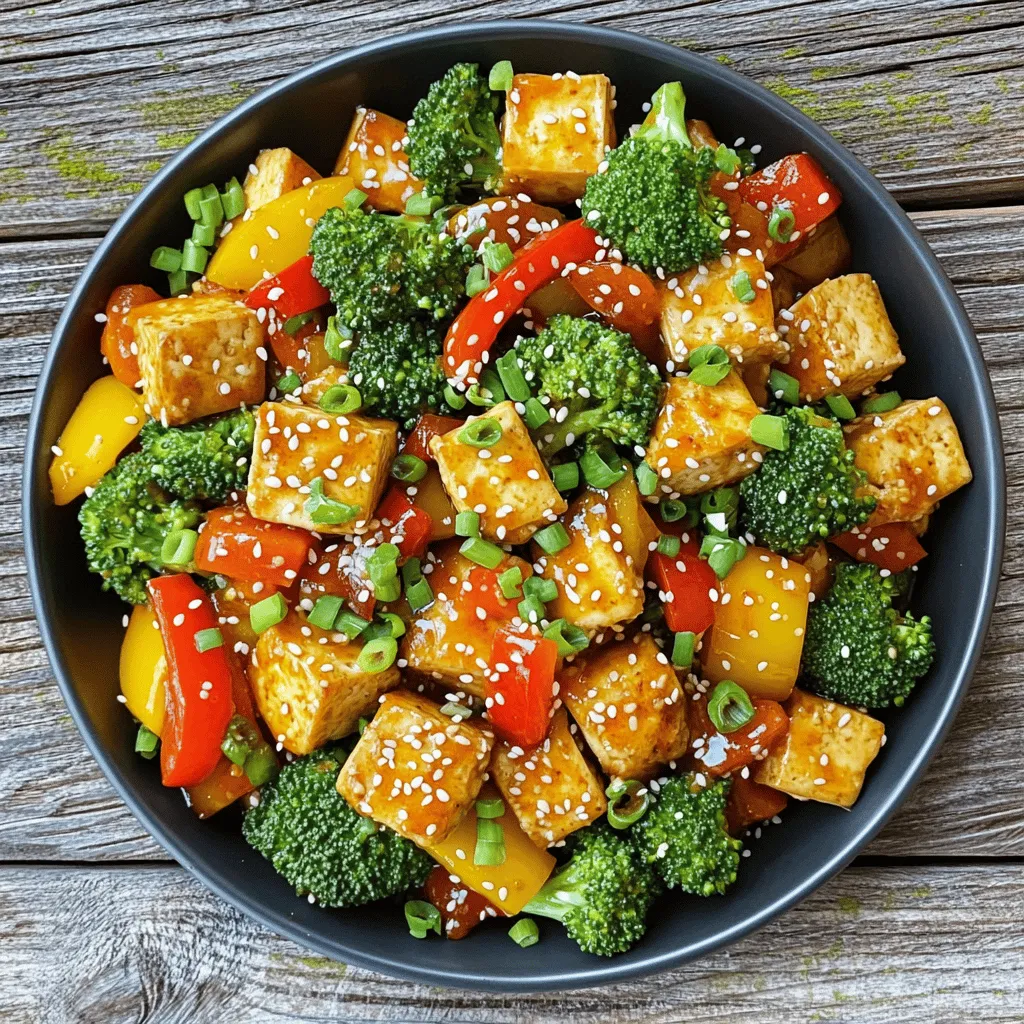
Are you ready for a tasty meal that’s quick and easy? This Chili Garlic Tofu Stir Fry packs bold flavors

- 4 chicken sausages, sliced into rounds - 2 cups baby potatoes, halved - 1 bell pepper (red or yellow), chopped - 1 zucchini, sliced - 1 red onion, cut into wedges - 4 cloves garlic, minced - 3 tablespoons olive oil - 1 tablespoon fresh rosemary, chopped - 1 tablespoon fresh thyme, chopped - 1 teaspoon smoked paprika - Salt and pepper to taste - Fresh parsley, chopped (for garnish) Gather these ingredients to make a tasty Garlic Herb Chicken Sausage Sheet Pan meal. Chicken sausage is full of flavor and cooks quickly. Baby potatoes add a nice texture. You can use any bell pepper you like; red or yellow both work great. Zucchini gives a fresh crunch, while the red onion adds sweetness. I love using fresh garlic in this recipe. It brings a strong taste to the dish. Olive oil helps everything roast nicely. The rosemary and thyme add an earthy note. Smoked paprika gives a hint of warmth. Don’t forget salt and pepper; they bring all the flavors together. Once you have everything, you are ready to start cooking. The fresh parsley at the end makes for a lovely garnish. It adds color and a fresh taste. Enjoy the process, and get ready for a delightful meal! - Preheat your oven to 425°F (220°C). - In a large mixing bowl, combine the sliced chicken sausages, halved baby potatoes, chopped bell pepper, sliced zucchini, and red onion wedges. This mix of colors and textures is key to a great dish. - In a small bowl, whisk together the minced garlic, olive oil, chopped rosemary, chopped thyme, smoked paprika, salt, and pepper. This mixture adds a burst of flavor to your meal. Make sure it's well combined so every bite is tasty. - Spread the mixture on a large sheet pan in a single layer. This helps everything roast evenly and get a nice golden-brown color. - Bake for 25-30 minutes. Stir the pan halfway to ensure even cooking. You want the sausages cooked through and the veggies tender and caramelized. This step is crucial for a delicious meal. Enjoy watching it roast and fill your kitchen with great aromas! When you pick chicken sausages, look for high quality. Check the label for natural ingredients. Fresh chicken sausages should smell good and feel firm. You want them to have a nice snap when you bite into them. For fresh vegetables, choose ones that are bright and firm. Baby potatoes should be smooth and free from spots. Bell peppers should have a shiny skin and feel heavy for their size. Zucchini should be small, firm, and free from blemishes. Always smell your veggies; they should have a fresh scent. Ovens can vary. If yours cooks hot, check the sausage early. You may need less time. For even cooking, layer your ingredients well. Spread them in a single layer on the sheet pan. This helps everything roast evenly. If they are packed too close, some may steam instead of roast. Stir the mixture halfway through cooking. This helps to brown all sides. Use a spatula to flip things gently, so everything stays intact. This dish pairs well with fresh sides. A simple green salad adds a nice crunch. You can also serve it with bread or a dip. A tangy yogurt sauce or hummus would be great choices. For garnishing, fresh parsley adds color and flavor. Sprinkle it on top just before serving. You can also add lemon zest for a bright touch. Arrange everything nicely on the plate. A colorful spread makes the meal more inviting. {{image_2}} You can mix up the veggies in this dish. Instead of zucchini and bell peppers, try these options: - Carrots, sliced - Broccoli florets - Cauliflower, cut into bite-sized pieces - Asparagus, trimmed In summer, use fresh tomatoes or green beans. In fall, consider butternut squash or Brussels sprouts. These choices keep it fresh and fun. Want more flavor? Here’s how to kick it up: - Add red pepper flakes for heat. - Try fresh basil or oregano for a twist. - A splash of balsamic vinegar adds depth. You can also use different sausage types. Try spicy sausage for a kick or sweet Italian sausage for a milder taste. Each option gives a new twist. Need to modify for diet? Here are some ideas: - For low-carb, swap baby potatoes for cauliflower rice. - To make it gluten-free, ensure your sausage is gluten-free. If you want a vegan option, replace chicken sausage with plant-based sausage. Use chickpeas or lentils for protein. These swaps keep the dish tasty for everyone. To keep your Garlic Herb Chicken Sausage Sheet Pan fresh, store it in an airtight container. Place it in the fridge within two hours of cooking. The cold helps stop bacteria growth. If you want to keep it longer, freeze it. Use freezer-safe bags or containers. Make sure to remove as much air as you can before sealing. When it's time to eat your leftovers, you have a few good options. For the best taste, reheat in the oven. Set your oven to 350°F (175°C). Bake for about 15-20 minutes. This keeps the sausage juicy and the veggies crisp. You can also use the microwave, but it may make the food a bit soggy. If you use the microwave, heat in short bursts and stir in between. Your Garlic Herb Chicken Sausage Sheet Pan will last about 3-4 days in the fridge. Make sure it stays in an airtight container. If you freeze it, it can last up to 3 months. Just remember to label and date your containers. This way, you can enjoy your meal later without guesswork. You can pair this dish with many tasty sides. Here are some great options: - Steamed broccoli: It adds a nice crunch and green color. - Mixed greens salad: A fresh salad brightens the meal and adds texture. - Quinoa or rice: These grains soak up the juices and make it filling. - Garlic bread: For a delicious, buttery side that everyone loves. Each of these sides brings a unique flavor and texture to your meal. You can mix and match based on what you like! Yes, you can use pre-cooked chicken sausage. It saves time and is very convenient. If using pre-cooked sausage: - Cut down cooking time: Bake for about 15-20 minutes instead of 25-30 minutes since the sausage is already cooked. - Check for warmth: Make sure the sausage is heated through before serving. This way, you still enjoy the great flavors of the dish! Absolutely! This recipe is perfect for meal prep. Here are some tips for preparing in advance: - Prepare in batches: You can make a larger batch and store leftovers. - Use airtight containers: Store portions in the fridge for up to 4 days. - Reheat properly: Warm it in the oven or microwave before eating. Meal prepping saves time and ensures you have a healthy option ready. Enjoy! This recipe for Garlic Herb Chicken Sausage Sheet Pan offers a simple and tasty meal. You learned about the necessary ingredients, step-by-step cooking instructions, and helpful tips. You can switch up the veggies and flavors to make it your own. Plus, proper storage ensures that leftovers stay fresh. Easy to prepare and full of flavor, this dish fits well into any meal plan. Enjoy making it, and share it with friends and family!

Garlic Herb Chicken Sausage Sheet Pan Delight

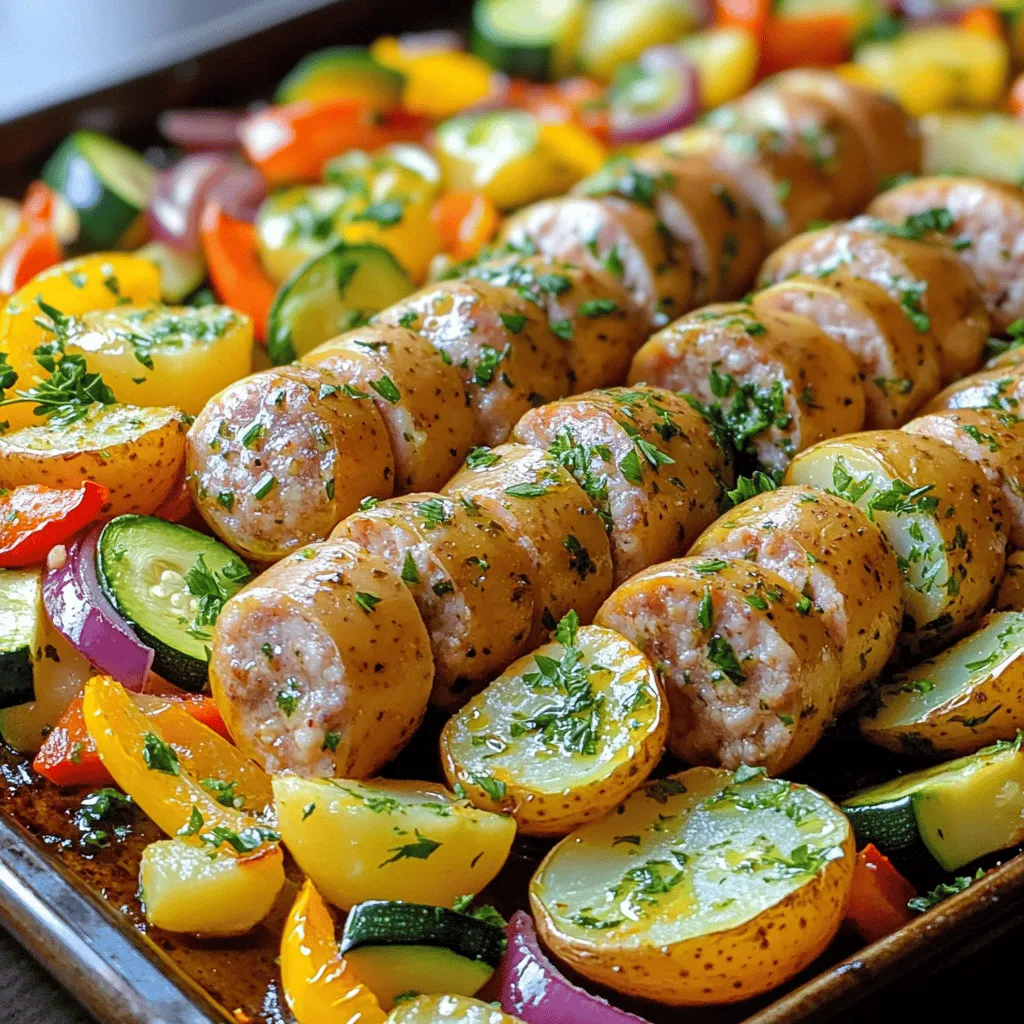
Welcome to the world of easy, tasty meals! Today, I’m sharing my favorite dish: Garlic Herb Chicken Sausage Sheet Pan

To make these tasty oatmeal cups, you need these main ingredients: - 2 cups rolled oats - 1/2 cup peanut butter (creamy or crunchy) - 1/4 cup honey or maple syrup - 1/4 cup unsweetened cocoa powder - 1/2 cup milk (dairy or plant-based) - 1 ripe banana, mashed - 1 teaspoon vanilla extract - 1/2 teaspoon baking powder - 1/4 teaspoon salt These ingredients work together to create a soft and chewy texture. The rolled oats give a hearty base. The peanut butter adds creaminess and protein. Cocoa powder gives a rich chocolate flavor, while honey or maple syrup adds sweetness. You can make these oatmeal cups even more fun by adding extra flavors. Consider these options: - 1/2 cup chocolate chips - 1/4 cup chopped nuts (like almonds or walnuts) Chocolate chips bring extra sweetness and a gooey texture. Nuts add crunch and healthy fats. Feel free to mix and match based on your taste! If you have specific dietary needs, don't worry! You can easily swap some ingredients: - Use almond butter or sunflower seed butter instead of peanut butter for nut-free options. - Maple syrup can replace honey for vegan recipes. - For gluten-free, ensure you use gluten-free oats. These swaps allow anyone to enjoy these delicious snacks. Start by preheating your oven to 350°F (175°C). This step is key for even baking. Next, get your muffin tin ready. You can grease it with oil or use paper liners. Either way works well! In a large mixing bowl, add 2 cups of rolled oats, 1/4 cup of cocoa powder, 1/2 teaspoon of baking powder, and 1/4 teaspoon of salt. Mix them well. Make sure there are no lumps. This mix gives the cups their texture and flavor. Grab another bowl for your wet ingredients. Whisk together 1/2 cup of peanut butter, 1/4 cup of honey or maple syrup, 1 ripe mashed banana, 1/2 cup of milk, and 1 teaspoon of vanilla extract. Keep whisking until it’s smooth. This mix adds creaminess and sweetness to the cups. Now, pour the wet mix into the dry ingredients. Stir until everything is combined. If you want, fold in 1/2 cup of chocolate chips or 1/4 cup of chopped nuts. Then, fill each muffin cup about 3/4 full. Bake them in the oven for 15-18 minutes. Check with a toothpick; it should come out clean when done. Once baked, take the cups out of the oven. Let them cool in the tin for 10 minutes. After that, move them to a wire rack to cool completely. For serving, drizzle extra peanut butter on top and sprinkle more chocolate chips. Enjoy your tasty, healthy snack! To get the best texture, use rolled oats. They give a chewy bite. Mix the dry ingredients well to avoid lumps. This makes sure the cocoa and baking powder spread evenly. When you mix the wet ingredients, make sure the peanut butter is smooth. A creamy peanut butter works best. If you want a crunchier cup, add chopped nuts. You can also fold in chocolate chips to boost flavor. To keep your oatmeal cups fresh, store them in an airtight container. They can last up to five days at room temperature. For longer storage, put them in the fridge. They will stay good for up to a week. If you want to freeze them, wrap each cup in plastic wrap. Then place them in a freezer bag. They will keep for up to three months. To enjoy later, just thaw them in the fridge overnight. Serving ideas can elevate your oatmeal cups. Try drizzling warm peanut butter on top just before serving. This adds a creamy touch. You can sprinkle extra chocolate chips or nuts for texture. Fresh fruit, like banana slices or berries, also makes a great topping. Serve them with a side of yogurt for a balanced snack. You can even pair them with a glass of milk for a filling treat. {{image_2}} You can spice up your Chocolate Peanut Butter Oatmeal Cups easily. Try adding a pinch of cinnamon for warmth. A little nutmeg gives a cozy touch too. If you love a hint of mint, add a few drops of peppermint extract. You can also explore different extracts like almond or coconut. Each addition changes the taste, making it fun to experiment! If you want to reduce sugar, replace honey with mashed dates or a sugar-free syrup. Stevia or monk fruit sweetener works well too. These swaps keep the sweetness without extra calories. Adjust the amount based on your taste. You can still enjoy these cups guilt-free! For those with nut allergies, use sunbutter or soy nut butter instead of peanut butter. These options mimic the creamy texture and taste. You can also skip the nut toppings altogether. Feel free to add seeds instead, like pumpkin or sunflower seeds. This way, everyone can enjoy these tasty treats! To keep your Chocolate Peanut Butter Oatmeal Cups fresh, store them in an airtight container. This helps lock in moisture and flavor. Place the container in the fridge if you plan to eat them within a week. For longer storage, use the freezer. You can stack them with parchment paper between layers to prevent sticking. To freeze your oatmeal cups, let them cool completely first. Once cool, place them in a freezer-safe bag or container. They can last up to three months in the freezer. When you're ready to enjoy them, take out the desired amount. Thaw them in the fridge overnight or at room temperature for a few hours. For the best taste, reheat your oatmeal cups in the oven. Preheat the oven to 350°F (175°C). Place the cups on a baking sheet and warm them for about 10 minutes. You can also microwave them for about 30 seconds to 1 minute. Just make sure to watch them closely to avoid overheating. Enjoy your tasty treat warm! Yes, you can make these oatmeal cups vegan. Replace the honey with maple syrup. Use a plant-based milk like almond or oat milk. Choose a vegan chocolate chip for added sweetness. These oatmeal cups last about five days in the fridge. Store them in an airtight container to keep them fresh. You can also freeze them for up to three months. Serve the oatmeal cups warm for the best taste. Drizzle a bit of extra peanut butter on top. You can also sprinkle more chocolate chips for a fun touch. Yes, these oatmeal cups can be gluten-free. Use certified gluten-free rolled oats. Check your other ingredients to ensure they are also gluten-free. You can use almond butter or sunflower seed butter as a substitute. These options provide a similar creamy texture and flavor. Choose one that fits your dietary needs. In this post, I covered how to make Chocolate Peanut Butter Oatmeal Cups. You learned about the key ingredients and how to mix and bake them. I also shared tips for storage and serving options. Remember, you can swap ingredients to fit your taste and needs. These cups are not only tasty but simple to make. Enjoy experimenting with flavors and different add-ins. With these tips, you can create a delicious treat every time. Get ready to enjoy your oatmeal cups!

Chocolate Peanut Butter Oatmeal Cups Healthy Snack Option

Are you craving a healthy yet delicious snack that’s easy to make? Look no further! These Chocolate Peanut Butter Oatmeal

To make creamy pesto shrimp pasta, gather these simple ingredients: - 8 oz fettuccine or spaghetti - 1 lb jumbo shrimp, peeled and deveined - 2 tablespoons olive oil - 3 cloves garlic, minced - 1 cup heavy cream - 1/2 cup prepared basil pesto - 1/2 cup grated Parmesan cheese - Salt and pepper to taste - Fresh basil leaves for garnish - Cherry tomatoes, halved (for garnish) This creamy pesto shrimp pasta serves four and is a great choice for a weeknight meal. Each serving contains: - Calories: 550 - Protein: 30g - Carbohydrates: 50g - Fat: 25g - Fiber: 2g This dish offers a balance of protein, carbs, and healthy fats, making it a filling option. You can easily swap some ingredients for different flavors or dietary needs: - Use whole wheat or gluten-free pasta for a healthier option. - Substitute shrimp with chicken or tofu for a different protein. - Try a dairy-free cream alternative if you need a vegan dish. - Use homemade pesto for a fresher taste. These alternatives help you customize the dish to your liking while still keeping it delicious. Start by boiling water in a large pot. Add a pinch of salt to the water. Cook the pasta according to the package instructions for about 8-10 minutes. You want it to be al dente, meaning it should still have a slight bite. Once done, drain the pasta and save 1/2 cup of the pasta water. Set the pasta aside for now. In a large skillet, heat 2 tablespoons of olive oil over medium heat. Add 3 cloves of minced garlic and let it cook for about 1 minute. This will make your kitchen smell amazing! Next, add the pound of peeled and deveined shrimp to the skillet. Season the shrimp with salt and pepper. Cook each side for 2-3 minutes until the shrimp turns pink and opaque. Once cooked, remove the shrimp from the skillet and keep it warm on a plate. In the same skillet, lower the heat. Pour in 1 cup of heavy cream. Stir the cream gently and bring it to a simmer. Add 1/2 cup of prepared basil pesto and 1/2 cup of grated Parmesan cheese. Mix well until everything is combined and creamy. If the sauce feels too thick, add a bit of the reserved pasta water until you reach a smooth texture. Return the shrimp to the sauce and toss them gently to coat. Finally, add the cooked pasta to the skillet and mix until all the pasta is covered in that delicious creamy pesto sauce. Taste it, and if needed, add more salt and pepper. To make great pasta, start with a big pot of water. Use lots of salt in the water. This helps flavor the pasta. Cook the pasta until it's al dente. This means it’s firm, but not hard. Check the package for the right cooking time. Save half a cup of the pasta water. You can use this later to make the sauce even better. The key to a creamy sauce is heavy cream. When you add it to the garlic and oil, stir slowly. Let it heat up to a gentle simmer. This helps it blend well. If the sauce seems thick, add some pasta water. This will help it mix smoothly. Always stir in the pesto and cheese next. This adds flavor and creaminess. Taste is key! After mixing everything, taste the dish. Add salt and pepper as needed. You can also try garlic powder or red pepper flakes for more flavor. If you love herbs, fresh basil is great on top. Cherry tomatoes add a nice touch too. They give color and freshness to the dish. {{image_2}} You can easily make this dish vegetarian. Instead of shrimp, use mushrooms or zucchini. Both add great texture. You can also add more veggies like bell peppers or spinach. Just sauté them with garlic before adding the cream. This will give your dish a fresh and colorful look. If you need a gluten-free meal, swap regular pasta for gluten-free pasta. Many options are available, like rice or quinoa pasta. They cook similarly to regular pasta. Ensure you check the package for cooking times. The creamy pesto sauce works well with any pasta type. To boost flavor, try adding lemon juice or zest. This will brighten the dish and make it pop. For heat, add red pepper flakes while cooking the shrimp. You can also experiment with different herbs. Try adding fresh parsley or thyme for a unique twist. These small changes can make your meal even tastier! To keep your creamy pesto shrimp pasta fresh, store it in an airtight container. Make sure to cool the pasta to room temperature first. This way, it won't steam inside the container and create moisture. You can store it in the fridge for up to three days. If you want to keep it longer, consider freezing. When it's time to enjoy the leftovers, reheat the pasta gently. You can use the microwave or the stovetop. If using the microwave, heat it in short bursts. This prevents overcooking. If using the stovetop, add a splash of water or cream to help loosen the sauce. Stir frequently until it’s warm. To freeze this dish, first, let it cool completely. Then, place it in a freezer-safe container. It can last up to three months in the freezer. When you’re ready to eat, thaw it overnight in the fridge. Reheat as mentioned before. This keeps the flavors and texture intact. Yes, you can use frozen shrimp. Just remember to thaw them first. Place the shrimp in a bowl of cold water for about 15 minutes. Make sure they are fully thawed before cooking. This way, they will cook evenly. Cook the shrimp as you normally would in the recipe. They will turn pink and opaque when done. To add spice, try these simple tips. You can add red pepper flakes while cooking. Start with a pinch and taste as you go. You can also use spicy pesto instead of regular pesto. Another option is to add a dash of hot sauce to the creamy sauce. Adjust the spice to your taste. If you want to avoid heavy cream, you have options. You can use half-and-half for a lighter sauce. Another good choice is coconut milk for a dairy-free option. Greek yogurt can also work but will change the texture. Just mix it in slowly and adjust to your liking. This blog covered key steps to making a delicious creamy pesto shrimp pasta. We explored the ingredients, showed how to prepare the pasta, cook the shrimp, and create the sauce. I provided tips for cooking and options for different diets. Remember to store your dish correctly to keep it fresh. You can customize the recipe to suit your taste and needs. Enjoy trying new flavors! Happy cooking!

Creamy Pesto Shrimp Pasta Delightful Weeknight Meal

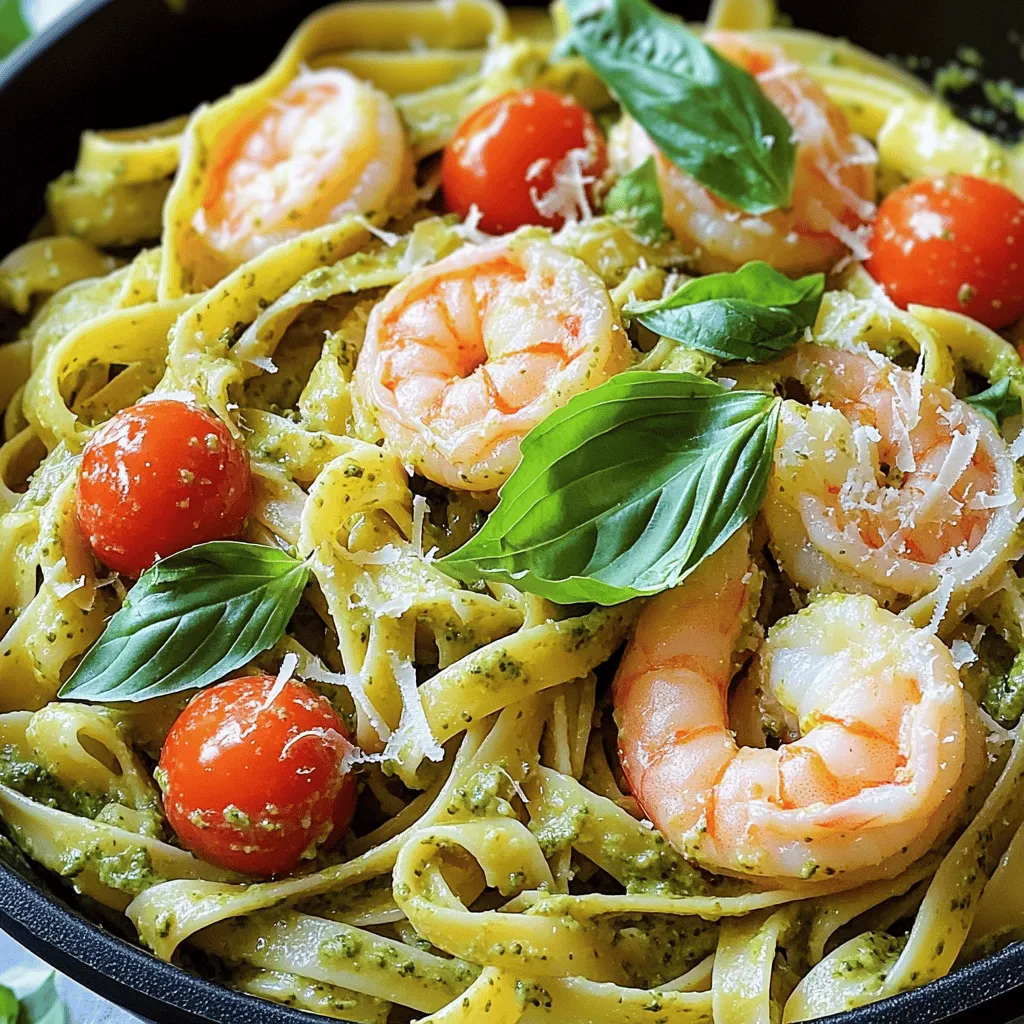
Looking for a quick meal that’s packed with flavor? You’ve found it! This Creamy Pesto Shrimp Pasta is your answer

To make Apple Cinnamon Coffee Cake Muffins, gather these main ingredients: - 2 cups all-purpose flour - 1 cup granulated sugar - 1 tablespoon baking powder - 1 teaspoon ground cinnamon - ½ teaspoon salt - ½ cup unsalted butter, softened - 2 large eggs - 1 cup milk - 1 teaspoon vanilla extract - 2 cups apples, peeled and diced (preferably Granny Smith or Honeycrisp) These ingredients blend perfectly to create muffins that are soft and flavorful. You can add extra flavor with these optional ingredients: - ½ cup chopped pecans or walnuts - ¼ cup brown sugar (for topping) - Extra cinnamon (for topping) Using nuts adds a nice crunch. The brown sugar topping gives a sweet finish. If you need to convert measurements, here is a quick guide: - 1 cup = 8 fluid ounces - ½ cup = 4 fluid ounces - 1 tablespoon = 3 teaspoons These conversions help when you need precise measurements for your baking. Start by preheating your oven to 350°F (175°C). Line your muffin tin with paper liners. If you prefer, grease the cups with cooking spray. This helps prevent sticking and makes cleanup easier. In a large mixing bowl, add 2 cups of all-purpose flour. Then, mix in 1 cup of granulated sugar, 1 tablespoon of baking powder, 1 teaspoon of ground cinnamon, and ½ teaspoon of salt. Whisk them together until well combined. This forms the base for your muffins. In a separate bowl, cream ½ cup of softened butter using an electric mixer. Once it’s smooth, add 2 large eggs, mixing well after each one. Then, pour in 1 cup of milk and 1 teaspoon of vanilla extract. Mix until everything is blended. This gives your muffins their rich flavor. Now, slowly add the wet mixture to the dry ingredients. Stir gently until just combined. It’s okay if the batter is a bit lumpy. Overmixing can make your muffins tough, so mix until you see no dry flour. Fold in 2 cups of peeled and diced apples. If you like nuts, add ½ cup of chopped pecans or walnuts now. Use a spoon or ice cream scoop to divide the batter evenly among the muffin cups. Fill each cup about ⅔ full. In a small bowl, mix together ¼ cup of brown sugar and some extra cinnamon. Sprinkle this topping generously over your muffins. Then, place the muffin tin in the oven. Bake for 18-22 minutes. Check if they are done by inserting a toothpick in the center. If it comes out clean, they’re ready. Once baked, let the muffins cool in the pan for about 5 minutes. After that, transfer them to a wire rack. Allow them to cool completely before serving. Enjoy the warm, sweet smell filling your kitchen! To keep the muffins moist, do not overbake them. Bake until a toothpick comes out clean. Also, use fresh ingredients. Fresh apples add moisture and flavor. You can also add a little extra milk to the batter for a softer texture. Granny Smith and Honeycrisp apples are my top picks. They hold their shape well and have a nice balance of sweet and tart. Other good options include Fuji and Braeburn. These apples add great flavor to your muffins. Mix the batter gently. When combining wet and dry ingredients, stir just until combined. It’s okay if there are lumps. Overmixing will lead to tough muffins. Remember, a light hand makes for fluffy treats. I love serving these muffins warm. Dust them with powdered sugar for a sweet touch. Pair them with coffee or tea for a delightful snack. You can also add fresh apple slices on the side for extra crunch. Enjoy them fresh out of the oven for the best flavor! {{image_2}} To make gluten-free apple cinnamon muffins, swap the all-purpose flour with a gluten-free blend. Look for a blend that includes xanthan gum, as it helps the muffins rise. You can follow the same recipe steps. The muffins will still be soft and moist. You won’t miss the gluten at all! To create vegan apple coffee cake muffins, replace the eggs with flaxseed meal or applesauce. Use a plant-based milk like almond or oat milk instead of regular milk. Substitute the butter with coconut oil or vegan butter. The flavor will remain rich, and the muffins will still be fluffy and delicious. Feel free to mix in other fruits for extra flavor. Pears, blueberries, or cranberries work well. You can also add spices like nutmeg or ginger for a twist. Just keep the apple amount the same. This will keep the muffins moist and tasty. Experimenting with flavors makes baking fun! To keep your apple cinnamon coffee cake muffins fresh, store them in an airtight container. This prevents them from drying out. Place a piece of parchment paper between layers if you stack them. It helps reduce sticking. Keep them at room temperature for the best taste. Avoid direct sunlight or heat sources, as they can change the texture. When stored properly, these muffins can last for about three days at room temperature. If you want to keep them longer, consider refrigerating them. In the fridge, they can last up to a week. However, they may lose some moisture. If you notice any mold or an off smell, it’s best to toss them. Freezing muffins is a great way to enjoy them later. To freeze, let them cool completely first. Wrap each muffin tightly in plastic wrap or foil. Place wrapped muffins in a freezer-safe bag or container. They can stay frozen for up to three months. When you’re ready to eat, thaw them in the fridge overnight or microwave them for a quick warm-up. Enjoy your muffins anytime! Yes, you can use other sweeteners. Maple syrup or honey can work. If you choose to use these, reduce the liquid a bit. You can also try coconut sugar for a different taste. Each sweetener gives a unique flavor. You can use applesauce as an egg substitute. Use 1/4 cup of applesauce for each egg. This keeps the muffins moist. You can also use mashed bananas for a sweet twist. Ground flaxseed mixed with water is another good option. Mix 1 tablespoon of flaxseed with 2.5 tablespoons of water and let it sit. To make the tops crunchy, add more brown sugar. Mix it with extra cinnamon and sprinkle it on top before baking. You can also add oats to the topping for extra texture. This gives a nice crunch that pairs well with the soft muffin inside. Yes, you can use different nuts. Almonds or pistachios are great options. If you prefer no nuts, just leave them out. The muffins will still taste amazing. The apples bring plenty of flavor, even without nuts. This blog covered all you need to make delicious apple muffins. You learned about essential ingredients and optional toppings. We shared clear steps for mixing and baking the muffins just right. Helpful tips ensured they stay moist and tasty. Many variations fit different diets and tastes. Lastly, we detailed how to store muffins for later enjoyment. Now, with this knowledge, you can bake with confidence and explore new flavors. Enjoy your baking journey!

Apple Cinnamon Coffee Cake Muffins Rich and Flavorful

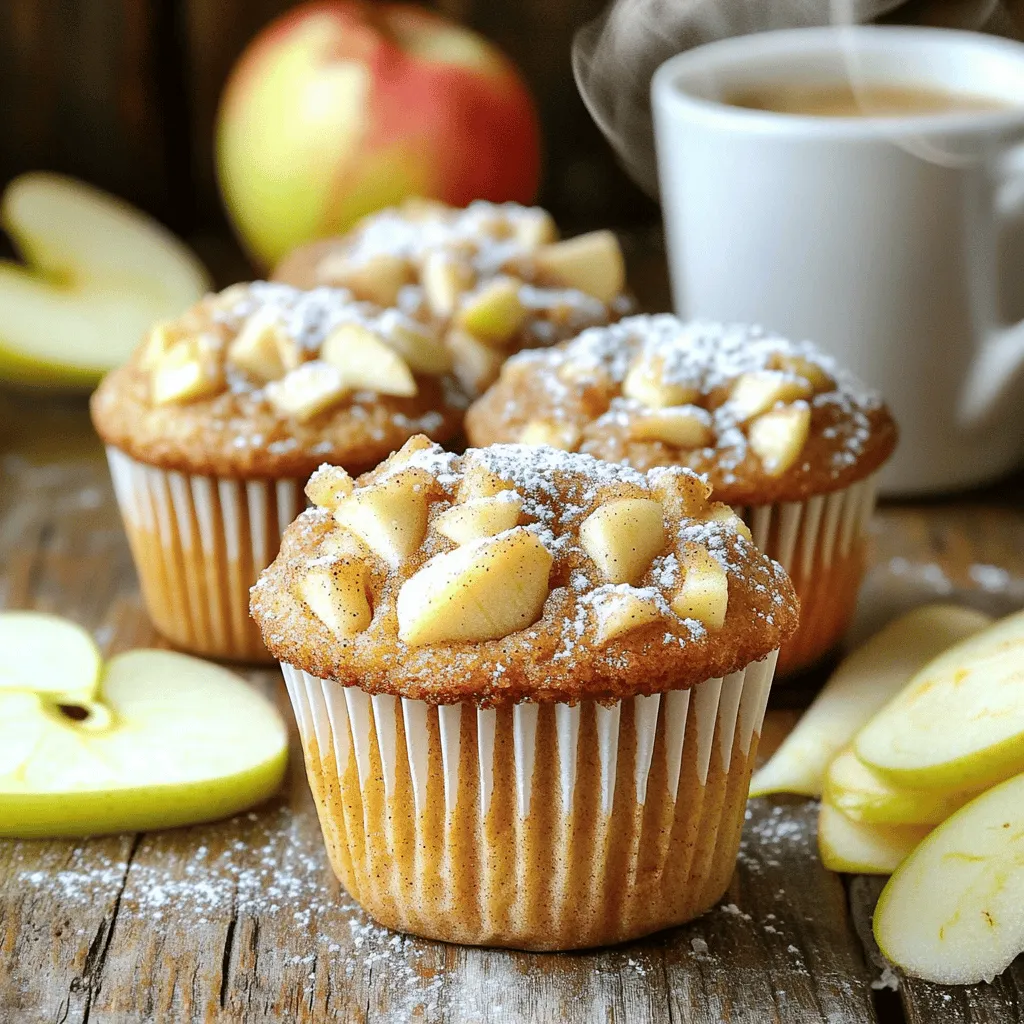
Are you ready to bake something truly delicious? These Apple Cinnamon Coffee Cake Muffins are rich, flavorful, and perfect for

- 4 cups milk (or dairy-free alternative) - 1 cup pumpkin puree - 1/2 cup semi-sweet chocolate chips - 1/4 cup sugar (adjust based on sweetness preference) - 1 teaspoon vanilla extract - 1 teaspoon pumpkin pie spice - 1/4 teaspoon salt - Whipped cream (for topping) - Ground cinnamon and nutmeg (for garnish) This hot cocoa is a warm hug in a cup. You’ll love how simple it is to gather these ingredients. First, choose your milk. You can use regular milk or a dairy-free option like almond or oat milk. Both work well and keep it creamy. Next, grab some pumpkin puree. Canned pumpkin is a great time-saver. You’ll need semi-sweet chocolate chips for rich flavor. Adjust the sugar based on how sweet you like your cocoa. I often start with 1/4 cup and add more if needed. Vanilla extract adds a warm, sweet note. Pumpkin pie spice brings the cozy fall flavors we love. A touch of salt balances the sweetness perfectly. Finally, whipped cream on top makes it feel like a treat. Don’t forget to sprinkle ground cinnamon and nutmeg for that festive touch. These ingredients come together to create a drink that warms you from the inside out. Start by gathering all your ingredients. In your slow cooker, combine: - 4 cups milk (or a dairy-free alternative) - 1 cup pumpkin puree - 1/2 cup semi-sweet chocolate chips - 1/4 cup sugar (adjust based on sweetness preference) - 1 teaspoon vanilla extract - 1 teaspoon pumpkin pie spice - 1/4 teaspoon salt Next, stir the mixture well. Make sure the chocolate chips mix in nicely. You want them to start melting into the warm milk. This step sets the stage for a rich, creamy drink. Now, cover your slow cooker. Set it on low heat for about 2-3 hours. Stir occasionally during this time. This helps ensure that everything blends well. You want the cocoa to be hot and smooth. Once it's ready, taste your cocoa. You may want to adjust the sweetness. If you like it sweeter, add more sugar. When serving, pour the hot cocoa into mugs. Top each serving with a generous swirl of whipped cream. Dust a sprinkle of ground cinnamon and nutmeg on top for extra flavor. This makes your drink look pretty and adds a warm, cozy touch. Enjoy your delicious Slow Cooker Pumpkin Pie Hot Cocoa! You can easily adjust the sugar in your hot cocoa. Start with 1/4 cup of sugar. Taste it after mixing. If you like it sweeter, add more sugar, one tablespoon at a time. This way, you can make it just right for your taste buds. To boost flavor, try adding more spices. A pinch of ginger or a dash of cloves can make it special. If you love nutmeg, sprinkle some in. Experiment to find your favorite mix! Set your slow cooker to low heat for the best results. This temperature helps the chocolate melt slowly without burning. Cooking time should be about 2-3 hours. Stir it every 30 minutes to mix well. This keeps the cocoa smooth and creamy. To prevent burning, make sure to coat the slow cooker well with the milk first. Stir before covering. This helps keep the ingredients from sticking to the bottom. The right mug can make your drink look fun! Use colorful or holiday-themed mugs. They add a nice touch to your cozy drink. For garnishing, top each mug with whipped cream. Then sprinkle ground cinnamon and nutmeg on top. You can also add chocolate shavings or a drizzle of caramel. These small details make your hot cocoa even more inviting! {{image_2}} You can easily make this cocoa dairy-free. Instead of regular milk, use almond milk, coconut milk, or oat milk. Each of these options adds its own flavor. For chocolate, choose dairy-free chocolate chips. These work just as well and keep the drink creamy and rich. Adding seasonal spices can change the game. You can try cardamom or ginger for a warm kick. If you want a sweeter taste, add a touch of vanilla bean. For chocolate, switch it up with dark or white chocolate chips. Dark chocolate gives a richer taste, while white chocolate adds a creamy sweetness. To make an iced version, start by making the hot cocoa as usual. Once it’s ready, let it cool down. Pour it over ice and stir well. You can top it with whipped cream, chocolate shavings, or even crushed cookies. Don't forget to try different toppings like peppermint or crushed nuts for extra crunch! To store leftovers, let the cocoa cool first. Pour it into a clean, airtight container. Place it in the fridge within two hours of cooking. Use it within three to five days for the best taste. When reheating, pour cocoa into a pot or microwave-safe mug. Heat it slowly on low on the stove or in 30-second bursts in the microwave. Stir well to mix and check the temperature. Yes, you can freeze Slow Cooker Pumpkin Pie Hot Cocoa. Pour the cooled cocoa into freezer-safe containers. Leave a bit of space at the top for expansion as it freezes. To thaw, move the container to the fridge for 24 hours. Reheat on the stove or microwave until warm. Stir well to blend any separated ingredients. In the fridge, the hot cocoa lasts three to five days. In the freezer, it can stay good for up to three months. Just remember, the sooner you enjoy it, the better the flavor! Yes, you can use non-dairy milk. Almond, oat, or soy milk work well. Each option adds a unique flavor. If you like creaminess, choose oat milk. If you want a nutty taste, go with almond milk. Just make sure to pick a unsweetened version if you want to control the sweetness. To spice it up, add more pumpkin pie spice. You can also include cayenne pepper for a kick. Start with a small amount, like 1/8 teaspoon, and taste it. If you want more heat, add a little more. Ground ginger or a dash of cinnamon can also enhance the flavor. While pumpkin pie spice adds warmth, it’s not strictly necessary. You can still enjoy the cocoa without it. If you prefer, you can use individual spices like cinnamon and nutmeg. These will still give you some of that cozy taste. Yes, you can make this in a regular pot. Just follow the same steps on the stove. Heat the mixture over medium-low heat. Stir often to prevent burning. Once everything melts together, it’s ready to serve. This recipe makes about six servings. You can serve it in mugs, filling each about three-quarters full. If you want to offer smaller portions, divide it into eight cups. Everyone loves a warm drink on a chilly day, so keep it flowing! This blog post guides you on making Slow Cooker Pumpkin Pie Hot Cocoa. We covered ingredients, step-by-step instructions, and tips for customization. You can adjust sweetness and try dairy-free alternatives. I hope you see how easy and fun this recipe can be. Enjoy making it your own with different flavors and presentation styles. Hot cocoa can warm your heart any time of year, so get creative!

Slow Cooker Pumpkin Pie Hot Cocoa Warm Cozy Drink

As the chill of fall settles in, there’s nothing quite like a warm drink to embrace the cozy season. Picture

- 1 pound fresh green beans, trimmed - 4 tablespoons unsalted butter, melted - 4 cloves garlic, minced - 1 teaspoon lemon zest - ½ teaspoon salt - ¼ teaspoon black pepper - 1 tablespoon balsamic glaze - Fresh parsley, chopped for garnish - Air fryer - Mixing bowl - Measuring spoons - Tongs or spatula To make Air Fryer Garlic Butter Green Beans, gather your ingredients first. Fresh green beans are key. Trim the ends for a neat look. You need unsalted butter for rich flavor. Minced garlic adds a punch. Lemon zest brings brightness. Salt and black pepper enhance the taste. If you want to elevate the dish, balsamic glaze is a great addition. It gives a sweet tang. Fresh parsley makes a colorful garnish. Keep a mixing bowl handy. You will need it to combine the butter and garlic. An air fryer is essential for that crispy finish. Tongs or a spatula help you mix and serve. This mix of ingredients and tools makes cooking easy and fun. You’ll enjoy every step as you create this quick side dish. Start by trimming the green beans. Cut off the tough ends to make them tender. Next, preheat your air fryer to 375°F (190°C) for about 5 minutes. This step helps the green beans cook evenly. In a large mixing bowl, combine the melted butter, minced garlic, lemon zest, salt, and black pepper. Stir well to mix it all together. Then, add the trimmed green beans to the bowl. Toss them until they are fully coated in the garlic butter mixture. Now, arrange the coated green beans in the air fryer basket. Make sure they lay in a single layer for the best results. Air fry them for 8 to 10 minutes. Shake the basket halfway through cooking to ensure they brown evenly. When done, the green beans will be tender-crisp and have a nice caramelized look. To get even cooking, shake the basket halfway through. This helps the green beans brown nicely. If you want them softer or crispier, adjust the cooking time. You can air fry them for 8 to 10 minutes based on your taste. Spices and herbs can add more flavor. Try adding red pepper flakes for heat or thyme for a fresh taste. You can also use olive oil or avocado oil if you prefer. Both are great alternatives to butter. They change the taste slightly but keep it delicious. For serving, place the green beans in a nice bowl. Drizzle a bit of melted butter on top for extra richness. You can also add some toasted sesame seeds for a fun crunch. This makes the dish look nicer and taste amazing. Use fresh parsley as a garnish for a pop of color. {{image_2}} You can make this dish plant-based by swapping butter for a vegan option. Use olive oil or vegan butter. Both options add great flavor. You can also use coconut oil for a different taste. These swaps keep the dish creamy and rich without dairy. Feel free to add other veggies to the mix. Carrots or bell peppers pair well with green beans. Slice the carrots thinly so they cook evenly. Bell peppers add sweetness and color. Toss them in with the green beans for a fun, vibrant side dish. Experiment with herbs and spices to change the taste. Try adding thyme or rosemary for an earthy flavor. You can also sprinkle in some red pepper flakes for heat. Adding lemon juice boosts the brightness and freshness. Let your taste buds guide you to new flavor adventures! To keep your Air Fryer Garlic Butter Green Beans fresh, store them in a sealed container. Place the container in the fridge. They can last up to three days. Make sure the beans are cool before sealing. This helps avoid sogginess. You can reheat the green beans in two ways: the air fryer or the microwave. For the air fryer, set it to 350°F (175°C). Heat the beans for about 3-5 minutes. This method keeps them crispy. If using the microwave, place the beans in a bowl. Cover with a damp paper towel and heat for 1-2 minutes. Check to ensure they’re hot throughout. To freeze cooked green beans, let them cool completely first. Then, place them in freezer-safe bags. Remove as much air as possible before sealing. They can last up to three months in the freezer. When ready to eat, thaw in the fridge overnight before reheating. Yes, you can use frozen green beans. However, fresh beans taste best. If you use frozen, thaw them first. This helps the garlic butter mix well. You might need to cook them a bit longer in the air fryer. Check for tenderness to know they are done. Green beans are done when they are tender-crisp. They should have a slight bite. You can check by tasting them. If they are still hard, let them cook a few more minutes. The goal is to have a nice bright green color and a soft texture. Garlic butter green beans go great with many dishes. They pair well with grilled chicken or steak. They also complement fish dishes nicely. You can serve them alongside rice or quinoa for a full meal. Consider adding them to a holiday dinner for a bright touch. You now know how to make delicious garlic butter green beans in an air fryer. Start with fresh green beans and simple ingredients like butter and garlic. Prepare, cook, and enjoy. Remember, you can switch things up with extra veggies or flavors. Store leftovers properly to savor later. I hope you try this easy recipe and make it your own. Happy cooking!

Air Fryer Garlic Butter Green Beans Quick Side Dish

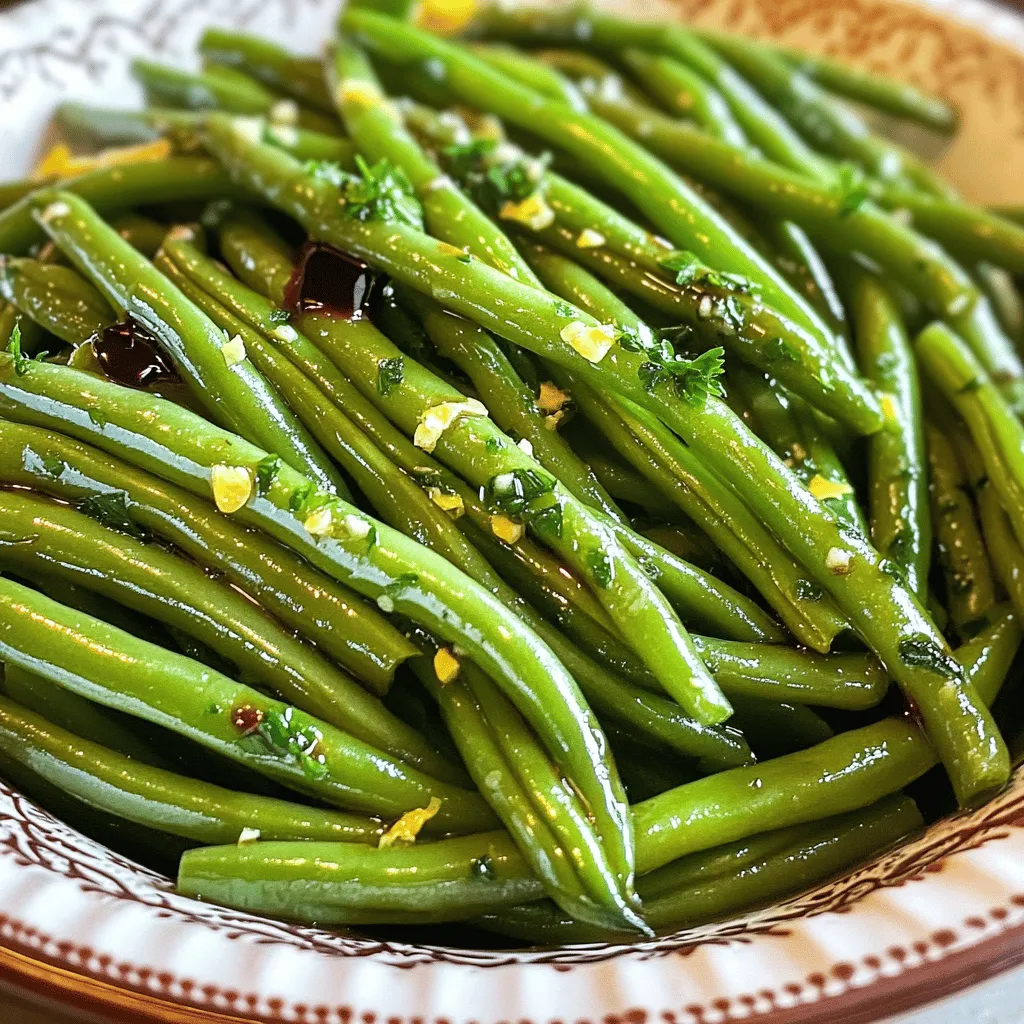
Looking for a quick side dish that’s both delicious and easy? You’ll love these Air Fryer Garlic Butter Green Beans!

- 1 cup couscous - 1 1/4 cups vegetable broth - 1/2 cucumber, diced - 1 cup cherry tomatoes, halved - 1/4 red onion, finely chopped - 1/2 bell pepper, diced (red or yellow) - 1/2 cup canned chickpeas, rinsed and drained - 1/4 cup Kalamata olives, pitted and sliced - 1/4 cup fresh parsley, chopped - 1/4 cup fresh mint, chopped - 1/4 cup tahini - 2 tablespoons lemon juice - 2 tablespoons olive oil - Salt and pepper to taste Couscous is the star of this dish. It’s easy to cook and absorbs flavors well. Use vegetable broth for a nice base. The diced cucumber and cherry tomatoes add freshness. Red onion and bell pepper give crunch. Chickpeas bring protein and olives add a salty kick. Fresh herbs like parsley and mint make it bright. - Crumbled feta cheese for serving - Additional herbs for garnish Feta cheese gives a creamy touch. You can add other herbs like dill or basil if you want. These options can change the taste and appeal. - Medium saucepan - Mixing bowls - Whisk You will need a medium saucepan to cook the couscous. Mixing bowls help combine the salad. A whisk is perfect for making the tahini dressing. Having these tools ready makes cooking simple. Boiling the broth First, pour 1 1/4 cups of vegetable broth into a medium saucepan. Heat the broth on high until it boils. This step is key for fluffy couscous. Steeping the couscous Once the broth is boiling, remove it from heat. Stir in 1 cup of couscous. Cover the pot with a lid. Wait for about 5 minutes, so the couscous can absorb the broth. After that, fluff it with a fork. Let it cool a bit before mixing it into the salad. Dicing and chopping techniques While the couscous cools, grab your veggies. Dice 1/2 cucumber, halve 1 cup of cherry tomatoes, finely chop 1/4 red onion, and dice 1/2 bell pepper. You can use red or yellow peppers. Rinse and drain 1/2 cup of canned chickpeas, too. Lastly, chop 1/4 cup each of fresh parsley and mint. Combining the salad ingredients In a large mixing bowl, combine all the diced and chopped vegetables. Add in the chickpeas and olives. This mix brings a burst of color and flavor to the salad. Whisking the dressing In a small bowl, add 1/4 cup tahini, 2 tablespoons lemon juice, and 2 tablespoons olive oil. Whisk these ingredients together until smooth. This dressing adds a rich, nutty flavor. Adjusting consistency If the tahini mixture is too thick, add a little water. Keep whisking until it reaches your desired consistency. It should be creamy yet pourable. Tossing the salad Add the cooled couscous to the bowl of vegetables. Gently toss everything together. Make sure the couscous and veggies are well mixed. Adding seasoning Pour the tahini dressing over the salad. Toss again until everything is coated. Taste your salad and add salt, pepper, or more lemon juice as needed. If you like, sprinkle crumbled feta cheese on top before serving. Enjoy your vibrant Mediterranean Couscous Salad! - For a bright look, use a big bowl. - Drizzle more tahini on top before serving. - Add fresh herbs on top for extra color and flavor. - Store leftovers in a sealed container in the fridge. - Use the salad within three days for the best taste. - If it seems dry, add a splash of olive oil when serving. - Let the salad chill for at least an hour to blend flavors. - Marinate for up to four hours for a richer taste. - Keep it in the fridge to keep it fresh and cool. {{image_2}} You can change the grains in this salad. Try quinoa or farro instead of couscous. They add unique flavors and textures. You can also swap out vegetables. Use zucchini, bell peppers, or even roasted carrots. If you want more protein, replace chickpeas with black beans or lentils. To spice up your salad, add some red pepper flakes or smoked paprika. These give a nice kick. If you want to try different dressings, mix things up with a yogurt dressing or a balsamic vinaigrette. These add a fresh twist and make your dish stand out. For a vegan option, skip the feta cheese. The salad is already vegan-friendly without it. If you need a gluten-free choice, switch couscous for quinoa. Always check labels to ensure all ingredients are gluten-free. These small changes help everyone enjoy this tasty salad! - Each serving is about 1 cup. - Total calories per serving: around 250 calories. This salad is packed with vitamins and minerals. You get: - Vitamin C from tomatoes and peppers. - Fiber from couscous and chickpeas. - Iron from chickpeas and olives. - Healthy fats from tahini and olive oil. These nutrients support your immune system and promote digestion. The fiber keeps you full and satisfied. This salad contains common allergens: - Wheat from couscous. - Sesame from tahini. - Dairy if using feta cheese. If you have allergies, here are some swaps: - Use quinoa or rice for a gluten-free option. - Replace tahini with sun butter for a nut-free version. - Omit feta for a dairy-free meal. Couscous comes from North Africa. It is made from semolina wheat. There are three main types: Moroccan, Israeli, and Lebanese. Moroccan couscous is the smallest and cooks quickly. Israeli couscous, or pearl couscous, is bigger and chewier. Lebanese couscous is the largest and has a nutty flavor. All types are versatile and soak up flavors well. Yes, you can easily make this salad vegan. Simply replace the tahini with a nut butter for creaminess. Skip the feta cheese, or use a vegan cheese option. Ensure your vegetable broth is plant-based as well. This way, you keep all the great flavors without any animal products. To keep your salad fresh, store it in an airtight container. Place it in the fridge right after serving. If you have added tahini dressing, store it separately. This prevents the salad from getting soggy. This salad lasts about 3 to 4 days in the fridge. The vegetables will stay fresh, but the taste may change over time. If you notice any signs of spoilage, it’s best to toss it out. Absolutely! You can mix it up with different dressings. A simple olive oil and vinegar mix works well. You can also try a yogurt-based dressing or a lemon vinaigrette. Each option brings its own unique flavor to the salad. This article covered making a delicious couscous salad. We discussed main and optional ingredients, how to cook couscous, and prepare vegetables. You learned to make a tasty tahini dressing and combine everything. I shared tips for serving, storing, and customizing your salad. You can swap ingredients for variety and check nutritional info for health benefits. Remember, cooking is fun! Experiment with flavors to create your version of this salad. Enjoy your cooking adventure!

Mediterranean Couscous Salad with Tahini Delight

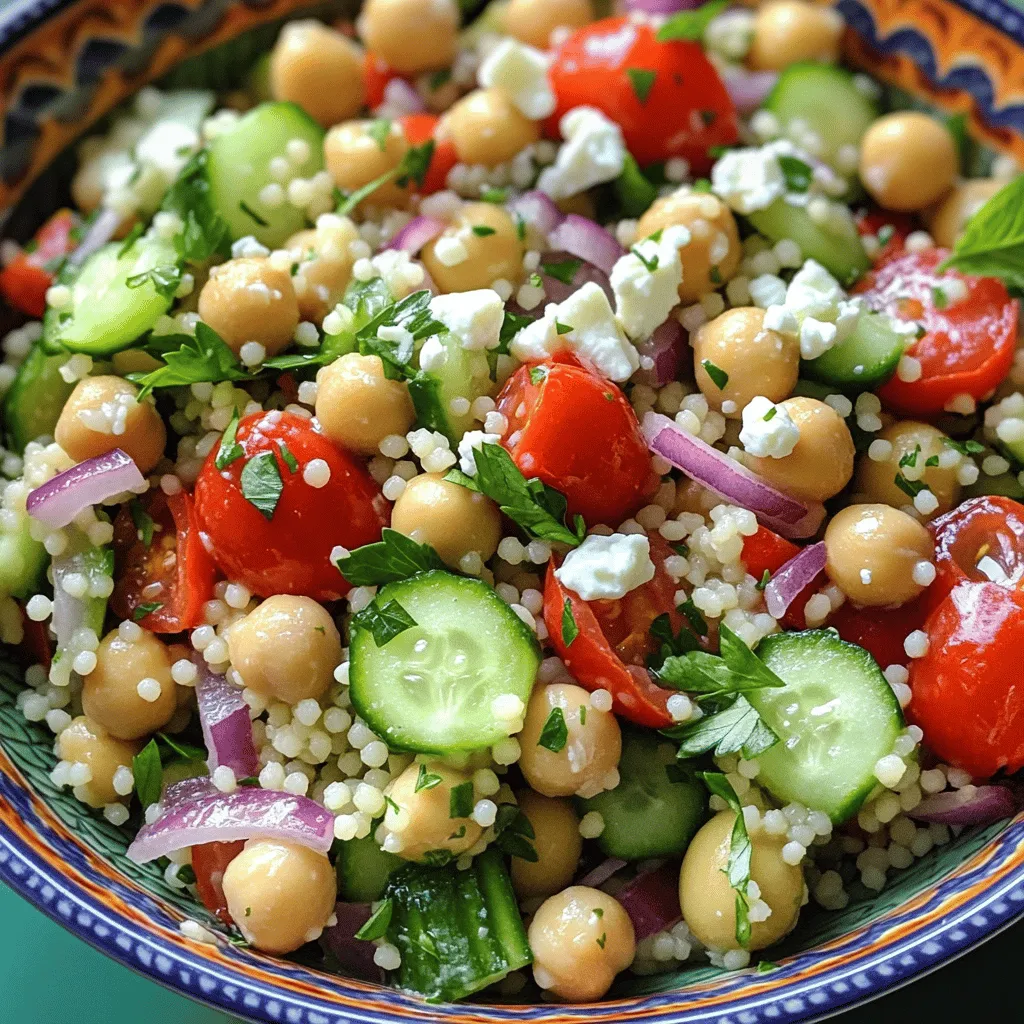
Looking to spice up your salad routine? In this blog post, I’ll show you how to create a fresh Mediterranean

Older posts
Newer posts
← Previous Page1 … Page22 Page23 Page24 … Page84 Next →

dsad

© 2026 Lisa Dishes • Built with GeneratePress

Our Policies

  • Copyright Policy
  • Cookie Policy
  • GDPR Policy
  • Privacy Policy
  • Disclaimer
  • Terms Of Use

More Information

  • Home
  • About
  • Contact
  • Appetizers
  • Dessert
  • Dinner
  • Drinks
©2026, Lisa Dishes About Back To Top