Skip to content
DisclaimerTerms Of UseGDPR PolicyCookie Policy

Lisa Dishes

  • Home
  • Drinks
  • Appetizers
  • Dinner
  • Dessert
  • About
  • Contact
  • Privacy Policy
DisclaimerTerms Of UseGDPR PolicyCookie Policy

NO-ING-IMG

- 1 lb (450g) shrimp, peeled and deveined - 1 lb (450g) gnocchi (store-bought or homemade) - 4 cloves garlic, minced - 1 cup heavy cream - 1 cup vegetable broth To make this dish, start with fresh shrimp. They add great flavor and texture. Gnocchi is the star of the show. You can use store-bought or make your own. Garlic brings a bold taste that you will love. Heavy cream adds richness, while vegetable broth gives depth to the sauce. - 1 cup cherry tomatoes, halved - 1 cup fresh spinach, roughly chopped - 2 tablespoons olive oil - 1 teaspoon dried basil - 1 teaspoon red pepper flakes (optional) Tomatoes add a nice pop of color and sweetness. Fresh spinach brings a healthy touch and brightens the dish. Olive oil is key for sautéing. Dried basil gives a hint of earthiness, while red pepper flakes can add a bit of heat. - Salt and pepper - Grated Parmesan cheese, for serving - Fresh parsley, chopped, for garnish Salt and pepper are essential for flavor. Grated Parmesan cheese makes each bite creamy and savory. Fresh parsley adds a lovely touch and a burst of color. To cook the gnocchi, start by boiling water in a large pot. Add a pinch of salt to the water. Once boiling, gently add the gnocchi. They will sink at first, then float when done. This takes about 2-3 minutes. Watch closely so they don’t overcook. When they float, use a slotted spoon to remove them. Drain in a colander and set aside. For perfect gnocchi texture, look for the ones that are soft and pillowy. If you make them at home, let them rest before cooking. This helps to keep their shape. Store-bought gnocchi works well too, and it saves time. Next, heat olive oil in a large skillet over medium heat. Add minced garlic and sauté it for about one minute. The garlic should smell great, but do not let it brown. After that, add the shrimp to the skillet. Season them with salt, pepper, and red pepper flakes if you like some heat. Cook the shrimp for 2-3 minutes, turning them as needed. They are ready when they turn pink and opaque. Once done, remove them from the skillet and set them aside. To enhance the flavor, make sure to season well. Fresh shrimp often taste better, so choose high-quality ones. In the same skillet, pour in the vegetable broth and bring it to a gentle simmer. Next, add the heavy cream and stir to blend. This creates a rich base for your sauce. Now, it’s time to add the cherry tomatoes and cooked gnocchi. Sprinkle in dried basil for added flavor. Stir everything together and cook for about 3-4 minutes. This helps the sauce thicken slightly. To finish, add the fresh spinach and return the shrimp to the skillet. Cook for an additional 2 minutes. The spinach should wilt nicely. Taste the sauce and adjust salt and pepper to your liking. This creamy sauce pairs perfectly with the shrimp and gnocchi. Remember to serve it hot and enjoy every bite! - Avoiding overcooked shrimp: Cook shrimp just until pink. This takes about 2-3 minutes. If you leave them too long, they get rubbery. Watch them closely while they cook. Remove them from the pan as soon as they change color. - Ensuring creamy consistency: Start with medium heat when you add cream. Stir it well with the broth. Let it thicken slowly for a few minutes. If you want it thicker, let it cook a little longer. Avoid high heat, as this can make it separate. - Pairing with side dishes: A fresh salad goes well with this dish. You can also serve garlic bread on the side. Both add crunch and freshness. - Best wine pairings for the dish: A nice white wine works best. Try a Chardonnay or a Sauvignon Blanc. These wines complement the shrimp and cream nicely. - Essential equipment for preparation: You need a large skillet for cooking. A good pot is needed for boiling the gnocchi. Use a strainer to drain the gnocchi after cooking. - Recommended utensils for ease: A wooden spoon helps stir your dish. Use a sharp knife for chopping garlic and tomatoes. A measuring cup ensures you get the right amounts for your sauce. {{image_2}} You can change up the protein in this dish easily. If you want seafood, try scallops or fish. They both work well with the creamy sauce. For a vegetarian or vegan twist, swap shrimp for mushrooms or tofu. Both add great texture and flavor without meat. Adding herbs and spices can make this dish unique. Try fresh basil or thyme for a fresh taste. You can also add lemon zest for a burst of flavor. If you like heat, add more red pepper flakes. Seasonal vegetables also help change the dish. Peas, bell peppers, or zucchini can add color and nutrition. Toss these in when you add the spinach. While gnocchi is a star, you can use other pasta types too. Penne or farfalle are great choices. Just make sure to cook them according to the package. You may need to adjust cooking times. If you use smaller pasta, watch it closely to avoid overcooking. This way, you can enjoy a new twist on a classic dish! To keep your creamy garlic shrimp gnocchi fresh, store it in an airtight container. Make sure to cool the dish before sealing it. This helps prevent moisture buildup. It lasts up to three days in the fridge. If you need to keep it longer, consider freezing. You can reheat your gnocchi in two ways: the microwave or stovetop. For the microwave, place it in a bowl. Heat in short bursts and stir often. For stovetop, use a skillet over low heat. Add a splash of broth or cream to keep it creamy. Stir well to combine. To freeze, let the dish cool completely. Transfer it to a freezer-safe container. It can last up to two months in the freezer. When ready to use, thaw it in the fridge overnight. For reheating, follow the stovetop tips to restore its creamy texture. It takes about 25 minutes to make this dish. - Prep time is around 10 minutes. - Cooking time takes about 15 minutes. This quick meal is great for busy nights. Yes, you can use frozen shrimp. Just make sure to thaw them first. You can thaw them in cold water for about 20 minutes. This helps keep the shrimp juicy and tender. To make this dish dairy-free, use alternatives. You can swap heavy cream with coconut milk or almond milk. For the cheese, try nutritional yeast or a dairy-free cheese. These changes keep the flavor but remove dairy. This dish pairs well with a fresh salad. You can also serve it with garlic bread. Roasted veggies make a tasty side too. These options balance the creamy gnocchi perfectly. This blog post covered how to make a delicious creamy garlic shrimp gnocchi. We explored main and additional ingredients, followed by step-by-step cooking instructions. I shared tips for perfect texture and serving suggestions. You learned about variations and how to store leftovers properly. In the end, this dish is flexible and easy to make. Try it out and enjoy every bite. With a few tips and tweaks, you can impress anyone at your dinner table.

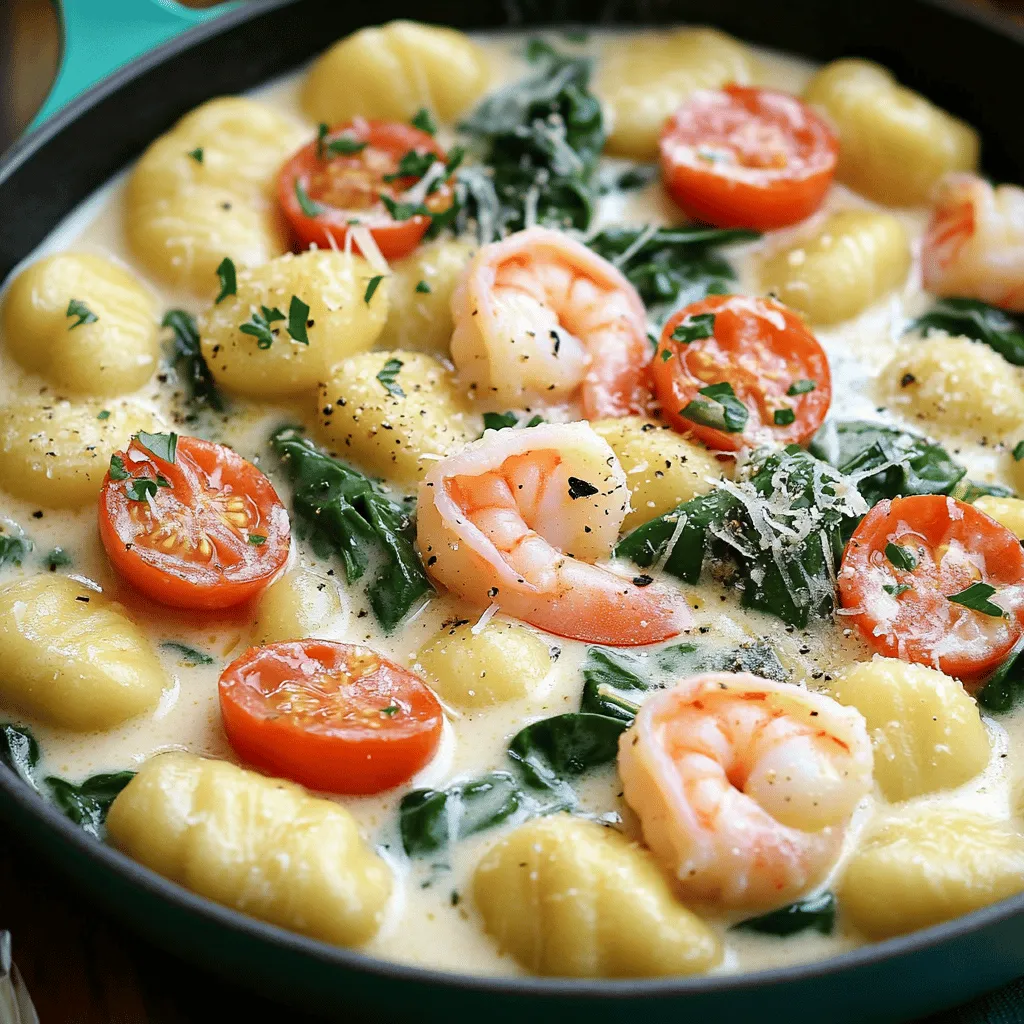
Creamy Garlic Shrimp Gnocchi Delightful Dinner Recipe

Craving a cozy yet elegant dinner? I’ve got just the recipe for you! This Creamy Garlic Shrimp Gnocchi is a

- 1 pound fresh green beans, trimmed - 2 tablespoons olive oil - 1/2 cup grated Parmesan cheese - 1 teaspoon garlic powder - 1/2 teaspoon onion powder - 1/2 teaspoon smoked paprika - 1/4 teaspoon red pepper flakes (optional for heat) - Salt and pepper to taste - Lemon wedges for serving For this dish, I find that one pound of green beans works best. It gives you about four servings. The olive oil helps the beans get crispy. I like using two tablespoons, but you can adjust it based on your taste. The cheese is key for flavor. Use half a cup of grated Parmesan for a rich taste. The seasonings, like garlic powder and onion powder, are one teaspoon and half a teaspoon, respectively. Smoked paprika adds depth with just half a teaspoon. If you want some heat, throw in a quarter teaspoon of red pepper flakes. Lastly, don’t forget salt and pepper to bring it all together. If you can't find fresh green beans, frozen green beans work too. Just make sure they are not mushy when cooked. You can also use different cheeses, like Pecorino Romano, if you want a new flavor. If you want to skip olive oil, try avocado oil for a similar taste. For the seasonings, feel free to mix in some Italian herbs or lemon zest for a brighter flavor. First, you need to preheat your air fryer. Set it to 400°F (200°C). Let it heat for about 5 minutes. This step helps get the green beans crispy. Next, take 1 pound of fresh green beans and trim the ends. Place them in a large mixing bowl. Add 2 tablespoons of olive oil. Toss the beans in the oil until they are well coated. This helps the seasonings stick. In a separate bowl, mix together the following seasonings: - 1/2 cup grated Parmesan cheese - 1 teaspoon garlic powder - 1/2 teaspoon onion powder - 1/2 teaspoon smoked paprika - 1/4 teaspoon red pepper flakes (optional) - Salt and pepper to taste Sprinkle this mixture over the green beans. Toss them again until they are evenly coated. This gives the beans tons of flavor and a crunchy texture. To get crispy green beans, start by drying them well. Any water left on them can make them soggy. Toss the green beans with olive oil until they are well coated. This oil helps the cheese stick and gives a nice crunch. When you place them in the air fryer, do not overcrowd the basket. Cook them in batches if needed. This way, air can flow freely, and each bean gets that perfect crisp. If you have leftovers, let them cool first. Store them in an airtight container. They will stay fresh for up to three days in the fridge. To keep them crispy, try adding a paper towel to the container. This helps absorb any extra moisture. When you want to eat them again, pop them back in the air fryer for a few minutes. This will help regain their crunch. One common mistake is not preheating the air fryer. Preheating is key for even cooking. Another mistake is using too much cheese. While cheese is tasty, too much can make the beans soggy. Lastly, don’t skip the shaking step. Shaking the basket halfway through cooking ensures all sides get that golden color. Avoid these mistakes to enjoy the best Air Fryer Parmesan Green Beans. {{image_2}} You can change the flavor of your Air Fryer Parmesan Green Beans easily. Here are some ideas: - Lemon zest: Add a fresh taste. - Italian herbs: Use basil, oregano, or thyme for a twist. - Cajun seasoning: Spice it up with some heat. - Nutritional yeast: For a cheesy flavor without dairy. Mix and match these seasonings to create your perfect blend. Just remember to keep the cheese for that crispy layer! If you want to swap green beans for other veggies, go ahead! Here are some great options: - Asparagus: Cook for a similar time. - Broccoli florets: Cut them small for even cooking. - Zucchini: Slice into thin strips for a delicious crunch. - Cauliflower: Break into small pieces for great texture. These veggies will still taste amazing with the Parmesan coating! Serving your Air Fryer Parmesan Green Beans can be fun. Here are some ideas: - As a side dish: Pair them with chicken, fish, or steak for a full meal. - In a salad: Toss them with greens, nuts, and a light dressing. - With dips: Try ranch or hummus for added flavor. - Garnished with nuts: Add toasted almonds or pine nuts for a crunch. These ideas will make your meal exciting and satisfying! After cooking your green beans, let them cool down. Once cool, place them in an airtight container. This will keep them fresh for up to three days in the fridge. If you want to eat them later, make sure to store them properly. Keeping them in a single layer helps reduce moisture. To reheat your green beans, you can use the air fryer again. Set it to 350°F (175°C) for about 5 minutes. This method keeps them crispy. You can also use the microwave. Just heat in short bursts of 30 seconds. Check often to avoid overcooking. If you want to save your green beans for a longer time, freezing is a great option. First, let them cool completely. Then, place them in a freezer-safe bag. Squeeze out as much air as possible. They will last up to three months in the freezer. When you're ready to eat, thaw them overnight in the fridge before reheating. Enjoy your crunchy treat anytime! Yes, you can use frozen green beans. They are a great option when fresh beans are not available. Just remember to thaw them first. Pat them dry to remove excess moisture. This helps them get crispy in the air fryer. Cook fresh green beans for 8-10 minutes at 400°F (200°C). If using frozen beans, cook them a bit longer, about 10-12 minutes. Shake the basket halfway through cooking for even crispiness. Keep an eye on them to avoid overcooking. These green beans pair well with many dishes. Try serving them with grilled chicken or salmon. They also go great with pasta or a fresh salad. Serve lemon wedges on the side for an extra zing. Enjoy the crunch and flavor! In this post, we explored the key ingredients and preparation for air fryer green beans. We covered measurements, alternatives, and step-by-step instructions for cooking and seasoning. I shared tips for crispiness, ways to store leftovers, and common mistakes to avoid. We also discussed cooking variations and answered frequent questions. For perfect air fryer green beans, remember the details and enjoy experimenting! You’ll impress friends and family with your skills.

Air Fryer Parmesan Green Beans Crunchy and Tasty Dish

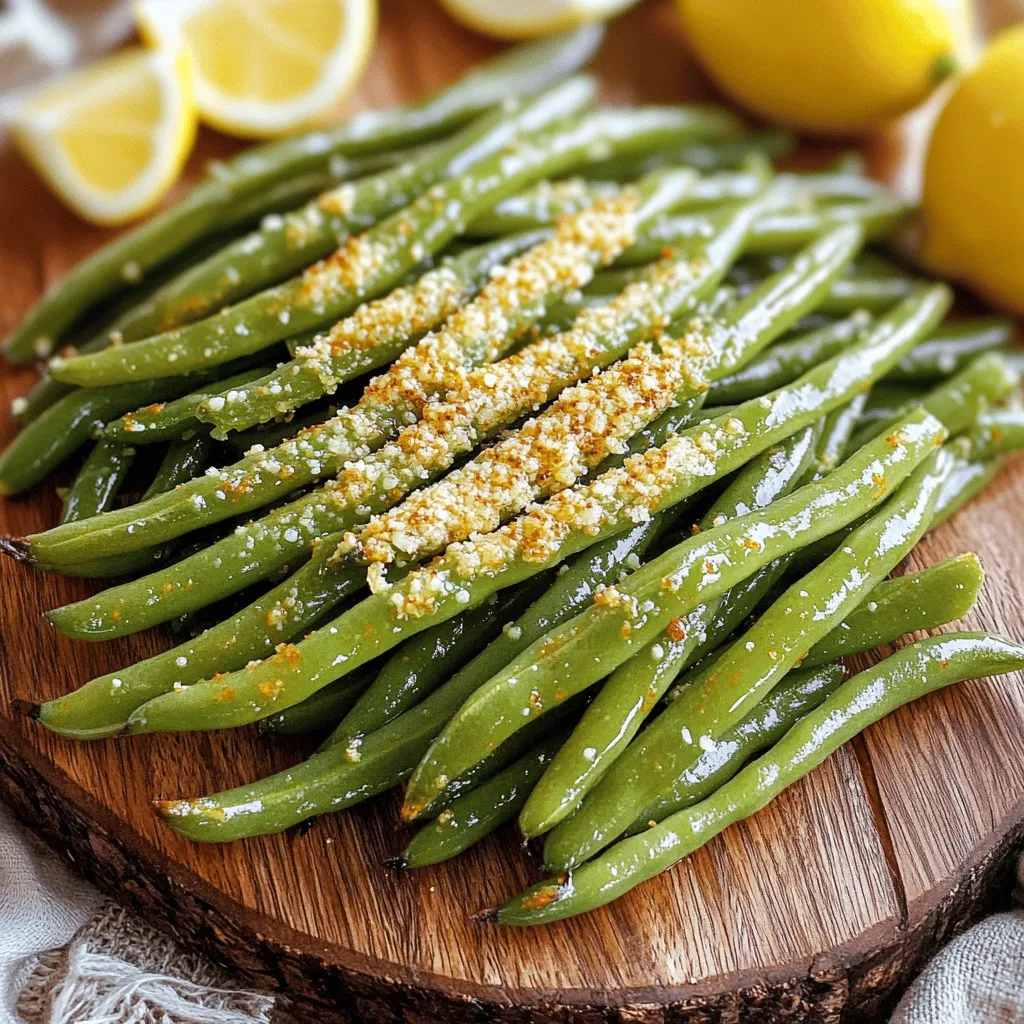
Looking for a quick and tasty side dish? Air Fryer Parmesan Green Beans are a game-changer! With a satisfying crunch

To make Creamy Garlic Parmesan Risotto, you will need a few key ingredients. Each one plays an important role in creating a rich and tasty dish. Here’s what you will need: - 1 cup Arborio rice - 4 cups vegetable broth (low sodium) - 1 medium onion, finely chopped - 4 cloves garlic, minced - 1 cup grated Parmesan cheese - 2 tablespoons olive oil - 2 tablespoons unsalted butter - Salt and black pepper to taste - Optional: 1/2 cup green peas (fresh or frozen) Arborio rice is special. It has a high starch content. This gives risotto its creamy texture. Low sodium vegetable broth adds flavor without being too salty. Fresh onion and garlic bring great taste to the dish. Grated Parmesan cheese makes it rich and savory. Olive oil and unsalted butter add a smooth finish to the risotto. You can also add green peas if you like. They bring a pop of color and sweetness. Fresh parsley can be used as a garnish. It adds a nice touch and bright flavor. Make sure to gather all your ingredients before you start cooking. This will make the process easier and more fun! To make creamy garlic Parmesan risotto, start with the broth. Heat 4 cups of low sodium vegetable broth in a saucepan over medium heat. Do not let it boil; keep it warm on low heat. Using low sodium broth keeps the dish balanced. This helps avoid overpowering flavors. Next, take a large skillet and heat 2 tablespoons of olive oil with 1 tablespoon of butter. Add 1 medium onion, finely chopped, and cook until it looks translucent. This usually takes about 3-4 minutes. Then, add 4 cloves of minced garlic. Cook it for one more minute. Make sure you do not let the garlic burn, as it can turn bitter. Now, it’s time to cook the risotto. Add 1 cup of Arborio rice to the skillet. Stir the rice well to coat it with the oil and butter. Toast the rice for about 2 minutes while stirring frequently. This step adds flavor. Then, start adding the warm vegetable broth one ladle at a time. Stir the rice continuously and wait until most of the broth is absorbed before adding more. This process takes about 18-20 minutes. You want the rice to become creamy but still slightly firm, known as al dente. Once you achieve this texture, remove the skillet from heat. Stir in the remaining tablespoon of butter and 1 cup of grated Parmesan cheese. Mix it until it is creamy. If you want to add green peas, fold them in now for extra color and sweetness. Finish by seasoning the risotto with salt and black pepper to taste. Let it sit for a couple of minutes before serving. To make great risotto, you must stir it often. This helps the rice cook evenly. Stirring also releases the starches, giving risotto its creamy texture. Without stirring, the rice can stick and burn. Aim for a steady rhythm while you cook. Achieving al dente rice is key. Al dente means the rice is soft but still has a slight bite. To check, taste a grain near the end of cooking. It should be tender but still firm. If you overcook it, the rice will turn mushy. Adding fresh herbs can boost the flavor of your risotto. I love using basil or thyme. Fresh herbs give a bright taste. You can add them at the end for the best flavor. If you want to add green peas, do it near the end. This keeps them bright and fresh. Fold them in after you mix in the cheese. They add a nice pop of color and texture. To make your risotto look elegant, serve it in shallow bowls. This allows the creamy rice to spread out. It looks nice and helps with portion control. Garnish with chopped parsley and some extra Parmesan on top. This adds color and enhances the dish’s flavor. A sprinkle of black pepper can also add visual appeal. Enjoy your beautiful, tasty risotto! {{image_2}} You can make risotto even better by adding proteins. Chicken or shrimp works well. Cook them first, then add to the risotto near the end. This change makes the dish hearty and satisfying. For a vegetarian option, consider adding green peas. They add color and sweetness. You can use fresh or frozen peas. Just fold them in when the risotto is creamy. Changing the cheese can alter the taste a lot. Try using different cheeses like Gruyère or goat cheese. Each cheese brings a unique flavor. Experiment to find what you love best. You can also play with spices. Adding a pinch of nutmeg or red pepper flakes gives a nice kick. Fresh herbs like thyme or basil also brighten the dish. If you need gluten-free options, Arborio rice is naturally gluten-free. Make sure to check any broth for gluten. Most vegetable broth is safe, but it’s smart to read the label. For vegan risotto, swap out the butter and cheese. Use olive oil and a plant-based cheese. Nutritional yeast can also add a cheesy flavor without using dairy. To keep your risotto fresh, place it in an airtight container. Make sure it cools off first. This helps prevent bacteria growth. You can store it in the fridge for up to three days. If you want to enjoy it later, you can also freeze it. When reheating risotto, the stovetop is best. Add a splash of broth or water. Stir it gently over low heat. This helps bring back its creamy texture. If you use a microwave, cover it with a damp paper towel. This keeps it moist as it heats. Yes, you can freeze risotto! To do this, let it cool completely. Then, scoop it into freezer-safe bags. Press out air before sealing. When ready to eat, thaw it overnight in the fridge. Reheat it slowly, adding a little broth to restore creaminess. The best rice for risotto is Arborio rice. This short-grain rice has a high starch content. This starch makes risotto creamy and smooth. Arborio rice absorbs flavors well, enhancing the dish. It also holds its shape, giving you that perfect texture. You can prepare risotto ahead of time, but it requires some care. Cook the risotto until it is al dente. Then, let it cool quickly. Store it in an airtight container in the fridge. When ready to eat, reheat with a splash of broth. This keeps the risotto moist and creamy. You know risotto is done when it is creamy and slightly firm. The rice should have a tender bite, called al dente. If it looks too thick, add more broth. Taste it to check the texture. Perfect risotto should feel smooth and rich on your palate. This article covered how to make a great risotto. We explored key ingredients like Arborio rice and garlic. You learned the importance of properly preparing your vegetable broth and sautéing your aromatics. Tips for getting that creamy texture and perfecting your dish help elevate flavors. We shared variations, storage tips, and answered common FAQs. Remember, cooking is about practice and fun. Enjoy each step as you make your own delicious risotto.

Creamy Garlic Parmesan Risotto Simple and Tasty Dish

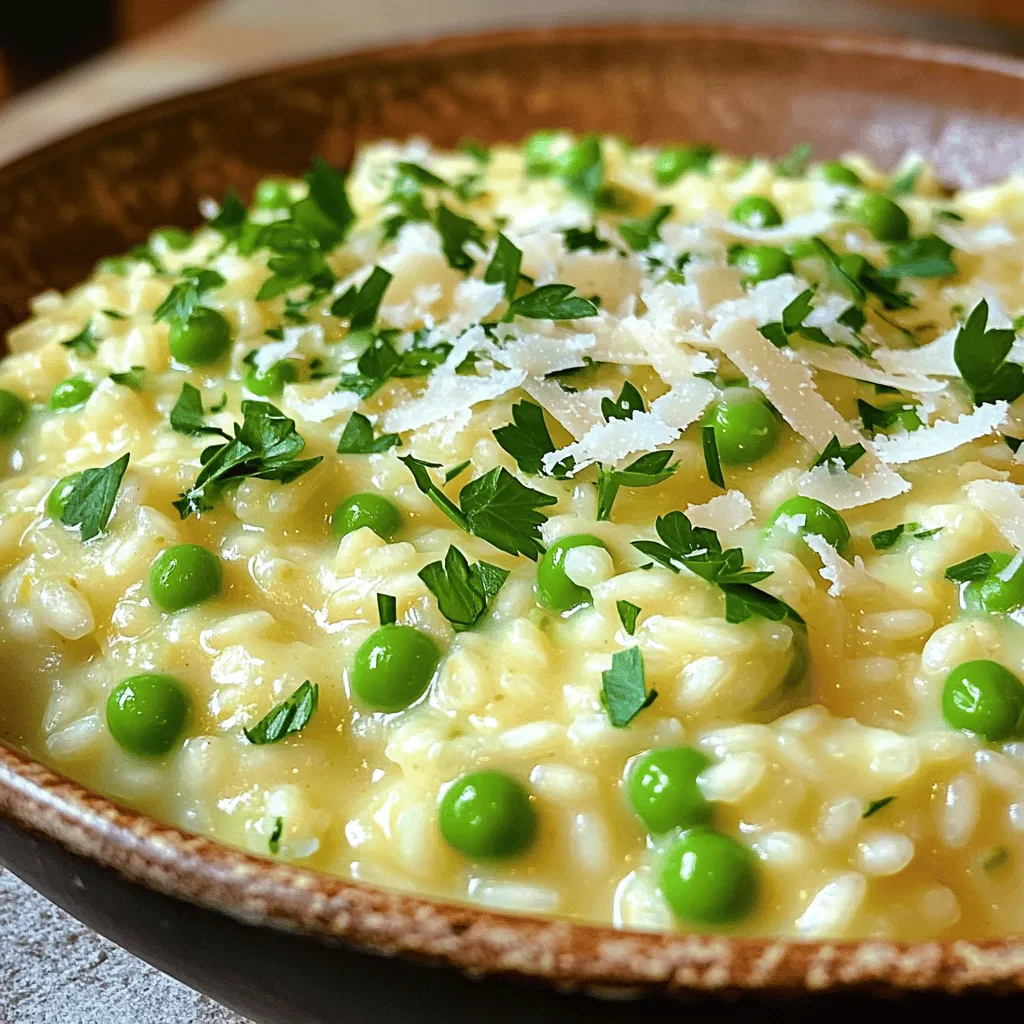
Welcome to your new favorite comfort food: Creamy Garlic Parmesan Risotto! This simple yet tasty dish will impress your family

To make this salad shine, gather these key items: - 1 medium butternut squash, peeled and diced - 2 tablespoons olive oil - 3 tablespoons pure maple syrup - Salt and pepper to taste - 1/2 teaspoon ground cinnamon - 5 cups mixed greens (arugula, spinach, and kale) - 1/4 cup dried cranberries - 1/4 cup feta cheese, crumbled - 1/4 cup walnuts, chopped - 1 tablespoon balsamic vinegar These ingredients create a lovely mix of flavors and textures. The butternut squash brings sweetness and creaminess, while the greens add freshness. The dried cranberries give a burst of tartness, and feta cheese provides a nice salty touch. You can add extras to boost flavor and nutrition. Some ideas include: - Sliced apple or pear for crunch - Grilled chicken for protein - Quinoa for added fiber - Pumpkin seeds for more crunch - Fresh herbs like parsley or mint for brightness These options allow you to customize your salad and make it your own. This salad is not just tasty; it’s also very healthy. Here’s why: - Butternut Squash: Rich in vitamins A and C. It supports eye health and boosts immunity. - Mixed Greens: Full of fiber and antioxidants. They help with digestion and overall health. - Dried Cranberries: Provide vitamins and minerals. They are great for heart health. - Walnuts: Packed with healthy fats and protein. They support brain health. - Feta Cheese: Offers calcium for strong bones. It adds flavor with fewer calories than other cheeses. This salad is a balanced meal that nourishes your body while delighting your taste buds. To start, preheat your oven to 400°F (200°C). This heat will help caramelize the squash. Next, peel and dice one medium butternut squash into small cubes. In a large bowl, mix the diced squash with two tablespoons of olive oil, three tablespoons of pure maple syrup, salt, and pepper to taste. Add half a teaspoon of ground cinnamon for warmth. Toss everything well until the squash is evenly coated. This blend of flavors will make your dish shine. Spread the squash mixture on a baking sheet in a single layer. Roast it in the oven for 25 to 30 minutes. Stir halfway through to ensure even cooking. The squash is ready when it is tender and golden brown. While the squash roasts, prepare the salad base. Take a large serving bowl and add five cups of mixed greens. I love using a mix of arugula, spinach, and kale for texture and flavor. Once the squash is done roasting, let it cool for about five minutes. Now, it’s time to combine! Add the slightly cooled roasted butternut squash to the bowl with the greens. Toss in a quarter cup of dried cranberries for sweetness, a quarter cup of crumbled feta cheese for creaminess, and a quarter cup of chopped walnuts for crunch. These ingredients add layers of flavor and texture to your salad. To finish your salad, drizzle one tablespoon of balsamic vinegar over the top. This adds a tangy contrast to the sweetness of the squash and cranberries. Toss gently to mix everything. It’s important not to over-mix, as you want to keep the beautiful layers visible. Serve your salad right away. You can garnish it with extra walnuts or feta if desired. This dish is perfect for a light meal or as a side dish. Enjoy the blend of flavors and textures in every bite! To roast butternut squash well, choose a medium-sized squash. Peel it carefully and dice it into even pieces. This helps it cook evenly. Toss the squash with olive oil, maple syrup, salt, pepper, and cinnamon in a bowl. Make sure each piece gets coated. Spread the squash on a baking sheet in a single layer. This prevents steaming and ensures a nice caramelization. Roast it at 400°F for 25-30 minutes, stirring halfway through. Look for tender pieces, with a golden brown color. To boost flavor, consider adding other ingredients. Try using fresh herbs like thyme or rosemary for a fragrant touch. A sprinkle of chili flakes can add a kick. You can also swap dried cranberries for pomegranate seeds. They give a pop of color and freshness. If you like nuts, try pecans or almonds instead of walnuts. For a creamier texture, use goat cheese instead of feta. Each change adds unique flavors to the salad. For a beautiful presentation, arrange the mixed greens first. Layer them in a large bowl or on individual plates. Next, add the roasted squash in a colorful pattern. Sprinkle dried cranberries and nuts on top. Crumbled feta adds a nice touch too. Drizzle balsamic vinegar just before serving. This keeps the salad fresh and vibrant. For extra flair, garnish with whole nuts or herbs. This makes your salad look inviting and delicious. {{image_2}} You can change the greens in your salad. Try using romaine or butter lettuce. They add a nice crunch. You can also mix in some fresh herbs. Chopped parsley or cilantro can boost the flavor. Want more texture? Add sliced radishes or cucumber. They give a fresh bite that pairs well with the sweetness of the squash. While balsamic vinegar is great, you can switch it up. A honey mustard dressing adds a zing. Simply mix honey, mustard, and olive oil. You can also try a lemon vinaigrette. Just whisk together lemon juice, olive oil, and a pinch of salt. Both options brighten the dish and add more layers of flavor. This salad shines in every season. In the fall, add roasted apples for sweetness. In winter, try pomegranate seeds for color and crunch. Spring brings fresh peas or asparagus, while summer can feature grilled corn. Each season offers a chance to play with flavors and textures. Let the ingredients change with the time of year! You can store leftover salad in an airtight container. Keep it in the fridge. The salad tastes best within three days. If you have extra roasted squash, store it separately. This keeps the greens fresh. To reheat roasted squash, put it on a baking sheet. Preheat your oven to 350°F (175°C). Heat for about 10 minutes. This method keeps the squash crispy. You can also use a microwave. Heat for 1-2 minutes, but it may become soft. For meal prep, chop the squash ahead of time. Store it in the fridge for up to three days. You can also roast the squash in advance. Just reheat it before serving. Prepare the greens and toppings separately. This keeps everything fresh and crisp. Yes, you can! Other squashes work well. Try acorn squash or pumpkin. Both add nice flavor. Just chop them into similar sizes. This keeps cooking time even. If you want a substitute for feta, use goat cheese. It has a similar texture. You can also try vegan cheese. Crumbled tofu is another option. It mimics the texture well. To make the salad vegan, skip the feta cheese. Use avocado for creaminess instead. You can also add nutritional yeast for a cheesy taste. This keeps the salad flavorful and rich. Yes, you can prepare the salad ahead of time. Roast the squash and cool it. Store it in the fridge. You can mix the greens and other toppings when ready to serve. This keeps everything fresh. In this post, we explored how to make a delicious Maple Roasted Butternut Squash Salad. We discussed key ingredients that elevate flavors and offered step-by-step instructions for roasting and assembling. You learned useful tips for perfecting your salad and variations to keep it fresh. Storing leftovers properly ensures you enjoy it longer. With these details, you can create a flavorful dish for any occasion. Enjoy your cooking adventure!

Maple Roasted Butternut Squash Salad Delightful Dish

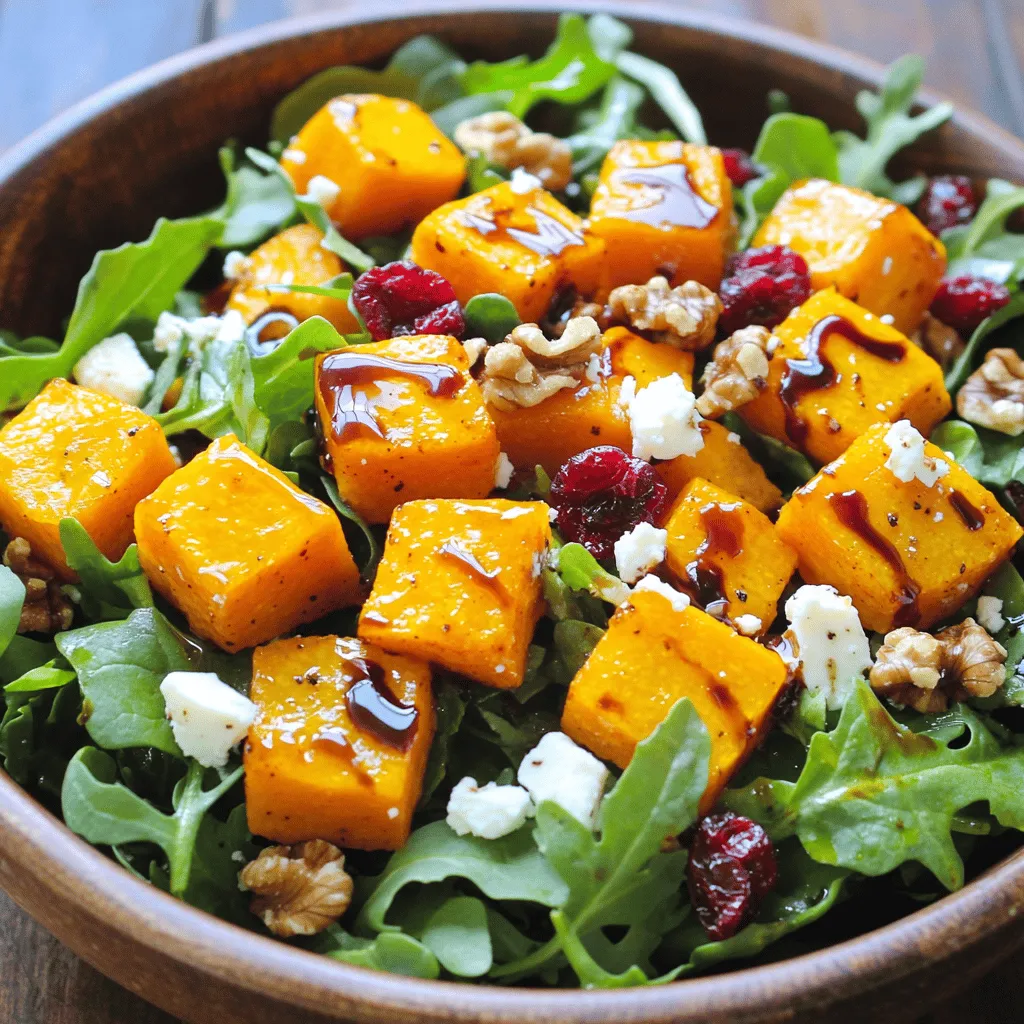
Welcome to the world of deliciousness with my Maple Roasted Butternut Squash Salad! This dish is not just a salad;

- 2 cups pretzel sticks - 1 cup unsalted butter, melted - 1 cup brown sugar, packed - 1 cup granulated sugar - 1 cup sweetened condensed milk - 1 teaspoon vanilla extract - 1/2 teaspoon sea salt (plus extra for topping) - 1 cup milk chocolate chips - 1/2 cup chopped pecans or walnuts (optional) For these No Bake Salted Caramel Pretzel Bars, we need some tasty ingredients. Pretzel sticks are the base. They give a nice crunch and salty flavor. Unsalted butter helps bind everything together. Next, we have brown sugar and granulated sugar, which create a sweet caramel. Sweetened condensed milk makes the filling creamy. Don’t forget vanilla extract for flavor! A little sea salt adds that perfect salty touch. Then, we use milk chocolate chips to top it all off. If you like, add chopped pecans or walnuts for some extra crunch. Gather these ingredients, and you’re ready to make a sweet treat that everyone will love! To start, grab a large bowl. Add 2 cups of pretzel sticks. Pour in 1 cup of melted unsalted butter. Mix it all up until the pretzels are coated well. This step is key for flavor. Once mixed, take a greased 9x9-inch baking pan. Press the pretzel mixture firmly into the bottom. Make sure it's even. This creates a strong base for your bars. Next, you will make the caramel filling. In a medium saucepan, combine 1 cup of brown sugar, 1 cup of granulated sugar, and 1 cup of sweetened condensed milk. Place the saucepan over medium heat. Stir this mixture continuously. When it starts to boil, let it bubble for 2-3 minutes. This thickens the caramel. Once thickened, remove it from the heat. Stir in 1 teaspoon of vanilla extract and 1/2 teaspoon of sea salt. Mix well for a smooth finish. Now, it's time to assemble your bars. Pour the caramel over the pretzel base. Spread it evenly with a spatula. If you want, sprinkle chopped pecans or walnuts on top. Gently press them into the caramel. Next, melt 1 cup of milk chocolate chips in a microwave-safe bowl. Do this in 30-second intervals, stirring until smooth. Drizzle the melted chocolate over the caramel layer. Use a spatula to spread it out evenly. Finally, refrigerate the bars for at least 2 hours. This helps everything set. Once firm, remove the bars from the pan. Cut them into squares and sprinkle a little extra sea salt on top. Enjoy your tasty treat! To get smooth caramel, stir often. This helps mix all the ingredients well. Use a sturdy spatula for better control. Always keep the heat at medium. If the heat is too high, the caramel may burn. Boil the mixture for just 2-3 minutes. This time is enough to thicken it without overcooking. When you press the pretzel base, use firm pressure. This makes a solid layer. If it's not pressed well, the bars may fall apart. After assembling, let the bars cool in the fridge. This helps them set properly. For cutting, use a sharp knife. A warm knife glides through the chocolate better. Add your favorite nuts for more crunch. Pecans or walnuts work great, but feel free to choose! You can also try different chocolates. Dark chocolate adds a rich taste, while white chocolate gives a sweet touch. Mix and match these options to make the bars your own! {{image_2}} You can use different types of chocolate in this recipe. Dark chocolate gives a rich, deep flavor. Milk chocolate adds sweetness and creaminess. If you want a lighter taste, try white chocolate. It melts well and looks pretty on top. Want to make it special? Add flavored extracts like almond or hazelnut. A few drops can change the whole taste. You can also mix in different nuts. Pecans or walnuts give crunch and flavor. Try adding peanuts for a fun twist! If you're looking for a lighter version, swap some ingredients. Use less butter or sugar. You can try coconut oil instead of butter too. For a vegan option, use plant-based butter and coconut milk. This way, you can enjoy the bars without worry! To keep your No Bake Salted Caramel Pretzel Bars fresh, store them in the fridge. Place the bars in an airtight container. This helps them stay moist and tasty. If you don't have a container, cover them tightly with foil. This option also works well. Make sure the bars cool completely before storing them. If you put warm bars in the fridge, they can get soggy. You can freeze these bars for long-term storage. Cut the bars into squares first. Then, wrap each square in plastic wrap. This step prevents freezer burn. Place the wrapped bars in an airtight container or freezer bag. To thaw, take the bars out and leave them in the fridge overnight. This method keeps the texture nice. You can also let them sit at room temperature for about an hour before serving. Enjoy your sweet treat any time! Yes, you can make these bars nut-free. Just skip the chopped nuts. The pretzels give a great crunch, so you will not miss the nuts. You can also use seeds, like pumpkin seeds, for added texture if you want. These bars last about one week in the fridge. Store them in an airtight container to keep them fresh. If you notice any changes in smell or texture, it’s best to throw them out. You can use coconut cream as a substitute for sweetened condensed milk. This makes the bars dairy-free and adds a slight coconut flavor. You can also mix milk with sugar and simmer it to create a homemade version. Absolutely! You can add sprinkles or even crushed candies on top. This makes the bars look fun and festive. Just make sure to add them right after you drizzle the chocolate so they stick well. Yes, you can make these bars without pretzels. Instead, use graham crackers or crushed cookies as the base. This will change the flavor a bit but will still taste great. You now have a clear path to making delicious pretzel caramel bars. We covered the essential ingredients, step-by-step instructions, tips for the perfect caramel, and various ways to customize your treat. Remember, experimenting with flavors can lead to new favorites. Store your bars properly to keep them fresh and tasty. Enjoy your sweet creations, and share them with friends and family for a delightful treat they’ll love!

No Bake Salted Caramel Pretzel Bars Delightful Recipe

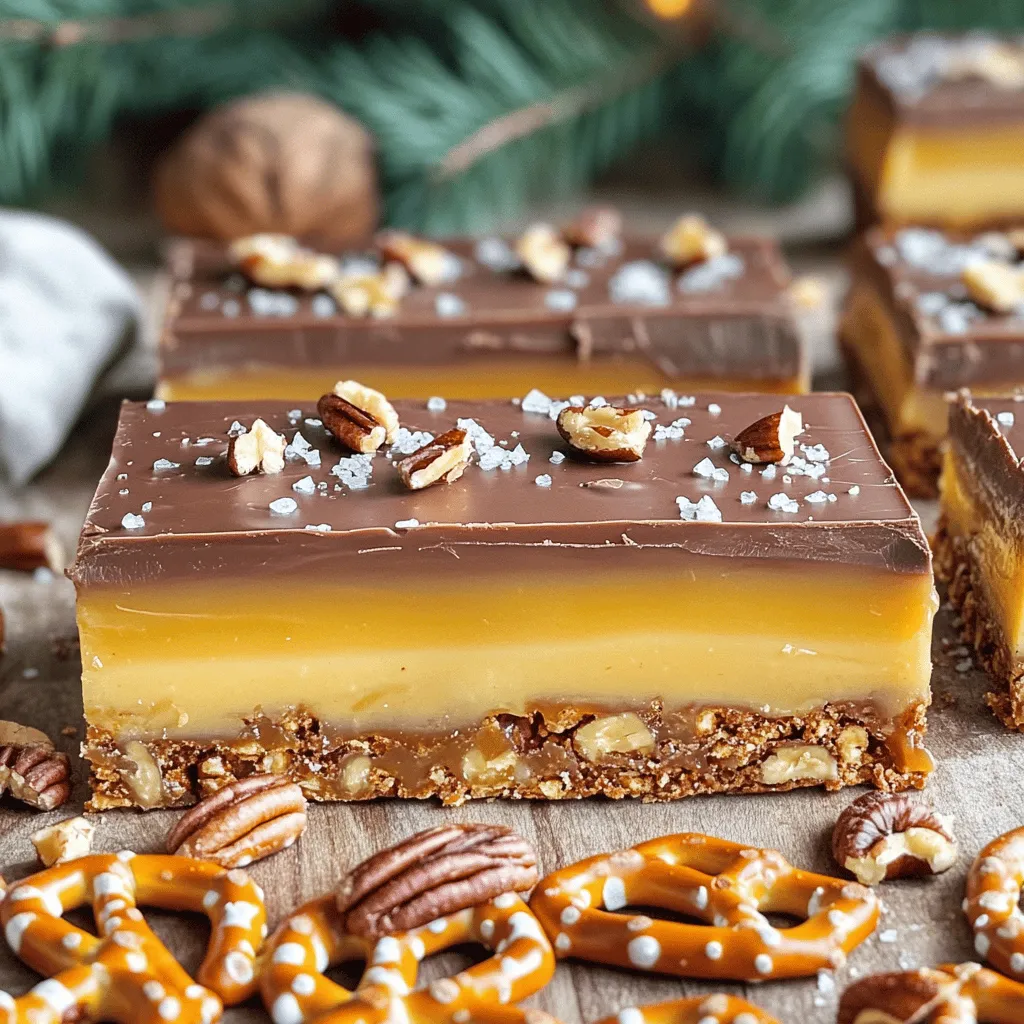
If you crave a sweet-salty treat, you’ll love making No Bake Salted Caramel Pretzel Bars! This easy recipe packs a

To make these tasty Pumpkin Cream Cheese Brownies, you’ll need a few key ingredients. Here’s what you should gather before starting: - 1 cup canned pumpkin puree - 1/2 cup granulated sugar - 1/2 cup brown sugar, packed - 1/2 cup vegetable oil - 2 large eggs - 1 teaspoon vanilla extract - 1 cup all-purpose flour - 1/2 cup unsweetened cocoa powder - 1 teaspoon baking powder - 1/2 teaspoon baking soda - 1/2 teaspoon salt - 1 teaspoon ground cinnamon - 1/2 teaspoon ground nutmeg - 1/4 teaspoon ground ginger - 4 oz cream cheese, softened - 1/4 cup powdered sugar Each ingredient has its own role in creating the perfect balance of flavors. The pumpkin puree gives moisture and a slight earthiness. The sugars add sweetness and help achieve the right texture. Vegetable oil keeps the brownies soft and fudgy. The eggs bind everything together. Cocoa powder provides rich chocolate flavor. The spices—cinnamon, nutmeg, and ginger—bring warmth and depth. The cream cheese adds a creamy swirl that makes each bite special. Make sure to gather all your ingredients before you start. This makes the process smooth and fun! First, preheat your oven to 350°F (175°C). This step ensures your brownies bake evenly. Next, take a 9x9-inch baking pan. You can grease it or line it with parchment paper. Using parchment paper helps the brownies come out easily after baking. In a medium bowl, combine the pumpkin puree, granulated sugar, brown sugar, vegetable oil, eggs, and vanilla extract. Whisk these ingredients together until they blend well. Make sure there are no lumps. This mixture gives your brownies a rich and moist texture. In a separate bowl, sift together the all-purpose flour, cocoa powder, baking powder, baking soda, salt, cinnamon, nutmeg, and ginger. Sifting helps remove clumps and mixes the dry ingredients evenly. This step also adds air, making your brownies light and fluffy. Gradually add the dry ingredients into the wet mixture. Stir gently until just combined. You want to see no flour streaks. Be careful not to overmix, as that can make your brownies tough. In a small bowl, beat the softened cream cheese with powdered sugar. Mix until it is smooth and creamy. This mixture adds a lovely tang to the brownies, balancing the sweetness from the sugar. Pour half of the brownie batter into the prepared pan and spread it evenly. Next, drop spoonfuls of the cream cheese mixture over the brownie base. Pour the rest of the brownie batter on top, spreading it gently. Now, take a knife or skewer and swirl the cream cheese into the brownie batter. This creates a beautiful marbled effect. Bake the brownies in the oven for 25 to 30 minutes. To check for doneness, insert a toothpick into the center. It should come out with a few moist crumbs, not wet batter. Once done, let them cool in the pan on a wire rack before cutting into squares. To get the best texture, avoid overmixing the batter. When you mix the dry and wet ingredients, stir just until you see no more flour. This keeps your brownies fudgy and moist. To bake evenly, use an oven thermometer. Ovens can be off by a few degrees. Preheat to 350°F (175°C) and place the pan in the center. This helps the brownies cook evenly. When it comes to serving, dust the top with powdered sugar. This gives a nice, sweet touch that looks great. You can also sprinkle cinnamon for extra flavor. For a special treat, add a dollop of whipped cream on top. It makes the brownies feel fancy and adds creaminess. One big mistake is not checking the brownies while baking. Avoid burning them by setting a timer for 25 minutes. Use a toothpick to test doneness. If it comes out with a few moist crumbs, they are ready. Another mistake is undercooking. If you see wet batter on the toothpick, bake for a few more minutes. Always cool the brownies in the pan before cutting. This helps them set properly. {{image_2}} To make these brownies gluten-free, swap all-purpose flour for a gluten-free blend. Look for blends that include xanthan gum. This will help your brownies stay tender. You can also check labels to ensure other ingredients are gluten-free. For a vegan twist, replace eggs with flaxseed meal. Mix 1 tablespoon of flaxseed with 2.5 tablespoons of water. Let it sit for a few minutes to thicken. For cream cheese, use a plant-based option made from nuts or tofu. This keeps your brownies creamy and delicious without animal products. Want to change things up? Add chocolate chips or nuts to the batter. I love using dark chocolate chips for a rich taste. Chopped walnuts or pecans add a nice crunch too. These extras bring new flavors and textures to your brownies, making them even more delightful. To keep your brownies fresh, store them in an airtight container. Line the container with parchment paper for easy removal. This helps keep the brownies moist and prevents them from getting hard. Place a piece of bread in the container too. The bread helps maintain moisture. Ensure the brownies cool completely before storing to avoid sogginess. To freeze brownies, first cut them into squares. Wrap each square tightly in plastic wrap. Then, place the wrapped brownies in a freezer-safe bag. Push out as much air as you can before sealing. Label the bag with the date. When you want to enjoy them, take out a square and let it thaw at room temperature for about 30 minutes. For a warm treat, you can heat it in the microwave for a few seconds. Brownies can stay fresh at room temperature for up to 3 days. If you store them in the fridge, they can last about a week. Just remember, the colder they get, the firmer they may become. So, warming them slightly before eating can bring back their soft, fudgy texture. Yes, you can make these brownies ahead of time. Bake them and let them cool completely. Then, wrap them tightly in plastic wrap or foil. Store them in the fridge for up to a week. For longer storage, freeze them in an airtight container. Just remember to thaw them in the fridge before serving. This way, you can enjoy these tasty treats whenever you want! If you don’t have canned pumpkin, you can use fresh pumpkin. Cook and puree it until smooth. Another option is butternut squash puree, which works well, too. Both will give you that great pumpkin flavor. You can also try sweet potato puree, but it will change the taste slightly. Just make sure your substitute is smooth and not watery. To check if the brownies are done, insert a toothpick into the center. If it comes out with a few moist crumbs, they are ready. If you see wet batter, bake for a few more minutes. Keep an eye on them; overbaking will make them dry. The edges should look set, while the center may be slightly soft. Yes, you can adjust the sweetness! If you want them less sweet, reduce the granulated and brown sugar by a quarter cup. If you prefer them sweeter, add an extra couple of tablespoons of sugar. Taste the batter before baking to find your perfect balance. Just remember that sweetness will change the final flavor a bit. These pumpkin cream cheese brownies are a treat anyone can enjoy. We started with easy-to-find ingredients, mixed them well, and added tips to ensure perfect results. I shared ways to store your brownies and variations to suit different diets. Remember, you can adjust sweetness and even freeze leftovers. Enjoy these treats fresh or save for later!

Pumpkin Cream Cheese Brownies Rich and Irresistible Treat

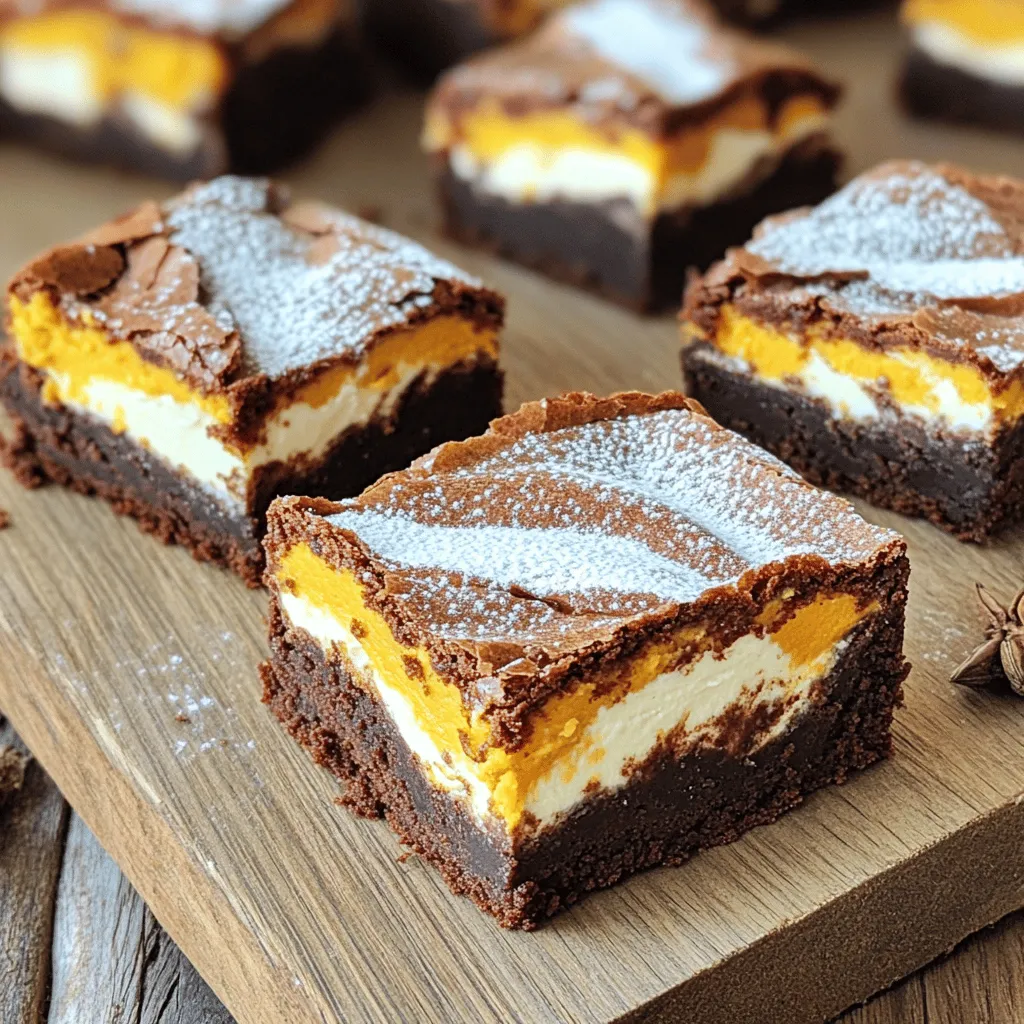
Are you ready to treat yourself? These Pumpkin Cream Cheese Brownies are rich, fudgy, and simply irresistible. With the warmth

For this dish, you need 1 pound of fresh green beans. Look for bright green beans that snap when bent. Trim the ends to keep them neat and easy to eat. Fresh beans add a crisp texture that frozen beans cannot match. The recipe calls for 3 tablespoons of unsalted butter, melted. This gives the green beans a rich flavor. You will also need 4 cloves of garlic, minced. Garlic adds a savory touch that makes this dish stand out. Combine these two for a mouthwatering garlic butter. You will need a few seasonings to enhance the flavor. Use 1 teaspoon of garlic powder and 1 teaspoon of onion powder. These add depth to the dish. If you like heat, add ½ teaspoon of red pepper flakes. For taste, add salt and black pepper as needed. For a bright finish, use the zest of 1 lemon and a squeeze of fresh lemon juice. If you want, sprinkle 2 tablespoons of grated Parmesan cheese on top for a cheesy touch. This blend of flavors makes the green beans shine! First, wash the green beans well. Make sure they are clean and fresh. After washing, dry them with a towel. This helps them get crispy later. Trim the ends of the beans if they are not already cut. You want nice, neat green beans for this dish. Grab a small bowl for the garlic butter mix. Add the melted butter and minced garlic. Then, sprinkle in the garlic powder and onion powder. If you like heat, add the red pepper flakes. Season with salt and black pepper to taste. Mix everything until it’s smooth and well combined. This mixture adds rich flavor to the beans. Now, it’s time to coat the green beans. Place them in a large bowl. Pour the garlic butter mixture over the beans. Toss them gently until they are fully coated. Preheat your air fryer to 375°F (190°C) for about 3 to 5 minutes. This step is key for even cooking. Next, spread the coated green beans in the air fryer basket. Make sure they are in a single layer. If your air fryer is small, you may need to fry them in batches. Cook for 8 to 10 minutes, shaking the basket halfway through. This helps them cook evenly. When they are tender and slightly crispy, they are ready. Finish by adding lemon zest and a squeeze of fresh lemon juice. Toss the beans to mix in the bright flavor. If you want, sprinkle grated Parmesan cheese on top. Enjoy your tasty air fryer garlic butter green beans! To get your green beans crispy, dry them well after washing. Moisture can lead to steaming instead of crisping. Preheat your air fryer to 375°F (190°C) for about 3-5 minutes. This helps achieve that delightful crunch. Lay the beans in a single layer. If you crowd them, they won't cook evenly. Shake the basket halfway through cooking. This ensures all sides get that perfect crisp. For more flavor, use fresh garlic and add lemon zest. Mixing in some red pepper flakes gives a nice kick. You can also try different seasonings like smoked paprika or Italian herbs. Don’t forget to taste your garlic butter mix before coating the beans. Adjust the salt and pepper for your preference. A sprinkle of grated Parmesan cheese at the end adds a rich finish. Watch the cooking time closely. Air fry for 8-10 minutes, shaking the basket halfway. Check for tenderness; they should be bright green and slightly crispy. If you prefer softer beans, cook for an extra minute or two. Always remember, it's easier to add time than to fix overcooked beans. Enjoy your perfectly air-fried garlic butter green beans! {{image_2}} You can add more veggies to your dish. Carrots and bell peppers work well. Slice them thin for even cooking. Toss them with the garlic butter just like the green beans. You can also try zucchini or asparagus. These add nice colors and flavors. Experiment with what you like best. Want to make it heartier? Add cooked chicken or shrimp. Toss them in with the green beans. The flavors of garlic butter will coat them too. You can even use tofu for a plant-based option. Just make sure to cook the proteins first. This keeps everything tasty and well-cooked. If you want a vegan option, no problem! Swap the butter for vegan butter or olive oil. Use nutritional yeast instead of Parmesan cheese. This gives a cheesy flavor without dairy. You can also add a splash of soy sauce for extra umami. These changes keep the dish delicious and plant-based. To keep your Air Fryer Garlic Butter Green Beans fresh, store them in an airtight container. Let them cool down first. Place a paper towel inside to absorb moisture. This helps keep the beans crisp. They can last in the fridge for about 3-5 days. If you want them to taste great later, avoid adding lemon juice or cheese until you serve them. Reheating is easy! Place the cold green beans in the air fryer. Set it to 350°F (175°C) and heat for about 3-5 minutes. Shake the basket halfway to make sure they heat evenly. You can also use a skillet. Heat a bit of butter over medium heat. Add the beans and stir for a few minutes. This will bring back their flavor and crispness. Freezing is a good option if you have leftovers. First, blanch the green beans in boiling water for 2-3 minutes. This helps keep their color and texture. Then, cool them in ice water to stop the cooking process. Drain and dry them well. Place them in freezer bags and squeeze out the air. They can last for up to 3 months in the freezer. When you’re ready to eat, just cook them straight from frozen! Yes, you can use frozen green beans! They are quick and easy. When using frozen beans, do not thaw them. Just toss them in the garlic butter mix and air fry. You may need to add a couple of extra minutes to the cooking time. Check for tenderness to know when they are ready. Air Fryer Garlic Butter Green Beans pair well with many dishes. Here are some ideas: - Grilled chicken - Roasted salmon - Steak - Pasta dishes - Quinoa salad These sides complement the garlic and butter flavors. They make a well-rounded meal. You will know the green beans are done when they are tender and slightly crispy. After 8-10 minutes, check for doneness. You can taste one or look for a bright green color. If they need more time, air fry for another minute or two. Make sure to shake the basket halfway through cooking for even results. In this blog post, we explored how to make Air Fryer Garlic Butter Green Beans. We covered the best ingredients, like fresh beans and rich garlic butter. You learned step-by-step how to prepare and cook them perfectly. I shared tips to ensure they are crispy and flavorful. You can also customize this dish by adding veggies or proteins. Remember, proper storage keeps leftovers fresh. Enjoy making this tasty side dish that your whole family will love!

Air Fryer Garlic Butter Green Beans Simple Delight

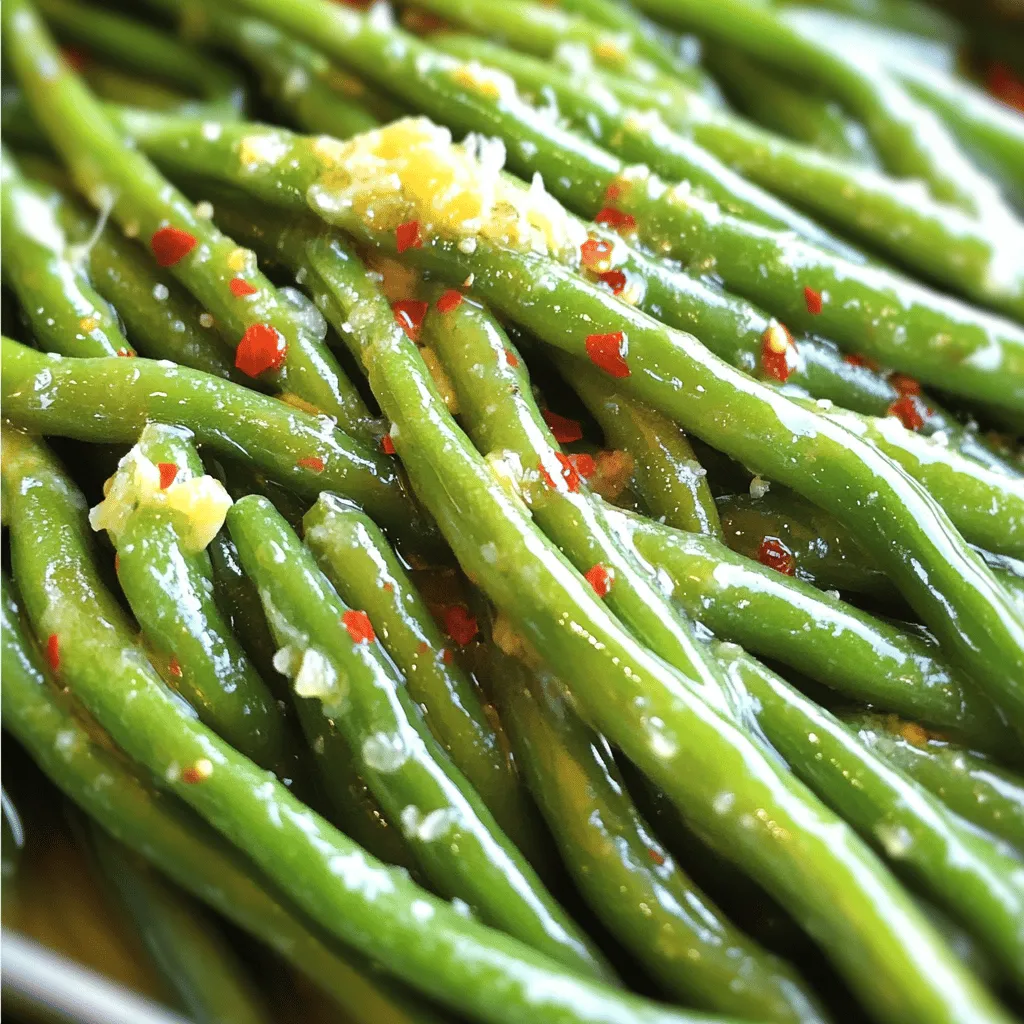
Looking for a quick and tasty side dish? Air Fryer Garlic Butter Green Beans are a winner! With just a

- 2 cups apple cider - 1 cup granulated sugar - 1/2 cup brown sugar, packed - 1/2 cup unsalted butter, softened - 2 large eggs - 1 teaspoon vanilla extract - 3 cups all-purpose flour - 2 teaspoons baking powder - 1 teaspoon baking soda - 1 teaspoon ground cinnamon - 1/2 teaspoon ground nutmeg - 1/4 teaspoon ground ginger - 1/2 teaspoon salt - 1/2 cup melted butter - 1 cup granulated sugar - 2 teaspoons ground cinnamon The apple cider is the star of this cake. It adds a sweet and tangy flavor. You can use fresh cider for the best taste. The sugars create a nice balance of sweetness. Brown sugar gives a deep flavor, while granulated sugar helps with texture. Butter adds richness and moisture to the cake. Eggs give the cake structure and help it rise. Vanilla extract adds a warm note that pairs well with spices. The flour forms the base of your cake. Baking powder and baking soda help it rise. The spices—cinnamon, nutmeg, and ginger—bring warmth and depth. Salt enhances all the flavors. For the coating, melted butter adds shine and helps sugar stick. The cinnamon-sugar mixture makes the cake taste like a cozy fall treat. First, grab your bundt pan. Grease it well with butter or non-stick spray. Then, sprinkle a light dusting of flour inside. This step helps the cake come out smoothly after baking. Next, take the apple cider and pour it into a saucepan. Heat it over medium-high heat until it starts to boil. Once it boils, reduce the heat to low. Let it simmer for about 15 to 20 minutes. You want the cider to reduce to about one cup. After that, take it off the heat and let it cool down. In a large bowl, cream together the granulated sugar, brown sugar, and softened butter. Mix until it looks light and fluffy. Now, add in the eggs, one at a time, and the vanilla extract. Beat until everything blends well. In another bowl, whisk together the flour, baking powder, baking soda, cinnamon, nutmeg, ginger, and salt. Gradually add this dry mix to the wet mixture. Alternate with the reduced apple cider. Start and end with the flour mix. Just mix until it comes together. Be careful not to overmix! Pour the batter into your greased bundt pan. Make sure the top is smooth. Now, place it in the oven and bake for 50 to 60 minutes. To check if it’s done, insert a toothpick into the center. If it comes out clean, it’s ready. Once baked, let it cool in the pan for about 10 to 15 minutes. Then, invert it onto a wire rack to cool completely. While the cake cools, melt some butter in a bowl. In another bowl, mix together the granulated sugar and cinnamon. Once the cake is cool, brush it with the melted butter. Then, sprinkle the cinnamon-sugar mixture generously over the cake. This gives it that classic donut touch! To start, greasing the bundt pan well is key. Use non-stick spray or butter with flour. This helps the cake release easily. Be generous but not too heavy. Make sure to coat all the nooks and crannies. Next, avoid overmixing the batter. This cake needs a light touch. Mix just until the dry and wet ingredients blend. Overmixing can make the cake dense and tough. For a fun twist, try adding nuts or raisins. Chopped walnuts or pecans give a nice crunch. Raisins add sweetness and a chewy texture. Mix them in gently so they spread evenly. You can also play with spices for more flavor. Add a pinch of cardamom or allspice. These will keep the taste fresh and interesting. Have fun with it! Garnishing can make your cake stand out. Serve with thin apple slices on the side. A dollop of whipped cream adds a nice touch, too. Pair your cake with warm drinks. A cup of tea or coffee works well. Hot apple cider is also a great choice. Enjoy the flavors of fall! {{image_2}} To make this cake gluten-free, you can swap all-purpose flour with a gluten-free flour blend. Choose a blend that contains xanthan gum, as it helps mimic the structure of wheat flour. You can also use almond flour or oat flour, but you may need to adjust the liquid in the recipe. Keep an eye on the texture during mixing. You want it to be thick but pourable. If you want a vegan version, replace the eggs with flaxseed meal or chia seeds. Mix one tablespoon of flaxseed meal or chia seeds with three tablespoons of water. Let it sit for a few minutes to form a gel. For butter, use coconut oil or a vegan butter substitute. Both options work well and keep the cake moist. You can add fruit to this cake for extra flavor. Diced apples give a nice crunch and enhance the apple taste. You can also fold in fresh or dried cranberries for a tart twist. Just make sure to reduce the sugar slightly if you add sweeter fruits. This will keep the cake balanced and tasty. You can store your apple cider donut bundt cake at room temperature or in the fridge. If you plan to eat it within two days, keep it at room temperature. Wrap the cake in plastic wrap or place it in an airtight container. This keeps it fresh and moist. If you want it to last longer, store it in the fridge. Just remember, cold air can dry it out. Wrap it well to avoid this. Freezing your bundt cake is easy and keeps it fresh. Here are the steps: 1. Cool the cake completely: Make sure your bundt cake is cool. This helps avoid ice crystals. 2. Wrap it well: Use plastic wrap to cover the cake tightly. Then, wrap it in aluminum foil for extra protection. 3. Label and date: Write the date and name on the foil. This helps you know when it was frozen. 4. Freeze: Place the wrapped cake in the freezer. It can last up to three months. When you want to eat it: - Thaw the cake: Take it out of the freezer. Leave it in the fridge overnight or on the counter for a few hours. - Unwrap carefully: Once thawed, remove the plastic and foil. Let it sit for a bit before serving. Your apple cider donut bundt cake stays fresh for different times based on how you store it: - Room temperature: 2-3 days if wrapped well. - Refrigerator: 5-7 days, but it may dry out if not wrapped. - Freezer: Up to 3 months, maintaining its flavor and texture. Enjoy this cake at its best by following these storage tips! Yes, you can use store-bought apple cider. Look for a brand that is fresh and not too sweet. Organic options often have a good apple flavor. Avoid ciders with added sugars or preservatives. The best cider will enhance the cake’s taste. To stop your bundt cake from sticking, grease the pan well. Use butter or non-stick spray. After greasing, dust the inside with flour. This creates a barrier. Also, let the cake cool in the pan for 10-15 minutes before flipping. This helps it release easily. You can use white sugar if you don’t have brown sugar. The cake will be less rich but still tasty. For a closer match, mix white sugar with molasses. Use one tablespoon of molasses for each cup of white sugar. This adds flavor and moisture. Check the cake around 50 minutes. Insert a toothpick into the center. If it comes out clean or with a few crumbs, the cake is done. If it has wet batter, bake for a few more minutes. The cake should also spring back when lightly pressed. This blog post showed you how to make the perfect Apple Cider Donut Bundt Cake. You learned the main ingredients, how to prepare and bake, and some helpful tips. I shared ways to store and variations to try, which make this cake even more fun. Enjoy this cake with your favorite drinks or share it with loved ones. Keep experimenting, and you will create delightful treats. Happy baking!

Apple Cider Donut Bundt Cake Delightful Fall Treat

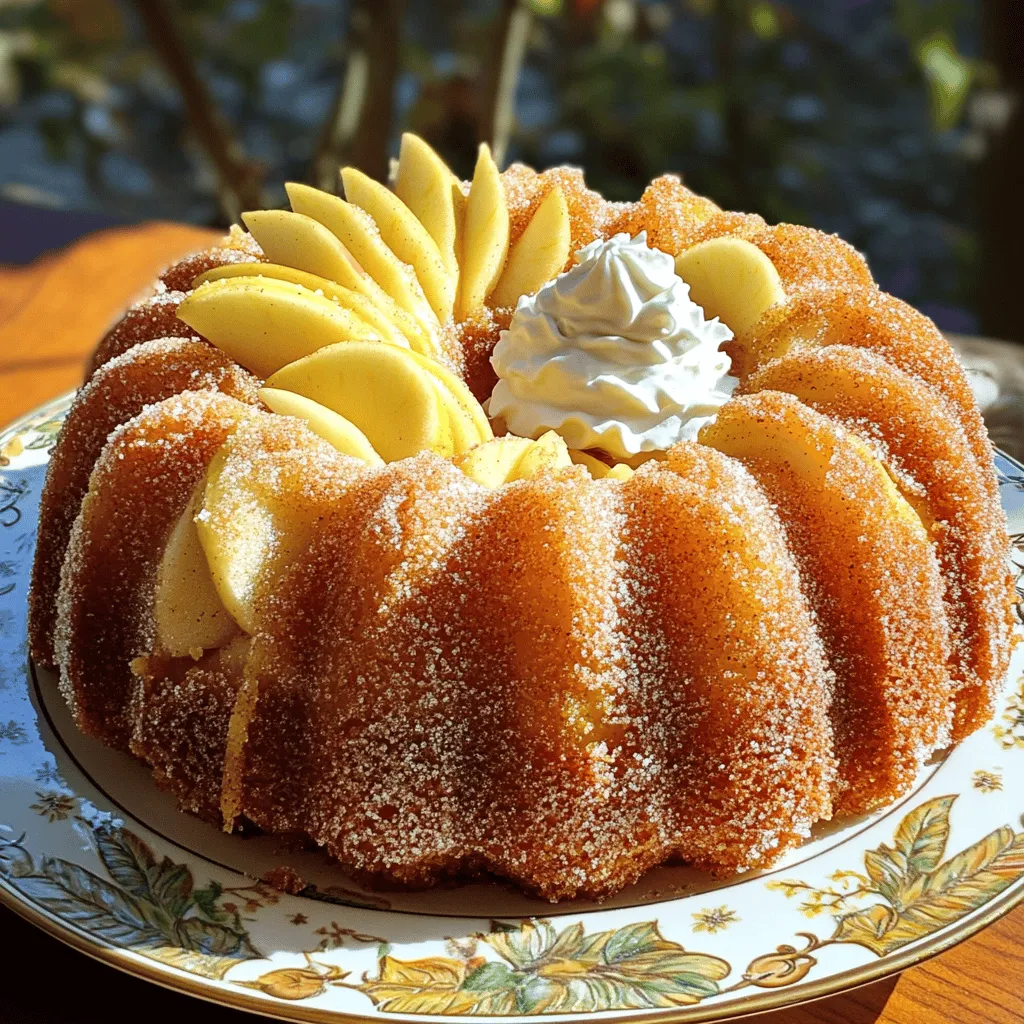
Fall is here, and it’s time to indulge in warm, cozy flavors! If you love the taste of apple cider

When making slow cooker pumpkin oatmeal, you need just a few key ingredients. Here’s what to gather: - 1 cup rolled oats - 1 cup canned pumpkin puree - 4 cups almond milk (or any milk of your choice) - 1/4 cup maple syrup (or honey) - 1 teaspoon vanilla extract - 1 teaspoon ground cinnamon - 1/2 teaspoon ground nutmeg - 1/4 teaspoon salt - 1/2 cup chopped pecans or walnuts (optional) - 1/2 cup dried cranberries or raisins (optional) - Fresh fruit for topping (e.g. banana slices or apple pieces) These ingredients come together to create a warm, comforting meal. The rolled oats provide a hearty base, while pumpkin puree adds creamy texture and flavor. Almond milk makes it rich and smooth, and maple syrup sweetens it just right. The spices like cinnamon and nutmeg give it that cozy fall taste. If you love crunch, add nuts or dried fruit for extra texture. Finally, fresh fruit on top brightens up each bowl. You can mix and match as you like! To start, gather your ingredients. In your slow cooker, combine: - 1 cup rolled oats - 1 cup canned pumpkin puree - 4 cups almond milk (or any milk of your choice) - 1/4 cup maple syrup (or honey) - 1 teaspoon vanilla extract - 1 teaspoon ground cinnamon - 1/2 teaspoon ground nutmeg - 1/4 teaspoon salt Stir everything well to mix. If you like, fold in 1/2 cup chopped pecans or walnuts and 1/2 cup dried cranberries or raisins. This adds great flavor and texture. After mixing, cover the slow cooker and set the cooking time. For a creamy oatmeal, choose your cooking time. Set the slow cooker on low for 6-8 hours. If you’re in a hurry, choose the high setting for 3-4 hours. Both methods yield delicious results. When your oatmeal is cooked, stir it gently. This helps create a smooth texture. If you want a thinner oatmeal, add a splash of almond milk. Serve it warm in bowls, topped with fresh fruit like banana slices or apple pieces. Drizzle more maple syrup on top if you wish. - Choosing the right oats: Use rolled oats for the best texture. Instant oats cook too quickly and turn mushy. Steel-cut oats take longer to cook and won’t give the same creamy finish. - Adjusting sweetness: Maple syrup adds a nice flavor. Start with 1/4 cup. You can add more later if you want it sweeter. Honey is a great alternative if you prefer. - Ensuring creaminess: Almond milk works well. If you want it creamier, use whole milk or a creamier plant-based milk. Stir in a bit more milk after cooking for your perfect consistency. - Topping ideas: Fresh fruit like banana slices or apple pieces adds brightness. Nuts like pecans or walnuts give a nice crunch. Dried fruit such as cranberries or raisins brings extra sweetness. - Variations for added flavor: Try adding a pinch of ginger or cloves for spice. You can also mix in a scoop of nut butter for a rich flavor boost. Another idea is to stir in dark chocolate chips for a sweet surprise! {{image_2}} You can easily make slow cooker pumpkin oatmeal fit your diet. For a vegan option, simply use almond milk and maple syrup. Both are plant-based and tasty. You can replace honey with more maple syrup. This keeps the oatmeal sweet and delicious. If you need gluten-free oatmeal, choose certified gluten-free rolled oats. Many brands offer them. This way, you enjoy the same creamy texture without worry. Always check labels to ensure no gluten sneaks in. Spices can change the game for your oatmeal. Cinnamon is great, but you can add more! Try ginger, cloves, or cardamom to spice things up. Just a pinch can add warmth and depth. Mix and match to find your favorite blend. You can also explore other mix-ins. Consider adding shredded coconut for a tropical twist. Chopped apples or pears give a fresh crunch. For extra sweetness, toss in chocolate chips or butterscotch chips. The options are endless! To store your slow cooker pumpkin oatmeal, let it cool first. Then, place it in an airtight container. It keeps well in the fridge for up to five days. When you are ready to eat, scoop out what you need. To reheat, use the microwave or heat it on the stove. Add a splash of almond milk to make it creamy again. Heat until warm, stirring often. You can freeze leftover oatmeal for later use. First, cool it completely. Then, divide it into portions and place it in freezer-safe bags or containers. Remove as much air as you can. This helps prevent freezer burn. It can last up to three months in the freezer. To thaw, move the container to the fridge overnight. For quicker thawing, you can use the microwave. Heat it in short bursts, stirring in between. Once thawed, reheat as you would for refrigerated oatmeal. Enjoy your cozy meal even when it’s cold outside! Can I make this oatmeal vegan? Yes, you can make this oatmeal vegan. Just use maple syrup as the sweetener. Almond milk works great, too. How can I adjust the recipe for larger servings? You can easily double the recipe. Just use 2 cups of oats and 8 cups of milk. Keep other ingredients in proportion. What would be a good substitute for almond milk? You may use any milk you like. Oat milk, soy milk, or coconut milk all work well. How long can I store leftovers? Store leftovers in the fridge for up to 5 days. Keep it in a sealed container to maintain freshness. Can I add protein powder to this recipe? Yes, you can add protein powder. Mix it in with the oats and other ingredients for a boost. What are some other toppings I could try? Try fresh fruits like bananas or apples. Nuts, seeds, or a dollop of yogurt also add great texture and flavor. You can make delicious slow cooker pumpkin oatmeal with simple ingredients. We covered the right oats, perfect spices, and cooking times. You learned how to adjust sweetness and serve with tasty toppings. Now you have the tools to create a warm and healthy meal. Enjoy exploring different mix-ins and flavors. Experimenting will make each bowl special. This oatmeal is not only easy to make but also fun to customize. Dive in and start cooking!

Slow Cooker Pumpkin Oatmeal Cozy and Nourishing Meal

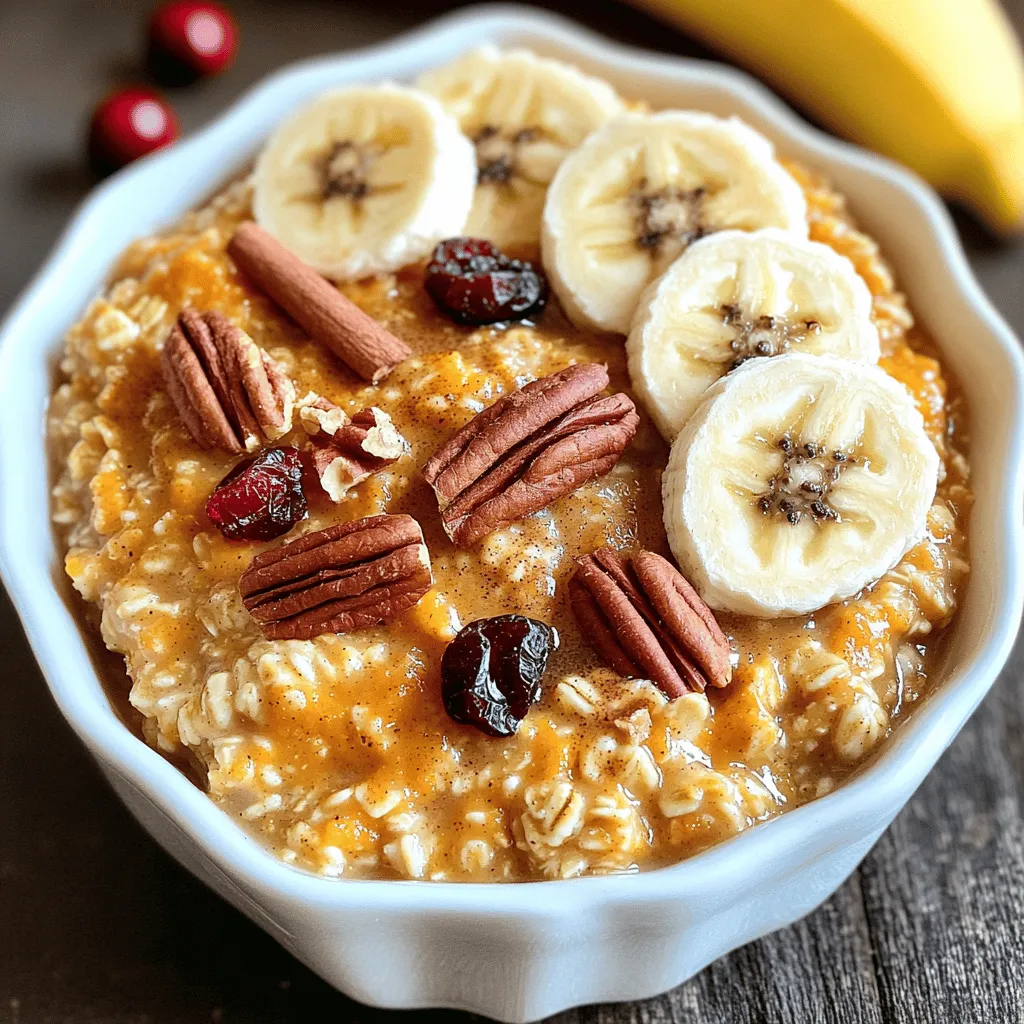
Looking for a warm, filling breakfast? This Slow Cooker Pumpkin Oatmeal is just what you need. It’s easy to make

- 4 bone-in, skin-on chicken thighs - 1/4 cup honey - 2 tablespoons soy sauce - 4 cloves garlic, minced - 1 tablespoon fresh ginger, grated - 1 teaspoon sesame oil The main ingredients for this dish are simple and full of flavor. The chicken thighs are juicy and tender. They soak up the marinade well. Honey gives a sweet touch. Soy sauce adds a salty depth. Garlic and ginger bring warmth and spice. The sesame oil rounds it all off with a nutty hint. - 2 cups broccoli florets - 1 cup baby carrots - Olive oil, salt, and pepper to taste The veggies add nutrition and color. Broccoli florets are crisp and vibrant. Baby carrots add sweetness. Toss these in olive oil, salt, and pepper. This mix enhances their natural taste. You want them tender but not mushy. - Chopped green onions - Sesame seeds Garnishes elevate the dish. Chopped green onions add a fresh crunch. Sesame seeds give a nice visual and a slight nutty flavor. These small touches make the meal look special. They help in making every bite memorable. - Preheat the oven to 400°F (200°C). - In a small bowl, whisk together: - 1/4 cup honey - 2 tablespoons soy sauce - 4 cloves garlic, minced - 1 tablespoon fresh ginger, grated - 1 teaspoon sesame oil This marinade gives the chicken a sweet and savory flavor. The garlic and ginger add depth. - Season 4 bone-in, skin-on chicken thighs with salt and pepper. - Coat the chicken in the marinade. Let it sit for 15 minutes to 2 hours. The longer you marinate, the more flavor you get. I recommend at least 30 minutes for best taste. - Toss 2 cups of broccoli florets and 1 cup of baby carrots with olive oil, salt, and pepper. - Line a sheet pan with parchment paper for easy cleanup. - Arrange the marinated chicken on one side of the pan. Spread the vegetables on the other side. - Pour the reserved marinade over both the chicken and vegetables. This extra marinade makes everything more tasty. - Bake for 35-40 minutes, or until the chicken is cooked through. Make sure it reaches 165°F (74°C). The skin will be crispy, and the veggies tender. Enjoy the aroma while it cooks! To get crispy skin on chicken thighs, start by drying the skin well. Moisture makes skin soggy. Season the skin with salt before cooking. This helps draw out extra moisture. Marination time plays a key role too. Let the chicken sit in the marinade for at least 15 minutes. You can go up to 2 hours for better taste and texture. The longer it sits, the more flavor it absorbs. Broccoli and baby carrots work best with this dish. They cook well and pair nicely with the chicken. For broccoli, cut the florets into smaller pieces for even cooking. Carrots should be sliced thin to soften quicker. If you use other veggies, like bell peppers or zucchini, adjust the cooking time. These may cook faster, so watch them closely. Feel free to experiment with different sauces! Try using teriyaki or barbecue sauce for a new twist. Adding spices and herbs can also boost flavor. Garlic powder, smoked paprika, or fresh herbs like thyme work great. Mixing and matching can lead to delicious surprises. Don't be afraid to get creative! {{image_2}} You can switch up the chicken thighs for chicken breasts or drumsticks. Chicken breasts cook faster. Drumsticks give you a juicier taste. You can also use pork or tofu for a fun twist. Pork pairs well with the honey and garlic flavors. Tofu absorbs the marinade nicely. Want to add a kick? Sprinkle some chili flakes into your marinade. This gives your chicken a spicy bite. For a fresh twist, add citrus flavors. A splash of orange or lemon juice brightens the dish. You can even zest the fruit for more flavor. Pair your chicken with sides that balance its sweetness. Steamed rice or quinoa works well. They soak up the tasty sauce. For a veggie boost, try a simple salad or roasted green beans. These sides complete the meal and add color to your plate. To store cooked chicken and vegetables, let them cool first. Place everything in airtight containers. This keeps the chicken juicy and the veggies fresh. You can use glass or plastic containers. Make sure they are safe for the fridge. Store leftovers in the fridge for up to three days. To reheat, the best method is the oven. Preheat it to 350°F (175°C). Place the chicken and veggies on a baking sheet. Heat them for about 15 to 20 minutes. Check that the chicken reaches 165°F (74°C) again. You want it hot and tasty. Yes, you can freeze this dish! To freeze, let it cool completely first. Wrap the chicken and veggies in plastic wrap. Then place them in a freezer bag. Squeeze out as much air as possible. You can freeze it for up to three months. To thaw, move it to the fridge overnight before reheating. Yes, you can use boneless chicken thighs. Boneless thighs cook faster. This can save you time. However, bone-in thighs have more flavor. The bones add richness to the dish. If you choose boneless, check them often. They may need less cooking time. Adjust your bake time to avoid dryness. To check if the chicken is done, use a meat thermometer. The safe internal temperature for chicken is 165°F (74°C). Insert the thermometer into the thickest part. If it reads 165°F, your chicken is ready. If you don't have a thermometer, check the juices. They should run clear, not pink. If you need a substitute for honey, try maple syrup. It gives a similar sweetness. You could also use agave nectar. Brown sugar mixed with water is another option. Just remember, the flavor may change slightly. Adjust to your taste to keep it delicious. This recipe combines tasty chicken and fresh vegetables, making it a great meal. You learned how to make a flavorful marinade and the right cooking times. With tips for crispy chicken skin and delicious variations, there are many ways to enjoy this dish. Try different proteins or spices to keep it exciting. Remember to store leftovers properly and reheat for the best taste. This dish is not just easy; it’s also versatile. Happy cooking!

Sheet Pan Garlic Honey Chicken Thighs Delight

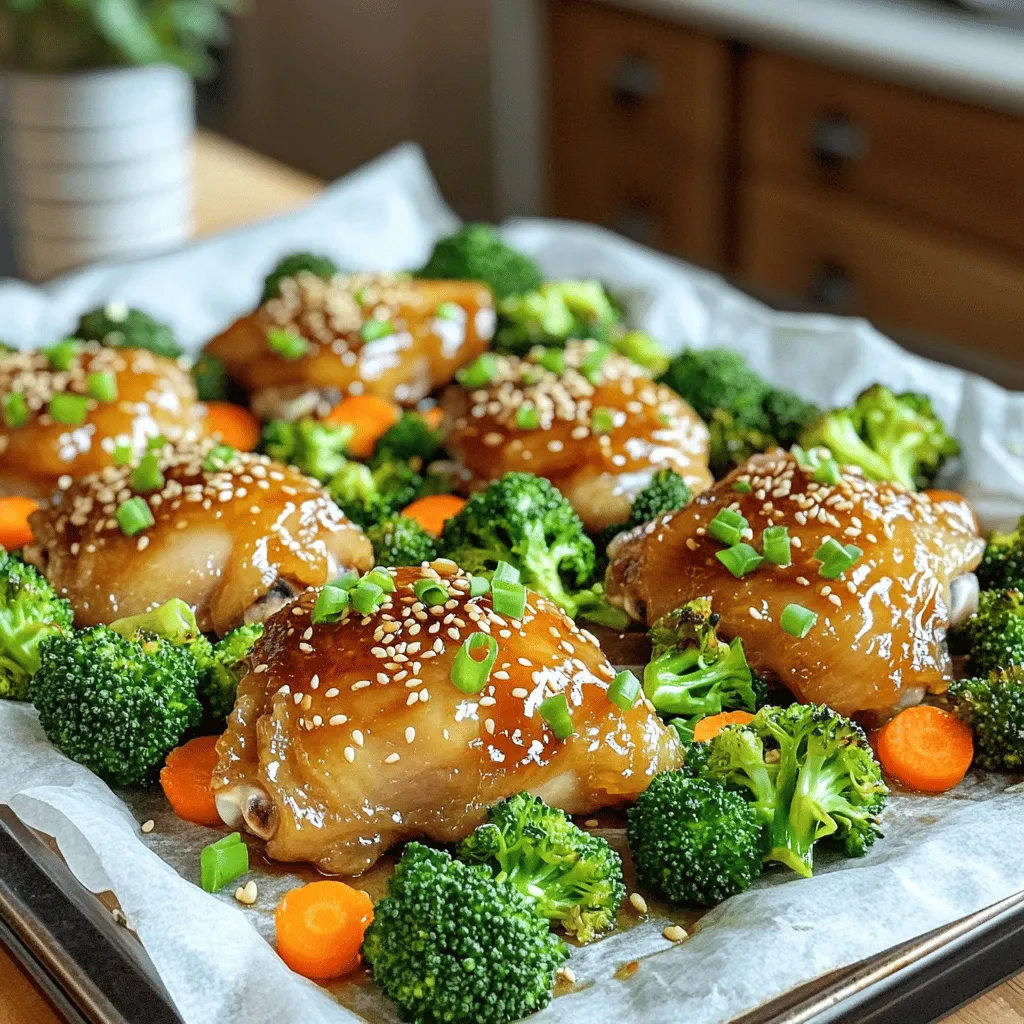
Get ready to savor the mouthwatering flavors of Sheet Pan Garlic Honey Chicken Thighs! This dish combines tender, juicy chicken

Older posts
Newer posts
← Previous Page1 … Page21 Page22 Page23 … Page84 Next →

dsad

© 2026 Lisa Dishes • Built with GeneratePress

Our Policies

  • Copyright Policy
  • Cookie Policy
  • GDPR Policy
  • Privacy Policy
  • Disclaimer
  • Terms Of Use

More Information

  • Home
  • About
  • Contact
  • Appetizers
  • Dessert
  • Dinner
  • Drinks
©2026, Lisa Dishes About Back To Top