Skip to content
DisclaimerTerms Of UseGDPR PolicyCookie Policy

Lisa Dishes

  • Home
  • Drinks
  • Appetizers
  • Dinner
  • Dessert
  • About
  • Contact
  • Privacy Policy
DisclaimerTerms Of UseGDPR PolicyCookie Policy

NO-ING-IMG

Here’s what you need for Air Fryer Cajun Salmon Bites. Gather these fresh and flavorful items: - 1 lb salmon fillet, skinless and boneless, cut into bite-sized cubes - 2 tablespoons olive oil - 1 tablespoon Cajun seasoning - 1 teaspoon garlic powder - 1 teaspoon smoked paprika - 1/2 teaspoon salt - 1/4 teaspoon black pepper - Juice of 1 lime - Fresh parsley, chopped (for garnish) These ingredients work together to create tasty bites. The salmon is the star, providing rich flavors and healthy fats. The olive oil helps the spices stick and adds a nice sheen. Cajun seasoning gives a bold kick, while garlic powder and smoked paprika deepen the taste. Salt and pepper balance the flavors. Lime juice adds brightness, and parsley is a fresh touch for garnish. Make sure to use fresh salmon for the best taste. You can find Cajun seasoning at stores or make your own. Enjoy the process of gathering your ingredients; it’s the first step to cooking something special! - In a mixing bowl, combine 2 tablespoons of olive oil, 1 tablespoon of Cajun seasoning, 1 teaspoon of garlic powder, 1 teaspoon of smoked paprika, 1/2 teaspoon of salt, and 1/4 teaspoon of black pepper. Stir well to mix. - Cut 1 pound of skinless, boneless salmon into bite-sized cubes. Add the salmon to the bowl. Toss gently until all cubes are coated with the marinade. Let the salmon sit for 15-20 minutes. This helps the flavors sink in. - Set your air fryer temperature to 400°F (200°C). - Allow it to preheat for about 5 minutes. This step helps cook the salmon evenly. - Place the marinated salmon bites in the air fryer basket. Make sure they sit in a single layer. - Cook the salmon for 8-10 minutes. Flip them halfway through. This ensures they brown nicely on both sides. Once they are golden brown and cooked through, they are ready to enjoy! - Monitor cooking time for doneness: Cook your salmon bites for 8-10 minutes. Check them halfway through. They should be golden brown. - Avoid overcrowding the air fryer: Cook in batches if needed. This helps the heat circulate and gives you crispy bites. - Experiment with additional spices: Add cayenne for heat or dill for a fresh taste. Just a little can change the flavor. - Try different marinades: You can use soy sauce or honey mustard. These add new layers to your dish. - Recommended side dishes for Cajun salmon bites: Pair with a green salad or coleslaw. Rice or quinoa also works well. - Presentation ideas for an appealing meal: Serve on a bright platter. Add lime wedges and sprinkle parsley on top. This makes the dish pop! {{image_2}} You can spice up your Cajun salmon bites by changing the seasonings. If you like heat, add hot sauce or a pinch of chili powder to your marinade. This will give your bites a fiery kick. For a fresh taste, use chopped herbs like dill or cilantro instead of Cajun seasoning. These fresh herbs add brightness and a new layer of flavor. If you want to try a different fish, tilapia or trout works well too. Both have a mild flavor that pairs nicely with the Cajun spices. For tilapia, follow the same cooking instructions as for salmon. Cook it for 8-10 minutes in the air fryer. If you choose trout, keep an eye on it, as it may cook a bit faster due to its thinner fillets. You can make a plant-based version of Cajun bites using tofu or tempeh. Cut the tofu into cubes and press it to remove excess water. Marinate it the same way as the salmon. Air fry the tofu for 10-12 minutes, flipping halfway through. This will give you a crispy texture. You can also use chickpeas as a substitute. They add a nutty flavor and protein to your dish. To keep your Cajun salmon bites fresh, store them in an airtight container. This helps lock in the flavor and moisture. Place them in the fridge right after they cool down. They will last for up to 3 days. To reheat salmon bites, use the air fryer. Heat it to 350°F (175°C). Cook them for about 5 minutes. This keeps them crispy and tasty. Avoid using the microwave, as it can make salmon rubbery. Yes, you can freeze Cajun salmon bites. Place them in a freezer-safe bag or container. They can last for up to 2 months. When ready to eat, thaw them in the fridge overnight. After thawing, reheat them in the air fryer for the best texture. 8-10 minutes, flipping halfway. This helps them cook evenly. I like to check for doneness. The bites should be golden brown and firm. Best with fresh salmon, but if using frozen, proper thawing is necessary. You should thaw it in the fridge overnight. This keeps the fish safe and tasty. Green salad, coleslaw, or rice dishes. A fresh salad adds crunch. Coleslaw gives a creamy touch. Rice makes a filling side. In this blog post, we explored a simple and tasty Cajun salmon bites recipe. We detailed the ingredients, step-by-step cooking instructions, and helpful tips for perfect texture. You can also mix it up with variations and learn smart storage methods for leftovers. My final thought is that cooking at home can be fun and rewarding. Enjoy trying this recipe and making it your own!

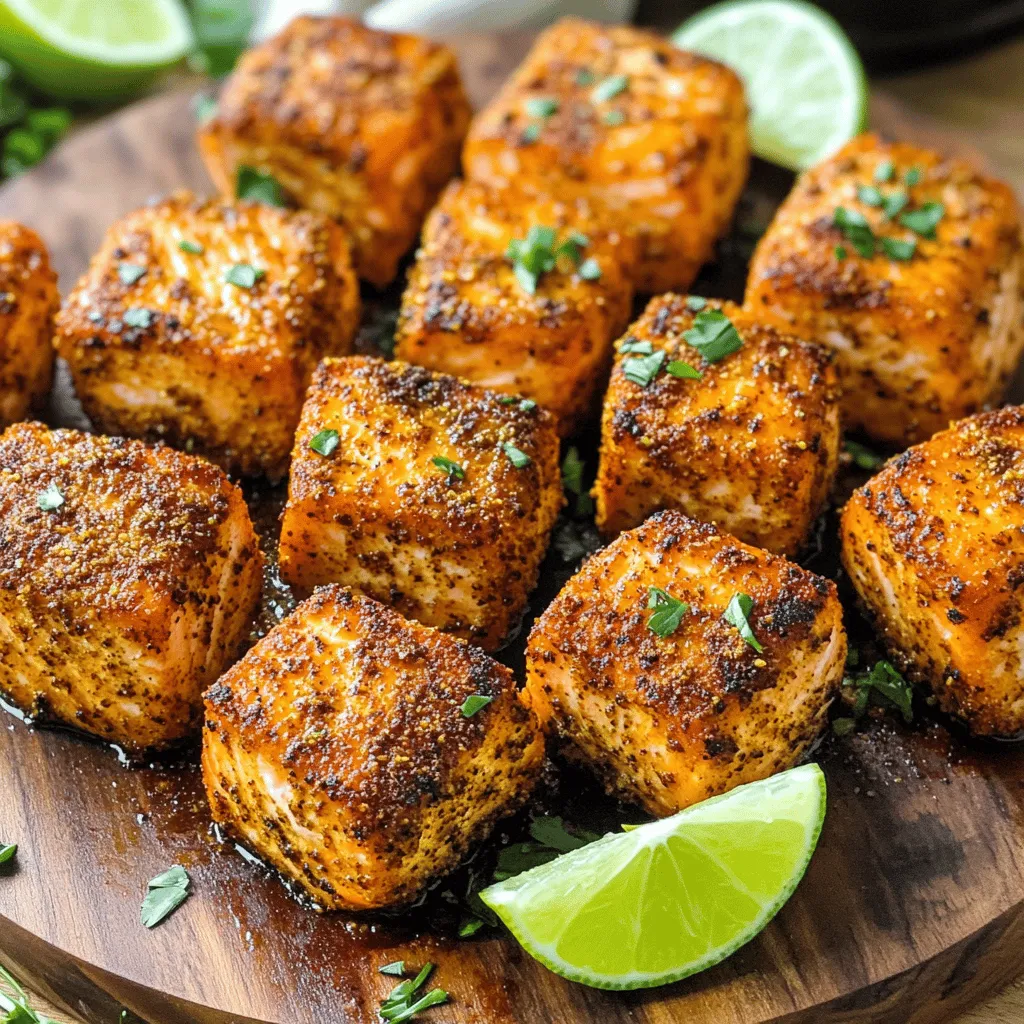
Air Fryer Cajun Salmon Bites Tasty and Simple Recipe

Craving a quick and tasty meal? Try these Air Fryer Cajun Salmon Bites! In just minutes, you can enjoy flaky,

- 4 large eggs - 1 ripe avocado, mashed - 1/2 cup Greek yogurt - 2 tablespoons Dijon mustard - 1 tablespoon lemon juice - 1/4 cup chopped green onions - 1/4 cup diced celery - Salt and pepper to taste - Optional: 1/4 cup cooked and shredded chicken or turkey - Optional: Lettuce leaves for serving To make a tasty protein avocado egg salad, you need a few key items. First, gather four large eggs. They provide protein and richness. Next, grab one ripe avocado. This adds creaminess and healthy fats. You'll also need half a cup of Greek yogurt. This boosts the protein and gives a nice tang. Two tablespoons of Dijon mustard add zest. A tablespoon of lemon juice brightens the flavor. For crunch, include a quarter cup of chopped green onions and diced celery. Don't forget salt and pepper to taste. For an extra protein boost, consider adding a quarter cup of cooked chicken or turkey. Lastly, if you want to serve it differently, grab some lettuce leaves. This makes a perfect base for your salad. Each ingredient plays a role in creating a delicious, healthy meal. To start, you need to hard-boil the eggs. Place four large eggs in a pot. Cover them with cold water. Turn the heat up to high and bring the water to a boil. Once boiling, cover the pot and take it off the heat. Let the eggs sit for 10 to 12 minutes. After that, get a bowl of ice water ready. Transfer the eggs to the ice bath to cool. This stops the cooking and makes peeling easy. While the eggs cool, let’s make the dressing. Grab a large bowl and add one ripe avocado, mashed. Then, mix in half a cup of Greek yogurt. Next, add two tablespoons of Dijon mustard and one tablespoon of lemon juice. Stir everything together until it’s smooth and creamy. This dressing adds flavor and keeps the salad nice and moist. Once the eggs are cool, peel them carefully. Chop the eggs into small pieces. Now, add the chopped eggs to your avocado mixture. Next, toss in a quarter cup of chopped green onions and a quarter cup of diced celery. If you want more protein, you can add a quarter cup of cooked and shredded chicken or turkey. Gently fold all the ingredients together until they are mixed well. Finally, season with salt and pepper to taste. This salad is now ready to enjoy! To make a great avocado egg salad, you need the right avocado. Look for an avocado that feels slightly soft when you gently squeeze it. If it’s too hard, it isn't ripe. If it feels mushy, it’s overripe. Once you have a ripe avocado, mash it well. This gives you a creamy base. For a smooth and creamy salad, mix the mashed avocado with Greek yogurt. This adds richness and moisture. You can also whisk in Dijon mustard and lemon juice for extra creaminess and flavor. Make sure to blend well to avoid lumps. To add more flavor, consider using spices like garlic powder or paprika. Fresh herbs like dill or parsley also work well. They add a fresh touch that brightens the dish. If you want to boost protein, consider adding cooked and shredded chicken or turkey. This makes the salad heartier and more filling. You can also add chopped nuts for a crunchy texture. There are many great ways to serve this salad. You can scoop it onto lettuce leaves for a light meal. This makes it fresh and crisp. Another option is to serve it in a sandwich. Use your favorite bread or wrap for a tasty lunch. Pair it with fresh veggies or a side of fruit for a complete meal. {{image_2}} You can switch up the proteins in this salad. Instead of using chicken or turkey, try adding canned tuna or chickpeas for a different taste. Both options provide protein and flavor. If you want a vegetarian option, lentils work great too. They add a nice texture and are packed with protein. Adding spices can give your salad a kick. Try a pinch of cayenne or smoked paprika for some heat. You can also mix in herbs like dill or cilantro for fresh flavors. For a Mediterranean twist, add olives, sun-dried tomatoes, or feta cheese. These ingredients create a bright and tangy taste. This salad is versatile. Serve it in wraps or sandwiches for a hearty meal. You can also enjoy it on its own for a light lunch. If you plan to meal prep, store the salad in airtight containers. This helps keep it fresh and easy to grab during busy days. To keep your protein avocado egg salad fresh, store it in an airtight container. This helps prevent air from drying it out. Always place it in the fridge right after serving. This way, you can enjoy it later without losing flavor. The salad lasts about 3 to 4 days in the refrigerator. However, it’s best to eat it within 2 days for the freshest taste. If you want to refresh your salad, mix it gently before serving. Add a little more Greek yogurt or lemon juice if it feels dry. Avoid reheating this salad, as it is best served cold. If you want to warm up any leftovers, try gently heating the chicken or turkey separately. Then, add it back to the salad when ready to serve. This keeps the salad's taste and texture just right. Protein avocado egg salad lasts about 3 to 5 days in the fridge. The key is to store it in an airtight container. Check for freshness before eating. If it smells off or looks strange, toss it out. Yes, you can use mayonnaise instead of Greek yogurt. Mayonnaise will add creaminess, but it has more fat. Greek yogurt is a healthier option, plus it adds protein. Choose what fits your taste and dietary needs. - Protein content explanation: Each serving of this salad packs a good amount of protein. The eggs provide about 6 grams of protein each. Greek yogurt adds even more, making this salad great for muscle repair and growth. - Health benefits of avocado and eggs: Avocados offer healthy fats and fiber. They help keep you full and support heart health. Eggs are rich in vitamins and minerals. They provide choline, important for brain function. Together, they make a nutritious meal that fuels your body well. This blog post shares a simple, fun recipe for protein avocado egg salad. You first hard-boil eggs and create a creamy dressing with avocado and Greek yogurt. Then, mix everything together for a tasty meal. Remember to try different flavors and proteins to make it your own. Store it properly for freshness, and enjoy it in wraps or on its own. With a few easy steps, you can make a healthy dish that's great for any meal. Now, get cooking and enjoy your delicious salad!

Protein Avocado Egg Salad Delightful and Healthy Meal

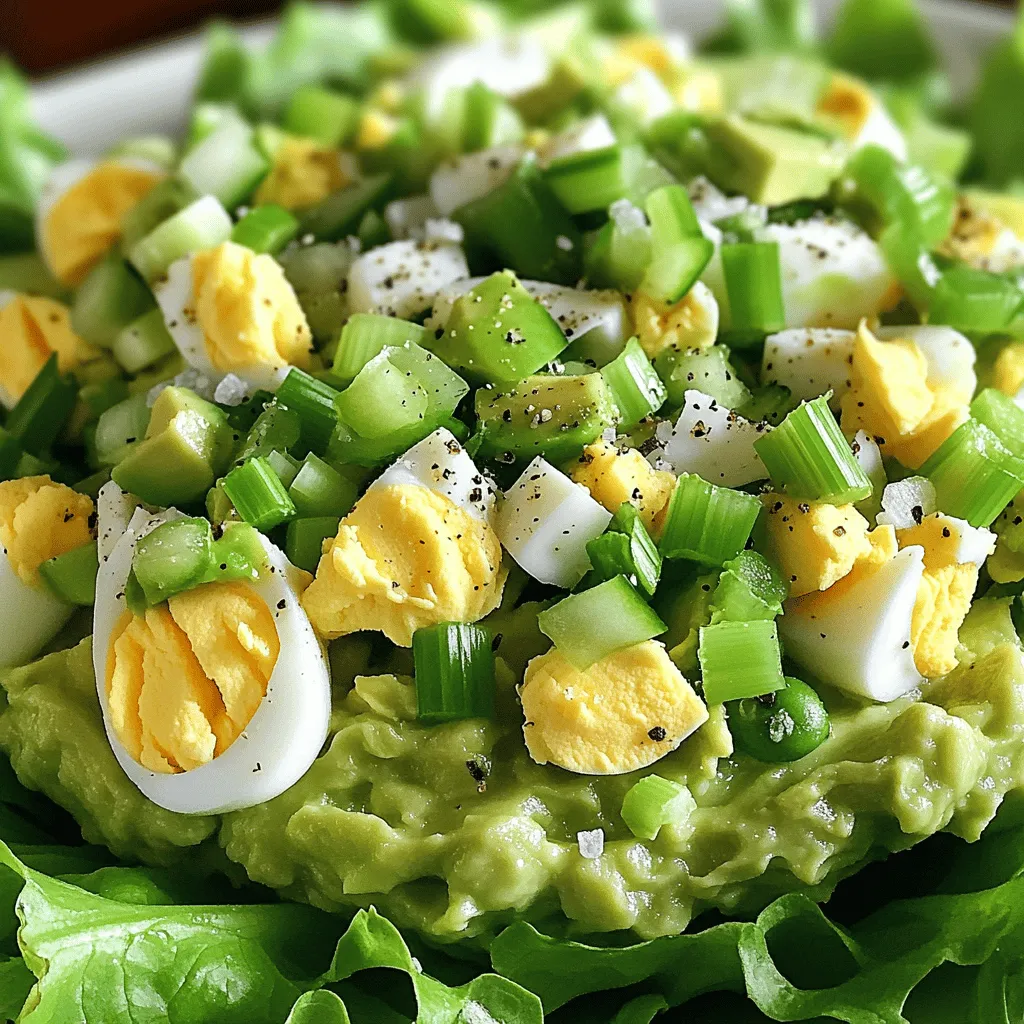
Looking for a healthy meal that’s packed with protein? Look no further! My Protein Avocado Egg Salad combines creamy avocado,

- 1 pound large shrimp, peeled and deveined - 4 tablespoons unsalted butter, melted - 4 cloves garlic, minced - 1 teaspoon smoked paprika - 1 teaspoon chili powder - 1/2 teaspoon cumin - Salt and pepper to taste - 8 small corn tortillas - 1 cup shredded green cabbage - 1 avocado, sliced - 1/4 cup fresh cilantro, chopped - 1 lime, cut into wedges The main ingredients focus on large shrimp, which are juicy and tender. The butter gives a rich taste, while garlic adds a nice kick. To spice things up, I use smoked paprika and chili powder. They bring warmth and depth to the dish. Cumin adds an earthy note, while salt and pepper enhance the flavors. For the tacos, I choose soft corn tortillas. They hold the shrimp well and add a lovely texture. Shredded cabbage gives a nice crunch and freshness. Avocado slices add creaminess, while cilantro brings a burst of flavor. Lime wedges are perfect for squeezing over the tacos, adding brightness. With these ingredients, you create a delicious and colorful meal. Each bite is full of flavor and freshness. - Preheat oven to 400°F (200°C). - Line a baking sheet with parchment paper. First, we need a hot oven. Preheating helps the shrimp cook evenly. The parchment paper makes cleanup easy. - Combine melted butter, minced garlic, and spices. - Stir to create a smooth mixture. Next, in a bowl, mix the melted butter and minced garlic. Add the spices: smoked paprika, chili powder, and cumin. Don't forget salt and pepper! Stir until it is smooth, like a sauce. - Toss shrimp in the garlic butter mixture. - Spread shrimp evenly on the baking sheet and bake for 8-10 minutes. Take the shrimp and toss them in the garlic butter mix. Make sure they are well coated. Place the shrimp in a single layer on the baking sheet. Bake for 8-10 minutes until they turn pink and opaque. - Warm corn tortillas in a dry skillet. - Cook for about 30 seconds on each side. While the shrimp bake, warm the corn tortillas. Place them in a dry skillet over medium heat. Cook each side for about 30 seconds. They should be soft and flexible. - Remove shrimp from oven and cool slightly. - Assemble tacos with shrimp, cabbage, avocado, cilantro, and lime juice. After the shrimp cool a bit, start making the tacos. Place a few shrimp in each tortilla. Top with shredded cabbage, avocado slices, and fresh cilantro. Finish with a squeeze of lime juice for extra flavor. Enjoy your tasty creation! To get the best shrimp, look for a pink and opaque color. This means they are cooked just right. If shrimp turn rubbery, they are overcooked. Keep an eye on them and pull them out of the oven right when they look perfect. Fresh lime juice adds a bright zest to your tacos. Just squeeze some on top before serving. It brings out the other flavors. For a nice look, garnish with more cilantro and lime wedges. This makes your dish pop and look fresh! Timing is key in the kitchen. You can save time by multi-tasking. While the shrimp are baking, prep your toppings. Warm the tortillas in a skillet at the same time. This way, everything is ready to go when the shrimp are done. Enjoy your cooking! {{image_2}} You can switch shrimp for chicken or tofu. Both options taste great. If you use chicken, cut it into small pieces. For tofu, press it to remove extra moisture. Adjust the cooking time based on what you choose. Chicken needs about 15-20 minutes, while tofu cooks in 10-12 minutes. Keep an eye on it to ensure everything is cooked well. Adding fresh herbs can boost the taste. Try parsley or dill for a bright touch. You can also change the spices. Add cayenne for heat or cumin for depth. Hot sauces are another way to spice things up. Mix and match until you find your favorite flavor! Corn tortillas are great, but you can try others too. Flour tortillas give a soft bite. For a low-carb choice, use lettuce wraps. They are fresh and crunchy. If you want more in each bite, use larger tortillas. They hold more fillings and make for heartier tacos. To keep your shrimp fresh, cool them down first. Place them in an airtight container. You can store them in the fridge for up to 2 days. This way, you can enjoy your tacos again! When you're ready to eat, reheat the shrimp. You can do this in a skillet or microwave until they are warm. Remember to warm the tortillas fresh before serving. This makes them soft and tasty again! If you want to save shrimp for later, freeze them before cooking. They can stay fresh for up to 2 months in the freezer. Just remember to thaw them in the refrigerator before you use them. This keeps them safe and ready for your next taco night! To add heat, mix cayenne pepper or hot sauce into the garlic butter. You can start with a small amount and taste. This way, you can find the right spice level for you. Yes, you can use frozen shrimp. Just make sure to thaw them before you start. Thawing lets the shrimp cook evenly. You can thaw them overnight in the fridge or quickly in cold water. If you can't find corn tortillas, don't worry! You can use flour tortillas, lettuce wraps, or even taco shells. Each option gives your tacos a different feel and taste. These tacos are best eaten fresh. However, you can store them in the fridge for 1-2 days. Keep the shrimp and toppings separate to maintain freshness. Absolutely! You can mix the garlic butter ahead of time. Store it in the fridge for up to a week. This saves time when you are ready to make your tacos. This blog post covered a simple and tasty shrimp taco recipe. It explained ingredients, step-by-step cooking, storage tips, and tasty variations. You can easily adjust flavors or use different proteins. Remember to check your shrimp for doneness and have fun with toppings! Try these tacos for a satisfying meal. You’ll enjoy great flavors with very little time in the kitchen. The best part is you can make them your own!

Sheet Pan Garlic Butter Shrimp Tacos Flavorful and Easy

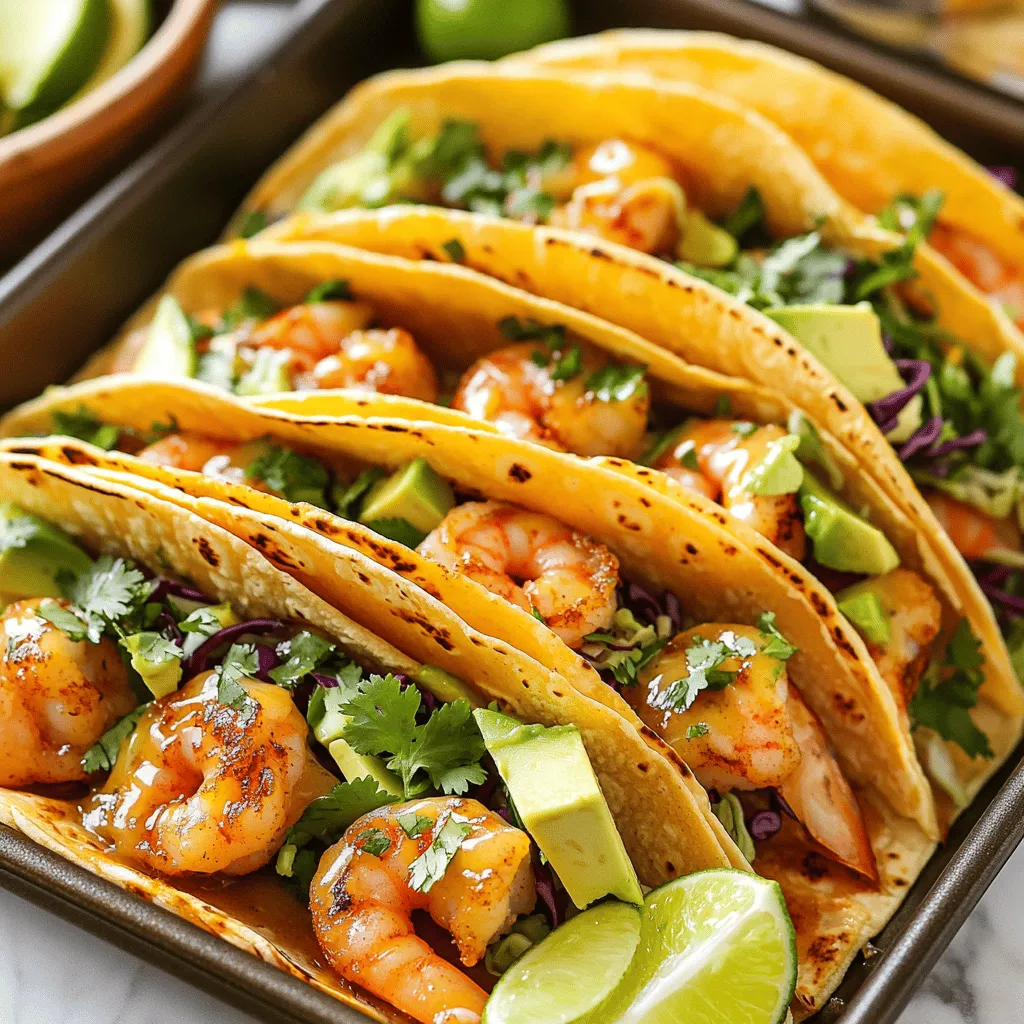
Welcome to a tasty escape where shrimp meets flavor! In this post, I’ll show you how to prepare Sheet Pan

- 1 lb boneless, skinless chicken breasts, diced - 1 tablespoon olive oil - 2 cloves garlic, minced - 1 cup orzo pasta - 4 cups chicken broth - 1 cup heavy cream - 1 cup grated Parmesan cheese - 1 cup frozen peas - Salt and pepper to taste Chicken is the star of this dish. I like to use boneless, skinless breasts. They cook quickly and stay juicy. Dicing the chicken helps it cook evenly and blend well with the orzo. Orzo is a small, rice-shaped pasta. It easily absorbs flavors and cooks fast. I prefer it for this creamy dish because it pairs well with rich sauces. The dairy products add a nice touch. Heavy cream gives the sauce a rich texture. Grated Parmesan cheese adds flavor and creaminess. It melts beautifully and makes the dish feel indulgent. - 1 teaspoon Italian seasoning - Fresh parsley, chopped (for garnish) - Salt and pepper I love using Italian seasoning in this recipe. It brings a warm, herby flavor. Just a teaspoon is enough to enhance the dish without overpowering it. Salt and pepper are key for balance. Season the chicken well while cooking. Adjust the seasoning later to taste. Fresh parsley adds a pop of color and freshness. I always chop it for garnish. It makes the dish look beautiful and brightens the flavor. These ingredients come together to create a creamy, comforting meal. You get rich flavors in every bite! Cooking the Chicken Start by heating olive oil in a large pot over medium heat. Add diced chicken breast, seasoned with salt, pepper, and Italian seasoning. Cook the chicken for about 5-7 minutes. You want it browned and cooked through. Stir it often for even cooking. Adding Garlic Once the chicken is ready, add minced garlic to the pot. Sauté for about one minute, just until the garlic is fragrant. This step adds a great flavor to your dish. Incorporating the Orzo Next, stir in one cup of orzo pasta. Make sure the orzo is coated well with the oil and the chicken's flavors. This helps it cook evenly and absorb all that goodness. Adding Chicken Broth Now, pour in four cups of chicken broth. Bring this mixture to a gentle boil. Once boiling, reduce the heat to low and cover the pot. Let it cook for about 10-12 minutes. Stir occasionally to prevent sticking. The orzo should be al dente and soak up most of the liquid. Mixing in Heavy Cream After the orzo is cooked, it’s time to add one cup of heavy cream. Stir well until the cream is mixed in and the sauce is nice and creamy. Adding Parmesan Cheese Then, add one cup of grated Parmesan cheese. Keep mixing until the cheese melts and blends into the sauce. This will make your dish rich and tasty. Final Ingredients and Seasoning Finally, stir in one cup of frozen peas and let it cook for another 2-3 minutes. Season with more salt and pepper if needed. Remove from heat and let it sit for a minute. This helps the sauce thicken. Before serving, sprinkle with fresh parsley for a pop of color and flavor. Optimal Chicken Cooking Techniques To cook the chicken well, I use diced, boneless, skinless pieces. Heat olive oil in the pot first. Add the chicken and season it with salt, pepper, and Italian seasoning. Brown the chicken for about 5-7 minutes. Make sure the chicken looks golden and is fully cooked. This step adds flavor and keeps the chicken juicy. Timing for Creamy Texture Get the timing right for a creamy sauce. After cooking the orzo, add heavy cream and Parmesan cheese. Stir until the cheese melts. This step takes just a few minutes. You want the sauce to coat the orzo well. Let it sit for a minute after cooking. This helps the sauce thicken just right. Additional Seasoning Options To boost flavor, consider adding more herbs or spices. A pinch of nutmeg can enhance the creaminess. You can also try red pepper flakes for a kick. Taste as you go to find the perfect balance. Experimenting with flavors makes the dish your own. Garnish Suggestions Don’t forget the finishing touch! Chopped fresh parsley adds color and freshness. You can also sprinkle more Parmesan on top. This makes the dish look great and adds extra flavor. Serve it warm for the best experience. {{image_2}} Protein Alternatives You can easily change the protein in this dish. Try using shrimp or turkey instead of chicken. Tofu works well for a plant-based option. Each choice brings unique flavors. Dairy-Free Options For a dairy-free version, swap the heavy cream for coconut milk. Use nutritional yeast in place of Parmesan cheese. This keeps the dish creamy while making it vegan-friendly. Vegetables to Include Add veggies for extra flavor and nutrition. Spinach, bell peppers, or broccoli are great choices. You can mix them in while cooking the orzo. Spices to Experiment With Spice it up with red pepper flakes or smoked paprika. Fresh herbs like basil or thyme can add depth. Experiment to find your favorite flavor blend! To store leftovers, place them in an airtight container. Make sure to cool the dish to room temperature first. This helps to keep it fresh. You can store it in the fridge for up to four days. When storing, try to keep it in smaller portions to make it easy to reheat. If you want to freeze this dish, use a freezer-safe container. Make sure to leave some space for expansion in the container. This meal can last in the freezer for about three months. When you are ready to eat, thaw it in the fridge overnight. To reheat, place the orzo in a pot over low heat. Add a splash of chicken broth or cream for moisture. Stir well, and heat until warmed through. You can also use a microwave if you prefer. Just cover it to keep moisture in and stir halfway through. Can I make this recipe in advance? Yes, you can make One Pot Creamy Chicken Alfredo Orzo ahead of time. Just cook the dish, let it cool, and store it in the fridge. It stays fresh for about three days. When you're ready to eat, simply reheat it on the stove or in the microwave. How do I reheat One Pot Creamy Chicken Alfredo Orzo? To reheat, place the orzo in a pot on low heat. Add a splash of chicken broth or cream to help it regain its creamy texture. Stir often until heated through. You can also use the microwave, but be sure to cover it to keep moisture in. Can I use a different type of pasta? Absolutely! You can swap orzo for other small pasta shapes like ditalini or elbows. Keep in mind that cooking times may change slightly, so check the package for guidance. Why is my sauce not creamy? If your sauce is not creamy, it could be due to not using enough cheese or heavy cream. Make sure you measure these ingredients carefully. Also, stirring well after adding the cream and cheese helps create that smooth texture. How to fix overcooked orzo? If your orzo is overcooked, try adding a little chicken broth or cream to bring back some moisture. You can also mix in some fresh or frozen peas for a bit of texture and flavor. This blog post covered how to make One Pot Creamy Chicken Alfredo Orzo. We explored key ingredients like chicken and orzo pasta, essential seasonings, and steps for that creamy sauce. I shared tips to perfect your cooking process and ways to customize your dish. Remember, experimenting with flavors and ingredients can take your meal to new heights. Follow the storage tips for leftovers, and don’t hesitate to tackle FAQs for smooth preparation. Enjoy your cooking journey, and savor each bite of your delicious dish!

One Pot Creamy Chicken Alfredo Orzo Delight

Craving a comforting meal that’s as easy as it is delicious? Look no further! My One Pot Creamy Chicken Alfredo

- 1 cup jasmine rice (cooked and cooled) - 200g shrimp, peeled and deveined - 2 tablespoons vegetable oil - 1 small onion, chopped - 2 cloves garlic, minced - 1 bell pepper (red or yellow), diced - 1 cup frozen peas and carrots mix - 2 eggs, beaten - 3 tablespoons soy sauce - 1 tablespoon sriracha (adjust for heat preference) - 1 teaspoon sesame oil - 2 green onions, sliced - Salt and pepper to taste - Lime wedges for garnish - Extra green onions for a pop of color This shrimp fried rice recipe serves four people. Each serving contains approximately: - Calories: 350 - Protein: 20g - Carbohydrates: 40g - Fat: 12g - Fiber: 3g This dish is a great source of protein and is balanced with vegetables. Enjoy it as a filling meal any time of the day! To start, heat 1 tablespoon of vegetable oil in a large skillet or wok. Make sure the heat is medium-high. Add the shrimp and season them with a pinch of salt and pepper. Cook the shrimp until they turn pink, about 2 to 3 minutes. When they are done, remove them from the pan and set them aside. This step ensures your shrimp stay juicy and flavorful. In the same skillet, add the other tablespoon of vegetable oil. Sauté the chopped onion and minced garlic for about 2 minutes. You want them to smell good and look translucent. Next, add the diced bell pepper and the frozen peas and carrots mix. Cook these for 3 to 4 minutes until they soften. This mix of colors adds great taste and nutrition. Now, push the vegetables to one side of the skillet. Pour the beaten eggs into the empty space. Scramble the eggs until they are fully cooked, then mix them with the veggies. Add the cooled jasmine rice next, breaking any clumps. Stir everything well. Pour in the soy sauce, sriracha, and sesame oil, then toss in the cooked shrimp. Mix until everything is hot and well combined. Finally, remove the skillet from heat and stir in the sliced green onions for a fresh crunch. Adjust with more salt, pepper, or sriracha to taste. Enjoy this simple and savory shrimp fried rice that is sure to impress! To make great shrimp fried rice, start with jasmine rice. Cook it ahead of time. Use 1 cup of water for every cup of rice. After cooking, let it cool. This helps the rice grains stay separate. If you don’t cool the rice, it can turn mushy. You can also use day-old rice for best results. It’s drier and works well in stir-frying. Soy sauce is key for flavor. Use 3 tablespoons to season your fried rice. If you like heat, add sriracha, starting with 1 tablespoon. Sesame oil adds a nice nutty taste. Mix these in to boost the dish. You can also add lime juice for a fresh zing. Just squeeze some lime wedges on top before serving. One mistake is overcrowding the skillet. This can lead to steaming instead of frying. Cook the shrimp and veggies in batches if needed. Another mistake is not seasoning the rice. Always add salt and pepper to enhance taste. Lastly, don’t skip the green onions. They add crunch and freshness. Remember, small details make your shrimp fried rice shine! {{image_2}} You can use different types of rice for this dish. Brown rice adds a nutty flavor. Cauliflower rice is a great low-carb option. For protein, shrimp is tasty, but chicken or tofu works well too. Just cook them like the shrimp. Adjust the cooking time for chicken to ensure it’s cooked through. Feel free to add more veggies! Broccoli, snap peas, or corn add color and crunch. Try adding spices like ginger for warmth or chili flakes for heat. You can also mix in fresh herbs like cilantro for extra flavor. Just aim for a good balance. To make this dish vegetarian, remove the shrimp and eggs. Use tofu or tempeh instead. For a vegan option, skip the eggs and add more veggies. You can also try using nutritional yeast for a cheesy flavor. This keeps it healthy and delicious for everyone! To keep your shrimp fried rice fresh, store it in an airtight container. Let it cool to room temperature before sealing. This step helps prevent moisture buildup. Place it in the fridge if you plan to eat it within a few days. Aim to eat leftovers within three days for the best taste. Reheat your shrimp fried rice in a skillet or microwave. If using a skillet, add a splash of water or oil. Heat over medium heat, stirring often. This method keeps the rice from getting dry. If you use a microwave, cover your dish with a damp paper towel. Heat in short bursts, stirring in between, until hot. You can freeze shrimp fried rice for later use. First, let it cool completely. Then, portion it into freezer-safe bags. Be sure to squeeze out excess air before sealing. Label the bags with the date. Frozen shrimp fried rice lasts up to three months. When ready to eat, thaw it in the fridge overnight before reheating. Yes, you can use uncooked shrimp. Just cook them first. Heat a skillet and add oil. Cook the shrimp until they turn pink, about 2-3 minutes. This step adds great flavor and texture. I recommend jasmine rice for fried rice. It has a nice aroma and fluffy texture. You can use leftover rice, too. Freshly cooked rice can be too sticky. Let it cool for better results. To add heat, mix in more sriracha. You can also add red pepper flakes or diced jalapeños. Adjust the spice level to fit your taste. A little heat can boost the dish's flavor and excitement. In this article, we covered the key ingredients for shrimp fried rice, from shrimp to veggies. I shared step-by-step instructions for perfect cooking. We explored tips to enhance flavor and avoid mistakes. You can even try variations like making it vegan. Remember to store leftovers properly and reheating them right. Experiment with the recipe and make it your own. Enjoy your cooking journey, and have fun with shrimp fried rice!

Savory Shrimp Fried Rice Quick and Simple Recipe

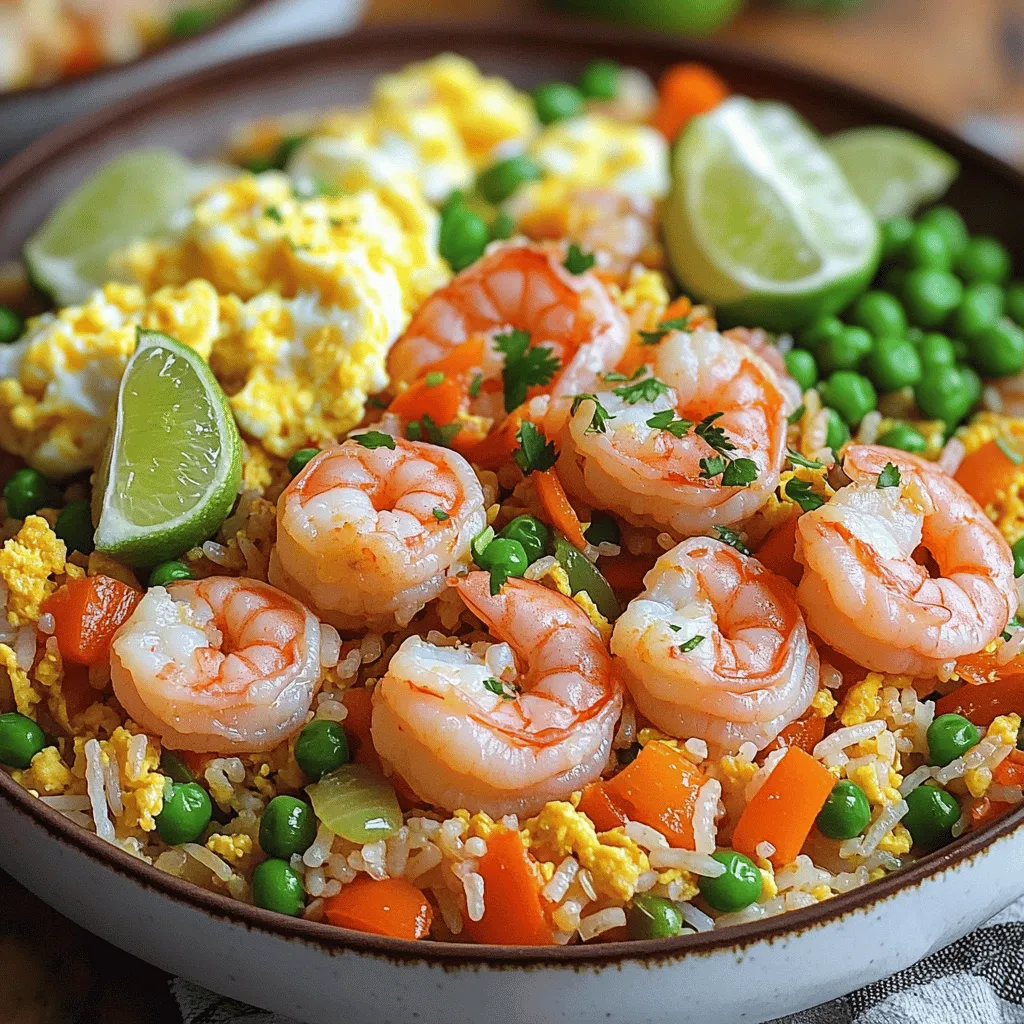
Craving a quick and delicious meal? You’re in the right place! My Savory Shrimp Fried Rice recipe combines fresh flavors

To make No Bake Pumpkin Spice Energy Balls, you need some key items: - 1 cup rolled oats - 1/2 cup nut butter (almond or peanut) - 1/2 cup pumpkin puree These three ingredients create a great base. The rolled oats provide fiber and texture. Nut butter adds healthy fats and protein. Pumpkin puree gives moisture and flavor. You can add some fun extras to enhance the energy balls: - 1/4 cup honey or maple syrup - 1/2 cup mini chocolate chips - 1/4 cup chopped nuts or seeds Honey or maple syrup adds sweetness. Chocolate chips bring a delightful treat. Nuts or seeds give a nice crunch. Spices and flavorings make these energy balls special: - 1 teaspoon pumpkin pie spice - 1/4 teaspoon sea salt - 1 teaspoon vanilla extract Pumpkin pie spice gives a warm, cozy flavor. Sea salt balances the sweetness. Vanilla extract enhances all the tastes. These ingredients work together to create a delicious and healthy snack. You can mix and match based on your taste. Enjoy the process of making these energy balls! Start by mixing the base ingredients. In a large bowl, add: - 1 cup rolled oats - 1/2 cup nut butter (almond or peanut) - 1/2 cup pumpkin puree - 1/4 cup honey or maple syrup - 1 teaspoon vanilla extract Stir all these ingredients together until they blend well. This mix forms a tasty base. Next, add the spices and flavorings. Incorporate: - 1 teaspoon pumpkin pie spice - 1/4 teaspoon sea salt Mix everything again until fully combined. If you want some extra crunch, fold in: - 1/2 cup mini chocolate chips (optional) - 1/4 cup chopped nuts or seeds (optional) Now, let’s chill the mixture. Place it in the fridge for about 20 to 30 minutes. Chilling helps the energy balls hold their shape. If the mix feels too sticky, a longer chill time can help. For the best texture, ensure the mixture is firm but not rock hard. You want it easy to shape into balls. After chilling, take the mixture out of the fridge. Use your hands to roll it into small balls, about 1 inch wide. This step is fun and lets you create bite-sized treats. Once shaped, place the energy balls on a parchment-lined baking sheet. This helps them cool and set well. After you finish rolling, put them back in the fridge for an hour. This last chill will help them firm up more. To get the right creaminess in your energy balls, adjust the nut butter. If you want a softer texture, add a bit more nut butter. Almond butter gives a smooth taste, while peanut butter adds a rich flavor. For sweetness, you can choose honey or maple syrup. Maple syrup offers a unique flavor twist. You can also try agave syrup for a different taste. When serving, get creative! A small bowl or a rustic wooden platter works well. To add flair, sprinkle some extra pumpkin pie spice on top. You can also arrange the balls in a pyramid shape for a fun look. Add a few whole nuts around them for color contrast. One common mistake is overmixing the ingredients. This can make the balls tough. Mix just until combined for a better texture. Another mistake is skipping the refrigeration step. Chilling the mixture for 20-30 minutes helps it firm up. This makes rolling the balls easier and improves the final product. {{image_2}} You can switch up the taste by using different nut butters. Almond butter gives a nice twist, while peanut butter adds a rich flavor. For a nut-free option, try sunflower seed butter. You can also add dried fruits or seeds for extra texture. Chopped dates or cranberries bring sweetness. Flaxseeds or chia seeds boost nutrition too. If you want a vegan treat, use maple syrup instead of honey. This keeps the recipe plant-based and just as tasty. For gluten-free energy balls, make sure to use certified gluten-free oats. This way, everyone can enjoy these yummy snacks without worry. Feel free to get creative with different spices. Adding nutmeg or cinnamon can change the flavor profile. For holiday fun, you can mix in mini chocolate chips or colored sprinkles. These small changes make your energy balls festive and exciting! Store your No Bake Pumpkin Spice Energy Balls in airtight containers. This keeps them fresh and tasty. You can choose to refrigerate or freeze them based on your needs. Refrigeration works well for short-term storage. Freezing is best for long-term storage. In the refrigerator, these energy balls last up to one week. If you freeze them, they can stay good for about three months. Just make sure to label your containers with the date to keep track. Watch for signs of spoilage. If the balls smell off or change color, it’s time to toss them. You can refresh them by letting them sit at room temperature for a few minutes before eating. No bake pumpkin spice energy balls stay fresh for about a week in the fridge. To store them, use an airtight container. This keeps them moist and tasty. If you want to keep them longer, freeze them. They can last up to three months in the freezer. Just remember to let them thaw before enjoying. Yes, you can use applesauce or mashed bananas instead of pumpkin puree. These options will change the flavor a bit. Applesauce gives a sweet and fruity taste. Mashed bananas add creaminess and sweetness too. Both are good choices if you want to mix things up. Yes, these energy balls are indeed healthy! They are packed with rolled oats, which provide fiber. Fiber helps with digestion and keeps you full longer. Nut butter adds protein, which is great for energy. Pumpkin puree has vitamins and minerals that are good for your health. Honey or maple syrup adds natural sweetness without refined sugar. Overall, these treats are a smart snack choice! In this post, we explored how to make no-bake pumpkin spice energy balls. We covered the key ingredients, including oats, nut butter, and pumpkin puree. You learned the steps to mix and chill the ingredients for the best texture. We also shared tips for variation and storage to keep them fresh. These energy balls are tasty and easy to customize. You can create your own flavors using different nuts or spices. Enjoy making them fresh or even for a special occasion!

No Bake Pumpkin Spice Energy Balls Healthy Treats

If you crave a quick snack that’s both healthy and delicious, then No Bake Pumpkin Spice Energy Balls are for

- 2 cans (8 oz each) refrigerated cinnamon rolls - 2 medium apples, peeled and diced (preferably Granny Smith) - 1/2 cup packed brown sugar - 1/4 cup butter, melted - 1 teaspoon ground cinnamon - 1/4 teaspoon nutmeg - 1/2 cup caramel sauce (homemade or store-bought) - Optional: Whipped cream for serving For this recipe, we will use simple ingredients that you can find easily. The star here is the cinnamon rolls. They provide a soft, fluffy base. The apples add a nice tart flavor, especially if you choose Granny Smith. The brown sugar and spices create a sweet, warm taste. The caramel sauce ties everything together, making it extra delicious. You can also customize the toppings. Whipped cream adds a lovely touch. You can use store-bought caramel sauce for ease or make your own for a fun twist. Each bite will be a mix of sweet, tart, and a hint of spice, perfect for any occasion. - Preheat your oven to 375°F (190°C). Grease a 9x13 inch baking dish with non-stick spray. - In a mixing bowl, combine 2 diced apples, 1/2 cup brown sugar, 1/4 cup melted butter, 1 teaspoon ground cinnamon, and 1/4 teaspoon nutmeg. Mix well and set aside. - Open 2 cans of refrigerated cinnamon rolls. Cut each roll into quarters. Place the quartered rolls in the greased baking dish. - Evenly distribute the apple mixture over the cinnamon rolls. Ensure every piece has some apples. - Drizzle 1/2 cup of caramel sauce generously over the mixture. This adds great flavor. - Bake in the preheated oven for 25-30 minutes. Check for doneness when the rolls are golden brown. - Once baked, remove from the oven and let it cool for about 5 minutes. Serve warm for the best taste. - For extra sweetness, drizzle more caramel sauce on top. You can also add whipped cream for a nice touch. You can change the type of apples for different tastes. Granny Smith apples give a nice tartness. If you want sweetness, try Honeycrisp or Fuji apples. They add a sweet twist. You can also add spices for extra flavor. Try ginger or allspice along with cinnamon. A pinch of cloves can also brighten the dish. These swaps make your bake unique. To ensure even cooking, spread the cinnamon rolls evenly in the dish. Make sure they are not too crowded. This helps them brown nicely. Check for doneness by inserting a toothpick. If it comes out clean, your bake is ready. If not, give it a few more minutes. Serve the bake warm in bowls. Drizzle more caramel sauce on top for extra sweetness. You can also add a dollop of whipped cream. This makes it look fancy and inviting. For a fun twist, sprinkle chopped nuts on top. Walnuts or pecans add crunch and flavor. Serve it with coffee or tea for a perfect treat. {{image_2}} You can change the flavor and texture of your caramel apple cinnamon roll bake. Adding nuts gives a nice crunch. I suggest walnuts or pecans. Just chop them up and sprinkle them over the apple mixture. This adds a great texture and flavor. You can also use different sauces. Try chocolate or butterscotch instead of caramel. Each sauce brings a new twist to this tasty dish. If you need gluten-free options, look for gluten-free cinnamon rolls. Many brands offer them now. They work just as well in this recipe. For a vegan version, you can swap butter with coconut oil or vegan butter. You can also use a vegan caramel sauce. These changes make the recipe fit different diets while keeping it delicious. You can easily adapt this recipe for holidays. For Thanksgiving, add extra spices like cloves or allspice for warmth. At Christmas, use cranberries for a tart touch. Seasonal fruits, like pears or peaches, also work well. Just peel and dice them like the apples. This way, you enjoy a new flavor each season while celebrating special times. To keep your caramel apple cinnamon roll bake fresh, store leftovers in the fridge. Place the dish in an airtight container or cover it tightly with plastic wrap. This dish stays fresh for up to three days when stored properly. If you want to enjoy this bake later, freezing is a great option. Cut it into individual portions. Wrap each piece in plastic wrap, then place them in a freezer-safe bag. This way, it can last for up to three months. To reheat, let it thaw overnight in the fridge. Then, warm it in the oven at 350°F (175°C) for about 15 minutes. This helps keep the texture and flavor intact. After storage, revive the flavor by warming it up. Add a drizzle of fresh caramel sauce for extra sweetness. You can also serve it with whipped cream to enhance the taste. Always check that it is heated through before serving. Enjoy your delicious treat! Can I make this recipe ahead of time? Yes, you can prepare the apple mixture and cut the cinnamon rolls. Store them in the fridge overnight. The next day, just assemble and bake! How can I make it a breakfast dish? Serve it warm with whipped cream and fresh fruit. You can also add nuts for crunch. This makes it feel special for breakfast. What is the best way to warm it up? You can reheat in the microwave for about 20 seconds. If you prefer the oven, warm it at 350°F for about 10 minutes. Why are my rolls not cooking through? This can happen if your oven temperature is too low. Always preheat your oven and check with a toothpick. If it comes out clean, the rolls are done. Can I use a different baking dish size? Yes, but keep in mind that a smaller dish may require longer bake time. A larger dish will cook faster, so adjust your time as needed. Can I use store-bought caramel sauce? Absolutely! Store-bought caramel sauce saves time and tastes great. Just drizzle it on top before baking. What type of apples are best for baking? Granny Smith apples are perfect for baking. Their tartness balances the sweetness of caramel and brown sugar. You can also mix in sweeter apples for more flavor. In this blog post, we explored a delicious apple cinnamon roll recipe. We listed key ingredients, provided clear steps for preparation and baking, and shared useful tips for variations and storage. You can make this dish your own with simple tweaks. Remember, it's all about flavors and creativity. Don't hesitate to try new ingredients or present it uniquely. With these ideas, you can impress your friends and family. Enjoy your baking adventure!

Caramel Apple Cinnamon Roll Bake Easy and Tasty Recipe

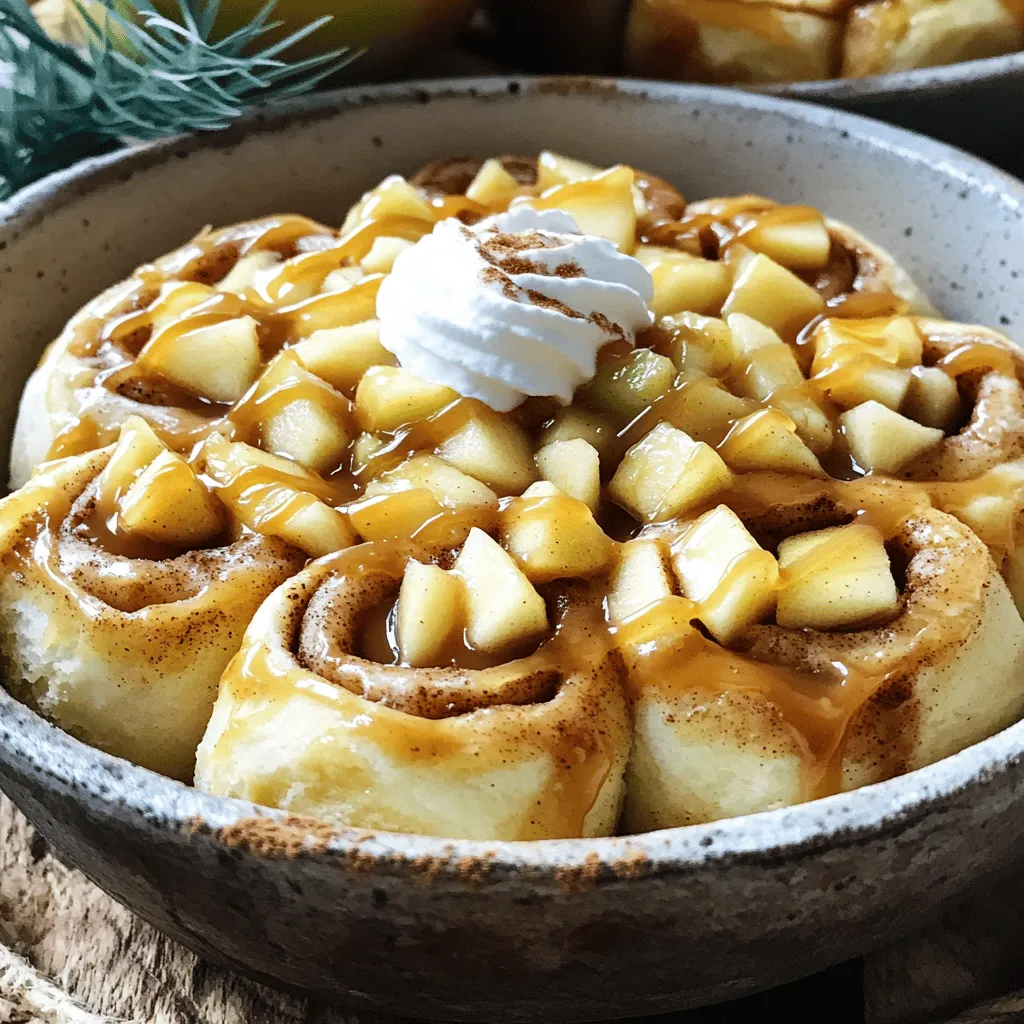
Craving a sweet, gooey treat? Let’s whip up a Caramel Apple Cinnamon Roll Bake! This easy recipe combines soft cinnamon

To make spicy Cajun chicken tenders, you need the following ingredients: - 1 lb chicken tenders - 1 cup buttermilk - 1 tablespoon hot sauce - 1 cup all-purpose flour - 1 tablespoon Cajun seasoning - 1 teaspoon smoked paprika - 1 teaspoon garlic powder - 1 teaspoon onion powder - ½ teaspoon cayenne pepper - Salt and pepper to taste - Vegetable oil for frying These ingredients create a flavorful dish. The chicken tends to soak up the buttermilk and hot sauce well. This adds depth to the taste. The blend of spices makes the coating crispy and spicy. You can adjust the cayenne pepper if you want it hotter or milder. Using high-quality ingredients makes a big difference. Always choose fresh chicken tenders for the best flavor. The buttermilk helps to tenderize the chicken, giving it a juicy bite. Cajun seasoning brings a unique blend of herbs and spices that enhances the dish. Each ingredient plays a role in creating that perfect crispy texture. Don't forget the vegetable oil; it ensures a beautiful golden color when frying. Now that you have your ingredients ready, you can move on to the fun part: cooking! First, grab a bowl. Combine 1 cup of buttermilk and 1 tablespoon of hot sauce. This mix will add flavor and keep the chicken tender. Now, take your 1 lb chicken tenders and place them in the bowl. Make sure they are fully submerged in the buttermilk. Cover the bowl and pop it in the fridge. Let the chicken marinate for at least 30 minutes. For stronger flavor, you can leave it overnight. Next, let’s prepare the coating. In a shallow dish, mix 1 cup of all-purpose flour, 1 tablespoon of Cajun seasoning, 1 teaspoon of smoked paprika, 1 teaspoon of garlic powder, 1 teaspoon of onion powder, and ½ teaspoon of cayenne pepper. Add salt and pepper to taste. This mix is your dredging station. It will give the chicken that crispy and flavorful crust. Now, it’s time to fry! Preheat about 1 inch of vegetable oil in a heavy skillet over medium-high heat until it reaches 350°F (175°C). Take the marinated chicken out of the fridge. Let the excess buttermilk drip off. Dredge each tender in your seasoned flour mixture. Make sure to coat them well. Carefully place the coated chicken tenders in the hot oil. Do not overcrowd the pan; this helps keep the oil hot. Fry each tender for about 4-5 minutes on each side. They should turn golden brown and be fully cooked. The internal temperature should reach 165°F (75°C). Once done, use a slotted spoon to remove the chicken. Place them on a paper towel-lined plate to drain excess oil. To make your spicy Cajun chicken tenders just right, tweak the cayenne pepper. If you like heat, keep it strong. If you prefer mild, cut back on the cayenne. You can also try different hot sauces. Each one adds a unique flavor. Experiment with your favorites to find the perfect match. A crispy coating is key. First, heat the oil to 350°F (175°C). Use a thermometer to check the oil's temperature. If it's too cool, the chicken will soak up oil and become soggy. Next, avoid overcrowding the pan. Fry in small batches to keep the temperature steady. This way, each tender gets that perfect crunch. Serve your spicy chicken tenders with tasty dipping sauces. Ranch is a classic choice, but spicy remoulade brings a fun twist. You can also pair them with side dishes like coleslaw or fries. These sides balance the heat and add variety to your meal. Enjoy your flavorful creation! {{image_2}} You can make a healthier version of spicy Cajun chicken tenders by baking them. This method cuts down on oil and gives a nice crunch. To bake, preheat your oven to 400°F (200°C). Place the breaded chicken tenders on a baking sheet lined with parchment paper. Bake for 20-25 minutes, flipping halfway through. This ensures they cook evenly and get crispy. If you want to change things up, try different seasoning blends. For Asian flavors, use soy sauce, ginger, and sesame oil. For a Mexican twist, swap Cajun seasoning for taco seasoning. You can also use store-bought spice mixes for convenience. These options let you enjoy new tastes without much extra effort. If you need alternatives, there are many options. For buttermilk, use plain yogurt or milk mixed with lemon juice. This will still give the chicken great flavor. If you're gluten-free, swap all-purpose flour for almond or coconut flour. These substitutes work well and keep the dish delicious. To keep your spicy Cajun chicken tenders fresh, cool them down first. Place them in an airtight container. Store them in the fridge for up to three days. If you want to keep them longer, consider freezing them. For freezing, use freezer-safe bags or containers. Squeeze out the air to prevent freezer burn. To reheat your chicken tenders, use an oven for the best results. Preheat the oven to 400°F (200°C). Place the tenders on a baking sheet and heat for about 10-15 minutes. This method keeps them crispy. If you’re in a hurry, you can use a microwave. However, be sure to cover them with a damp paper towel. This helps prevent sogginess but may not keep them as crispy. Enjoy your tasty tenders again! You should marinate the chicken for at least 30 minutes. This allows the buttermilk and hot sauce to soak into the meat. For even better flavor, I recommend marinating overnight. The longer it sits, the juicier and tastier it becomes. Yes, you can freeze the chicken tenders. First, let them cool completely after frying. Then, place them in a single layer on a baking sheet. Freeze them for about an hour. After that, transfer the tenders to a freezer bag. Be sure to remove as much air as possible. To thaw, just place them in the fridge overnight. You can also reheat them in the oven to keep them crispy. Many sauces pair well with spicy Cajun chicken tenders. Here are a few of my favorites: - Ranch dressing - Spicy remoulade - Honey mustard - Blue cheese dressing - Barbecue sauce You can also serve them with a side of coleslaw or fries for a complete meal. You learned how to make spicy Cajun chicken tenders from start to finish. From marinating to frying, each step is key to great flavor and texture. Remember to adjust the spice to match your taste. Use oven-baking if you want a healthier dish. Store leftovers carefully so they stay tasty. Enjoy your meal with delicious dips and sides. This dish is sure to impress anyone who tries it. Now, go ahead and make your spicy Cajun chicken tenders!

Spicy Cajun Chicken Tenders Crispy and Flavorful Dish

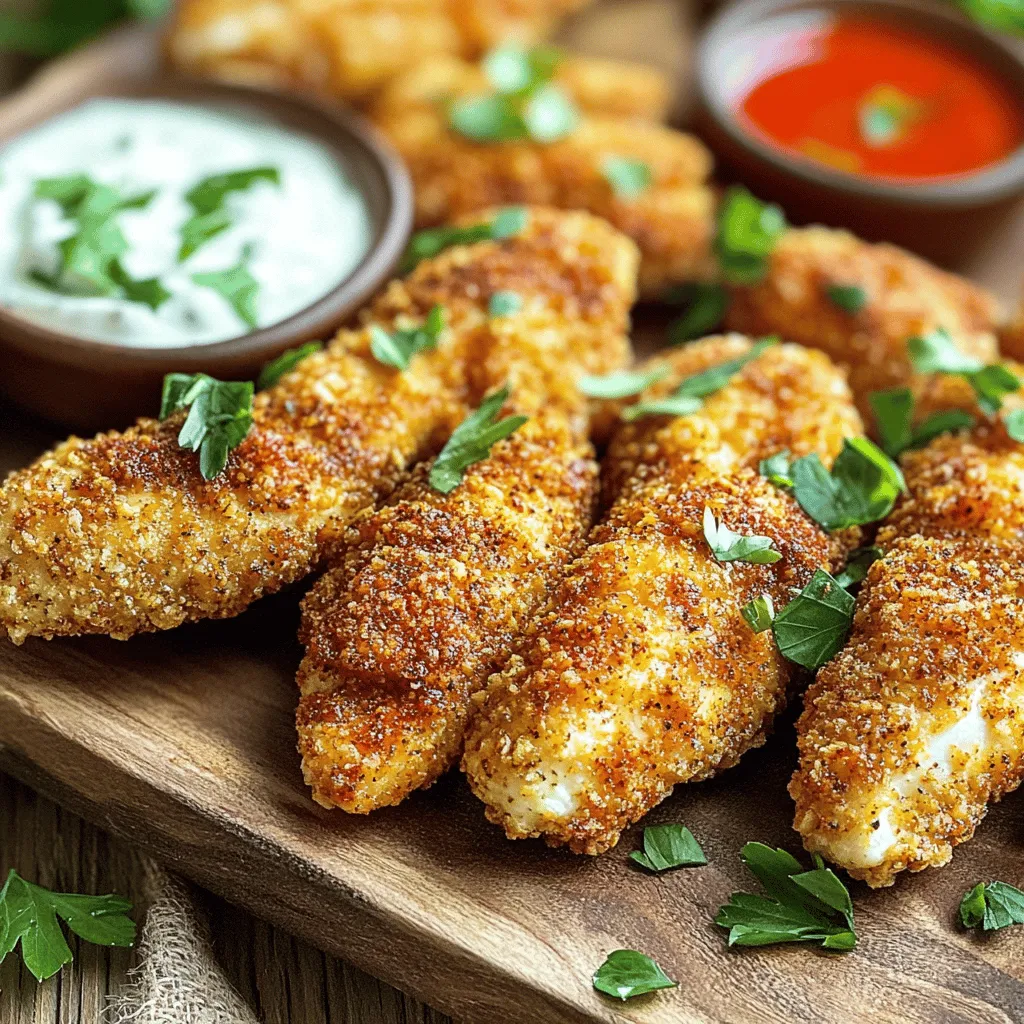
Craving something spicy and crispy? Look no further! My Spicy Cajun Chicken Tenders are packed with flavor and sure to

To make Greek Yogurt Parfait Popsicles, you need simple ingredients. Here’s what you’ll need: - 2 cups Greek yogurt (plain or flavored) - 1 cup mixed berries (strawberries, blueberries, raspberries) - 1 tablespoon honey or maple syrup (optional for sweetness) - 1/2 cup granola (preferably clumpy) - 1/2 cup coconut flakes (unsweetened) - 1 teaspoon vanilla extract Each ingredient brings a unique flavor and texture to the popsicles. Greek yogurt is creamy and rich. It gives a great base. The mixed berries add natural sweetness and vibrant color. You can use any berries you like. Honey or maple syrup helps to sweeten the yogurt, but it is not necessary. Granola gives a nice crunch, and coconut flakes add a tropical twist. Finally, vanilla extract enhances the overall flavor. You can mix and match to suit your taste. If you want more sweetness, add more honey or maple syrup. If you love coconut, feel free to add more coconut flakes. Each ingredient works together to create a refreshing treat. - First, wash the mixed berries under cool running water. This removes dirt and germs. - After washing, pat them dry with a clean towel. If you use strawberries, chop them into small pieces. This helps them mix well. - In a medium bowl, take 2 cups of Greek yogurt. You can use either plain or flavored yogurt. - Add 1 tablespoon of honey or maple syrup if you like it sweeter. Then, mix in 1 teaspoon of vanilla extract. - Stir everything together until smooth. This makes the yogurt tasty. - Grab your popsicle molds and start with a spoonful of yogurt at the bottom. This is your first layer. - Next, add a layer of mixed berries. You can use strawberries, blueberries, or raspberries. - After berries, sprinkle some granola on top. This adds a nice crunch. - Keep repeating the layers until the molds are almost full. Finish with a layer of yogurt on top. - Now, sprinkle a few coconut flakes on top of each mold. This gives extra flavor and texture. - If your molds have covers, place them on top. If not, insert popsicle sticks into the center of each mold. - Finally, place the molds in the freezer. Let them freeze for at least 4 to 6 hours. They need to be completely solid before you eat them. You can use plain or flavored Greek yogurt. Plain yogurt gives a tangy taste. Flavored yogurt adds sweetness and fun. I prefer plain yogurt for its versatility. You can mix in your own flavors later. To create beautiful popsicles, layer your ingredients evenly. Start with yogurt at the bottom. Then, add berries and granola. Repeat this until the molds are full. Make sure to finish with yogurt. This helps keep the layers nice and neat. Sweetness is important for taste. If you like it sweet, add honey or maple syrup. Start with one tablespoon and taste. You can always add more. If you want it less sweet, skip the sweetener. The fruit adds natural sweetness too. {{image_2}} You can swap fruits to make new flavors. Try peaches, mangoes, or bananas. Each fruit adds its own taste. You can also mix berries for a fun twist. For sweetness, use agave syrup or stevia instead of honey. This gives options for different diets. If you need dairy-free options, use almond, soy, or coconut yogurt. These work well in the popsicle mix. For gluten-free choices, pick granola made without wheat. Many brands offer tasty gluten-free options. This way, everyone can enjoy the treat! Make your popsicles stand out. Use fun molds shaped like stars or animals. Layer colors for a rainbow effect. You can also drizzle melted chocolate over the top. Serve with fresh fruit on the side for a pretty plate. These ideas make your popsicles look as good as they taste! To keep your Greek Yogurt Parfait Popsicles fresh, store them in a freezer-safe bag or container. Make sure to wrap them tightly to prevent freezer burn. You can also use popsicle molds that have lids. This way, they stay protected from odors in the freezer. These popsicles can last in the freezer for up to two months. After that, they may lose their flavor and texture. If you notice ice crystals forming, it's a sign they are not as fresh. Always label your containers with the date, so you know when to enjoy them! When you're ready to eat a popsicle, take it out of the freezer. Run warm water over the outside of the mold for a few seconds. This helps loosen the popsicle. If you prefer a softer treat, let it sit at room temperature for about five minutes before serving. Enjoy your tasty, refreshing delight! Greek Yogurt Parfait Popsicles need at least 4 to 6 hours to freeze. This time ensures they become solid and easy to enjoy. It’s best to leave them overnight for the best result. You can check them after 4 hours but waiting longer helps them set well. Yes, you can use frozen berries. Frozen berries work well in these popsicles. They add a nice chill and flavor. Just make sure to thaw them slightly before use. This helps them mix better with the yogurt. Fresh berries are great too, but frozen ones are super convenient. Greek Yogurt Parfait Popsicles are healthy and tasty. Each popsicle has about 100 calories. They also contain about 5 grams of protein and around 10 grams of sugar. The exact values depend on the yogurt and sweetener you use. These popsicles offer a good balance of nutrients. To make these popsicles vegan, use plant-based yogurt. Almond, coconut, or soy yogurt are great choices. For sweeteners, use maple syrup instead of honey. These swaps keep the flavor delicious while making the recipe vegan-friendly. Enjoy a creamy treat without dairy! In this post, we explored making Greek Yogurt Parfait Popsicles. We covered the key ingredients, from yogurt to berries and granola. Then, I walked you through each easy step to create these tasty treats. I shared tips for the best layers and how to adjust sweetness. Don’t forget, you can get creative with flavors! Finally, remember to store your popsicles well to keep them fresh. Enjoy these delicious desserts that are fun to make and eat!

Greek Yogurt Parfait Popsicles Tasty Summer Treat

Looking for a fun, healthy way to cool down this summer? Greek Yogurt Parfait Popsicles are your answer! Packed with

To make roasted red pepper hummus, you will need: - 2 large red bell peppers - 1 can (15 oz) chickpeas, drained and rinsed - 3 tablespoons tahini - 2 tablespoons olive oil - 2 cloves garlic, minced - 2 tablespoons lemon juice - 1 teaspoon ground cumin - Salt and pepper to taste - A pinch of smoked paprika (for garnish) - Fresh parsley, chopped (for garnish) This mix of ingredients gives the hummus a rich flavor. The roasted peppers add a sweet, smoky taste that brightens the dish. The key ingredients offer many health benefits: - Red bell peppers: High in vitamins A and C, they boost your immune system. - Chickpeas: Packed with protein and fiber, they support digestion and muscle health. - Tahini: This sesame paste provides healthy fats and adds creaminess. - Olive oil: Rich in heart-healthy fats, it helps lower bad cholesterol. - Garlic: Known for its health benefits, it adds flavor and can boost your immune system. Each serving is not just tasty but also nutritious. You can enjoy this hummus guilt-free! If you lack some ingredients, don’t worry. Here are some easy swaps: - Red bell peppers: You can use yellow or orange bell peppers for a different taste. - Chickpeas: White beans or black beans work well in a pinch. - Tahini: Sunflower seed butter or Greek yogurt can replace tahini. - Olive oil: Avocado oil or any neutral oil can be used if needed. - Garlic: Garlic powder can replace fresh garlic; just use less. These substitutions keep the flavor strong while making the recipe flexible. Feel free to mix and match based on what you have! First, you need to prep the red bell peppers. Start by preheating your oven to 425°F (220°C). Next, cut the peppers in half and take out the seeds and membranes. Place the halves cut-side down on a baking sheet lined with parchment paper. Roast the peppers for about 25 to 30 minutes. You want the skin to get charred and blistered. When they are done, take them out of the oven and let them cool a bit. Once they are cool enough to touch, peel off the charred skin and throw it away. This process adds a deep flavor to your hummus. Now, it’s time to blend the hummus. In a food processor, put the roasted peppers along with the chickpeas, tahini, olive oil, minced garlic, lemon juice, ground cumin, and a pinch of salt and pepper. Blend everything together until it is smooth. Make sure to scrape down the sides as needed. If your mixture seems too thick, add a tablespoon of water at a time. Keep blending until you reach the perfect texture. This step is key for a creamy hummus. To get the best consistency, you might need to adjust the water. If your hummus feels dry, add a little more water. If it’s too thin, just add a bit more chickpeas or tahini. Always taste it and adjust the seasoning. A good hummus should be smooth and spreadable. You can top it with a drizzle of olive oil and sprinkle some smoked paprika and chopped parsley for a nice touch. This makes your hummus not only tasty but also beautiful! Roasting bell peppers brings out their sweet flavor. Start by choosing ripe, bright red peppers. Preheat your oven to 425°F (220°C). Cut the peppers in half and remove seeds. Place them cut-side down on a lined baking sheet. Roast them for about 25-30 minutes. Look for charred, blistered skin. This shows they are ready. After roasting, let them cool. The skins will peel off easily when cool. This method makes the peppers soft and smoky. To boost flavor, add a few extra ingredients. Consider adding a small amount of lemon zest for brightness. You can also use roasted garlic instead of raw. This gives a sweeter taste. If you like heat, add a pinch of cayenne pepper. It gives a nice kick. Fresh herbs like basil or cilantro can add freshness. Mix these in before blending for a richer flavor. Always taste as you go. Adjust the salt and pepper to your liking. Roasted red pepper hummus pairs well with many foods. Serve it with pita chips for a crunchy texture. Fresh veggies like carrots and cucumbers are great for dipping. You can also use toasted bread or crackers. For a fun twist, try it as a spread on sandwiches. Add some sliced turkey or veggies for a tasty lunch. Garnish with smoked paprika and parsley for color. This makes your dish look even more inviting. Enjoy your hummus with friends at a party or a quiet snack at home! {{image_2}} Want to add some heat? Start with the basic recipe, then add jalapeños. You can use fresh or pickled jalapeños, depending on your spice level. A tablespoon of sriracha or harissa gives a nice kick too. Blend these in with the other ingredients. Enjoy this spicy twist with veggies or chips! Herbs and spices can change your hummus game. Try adding fresh basil or cilantro for a fresh taste. You can also experiment with spices like smoked paprika or chili powder. Mixing in a teaspoon of za'atar adds a Middle Eastern flavor. Blend these choices in for a new layer of yum! This hummus is already vegan and gluten-free! If you want to make it nut-free, just skip the tahini. You can swap tahini with sunflower seed butter or skip it altogether. For added protein, mix in some cooked lentils. These small changes keep it friendly for everyone, without losing flavor. To keep your roasted red pepper hummus fresh, store it in an airtight container. This will prevent it from drying out. Make sure the lid fits tightly. You can also press plastic wrap directly onto the hummus before sealing the lid. This extra step helps keep air out. You can freeze hummus if you want to save it for later. Use a freezer-safe container and leave some space at the top. The hummus will expand as it freezes. You can also make small portions in an ice cube tray for easy use. When ready to eat, thaw it in the fridge overnight. Homemade roasted red pepper hummus lasts about one week in the fridge. Check for signs of spoilage. Look for changes in color or texture. If it smells sour or off, it’s best to toss it. Always trust your senses. When in doubt, throw it out! Yes, you can make hummus without tahini. You can use more olive oil or add nuts like cashews instead. This will give your hummus a nice creamy texture. Just remember to adjust the other flavors to keep it tasty. Homemade roasted red pepper hummus lasts about 4 to 7 days in the fridge. Store it in an airtight container for best results. Always check for any signs of spoilage before eating. You can find roasted red pepper hummus at most grocery stores. Look in the deli or refrigerated section. Many brands make this tasty dip, so you have options. Local markets may also offer fresh versions. Roasted red pepper hummus is a tasty and easy dish to make. You learned the best ingredients, step-by-step prep, and tips for great flavor. We covered some fun variations and how to store your hummus too. In my experience, combining these tips ensures your hummus always impresses. Dive into this healthy snack, and don't be afraid to experiment. Enjoy creating your perfect hummus dish!

Roasted Red Pepper Hummus Simple and Healthy Recipe

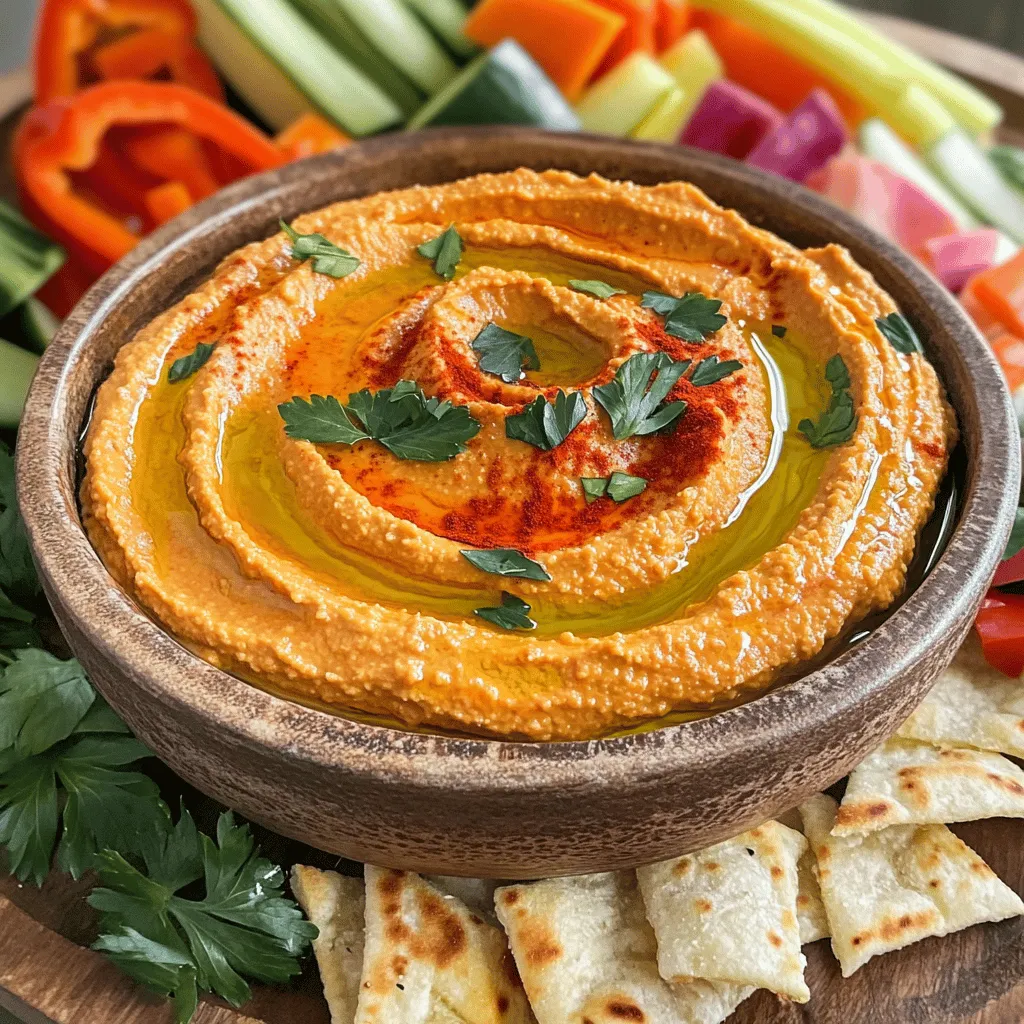
Are you ready to spice up your snacking? Today, I’ll share my simple and healthy roasted red pepper hummus recipe.

Older posts
Newer posts
← Previous Page1 … Page17 Page18 Page19 … Page84 Next →

dsad

© 2026 Lisa Dishes • Built with GeneratePress

Our Policies

  • Copyright Policy
  • Cookie Policy
  • GDPR Policy
  • Privacy Policy
  • Disclaimer
  • Terms Of Use

More Information

  • Home
  • About
  • Contact
  • Appetizers
  • Dessert
  • Dinner
  • Drinks
©2026, Lisa Dishes About Back To Top