Skip to content
DisclaimerTerms Of UseGDPR PolicyCookie Policy

Lisa Dishes

  • Home
  • Drinks
  • Appetizers
  • Dinner
  • Dessert
  • About
  • Contact
  • Privacy Policy
DisclaimerTerms Of UseGDPR PolicyCookie Policy

NO-ING-IMG

- 250g egg noodles - 200g chicken breast - 4 cloves garlic - 1 red chili - 2 tablespoons soy sauce - 1 tablespoon sesame oil - 1 tablespoon vegetable oil - 1 bell pepper - 3 spring onions - Salt and pepper - Fresh cilantro - Lime wedges Gathering fresh ingredients is key to this dish. The egg noodles serve as a great base. Chicken breast adds protein and flavor. Garlic and red chili bring bold taste. Soy sauce and sesame oil give it a rich umami kick. I love adding bell pepper for crunch. Spring onions add a nice touch of color. Don't forget salt and pepper for seasoning. Fresh cilantro makes a perfect garnish. Lime wedges add a zesty touch when you serve. Make sure you have all these ingredients ready. It helps the cooking process go smoothly. You can even prep some items in advance. Chop the veggies and slice the chicken ahead of time. This way, you can whip up the dish in just 15 minutes. To start, cook 250g of egg noodles. Follow the package instructions carefully. Once they are soft, drain them in a colander. Rinse the noodles under cold water. This stops them from cooking too much. Set the noodles aside for later. Next, grab a large skillet or wok. Heat 1 tablespoon of vegetable oil over medium-high heat. Add 200g of thinly sliced chicken breast. Season it with a pinch of salt and pepper. Stir-fry the chicken for 3 to 4 minutes. Cook until it turns golden and is no longer pink inside. Now, it’s time to add flavor. Toss in 4 minced garlic cloves and 1 finely chopped red chili. Stir continuously for 1 to 2 minutes. This makes the garlic fragrant. Then, add 1 sliced bell pepper and 3 chopped spring onions. Cook for another 2 minutes. You want the veggies to soften slightly. Finally, drizzle 2 tablespoons of soy sauce and 1 tablespoon of sesame oil over the chicken and veggies. Mix everything well to combine. Then, add the cooked noodles to the skillet. Gently toss everything together until the noodles are heated through. Serve hot, garnished with fresh cilantro and lime wedges for a bright touch. To ensure tender chicken, start with thin slices. Thin pieces cook fast and stay juicy. Marinate the chicken with a bit of soy sauce for added flavor. This step makes a big difference. Cook on high heat but don’t overcrowd the pan. This keeps the chicken from steaming, helping it brown nicely. You can control the heat in this dish easily. Use more or less chili, depending on your taste. If you want it mild, remove the seeds from the chili. For extra heat, add a pinch of red pepper flakes. Always taste as you go, so you find your perfect balance. Speed is key in this recipe. Prepare all your ingredients before you start cooking. Chop the veggies and mince the garlic ahead of time. Use a large skillet or wok to cook everything quickly. High heat helps the chicken and veggies cook fast. Stir constantly to keep everything moving and prevent burning. {{image_2}} If you want to switch it up, try shrimp or tofu. Shrimp cooks fast and adds a nice sweetness. Simply replace the chicken with 200g of shrimp. Sauté it until it turns pink, about 3 minutes. For a vegetarian option, use firm tofu. Press and cube the tofu, then fry it until golden. This will give a great texture and soak up flavors well. You can also change the veggies. Broccoli, snap peas, or carrots work well in this dish. Cut them into bite-sized pieces for easy cooking. Add these veggies with the bell pepper for a colorful mix. They will add crunch and nutrients to your meal. Want to make it even better? Try adding nuts or extra sauces. Cashews or peanuts can give a nice crunch. Toss in a handful when you add the noodles. You can also play with sauces. A splash of oyster sauce or chili paste can add depth. Mix and match to find your favorite flavor. To store leftovers, let the noodles cool down first. Use an airtight container. This keeps the flavors fresh. Place the chicken and noodles together. You can add veggies too. Store in the fridge for up to three days. To reheat the noodles, use a skillet. Add a splash of water or oil. Heat over medium-low heat. Stir often to warm evenly. You can also use a microwave. Place noodles in a microwave-safe dish. Cover with a damp paper towel. Heat in short bursts, stirring in between. This keeps the noodles moist and tasty. To freeze the dish, let it cool completely. Use freezer-safe containers. Separate the chicken from the noodles if you like. This makes it easier to thaw. Store for up to three months. When ready to eat, thaw overnight in the fridge. Reheat on the stove or in the microwave. Enjoy your Garlic Chili Chicken Noodles even after freezing! To boost the spice, add more chopped chili. You can also use chili flakes. If you like heat, try a splash of hot sauce or sriracha. Mix it in just before serving for a punchy kick. Yes, you can use rice noodles, udon, or even whole wheat noodles. Just adjust the cooking time based on the noodle type. Follow the package instructions for best results. To make it vegetarian, replace chicken with tofu or tempeh. You can also add more veggies like broccoli or carrots. Use soy sauce for flavor, and keep everything else the same. Leftovers stay good for about 3 to 4 days in the fridge. Store them in an airtight container. Reheat in a skillet for a quick meal. Enjoy every bite! This recipe for Garlic Chili Chicken Noodles blends flavors and textures well. You learned how to cook the noodles, sauté chicken, and add fresh veggies and spices. I shared tips to make your chicken tender and adjust spice levels to your taste. You can even switch proteins or veggies if you want. Store your leftovers correctly to enjoy them later. With this dish, you can create a meal that suits your cravings. Happy cooking!

Garlic Chili Chicken Noodles in 15 Minutes Delight

Looking for a quick and tasty meal? My Garlic Chili Chicken Noodles take just 15 minutes to whip up! This

- 1 lb chicken tenderloins - 1 cup buttermilk - 1 teaspoon garlic powder - 1 teaspoon paprika - 1 cup all-purpose flour - 1 cup panko breadcrumbs - 1 teaspoon salt - 1 teaspoon black pepper - 1 teaspoon onion powder - 1/4 cup Dijon mustard - 1/4 cup honey - 1 tablespoon apple cider vinegar - Salt and pepper to taste These ingredients bring together the perfect balance of flavor and crunch. The chicken tenderloins are juicy and tender. The buttermilk helps them soak up flavor and stay moist. Garlic powder and paprika add great taste. For the breading, all-purpose flour gives a solid base. Panko breadcrumbs make the coating extra crispy. Salt, pepper, and onion powder add more seasoning to the mix. The honey mustard sauce is simple yet delicious. It combines sweet honey with tangy Dijon mustard. A splash of vinegar adds a nice kick. This sauce is perfect for dipping your crispy chicken tenders. Gather these ingredients, and you are ready to make a tasty meal. Enjoy the crunch and flavor in every bite! Start by taking 1 pound of chicken tenderloins. Place them in a bowl. Pour 1 cup of buttermilk over the chicken. Add 1 teaspoon of garlic powder and 1 teaspoon of paprika. Mix everything well. This helps to make the chicken juicy and flavorful. Cover the bowl and put it in the fridge. Let it marinate for at least 30 minutes. For the best taste, marinate overnight. Now, let’s get the breading ready. In a shallow dish, combine 1 cup of all-purpose flour, 1 teaspoon of salt, 1 teaspoon of black pepper, and 1 teaspoon of onion powder. Mix these dry ingredients well. In another dish, add 1 cup of panko breadcrumbs. This will give the chicken a nice crunch. Once the chicken is marinated, it’s time to coat it. Take the chicken from the buttermilk and let the excess drip off. First, dredge the chicken in the flour mixture. Then, dip it back into the buttermilk briefly. Finally, coat it well with the panko breadcrumbs. Press down gently so the breadcrumbs stick. Next, preheat your air fryer to 400°F (200°C) for about 5 minutes. Spray the air fryer basket with cooking spray. Place the chicken tenders in a single layer. You may need to cook in batches. Lightly spray the tops of the chicken tenders with cooking spray, too. Cook for 8 to 10 minutes. Flip halfway through. They should be golden brown and crispy when done. While the chicken cooks, let’s make the honey mustard sauce. In a small bowl, whisk together 1/4 cup of Dijon mustard, 1/4 cup of honey, and 1 tablespoon of apple cider vinegar. Add a pinch of salt and pepper to taste. Once the chicken is ready, let it cool slightly before serving. Enjoy your crispy chicken tenders with the honey mustard sauce! For the crispiest chicken tenders, use panko breadcrumbs. They add a light crunch. Press the breadcrumbs onto the chicken firmly. This helps them stick better during cooking. Don't skip the cooking spray; it gives you that golden finish. A light coat on top makes a big difference. Set your air fryer to 400°F (200°C). Cook the chicken for 8 to 10 minutes. Flip them halfway to get an even crisp. If they aren't golden brown yet, add a minute or two. Always check that the internal temperature reaches 165°F (75°C) for safety. Marinate your chicken in buttermilk. This makes the chicken tender and moist. Add garlic powder and paprika for flavor. Let it sit for at least 30 minutes, or overnight for the best taste. Cover it well in the fridge to keep it fresh. {{image_2}} If you love heat, you can spice up your chicken tenders easily. Just add cayenne pepper or chili powder to the flour mix. Start with half a teaspoon and adjust to your taste. This gives each bite a nice kick. Pair them with the honey mustard sauce to balance the spice. While honey mustard is a classic, don't be afraid to try other sauces. BBQ sauce adds a smoky flavor that can be very tasty. Ranch dressing offers a cool contrast to the crispy tenders. You can even mix sauces for a unique dip. Have fun experimenting to find your favorite! For those who need gluten-free options, swap all-purpose flour with gluten-free flour. Use gluten-free panko breadcrumbs instead of regular ones. The process remains the same, and you will still get crispy chicken tenders. Enjoy your meal without worry! To keep your chicken tenders fresh, store them in an airtight container. Place a paper towel at the bottom to absorb moisture. This helps maintain their crispiness. They can stay in the fridge for up to three days. Just make sure they cool completely before sealing. To reheat your chicken tenders, use the air fryer again. Preheat it to 350°F (175°C). Arrange the tenders in a single layer. Heat them for about 5-7 minutes. This method helps them regain their crunch. You can also use an oven, but the air fryer works best. If you want to freeze them, let the cooked tenders cool first. Then, place them in a freezer-safe bag. Remove as much air as possible before sealing. They can stay frozen for up to three months. When ready to eat, thaw them in the fridge overnight before reheating. Yes, you can use chicken breasts. Cut them into strips to match the size of tenderloins. This helps with even cooking. Chicken breasts may take a little longer to cook. Always check the internal temperature to ensure they reach 165°F for safety. To keep the breading intact, use the double-dip method. First, coat the chicken in flour, then dip it back into the buttermilk. Finally, roll it in panko breadcrumbs. Press down gently to help it stick. Also, avoid moving the chicken too much while cooking in the air fryer. Crispy chicken tenders pair well with many sides. Consider serving them with: - A fresh green salad - Crispy fries or sweet potato fries - Coleslaw for crunch - Veggie sticks with ranch dressing - Rice or a grain salad for something hearty These options add color and balance to your meal. We covered the key ingredients to make delicious chicken tenderloins and a great honey mustard sauce. I shared a simple step-by-step guide, tips for crispy texture, and tasty variations. Remember, proper marinating and cooking time make a big difference. Don't forget to store any leftovers well and reheat them for the best crunch. With these ideas, you'll impress everyone with your chicken tenders. Enjoy your cooking adventure!

Air Fryer Crispy Chicken Tenders with Honey Mustard Delight

Are you ready to indulge in crispy chicken tenders that are quick and easy? In this blog post, I’ll share

- 2 cups vanilla ice cream - 1 cup whole milk - 1 medium apple, peeled and diced The main ingredients create the base of your milkshake. Vanilla ice cream makes it rich and creamy. Whole milk adds smoothness and helps blend everything. The medium apple gives a fresh crunch and a sweet-tart flavor. - 1/4 cup caramel sauce - 1/2 teaspoon ground cinnamon - Whipped cream for topping The flavor enhancers take the milkshake to the next level. Caramel sauce adds a delicious sweetness that pairs perfectly with the apple. Ground cinnamon gives a warm spice that fits well with fall flavors. Finally, whipped cream on top makes it look inviting and adds a fluffy texture. - A pinch of sea salt - Additional garnishes Adding a pinch of sea salt can enhance the flavors. It gives a nice contrast to the sweetness. Extra garnishes, like a sprinkle of cinnamon or apple slices, can also make your milkshake more appealing and fun. These small touches make your milkshake feel special. 1. Start by combining the ingredients in your blender. Add 2 cups of vanilla ice cream, 1 cup of whole milk, 1 medium apple (peeled and diced), 1/4 cup of caramel sauce, and 1/2 teaspoon of ground cinnamon. 2. Blend on high until the mixture is smooth and creamy. Make sure the apple pieces mix well. If you want a chunkier milkshake, blend for a shorter time. 1. Pour the milkshake into tall glasses. Aim to fill them about three-quarters full. 2. Top each glass with whipped cream. Drizzle extra caramel sauce on top for a sweet touch. 3. For a decorative finish, sprinkle a little cinnamon or add a few small apple slices on top. 1. Taste your milkshake and adjust the sweetness. You can add a pinch of sea salt for a sweet and salty flavor. Blend briefly to mix it in. 2. If you want a chunkier texture, blend less. For a smoother shake, blend longer. The key to a great milkshake is the right mix of ingredients. Use 2 cups of vanilla ice cream and 1 cup of whole milk for a rich base. This ratio gives the milkshake a creamy texture. Adjust the ratio if you want it thicker or thinner. Chill your glasses in the freezer for 10 minutes before serving. This will keep your milkshake cold and frosty. A cold glass makes each sip more enjoyable. You can add different fruits to change the taste. Try bananas or pears for a fun twist. Each fruit brings its own flavor and pairs well with caramel. You can also explore nutty or spicy flavors. Add a scoop of peanut butter for a nutty taste. A pinch of nutmeg or ginger can give it a warm spice. Avoid over-blending your milkshake. Blend just until smooth. If you blend too long, it can turn too thin. Always use high-quality caramel sauce. Low-quality sauce can make your milkshake taste off. Choose a sauce that is rich and thick for the best flavor. {{image_2}} You can give your caramel apple milkshake a fun twist for the seasons. In fall, try adding pumpkin spice. Just a pinch can warm up the flavors. It brings a cozy vibe perfect for chilly days. For the holidays, use peppermint. Add a splash of peppermint extract for a festive touch. This will make your shake taste like a holiday treat. If you want a dairy-free or vegan option, swap out the ice cream and milk. Use coconut or almond milk and a vegan ice cream. These changes keep the creamy texture while making it friendly for all diets. For a healthier choice, use low-calorie ice cream and skim milk. This cuts down on calories without losing flavor. Get creative with your toppings! Crunchy toppings like crushed graham crackers or nuts can add fun texture. You can also sprinkle some cinnamon on top for extra flavor. If you need an energy boost, mix in protein powder. This adds health benefits while keeping your milkshake creamy and tasty. To store your leftover milkshake, pour it into an airtight container. Seal it tightly. This helps keep the flavor fresh. You can also use a mason jar. Make sure to leave some space at the top. The milkshake may expand when it freezes. Always refrigerate your milkshake if you plan to drink it soon. It tastes best within 24 hours. If you need to store it longer, freeze it. But remember, freezing can change the texture. To maintain the creaminess, stir it well after thawing. You can enjoy your leftover milkshake straight from the fridge. Shake or stir it well before drinking. If you want something warm, heat it gently in a pot. Avoid boiling it, as that can ruin the flavor. Use any leftover milkshake in fun ways! Pour it over pancakes for a sweet treat. You can also freeze it in molds for popsicles. Blend it with coffee for a delicious iced drink. The options are endless! In the refrigerator, your milkshake lasts about 2 days. It’s best to consume it fresh for the best taste. If it smells sour or has a strange color, toss it out. Also, if you see any separation or clumps, it's time to say goodbye. Always trust your senses when checking food freshness. You can use several options if you need a substitute. Here are a few: - Non-dairy ice cream made from coconut or almond milk - Frozen yogurt for a lighter option - Banana ice cream, which you can make by blending frozen bananas These choices keep the milkshake creamy and tasty. Each will add a unique twist to your drink. Yes, you can prep this milkshake in advance! Here are my tips: - Blend all ingredients and store in the fridge for up to two hours. - Keep the whipped cream separate to maintain its texture. - When ready to serve, give it a quick blend to restore creaminess. Making it ahead lets you enjoy it on busy days without losing flavor. Boosting the caramel taste is easy! Try these ideas: - Add an extra 1/4 cup of caramel sauce for a richer flavor. - Mix in a teaspoon of caramel extract for depth. - Use salted caramel for a sweet and salty combo. These tips will make your milkshake even more irresistible! This blog post covered how to make a delicious caramel apple milkshake. We explored key ingredients like vanilla ice cream and whole milk. You learned tips for perfecting the mix, varying flavors, and storing leftovers properly. Whether going for seasonal twists or dietary adaptations, you can create a milkshake just right for you. With this knowledge, grab your blender and start crafting your own tasty treat today! Enjoy the process and have fun experimenting with flavors.

Irresistible Caramel Apple Milkshake Creamy Delight

Craving a sweet, creamy treat? Look no further than the irresistible caramel apple milkshake! This delightful blend of vanilla ice

For this Rustic Chicken Lentil Stew, you will need: - 1 lb boneless, skinless chicken thighs, cut into chunks - 1 cup dried green or brown lentils, rinsed - 4 cups low-sodium chicken broth - 2 carrots, chopped - 2 celery stalks, chopped - 1 medium onion, diced - 3 cloves garlic, minced - 1 teaspoon dried thyme - 1 teaspoon smoked paprika - 1 bay leaf - Salt and pepper to taste - 2 tablespoons olive oil These ingredients come together to create a warm and hearty meal. The chicken thighs add rich flavor, while the lentils give it a nice texture. You might want to add: - Fresh parsley for garnish - Additional spices or herbs These optional ingredients can elevate your stew's look and taste. Fresh parsley adds a bright touch and some freshness. You can also play with spices to match your taste. To start, I heat olive oil in a skillet over medium heat. I add the diced onion and sauté it until it turns translucent, which takes about 5 minutes. This step builds the base for great flavor. Next, I toss in the minced garlic, chopped carrots, and chopped celery. I cook these together for about 3 to 4 minutes until they soften. This mix brings a nice aroma and color to the stew. Once the vegetables are ready, I transfer them into my slow cooker. I then place the chicken thighs right on top of the veggies. This layering helps the chicken soak in all those good flavors. After the chicken, I stir in the rinsed lentils along with dried thyme, smoked paprika, and a bay leaf. Then, I pour in 4 cups of low-sodium chicken broth. If I want, I add salt and pepper to taste. This mix of ingredients creates a hearty and tasty stew. Now it's time to set the slow cooker. I can choose to cook on low for 6 to 8 hours. This option makes the chicken very tender. If I'm in a hurry, I can set it to high for 3 to 4 hours. Both ways yield a warm and filling stew, perfect for any day. To boost the taste of your rustic chicken lentil stew, consider these spices: - Dried thyme gives a warm, earthy flavor. - Smoked paprika adds a hint of smoky depth. - Bay leaf infuses a subtle aroma. Choosing the right broth matters too. I prefer low-sodium chicken broth. It lets the stew's flavors shine without being too salty. For tender chicken and lentils, follow these tips: - Cut chicken thighs into smaller chunks for even cooking. - Rinse lentils well before adding them. This helps remove dirt and debris. - Keep the slow cooker covered. This traps steam and helps the chicken and lentils cook gently. Prep can make cooking easier: - Chop your veggies a day ahead. Store them in the fridge to save time. - Use frozen vegetables. They cook well and add convenience. Just toss them in the slow cooker without thawing. These tips will help you create a delicious rustic chicken lentil stew with ease. Enjoy the process! {{image_2}} For a vegetarian version, use hearty vegetables or plant-based protein. Great substitutes for chicken include: - 1 can of chickpeas, drained - 1 cup of diced mushrooms - 1 block of firm tofu, cubed These options add protein and flavor. When using vegetables, adjust cooking times. Cook for 4-6 hours on low or 2-3 hours on high. Always check for tenderness. You can make this stew your own by adding more veggies. Try: - 2 medium potatoes, diced - 1 cup of fresh spinach - 1 bell pepper, chopped Feel free to adjust the spice level. Add more smoked paprika for heat or a pinch of cayenne. Taste as you go to find your perfect balance. If you prefer to use an Instant Pot, here are quick steps: 1. Sauté the onions and garlic using the sauté function. 2. Add all ingredients to the pot. 3. Cook on high pressure for 15 minutes. For stovetop preparation, follow these steps: 1. Sauté the vegetables in a large pot. 2. Add chicken and other ingredients. 3. Simmer for about 30-40 minutes, until the chicken is cooked and lentils are tender. This way, you can enjoy the stew no matter your cooking style! To keep your Rustic Chicken Lentil Stew fresh, store it in proper containers. Use airtight containers to help keep the flavors in. This stew can last in the fridge for about 3 to 4 days. Make sure to let it cool before sealing and storing. This step helps prevent bacteria growth. If you want to freeze the stew, let it cool completely first. Then, pour it into freezer-safe bags or containers. Remember to leave some space at the top, as the stew will expand when frozen. It can be frozen for up to 3 months. When it’s time to enjoy your stew again, thaw it overnight in the fridge. To reheat, warm it on the stove over low heat or in the microwave. Stir well to ensure even warming. If it seems thick, add a splash of chicken broth or water. Enjoy the warmth of this cozy dish! Yes, you can use canned lentils. They cook faster than dried lentils. If you use them, add them in the last 30 minutes of cooking. This keeps them from becoming mushy. Canned lentils are already cooked, so they just need to warm up. Remember to drain and rinse them before adding. This helps reduce sodium and improves flavor. You can use chicken breasts instead of thighs. They are leaner but still tasty. Another option is to use turkey thighs or drumsticks. Both will add rich flavor to the stew. If you want a vegetarian option, try chickpeas or mushrooms. They bring a nice texture and absorb flavors well. To thicken your stew, you can mash some lentils. After cooking, take out a cup of lentils and mash them with a fork. Then stir them back in. Another way is to mix a bit of cornstarch with water and add it to the stew. Let it cook for another 15 minutes to thicken up. You can also add more vegetables, like potatoes, to help absorb some liquid. This blog covered how to make a hearty chicken stew with lentils. You learned about the main and optional ingredients, from chicken thighs to fresh parsley. We discussed step-by-step instructions for prepping and cooking. Tips for flavor and texture improvements help make your stew shine. Variations let you customize it, while storage info keeps leftovers fresh. Remember, cooking can be fun and rewarding. Enjoy creating your own delicious twist on this recipe!

Rustic Chicken Lentil Stew Slow Cooker Delight

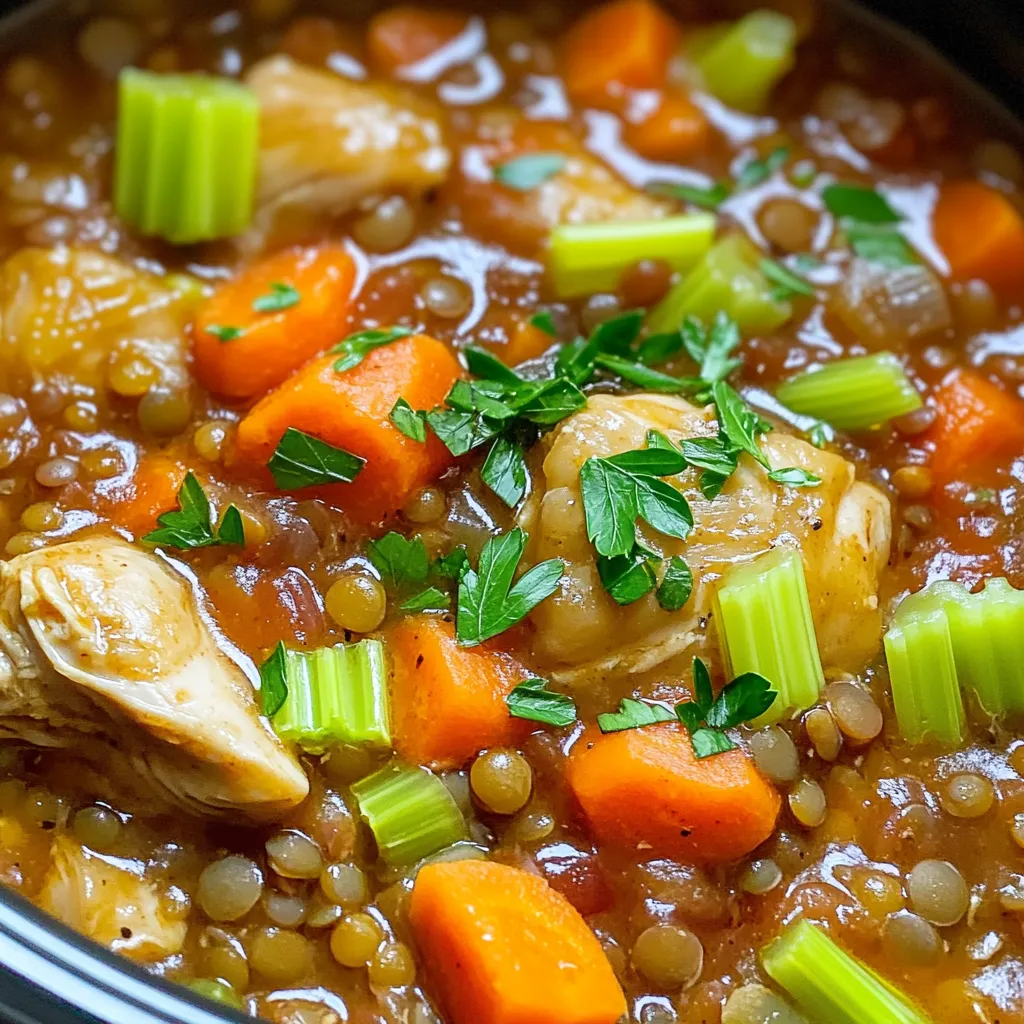
Looking to warm up with a hearty meal? My Rustic Chicken Lentil Stew Slow Cooker Delight is the answer. Made

- 2 cups crushed pretzels - 1/2 cup unsalted butter, melted - 1/4 cup brown sugar - 8 oz cream cheese, softened - 1 cup powdered sugar - 1 teaspoon vanilla extract - 1 1/2 cups heavy whipping cream - 1/2 cup salted caramel sauce (plus extra for drizzling) - Sea salt for sprinkling If you need a change, consider these swaps: - Use gluten-free pretzels for a gluten-free option. - Swap out unsalted butter for coconut oil for a dairy-free choice. - Cream cheese can be replaced with a dairy-free cream cheese for a vegan version. - You can use light brown sugar or white sugar if you run out of brown. - For a lighter option, substitute heavy cream with whipped coconut cream. Choosing the right ingredients makes a big difference: - Look for fresh pretzels; they should be crunchy and not stale. - Choose high-quality cream cheese, as it affects the texture. - Use pure vanilla extract for a richer flavor. - Select a good salted caramel sauce for the best taste; homemade is great if you have time. - Sea salt should be flaky and fresh; it enhances the sweet and salty balance. These ingredients create a tasty treat that you will love to make and share! To make these salted caramel pretzel cheesecake bars, start with the crust. In a medium bowl, mix the crushed pretzels, melted butter, and brown sugar. Stir until the pretzels feel like wet sand. Next, press this mixture into the bottom of a 9x9 inch baking pan. Make sure it is firm and even. Set the pan in the fridge while you prepare the filling. Now, in a large bowl, beat the softened cream cheese, powdered sugar, and vanilla extract. Mix until it is smooth and creamy. In another bowl, whip the heavy cream until you see stiff peaks. This will add air and make the filling light. Gently fold the whipped cream into the cream cheese mixture. Do this slowly so you do not lose the air. Then, drizzle the salted caramel sauce into the filling. Use a spatula to swirl it in. This gives you a pretty marbled look. Pour the filling over the chilled pretzel crust. Spread it evenly across the top. Cover your pan with plastic wrap. Place it back in the refrigerator for at least four hours. For the best texture, let it chill overnight. To get a creamy texture, use softened cream cheese. It should be at room temperature before mixing. This helps it blend smoothly with the sugar and vanilla. When whipping the heavy cream, watch for stiff peaks. This means the cream holds its shape well. Be gentle when folding the whipped cream into the cream cheese. You want to keep the air in the mix. Refrigeration is key for these bars. It allows the filling to set properly. If you cut them too soon, they may fall apart. Four hours is the minimum chill time, but overnight is best. This helps all the flavors blend together. The longer it sits, the better the taste! One common mistake is not crushing the pretzels enough. Aim for a fine crumb. This helps the crust hold together better. Another mistake is overmixing the cream cheese. Mix just until smooth. If you whip it too much, it can become too airy. Lastly, don’t skip the chilling time. It’s key for the bars to set well. Patience pays off! Cutting the bars can be tricky. Use a sharp knife and warm it slightly. This helps make clean cuts. Start by lifting the bars out using the plastic wrap. Cut into squares while still in the pan for less mess. Serve on a pretty plate. Drizzle with extra salted caramel for a nice touch. Don’t forget to sprinkle a bit of sea salt on top! You can boost flavor in many ways! Try adding chocolate chips to the cream cheese mix. This adds a rich touch. You could also fold in crushed nuts for a nice crunch. If you like fruit, consider a swirl of raspberry or blueberry puree. These additions can elevate your cheesecake bars and make them unique. Be creative and have fun with it! {{image_2}} You can enjoy these bars without gluten. Use gluten-free pretzels instead of regular ones. Many stores sell tasty gluten-free pretzel options. They create a great crust and keep the flavor. Always check labels to ensure they are truly gluten-free. This way, everyone can enjoy the treat together. Want to jazz up your cheesecake bars? Add chocolate or fruit flavors. You can mix in chocolate chips with the cream cheese. Dark or milk chocolate works well. If you love fruit, try adding fresh berries or banana slices. You can also swirl in fruit purees for a pop of color and taste. These add-ins give the bars a unique twist. Toppings can make your bars even better. Try crushed nuts for crunch. Pecans or almonds add a nice touch. You can also sprinkle colorful sprinkles on top for fun. Another idea is to add more salted caramel sauce for extra sweetness. These toppings can change the look and taste of your bars. Explore different options to find your favorite! To keep your salted caramel pretzel cheesecake bars fresh, store them in the fridge. Use an airtight container to prevent them from drying out. If you cut the bars, place parchment paper between each piece. This keeps them from sticking together. They will stay fresh for about 5 days in the fridge. If you want to save your bars longer, freezing works well. Cut the bars into squares first. Wrap each square in plastic wrap, then place them in a freezer-safe bag. Remember to remove as much air as possible. They can last in the freezer for up to 3 months. Thaw them in the fridge overnight before enjoying. Reheating is not necessary for these bars. They taste best chilled. If you prefer them slightly warm, microwave them for just 10-15 seconds. Be careful not to overheat, or the texture will change. Enjoy them as they are for the best taste experience! Salted caramel pretzel cheesecake bars can last up to a week in the fridge. Keep them in an airtight container to protect them from drying out. If you notice any change in texture or smell, it’s best to toss them out. Yes, you can make these bars a day or two ahead of time. They need time to chill and set properly. This makes them great for parties or gatherings. Just cover them well and store them in the fridge until you are ready to serve. If you need a substitute for cream cheese, try using Greek yogurt or mascarpone. Both options give a creamy texture. You can also use vegan cream cheese for a dairy-free version. Adjust the sweetness if needed. You learned about making delicious salted caramel pretzel cheesecake bars. We covered key ingredients, substitutions, and tips for quality selection. Step-by-step instructions showed you how to create a creamy texture while covering refrigeration's role. We also explored common mistakes, cutting techniques, and flavor options. As you try these tips and tricks, remember to safely store your bars for lasting enjoyment. Don’t hesitate to mix things up with different flavors or toppings. Now, you have the tools to make these treats a hit! Enjoy the process and share the results with friends!

Salted Caramel Pretzel Cheesecake Bars No-Bake Delight

Craving a treat that combines sweet, salty, and creamy all in one bite? You’re in the right place! My No-Bake

- 2 cups all-purpose flour - 1 tablespoon baking powder - 1 teaspoon baking soda - 1 teaspoon salt - ½ cup unsalted butter, chilled and cubed - 1 cup sharp cheddar cheese, shredded - 1 cup finely diced apples (such as Granny Smith) - ¼ cup honey - ¾ cup buttermilk - 1 tablespoon fresh thyme leaves - Alternative cheeses: You can use mozzarella or Gruyère for a milder taste. - Sweetener options: Maple syrup or agave can replace honey if you prefer. - Gluten-free flour options: Use a gluten-free blend to make these biscuits gluten-free. - Choosing the right apple: Granny Smith apples work best for a nice tart flavor. Other firm apples can work too, but avoid soft varieties. - The role of buttermilk in baking: Buttermilk adds moisture and tang, helping the biscuits rise and stay tender. - Fresh vs. dried thyme: Fresh thyme has a brighter taste, while dried thyme can be more concentrated. Use half the amount of dried if substituting. 1. Preheat your oven to 425°F (220°C). Line a baking sheet with parchment paper. This will help the biscuits not stick. 2. In a large bowl, mix the dry ingredients. Whisk together 2 cups of flour, 1 tablespoon of baking powder, 1 teaspoon of baking soda, and 1 teaspoon of salt until they are well combined. 3. Add the butter to the flour mix. Cut ½ cup of chilled, cubed butter into the dry mixture. Use your fingers or a pastry cutter to blend until it looks like coarse crumbs. 1. Knead the dough lightly. Turn the dough onto a floured surface. Pat it down into a rectangle about ¾ inch thick. 2. Create layers by folding. Fold the dough over itself a couple of times. This helps make the biscuits flaky. 3. Cut your biscuits. You can use a biscuit cutter for rounds or a knife for squares. Keep them about 2 inches apart on the baking sheet. 1. Bake the biscuits. Place the baking sheet in the oven and bake for 15-18 minutes. They should be golden brown on top when done. 2. Check for doneness. Look for a nice golden color. You can also tap the top; it should sound hollow. Now you're ready to enjoy these delicious Apple Cheddar Biscuits with Thyme Butter! To get the best dough, you want it to feel just right. Aim for a slightly sticky texture that holds together well. If it’s too dry, add a little more buttermilk. If it feels too wet, sprinkle in some extra flour. For flakiness, cold butter is key. Make sure your butter stays chilled until you mix it in. When you blend it into the flour, leave small chunks. This gives your biscuits those lovely layers. These biscuits shine when served warm with thyme butter. Slather it on right after they come out of the oven. You can also serve them with soups or salads. They pair well with a creamy tomato soup or a fresh green salad. For a fun twist, think about adding a sprinkle of cheese on top before baking. It adds a nice crust and extra flavor. If your biscuits turn out dense, check your measurements. Too much flour can weigh them down. Try using a kitchen scale for accuracy. For dry biscuits, ensure you use enough buttermilk. If they are still dry, consider adding a bit more honey for moisture. If your biscuits stick to the baking sheet, make sure to use parchment paper. It helps prevent sticking and makes cleanup easier. Should you notice burning, check your oven temperature. An oven thermometer can help ensure it’s accurate. Adjust the temperature down slightly if needed. {{image_2}} You can make Apple Cheddar Biscuits even better. Adding herbs or spices boosts flavor. Try rosemary or sage for a fresh twist. You can also mix in nuts or cranberries. Walnuts add crunch, while cranberries give a sweet-tart taste. Want to make these biscuits vegan? Use plant-based butter and almond milk instead of buttermilk. For a low-sugar option, swap honey for a sugar substitute. This keeps the flavor while reducing sugar. Choosing the right cheddar is key. Mild cheddar gives a softer taste, while sharp cheddar adds a strong flavor. You can even use flavored cheeses. Pepper jack or smoked cheddar brings new tastes to the dish. Experiment to find your favorite! To keep your leftover biscuits fresh, store them in an airtight container. This helps prevent them from drying out. If you have a lot, you can wrap them in plastic wrap before placing them in the container. I recommend using a glass or plastic container with a tight seal. If you want to enjoy these biscuits later, freezing is a great option. First, let the biscuits cool completely. Then, place them in a single layer on a baking sheet. Freeze them for about an hour until solid. After that, move them to a freezer bag or container. When you’re ready to eat, reheat them in the oven. Bake at 350°F (175°C) for about 10-15 minutes. This helps them regain their fluffy texture. At room temperature, these biscuits can last for about 2-3 days. Keep them in a cool, dry place. Watch for signs of spoilage, such as a hard texture, mold, or an off smell. If you notice any of these, it’s best to throw them away. Enjoy your delicious apple cheddar biscuits while they’re fresh! To add more flavor, you can mix in fresh herbs. Try rosemary or sage for a twist. You can also add spices like black pepper or paprika. A pinch of garlic powder brings depth too. Experiment with different types of cheese, like pepper jack or gouda. You can even add nuts or dried fruits for extra texture and taste. Yes, you can make these biscuits ahead of time. Prepare the dough and shape the biscuits. Then, wrap them in plastic wrap and chill in the fridge. This keeps them fresh until you are ready to bake. You can also freeze the shaped biscuits. Just thaw them in the fridge before baking. This works well for busy mornings or gatherings. To reheat leftover biscuits, preheat your oven to 350°F. Wrap the biscuits in foil to keep them moist. Heat in the oven for about 10-15 minutes. You can also microwave them for about 20 seconds. For best results, avoid overheating, as this can dry them out. Enjoy them warm with thyme butter for a tasty treat! These biscuits are easy to make and full of flavor. We covered key ingredients, substitutions, and tips for perfecting your bake. You learned how to prepare, shape, and store these treats. Now, you can customize them and troubleshoot common problems. With practice, you can impress your family and friends. Enjoy these biscuits with soup, salad, or just on their own. Happy baking, and don’t forget to share your results!

Apple Cheddar Biscuits with Thyme Butter Recipe

Looking for a tasty treat that’s perfect for brunch or just a snack? My Apple Cheddar Biscuits with Thyme Butter

- 1 cup all-purpose flour - 1/2 cup granulated sugar - 1/2 cup brown sugar, packed - 1/2 teaspoon baking powder - 1/2 teaspoon baking soda - 1 teaspoon ground cinnamon - 1/2 teaspoon ground nutmeg - 1/4 teaspoon ground ginger - 1/2 teaspoon salt The dry ingredients form the base of our cupcake. All-purpose flour gives structure. Granulated sugar adds sweetness, while brown sugar provides a rich flavor. Baking powder and baking soda help the cupcakes rise. The spices—cinnamon, nutmeg, and ginger—bring that warm, seasonal taste. Salt balances the sweetness. - 1/2 cup canned pumpkin puree - 1/2 cup vegetable oil - 2 large eggs - 1 teaspoon vanilla extract The wet ingredients are just as important. Canned pumpkin puree gives moisture and flavor. Vegetable oil keeps the cupcakes soft. Eggs add richness and help them rise. Vanilla extract enhances the overall taste. - 1 cup heavy whipping cream - 2 tablespoons powdered sugar - 1/2 teaspoon vanilla extract (for frosting) Whipped frosting is the crown on our cupcakes. Heavy whipping cream creates a light and fluffy texture. Powdered sugar sweetens the frosting, while vanilla adds a lovely aroma. This combination makes each bite delightful. - Preheat the oven to 350°F (175°C). - Line the muffin tin with cupcake liners. Start by warming your oven to 350°F. This step is key. It helps the cupcakes bake evenly. While your oven heats, grab a muffin tin and place cupcake liners inside. This makes for easy cleanup and adds a fun touch to your dessert. - Whisk together all dry ingredients in a large mixing bowl. In a big bowl, mix the dry ingredients. Combine flour, granulated sugar, brown sugar, baking powder, baking soda, cinnamon, nutmeg, ginger, and salt. Whisk them well. This mix gives your cupcakes that signature pumpkin pie flavor. Make sure there are no lumps for a smooth batter. - Mix the pumpkin puree, vegetable oil, eggs, and vanilla extract until smooth. In another bowl, combine the pumpkin puree, vegetable oil, eggs, and vanilla. Blend these ingredients until smooth. This mix adds moisture and flavor to your cupcakes. The pumpkin gives a rich taste and makes them fluffy. - Combine wet and dry ingredients and mix until just combined. Gently pour the wet mixture into the dry ingredients. Use a spatula to fold them together. Mix until just combined, being careful not to overmix. A few lumps are okay. This keeps the cupcakes light and airy. - Distribute batter into liners and fill two-thirds full. Spoon the batter into each cupcake liner. Fill them about two-thirds full. This allows room for the cupcakes to rise. It’s easy to get messy, but don’t worry; just keep it neat! - Bake for 18-20 minutes and cool in the tin for 5 minutes before transferring. Place your muffin tin in the oven. Bake for 18 to 20 minutes. Check if they are done by inserting a toothpick. If it comes out clean, they’re ready! Let them cool in the tin for five minutes. Then, move them to a wire rack to cool completely. - Beat whipping cream, add powdered sugar and vanilla until stiff peaks form. While the cupcakes cool, it’s time for the frosting. In a bowl, whip the heavy cream. As it thickens, add powdered sugar and vanilla extract. Keep beating until you see stiff peaks. This frosting is light, sweet, and the perfect topping. - Pipe or spread frosting on completely cooled cupcakes. Once your cupcakes are cool, it’s frosting time! You can pipe or spread the whipped frosting on top. Feel free to get creative here. Add a sprinkle of cinnamon or nutmeg for extra flair. You can even garnish with a slice of candied pumpkin. Enjoy your delicious treats! To achieve moist cupcakes, I recommend using room temperature eggs. Cold eggs can lead to uneven mixing. Also, do not overmix the batter. A few lumps are okay. This helps keep the cupcakes soft and fluffy. For the best whipped frosting, consider using cold mixing bowls. Cold bowls help the cream whip faster. Adjust the sugar based on your taste preference. You can make it sweeter or less sweet based on what you like. To make your cupcakes look amazing, garnish them with a sprinkle of cinnamon or nutmeg. You can also add a slice of candied pumpkin on top. This adds both flavor and a pop of color. {{image_2}} You can enhance your pumpkin pie cupcakes in fun ways. Adding chocolate chips gives a sweet surprise in every bite. Nuts like walnuts or pecans add a nice crunch. You can also mix in other spices, such as cloves, for a warm, spicy twist. These small changes can make your cupcakes unique. While whipped frosting is light and fluffy, you can try cream cheese frosting instead. It has a tangy flavor that pairs well with pumpkin. If you want to switch things up, you can add flavored extracts. Almond or maple extracts can bring a new taste to the frosting. Experimenting with these options can lead to delightful results. If you need a gluten-free dessert, you can easily modify this recipe. Just swap the all-purpose flour with a gluten-free blend. Make sure the blend is suitable for baking, as it will help your cupcakes rise and stay soft. This change allows everyone to enjoy these tasty treats without worry. To store your pumpkin pie cupcakes, keep them at room temperature in an airtight container. This method keeps them fresh for up to three days. If your home is warm, consider refrigerating them. In the fridge, they can last about a week. Just remember, the fridge can dry them out, so seal them well. You can freeze these cupcakes for longer storage. First, let them cool completely. Then, wrap each cupcake in plastic wrap. Place them in a freezer-safe bag or container. They will stay fresh for up to three months. When you're ready to eat them, take them out and let them thaw at room temperature for a few hours. If you have leftover whipped frosting, store it in the fridge. Place it in an airtight container. It can last for up to three days. When you are ready to use it again, whip it lightly to restore its texture. This will make it fluffy and easy to spread or pipe on your cupcakes. Yes, you can make these cupcakes ahead of time. Bake them a day or two before your event. After they cool, store them in an airtight container. Keep them at room temperature for best taste. You can frost them just before serving. This keeps the frosting fresh and fluffy. If you don’t have pumpkin puree, you can use butternut squash puree. It has a similar texture and flavor. You can also make homemade puree by cooking and blending pumpkin or squash. Just ensure it is smooth and thick for the best result. To make moist cupcakes, use room temperature eggs and oil. Do not overmix your batter; mix until just combined. Adding a bit more oil or even sour cream can help keep them moist. Also, try to bake them just until a toothpick comes out clean. Yes, you can use alternative sweeteners. Honey or maple syrup can replace sugar. Remember that these may change the texture a bit. Stevia or monk fruit sweetener can also work. Make sure to check the conversion rates for the best outcome. These pumpkin cupcakes are easy and fun to make. You learned about ingredients, steps, and tips for success. You can bake moist cupcakes with whipped frosting at home. Try different flavors and storage methods to keep them fresh. Don’t forget to make them your own! Enjoy the sweet results of your hard work. These cupcakes will impress everyone and make any occasion special. Embrace your baking skills and share your delicious treats!

Pumpkin Pie Cupcakes with Whipped Frosting Treat

Craving the perfect fall treat? These Pumpkin Pie Cupcakes with Whipped Frosting combine all the cozy flavors of classic pumpkin

- 1 lb large shrimp, peeled and deveined - 2 cups broccoli florets - 1 red bell pepper, sliced - 1 zucchini, sliced - 1 cup cherry tomatoes, halved - 4 cloves garlic, minced - 3 tablespoons olive oil - 1 tablespoon Italian seasoning - 1 teaspoon red pepper flakes (optional) - Salt and pepper, to taste - Fresh parsley, chopped (for garnish) - Lemon wedges (for serving) Gathering the right ingredients is key to making the Garlic Herb Shrimp & Veggie Bake. Start with large shrimp. They should be peeled and deveined for the best taste. You can find them at most grocery stores. Next, choose fresh vegetables. Broccoli florets add crunch and color. A red bell pepper gives sweetness and brightness. Zucchini is soft and mild, while cherry tomatoes add juicy bites. For flavor, garlic is a must. You will use fresh garlic, not powdered. Olive oil is your base for the seasoning. It keeps the shrimp and veggies moist while baking. Italian seasoning brings warmth and depth. Red pepper flakes are optional, but they give a nice kick. Don't forget salt and pepper; they enhance all the flavors. Finally, garnishes like parsley and lemon wedges brighten the dish. The parsley adds a fresh touch, and lemon juice gives a zesty finish. Make sure to have these ready before you start cooking. - Preheating the Oven First, set your oven to 400°F (200°C). This ensures even cooking. A hot oven helps the shrimp cook fast. - Preparing the Vegetables and Shrimp Next, gather your fresh veggies and shrimp. You need 1 pound of large shrimp that is peeled and deveined. For veggies, use 2 cups of broccoli florets, 1 sliced red bell pepper, and 1 sliced zucchini. Don’t forget 1 cup of halved cherry tomatoes. Place all these in a big bowl. - Whisking the Olive Oil Mixture In a small bowl, mix 4 minced garlic cloves with 3 tablespoons of olive oil. Add 1 tablespoon of Italian seasoning, 1 teaspoon of red pepper flakes (if you want some heat), salt, and pepper to taste. Whisk this well until combined. - Tossing & Spreading on Baking Sheet Pour this olive oil mix over your shrimp and veggies. Toss everything together so each piece gets coated. Then, spread the mixture evenly on a large baking sheet. - Baking Time and Temperature Bake in your preheated oven for 15 to 20 minutes. You want the shrimp to turn pink and the veggies to become tender. Keep an eye on it to avoid overcooking. - Squeezing Lemon Juice Once baked, take the pan out of the oven. Squeeze fresh lemon juice all over the dish. This adds brightness and flavor. - Garnishing with Parsley Finally, sprinkle chopped fresh parsley on top. This gives your meal a nice pop of color and a fresh taste. Ensuring Even Cooking To make sure everything cooks just right, spread the shrimp and veggies evenly on the baking sheet. This helps them cook at the same pace. If they are too crowded, some may get soggy. Try to keep space between each piece. Avoiding Overcooked Shrimp Shrimp cooks fast, so watch it closely. Bake for 15 to 20 minutes, until they turn pink. If they cook too long, they can become rubbery. If you see them getting bright orange, take them out right away. Creative Plating Ideas For a fun look, serve the dish right on the baking sheet. It gives a rustic vibe. You can also use a big platter and arrange the shrimp and veggies neatly. Add lemon wedges around for color and zest. Pairing with Side Dishes This dish goes well with many sides. Try a simple green salad or some crusty bread. Rice or quinoa also works great. They soak up the tasty juices nicely. Adding Other Vegetables Feel free to mix in your favorite veggies. Asparagus, carrots, or snap peas can add nice colors and flavors. Just chop them to match the cooking time of the shrimp. Spice Level Adjustments If you like heat, add more red pepper flakes. You can also use hot sauce or fresh jalapeños. For a milder taste, skip the red pepper or use sweet bell peppers instead. Adjust to fit your taste! {{image_2}} You can easily swap shrimp for other proteins. Chicken is a great choice. Use boneless chicken thighs or breasts cut into bite-sized pieces. Cook them the same way as shrimp. Tofu works too. Use firm or extra-firm tofu. Press it first to remove moisture. Cut it into cubes and toss it in the same garlic herb mix. For seafood lovers, try scallops or even fish fillets. White fish like cod or tilapia holds up well when baked. Just adjust the cooking time. Fish cooks faster than shrimp, so keep an eye on it. Using seasonal vegetables adds fun and flavor. In spring, add asparagus or peas. In summer, try bell peppers and corn. Fall is perfect for squash or Brussels sprouts. Winter calls for hearty veggies like carrots and sweet potatoes. Feel free to swap any of the vegetables in the recipe. Broccoli can easily be replaced with green beans. Zucchini can be switched with eggplant. Just make sure your choices match the cooking time. Fresh herbs can change the entire dish. Instead of Italian seasoning, try fresh basil or cilantro. Parsley adds a nice touch, but thyme or rosemary can also work well. Use what you love or have on hand. Spice lovers can play with the heat. Add more red pepper flakes or a dash of cayenne. You can also use smoked paprika for a different flavor. If you prefer a sweeter taste, sprinkle some brown sugar or honey on the veggies. Mixing flavors keeps each bake exciting! To keep your Garlic Herb Shrimp and Veggie Bake fresh, use airtight containers. Let the dish cool down before sealing it. This helps prevent moisture buildup. Store it in the fridge for up to three days. If you want to keep it longer, freezing is a great option. To freeze your leftovers, first, let them cool completely. Then, portion them into freezer-safe bags or containers. Be sure to remove as much air as possible. Label each bag with the date. Properly stored, it can last for up to three months. When you’re ready to enjoy it again, thaw it overnight in the fridge. When it’s time to reheat, I recommend using the oven. Preheat your oven to 350°F (175°C). Spread the shrimp and veggies on a baking sheet. Bake for about 10-15 minutes. This method keeps the texture nice. You can also use a microwave. Just heat in short bursts. Stir and check often to avoid overcooking. Enjoy your meal warm and tasty! Bake Garlic Herb Shrimp & Veggie Bake for 15 to 20 minutes at 400°F. Check that the shrimp turns pink and the veggies become tender. Thin shrimp cook fast, so keep an eye on them. Yes, you can prep this dish ahead of time. Chop veggies and marinate shrimp in the garlic mixture. Store them in the fridge for up to 24 hours. When ready, spread them on a baking sheet and bake. Pair this dish with rice or quinoa for a filling meal. A simple green salad is also great. For drinks, try a crisp white wine or sparkling water with lemon. For more heat, add extra red pepper flakes to the oil mix. You can also use a spicy seasoning blend or hot sauce. Another option is to include diced jalapeños with the veggies. This blog post covered a simple, tasty Garlic Herb Shrimp and Veggie Bake. We discussed key ingredients, step-by-step instructions, and useful tips to ensure great results. You can adjust flavors and swap ingredients based on what you have. Storing and reheating tips help keep your dish fresh. Now you have all the knowledge needed to create a delicious, versatile meal. Enjoy cooking and sharing it with others!

Garlic Herb Shrimp & Veggie Bake Sheet Pan Delight

Are you ready to savor a quick and tasty meal? My Garlic Herb Shrimp & Veggie Bake Sheet Pan Delight

- 2 cups cooked chicken, shredded - 1/2 cup peanut butter - 1/4 cup soy sauce - 2 tablespoons honey - 1 tablespoon sriracha (or to taste) - 1 tablespoon sesame oil - 1 cup shredded carrots - 1 red bell pepper, thinly sliced - 1 cucumber, julienned - 4 large lettuce leaves (like romaine or butter lettuce) - Chopped cilantro for garnish - Crushed peanuts for garnish I love using fresh ingredients. Fresh veggies add crunch and flavor. They make the wraps vibrant and tasty. You can buy fresh chicken or cook it yourself. Store-bought rotisserie chicken saves time. It’s great when you’re busy. Fresh peanut butter gives a rich taste. If you use store-bought, check the label for quality. Look for natural ingredients without added sugar. Garnishes add fun to your wraps. Chopped cilantro gives a fresh kick. Crushed peanuts add crunch and flavor. You can also sprinkle sesame seeds for extra texture. For more heat, add sliced jalapeños. These extras make the dish special. Feel free to mix and match based on what you like! First, gather all your ingredients. You need cooked chicken, peanut butter, soy sauce, honey, sriracha, sesame oil, carrots, bell pepper, cucumber, and lettuce. 1. In a mixing bowl, add peanut butter, soy sauce, honey, sriracha, and sesame oil. 2. Whisk until the mixture is smooth and well blended. 3. In another bowl, toss the shredded chicken with half of the peanut sauce. Make sure the chicken is evenly coated. 4. Set aside the rest of the sauce for later. To make great wraps, choose fresh and crispy lettuce leaves. Romaine or butter lettuce works well. 1. Lay one lettuce leaf flat on a clean surface. 2. Place a portion of the peanut chicken in the center of the leaf. 3. Add a layer of shredded carrots, sliced bell pepper, and cucumber. 4. Fold the sides over the filling. 5. Roll it up tightly from the bottom to form a wrap. 6. Repeat with the rest of the ingredients. Serving these wraps is easy and fun. Place the wraps on a platter. Drizzle the reserved peanut sauce over the top. 1. Garnish with chopped cilantro and crushed peanuts for added flavor. 2. You can also serve them with a side of extra peanut sauce for dipping. These wraps are great for parties or quick meals. Enjoy the mix of fresh veggies and spicy peanut sauce! To make a great peanut sauce, use smooth peanut butter. Mix it well with soy sauce, honey, sriracha, and sesame oil. Whisk until it looks creamy and smooth. Taste it! Adjust the sriracha for your spice level. A little heat adds fun. This sauce is key for flavor in your wraps. To save time, use pre-cooked chicken. Shredded rotisserie chicken works well. You can also chop veggies quickly. Use a knife or a food processor for speed. Prepping your ingredients ahead helps too. Lay everything out before you start. This way, you can make the wraps fast, in just 15 minutes! Watch out for overfilling your wraps. Too much filling makes them hard to roll. Keep the toppings light and balanced. Also, don’t skip the reserved peanut sauce. It adds flavor when you serve your wraps. Lastly, ensure your lettuce is fresh. Wilted leaves won’t hold your wrap together well. {{image_2}} You can easily make these wraps vegetarian. Use cooked tofu instead of chicken. Tofu absorbs flavors well, just like chicken. For a vegan option, swap honey with maple syrup. You can also add more veggies, like bell peppers and zucchini, to boost taste and texture. Don’t have peanut butter? Try almond butter or cashew butter. Both give a nutty flavor and creamy texture. If you want less salt, use low-sodium soy sauce. For a gluten-free choice, use tamari sauce. Feel free to customize based on what you have at home. Want to change the protein in your wraps? You can use shrimp or beef for a twist. Simply cook them in a pan with a bit of sesame oil. For a lighter option, grilled chicken breast works great. Remember to keep the flavors balanced with the peanut sauce. To keep your spicy Thai peanut chicken wraps fresh, wrap them tightly. Use plastic wrap or foil. This method helps avoid air exposure, which can make them soggy. Store them in the fridge for the best taste. If you have leftover peanut sauce, store it in a sealed container. Keeping the sauce separate helps maintain the wraps' crunch. If you want to enjoy the wraps warm, it's easy to reheat. Remove them from the fridge and unwrap them. Place the chicken filling in a bowl and microwave it for about 30 seconds. Check the temperature and heat more if needed. After warming, you can reassemble the wrap with fresh lettuce and veggies. This keeps the wrap crisp and tasty. These wraps stay good for about three days in the fridge. After three days, the ingredients may not taste as fresh. If you notice any change in smell or color, it’s best to toss them out. For the best flavor, enjoy them within the first two days. This way, you get all the yummy taste of the spicy Thai peanut chicken wraps. Yes, you can make these wraps ahead of time. Wraps are best when fresh. If you prep the chicken and sauce in advance, store them in separate containers. Keep the veggies and lettuce separate too. When you are ready to eat, just assemble the wraps. This keeps everything crisp and tasty. You can serve many things with these wraps. Here are a few ideas: - Fresh fruit like mango or pineapple - A light salad with cucumber and lime - Rice noodles for a filling side - Steamed broccoli or snap peas These sides add color and fun to your meal. To make the wraps spicier, add more sriracha to the sauce. You can also sprinkle chili flakes on top. If you want the wraps milder, cut back on sriracha. Try using less sauce or swap it for a plain peanut butter. Taste as you go to get it just right. In this blog post, we explored the key ingredients and step-by-step methods for making delicious wraps. We discussed how fresh ingredients can elevate your meal, while optional garnishes can add extra flair. You learned tips for perfect peanut sauce and common mistakes to avoid. Don't forget the variations, like vegan options or different proteins, to suit your taste. Lastly, I shared storage tips to keep leftovers fresh. Dive into making your wraps, and enjoy the flavors!

Spicy Thai Peanut Chicken Wraps Quick and Easy Recipe

Looking for a quick and tasty meal? These Spicy Thai Peanut Chicken Wraps are your answer! In just 15 minutes,

To make BBQ pulled chicken sliders, you need: - 2 lbs boneless, skinless chicken breasts - 1 cup BBQ sauce (your favorite brand or homemade) - 1 tablespoon apple cider vinegar - 1 tablespoon smoked paprika - 1 teaspoon garlic powder - 1 teaspoon onion powder - 1/2 teaspoon black pepper - 1/2 teaspoon salt - 1/4 teaspoon cayenne pepper (optional, for heat) - 12 slider buns You can add fun toppings to your sliders: - Coleslaw - Pickles Choosing the right BBQ sauce is key. Here are my favorites: - Sweet and smoky sauce for a classic taste. - Spicy chipotle for a kick. - Tangy vinegar-based sauce for a zing. Experiment with flavors to find what you love best! Start by rinsing the chicken breasts under cold water. Pat them dry with paper towels. This step is key for a tasty dish. Place the chicken directly into your slow cooker. Make sure they fit well and do not overlap. In a small bowl, gather your ingredients for the sauce. Combine 1 cup of BBQ sauce, 1 tablespoon of apple cider vinegar, and 1 tablespoon of smoked paprika. Add 1 teaspoon of garlic powder, 1 teaspoon of onion powder, 1/2 teaspoon of black pepper, and 1/2 teaspoon of salt. If you like spice, include 1/4 teaspoon of cayenne pepper. Stir until everything mixes smoothly. This sauce will be flavorful and sticky. Pour the sauce over the chicken in the slow cooker. Make sure the chicken is well coated. Cover the slow cooker with its lid. Cook on low for 6-7 hours or high for 3-4 hours. The chicken should become tender and easy to shred. This long cooking time gives the chicken flavor and keeps it juicy. When the chicken is done, take it out of the slow cooker. Use two forks to shred the chicken into bite-sized pieces. Return the shredded chicken to the slow cooker. Mix it with the remaining sauce for about 10 minutes. This helps the chicken soak up all the flavors. While this happens, toast your slider buns lightly. Assemble your sliders by placing a generous amount of pulled chicken on each bun. You can add coleslaw and pickles on top if you want. Enjoy your delicious BBQ pulled chicken sliders! Cooking in a slow cooker is easy and fun. Here are some tips to get it right: - Always use fresh, high-quality chicken. This gives the best flavor. - Don’t crowd the slow cooker. Leave space for heat to circulate. - Keep the lid closed. Opening it lets heat out and slows cooking. - Adjust cooking time based on your slow cooker. Some cook faster than others. Shredding chicken can be simple if you follow these steps: - Let the chicken cool for a few minutes after cooking. - Use two forks to pull the chicken apart. - For a quicker method, you can use a stand mixer. Just mix on low speed! - Mix the shredded chicken back into the sauce for more flavor. Marinades add a lot of taste to your chicken. Here’s how to use them: - Soak the chicken in your BBQ sauce overnight for extra flavor. - Add spices like cumin or chili powder to your marinade for depth. - Use vinegar or citrus juice to help tenderize the meat. - Experiment with different sauces for unique flavors each time! {{image_2}} You can change the taste of your pulled chicken by using different BBQ sauces. Each sauce brings its own unique flavor. For a sweet taste, try a honey BBQ sauce. For a tangy kick, use a vinegar-based sauce. You can also try a spicy sauce with chipotle or jalapeño for heat. If you love smoky flavors, opt for a sauce that has mesquite or hickory. Mix and match these sauces to create your own BBQ style. If you want a meatless option, there are great substitutes. Use jackfruit as a stand-in for chicken. It shreds easily and takes on flavor well. For a protein boost, try using lentils or chickpeas. You can cook them in BBQ sauce just like the chicken. Tofu is another good option. Press it to remove water, then cube and cook in your favorite BBQ sauce. These options keep the sliders tasty and satisfying. When serving these sliders, think about fun toppings. Coleslaw adds crunch and freshness. Pickles give a nice tang. You could also add sliced jalapeños for extra heat. For a zesty twist, try adding avocado or guacamole. Pair these sliders with baked sweet potato fries or a fresh salad for a complete meal. Having fun with toppings and sides makes this dish even more enjoyable! To store leftover BBQ pulled chicken, let it cool first. Place it in an airtight container. Make sure to remove as much air as possible. This helps keep the chicken fresh. You can store it in the fridge for up to four days. If you want it to last longer, freezing is a great option. When you're ready to eat, reheating is simple. You can use the microwave or stovetop. For the microwave, place the chicken in a bowl. Heat it in short bursts, stirring in between. For the stovetop, warm it in a skillet over low heat. Add a splash of water or BBQ sauce to keep it moist. This will make sure your chicken stays tasty and juicy. If you decide to freeze your pulled chicken, it’s best to do this right after cooking. Divide it into portions for easy meals later. Use freezer-safe bags or containers. Label them with the date and contents. Pulled chicken can last up to three months in the freezer. When you're ready to enjoy it, thaw it overnight in the fridge before reheating. This keeps the flavors fresh and delicious. Yes, you can use frozen chicken breasts. Just remember to add extra cooking time. Cook on low for 8-9 hours or high for 4-5 hours. This helps ensure the chicken cooks fully and stays juicy. To make BBQ sauce from scratch, mix these simple ingredients: - 1 cup ketchup - 1/4 cup apple cider vinegar - 1/4 cup brown sugar - 1 tablespoon Worcestershire sauce - 1 teaspoon garlic powder - 1 teaspoon onion powder - Salt and pepper to taste Combine all these in a pot over medium heat. Stir until warm and combined. This sauce adds a fresh, homemade touch to your sliders. Great sides to serve with sliders include: - Coleslaw - Potato salad - Sweet potato fries - Corn on the cob - Chips and salsa These sides complement the flavors of the pulled chicken and add variety to your meal. You can store leftovers in the fridge for up to 4 days. Keep the pulled chicken in an airtight container. For longer storage, freeze it for up to 3 months. Just thaw in the fridge before reheating. You now have all the tools to make great pulled chicken. We covered the main ingredients, tasty toppings, and the best BBQ sauces. Step-by-step, you learned how to cook chicken slowly, mix sauce, and serve it with care. I shared tips for cooking, shredding, and making flavors pop. Plus, we explored fun variations and how to store and reheat your meal. With these steps, I hope you feel ready to create a delicious dish. Enjoy making tasty pulled chicken for your friends and family!

BBQ Pulled Chicken Sliders Slow Cooker Delight

Are you ready to treat yourself to an easy, mouthwatering meal? In this blog post, I’ll show you how to

Older posts
Newer posts
← Previous Page1 … Page14 Page15 Page16 … Page84 Next →

dsad

© 2026 Lisa Dishes • Built with GeneratePress

Our Policies

  • Copyright Policy
  • Cookie Policy
  • GDPR Policy
  • Privacy Policy
  • Disclaimer
  • Terms Of Use

More Information

  • Home
  • About
  • Contact
  • Appetizers
  • Dessert
  • Dinner
  • Drinks
©2026, Lisa Dishes About Back To Top