Skip to content
DisclaimerTerms Of UseGDPR PolicyCookie Policy

Lisa Dishes

  • Home
  • Drinks
  • Appetizers
  • Dinner
  • Dessert
  • About
  • Contact
  • Privacy Policy
DisclaimerTerms Of UseGDPR PolicyCookie Policy

NO-ING-IMG

- 4 cups all-purpose flour - 1 packet active dry yeast (2 1/4 teaspoons) - 1/2 cup warm milk - 1/4 cup granulated sugar - 1/2 cup unsalted butter, melted - 1/2 teaspoon salt - 2 large eggs - 2 large apples, peeled and diced - 1/2 cup brown sugar - 2 teaspoons ground cinnamon - 1/4 cup unsalted butter, softened - 1 cup brown sugar - 1/2 cup heavy cream - 1/4 cup unsalted butter - 1 teaspoon vanilla extract - Pinch of salt Creating caramel apple cinnamon rolls starts with these essential ingredients. You need to prepare the dough first. Start with flour and yeast. Warm milk helps bring the yeast to life. Add sugar to sweeten your dough. Melted butter gives it richness. Salt enhances all the flavors. Finally, eggs add structure and moisture. Next comes the filling. Choose two large apples. They should be firm and sweet, like Honeycrisp or Granny Smith. Diced apples mix well with brown sugar and cinnamon. This mixture will give your rolls a warm, spicy flavor. Softened butter makes it easy to spread over the dough. Lastly, the caramel sauce ties everything together. Brown sugar creates a deep sweetness. Heavy cream adds richness and a smooth texture. Butter helps the sauce thicken, while vanilla extract gives a lovely aroma. A pinch of salt brightens all the flavors. These ingredients come together to make a soft and sweet delight. You can imagine the aroma filling your kitchen as they bake. 1. Combine milk, sugar, and yeast: In a big bowl, mix warm milk, sugar, and yeast. Let it sit for about 5 to 10 minutes. You want it to get frothy. This means the yeast is alive and ready to work. 2. Add melted butter, salt, and eggs: Next, add the melted butter, salt, and eggs to your yeast mix. Stir until combined. 3. Knead the dough until smooth: Gradually add the flour to the mixture. Knead the dough for about 5 to 7 minutes on a floured surface. When it feels smooth and elastic, it’s ready. 4. Let it rise: Place the dough in a greased bowl. Cover it with a kitchen towel. Let it rise in a warm spot for about 1 hour. It should double in size. 1. Mix diced apples with sugar and cinnamon: In a medium bowl, combine the diced apples with brown sugar and cinnamon. Set this aside. 2. Make the caramel sauce on the stovetop: In a saucepan over medium heat, mix brown sugar, heavy cream, butter, vanilla extract, and a pinch of salt. Stir until it thickens and is smooth. Remove from heat. 1. Roll out the dough and spread apple filling: Once the dough has risen, punch it down. Roll it out on a floured surface into a rectangle, about 1/2 inch thick. Spread the softened butter over the dough. Then sprinkle the apple mixture evenly across the top. 2. Cut and arrange the rolls in the baking dish: Roll the dough tightly from one long edge to the other. Cut the log into 12 equal slices. Place these rolls in a greased 9x13 inch baking dish. 3. Let rise and bake until golden brown: Pour half of the caramel sauce into the bottom of the dish. Place the sliced rolls on top and pour the rest of the sauce over them. Cover the dish with a towel and let the rolls rise again for 30 minutes. Preheat the oven to 350°F (175°C). Bake for 25 to 30 minutes, or until they turn golden brown. These steps lead you to warm, sweet rolls full of caramel and apples. Using warm milk helps activate the yeast. This step gives your rolls a nice rise. Make sure the milk is not too hot. A temperature around 110°F works well. Kneading the dough properly is key. I like to knead for about 5 to 7 minutes. You want the dough to feel smooth and elastic. If it sticks to your hands, use a little flour. Choosing the right apples makes a big difference. I recommend using sweet apples like Fuji or Honeycrisp. These apples hold their shape and add great flavor. To make the caramel sauce smooth, stir constantly as it cooks. This helps avoid lumps. If it gets too thick, add a splash of cream to loosen it up. For toppings, a sprinkle of cinnamon adds warmth. A scoop of vanilla ice cream pairs perfectly. You can also drizzle extra caramel sauce on top for a sweet touch. To present your caramel apple cinnamon rolls, place them on a nice plate. Arrange them in a circle and drizzle caramel over each roll. This makes for a lovely display that is sure to impress! {{image_2}} You can make these rolls gluten-free. Simply replace all-purpose flour with a gluten-free flour blend. Choose a blend that works well for baking. Look for one with xanthan gum added for better texture. This swap keeps the rolls soft and tasty. If you want a vegan version, it's easy to swap out dairy and eggs. Use almond milk or oat milk instead of regular milk. For the butter, try coconut oil or vegan butter. Replace eggs with flaxseed meal mixed with water. This keeps the dough moist and fluffy. Want to jazz up your rolls? Add some nuts, like chopped pecans or walnuts, for crunch. You can also mix in dried fruits, such as raisins or cranberries, for sweetness. Try adding extra spices like nutmeg or ginger for a warm flavor boost. To store leftover caramel apple cinnamon rolls, let them cool first. Place them in an airtight container. You can keep them at room temperature for up to two days. This keeps them soft and sweet. For longer shelf life, refrigerate them. In the fridge, they stay fresh for about a week. Just make sure to wrap them tightly. This helps prevent them from drying out. When it’s time to enjoy your rolls again, you want them warm. The best way is to use the oven. Preheat it to 350°F (175°C). Place the rolls on a baking sheet. Cover them with foil to keep them moist. Heat for about 10-15 minutes. You can also microwave them for a quick fix. Just warm them for 15-20 seconds. Check to see if they are hot enough. If you want to save some rolls for later, freezing is a great option. First, let the rolls cool completely. Wrap each roll in plastic wrap. Then, place them in a freezer bag. Remove as much air as possible. This helps keep them fresh. You can freeze them for up to three months. When you're ready to eat, thaw them overnight in the fridge. Reheat them as described above to enjoy that fresh-baked taste again! To check if the rolls are done, look for a golden brown color. The rolls should also feel firm to the touch. You can use a thermometer for a precise check. The inside temperature should be about 190°F (88°C). If you see these signs, your rolls are ready to enjoy! Yes, you can make the dough ahead of time. After kneading, let it rise for one hour. Then, punch it down and wrap it tightly in plastic wrap. Store it in the fridge for up to 24 hours. When you're ready, take it out and let it warm up before rolling it out. You can swap some ingredients for others based on your needs. If you have allergies, use gluten-free flour instead of all-purpose flour. For a dairy-free option, try almond milk and vegan butter. If you want a twist, add nuts or dried fruit to the filling. In this blog post, we explored how to make delicious caramel apple cinnamon rolls. We went through each step, from mixing the dough to baking the rolls. I shared tips for perfecting your dough and enhancing flavor. Remember, you can make this recipe gluten-free or vegan too. Store leftovers properly to keep them fresh. Enjoy baking these tasty rolls, and impress your friends and family with your delicious creation. Happy baking!

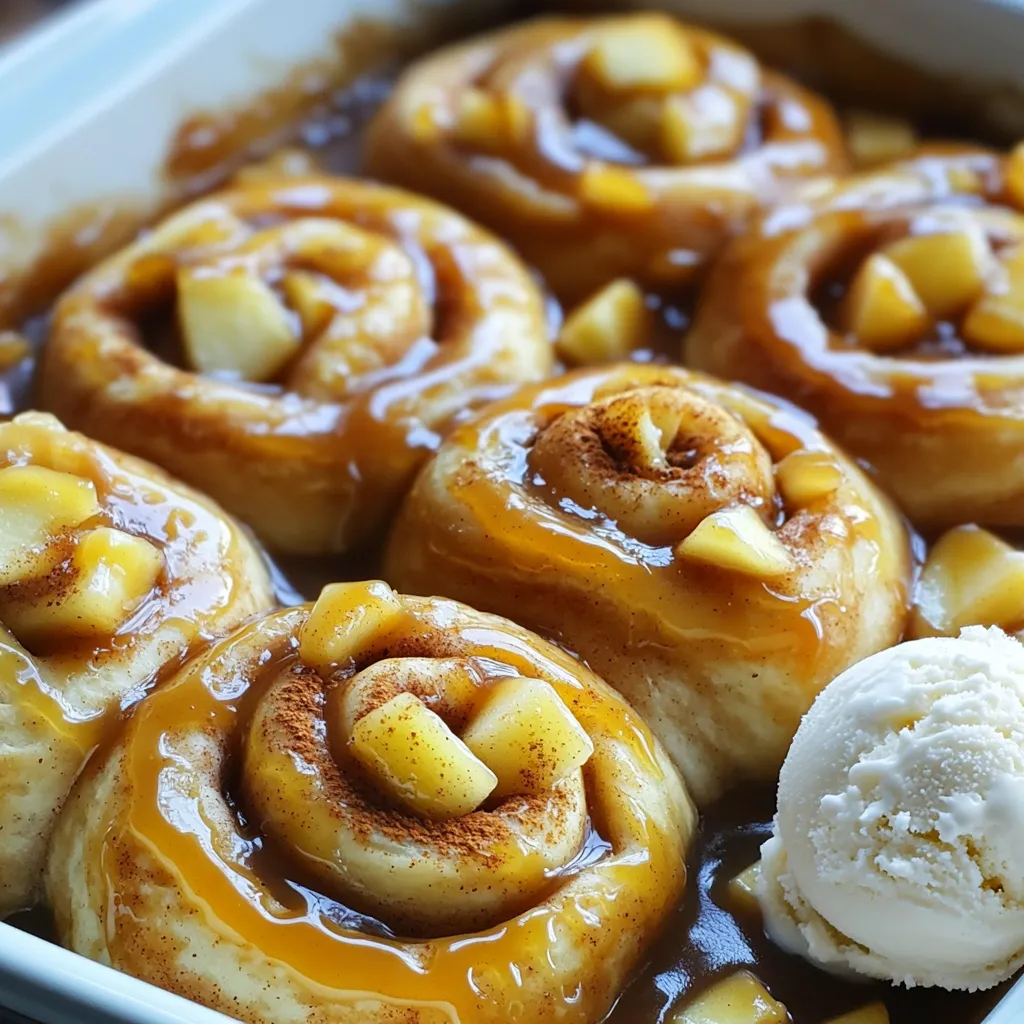
Caramel Apple Cinnamon Rolls Soft and Sweet Delight

Get ready to treat yourself to the ultimate comfort food: caramel apple cinnamon rolls! Picture soft, warm dough filled with

- 12 oz fettuccine pasta - 4 cups fresh spinach, roughly chopped - 2 tablespoons olive oil - 3 cloves garlic, minced The main ingredients create the heart of this dish. Fettuccine pasta gives you a nice, thick noodle that holds sauce well. Fresh spinach adds a pop of color and nutrients. Olive oil brings richness and flavor, while garlic adds a savory kick. - 1 cup heavy cream - 1 cup grated Parmesan cheese The dairy ingredients give this dish a creamy base. Heavy cream makes the sauce rich and smooth. Grated Parmesan cheese adds a nutty flavor that pairs perfectly with the cream. Together, they create that dreamy Alfredo texture. - 1 cup vegetable broth - 1/2 teaspoon nutmeg - Salt and pepper to taste Seasonings and liquids help balance the flavors. Vegetable broth adds depth to the sauce. Nutmeg enhances the creaminess and adds warmth. Salt and pepper are key to making all the flavors shine. Adjust them to your taste for the best result. 1. Sautéing garlic and heating oil Start by heating 2 tablespoons of olive oil in a large pot over medium heat. Once the oil is hot, add 3 cloves of minced garlic. Sauté the garlic for about 1 minute. You want it fragrant but not browned. Watch closely to avoid burning. 2. Mixing in liquids and ensuring pasta is submerged After the garlic is ready, pour in 1 cup of heavy cream and 1 cup of vegetable broth. Stir well to combine these liquids. Now, add 12 ounces of fettuccine pasta to the pot. Make sure the pasta is fully submerged in the mixture. This step is key for even cooking. 1. Boiling pasta and cooking time Bring the mixture to a gentle boil. Once it starts boiling, lower the heat and cover the pot. Cook the pasta for about 10-12 minutes. Stir occasionally to prevent sticking. The pasta should be al dente when done. 2. Stirring in spinach and cheese When the pasta is cooked, add 4 cups of roughly chopped fresh spinach and 1 cup of grated Parmesan cheese. Stir until the cheese melts and the spinach wilts. This adds a creamy texture and rich flavor to your dish. 1. Adjusting sauce consistency If you find the sauce too thick, don't worry! Simply add a bit more vegetable broth or a splash of water. Stir well until you reach your desired sauce consistency. 2. Serving suggestions with garnishes Serve the pasta hot, and don’t forget to garnish! Add freshly cracked black pepper and more Parmesan cheese on top. This adds a nice touch and extra flavor. Enjoy your creamy delight! How to avoid overcooking pasta To keep your pasta al dente, watch the clock. Cook it for 10-12 minutes. Stir it every few minutes. This helps it cook evenly. If you taste a piece and it’s firm, then it’s ready. If it's mushy, you've cooked it too long. Remember, it will cook a bit more after you add the spinach and cheese. Best practices for sautéing garlic Sauté garlic on medium heat. This helps it release its flavor without burning. Add it to the oil and stir for about one minute. As soon as you smell that rich aroma, you know it’s time to add the liquids. If it turns brown, it will taste bitter, so keep a close eye on it. Additional spices to try You can add a pinch of red pepper flakes for heat. A bit of dried basil or oregano can also bring extra flavor. Nutmeg adds warmth, but don’t overdo it. Just half a teaspoon is perfect in this dish. You can always adjust to your taste. Suggestions for adding protein To make this dish heartier, consider adding cooked chicken or shrimp. You can also use chickpeas for a plant-based option. Just mix them in when you add the spinach. This way, they will warm up while the spinach wilts. Ideal cookware for one-pot meals Use a large pot or a Dutch oven. These types of cookware distribute heat evenly. They also give you enough space to stir without splashing. A lid is important for cooking pasta, so make sure your pot has one. Tools for easy cleanup A wooden spoon is ideal for stirring. It won’t scratch your pot and is sturdy. Have a measuring cup handy for the broth and cream. A spatula can help scrape any bits stuck to the bottom. Finally, a plate for serving makes it easy to share this tasty meal. {{image_2}} You can make this dish work for your needs. If you want gluten-free pasta, use rice or quinoa pasta. These options cook well and taste great. For a dairy-free version, swap heavy cream with coconut cream or cashew cream. Nutritional yeast can replace Parmesan cheese for a cheesy flavor without dairy. To make this dish even better, you can add more veggies. Try mushrooms, bell peppers, or cherry tomatoes. These add color and taste. Fresh herbs like basil or parsley can also boost the flavor. If you crave something different, mix in a jar of pesto or a splash of marinara sauce for a new twist. To save time, you can make this meal ahead. Cook the pasta and sauce, then store them in separate containers. This keeps everything fresh. When you're ready to eat, just heat them on the stove or in the microwave. Add a splash of broth if the sauce gets too thick during reheating. Enjoy the comfort of this creamy dish any time! To keep your One Pot Spinach Alfredo Pasta fresh, store it in an airtight container. Let it cool before sealing. It lasts up to three days in the fridge. Always reheat only what you plan to eat. If you want to freeze the pasta, let it cool first. Place it in a freezer-safe container. It stays good for about two months. To thaw, move it to the fridge overnight. Reheat in a pot over low heat, adding a splash of broth to keep it creamy. For easy lunches, pack individual servings in small containers. You can also add a side salad or bread for a complete meal. Consider using mason jars for fun and easy transport. Can I use a different type of pasta? Yes, you can use other pasta types. Bowtie or penne work well too. Just keep an eye on the cooking time. Thinner pasta cooks faster, while thicker pasta takes longer. How can I make this dish spicier? To add heat, try red pepper flakes or a splash of hot sauce. You can also use spicy sausage or jalapeños for a bigger kick. Start small, then taste and adjust as needed. Is this dish suitable for vegetarians? Yes, this dish is vegetarian-friendly. It contains no meat, just fresh spinach and cheese. If you want to make it vegan, swap heavy cream and Parmesan for dairy-free options. What is the calorie count per serving? This dish has about 500 calories per serving. It includes pasta, cream, and cheese, which contribute to the calorie count. To reduce calories, you can cut down on the cheese or use less cream. What if I don't have nutritional yeast or Parmesan? If you lack these ingredients, use any hard cheese you have. Grated mozzarella or cheddar can work too. Nutritional yeast adds a cheesy flavor, so you can skip it or use more spices. How to adjust cooking time for larger servings? For more servings, increase the liquid and pasta proportionally. Cooking time may stay the same, but check for doneness. Stir more often to avoid sticking. This blog post covered a delicious fettuccine recipe using fresh ingredients. We explored how to prepare, cook, and add your favorite flavors. You learned tips on avoiding overcooked pasta and using the right tools. We also discussed variations and storage methods to enjoy this dish later. In the kitchen, creativity matters. Don't hesitate to mix things up and make this your own! Enjoy your cooking journey.

One Pot Spinach Alfredo Pasta Rich and Creamy Delight

Are you ready to whip up a meal that’s both rich and creamy? This One Pot Spinach Alfredo Pasta is

Here is what you need for a tasty mocha peanut butter smoothie: - 1 ripe banana - 1 cup brewed coffee, cooled - 2 tablespoons natural peanut butter - 1 tablespoon cocoa powder - 1 tablespoon honey or maple syrup - 1/2 cup milk (dairy or non-dairy) - 1/2 cup ice cubes - A pinch of salt - Optional: Whipped cream and cocoa nibs for topping Each ingredient plays a big role in flavor and texture. The ripe banana gives natural sweetness and creaminess. The cooled coffee adds that rich mocha flavor. Natural peanut butter gives a nutty taste and pairs well with cocoa powder. Honey or maple syrup can boost sweetness to your liking. Milk helps blend everything smoothly while ice cubes make it refreshing. A pinch of salt brings out all the flavors. If you want to make it extra special, add whipped cream and cocoa nibs on top. These simple ingredients create a delicious smoothie that you can enjoy any time of day. 1. First, gather all your ingredients. You need a ripe banana, cooled coffee, peanut butter, cocoa powder, honey or maple syrup, milk, ice cubes, and a pinch of salt. 2. Next, combine these ingredients in a blender. Make sure to add the banana, coffee, peanut butter, cocoa powder, honey or maple syrup, milk, ice cubes, and salt into the blender. 3. Blend on high speed until smooth and creamy. Check for any chunks of banana or ice. If you see any, blend a bit longer. 4. Now, taste your smoothie. If it needs more sweetness, add a little more honey or maple syrup. Blend again if you adjust the sweetness. 1. Once you have your smoothie ready, pour it into a tall glass. 2. For a fun touch, you can add whipped cream on top. Sprinkle some cocoa nibs for extra crunch and flavor if you like. To make your Mocha Peanut Butter Smoothie creamy, start with a ripe banana. A ripe banana is sweeter and blends better. It adds a nice, smooth texture. Next, cool your brewed coffee. Hot coffee can make your smoothie too warm. Let it sit for a bit before adding it to the blender. You can easily change the sweetness of your smoothie. If you like it sweeter, add more honey or maple syrup. Start with one tablespoon. Blend and taste it. If you need more sweetness, add a little more. Blend again to mix it well. Serving your smoothie can be fun! Pour it into a tall glass to show off its rich color. You can top it with whipped cream for a special touch. Sprinkle cocoa nibs on top for a nice crunch. These small details make your smoothie look fancy and inviting. {{image_2}} You can make this smoothie fit your diet. Use non-dairy milk like almond or oat milk. These options add a nice flavor. For sweeteners, try sugar-free ones. Stevia or erythritol works well. You can adjust how sweet you want. This keeps the smoothie tasty without added sugar. Want to change the taste? Add spices like cinnamon or vanilla extract. These give your drink a warm touch. You can also use different nut butters. Almond or cashew butter brings new flavors. Each nut butter has its unique taste, so experiment to find your favorite. Using seasonal fruits can make this smoothie special. In summer, add fresh berries like strawberries or blueberries. They add a bright taste and color. In fall, try pumpkin puree for a cozy flavor. You can also mix in spices like nutmeg or ginger to match the season. To store leftovers, pour the smoothie into an airtight container. Seal it tight and place it in the fridge. It stays fresh for up to 24 hours. Give it a quick stir before you drink it again. This helps mix any separated ingredients. You can freeze this smoothie for later. Pour it into ice cube trays or a freezer-safe bag. Freeze for up to three months. When you want to enjoy it again, blend the frozen cubes with a little milk. This makes it creamy and fresh. The smoothie tastes best fresh. If stored in the fridge, use it within a day. After that, it may lose flavor and texture. If you freeze it, keep track of how long it’s in there. Use it within three months for the best taste. You can use almond butter or cashew butter. These nut butters have a similar taste. Sunflower seed butter is another great choice for those with nut allergies. Each option adds a unique flavor to your smoothie. Yes, you can use instant coffee. Mix it with hot water to dissolve it first. Instant coffee gives a different flavor but works well in this smoothie. It is a quick and easy option if you are short on time. Yes, this smoothie can be vegan-friendly. Use non-dairy milk, like almond or oat milk. Replace honey with maple syrup for sweetness. This way, you keep it plant-based and delicious. To add more protein, include protein powder or Greek yogurt. You can also add chia seeds or hemp seeds. These ingredients boost the protein content without changing the flavor much. Enjoy your creamy and delicious treat while keeping it nutritious! This blog post covered how to make a delicious smoothie with simple ingredients. We explored what you need, ways to prepare it, and tips for the best results. Remember, you can customize flavors and ingredients to fit your taste. Enjoy the options like non-dairy milk or seasonal fruits. Storing leftovers and knowing shelf life helps you reduce waste. Smoothies are fun and easy! Now, grab your ingredients and start blending for a tasty treat!

Mocha Peanut Butter Smoothie Creamy and Delicious Treat

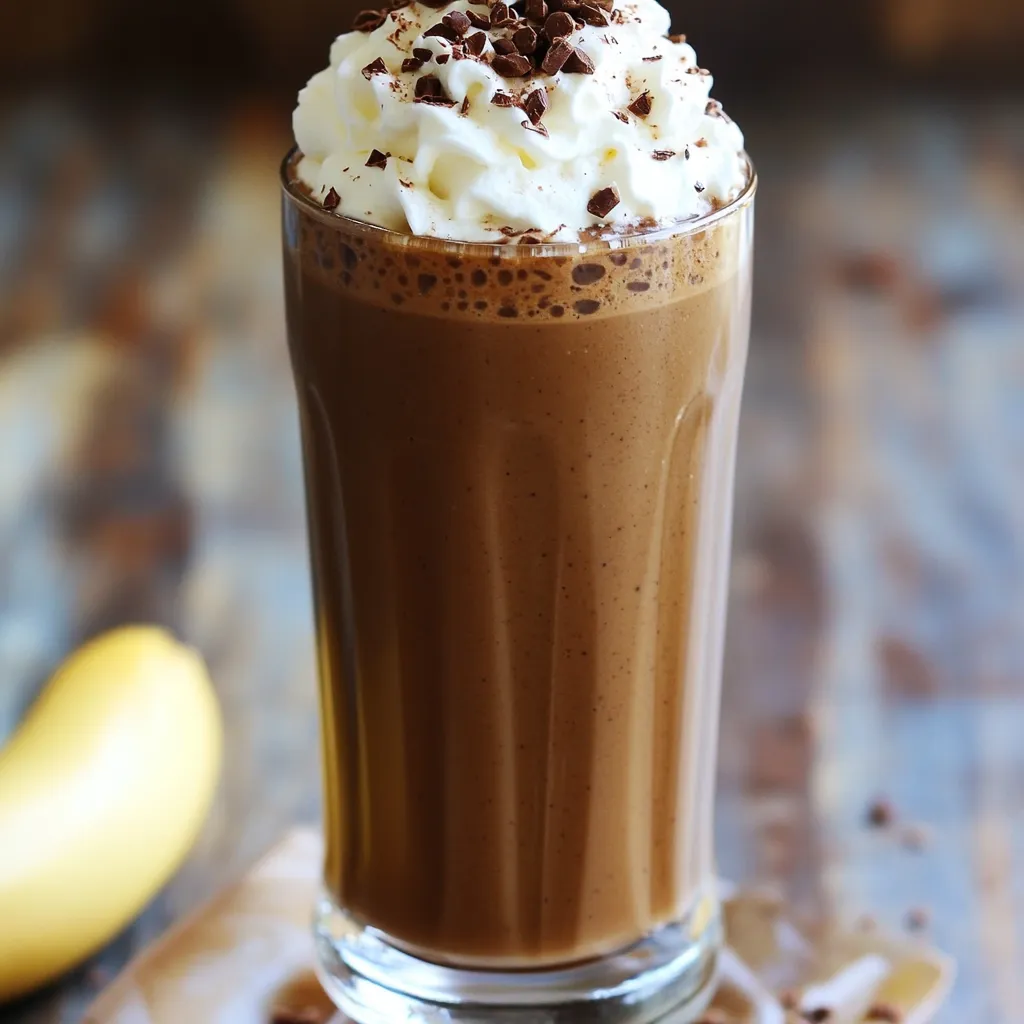
Get ready to mix up a creamy and delicious treat with this Mocha Peanut Butter Smoothie! This fun drink combines

To make these delicious pumpkin spice snickerdoodle cookies, gather the following: - 1 cup unsalted butter, softened - 1 cup granulated sugar - 1/2 cup brown sugar, packed - 1/2 cup pumpkin puree - 1 large egg - 1 teaspoon vanilla extract - 3 cups all-purpose flour - 1 teaspoon baking soda - 1/2 teaspoon baking powder - 2 teaspoons ground cinnamon - 1 teaspoon pumpkin pie spice - 1/4 teaspoon salt - 1/2 cup granulated sugar (for rolling) - 1 tablespoon cinnamon (for rolling) Each ingredient plays a key role in flavor and texture: - Use 1 cup of unsalted butter. This gives a rich taste without added salt. - Granulated sugar and brown sugar both add sweetness. Brown sugar adds moisture. - Pumpkin puree is key for flavor and moisture. It also gives a lovely color. - The egg helps bind the dough and gives it structure. - Vanilla extract adds warmth to the cookies. - All-purpose flour is the base for the dough. - Baking soda and baking powder help the cookies rise. - Ground cinnamon and pumpkin pie spice bring that cozy fall flavor. - Salt balances the sweetness. You can make these cookies even if you lack some ingredients: - If you don't have unsalted butter, use salted butter but reduce the added salt. - Replace granulated sugar with coconut sugar for a lower glycemic index. - You can swap out pumpkin puree with applesauce if needed. - For eggless cookies, use a flax egg (1 tablespoon ground flaxseed mixed with 2.5 tablespoons water). - Gluten-free flour can replace all-purpose flour, but check the blend for best results. Now you have everything you need to create these tasty pumpkin spice snickerdoodle cookies! Enjoy the process and the delightful smells that fill your kitchen. Start by preheating your oven to 350°F (175°C). This helps the cookies bake evenly. Next, grab a large mixing bowl. In this bowl, cream together one cup of softened unsalted butter, one cup of granulated sugar, and half a cup of packed brown sugar. Mix until it looks light and fluffy. This step gives your cookies a nice texture. Now, add half a cup of pumpkin puree, one large egg, and one teaspoon of vanilla extract to the bowl. Beat this mixture until well combined. In a separate bowl, whisk together three cups of all-purpose flour, one teaspoon of baking soda, half a teaspoon of baking powder, two teaspoons of ground cinnamon, one teaspoon of pumpkin pie spice, and a quarter teaspoon of salt. This blend adds all the warm flavors we love. Gradually mix the dry ingredients into the wet ingredients. Stir gently until just combined. Be careful not to overmix; this keeps your cookies soft. In a small bowl, mix half a cup of granulated sugar with one tablespoon of cinnamon for the rolling sugar. Now, scoop out dough balls that are about one to one and a half tablespoons in size. Roll each ball in the cinnamon-sugar mixture until it’s well coated. Place the dough balls on your lined baking sheets, leaving about two inches between each. Bake the cookies in the preheated oven for 10 to 12 minutes. The edges should be lightly golden, while the centers may look soft. Don’t worry; they will firm up as they cool. Once baked, take the cookies out of the oven. Let them cool on the baking sheet for five minutes. This step helps them set and makes them easier to move. After five minutes, transfer the cookies to a wire rack to cool completely. For storage, keep the cookies in an airtight container. They will stay fresh for about a week. If you want to keep them longer, you can freeze them. Just make sure to separate layers with parchment paper to prevent sticking. To get the best texture in your cookies, use softened butter. It helps mix well with sugars. Cream it well until light and fluffy. This adds air, making cookies soft. When mixing dry ingredients, do not overmix. Stir until just combined. This keeps the cookies tender. One big mistake is measuring flour wrong. Use the spoon and level method. Scoop flour into a cup, then level it off. Too much flour makes cookies dry. Another mistake is baking too long. Watch for edges that are lightly golden. The centers will firm up as they cool. For rolling, mix sugar and cinnamon in a bowl. Use half a cup of sugar and one tablespoon of cinnamon. Roll each dough ball in this mix. Make sure they are fully coated. The cinnamon sugar adds flavor and a nice crunch. Space the cookies two inches apart on the baking sheet. This gives them room to spread while baking. {{image_2}} To make gluten-free pumpkin spice snickerdoodles, swap the all-purpose flour for a gluten-free blend. Look for blends that include xanthan gum. This will help give your cookies the right texture. Just follow the same recipe steps. You will still enjoy those soft and chewy cookies. If you love chocolate, try adding chocolate chips to your pumpkin snickerdoodles. Add about one cup of semi-sweet chocolate chips to the dough after mixing in the dry ingredients. This adds a sweet twist to the classic cookie. The chocolate pairs well with the pumpkin spice flavors. You can make your pumpkin spice snickerdoodles healthier. Use coconut oil instead of butter for a lighter option. You can also use coconut sugar instead of granulated and brown sugar. For a lower-carb version, consider almond flour. These changes keep the flavor while making the cookies better for you. To keep your Pumpkin Spice Snickerdoodle Cookies fresh, store them in an airtight container. Use a container made of glass or plastic. Place parchment paper between layers to prevent sticking. Keep them at room temperature for the best taste. Avoid direct sunlight and heat, as these can make your cookies dry. If you want to save some cookies for later, you can freeze them. First, let the cookies cool completely. Then, place them in a single layer on a baking sheet. Freeze for about one hour. Once frozen, transfer them to a freezer bag. Remove as much air as possible before sealing. This method helps keep them fresh for weeks. When stored properly, your cookies can last up to one week at room temperature. If frozen, they can last up to three months. Just remember to let them thaw at room temperature for a few hours before enjoying. This way, you can savor that fresh-baked taste even after freezing! To make pumpkin puree at home, start with a small pumpkin. Cut it in half and scoop out the seeds. Place the halves face down on a baking sheet. Roast at 350°F for about 45 minutes. When soft, let it cool. Scoop out the flesh and blend until smooth. You can also use canned pumpkin, but homemade has a fresher taste. Yes, you can use margarine instead of butter. However, the taste might change a bit. Butter gives cookies a rich flavor. Margarine often has more water, which can affect texture. If you choose margarine, look for one that says it's good for baking. This will help keep your cookies soft and tasty. If your dough is too sticky, don't worry! You can fix it. Start by adding a little flour. Add 1 tablespoon at a time until it feels right. Mix it slowly. If you add too much, it can make your cookies tough. You can also chill the dough for 30 minutes. This helps firm it up, making it easier to roll. This post covered how to make delicious pumpkin spice snickerdoodles. We looked at ingredients, step-by-step instructions, and helpful tips for success. I shared cool variations and storage advice to keep your treats fresh. In the end, these cookies are fun to make and perfect for any time. Enjoy baking and sharing your tasty treats!

Pumpkin Spice Snickerdoodle Cookies Easy Recipe Delight

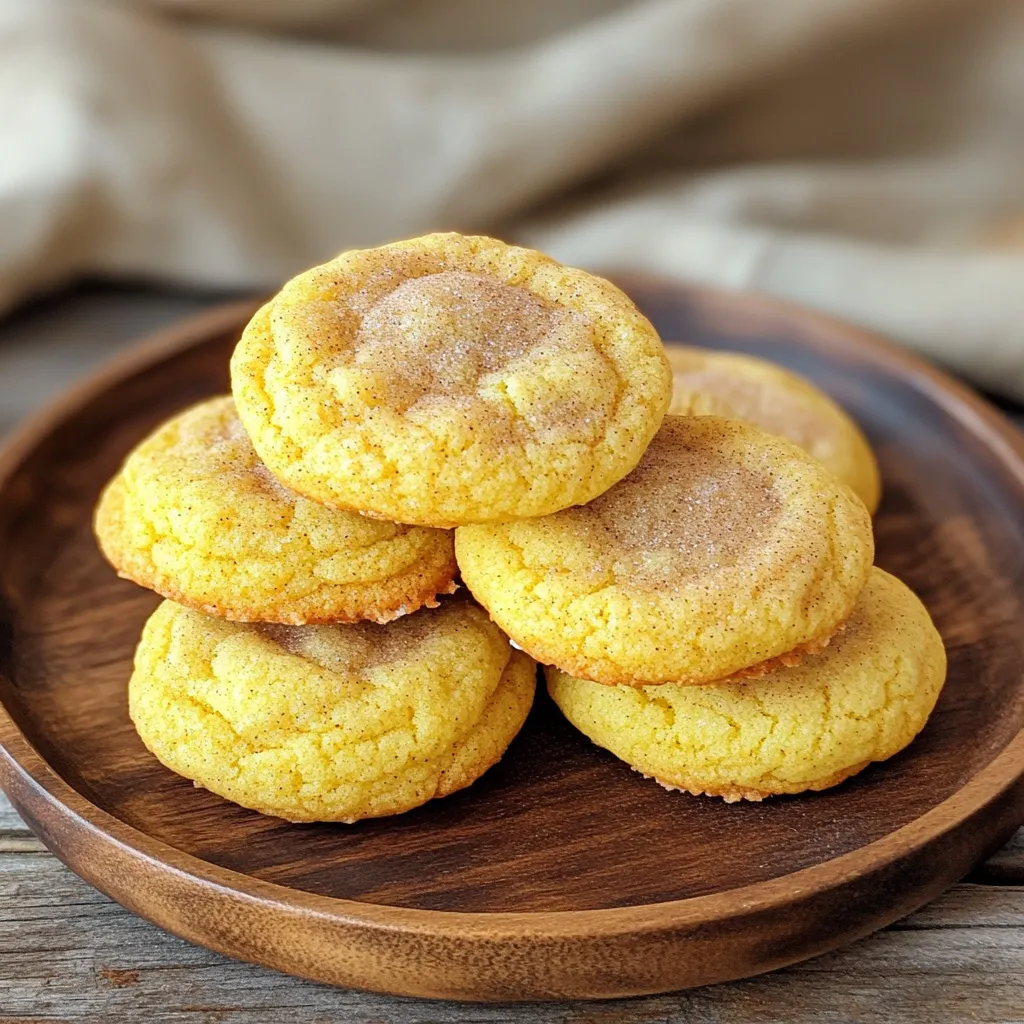
Fall is here, and it’s time to indulge in delicious treats! If you love pumpkin spice and cookies, this recipe

- 4 boneless, skinless chicken breasts - 2 cups crushed tomatoes - 1 medium onion, diced - 4 cloves garlic, minced - 1 cup fresh basil leaves, chopped - 1 tablespoon olive oil - 1 teaspoon dried oregano - 1 teaspoon salt - 1/2 teaspoon black pepper - 1/2 cup shredded mozzarella cheese - Cooked pasta or rice The chicken breasts are the star of this dish. They soak up all the flavors while cooking. Crushed tomatoes add rich taste and a nice sauce. Fresh basil gives a sweet and herbal note that brightens the dish. Onions and garlic add depth and a warm aroma. Olive oil brings healthy fat and helps with cooking. Oregano adds a hint of earthiness. Salt and pepper enhance all the flavors. Finally, mozzarella cheese adds creaminess when served. When picking chicken, look for bright color and no strong smell. For tomatoes, choose ones that are ripe and have a sweet scent. Fresh basil should look vibrant and green, with no brown spots. Pick firm onions and garlic bulbs that feel heavy for their size. Always check for the freshest ingredients to boost taste and nutrition. To start, gather all your ingredients. You need: - 4 boneless, skinless chicken breasts - 2 cups crushed tomatoes - 1 medium onion, diced - 4 cloves garlic, minced - 1 cup fresh basil leaves, chopped - 1 tablespoon olive oil - 1 teaspoon dried oregano - 1 teaspoon salt - 1/2 teaspoon black pepper - 1/2 cup shredded mozzarella cheese - Cooked pasta or rice Begin by heating olive oil in a skillet over medium heat. Add the diced onion and cook for about 5 minutes. You want the onion to be soft and clear. Then, add minced garlic and cook for another minute. The smell will be amazing! Now, take your slow cooker. Place the chicken breasts at the bottom. Pour the onion and garlic mixture over them. Add in the crushed tomatoes, chopped basil, oregano, salt, and pepper. Mix gently so the chicken is well-covered with the sauce. Cover the slow cooker and set it to low heat for 6-7 hours or high heat for 3-4 hours. Check that the chicken is tender and fully cooked. Once the cooking time is up, it’s time to shred the chicken. Use two forks to pull the chicken apart right in the slow cooker. Mix it well with the sauce. Serve this tasty tomato basil chicken over cooked pasta or rice. For an extra treat, sprinkle on some shredded mozzarella cheese. You can also add more fresh basil on top for color and flavor. Enjoy your meal! To boost the taste of your Slow Cooker Tomato Basil Chicken, try adding some fresh herbs. Fresh thyme or parsley can give your dish a bright kick. You can also splash a bit of balsamic vinegar for tang. If you like heat, add red pepper flakes. They add warmth without overpowering the dish. Always taste and adjust as you go. A little salt can also bring out the flavors. For tender chicken, cook it low and slow. This way, the meat absorbs all the juices and flavors. If you prefer a thicker sauce, let the dish cook a bit longer without the lid. Also, shredding the chicken in the sauce helps mix in the flavors and keeps the meat moist. Pair this dish with pasta or rice to soak up that delicious sauce. One common mistake is overcooking the chicken. It can become dry and tough. Stick to the cooking times for the best results. Another mistake is not seasoning enough. Always season your chicken before adding everything else. Lastly, avoid skipping the sauté step for onions and garlic. This step builds a strong flavor base for your dish. {{image_2}} You can easily add vegetables to your Slow Cooker Tomato Basil Chicken. Start with bell peppers, zucchini, or spinach. These veggies add great color and nutrients. Cut them into bite-sized pieces. Toss them in with the chicken and sauce. They cook well and soak up flavor. Another option is to add carrots. Slice them thin for quick cooking. You can even use frozen peas towards the end of cooking. They will keep their bright color and crunch. Adding veggies makes the dish more filling and healthy. This recipe can fit gluten-free or low-carb diets. For gluten-free, just serve the chicken over rice or gluten-free pasta. Check labels to ensure they are safe. If you want low-carb, skip the pasta. Instead, serve the chicken over zucchini noodles or cauliflower rice. Both options taste great and keep carbs low. You can still enjoy the rich sauce and flavors. You can switch out the chicken for other proteins. Try using turkey breasts for a leaner option. Pork tenderloin also works well. Just adjust the cooking time. If you're looking for a vegetarian option, use chickpeas or lentils. These proteins absorb the sauce well. You can also use firm tofu. Just press and cube it before adding it to the slow cooker. Each of these options keeps the dish tasty and satisfying. You can store your Slow Cooker Tomato Basil Chicken in the fridge. Place it in an airtight container. This keeps it fresh for up to four days. Make sure the chicken is cooled before sealing. This helps prevent moisture and keeps flavors strong. Freezing is a great option for this dish. Allow the chicken to cool completely. Then, transfer it to a freezer-safe container or bag. It will stay fresh for about three months. When you are ready to eat, let it thaw in the fridge overnight. Reheat your chicken gently to keep it moist. You can use the microwave or stove. If using the stove, heat it on low. Stir occasionally to avoid burning. Add a splash of water or broth if it seems dry. This will help revive the great flavors. You can store Slow Cooker Tomato Basil Chicken in the fridge for up to four days. Make sure to put it in an airtight container. If you want to keep it longer, freeze it. In the freezer, it stays good for up to three months. When you’re ready to eat, just thaw it overnight in the fridge. Yes, you can! If you don’t have a slow cooker, use a large pot. Start by sautéing the onions and garlic as you would in the slow cooker. Then, add everything else to the pot. Cover and simmer on low heat for about 30 to 40 minutes. Check the chicken to make sure it is cooked through. This dish pairs well with cooked pasta or rice. The tomato sauce adds great flavor to both. You can also serve it with a side salad or garlic bread for a complete meal. Don’t forget to sprinkle some extra mozzarella cheese on top for that creamy touch! In this blog, we explored how to make Slow Cooker Tomato Basil Chicken. We covered key ingredients and how to choose fresh ones. I provided step-by-step instructions for preparing and cooking. I shared tips to enhance flavor and avoid common mistakes. You can also try fun variations and learn storage tips for leftovers. Remember, cooking should be simple and fun. Use fresh ingredients, follow the steps, and enjoy your meal!

Slow Cooker Tomato Basil Chicken Flavorful Dinner Recipe

Looking for an easy dinner that bursts with flavor? You’ve found it! My Slow Cooker Tomato Basil Chicken packs a

- 4 salmon fillets - 2 cups broccoli florets - 1/4 cup Dijon mustard - 1/4 cup honey - 2 tablespoons olive oil - 2 teaspoons garlic powder - 1 teaspoon smoked paprika - Salt and pepper to taste - Fresh parsley, chopped (for garnish) If you need to convert measurements, here are some tips: - 1/4 cup is equal to 4 tablespoons. - 2 cups equals 16 fluid ounces. - 1 teaspoon is about 5 milliliters. Using fresh ingredients makes a big difference in flavor. Fresh salmon has a rich taste and tender texture. Broccoli should be bright green and firm for the best crunch. Fresh Dijon mustard adds a tangy kick, while honey gives a sweet balance. Quality olive oil enhances the overall dish. When you use fresh ingredients, you boost taste and nutrition. You want your meal to shine, and fresh items help you achieve that. So always choose the best when you cook! Start by preheating your oven to 400°F (200°C). This step is key. A hot oven cooks the salmon and broccoli evenly. While you're at it, line a large sheet pan with parchment paper. This makes cleanup a breeze. In a small bowl, mix together the Dijon mustard and honey. Add olive oil, garlic powder, smoked paprika, salt, and pepper. Whisk it all together until smooth. This sauce adds a tasty kick to your salmon and broccoli. Place the salmon fillets in the center of your sheet pan. Brush half of the honey mustard sauce over the salmon fillets. Next, arrange the broccoli florets around the salmon. Drizzle the rest of the sauce over the broccoli. Season the broccoli with more salt and pepper, then toss gently. Slide the sheet pan into your preheated oven. Bake for about 15 to 20 minutes. The salmon should flake easily with a fork. The internal temperature should reach 145°F (63°C). The broccoli should be tender and have slight browning. After baking, take the sheet pan out of the oven. Let it rest for a couple of minutes. This helps the juices settle. Check that the salmon is fully cooked. If it’s flaky, you’re good to go! Garnish with chopped fresh parsley before serving. Enjoy your meal! To get the best salmon, start with fresh fillets. Look for bright color and no fishy smell. Make sure you let the salmon sit out for about 15 minutes before cooking. This helps it cook evenly. Brush the honey mustard sauce on each fillet. It adds flavor and moisture. Cook your salmon until it reaches an internal temperature of 145°F. It should flake easily when done. Seasoning is key to making your dish sing. Use salt and pepper to taste. These simple spices boost the salmon's natural flavor. The garlic powder and smoked paprika add depth. They give a warm and savory taste. Don’t be shy with the honey mustard sauce; it brings sweetness and tang. Feel free to experiment with other herbs, like thyme or dill, for added aroma. Baking time can vary based on your oven and the thickness of the salmon. Generally, bake for 15-20 minutes. Check for doneness around the 15-minute mark. If your salmon is thick, it may need a bit longer. Broccoli should be tender and slightly browned. If it's not done after 20 minutes, give it a few extra minutes. Always watch closely to avoid overcooking. {{image_2}} You can easily add more veggies to this dish. Try using carrots, bell peppers, or asparagus. Chop them into similar sizes as the broccoli. This way, they cook evenly. Toss them around the salmon and drizzle with sauce. The honey mustard flavor pairs well with many vegetables. Experimenting adds fun and color to your meal. While honey mustard is a star, you can switch it up. Try teriyaki sauce or a lemon-garlic mix. For a spicy kick, add sriracha or chili paste to the honey mustard. Each sauce brings a new taste and vibe. You can even create a yogurt sauce for a creamy twist. This simple change can make the dish feel fresh and exciting. Salmon is fantastic, but it's not the only option. You can use trout or cod for a change. Both types of fish cook well and take on flavors nicely. Just make sure they are fresh and farmed sustainably. Adjust cooking times if needed. Thinner fish may cook faster, while thicker ones might need more time. Enjoy experimenting with different fish to find your favorite! You can keep leftovers in an airtight container. Place them in the fridge for up to three days. Make sure to store the salmon and broccoli together for best flavor. It’s best to eat them fresh, but they can still taste good when stored. To reheat, use the oven for the best results. Preheat your oven to 350°F (175°C). Place the salmon and broccoli on a baking sheet. Heat for about 10 minutes or until warm. You can also use a microwave if you need a quick option. Just heat in short bursts, checking often. If you want to freeze your dish, do it right away. Wrap the salmon and broccoli tightly in foil or use freezer-safe containers. It can last up to three months in the freezer. When you’re ready to eat, thaw it in the fridge overnight before reheating. Yes, you can use frozen salmon. Just make sure to thaw it first. Place the salmon in the fridge overnight to thaw. If you're short on time, you can also run it under cold water for about an hour. Once thawed, follow the same steps in the recipe. This method works well for keeping the salmon moist. Honey mustard salmon pairs well with many sides. I suggest serving it with: - Rice - Quinoa - Mashed potatoes - A fresh salad - Roasted sweet potatoes These options add balance to your meal. They also soak up the tasty honey mustard sauce! To check if salmon is cooked, look for a few signs: - The meat should be opaque. - It should easily flake with a fork. - The internal temperature should reach 145°F (63°C). A meat thermometer is great for accuracy. If you don’t have one, use a fork to test the flakiness. Yes, you can prepare this meal in advance. You can mix the honey mustard sauce and coat the salmon and broccoli. Store everything in the fridge for up to 24 hours. When ready to cook, just preheat the oven and bake as directed. This saves time and makes meal prep easy! We covered key ingredients and how to prepare honey mustard salmon with broccoli. Fresh ingredients boost flavor, while careful baking ensures perfect doneness. Remember tips for seasoning and timing; they elevate the dish. You can try fun variations with different veggies or sauces. Don’t forget about storage options for leftovers. With these steps and insights, you can make this meal your own. Enjoy experimenting and cooking delicious salmon!

Sheet Pan Honey Mustard Salmon Broccoli Delight

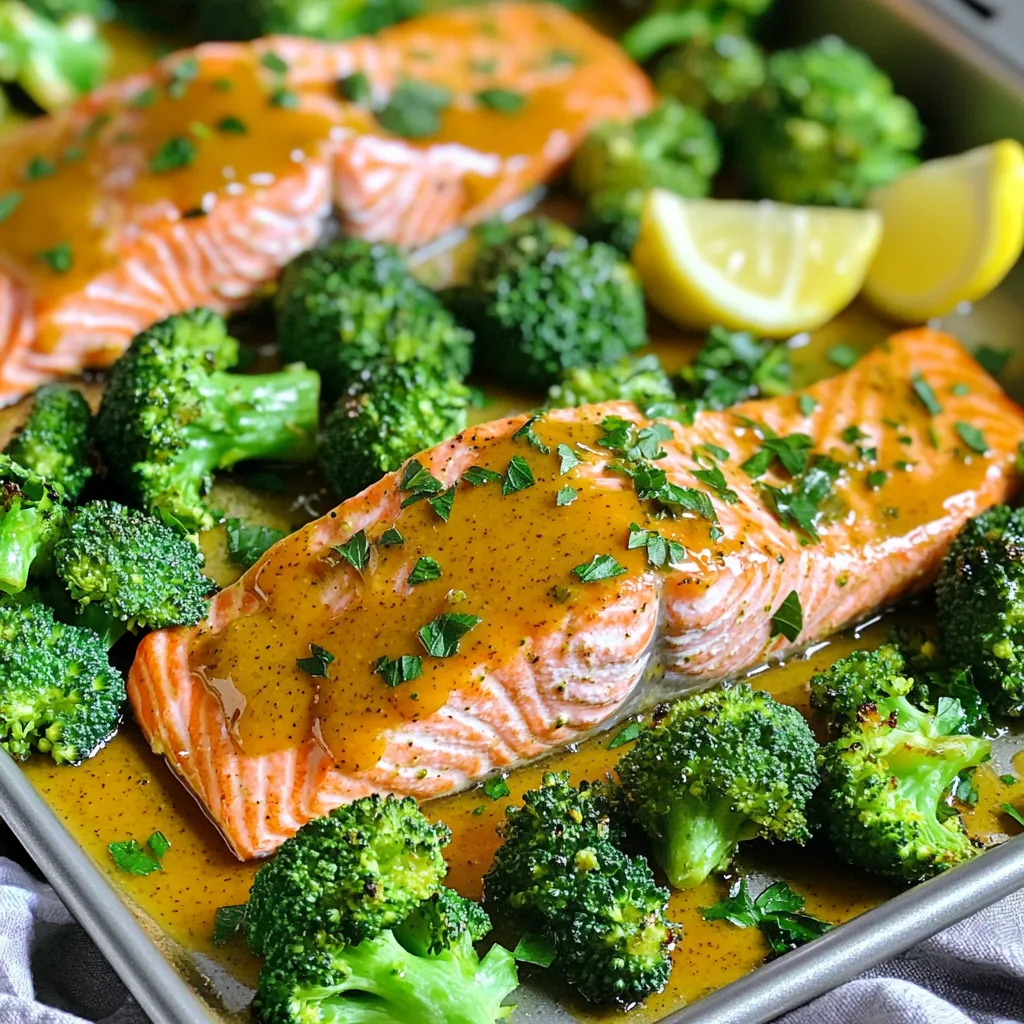
Looking for a simple, healthy dinner? Try my Sheet Pan Honey Mustard Salmon Broccoli Delight! This tasty recipe combines flaky

- 1 pound chicken tenders - 1 cup all-purpose flour - 1 cup panko breadcrumbs - ½ cup grated Parmesan cheese - 2 large eggs - 4 cloves garlic, minced - 1 teaspoon Italian seasoning - ½ teaspoon paprika - Salt and pepper to taste For this recipe, I focus on using fresh ingredients. The chicken tenders are the star, so pick high-quality ones. Panko breadcrumbs give a great crunch. Grated Parmesan adds rich flavor. For the coating, I use all-purpose flour for a light base. The eggs help the crumbs stick well. Fresh garlic is key; it boosts the flavor and aroma. When it comes to seasoning, Italian seasoning and paprika add depth. Don’t forget salt and pepper. They enhance all the flavors in the dish. I also suggest using olive oil spray. It keeps the tenders crispy without excess oil. This blend of ingredients makes every bite delicious and satisfying. Enjoy the crunch and flavor of these tasty tenders! Setting Up the Dredging Station First, gather three bowls. Place one bowl with all-purpose flour. In the second bowl, beat two large eggs. In the third bowl, mix panko breadcrumbs, grated Parmesan cheese, minced garlic, Italian seasoning, paprika, salt, and pepper. This mix will add flavor and crunch to the chicken. Mixing the Panko Coating Combine the panko breadcrumbs with cheese and seasonings. This will make a tasty coating. The garlic adds a nice kick. Make sure everything is well blended. Coating Process Take one chicken tender. First, dip it into the flour. Make sure it is fully covered. Next, place it in the beaten eggs. Let the excess egg drip off. Finally, roll it in the panko mixture. Press it down gently to help the coating stick. Ensuring Adherence of Coating This step is key for a crunchy bite. Press the panko firmly onto the chicken. This helps it stick during cooking. Repeat this for each chicken tender. Preheating the Air Fryer Before cooking, preheat the air fryer to 380°F (193°C). This takes about five minutes. Preheating gives the chicken a nice crispy texture. Arranging Chicken Tenders Spray the basket lightly with olive oil. Place the coated chicken tenders in the basket. Make sure they are in a single layer. Do not overcrowd them; this helps them cook evenly. Cooking Time and Temperature Air fry the chicken tenders for 10-12 minutes. Flip them halfway through. Spray them lightly with olive oil again for extra crispiness. They are done when golden brown and reach an internal temperature of 165°F (75°C). Enjoy the aroma while they cook! - Using Olive Oil Spray: A light spray of olive oil helps the tenders crisp up nicely. It also adds a touch of flavor. Just a few spritzes will do the trick. - Importance of Overcrowding: Avoid putting too many tenders in the air fryer at once. If you overcrowd, they won't cook evenly. Give them space to breathe and get that perfect crunch. - Ideal Internal Temperature: The chicken tenders are done when they reach an internal temperature of 165°F (75°C). Use a meat thermometer to check this. It ensures they are safe to eat. - Visual Cues for Cooking: Look for a golden-brown color on the outside. The tenders should be firm to the touch. If they look crispy and golden, you’re close to perfection. - Serving Ideas: Serve your chicken tenders on a nice platter. Pair them with marinara or ranch dipping sauce. This adds a fun twist to your meal. - Garnishing Tips: Fresh parsley or cilantro makes a great garnish. Just sprinkle some on top for a pop of color. It makes the dish look more inviting and tasty. {{image_2}} You can make these chicken tenders even more exciting. Add spices or herbs to suit your taste. Try some cayenne for heat or dried thyme for a fresh touch. A pinch of cumin adds a warm, earthy flavor. You can mix your favorite herbs right into the panko coating. Switching up the cheese is also fun. Instead of Parmesan, use cheddar for a sharper taste. Mozzarella gives a nice, gooey texture. You can even combine different cheeses for a unique flavor blast. Dipping sauces can take your meal to the next level. Homemade marinara works great with these tenders. Its rich tomato flavor complements the garlic and cheese. Just heat it up on the stove, and it’s ready to go! Ranch dressing is a classic choice too. Its creamy texture adds a cool balance. You can also explore other sauces like honey mustard or barbecue. Each sauce brings a new twist to your chicken tenders. For side dishes, consider a fresh salad. A simple green salad with lemon dressing pairs nicely. You might also enjoy some roasted veggies. They add color and nutrition to your plate. If you want a heartier meal, serve the tenders with fries or mashed potatoes. Both options will satisfy your cravings. You could even make a fun platter with chicken tenders and various dips. This way, everyone can enjoy their favorite flavors! After enjoying your Air Fryer Garlic Parmesan Chicken Tenders, you might have some leftovers. To keep them fresh, follow these best practices for refrigeration: - Let the chicken tenders cool to room temperature. - Place them in an airtight container or wrap them tightly in foil. - Store in the fridge. These tenders stay fresh for about 3 to 4 days. If they smell or look off, it’s best to toss them. When you’re ready to enjoy your leftovers, reheating them correctly is key. Here’s how: Using the Air Fryer: - Preheat your air fryer to 375°F (190°C). - Place the chicken tenders in the basket, making sure they are in a single layer. - Air fry for about 5 to 7 minutes until they are hot and crispy. Oven or Microwave Options: - For the oven, preheat it to 375°F (190°C). Place the chicken on a baking sheet and heat for about 10 minutes. - If you use a microwave, heat on medium power for 1 to 2 minutes. However, this may not keep them crispy. If you want to save some tenders for later, freezing is a great option. Here’s how to freeze cooked tenders: - Let the chicken tenders cool completely. - Place them in a single layer on a baking sheet and freeze for 1 to 2 hours. - Once frozen, transfer them to a freezer-safe bag or container. Remove as much air as possible. You can freeze them for up to 3 months. Thawing Instructions: - To thaw, move the tenders to the fridge for about 6 hours or overnight. - You can also microwave them on low power for a quick thaw, but be careful not to cook them. With these tips, you can enjoy your Air Fryer Garlic Parmesan Chicken Tenders even after the first meal! Cook chicken tenders for 10 to 12 minutes at 380°F (193°C). Flip them halfway through cooking. This helps them cook evenly and become crispy. Always check the internal temperature. It should reach 165°F (75°C) for safety. Yes, you can use frozen chicken tenders. However, you need to cook them longer. Increase your cooking time to about 15 to 18 minutes. Make sure to check their temperature to ensure they are fully cooked. You can serve these tasty tenders with many sides. Some great options include: - French fries - Sweet potato fries - A fresh salad - Steamed veggies - Garlic bread These pair well and make a complete meal! This blog post covered how to make Air Fryer Garlic Parmesan Chicken Tenders. We looked at the main and coating ingredients, cooking steps, and tips for perfect results. You learned how to achieve crispiness, check doneness, and present your dish well. We also explored variations, storage methods, and answered common questions. Enjoy making these tasty tenders! They are easy, quick, and a sure hit.

Air Fryer Garlic Parmesan Chicken Tenders Delight

Welcome to a mouthwatering adventure with my Air Fryer Garlic Parmesan Chicken Tenders Delight! These crispy, flavorful tenders are not

- 2 cans (28 ounces each) crushed tomatoes - 1 medium onion, chopped - 3 cloves garlic, minced - 4 cups vegetable broth - 1 teaspoon dried oregano - 1 teaspoon sugar - 1 cup heavy cream (or coconut cream) - 1/4 cup fresh basil, chopped - Salt and pepper to taste - 2 tablespoons olive oil When I make this soup, I start with crushed tomatoes. They give a rich base. Next, I chop one medium onion and mince three cloves of garlic. The onion adds sweetness, while the garlic adds depth. I use four cups of vegetable broth for flavor and body. I include dried oregano for an Italian touch and a teaspoon of sugar to balance the acidity. The cream makes the soup creamy, and I often swap it for coconut cream for dairy-free options. Fresh basil gives a bright finish, and I always season with salt and pepper for taste. Finally, I use two tablespoons of olive oil to sauté the onions. For a dairy-free option, use coconut cream instead of heavy cream. You can also try cashew cream for a nutty flavor. Fresh herbs like basil are great, but dried herbs work well too. Just remember, dried herbs are stronger, so use less. If you need more servings, it’s easy to adjust. Simply double the ingredients for a larger batch. Keep the same ratios, and the soup will turn out well. For fewer servings, cut the ingredients in half. This way, you can enjoy this comforting soup anytime! 1. Start by heating the olive oil in your slow cooker on the sauté function. This step adds great flavor. 2. Add the chopped onion. Cook for about 5 minutes until it becomes soft. 3. Next, stir in the minced garlic. Cook for another 1-2 minutes until it smells nice. 4. Now, it's time to add the crushed tomatoes, vegetable broth, dried oregano, and sugar. Mix well. 5. Season with salt and pepper to taste. This will enhance the flavor. - You can cook on low for 6-8 hours or high for 3-4 hours. Choose what works best for you. - To check for doneness, the soup should be hot and the flavors melded together. A good stir will tell you if it's ready. - For a smooth soup, use an immersion blender right in the slow cooker. It’s easy and quick. - If you don’t have one, transfer the soup in batches to a regular blender. Just be careful, as hot soup can splatter. To boost the taste of your soup, add more herbs. Try fresh thyme or parsley. They bring a lovely freshness. You can also use spices like red pepper flakes for heat. For garnishes, consider a dollop of sour cream or a sprinkle of cheese. Fresh basil is great too. It adds color and taste. When using the sauté function, keep an eye on the onions. Stir them often to stop burning. If your soup is too thick, add more broth or cream. For creaminess, blend well after cooking. You can use an immersion blender for a smooth result. Homemade soup tastes better than store-bought. You get fresh flavors and no preservatives. Slow-cooked meals have depth and warmth. They create a cozy feeling at home. You can control the ingredients too, making it healthier. {{image_2}} You can make this soup even better by adding extra veggies. Carrots and celery work great. They add sweetness and crunch. Just chop them small and toss them in. If you want a meatier soup, try adding cooked bacon or sausage. Chop it up and stir it in near the end. This adds a nice smoky flavor. It can make the soup heartier and more filling. If you follow a vegan diet, you can still enjoy this soup. Use coconut cream instead of heavy cream. This keeps it creamy and rich without any dairy. For those who need gluten-free meals, rest easy. All the ingredients listed are gluten-free. Just double-check your vegetable broth to make sure it’s safe. Want to spice things up? Add red pepper flakes for a kick. Start with a pinch and taste as you go. This can change your soup from mild to bold. You can also give it an Italian twist. Adding parmesan cheese can enhance the flavor. Mix in some grated cheese just before serving and let it melt. It makes the soup taste even more delicious. Store leftover soup in an airtight container. This keeps it fresh and safe. The soup will last about 3 to 5 days in the fridge. Make sure it cools down first before putting it in the fridge. To freeze the soup, let it cool completely. Pour the soup into freezer-safe containers. Leave some space at the top for expansion. You can also use freezer bags. This makes it easy to thaw. The soup can last up to 3 months in the freezer. Reheat soup on the stove over low heat. Stir often to avoid sticking. You can also use the microwave in short bursts. If you use the microwave, stir it well between bursts. To keep the texture smooth, add a splash of cream or broth while reheating. Yes, you can use fresh tomatoes. Just peel and chop about 3 pounds. Fresh tomatoes add a light flavor. They may need more cooking time to soften. This soup pairs well with grilled cheese sandwiches. You can also serve it with a fresh salad. Crusty bread or a warm baguette makes a great side too. To thicken the soup, add more cream or blend less. For a thinner soup, add more vegetable broth. You can also try adding a potato, which breaks down and thickens the soup. Blending the soup is not required but helps create a smooth texture. If you prefer a chunky soup, skip blending. You can leave some ingredients unblended for more texture. Yes, you can leave out the cream. Use more broth and add a splash of olive oil. You can also use coconut cream for a dairy-free alternative. This blog post covered how to make a delicious creamy tomato basil soup. We discussed key ingredients, easy steps, and helpful tips. You learned how to adjust recipes and avoid common mistakes. Exploring variations allowed for personal touch, too. In conclusion, this soup is simple and satisfying. You can enjoy it fresh, or store it for later. With a few tweaks, it fits every taste. So, gather your ingredients and start cooking. You’ll love every warm, creamy bite.

Savory Slow Cooker Creamy Tomato Basil Soup Recipe

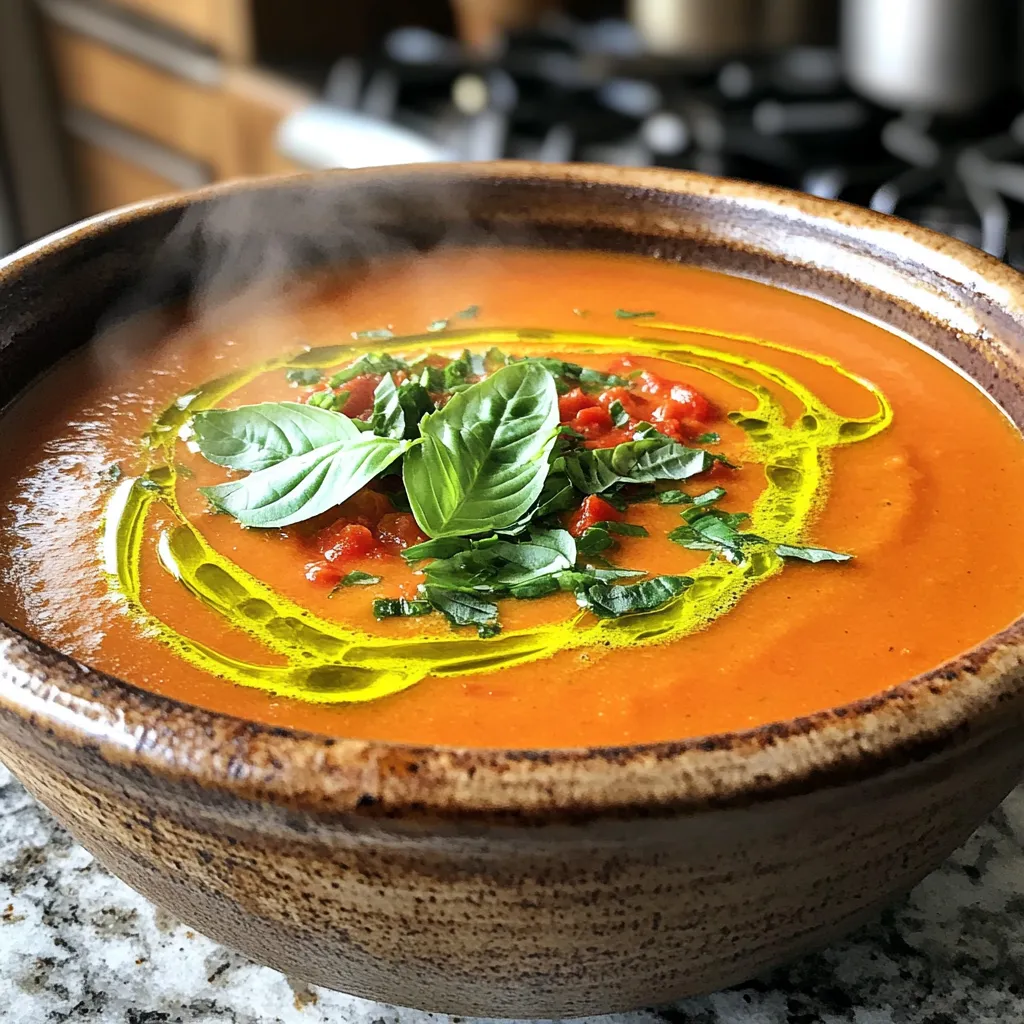
Are you ready to turn your kitchen into a cozy haven with savory delights? This Slow Cooker Creamy Tomato Basil

- 2 cups pretzel sticks - 1 cup semi-sweet chocolate chips - 1 cup sweetened condensed milk - 1/2 cup creamy peanut butter - 1/2 cup caramel sauce - 1 teaspoon vanilla extract - 1/4 teaspoon sea salt (plus more for topping) Gathering these ingredients is simple. You may already have some at home. The pretzel sticks give a nice crunch. The semi-sweet chocolate adds rich flavor. Sweetened condensed milk makes it creamy and sweet. Creamy peanut butter adds depth. Caramel sauce brings that gooey sweetness. Vanilla enhances all the flavors. Sea salt balances the sweet and salty. Feel free to get creative with toppings! You can add nuts or other sweets if you like. Just make sure to keep the balance of flavors. Enjoy the process of gathering and preparing these ingredients. It's the first step to making something amazing. 1. Lining the baking dish: Start by lining an 8-inch square baking dish. Use parchment paper, and let some paper hang over the sides. This makes it easy to lift the fudge out later. 2. Mixing pretzel sticks: In a bowl, mix 2 cups of pretzel sticks. Set aside a handful for later use. This will add a nice crunch on top. 3. Melting the fudge mixture: In a medium saucepan, melt 1 cup of semi-sweet chocolate chips, 1 cup of sweetened condensed milk, and 1/2 cup of creamy peanut butter. Use low heat and stir often. You want a smooth and creamy texture. Once it’s ready, take it off the heat. Stir in 1 teaspoon of vanilla extract and 1/4 teaspoon of sea salt. This will enhance the flavor. 1. Coating the pretzels: Pour the melted fudge mixture over the pretzel sticks in the bowl. Fold gently until all pretzels are coated evenly. 2. Drizzling caramel and topping: Transfer the fudge mixture to the lined baking dish. Press it down gently to make an even layer. Drizzle 1/2 cup of caramel sauce on top. Use a spatula to swirl it lightly into the fudge. Then, sprinkle the reserved pretzel pieces on top along with a little extra sea salt. 3. Refrigerating to set: Place the dish in the fridge for at least 2 hours. This helps the fudge set properly. Once it's firm, lift it out using the parchment paper. Cut it into squares, and enjoy your no-bake salted caramel pretzel fudge. How do I store leftovers? To keep your fudge fresh, place it in an airtight container. This helps keep moisture out. You can also layer squares with parchment paper to avoid sticking. Store it in the fridge for the best taste. What are the best storage containers? Use glass or plastic containers with tight lids. These materials seal well. Avoid using metal containers, as they can alter the taste of the fudge. If you have a lot of fudge, consider using multiple small containers. What are some serving suggestions? Arrange your fudge squares on a nice plate. You can drizzle extra caramel sauce over them for flair. Serve with small forks or toothpicks for easy eating. This makes your dessert look appealing and fun. How can I garnish for visual appeal? Sprinkle a pinch of flaky sea salt on top for a great finish. You can also add some crushed pretzels for texture. For color, consider adding a few chocolate shavings. These small touches make your fudge look gourmet. {{image_2}} You can change the flavor of your fudge in fun ways. Here are some ideas: - Alternative toppings: Try adding crushed nuts, mini marshmallows, or chocolate sprinkles. Each adds a new layer of taste and texture. - Sweetness levels: If you want less sweetness, use dark chocolate chips instead. You can also reduce the caramel sauce for a more balanced flavor. Many people have special diets. Thankfully, this fudge can fit into those needs: - Gluten-free options: Use gluten-free pretzel sticks. They taste just as good and keep the crunch. - Vegan adaptations: Swap the sweetened condensed milk for coconut cream and use dairy-free chocolate chips. This way, everyone can enjoy the treat! To keep your No-Bake Salted Caramel Pretzel Fudge fresh, store it in an airtight container. This helps to lock in moisture and flavor. Place a piece of parchment paper between layers to avoid sticking. You can keep it in the fridge for up to two weeks. If you are like me and love your treats fresh, try to eat them within the first week. Freezing is a great option if you want to save some fudge for later. To freeze the fudge, first cut it into squares. Wrap each piece tightly in plastic wrap. Then, place them in a freezer-safe bag or container. Label it with the date so you know when you made it. You can freeze the fudge for up to three months. When you are ready to enjoy some, take it out of the freezer. Place it in the fridge for about an hour to thaw. If you want it faster, leave it at room temperature for about 30 minutes. Avoid microwaving, as this can change its texture. Enjoy your fudge just like fresh! Yes, you can! While I love semi-sweet chocolate, you can explore other types. Dark chocolate adds richness and depth. Milk chocolate brings a sweeter taste. You might even try white chocolate for a creamy twist. Just remember, different chocolates will change the fudge's flavor and texture. The fudge needs at least 2 hours in the fridge to set. This time allows it to firm up and hold its shape. For best results, leave it in longer if you can. You want it nice and cool before cutting into squares. If you want a change, you can use nuts or crispy rice cereal. Crushed graham crackers work well too. Each option adds a unique crunch and flavor. Just ensure your substitute pairs nicely with the sweet and salty notes of the fudge. This recipe uses simple ingredients to create a tasty treat. You learned how to mix, melt, and set the fudge. Tips for storage and presentation can help your dessert shine. For fun, mix in flavors or adjust the sweetness to suit your taste. You can even find options for gluten-free or vegan diets. Enjoy your delicious fudge and share it with friends! It's a great sweet treat for any occasion.

No-Bake Salted Caramel Pretzel Fudge Delight

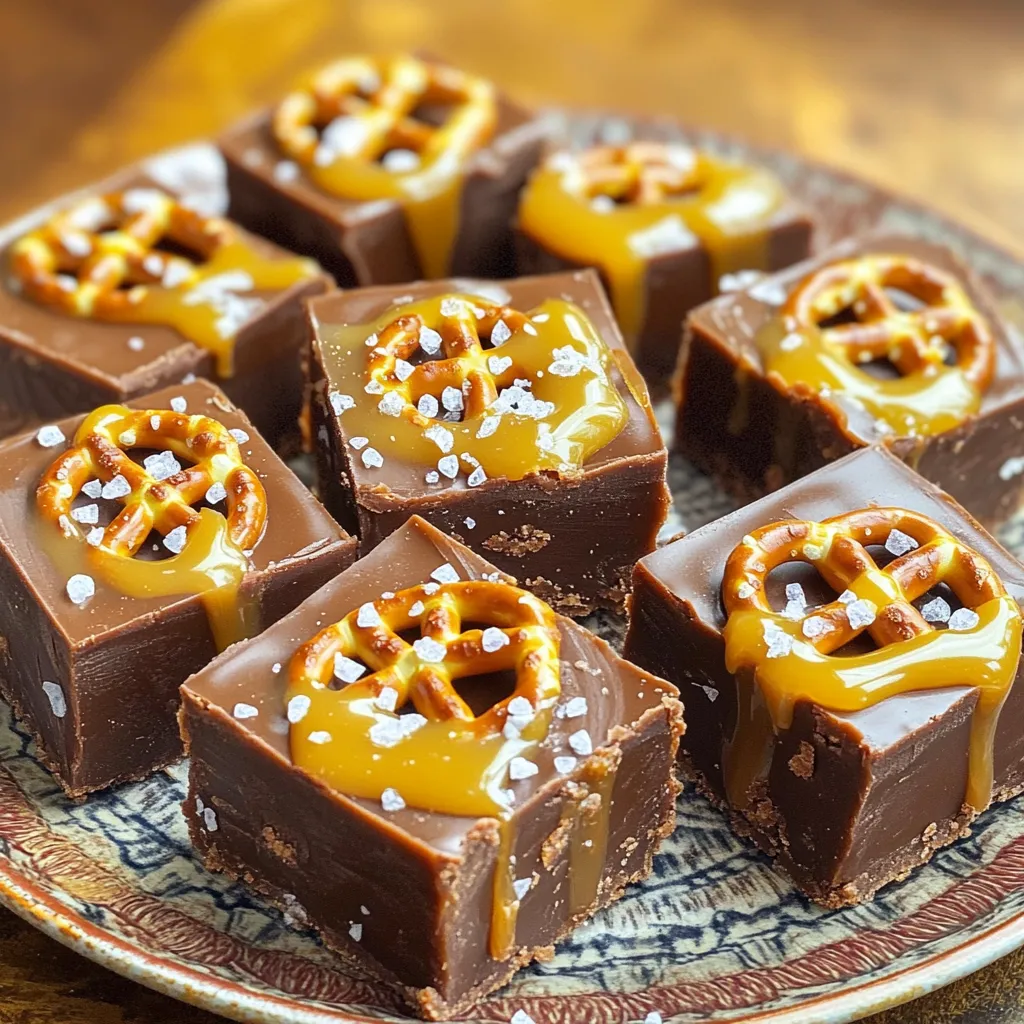
Get ready to indulge in a sweet treat that requires zero baking! My No-Bake Salted Caramel Pretzel Fudge combines the

- 2 ½ cups all-purpose flour - 1 tablespoon baking powder - 1 teaspoon baking soda - 1 teaspoon ground cinnamon - ½ teaspoon ground nutmeg - ½ teaspoon salt For the dry mix, I use all-purpose flour as the base. I add baking powder and baking soda to help it rise. Ground cinnamon gives warm flavor, while nutmeg adds depth. Salt balances the sweetness, making each bite perfect. - 2 cups apple cider - 1 cup unsalted butter, softened - 3 large eggs - 1 teaspoon vanilla extract For wet ingredients, I start with fresh apple cider, which adds moisture and flavor. Softened unsalted butter gives richness. Eggs bind everything together, and vanilla adds a sweet note that brightens the cake. - 1 cup granulated sugar - ½ cup brown sugar, packed - 1 cup diced apples - 1 cup powdered sugar (for glaze) - 2 tablespoons pure maple syrup - 1 tablespoon milk (adjust for glaze thickness) The sugars create a sweet foundation. Granulated sugar provides sweetness, while brown sugar adds a hint of caramel. Diced apples bring texture and fruitiness. For the glaze, I mix powdered sugar with maple syrup and milk, creating a sweet finish that makes the cake shine. Reducing the apple cider Start by pouring 2 cups of apple cider into a saucepan. Heat it on medium. Watch as it boils and then let it simmer. This will take about 15-20 minutes. You want it to reduce to 1 cup. This step adds a rich flavor. Creaming the butter and sugars In a large bowl, combine 1 cup of softened butter, 1 cup of granulated sugar, and ½ cup of packed brown sugar. Beat them together until the mixture is light and fluffy. This should take about 3 minutes. It’s key for a soft cake. Mixing in eggs and vanilla Add 3 large eggs one at a time. Mix well after each egg to blend it in. Next, stir in 1 teaspoon of vanilla extract. This adds a lovely aroma and flavor. Whisking dry ingredients In another bowl, whisk together 2 ½ cups of all-purpose flour, 1 tablespoon of baking powder, 1 teaspoon of baking soda, 1 teaspoon of ground cinnamon, ½ teaspoon of ground nutmeg, and ½ teaspoon of salt. This step ensures even mixing of the dry ingredients. Folding in diced apples Now, slowly add the dry mix to the butter mix. Alternate with the reduced apple cider, starting and ending with the dry mix. Mix until just combined. Then gently fold in 1 cup of diced apples. This step adds texture and flavor. Pouring batter into prepared pans Grease and flour your chosen baking pan. Pour the batter in, spreading it evenly. This helps the cake bake uniformly. Baking times for different pan sizes If using two 9-inch round pans, bake for 30-35 minutes. For a 9x13-inch sheet cake, bake for 40-45 minutes. Use a toothpick to check if it’s done. It should come out clean when inserted in the center. Cooling tips before glazing Let the cake cool in the pan for 10 minutes. Then transfer it to a wire rack. Cool completely before adding the maple glaze. This prevents the glaze from melting away. - Using fresh apple cider: Fresh apple cider makes a big difference. It adds rich flavor. Look for cider with no added sugars or preservatives. This will help your cake taste great. You can find fresh cider at local markets in autumn. - Avoiding overmixing the batter: Mix the batter just till it comes together. Overmixing can make the cake dense. Gently fold in the diced apples at the end. This keeps the texture light and fluffy. - Adjusting glaze thickness: Start with the maple syrup and powdered sugar. Add milk slowly until you reach the right thickness. A thicker glaze stays on top. A thinner glaze will drip down the sides more. - Techniques to drizzle glaze effectively: Use a spoon or small whisk to drizzle the glaze. Hold it high for a more even drizzle. Move your hand in a back-and-forth motion for a fun pattern. Practice makes perfect! - Adding spices or extracts: Consider adding a pinch of ginger or cloves. These spices can give your cake a warm flavor. A splash of almond extract also adds a nice touch. - Tips for incorporating different apple varieties: Use a mix of sweet and tart apples. Granny Smith and Honeycrisp work well together. This blend will add depth to the cake's flavor. Make sure to peel and dice the apples so they blend well in the batter. {{image_2}} You can change up the frosting for fun. A cream cheese frosting adds a tangy taste. It pairs well with the sweet apple cider cake. To make this, mix softened cream cheese with butter and powdered sugar. Add a splash of vanilla for extra flavor. If you love chocolate, try a chocolate ganache. Melt chocolate with heavy cream for a rich topping. Pour it over the cooled cake. The chocolate and apple flavors blend beautifully. For those who need gluten-free options, use a gluten-free flour blend. This works well in the cake batter. Make sure the other ingredients are gluten-free too. If you want a vegan version, swap eggs for flax eggs. Mix one tablespoon of ground flaxseed with three tablespoons of water. Let it sit until it thickens. Use a dairy-free butter substitute and almond or oat milk for the glaze. To boost the flavor, add nuts or dried fruits. Chopped walnuts or pecans add crunch. Dried cranberries or raisins bring a sweet chewiness. Mix them into the batter before baking. Experiment with spices too. Add ginger or cloves for a warm twist. A pinch of allspice can deepen the flavor, making every bite exciting. To keep your apple cider cake fresh, wrap it tightly. Use plastic wrap or foil. This prevents air from drying it out. You can store it at room temperature for up to two days. If you live in a warm area, refrigerate it. Always keep it in an airtight container to maintain its moisture. To freeze the cake, let it cool completely first. Then, wrap it well in plastic wrap. You can also use aluminum foil for extra protection. Place it in a freezer-safe bag. This will help avoid freezer burn. When you're ready to eat, thaw it in the fridge overnight. For the best texture, let it sit at room temp for an hour before serving. This cake lasts up to five days at room temperature. In the fridge, it can last about a week. Look for signs of spoilage like mold or an off smell. If the cake feels dry or crumbly, it’s best to toss it. Enjoy every slice while it’s fresh for the best taste! For this cake, baking time depends on the pan. If you use two 9-inch round cake pans, bake for 30-35 minutes. If you opt for a 9x13-inch sheet cake, go for 40-45 minutes. Always check with a toothpick. Insert it into the center; it should come out clean. Yes, you can use store-bought apple cider. However, homemade cider often has a richer flavor. Store-bought cider may taste milder. If using store-bought, look for a brand with no added sugars. This way, your cake stays true to the apple flavor. You can use honey or agave syrup as substitutes for maple syrup. Honey gives a floral note, while agave is milder. However, these alternatives may change the glaze's flavor slightly. If you prefer a vegan option, agave is your best bet. Yes, this cake can fit special diets with a few changes. For gluten-free, substitute all-purpose flour with a gluten-free blend. For dairy-free, use coconut oil in place of butter and almond milk in the glaze. These adjustments keep the cake tasty and enjoyable! This blog post covered how to make a delicious apple cider cake. We explored the dry and wet ingredients, and essential components like apples and maple glaze. I walked you through step-by-step instructions, including tips for the best flavor and texture. We also looked at variations, storage methods, and answered common questions. Remember, this cake is not just a treat; it’s a way to enjoy fall flavors any time. With a bit of practice, you can make it your own. Happy baking!

Apple Cider Cake with Maple Glaze Simple Delight

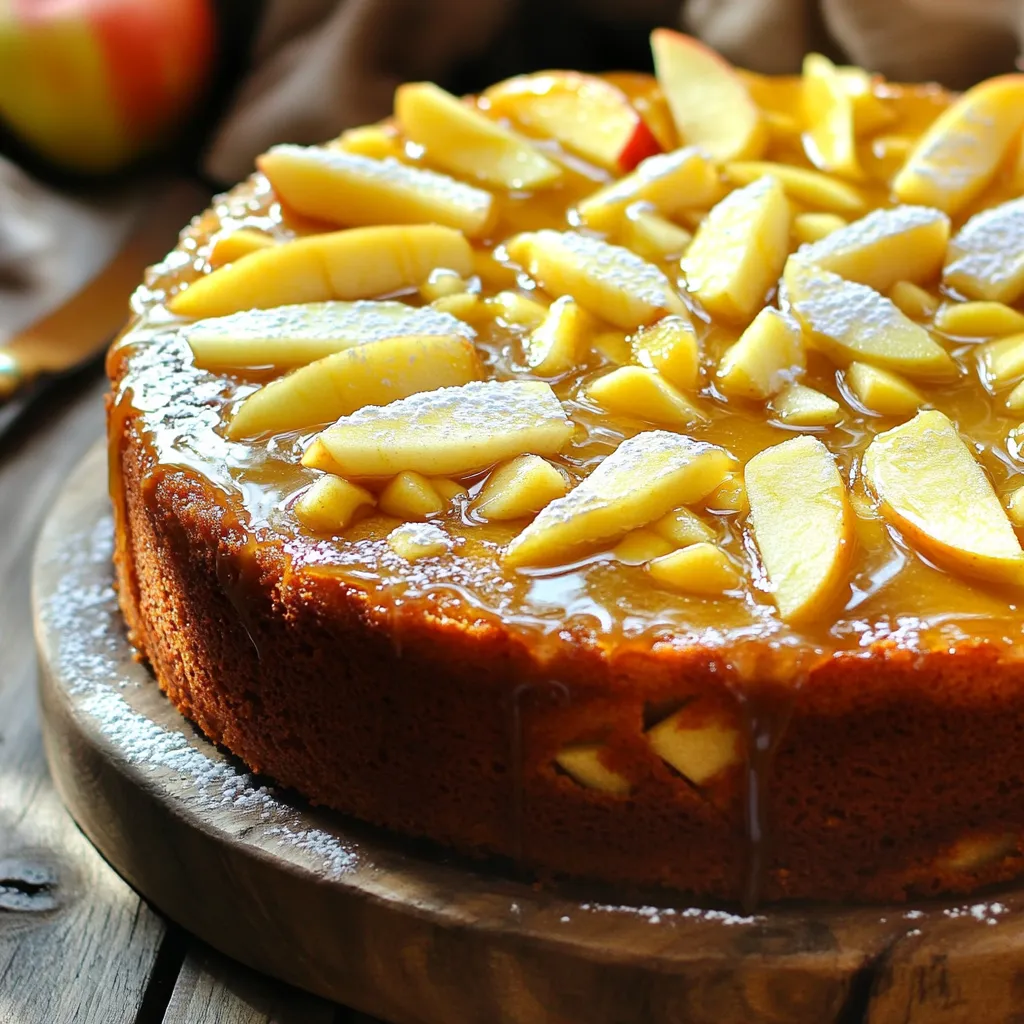
Welcome to my kitchen! Today, I’m sharing a recipe for Apple Cider Cake topped with a sweet maple glaze. This

Older posts
Newer posts
← Previous Page1 … Page12 Page13 Page14 … Page84 Next →

dsad

© 2026 Lisa Dishes • Built with GeneratePress

Our Policies

  • Copyright Policy
  • Cookie Policy
  • GDPR Policy
  • Privacy Policy
  • Disclaimer
  • Terms Of Use

More Information

  • Home
  • About
  • Contact
  • Appetizers
  • Dessert
  • Dinner
  • Drinks
©2026, Lisa Dishes About Back To Top