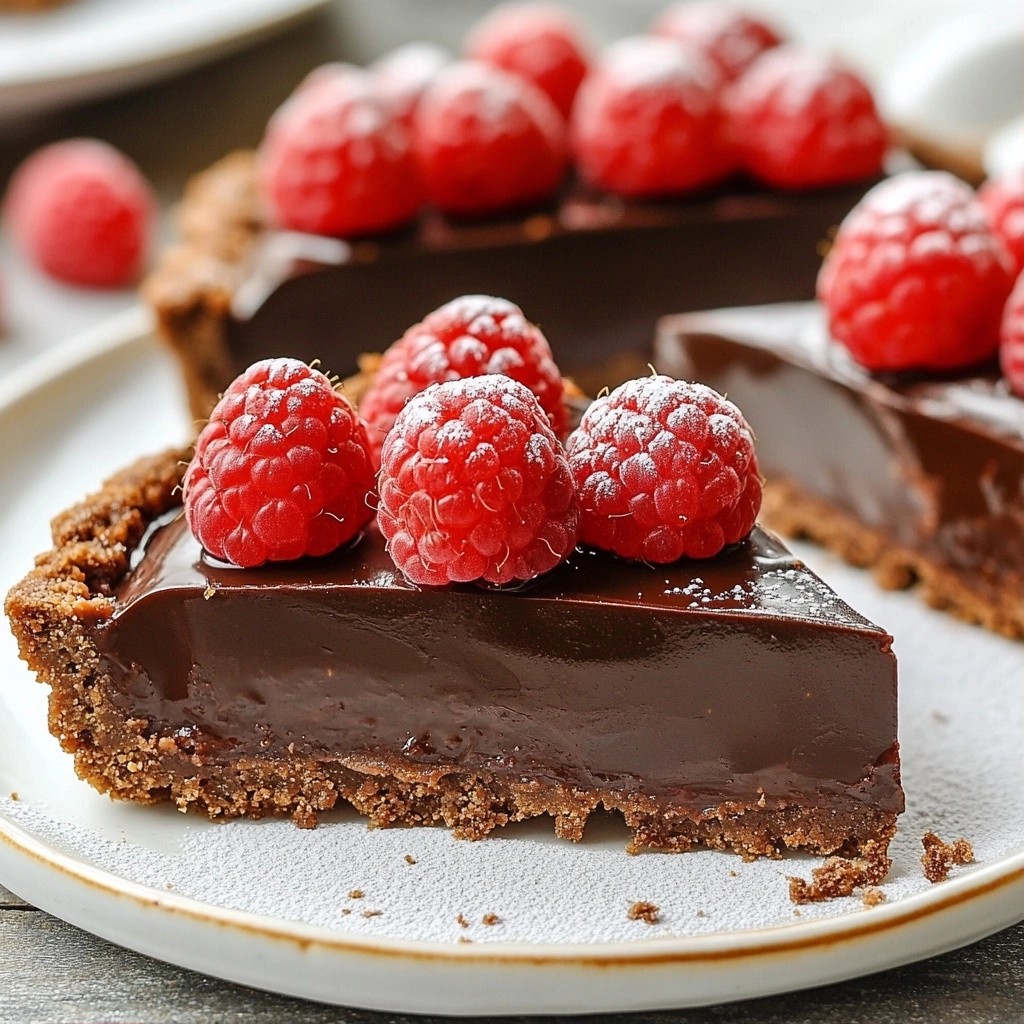
If you love chocolate and raspberries, you’re in for a treat! My Smooth No-Bake Chocolate Raspberry Tart is easy to make and simply delicious. This dessert impresses with rich flavors and a creamy texture. You won’t need to turn on the oven, making it perfect for hot days or quick gatherings. Let's dive in and discover how you can whip up this delightful tart that will wow your guests!
Why I Love This Recipe
- Decadent Flavor: The combination of rich dark chocolate and fresh raspberries creates an indulgent dessert that satisfies any sweet tooth.
- No-Bake Convenience: This tart is incredibly easy to make without the need for an oven, perfect for hot days or when you're short on time.
- Healthy Ingredients: Using coconut milk and natural sweeteners makes this tart a healthier option compared to traditional desserts.
- Visual Appeal: The vibrant colors of the raspberries against the dark chocolate make for a stunning presentation that wows guests.
Ingredients
Main Ingredients for Tart Crust
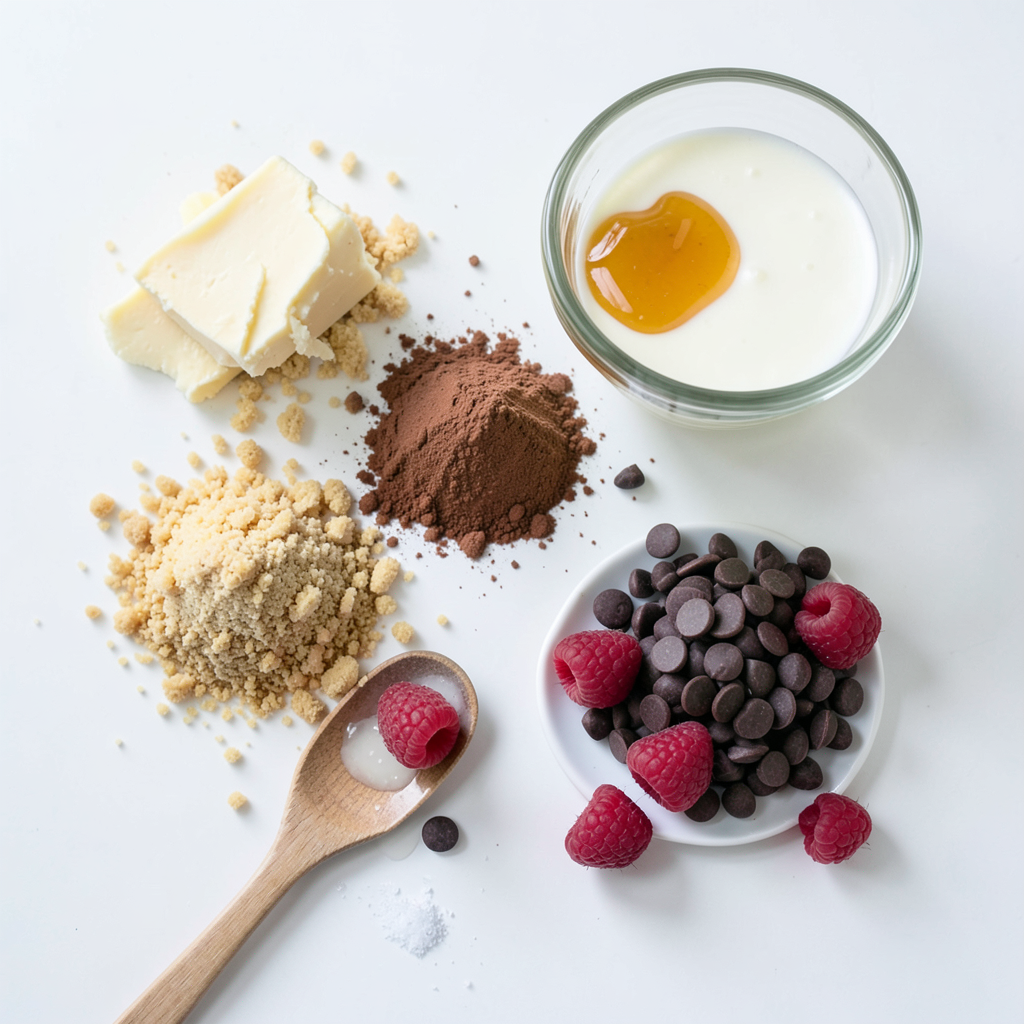
- 1 ½ cups graham cracker crumbs
- ½ cup unsweetened cocoa powder
- ½ cup unsalted butter, melted
- 2 tablespoons honey or maple syrup
To make a great crust, start with graham cracker crumbs. They give a sweet and crumbly base. Cocoa powder adds rich chocolate flavor. Melted butter binds the mixture together. Honey or maple syrup adds a touch of natural sweetness. Combine these in a bowl, and you will have a perfect tart crust.
Ingredients for Chocolate Filling
- 1 ½ cups dark chocolate chips (dairy-free if desired)
- 1 cup coconut milk (full-fat for creaminess)
- 1 teaspoon vanilla extract
- A pinch of salt
- 1 cup fresh raspberries (plus extra for topping)
The filling is the star of the tart. Dark chocolate chips melt into a smooth chocolate layer. Coconut milk adds creaminess, making it rich and luscious. Vanilla extract enhances the flavors, while a pinch of salt brings everything together. Finally, fresh raspberries add a burst of fruitiness, balancing the sweetness.
Optional Garnish Ingredients
- Additional fresh raspberries
For garnish, fresh raspberries look beautiful on top. They add color and an extra raspberry kick. You can also sprinkle cocoa powder for a touch of elegance. This simple garnish makes the tart look even more delightful and tempting.
Step-by-Step Instructions
Preparing the Tart Crust
First, grab a mixing bowl. Combine 1 ½ cups of graham cracker crumbs with ½ cup of unsweetened cocoa powder. Next, add ½ cup of melted unsalted butter and 2 tablespoons of honey or maple syrup. Mix everything well until it looks like wet sand.
Now, take a tart pan and press the crumb mix firmly into the bottom and sides. Make sure it is packed tight. This helps the crust hold its shape. Once done, put the crust in the fridge while you make the filling.
Making the Chocolate Raspberry Filling
For the filling, take a saucepan and heat 1 cup of full-fat coconut milk over medium heat. Bring it to a gentle simmer, then remove it from the heat. Stir in 1 ½ cups of dark chocolate chips, 1 teaspoon of vanilla extract, and a pinch of salt. Mix until it is smooth and creamy.
Let this chocolate mix cool for about 10 minutes. After that, gently fold in 1 cup of fresh raspberries. Be careful not to mash them too much.
Assembling and Chilling the Tart
Now it’s time to assemble! Pour the chocolate raspberry filling into the chilled crust. Smooth it out evenly with a spatula. Once it looks nice, put the tart back in the fridge. Let it chill for at least 4 hours, or until it is set.
After it sets, carefully remove the tart from the pan. Top it with extra fresh raspberries for a lovely look. Now, it’s ready to serve and enjoy!
Tips & Tricks
Achieving the Perfect Tart Texture
To get a smooth texture, use fine graham cracker crumbs. You can crush the crackers in a food processor or place them in a bag and roll with a pin. Add melted butter and mix until it looks like wet sand. Press this mixture firmly into your tart pan. This helps create a strong base. Chill it well before adding the filling. This step keeps the crust from getting soggy.
Enhancing Flavor with Additional Ingredients
Want to boost the taste? Consider adding a splash of espresso to the chocolate filling. It brings out the chocolate flavor nicely. You can also swap the raspberries for strawberries or add a hint of orange zest. Both options add a fresh twist. If you like nuts, try mixing in some crushed walnuts for a crunchy bite.
Presentation Tips for Serving
Make your tart look stunning. Slice it carefully and place each piece on a plate. Top with whole raspberries and a light dusting of cocoa powder. For extra flair, drizzle with melted dark chocolate. This simple touch makes your tart look like a dessert from a fancy restaurant. Serve with a dollop of whipped cream to impress your guests even more.
Pro Tips
- Use Fresh Ingredients: Opt for fresh raspberries to enhance the flavor and presentation of your tart.
- Chill Properly: Ensure the tart is chilled for at least 4 hours to achieve the perfect set and texture.
- Experiment with Sweeteners: Feel free to adjust the sweetness by using agave nectar or adjusting the amount of honey/maple syrup.
- Presentation Matters: Use a sprinkle of cocoa powder and a few whole raspberries for a visually appealing garnish when serving.
Variations
Alternate Chocolate Options
You can switch up the chocolate in this tart. If you want a sweeter taste, try milk chocolate chips. For a richer flavor, use semisweet chocolate. You can even go for white chocolate for a fun twist. Remember, if you use dairy-free chocolate, it works great too!
Fruit Substitutes for the Filling
Raspberries are amazing, but you can try other fruits too. Fresh strawberries or blueberries can give a nice taste. If you prefer tropical flavors, go for mango or pineapple. Just chop the fruit and fold it into the filling like you would with raspberries.
Gluten-Free or Vegan Modifications
To make this tart gluten-free, use gluten-free graham crackers. They work just like regular ones. If you want a vegan tart, replace the butter with coconut oil. Use maple syrup instead of honey for sweetness. You can also use plant-based chocolate chips for a full vegan delight.
Storage Info
Best Practices for Refrigeration
To keep your tart fresh, store it in the fridge. Use an airtight container to prevent any odors from affecting the flavor. Make sure to cover the tart gently with plastic wrap if you do not have a container. This keeps it moist while it chills. The tart should stay fresh for up to 5 days in the fridge.
Freezing Instructions
If you want to save some for later, freezing works well. Wrap the tart tightly in plastic wrap, then place it in a freezer-safe container. This keeps out air and moisture. You can freeze the tart for up to 3 months. When you're ready to enjoy it, thaw it in the fridge for a few hours or overnight.
Shelf Life and Reheating Tips
The tart is best eaten cold, so there’s no need to reheat it. If you do want to serve it warm, let it sit out for about 10 minutes. This way, it softens just enough for a smooth bite. If stored properly, the tart will remain tasty for about 5 days in the fridge or up to 3 months in the freezer.
FAQs
Can I use different types of chocolate?
Yes, you can use different types of chocolate. Dark chocolate gives a rich taste. Milk chocolate offers a sweeter flavor. If you like white chocolate, that works too! Just remember, each type changes the tart's taste.
How long does the tart need to chill?
The tart needs to chill for at least 4 hours. This time helps it set properly. If you can wait longer, it tastes even better. Overnight chilling is perfect for the best flavor and texture.
What can I serve with the tart?
You can serve the tart with whipped cream or ice cream. Fresh berries add a nice touch. A dusting of cocoa powder also enhances the look. Try pairing it with mint leaves for a fresh twist.
This blog post covered how to make a delicious chocolate tart. We looked at the key ingredients for the crust and filling, plus optional garnishes. You learned step-by-step instructions, tips for the right texture, and ways to enhance flavor. Variations like gluten-free options were also discussed. Don’t forget to follow the storage tips for freshness. Making this tart is a fun kitchen project that will impress everyone. Enjoy your baking, and share this tasty treat with family and friends!