Craving a sweet treat that's easy to whip up? Our Silky No-Bake Dark Chocolate Peppermint Cups are the perfect solution! They offer rich chocolate flavor with a minty twist, and you don’t even need to turn on the oven. I’ll guide you through simple steps, tasty ingredients, and useful tips to create these delightful cups at home. Get ready to satisfy your sweet tooth with this quick and fun recipe!
Why I Love This Recipe
- Decadent Flavor: The rich dark chocolate paired with refreshing peppermint creates a perfect balance of sweet and minty, making each bite irresistible.
- No-Bake Convenience: This recipe is incredibly easy to make without any baking required, making it a perfect treat for any occasion.
- Customizable Delight: You can adjust the sweetness and peppermint intensity to your liking, or even add other toppings like nuts or dried fruits.
- Perfect for Sharing: These cups are great for holiday gatherings, parties, or as thoughtful homemade gifts for friends and family.
Ingredients
Main Components
To create Silky No-Bake Dark Chocolate Peppermint Cups, you need a few key ingredients. First, gather:
- 1 cup dark chocolate chips (70% cocoa or higher)
- 1/2 cup coconut oil
- 1/4 cup unsweetened cocoa powder
Dark chocolate chips provide richness and depth. Coconut oil adds creaminess and keeps the cups firm. Unsweetened cocoa powder enhances the chocolate flavor.
Sweeteners and Flavors
Next, we add sweetness and flavor. You will need:
- 1/4 cup maple syrup
- 2 teaspoons pure peppermint extract
- 1/2 teaspoon vanilla extract
- Pinch of sea salt
Maple syrup acts as a natural sweetener. Pure peppermint extract gives that refreshing taste. Vanilla extract balances the flavors, while a pinch of sea salt enhances them.
Toppings
For the finishing touch, we include a fun topping. You will want:
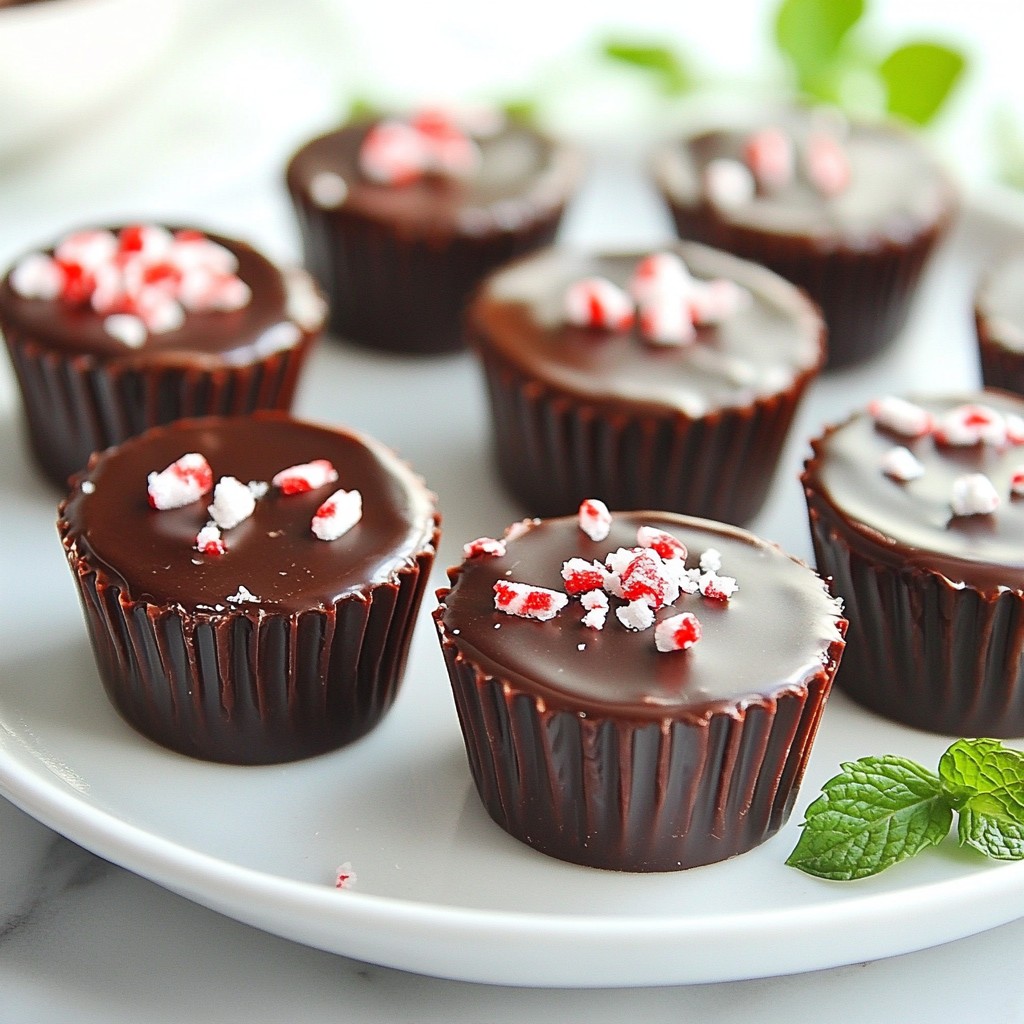
- 1/2 cup crushed peppermint candies (or candy canes)
These crushed candies add a lovely crunch and festive flair. They also bring a burst of peppermint joy in every bite.
Gather these ingredients, and you are ready to make a delicious treat!

Step-by-Step Instructions
Melting Chocolate and Coconut Oil
To start, I melt the chocolate and coconut oil together. You can use a double boiler or a heat-safe bowl over simmering water. This method helps keep the chocolate smooth. Stir often until the mixture melts completely. You want it to look shiny and silky.
Combining Ingredients
Once melted, it is time to add sweeteners and flavors. I take the bowl off the heat and mix in the maple syrup, peppermint extract, vanilla extract, and a pinch of sea salt. This step adds depth to the flavor. Stir well until everything is combined and smooth.
Preparing and Filling Molds
Next, I prepare my molds. I line a muffin tin with paper liners or use silicone muffin cups. This helps with easy removal later. Using a spoon, I pour a small amount of the chocolate mixture into each cup. Fill them about one-third full.
Chilling Process
Now comes the fun part! I sprinkle a layer of crushed peppermint candies on top of the chocolate in each cup. Then, I pour the rest of the chocolate mixture over the candies until the cups are nearly full. I use a spatula to smooth the tops if needed. Finally, I place the muffin tin in the fridge. I let the cups chill for at least 1-2 hours until they are firm. Enjoy these treats chilled for a refreshing bite!
Tips & Tricks
Achieving the Perfect Texture
To get that silky feel, use high-quality dark chocolate. I suggest chocolate with at least 70% cocoa. This will give you a rich taste and smooth texture. Melt the chocolate and coconut oil together slowly. Stir often to keep it creamy. If the mixture seems too thick, add a little more coconut oil. The key is to blend everything well for a smooth finish.
Serving Suggestions
These cups are great for any occasion. Serve them chilled for a refreshing treat. You can enjoy them at holiday parties or casual family gatherings. Pair them with coffee or tea for a nice touch. You can also stack them on a tray for an eye-catching display. The flavors work well together and will impress your guests.
Presentation Tips
Make your cups look as good as they taste. Place them on a festive platter. You can sprinkle extra crushed peppermint candies on top for color. A sprig of fresh mint adds a nice touch too. For a fun twist, use colorful liners. This makes each cup pop and look inviting. Remember, we eat with our eyes first!
Pro Tips
- Use High-Quality Chocolate: Opt for dark chocolate with at least 70% cocoa for a rich flavor and smooth texture.
- Coconut Oil for Creaminess: Coconut oil helps create a silky texture; make sure to melt it completely with the chocolate.
- Chill for Best Results: Allow the cups to chill thoroughly in the refrigerator for at least 2 hours to ensure they set properly.
- Experiment with Flavors: Feel free to adjust the peppermint extract or add spices like cinnamon for a unique twist.
Variations
Alternative Chocolate Options
You can swap dark chocolate for milk or white chocolate. Each choice gives a different taste. Milk chocolate adds creaminess, while white chocolate brings sweetness. If you like rich flavors, stick with dark chocolate. The higher the cocoa content, the more intense the taste.
Different Flavor Profiles
Adding flavors can make your cups unique. Try using orange zest for a citrus touch. Almond extract can also enhance the flavor. For a spicy kick, add a dash of cinnamon. You can even mix in a little espresso powder for a coffee twist. These flavors will change the whole vibe of your treat.
Dietary Modifications
If you want to make these cups dairy-free, use dairy-free chocolate chips. You can also replace maple syrup with agave syrup for a vegan option. For a nut-free version, ensure your chocolate and coconut oil are free of cross-contamination. Adjusting these ingredients keeps the fun without losing flavor.
Storage Info
Best Storage Practices
To keep your silky no-bake dark chocolate peppermint cups fresh, store them in an airtight container. This helps prevent moisture and keeps them safe from strong odors. Line the container with parchment paper for extra protection. If you stack the cups, place wax paper between layers to avoid sticking.
Shelf Life
These peppermint cups last about one week in the fridge. After a week, they may lose their great taste and texture. If you want them to last longer, consider freezing them for later use.
Freezing Instructions
You can freeze these treats for up to three months. Wrap each cup in plastic wrap before placing them in a freezer-safe container. This keeps them fresh and prevents freezer burn. When you're ready to enjoy, just move them to the fridge for a few hours to thaw. Enjoy the deliciousness!
FAQs
Can I use milk chocolate instead of dark chocolate?
Yes, you can use milk chocolate. Milk chocolate will make the cups sweeter. The texture will also be creamier. However, you won’t get the same rich flavor as dark chocolate. If you love sweetness, milk chocolate works great!
What can I substitute for coconut oil?
You can use unsalted butter or another oil. Olive oil or avocado oil are good options too. These will change the taste a bit, but they still work well. Just keep the same amount as the coconut oil in the recipe.
How long do these peppermint cups last?
These peppermint cups last about one week in the fridge. Store them in an airtight container. They can also stay fresh for about three months in the freezer. Just make sure to wrap them well to avoid freezer burn.
In this article, I covered key ingredients for your peppermint cups, from chocolate to toppings. I shared step-by-step instructions for melting chocolate and chilling the cups. You learned tips for the best texture and presentation. We explored tasty variations and discussed storage tips to keep them fresh.
Now, you can impress friends and family with these treats. Experiment and find your favorite flavors. Enjoy making these simple sweets!