Indulging in a rich, no-bake dark chocolate mousse is a sweet escape you deserve. This recipe combines simple ingredients and easy steps, making it perfect for any chocolate lover. Whether you want to impress guests or enjoy a quiet night in, this mousse is sure to satisfy. Let’s dive into the luscious world of chocolate delight that awaits you!
Why I Love This Recipe
- Decadent Flavor: This mousse boasts an intense dark chocolate flavor that is both rich and satisfying, perfect for chocolate lovers.
- Silky Texture: The velvety smoothness of this mousse melts in your mouth, providing a luxurious dessert experience.
- Simple Preparation: With just a few ingredients and straightforward steps, this recipe is easy to follow, making it accessible for all skill levels.
- Versatile Serving Options: Whether served in individual cups or a large bowl, this mousse is perfect for any occasion, from casual gatherings to elegant dinners.
Ingredients
List of Ingredients
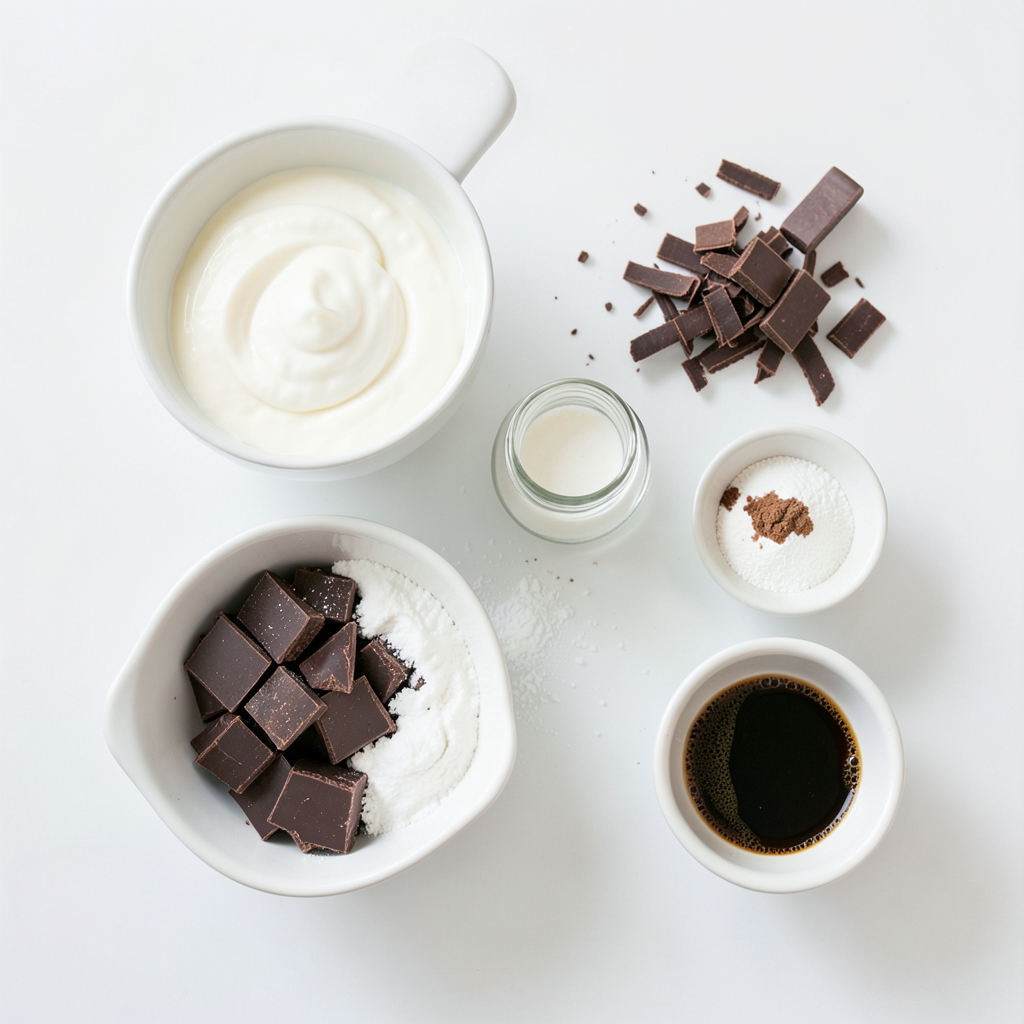
To make this rich no-bake dark chocolate mousse, you will need:
- 200g dark chocolate (70% cocoa), chopped
- 2 cups heavy cream
- 1/4 cup powdered sugar
- 1 teaspoon vanilla extract
- Pinch of salt
- 2 tablespoons coffee (optional, enhances chocolate flavor)
- Chocolate shavings or berries for garnish
Ingredient Substitutions
You can switch some ingredients based on your needs. If you want a lighter mousse, use whipped coconut cream instead of heavy cream. You can also choose a dairy-free chocolate to make it vegan. If you lack powdered sugar, regular granulated sugar works too. Just blend it finely before use. For flavor, you can skip the coffee or use espresso if you want a stronger taste.
Importance of Quality Ingredients
Using high-quality ingredients makes a big difference. The dark chocolate should be at least 70% cocoa for the best flavor. It gives the mousse a deep and rich taste. Fresh heavy cream adds a smooth texture. Always choose the best vanilla extract you can find. It enhances the overall flavor profile. Remember, great ingredients lead to a great dessert!
Step-by-Step Instructions
Melting the Dark Chocolate
To start, chop the dark chocolate into small pieces. Place the chocolate in a microwave-safe bowl. Heat it in the microwave for 30 seconds. Stir the chocolate after each interval. Keep heating until the chocolate is fully smooth. Let it cool for a bit. This step is key, as cool chocolate mixes better with cream.
Whipping the Cream
Next, grab a clean bowl. Add 1 1/2 cups of heavy cream. Use a hand mixer or a stand mixer. Beat the cream until soft peaks form. This means it should look fluffy. Now, add the powdered sugar, vanilla extract, and a pinch of salt. Continue to whip until stiff peaks form. You want it thick and creamy, not runny.
Combining the Mixtures
If you chose to use coffee, stir it into the cooled chocolate. Mix until it's smooth. Now, gently fold this chocolate mix into the whipped cream. Do this in three parts. Use a spatula to combine, but be careful. You don’t want to lose all that air from the whipped cream. Keep folding until there are no white streaks left.
Refrigeration and Serving
Now, it's time to serve. Divide the mousse into cups or a big bowl. Cover it and place it in the fridge. Let it chill for at least 4 hours. This helps the mousse set properly. When you're ready to serve, whip the remaining 1/2 cup of heavy cream to soft peaks. Add a dollop on top of each mousse. Finish with chocolate shavings or fresh berries for a touch of class.
Tips & Tricks
Achieving the Perfect Texture
To get the best texture, focus on your whipped cream. Whip it until you see soft peaks. This keeps the mousse light and airy. When folding in the chocolate, do it gently. Use a spatula to mix, and don’t rush. You want to keep the air in the cream for that fluffy feel.
Serving Suggestions
I love serving this mousse in small cups. This makes it easy for guests to enjoy. You can add a dollop of whipped cream on top. Garnish with chocolate shavings or fresh berries. Both add color and flavor. For a fun twist, serve with a crunchy cookie on the side.
Enhancements for Richness
For a richer taste, try adding coffee. Just two tablespoons can boost the chocolate flavor. To make it even creamier, use high-quality chocolate. Look for dark chocolate with 70% cocoa or more. This gives the mousse a deep, bold taste. You can also swirl in a bit of melted chocolate before serving for added richness.
Pro Tips
- Use Quality Chocolate: The flavor of your mousse largely depends on the quality of the chocolate. Choose a high-quality dark chocolate with at least 70% cocoa for the best results.
- Cool the Chocolate Properly: Make sure the melted chocolate is slightly cooled before folding it into the whipped cream to avoid melting the cream and losing its airy texture.
- Whip Cream to Right Consistency: Whip the cream until stiff peaks form, but be careful not to over-whip, as it can turn grainy and affect the mousse's smooth texture.
- Chill Before Serving: Allow the mousse to set in the refrigerator for at least 4 hours. This will enhance the flavor and ensure a perfect texture.
Variations
Alternative Flavors (Mint, Orange, etc.)
You can change the flavor of your mousse easily. Try adding a few drops of mint extract for a fresh taste. Orange zest also works well. Just add about a tablespoon of zest to the melted chocolate. This brightens the flavor and adds a nice twist.
Ways to Customize Garnishes
Garnishes add style and flair to your mousse. Use chocolate shavings for a classic look. Fresh berries like raspberries or strawberries can add color and a fruity touch. For a fun crunch, sprinkle some crushed nuts on top. You can even drizzle a bit of caramel sauce for extra sweetness!
Vegan or Dairy-Free Options
If you want a vegan mousse, swap out the heavy cream. Use coconut cream instead. It gives a rich texture and a hint of coconut flavor. Make sure to use dairy-free chocolate. Check the label to ensure it has no milk. This way, everyone can enjoy a tasty treat!
Storage Info
Best Practices for Storing Mousse
To keep your dark chocolate mousse fresh, cover it well. Use plastic wrap or an airtight container. This keeps air out and prevents it from absorbing odors from the fridge. Always store the mousse in the fridge. Do not leave it out at room temperature for too long.
Shelf Life and Freezing Tips
Your mousse will stay fresh for about 3 to 4 days in the fridge. If you want to keep it longer, you can freeze it. For freezing, place the mousse in freezer-safe containers. It can last for up to 2 months in the freezer. When ready to eat, move it to the fridge overnight to thaw.
Reheating and Serving after Storage
You do not need to reheat mousse. It tastes best cold. If you have leftover mousse, just give it a gentle stir before serving. This helps return the texture to its creamy state. Add fresh whipped cream and garnishes right before serving for that lovely touch. Enjoy your mousse even after storage!
FAQs
Can I make this mousse ahead of time?
Yes, you can make this mousse ahead of time. It tastes great after chilling. I often prepare it a day before serving. This gives it time to set well and flavors to blend. Just cover it tightly in the fridge.
What type of chocolate works best?
I recommend using dark chocolate with 70% cocoa. This gives the mousse a rich flavor. You can also use chocolate with higher cocoa content for a bolder taste. Avoid using milk chocolate, as it will make the mousse too sweet.
Is it possible to use less sugar?
Yes, you can use less sugar if you prefer. The mousse will still taste great. Start with half the amount and adjust to your taste. Remember, the chocolate also adds sweetness.
How can I make it more chocolatey?
To make it more chocolatey, use a higher percentage of dark chocolate. You can also add cocoa powder. Mix in about 2 tablespoons of cocoa powder with the chocolate. This adds more depth without changing the texture.
Can I substitute the heavy cream?
Yes, you can substitute heavy cream with coconut cream for a dairy-free version. This will give a slightly different flavor but still keep it creamy. You can also use whipped topping for a lighter mousse.
We discussed simple ingredients to make delicious mousse. Quality matters for great taste. I shared step-by-step instructions to guide you easily. Tips help you achieve the best texture and flavor. Plus, many variations let you customize to your liking.
Remember, storing mousse correctly keeps it fresh for longer. You can make it ahead and enjoy stress-free. Dive into making this treat, and have fun experimenting with flavors and styles! Enjoy your tasty creation!