Craving a sweet yet simple treat? You’ll love these Rich No-Bake Chocolate Hazelnut Bars! They combine creamy chocolate and crunchy hazelnuts in every bite. Plus, you don’t need to turn on your oven. I'll guide you through easy steps to create these delicious bars, perfect for any occasion. Get ready to impress your friends and family with this quick, tasty dessert that everyone will adore!
Why I Love This Recipe
- Healthier Indulgence: This recipe offers a guilt-free way to enjoy chocolate bars, packed with wholesome ingredients like oats and hazelnuts.
- No Baking Required: Perfect for those who want a quick and easy dessert without turning on the oven!
- Customizable: Feel free to adjust the sweetness or add your favorite ingredients like dried fruits or different nuts.
- Perfect for Sharing: These bars make for great snacks or gifts, beautifully presented and easy to cut into portions.
Ingredients
Main Ingredients List
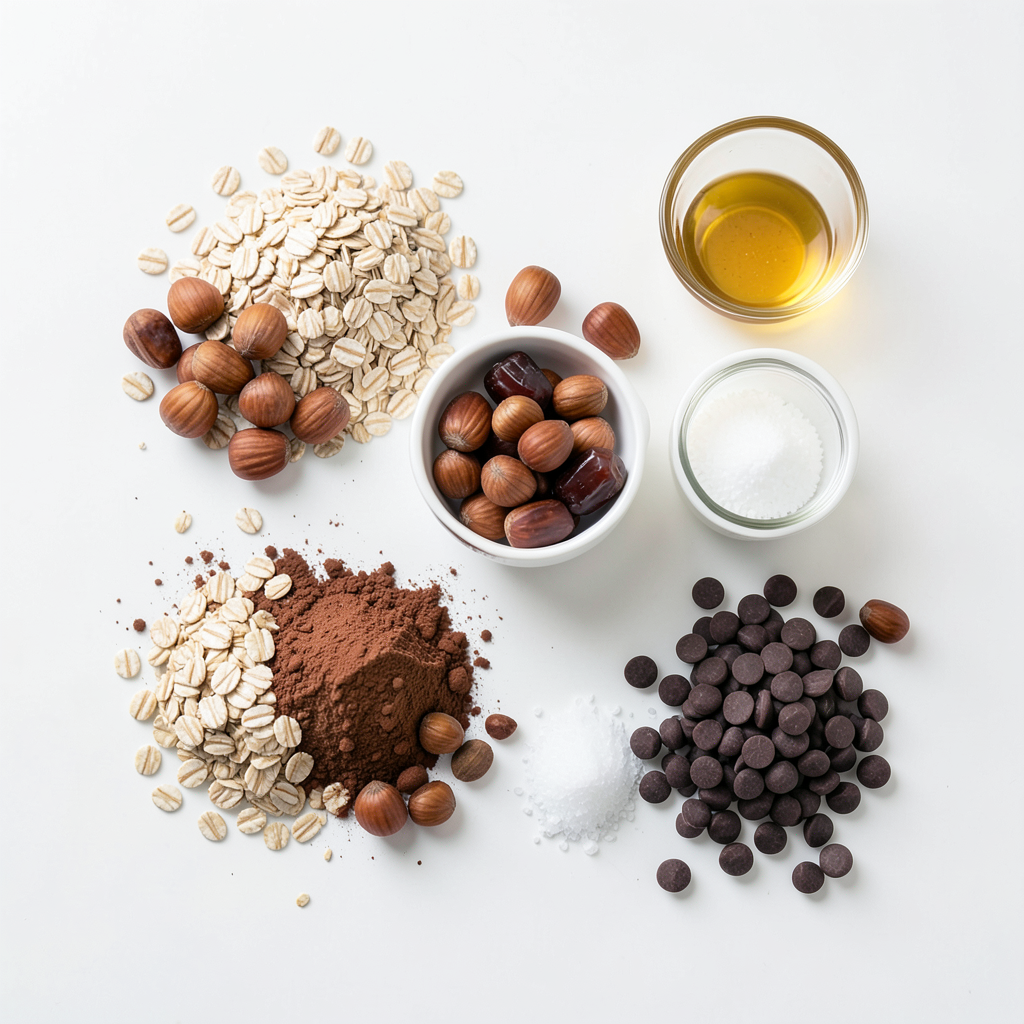
To make these tasty Rich No-Bake Chocolate Hazelnut Bars, you will need:
- 1 cup rolled oats
- 1 cup pitted dates, soaked for 10 minutes and drained
- 1 cup raw hazelnuts
- 1/2 cup unsweetened cocoa powder
- 1/4 cup maple syrup
- 1/4 cup coconut oil, melted
- 1 teaspoon vanilla extract
- A pinch of sea salt
- 1/2 cup dark chocolate chips (dairy-free if desired)
- Chopped hazelnuts for topping
Optional Ingredients for Variation
You can change this recipe to fit your taste. Here are some options:
- Use almond butter instead of coconut oil for creaminess.
- Add a scoop of protein powder for extra nutrition.
- Include shredded coconut for a tropical twist.
Notes on Ingredient Quality
The quality of your ingredients matters. Here’s what to look for:
- Hazelnuts: Choose fresh, raw hazelnuts for the best flavor.
- Cocoa powder: Use high-quality cocoa for richer taste.
- Maple syrup: Opt for pure maple syrup, not imitation.
- Chocolate chips: Dairy-free options add a nice touch if needed.
Investing in good ingredients makes these bars even better. Enjoy the process of gathering your supplies!
Step-by-Step Instructions
Preparation of the Hazelnut Base
Start by gathering your food processor. Add one cup of raw hazelnuts. Blend them well. You want them finely ground, but not a paste. This gives a great nutty flavor to your bars. Next, soak one cup of pitted dates in water for 10 minutes. After soaking, drain them. Add the dates to the food processor. Now, add one cup of rolled oats, half a cup of unsweetened cocoa powder, and a pinch of sea salt. Also, include a quarter cup of maple syrup and a quarter cup of melted coconut oil. Blend everything until it feels sticky and well combined. This mixture will form the base of your treats.
Combining and Blending the Ingredients
Line an 8x8 inch baking dish with parchment paper. Leave some extra paper to help lift the bars later. Now, take your blended mixture and press it firmly into the dish. Use your hands or a spatula to make it even. It should be flat and compact. This step is key for the bars to hold their shape. Make sure the mixture covers the entire bottom of the dish. The base is now ready for the chocolate topping!
Melting and Pouring the Chocolate
Next, melt half a cup of dark chocolate chips. You can use a microwave or a double boiler. If using a microwave, heat for 30 seconds at a time. Stir after each interval until smooth. Once melted, pour the chocolate over the pressed base. Use a spatula to spread it evenly. This creates a rich layer on top. Finally, sprinkle chopped hazelnuts over the chocolate. Press them in lightly to stick. Now, place the dish in the fridge for at least 2 hours. This helps the bars set. After chilling, lift the bars out using the parchment paper and cut them into squares. Enjoy your delicious treats!
Tips & Tricks
Achieving the Perfect Texture
To get the right texture, blend the hazelnuts well but not too much. If you blend too long, they turn into nut butter. Aim for a fine grind. When you mix the oats, dates, and cocoa, blend until it’s sticky. This stickiness helps the bars hold together.
How to Store the Bars for Freshness
To keep your bars fresh, wrap them tightly in plastic wrap or foil. You can also store them in an airtight container. Keep them in the fridge for up to a week. If you want to keep them longer, freeze them. Just make sure to wrap them well.
Serving Suggestions for Presentation
For a fun touch, drizzle extra melted chocolate over the bars. You can also sprinkle chopped hazelnuts on top. Serve them on a nice platter for guests. If you are gifting them, wrap each bar in parchment and tie with twine. It looks great and adds a personal touch.
Pro Tips
- Choose Fresh Dates: Opt for fresh, soft dates for the best sweetness and texture in your bars.
- Customize Your Nuts: Feel free to substitute hazelnuts with almonds or walnuts for a different flavor profile.
- Melting Chocolate Tips: When melting chocolate, do it slowly to prevent burning; stirring frequently helps achieve a smooth consistency.
- Storage Advice: Keep the bars refrigerated in an airtight container to maintain freshness for up to a week.
Variations
Substitute Ingredients for Dietary Preferences
You can easily swap out some ingredients to fit your needs. For a gluten-free option, use gluten-free oats. If you need a nut-free version, you can replace hazelnuts with sunflower seeds. This change keeps the texture, while avoiding allergens. You can also use agave syrup instead of maple syrup. This works well for a plant-based sweetener.
Flavor Additions to Enhance the Recipe
To add more flavor, consider mixing in spices. A pinch of cinnamon can give warmth. For a kick, add a bit of sea salt. You can also try adding a few tablespoons of almond butter for a creamy texture. Or, mix in some espresso powder for a rich coffee taste. These additions make the bars even more exciting.
Alternate Toppings to Customize
Toppings can change the look and taste of your bars. Instead of chopped hazelnuts, sprinkle on shredded coconut. You could also use chopped dark chocolate for an extra treat. Try adding crushed freeze-dried berries for a pop of color. Each topping brings a new twist, allowing you to create your own signature bar.
Storage Info
Best Storage Practices for No-Bake Bars
To keep your rich no-bake chocolate hazelnut bars fresh, store them in an airtight container. This helps keep moisture out and prevents the bars from getting hard. Place a layer of parchment paper between each layer of bars. This way, they won’t stick together. You can keep them in the fridge for up to one week. If you follow these steps, your bars will stay tasty and fresh.
Freezing Instructions for Extended Shelf Life
If you want to save your bars for later, you can freeze them. Cut the bars into squares before freezing. Wrap each piece in plastic wrap or foil. Then, put them in a freezer-safe bag or container. They can last up to three months in the freezer. When you want to eat them, take them out and let them thaw in the fridge. This keeps the texture nice and smooth.
Signs of Spoilage and How to Avoid It
Check your bars for any signs of spoilage. If you see mold or a strange smell, it is best to throw them away. Also, if they feel very hard or dry, they may not taste good. To avoid spoilage, always store them in an airtight container. Keep them away from heat and light. Enjoy your delicious bars while they are fresh!
FAQs
How long do these no-bake bars last?
These no-bake bars last about one week in the fridge. Store them in an airtight container. If you want them to last longer, freeze them for up to three months. Just thaw them in the fridge before enjoying.
Can I use other nuts instead of hazelnuts?
Yes, you can use other nuts if you prefer. Almonds or cashews work well too. Just make sure to grind them finely like the hazelnuts. This keeps the texture nice and smooth in the bars.
Is it possible to make these bars vegan?
Absolutely! The recipe is almost vegan as it stands. Just ensure you use dairy-free chocolate chips. The rest of the ingredients are plant-based, making this a great vegan treat.
What can I substitute for maple syrup?
If you don’t have maple syrup, you can use agave nectar or honey. Both will add sweetness and moisture. Just remember that honey is not vegan, so use agave if you want it to stay vegan.
This article covered how to make delicious no-bake bars. We discussed the main ingredients and optional ones to boost flavor. You learned step-by-step instructions for preparation and blending. I shared tips for a great texture and how to store the bars to keep them fresh. You can try variations to suit your taste or dietary needs.
Embrace these ideas and make your bars unique. Enjoy your tasty treats!