Are you craving a delicious treat that’s quick and easy? Dive into my Rich No-Bake Chocolate Hazelnut Bars recipe! Made with wholesome ingredients like hazelnuts and dates, these bars are not just tasty—they’re full of nutrients. Perfect for snacks, desserts, or quick energy boosts, you’ll love how simple they are to make. Ready to impress your friends and family? Let’s get started!
Why I Love This Recipe
- Decadent Flavor: These bars are rich, indulgent, and satisfy your chocolate cravings without any baking.
- Nutritious Ingredients: Made with wholesome ingredients like hazelnuts and Medjool dates, they provide a healthy treat option.
- Easy Preparation: With no baking required, this recipe is quick and simple, perfect for all skill levels in the kitchen.
- Customizable Toppings: You can easily add your favorite nuts or seeds on top for extra texture and personalization.
Ingredients
List of Required Ingredients
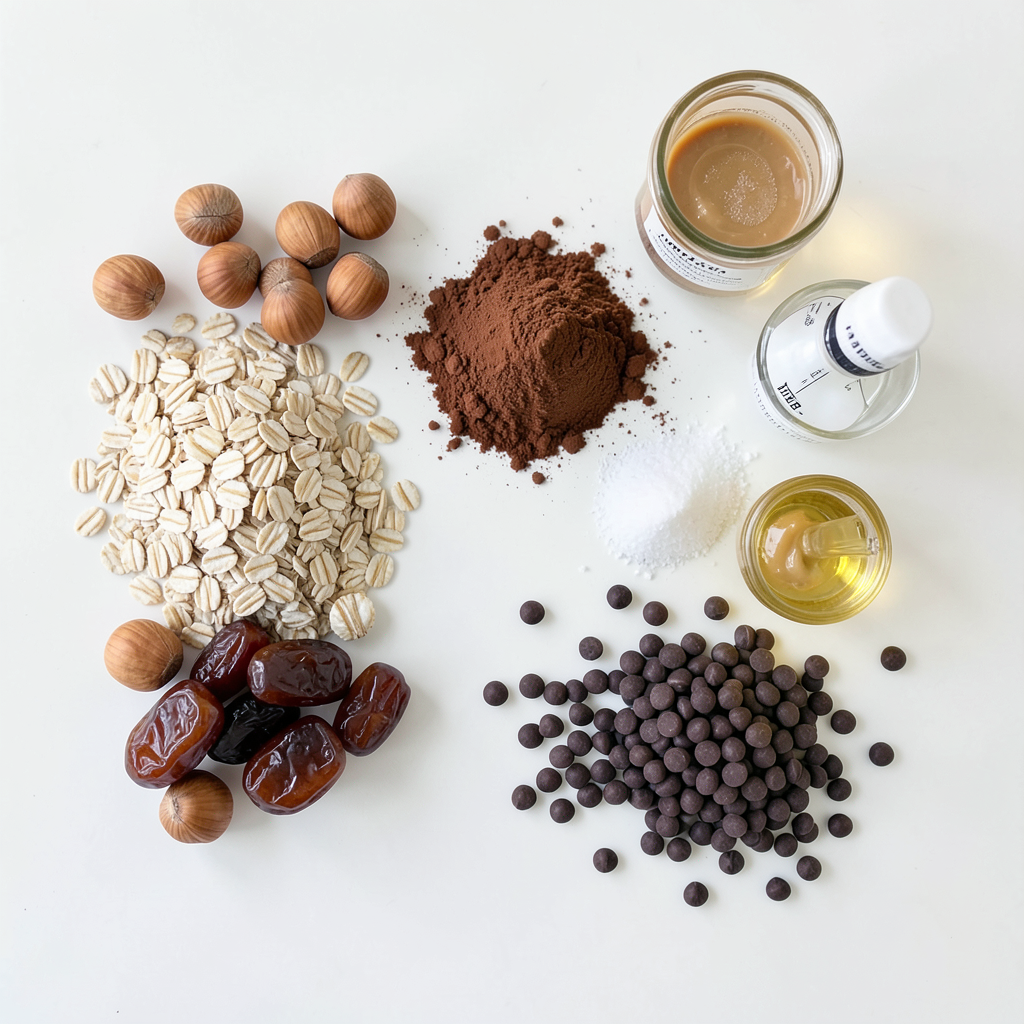
- 1 cup raw hazelnuts
- 1 cup pitted Medjool dates
- 1/2 cup rolled oats
- 1/4 cup unsweetened cocoa powder
- 1/4 cup almond butter
- 1/4 teaspoon sea salt
- 1 teaspoon vanilla extract
- 1/2 cup dark chocolate chips
- 2 tablespoons coconut oil
Ingredient Substitutions
You can swap hazelnuts with almonds or cashews for a different taste. If you need a nut-free option, try sunflower seed butter instead of almond butter. For a vegan option, use dairy-free chocolate chips and coconut cream in place of the regular chocolate.
Importance of Ingredient Quality
Using high-quality hazelnuts makes a big difference in taste. Fresh Medjool dates add rich sweetness and moisture. Always choose organic when possible. This ensures you get the best flavor and nutrition. The better the ingredients, the better your bars will taste!
Step-by-Step Instructions
Process Overview
Making Rich No-Bake Chocolate Hazelnut Bars is simple and fun. You will chop hazelnuts, blend the dough, and melt chocolate. Then, you will assemble and chill the bars to set. This easy process gives you tasty bars without baking.
Detailed Cooking Steps
1. Processing hazelnuts and creating the dough: First, add the raw hazelnuts to a food processor. Pulse them until they are finely chopped, not powdered. Transfer half to a bowl for later use. Next, add the pitted Medjool dates, rolled oats, cocoa powder, almond butter, sea salt, and vanilla extract to the processor. Blend until you have a sticky dough. If it feels too crumbly, add a tablespoon of water and blend again.
2. Preparing the baking dish and mixing the ingredients: Line an 8x8 inch baking dish with parchment paper. Leave some paper hanging over the edges for easy removal. Press the dough evenly into the bottom of the dish. Use your hands or a spatula to make it smooth and flat.
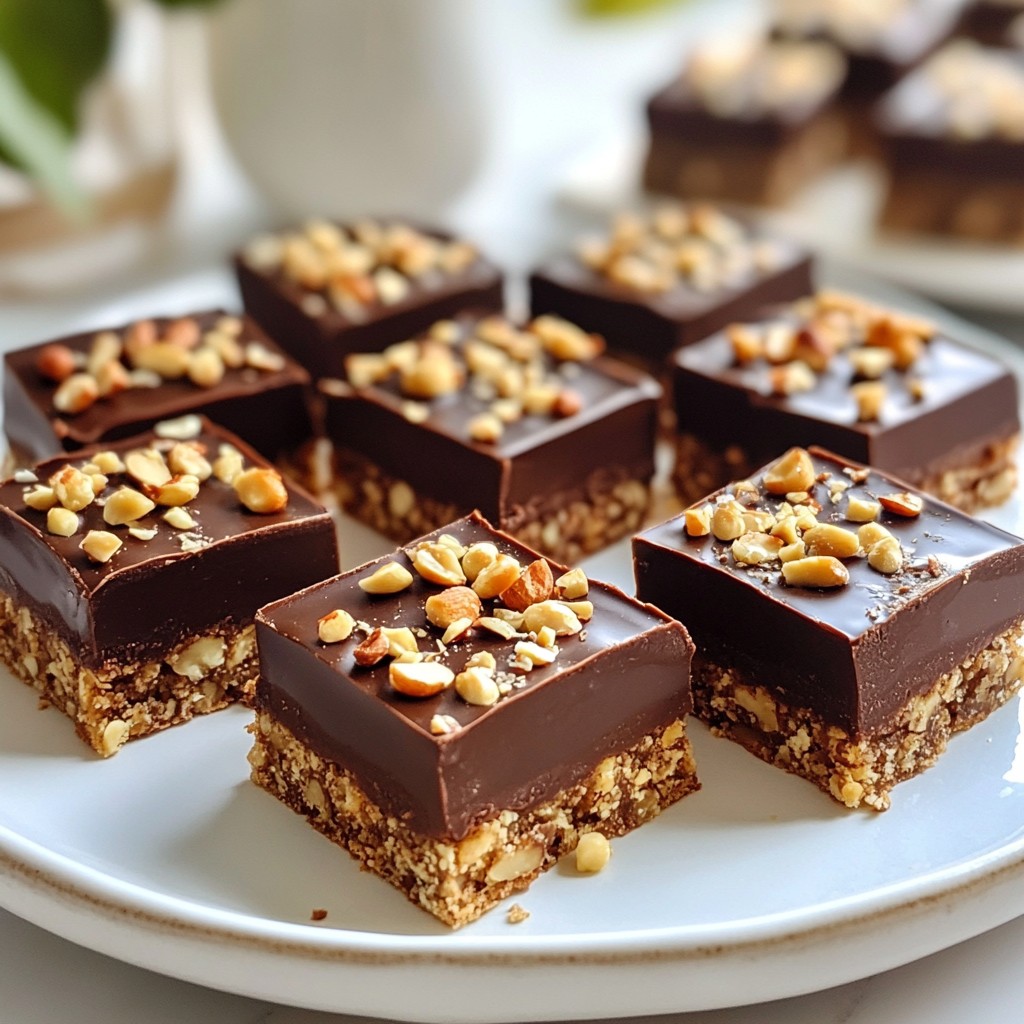
3. Melting chocolate and assembling the bars: In a small saucepan, melt the dark chocolate chips and coconut oil together over low heat. Stir until smooth. Pour the melted chocolate over the pressed chocolate-hazelnut base and spread it evenly. Then, sprinkle the reserved chopped hazelnuts on top for extra crunch and appeal.
Visual Aids
- Step 1: Show a photo of the chopped hazelnuts in the food processor.
- Step 2: Include an image of the dough pressed into the lined dish.
- Step 3: Capture the chocolate melting in the saucepan and the final assembly with hazelnuts on top.
These visuals will help you see each step clearly and guide you through the process!
Tips & Tricks
Common Mistakes to Avoid
- Over-processing the hazelnuts: When you chop hazelnuts, stop before they turn into a powder. You want a fine chop, not a paste. This keeps the bars crunchy and tasty.
- Getting the right consistency for the dough: Your dough should hold together when pressed. If it's too crumbly, add a little water to help it stick. Test it by squeezing a bit in your hand.
Expert Tips for Best Results
- How to achieve a perfect chocolate layer: Melt your dark chocolate chips and coconut oil slowly. Stir often to prevent burning. A smooth layer makes the bars look great and taste even better.
- Recommended chilling times for optimal texture: Chill your bars for at least two hours. This helps them firm up. For best results, let them sit longer. You'll get a better bite this way.
Tools and Equipment
- Essential kitchen tools needed for the recipe: You need a food processor to blend the ingredients. A small saucepan helps melt the chocolate. A spatula is handy for spreading the layers.
- Suggested food processors and baking dishes: A medium-sized food processor works best for chopping nuts. Use an 8x8 inch baking dish for even bars. Look for one with a bit of a non-stick surface or use parchment paper.
Pro Tips
- Soak Your Dates: Soaking the Medjool dates in warm water for 10-15 minutes will make them softer and easier to blend into the mixture.
- Chill Before Cutting: Allow the bars to set in the refrigerator for at least 2 hours to ensure they hold their shape when cut.
- Customize Your Nuts: Feel free to substitute or add other nuts like walnuts or almonds for a different flavor profile.
- Use Quality Chocolate: Opt for high-quality dark chocolate for a richer taste and smoother texture on top of the bars.
Variations
Flavor Enhancements
You can easily change the flavor of your bars. Adding spices can make a big difference. Try mixing in cinnamon or a sprinkle of sea salt to the chocolate. These spices add warmth and depth. If you want a different taste, swap in other nut butters. Peanut butter or cashew butter can bring new flavors. Experimenting with different nut butters can be fun.
Dietary Adaptations
If you follow a gluten-free diet, this recipe works great. The oats can be gluten-free to fit your needs. You can also create allergy-friendly versions. For extra nutrition, consider adding superfoods like chia seeds or flaxseeds. Protein powders can also boost the bars. This way, you can enjoy a tasty treat that fits your diet.
Seasonal Additions
Seasonal ingredients can make your bars even better. You can use dried fruits like cranberries or apricots for a chewy texture. These fruits add natural sweetness. You can also try using seasonal nuts. In fall, walnuts or pecans can give a nice crunch. In summer, consider adding fresh berries for a fruity twist.
Storage Info
Best Storage Practices
To keep your rich no-bake chocolate hazelnut bars fresh, use an airtight container. Glass or plastic containers work well. You can also wrap each bar in parchment paper for easy serving. When stacking bars, place parchment paper between layers. This prevents them from sticking together.
Shelf Life
These bars last about one week in the fridge. They can stay fresh for up to three months in the freezer. To freeze, cut the bars first. Then, wrap each piece in plastic wrap and place in a freezer bag. When ready to eat, thaw them in the fridge overnight.
Serving Suggestions
These bars make a great snack on their own. You can serve them with fresh fruit or a scoop of ice cream. For a nice touch, dust the bars with cocoa powder or sprinkle sea salt on top. They also pair well with coffee or tea for a delightful treat.
FAQs
How can I adjust the sweetness of the bars?
You can easily change the sweetness. To reduce it, use fewer Medjool dates. You can also swap in unsweetened cocoa powder. For more sweetness, add extra dates or a drizzle of honey. Taste the mix before you press it into the dish. This way, you can find the right flavor for you and your family.
Can I use different types of chocolate?
Yes, you can use other chocolates! Milk chocolate will make the bars sweeter. White chocolate gives a creamy taste, perfect for those who love it. Just remember to melt it the same way as the dark chocolate. This will keep the texture smooth and tasty. Adjust the cocoa to balance the flavors if you switch chocolates.
How do I know when the bars are set?
The bars are ready when they feel firm to the touch. After chilling for at least two hours, check the edges. They should pull away from the sides of the dish. If you press gently, the bars should hold their shape. Once set, lift them out and cut them into squares. Enjoy your delicious creation!
Making these bars is simple and fun. We covered the key ingredients, cooking steps, and tips for success. Quality matters, so use fresh nuts and dates. Remember, you can adapt the recipe to suit your taste or diet. Store them right, and they can last longer. These bars not only taste great but also offer healthy energy. Enjoy creating your perfect snack!