Craving something sweet and easy? You’ll love my Rich No-Bake Chocolate Almond Praline Tart! This tart is packed with creamy chocolate and nutty goodness, making it a perfect treat for any occasion. Best of all, there’s no baking required! I’ll share the simple steps, tips, and ideas to make this scrumptious dessert shine. Let’s dive in and create something delicious together!
Why I Love This Recipe
- Decadent Flavor: This tart combines rich chocolate and nutty almond flavors, creating a luxurious dessert that satisfies cravings.
- No-Bake Convenience: No need for an oven! This recipe allows you to whip up a delicious dessert without the fuss of baking.
- Healthy Ingredients: Made with almond flour and natural sweeteners, this tart is a guilt-free treat that’s better for you than traditional desserts.
- Impressive Presentation: The beautiful layers and toppings make this tart an eye-catching centerpiece for any gathering.
Ingredients
Essential Ingredients List
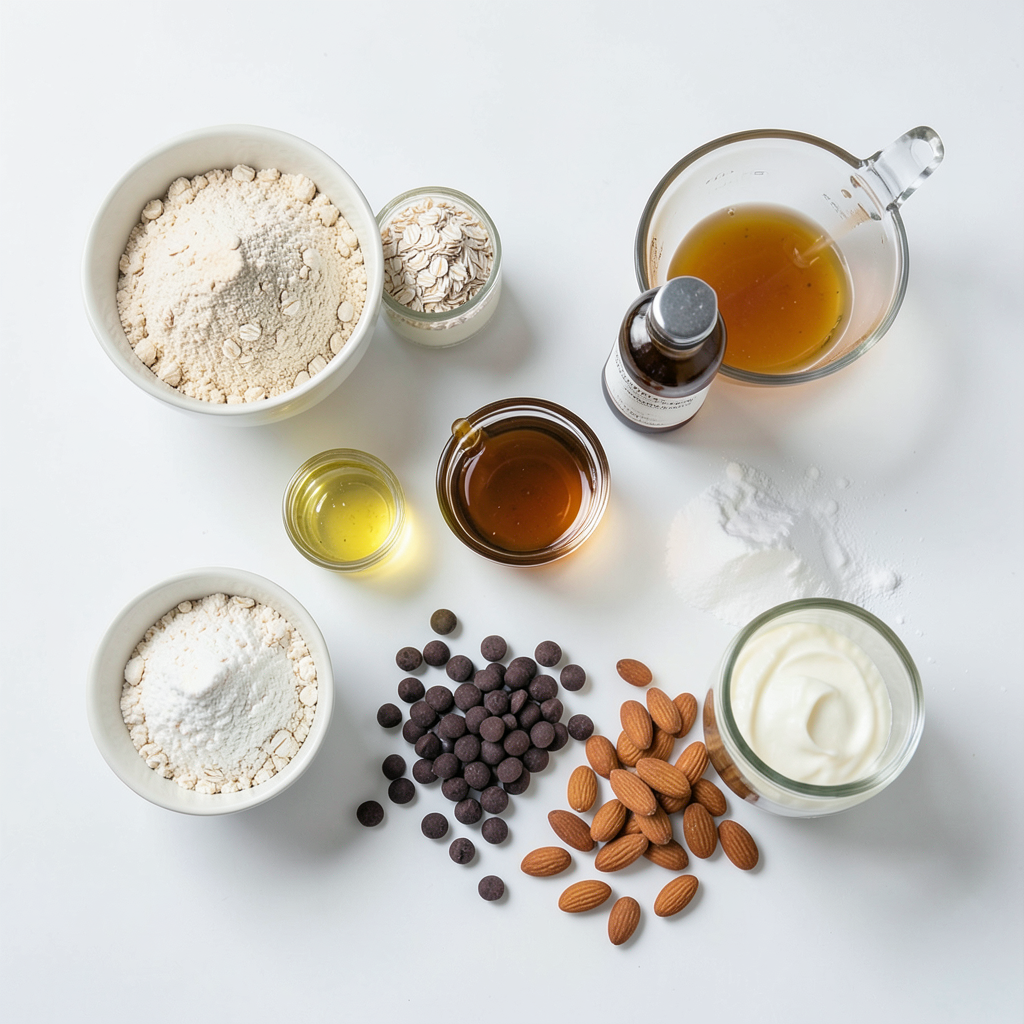
To make the rich no-bake chocolate almond praline tart, gather these key ingredients:
- 1 cup almond flour
- 1/2 cup rolled oats
- 1/4 cup melted coconut oil
- 1/4 cup maple syrup
- 1/2 teaspoon vanilla extract
- 1/2 cup dark chocolate chips
- 1/2 cup heavy cream
- 1/4 cup almond butter
- 1/4 cup chopped toasted almonds
- 1/4 cup confectioners' sugar (for dusting)
These ingredients work together to create a smooth and creamy tart.
Optional Garnishes
To make your tart even more special, consider these garnishes:
- Whipped cream
- Crushed almonds
- Fresh mint leaves
These toppings add charm and flavor, making each slice look delightful.
Ingredient Substitutions
If you need to swap out some ingredients, here are a few ideas:
- Use cashew flour instead of almond flour for a different nut flavor.
- Swap maple syrup with honey or agave syrup for sweetness.
- For a non-dairy option, replace heavy cream with coconut cream.
These substitutions will still keep your tart delicious and enjoyable!
Step-by-Step Instructions
Preparing the Crust
To make the crust, start by mixing almond flour and rolled oats in a bowl. Add melted coconut oil, maple syrup, and vanilla extract. Stir until you have a crumbly mix. This blend holds the crust together well. Now, press this mixture firmly into the bottom and sides of a tart pan. Make sure it is even and packed tight. Next, place the tart shell in the freezer for 15 to 20 minutes. This helps it firm up nicely.
Making the Chocolate Filling
While the crust sets, let’s prepare the chocolate filling. Heat heavy cream in a small saucepan over medium heat. Watch closely until it’s just about to simmer. Remove it from heat and add dark chocolate chips. Stir until the chocolate melts and becomes smooth. This step is key to a rich filling. Next, mix in almond butter until well combined. Allow this mixture to cool slightly before pouring it into the crust.
Assembling the Tart
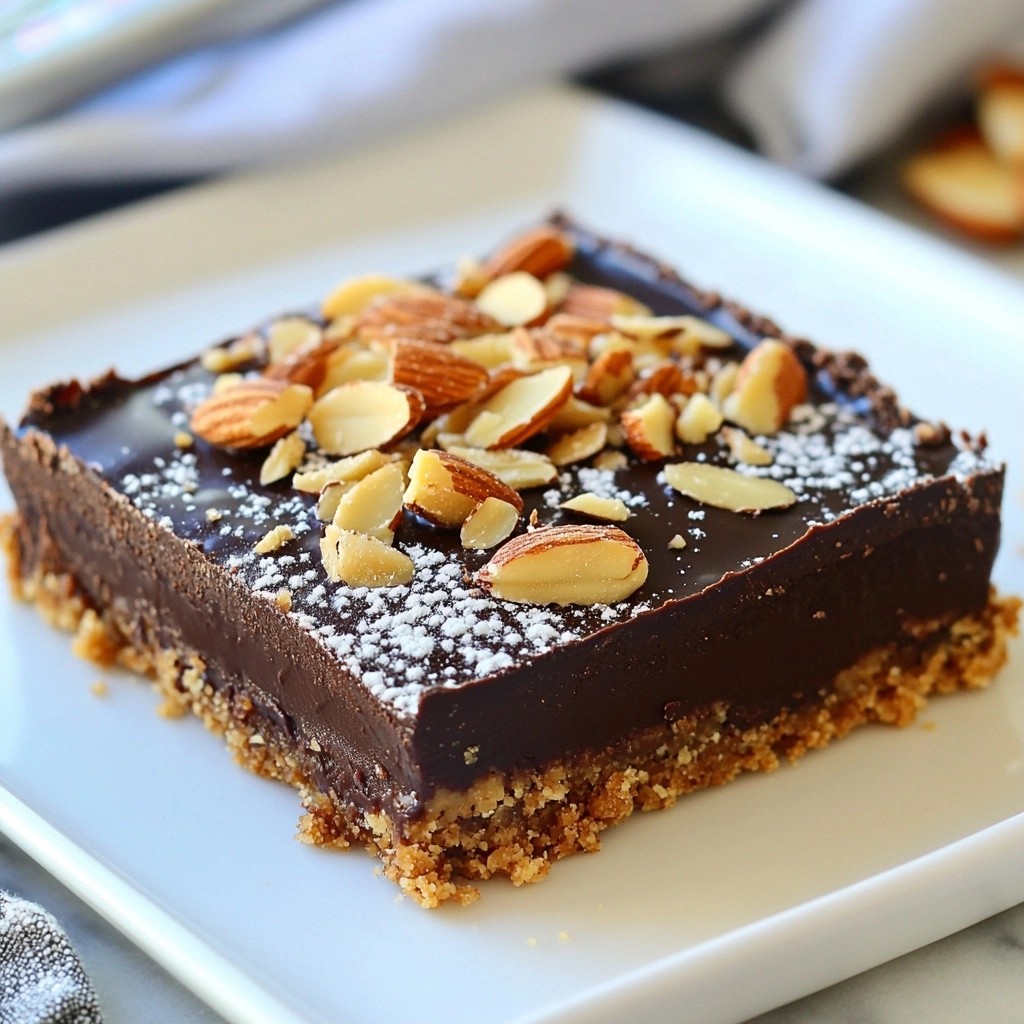
Now it’s time to assemble the tart. Pour the chocolate almond mixture into your prepared crust. Use a spatula to spread it evenly. This step ensures every bite has that rich, chocolatey flavor. To finish, sprinkle chopped toasted almonds on top. They add a nice crunch and extra flavor. Next, refrigerate the tart for at least three hours or until it’s set. Before serving, dust the top with confectioners' sugar for a beautiful touch. Enjoy your rich no-bake chocolate almond praline tart!
Tips & Tricks
How to Achieve the Perfect Crust
To make a great crust, use fresh almond flour. Old flour can make your crust dry. Mix the almond flour with rolled oats. The oats help add texture. Press the mixture firmly into the tart pan. This helps it hold its shape. Freeze the crust for 15 to 20 minutes. This step keeps it from crumbling later.
Ensuring a Smooth Chocolate Filling
For a smooth filling, heat the cream gently. Do not let it boil, or it can split. Stir in the dark chocolate chips right after you remove it from the heat. Mix well until the chocolate melts completely. Adding almond butter makes the filling creamy. Let the filling cool a bit before pouring it into the crust. This will help it set better.
Presentation Tips for Serving
Serve your tart on a nice dessert plate. A sprinkle of confectioners’ sugar adds a sweet touch. For extra flair, add a dollop of whipped cream. You can also sprinkle crushed almonds on top. This gives a nice crunch and looks pretty. The tart tastes best chilled, so keep it in the fridge before serving.
Pro Tips
- Use High-Quality Chocolate: For the best flavor, opt for high-quality dark chocolate with at least 70% cocoa content. This will enhance the richness of your tart.
- Chill the Filling: Allow the chocolate almond mixture to cool slightly before pouring it into the crust. This prevents the crust from becoming soggy.
- Customize Your Toppings: Feel free to get creative with toppings! Try adding sea salt, fresh berries, or a drizzle of caramel for extra flavor and visual appeal.
- Let It Set Properly: Make sure to refrigerate the tart for at least 3 hours. This ensures that the filling sets properly and makes for cleaner slices when serving.
Variations
Alternative Nut Butters
You can change the almond butter to suit your taste. Try peanut butter for a classic combo. Cashew butter brings a creamier feel, while sunflower seed butter is great for nut-free diets. Each choice adds its own flavor and texture. Experiment with your favorite nuts to find the best mix.
Using Different Chocolate Types
The recipe calls for dark chocolate, but you can switch it up. Use milk chocolate for a sweeter treat. White chocolate gives a rich and creamy taste. You could even blend different chocolates for a layered effect. This small change can make a big difference in flavor.
Flavor Add-ins for a Unique Twist
Want to make your tart special? Add a dash of sea salt for a salty-sweet combo. A bit of espresso powder can deepen the chocolate's taste. You can also mix in orange zest for a bright flavor. These tiny extras let you create a tart that feels personal and unique.
Storage Info
Best Way to Store the Tart
To keep your tart fresh, store it in the fridge. Use an airtight container. This method helps maintain its rich flavor and texture. If you cover it tightly, the tart stays moist and yummy. Avoid placing it near strong-smelling foods.
How Long the Tart Lasts
The tart lasts about five days in the fridge. After that, it may lose flavor and texture. If you notice any changes in smell or appearance, it’s best to toss it. Enjoy it fresh for the best taste!
Freezing Instructions
You can freeze the tart for up to three months. Wrap it well in plastic wrap and then foil. This prevents freezer burn and keeps it safe. To serve, thaw it overnight in the fridge. After thawing, let it sit at room temperature for a bit before enjoying.
FAQs
Can I make this tart ahead of time?
Yes, you can make this tart a day in advance. Just follow the recipe and chill it well. The flavors deepen overnight, making it even better. Store it in the fridge, covered with plastic wrap. This keeps it fresh and tasty.
What can I serve with the tart?
This tart pairs well with many items. A dollop of whipped cream adds a nice touch. You could also serve it with fresh berries or a scoop of vanilla ice cream. These choices balance the rich chocolate flavor and enhance the dessert.
Is it possible to make this recipe vegan?
Yes, you can make this tart vegan with simple swaps. Use coconut cream instead of heavy cream. Replace dark chocolate chips with dairy-free ones. Maple syrup is already a great sweetener. This way, you keep the rich taste without using animal products.
This blog post covered all the details needed to make a delicious tart. We talked about essential ingredients, optional garnishes, and substitutions. You learned step-by-step how to prepare the crust, make the chocolate filling, and assemble the tart. I shared tips for a perfect finish and variations to try. We also discussed storage and answered common questions.
With these ideas, you can create a treat that impresses your family and friends. Enjoy your baking!