
Are you ready to impress your friends and family with a delightful Peach Raspberry Galette? This simple and tasty dessert brings together sweet peaches and tart raspberries, all wrapped in a flaky crust. In this post, I'll guide you through the easy steps to make this crowd-pleaser. From the essential ingredients to helpful tips, you’ll find everything you need to master this stunning dish. Let’s get started!
Why I Love This Recipe
- Fresh and Fruity: This galette combines the sweet flavors of ripe peaches and tart raspberries, making each bite a delightful experience.
- Easy to Make: The rustic nature of a galette means you don't need to worry about perfection—just fold the edges and bake!
- Versatile Dessert: You can easily swap out fruits based on the season, making this recipe a year-round favorite.
- Perfect with Ice Cream: Serving it warm with a scoop of vanilla ice cream elevates this dessert to another level of deliciousness.
Ingredients
List of Ingredients Required
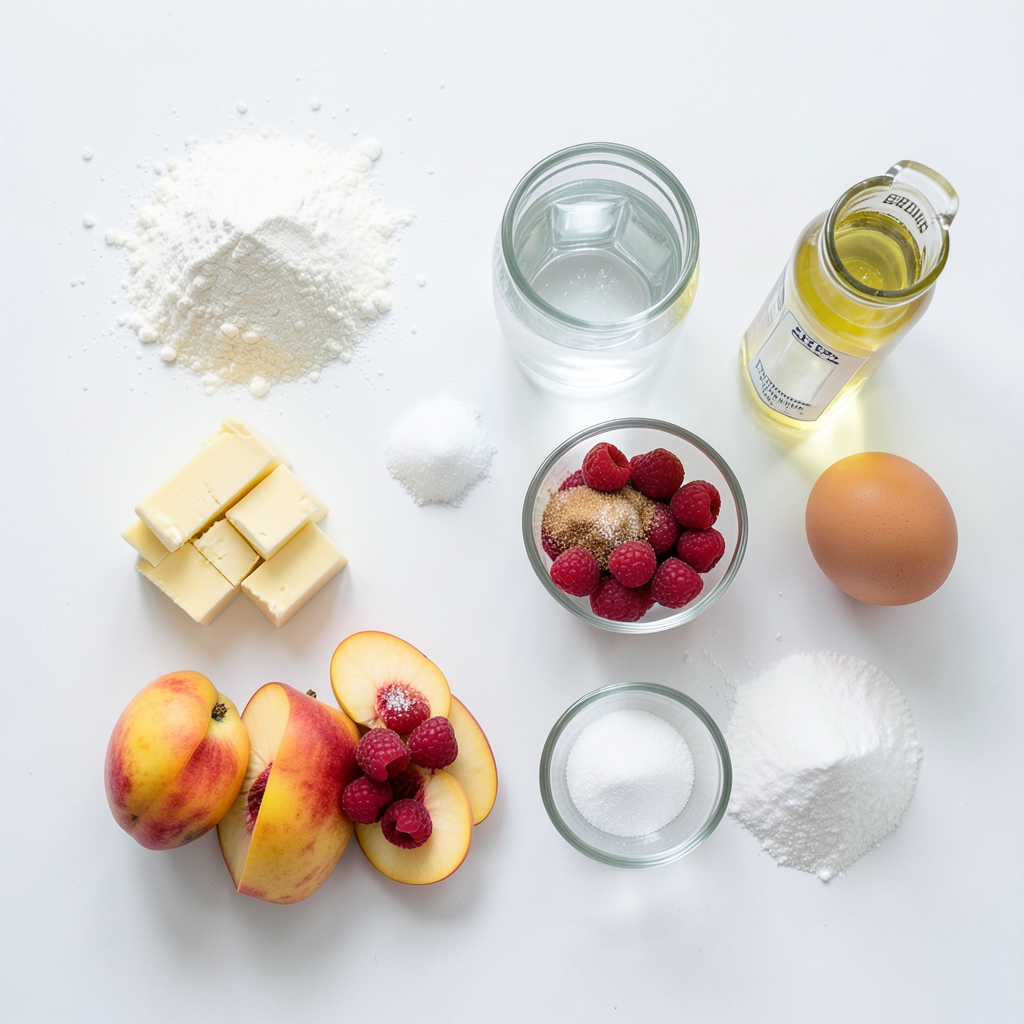
- 1 ½ cups all-purpose flour
- ¼ teaspoon salt
- ½ cup unsalted butter, chilled and cubed
- 6 tablespoons ice water
- 2 large peaches, peeled and sliced
- 1 cup fresh raspberries
- ⅓ cup granulated sugar
- 1 tablespoon cornstarch
- 1 tablespoon lemon juice
- 1 teaspoon vanilla extract
- 1 egg (for egg wash)
- Coarse sugar (for sprinkling)
Key Ingredient Notes
Flour gives the galette its structure. Use all-purpose flour for best results. Salt enhances flavor in the dough. Chilled butter is key for a flaky crust. Ice water helps make the dough easy to work with.
Peaches offer sweetness and juiciness. Choose ripe, firm peaches. Raspberries add a tart contrast. Fresh fruit works best for flavor and texture. Granulated sugar sweetens the filling and balances the tartness. Cornstarch thickens the juices from the fruit, preventing a soggy crust. Lemon juice brightens the flavors, while vanilla adds warmth.
Substitutes for Common Ingredients
- For all-purpose flour, use a gluten-free flour blend.
- Use coconut oil or margarine instead of unsalted butter for a dairy-free option.
- Substitute honey or maple syrup for granulated sugar if desired.
- Swap cornstarch with arrowroot powder for thickening.
- For lemon juice, try lime juice for a different twist.
- Vanilla extract can be replaced with almond extract for a unique flavor.
Step-by-Step Instructions
Making the Dough
To start, gather your ingredients. In a large bowl, mix 1 ½ cups of flour and ¼ teaspoon of salt. Next, add ½ cup of cold butter cubes. Use a pastry cutter or your fingers to mix until it looks like coarse crumbs. Then, add 6 tablespoons of ice water, one tablespoon at a time. Stop mixing when the dough forms a ball. Shape it into a disk and wrap it in plastic. Chill it in the fridge for at least 30 minutes.
Preparing the Filling
While the dough chills, let’s prepare the filling. In a separate bowl, combine 2 large sliced peaches and 1 cup of fresh raspberries. Add ⅓ cup of granulated sugar, 1 tablespoon of cornstarch, 1 tablespoon of lemon juice, and 1 teaspoon of vanilla extract. Gently toss the fruit until it is well coated. Set this aside to let the flavors combine.
Assembling and Baking the Galette
Preheat your oven to 400°F (200°C). Once the dough is ready, roll it out on a floured surface into a 12-inch circle. Carefully move the dough to a baking sheet lined with parchment paper. Spoon the prepared fruit filling into the center, leaving a 2-inch border. Fold the edges of the dough over the filling, making pleats to hold the fruit in. In a small bowl, beat 1 egg and brush it over the exposed dough. Sprinkle coarse sugar on top for extra crunch. Bake for 30-35 minutes, or until the crust turns golden and the filling bubbles. Once done, let it cool for a few minutes before slicing. Enjoy it warm or at room temperature!
Tips & Tricks
Ensuring Perfect Dough Texture
To get the best dough, keep your butter very cold. Use a pastry cutter to mix. You want it to look like crumbs, not paste. Add ice water slowly. Too much water makes it sticky. Chill the dough for at least 30 minutes. This step helps it stay flaky when baked.
How to Prevent Soggy Bottoms
A soggy galette is no fun. To avoid this, use cornstarch in your filling. It will soak up the fruit juices. Let the fruit mix sit for a bit before adding it to the dough. This step allows juices to drain. Also, bake on a preheated baking sheet. This helps the bottom crisp up faster.
Best Baking Practices for Even Cooking
Set your oven to 400°F (200°C) for the perfect bake. This temperature helps the crust turn golden brown. Place your galette in the center of the oven. This ensures even heat. Don’t open the oven door too much while baking. It can let heat escape and affect cooking time.
Pro Tips
- Chill the Dough: Make sure your butter and water are ice-cold to ensure a flaky crust. This helps to prevent the butter from melting before baking.
- Use Fresh Fruit: For the best flavor, use ripe, fresh peaches and raspberries. Frozen fruit can make the filling too watery.
- Experiment with Flavors: Add spices like cinnamon or nutmeg to the fruit filling for an extra flavor boost. A pinch can elevate the dish significantly.
- Let it Rest: After baking, let the galette cool for at least 10 minutes. This allows the filling to set, making it easier to slice.
Variations
Different Fruit Combinations
You can switch up the fruits in your galette. Try using blueberries, blackberries, or plums. Each fruit brings its own flavor and sweetness. You can even mix fruits for a fun twist. For a tropical vibe, add mango or pineapple. Just keep the sugar amount in check based on the fruit's sweetness.
Gluten-Free Options
If you need a gluten-free version, use gluten-free flour. There are many great blends available. You can also use almond flour for a nutty taste. Just remember to add a bit more liquid or fat to keep the dough moist. This way, your galette will still taste amazing and be safe for gluten-free diets.
Flavor Enhancements (Herbs, Spices)
Herbs and spices can make your galette even better. Add a pinch of cinnamon for warmth. For a fresh twist, try adding basil or mint. You can also add a dash of ginger for a zesty kick. These flavors pair well with peaches and raspberries. Just be careful not to overpower the fruit.
Storage Info
How to Store Leftover Galette
To store your leftover galette, first let it cool. This helps keep it fresh. Wrap the galette in plastic wrap or place it in an airtight container. Store it in the fridge for up to three days. Keeping it covered helps prevent it from drying out.
Reheating Instructions
Reheating is simple. Preheat your oven to 350°F (175°C). Place the galette on a baking sheet. Bake for about 10 to 15 minutes. This warms the galette and makes the crust crispy again. For quicker reheating, you can use a microwave. Heat it for about 30 seconds, but the crust may not be as crunchy.
Freezing Tips for Long-Term Storage
Freezing is a great option if you want to keep the galette longer. Wrap it tightly in plastic wrap and then in aluminum foil. This prevents freezer burn. You can freeze it for up to three months. When you’re ready to eat it, thaw it in the fridge overnight. Then, reheat it in the oven as mentioned above. Enjoy your delicious galette anytime!
FAQs
Can I make the galette ahead of time?
Yes, you can make the galette ahead of time. Prepare the dough and filling separately. You can keep the dough in the fridge for up to two days. Store the filling in the fridge for up to three days. When you are ready to bake, roll out the dough and add the filling. Bake as directed for a fresh dessert.
What can I serve with Peach Raspberry Galette?
Peach Raspberry Galette pairs well with many sides. You can serve it with a scoop of vanilla ice cream. Whipped cream also adds a nice touch. If you want something fruity, serve it with a berry compote. A drizzle of caramel sauce makes it extra special, too.
How can I tell when the galette is done?
You can tell the galette is done by checking the crust. It should be golden brown and crispy. The fruit filling will bubble slightly, showing it's cooked through. If you see these signs, your galette is ready to enjoy!
You learned how to make a delicious galette from start to finish. We covered the key ingredients, dough-making steps, and filling preparation. I shared tips for perfect texture, avoiding soggy bottoms, and ensuring even cooking. You also saw variations for fruit combinations and gluten-free options. Finally, I provided storage tips to keep leftovers fresh. Now, you can create and enjoy this tasty treat anytime. Happy baking!