
Latest & Greatest

Garlic Knots That Will Satisfy Any Craving
Are you ready to impress your friends and family with mouthwatering garlic knots? These soft, buttery delights are not only
Read more…
Crispy Chicken Nuggets Easy and Tasty Recipe Guide
Craving Crispy Chicken Nuggets? You’ve found the right spot! In this easy and tasty guide, I’ll walk you through the
Read more…
Homemade Biscuits Fluffy and Easy to Make
Want to make homemade biscuits that are fluffy and simple? You’re in the right place! I’ll guide you through each
Read more…
Mini Pineapple Upside-Down Cheesecakes Delightful Treat
If you love the classic taste of pineapple upside-down cake but want a fun twist, these Mini Pineapple Upside-Down Cheesecakes
Read more…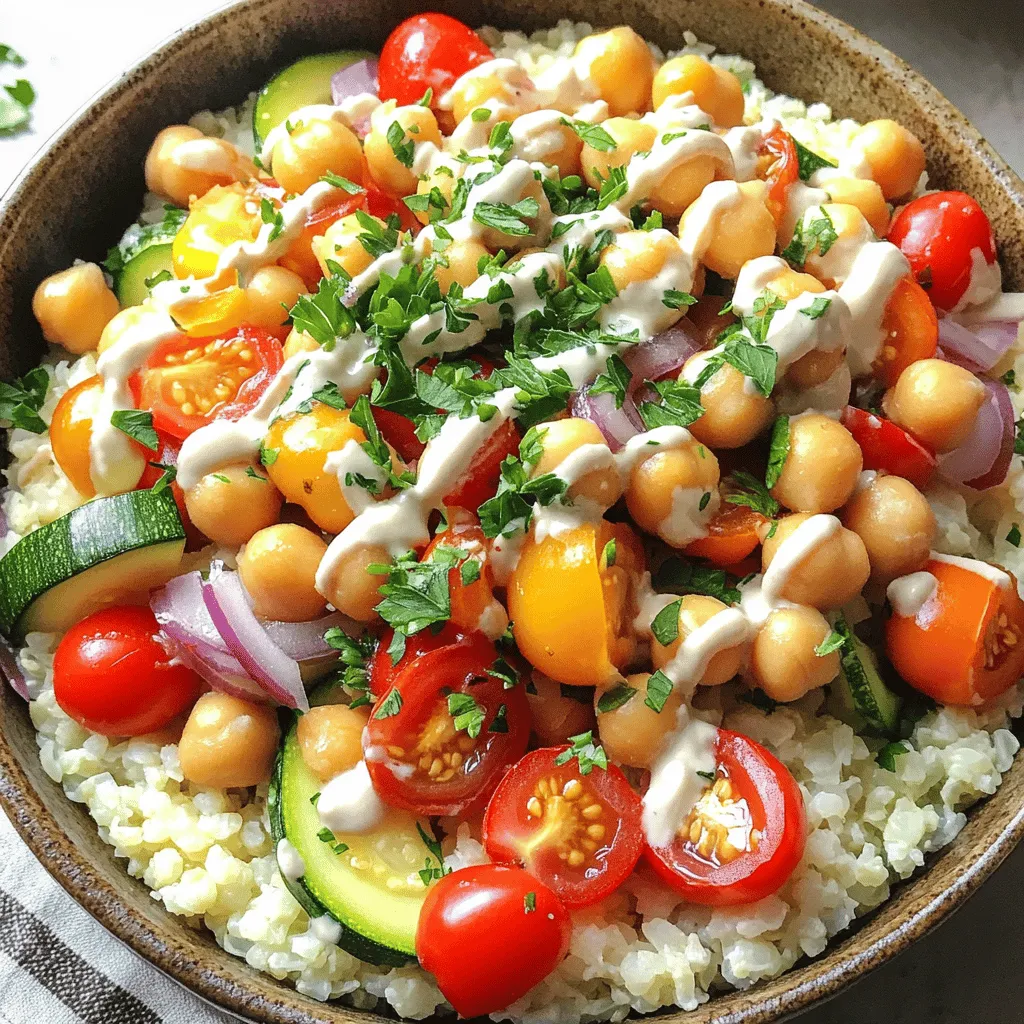
Cauliflower Rice Bowl Packed with Flavorful Veggies
Are you ready to spice up your meals with a fun and healthy twist? My Cauliflower Rice Bowl is packed
Read more…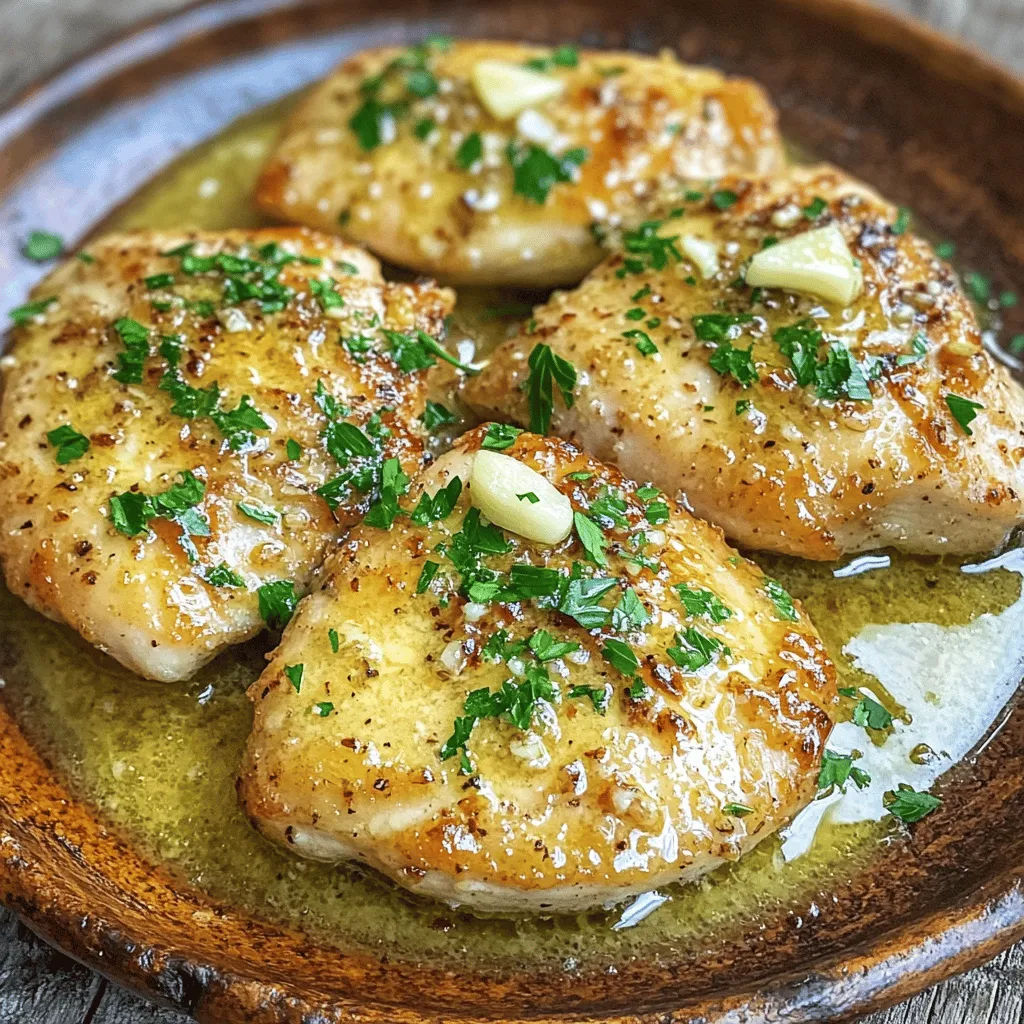
Garlic Butter Chicken Flavorful and Simple Recipe
If you’re looking for a dish that packs a punch with flavor but is simple to make, look no further!
Read more…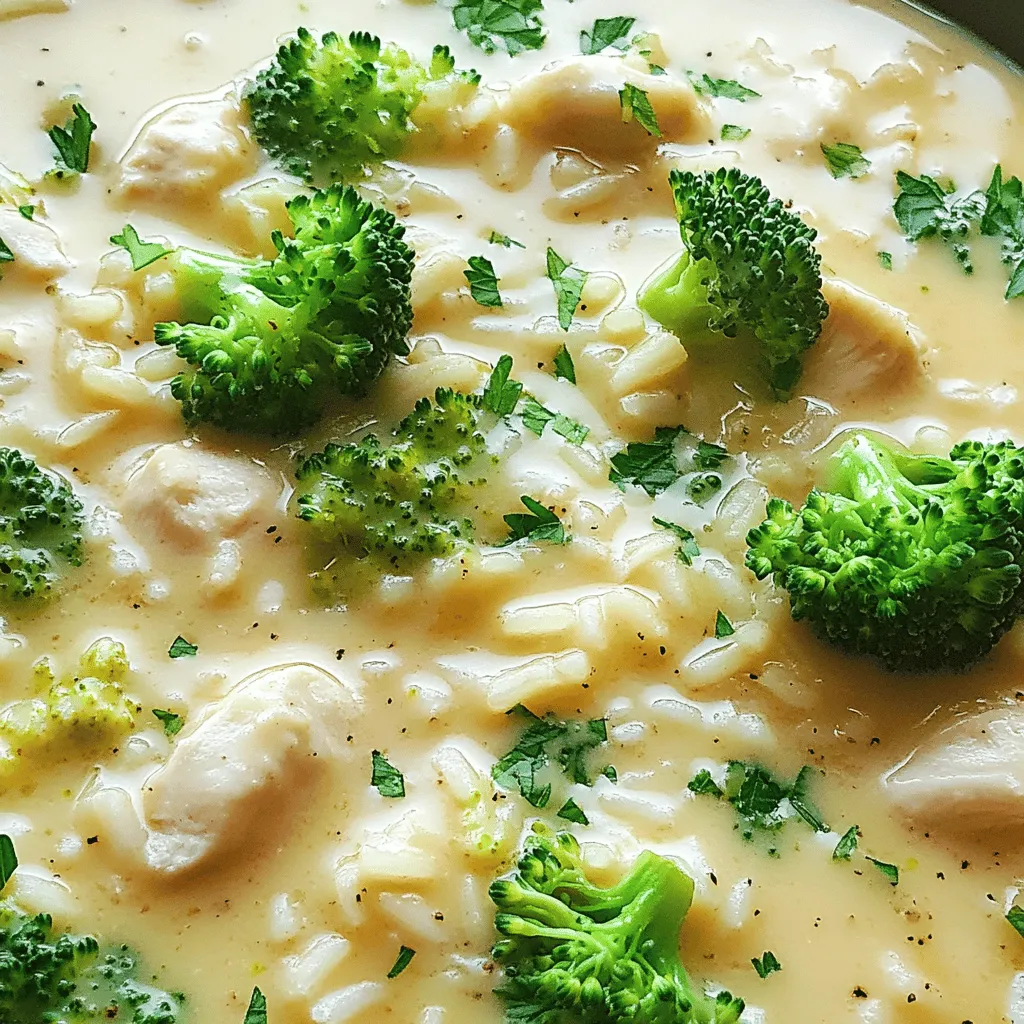
Creamy Chicken and Rice Savory Comfort Meal
Are you craving something warm and comforting? Look no further! I’m excited to share my Creamy Chicken and Rice recipe.
Read more…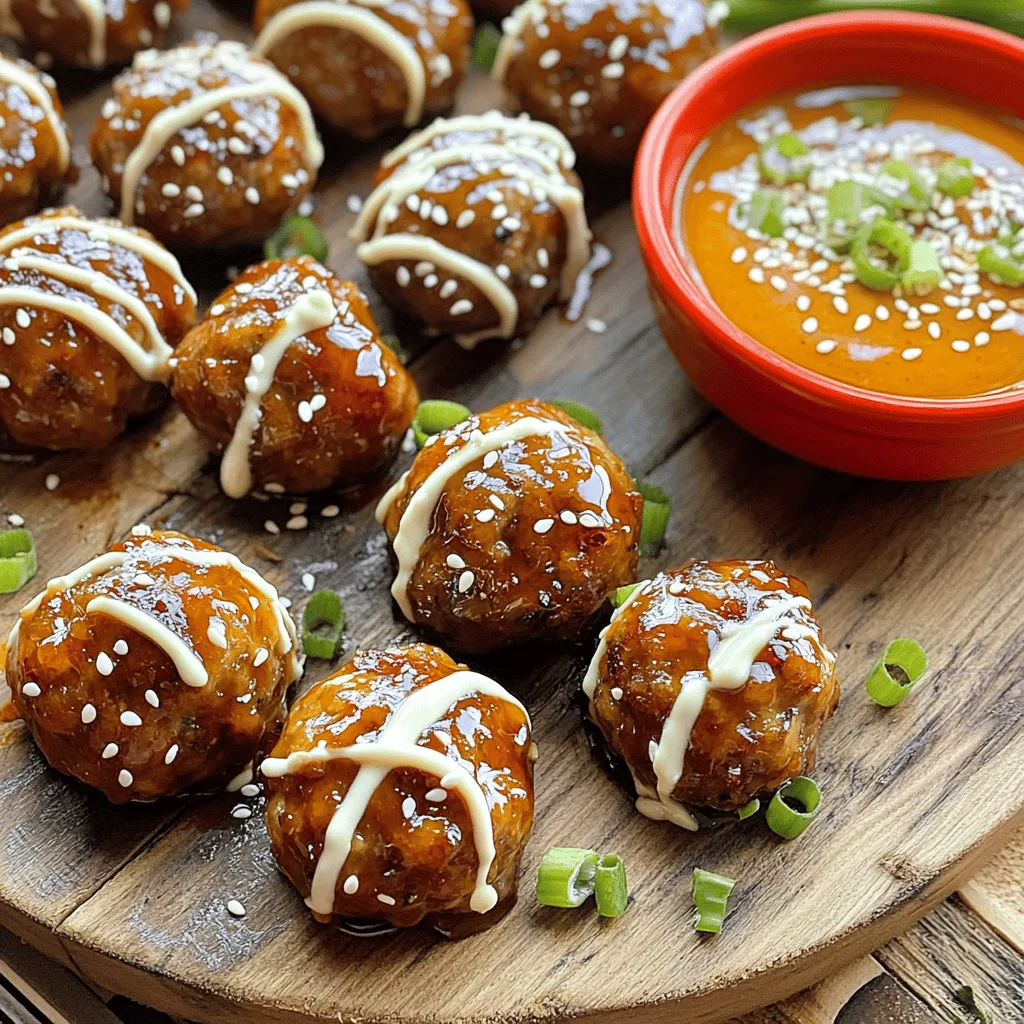
Korean BBQ Meatballs with Spicy Mayo Delight
Ready to wow your taste buds? In this post, I’ll guide you through making Korean BBQ Meatballs with Spicy Mayo.
Read more…browse recipes


![To make Coconut Chicken with Apricot Sauce, you need fresh and simple ingredients. Here's the list of what you'll need: - 4 boneless, skinless chicken breasts - 1 cup unsweetened coconut milk - 1 cup shredded coconut (unsweetened) - 1 tablespoon lime juice - 2 tablespoons honey - 1 teaspoon garlic powder - 1 teaspoon ginger powder - Salt and pepper to taste - 1 cup apricot preserves - 1 tablespoon soy sauce - Fresh cilantro for garnish Each ingredient plays a key role in creating rich flavors. The chicken is tender and juicy, thanks to the coconut milk marinade. The coconut adds a nice crunch, while the apricot sauce brings sweetness and tang. You can find the full recipe to help you combine these ingredients perfectly. Preparing the Marinade Start by mixing the marinade. In a bowl, combine one cup of coconut milk, one tablespoon of lime juice, and two tablespoons of honey. Add one teaspoon each of garlic powder and ginger powder. Season with salt and pepper. Make sure the mix is smooth. The Importance of Marination Time Place the chicken breasts in the marinade. Cover the bowl and put it in the fridge. Let it marinate for at least 30 minutes. For best results, aim for 1-2 hours. This step boosts flavor and keeps the chicken moist. Cooking Techniques for Sauce Preparation In a small saucepan, mix one cup of apricot preserves with one tablespoon of soy sauce. Heat over medium heat. Stir the mixture well. Bring it to a gentle simmer, stirring now and then. Tips for Thickness and Flavor Cook the sauce for about five minutes. This helps it thicken a bit. If you want a thicker sauce, let it simmer longer. Taste it to see if it needs more soy sauce for saltiness. Preheating the Oven Before you coat the chicken, preheat your oven to 375°F (190°C). This ensures even cooking. Coating the Chicken with Coconut Take the chicken out of the marinade. Let any excess marinade drip off. Roll each chicken breast in one cup of shredded coconut. Press firmly so that the coconut sticks well. Ideal Cooking Temperature and Time Place the coconut-coated chicken on a baking sheet lined with parchment paper. Bake it in your preheated oven for 25-30 minutes. This should cook the chicken through. Checking for Doneness Use a meat thermometer to check the chicken. It should reach an internal temperature of 165°F (75°C). If you don’t have a thermometer, cut into it. Make sure it’s no longer pink inside. Plating the Dish Once the chicken is done, take it out of the oven. Let it rest for a few minutes. This helps the juices settle. Serve the chicken on a plate. Garnishing with Fresh Cilantro Drizzle the warm apricot sauce over the chicken. Top it off with fresh cilantro. This adds a burst of color and flavor. Enjoy your Coconut Chicken with Apricot Sauce! For the full recipe, check out the complete instructions. - Substituting Ingredients: You can swap honey for maple syrup for a vegan twist. Try a different fruit preserve, like peach, if apricot isn't your favorite. - Adding Spices and Herbs: Add a pinch of cayenne for heat. Fresh ginger adds a bright note. Chopped cilantro gives a fresh burst when served. - Recommended Baking Sheets and Pans: Use a heavy-duty baking sheet. This helps the chicken cook evenly and achieve a nice crust. Parchment paper makes for easy cleanup. - Using Meat Thermometers: A meat thermometer ensures your chicken is safe to eat. Check the thickest part of the breast. It should read 165°F (75°C) for perfect doneness. - Best Practices for Prep and Cook Time: Marinate the chicken for at least one hour. This makes the flavors richer. Prep and bake time takes about an hour for the whole dish. - How to Plan Ahead for Quick Meals: Marinate the chicken the night before. You can also make the apricot sauce ahead. Just reheat before serving to save time. For the full recipe, check the details above! {{image_2}} You can change up the meat in this dish. Try using fish like salmon or tilapia for a lighter option. Tofu is great if you want a plant-based meal. It absorbs flavors well. Just remember to marinate it just like chicken for the best taste. If you're looking for a dairy-free option, coconut milk is your friend. It adds creaminess without any dairy. You can also find coconut yogurt for a similar effect in sauces. Balancing sweet and savory is key here. You can add more honey for sweetness or soy sauce for saltiness. If you want a tangy twist, try adding more lime juice. This will brighten up the dish. For spice lovers, consider adding chili flakes or cayenne pepper. Start with a small amount and taste as you go. You can always add more spice, but it’s hard to take it out! This dish pairs well with many sides. Consider serving it with jasmine rice or quinoa. Both add a nice base for the chicken and sauce. Steamed vegetables also work well. They add color and nutrition to your plate. For presentation, think about how you plate the dish. Use a white plate for contrast. Drizzle the warm apricot sauce over the chicken. Garnish with fresh cilantro for a pop of color. You can also add lime wedges for a fresh touch. Explore the [Full Recipe] for more ways to enjoy Coconut Chicken with Apricot Sauce! To store your leftovers, place the coconut chicken in an airtight container. You can keep it in the fridge for up to four days. Make sure it cools down before sealing the container. This helps keep the chicken fresh and tasty. If you notice any off smells or changes in color, it's best to discard it. If you want to save coconut chicken for later, freezing is a great option. Wrap each piece tightly in plastic wrap, then place them in a freezer bag. Label the bag with the date. Coconut chicken can last for about three months in the freezer. To thaw, move it to the fridge overnight or use the microwave. When you're ready to enjoy your meal again, reheating is simple. You can use the oven at 350°F (175°C) or the microwave. If using the oven, cover it with foil to keep moisture in. This helps the chicken stay juicy. For safety, ensure that the chicken heats to at least 165°F (75°C) before eating. Always check the center to make sure it’s hot. Enjoy your flavorful delight! To make this dish, follow these steps: 1. Marinate the chicken in a mix of coconut milk, lime juice, honey, garlic powder, and ginger powder. Season it with salt and pepper. Let it sit for at least 30 minutes. 2. Cook the apricot sauce by heating apricot preserves and soy sauce in a pan. Stir until it thickens. 3. Coat the marinated chicken in shredded coconut. 4. Bake the chicken at 375°F (190°C) for 25-30 minutes. 5. Serve with the warm apricot sauce on top. This simple process gives you a flavorful delight. For a detailed recipe, check the Full Recipe. Yes, you can use frozen chicken breasts. Thaw the chicken first in the fridge overnight or in cold water for a quicker method. Once thawed, you can marinate it like fresh chicken. This ensures even flavor and better texture when cooked. This dish pairs well with: - Steamed jasmine rice - Roasted vegetables - A light salad with citrus dressing - Coconut rice for an extra coconut flavor These sides balance nicely with the sweet and savory notes of the chicken. Yes, this recipe is gluten-free. Most ingredients, like coconut milk and apricot preserves, do not contain gluten. Just ensure your soy sauce is labeled gluten-free, as traditional soy sauce may contain wheat. To make more servings, simply multiply the ingredient amounts by the number of servings you want. Keep in mind that cooking time may change. Check the chicken's internal temperature to ensure it's at 165°F (75°C). Adjust the baking sheet size if needed to fit all the chicken. In this blog post, I covered how to make Coconut Chicken with Apricot Sauce. We discussed the key ingredients, focusing on marination and sauce techniques. I shared baking tips and serving suggestions for a flavorful dish. Remember to explore ingredient swaps for variety and proper storage to keep leftovers fresh. Cooking should be fun, and this recipe is a great way to experiment. I hope you find joy in creating this meal. Enjoy your cooking and the delicious results!](https://lisadishes.com/wp-content/uploads/2025/04/7b7870c6-9a30-404d-8ad0-b2003651ebfc.webp)
Coconut Chicken with Apricot Sauce Flavorful Delight
If you’re ready to elevate your dinner game, my Coconut Chicken with Apricot Sauce will impress everyone! This dish blends juicy chicken with creamy…
My Latest Desserts

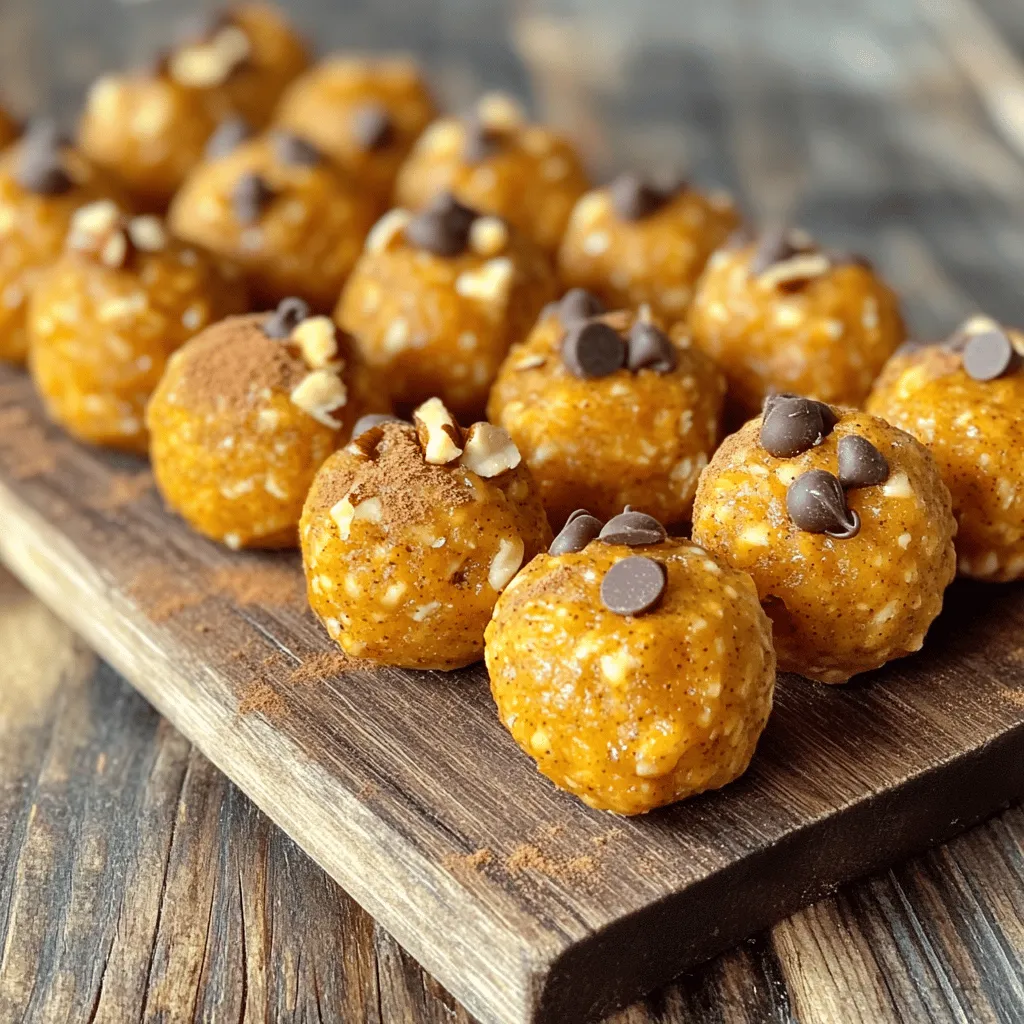
Pumpkin Spice Energy Bites Tasty and Healthy Snack
Looking for a tasty and healthy snack to fuel your day? This Pumpkin Spice Energy Bites recipe is your answer! Read Full Recipe-
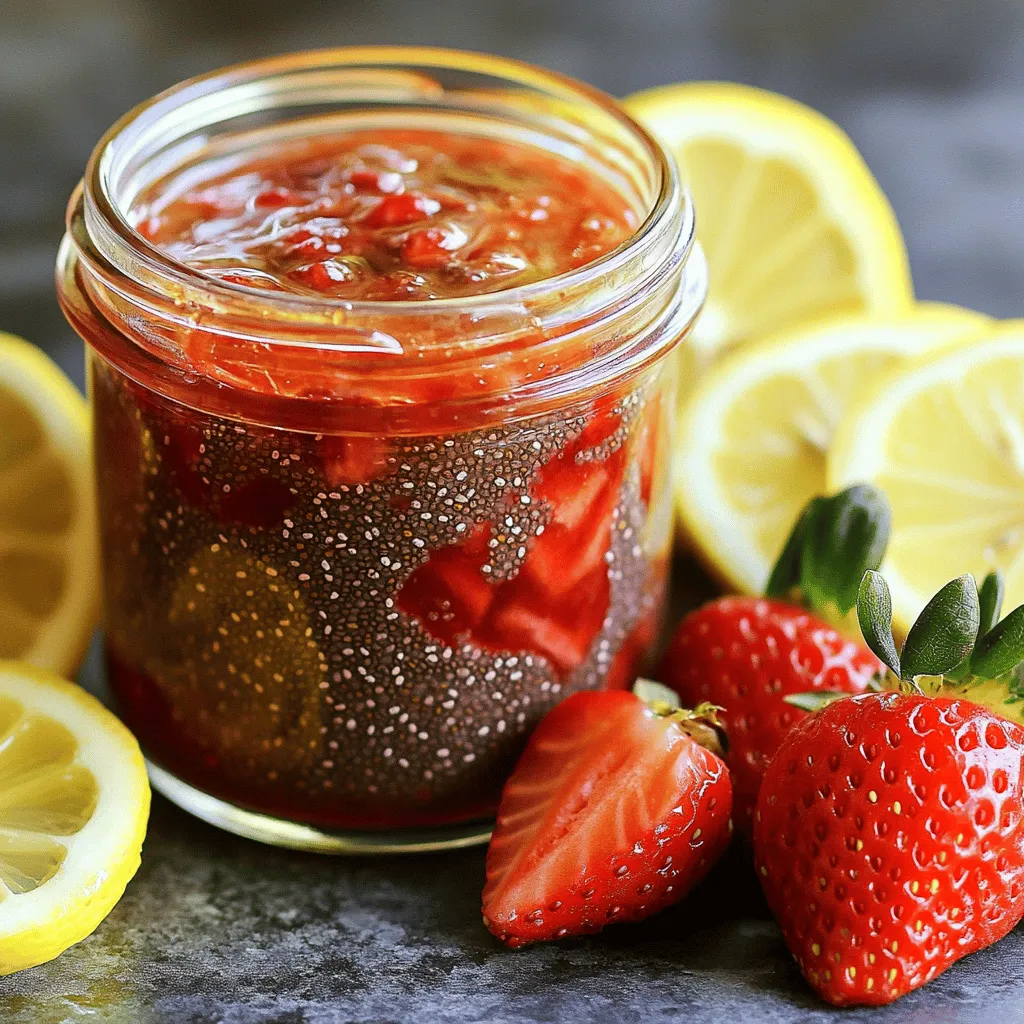
Strawberry Chia Seed Jam Tasty and Healthy Treat
If you’re craving a sweet treat that’s also good for you, I’ve got just the thing: Strawberry Chia Seed Jam! Read Full Recipe -
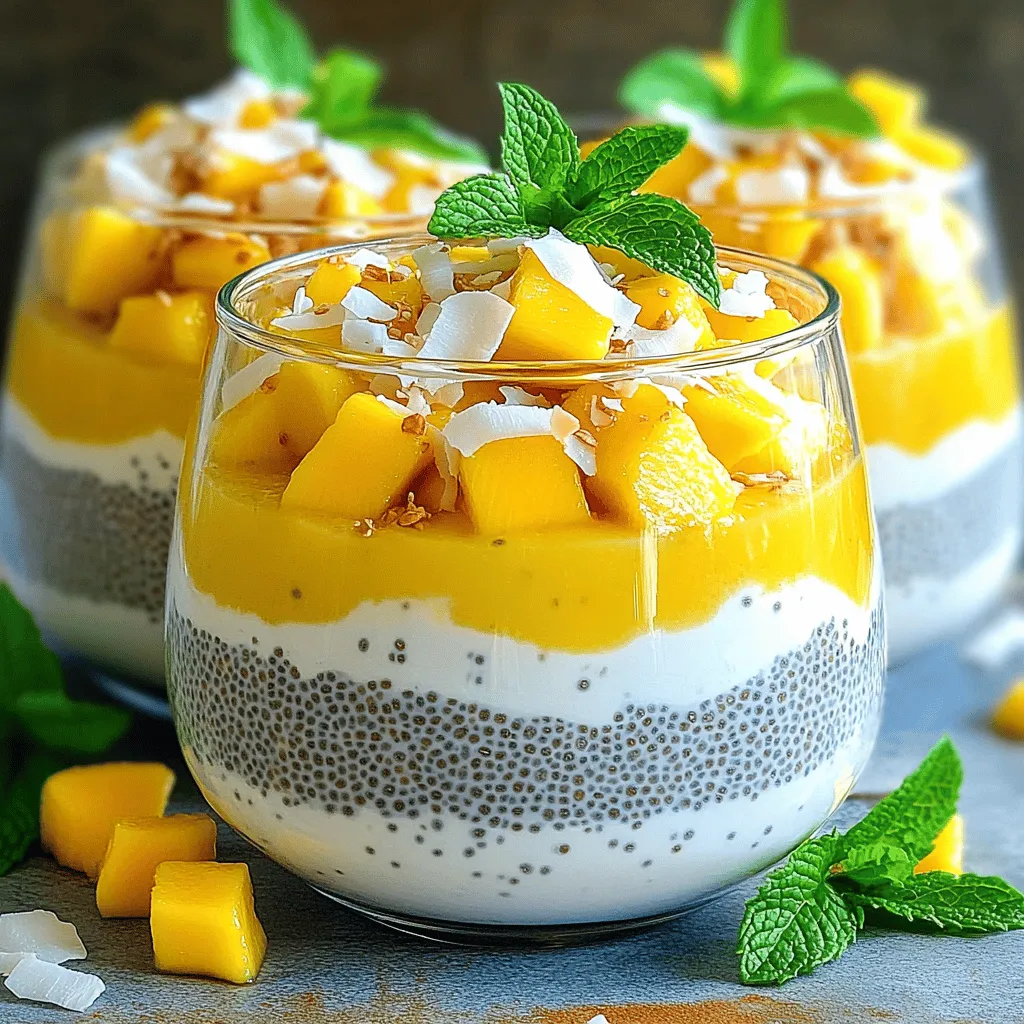
Mango Coconut Chia Pudding Healthy and Easy Recipe
Are you ready to indulge in a delicious, healthy treat? Mango Coconut Chia Pudding is simple to make and packed Read Full Recipe -
Pumpkin Spice Muffins Warm and Cozy Fall Treat
Fall is the perfect time for warm and cozy treats, and nothing says autumn like pumpkin spice muffins. These fluffy Read Full Recipe -
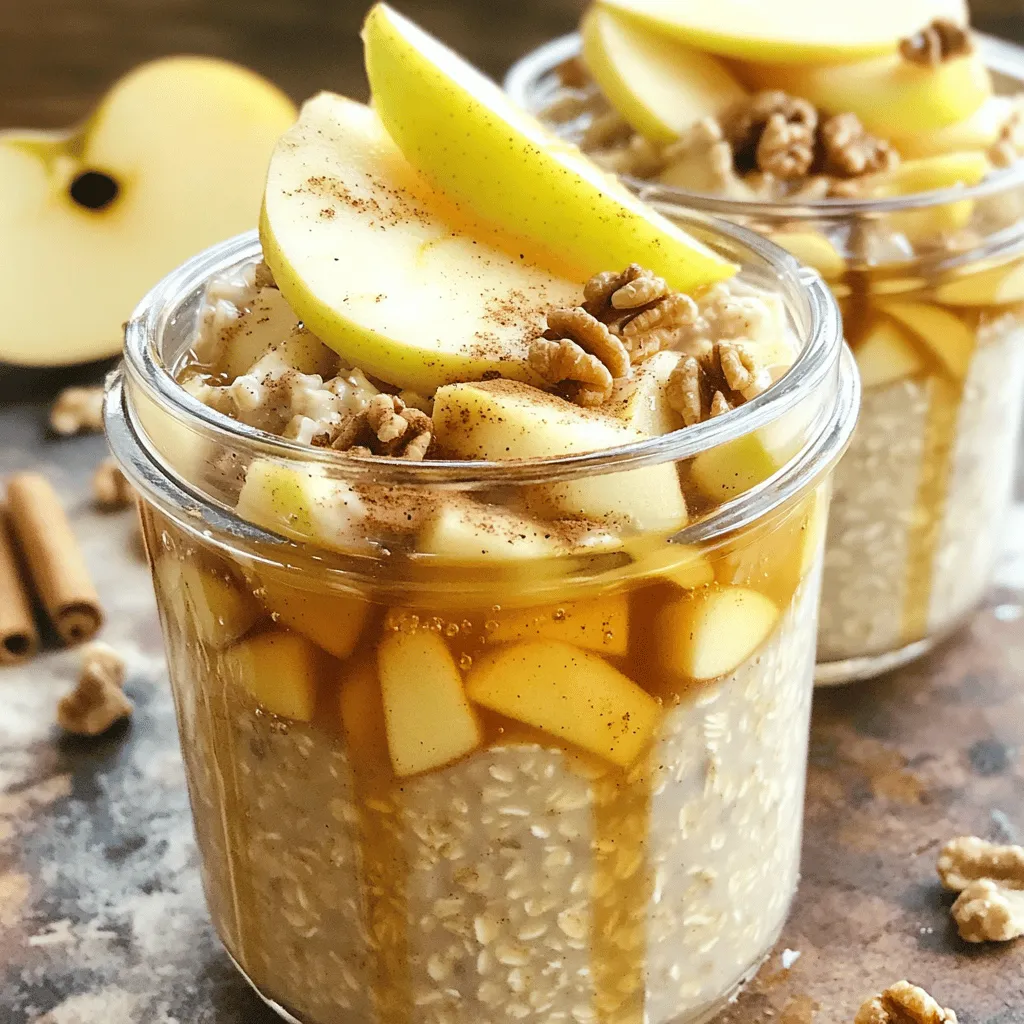
Apple Cinnamon Overnight Oats Healthy Breakfast Option
Looking for a quick and healthy breakfast? You’ve found it! Apple Cinnamon Overnight Oats are the perfect choice for busy Read Full Recipe -
Raspberry Almond Shortbread Bars Simple and Tasty Treat
Looking for a sweet treat that’s easy to make and perfect for any occasion? Raspberry Almond Shortbread Bars are your Read Full Recipe -
Chocolate Covered Strawberry Pops Delightful Treats
Are you ready for a sweet treat? Chocolate Covered Strawberry Pops are delicious and fun to make. I’ll guide you Read Full Recipe -
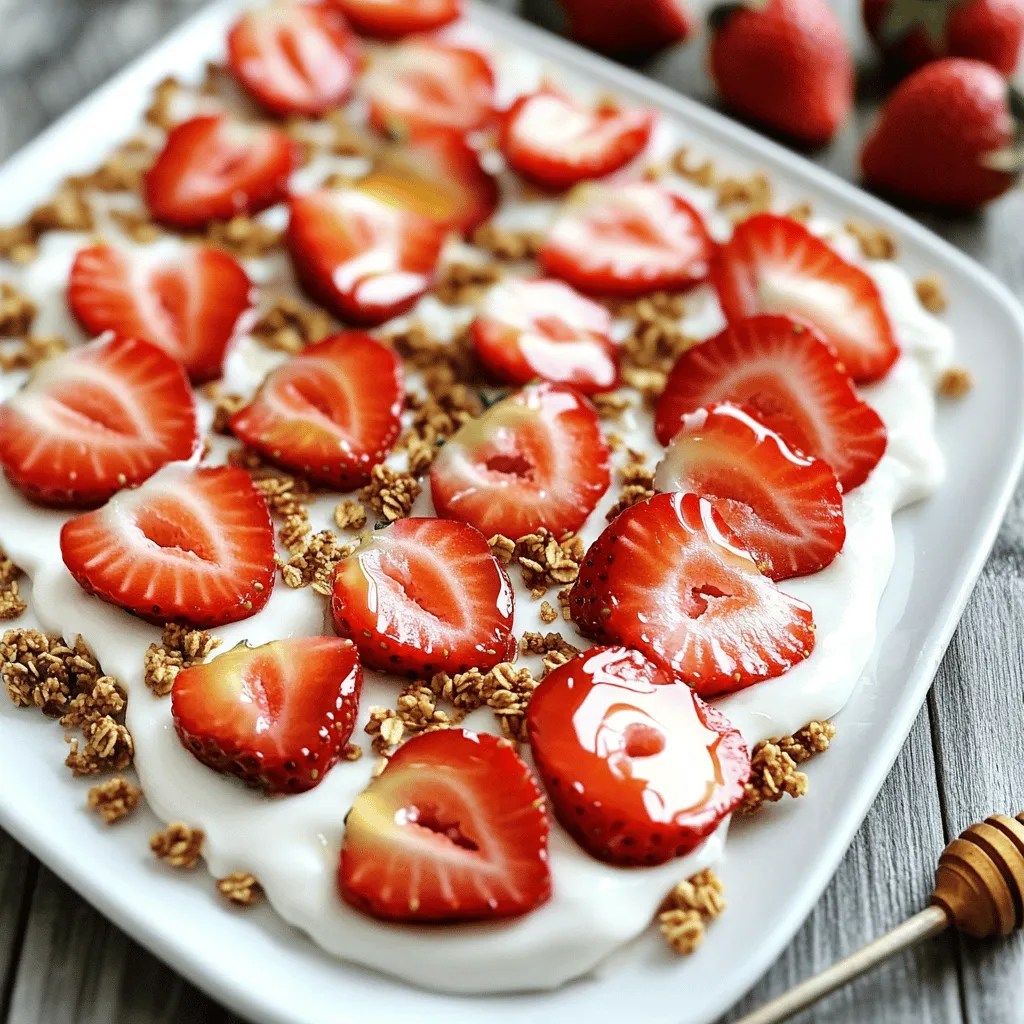
Fresh Strawberry Yogurt Bark Delicious and Easy Treat
Looking for a quick and tasty treat? Fresh Strawberry Yogurt Bark is your answer! This easy recipe combines creamy Greek Read Full Recipe -
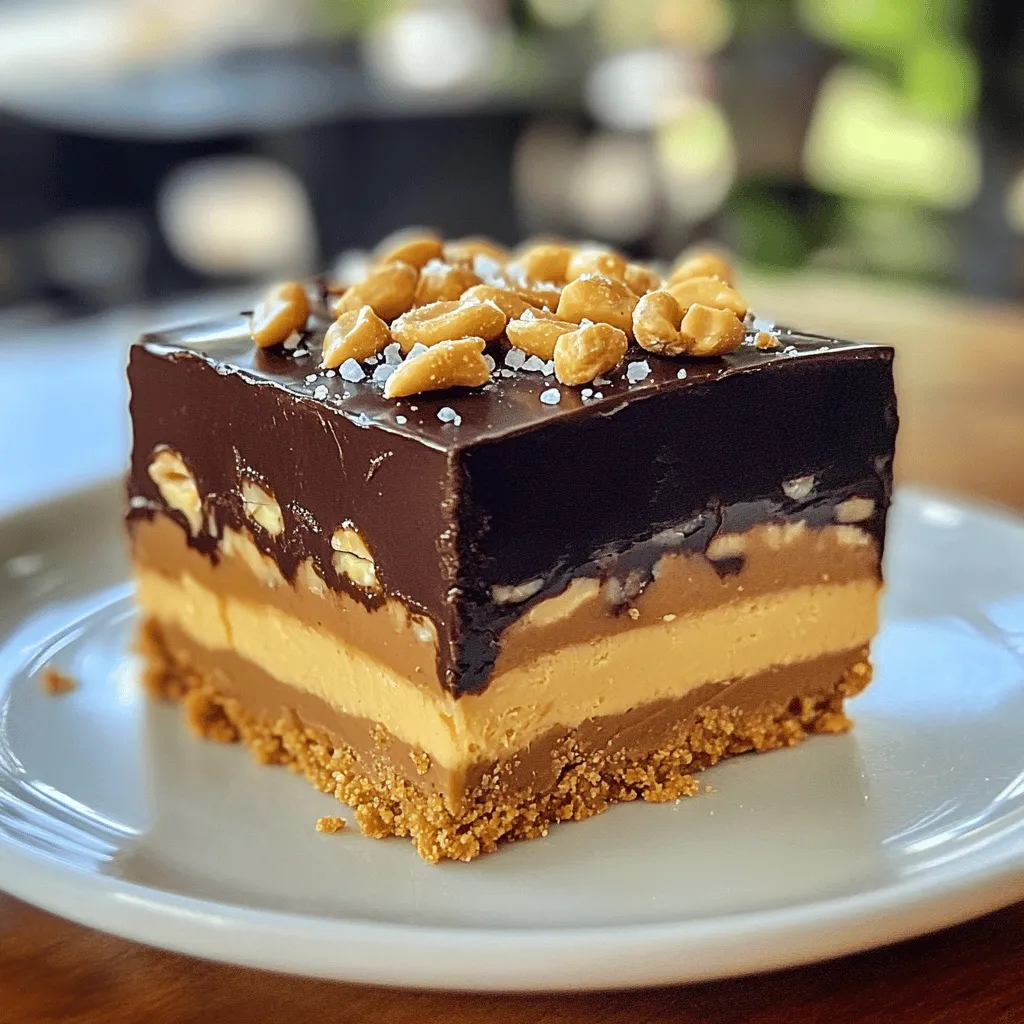
No-Bake Snickers Bars Simple and Decadent Treat
Indulge in a simple and delicious treat with my No-Bake Snickers Bars recipe! These bars come together fast and need Read Full Recipe -
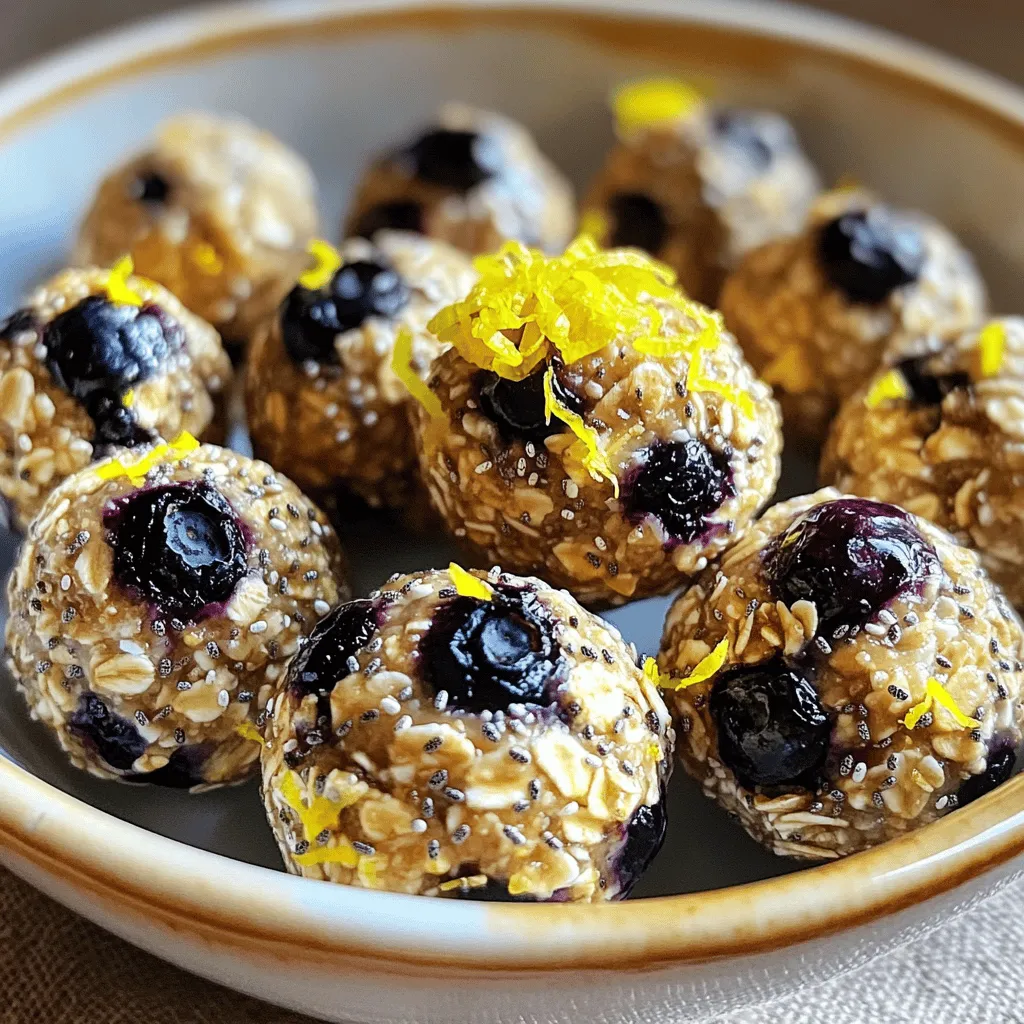
Lemon Blueberry Energy Bites Nourishing Snack Idea
Looking for a tasty, energy-packed snack? Try my Lemon Blueberry Energy Bites! These little balls are the perfect blend of Read Full Recipe


My Latest Recipes

hey,
i’m !
I’m so happy you’re here!
Each recipe I share is a little piece of love from my kitchen. May they fill your heart and home with warmth. Let’s cook up something wonderful together.
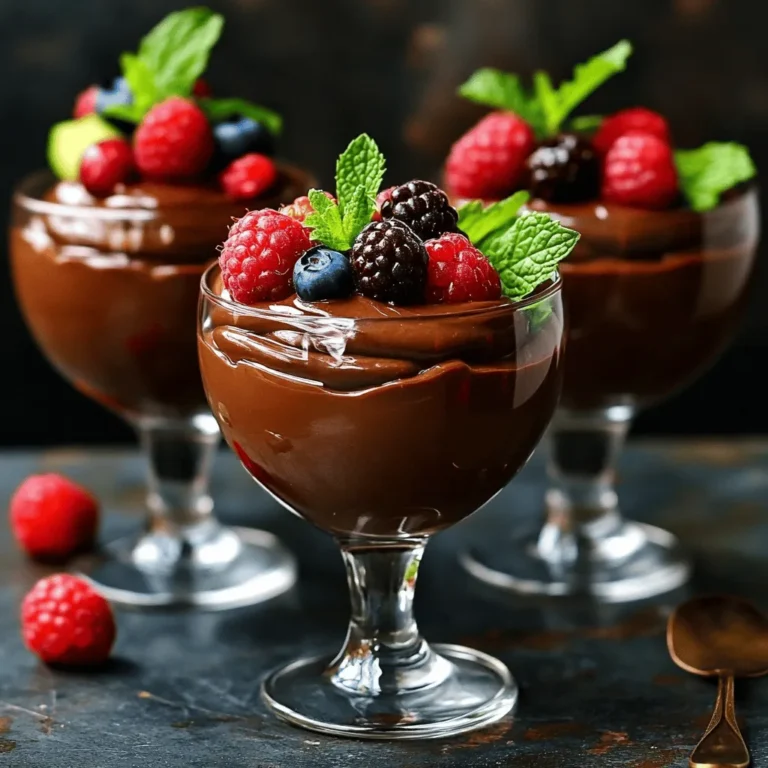
![- 2 ripe avocados - 1/2 cup unsweetened cocoa powder - 1/2 cup maple syrup or honey - 1/2 cup almond milk or any milk of choice - 1 teaspoon vanilla extract - A pinch of sea salt - Fresh berries and mint leaves for garnish To make my chocolate avocado mousse, I start with ripe avocados. They give the mousse its creamy texture. You want them soft but not brown. Next, I grab unsweetened cocoa powder. This adds that rich chocolate flavor we all love. I use maple syrup or honey for sweetness. Both work well. You can adjust the amount based on your taste. Then, I pour in almond milk. It helps blend everything smoothly. You can use any milk you like, even dairy milk. I add a teaspoon of vanilla extract for extra flavor. Finally, a pinch of sea salt balances the sweetness. It enhances the chocolate taste. For garnish, fresh berries and mint leaves add color and a nice touch. They make the mousse look beautiful on the table. - Nut butter for added creaminess - Dark chocolate shavings for garnish If you want an even creamier mousse, you can add nut butter. It gives a richer taste. Dark chocolate shavings also make a great garnish. They add a fancy touch and extra chocolate flavor. This chocolate avocado mousse recipe is easy and fun to make. For the full details, check the [Full Recipe]. Enjoy creating this delicious treat! - Start by blending the ripe avocados until they are smooth. - Next, mix in the unsweetened cocoa powder and your choice of sweetener. - Scrape down the sides of your food processor to combine everything. - Blend again until the mixture is silky and smooth. - Once ready, transfer the mousse into serving bowls or dessert glasses. - Refrigerate the mousse for at least 30 minutes. - This chilling time helps the mousse firm up and taste even better. - Serve the mousse chilled for a rich and creamy delight. For the full recipe, check out the instructions above. To get a silky consistency, use very ripe avocados. They should have a slight give when you press them. This softness helps the mousse blend smoothly. If your avocados are not ripe, the mousse will be chunky. Always check for dark green or black skin and feel for softness. You can add spices like cinnamon for extra depth. Just a pinch can make a big difference. Maple syrup and honey work well, but feel free to try other sweeteners like agave or stevia. Each option brings its own unique taste. This mousse pairs well with fresh fruits like berries or banana slices. You can also serve it with a dollop of whipped cream for a rich touch. For garnishing, use mint leaves on top for a pop of color. Drizzle with chocolate sauce for added flair. Try these ideas to impress your guests! For more detailed steps, refer to the [Full Recipe]. {{image_2}} For a vegan twist, use maple syrup instead of honey. This swap keeps the mousse plant-based. The creamy avocado pairs well with the rich cocoa. Maple syrup adds a unique sweetness. You still get that delightful texture. Just blend everything as usual. Your guests won’t even know it’s vegan! This mousse is naturally gluten-free. Just make sure all your ingredients are certified gluten-free. Cocoa powder and maple syrup are safe choices. Using almond milk or any other milk works too. This dessert is great for anyone avoiding gluten. You can serve it with confidence. Want to mix it up? Try adding espresso for a coffee kick. It brings out the chocolate flavor nicely. If you prefer something minty, add peppermint extract. Just a drop or two will do. These twists can change the whole taste. Experiment and find your favorite version! To keep your mousse fresh, cover it tightly with plastic wrap. You can also use an airtight container. This helps prevent any air from getting in and keeps it smooth. The mousse will stay good in the fridge for about three days. Yes, you can freeze chocolate avocado mousse! It’s a great way to save leftovers. Just place it in a freezer-safe container. Make sure to leave some space at the top, as it may expand when frozen. After freezing, you should thaw the mousse in the fridge overnight. Once thawed, blend it again for a smoother texture. If it seems too thick, add a splash of almond milk and mix until creamy. Enjoy your mousse just like fresh! For the full recipe, check out the details above. Yes, you can use dairy milk in this mousse. Almond milk adds a nutty taste. However, whole milk or cream will give a richer flavor. If you prefer dairy, go for it! Just keep in mind the mousse may be a bit heavier. Absolutely! Kids love this mousse. Avocados are packed with healthy fats and vitamins. They provide energy and support growth. Plus, the chocolate flavor makes it a fun treat. This dessert can be a great way to sneak in some nutrition. To make this mousse sugar-free, swap maple syrup for a low-carb sweetener. Options like stevia or erythritol work well. Adjust the amount based on your taste. You can still enjoy the rich flavor without added sugars! If you want to switch cocoa powder, try carob powder. It has a similar taste but is sweeter. Another option is chocolate protein powder, which adds extra nutrition. Just adjust the sweetness as needed for the best flavor. To check if avocados are ripe, gently squeeze them. They should feel slightly soft but not mushy. Look for dark green skin. If the stem comes off easily and is green underneath, the avocado is ready. Use ripe avocados for the best mousse texture and taste. This blog post shared a simple and tasty recipe for chocolate avocado mousse. You learned about the key ingredients, step-by-step instructions, and tips to make it perfect. Explore fun variations like vegan and gluten-free options. Store leftovers properly, and enjoy this treat when you want something sweet. With ripe avocados, you'll create a creamy dessert everyone will love. Try it, and I bet you'll impress your friends and family! Enjoy your cooking and the delicious results!](https://lisadishes.com/wp-content/uploads/2025/05/ca7f7be2-30be-412d-a36b-11ba15cc35fe-300x300.webp)


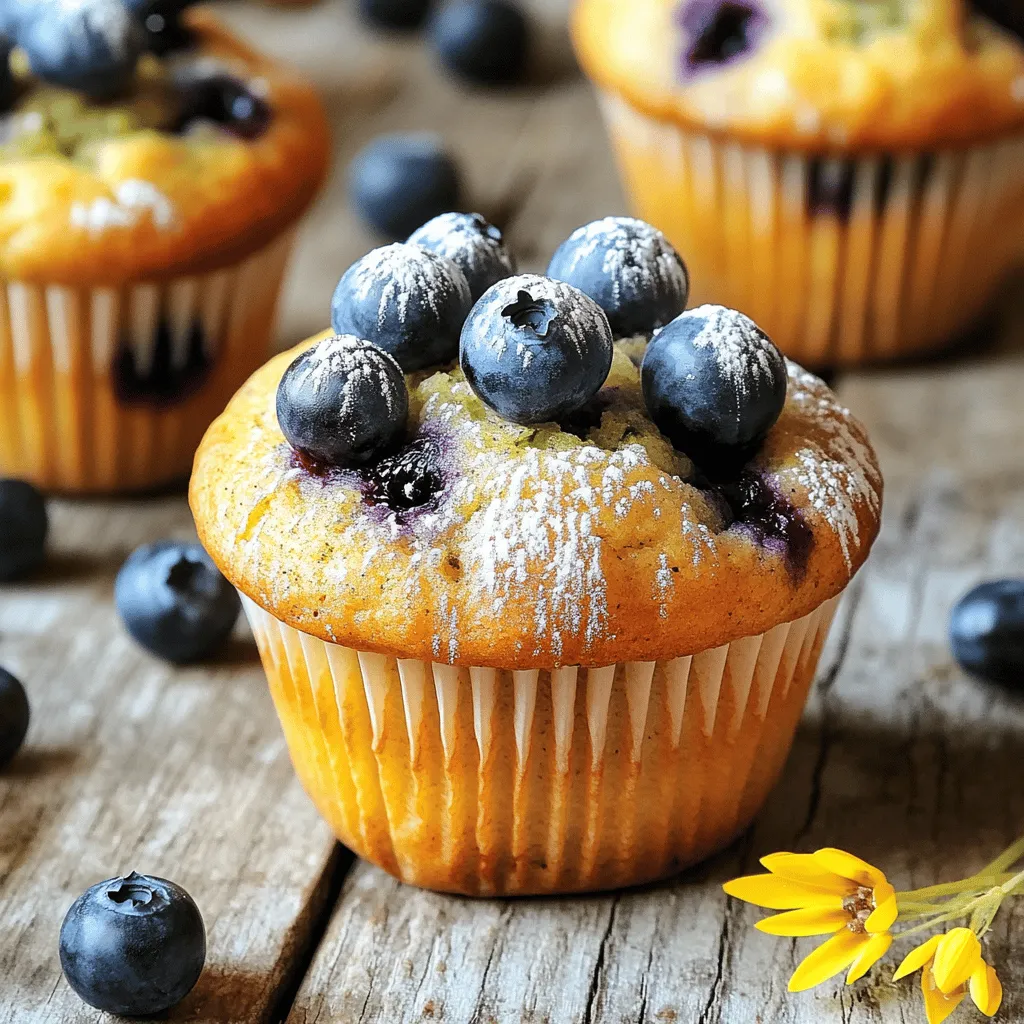
Zucchini Blueberry Muffins Tasty and Simple Delight
Looking for a tasty twist on muffins? Try my Zucchini Blueberry Muffins! This easy recipe combines fresh blueberries and flavorful zucchini to create a…