Latest & Greatest
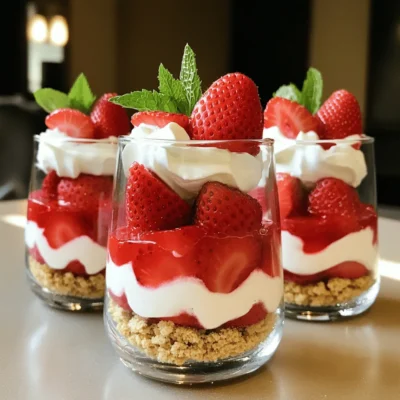
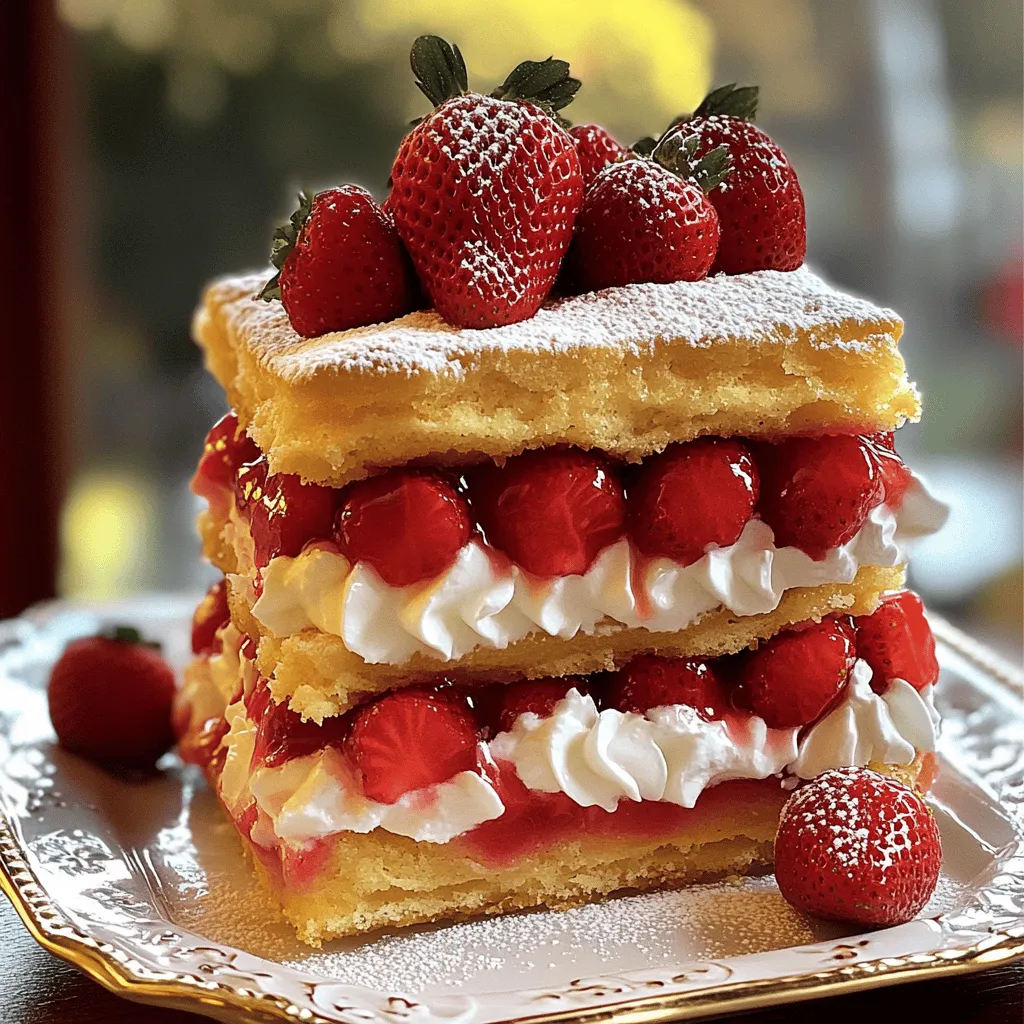
No-Bake Strawberry Shortcake Quick and Simple Delight
Are you craving a sweet treat that’s easy and delicious? Look no further! My No-Bake Strawberry Shortcake is a quick
Read more…
Jalapeño Popper Dip Flavorful and Simple Delight
Are you ready for a dip that combines creamy goodness with just the right kick? Jalapeño Popper Dip is your
Read more…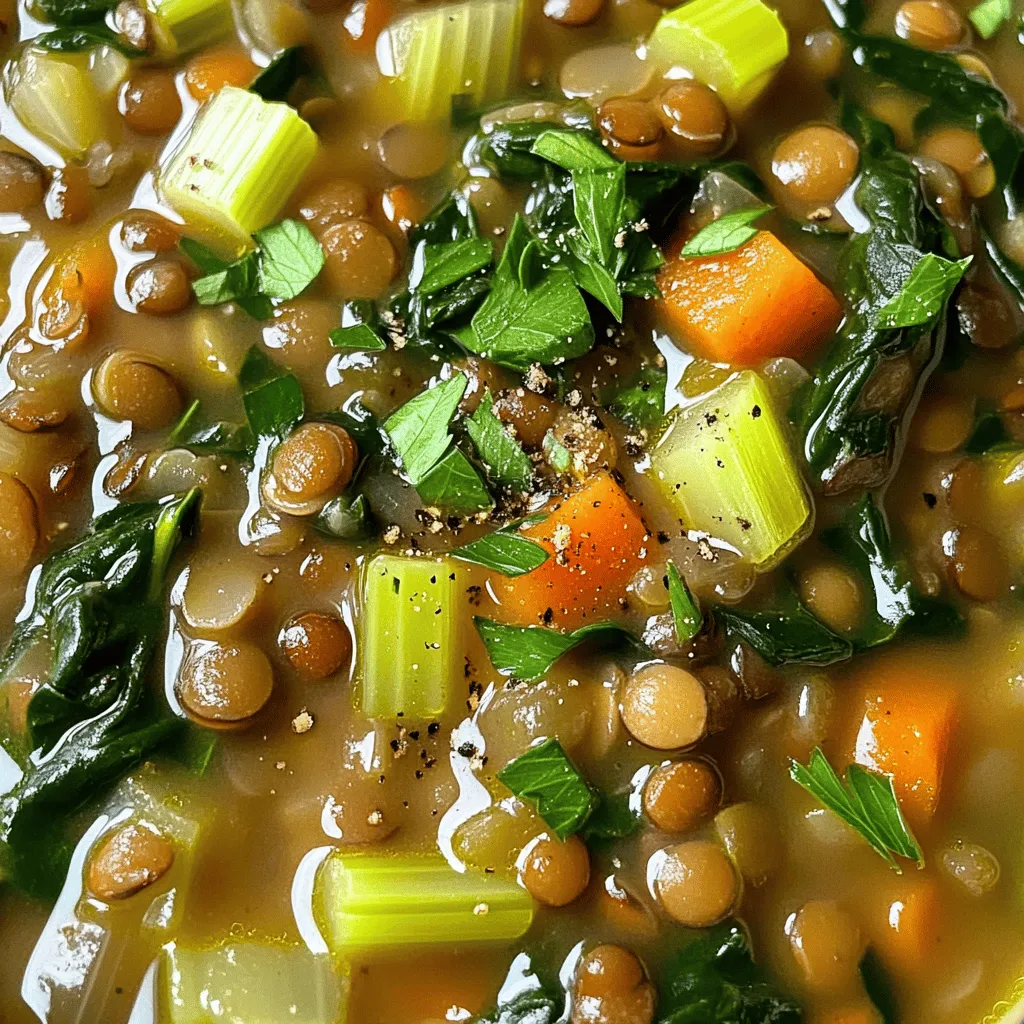
Lentil Soup with Spinach Healthy and Flavorful Meal
Are you looking for a healthy yet delicious meal option? Lentil Soup with Spinach checks both boxes! Packed with nutrients,
Read more…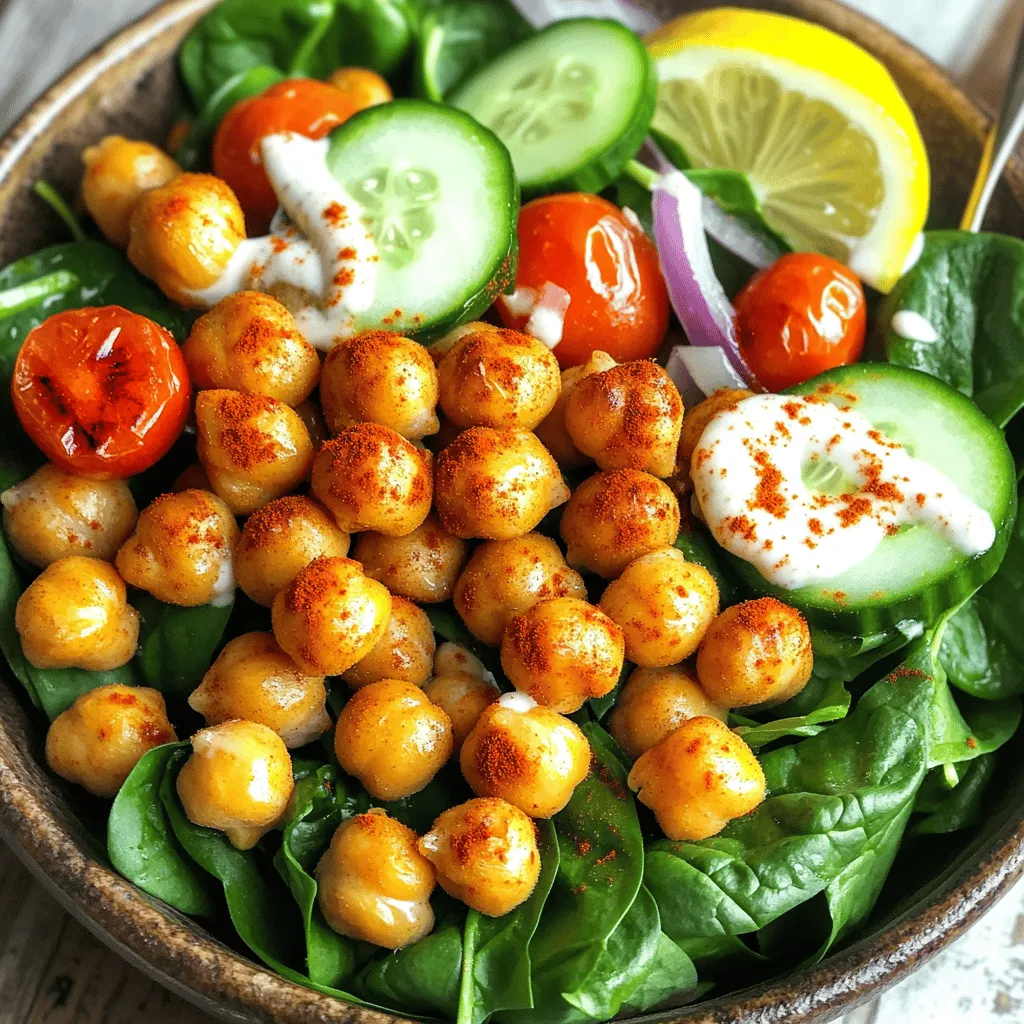
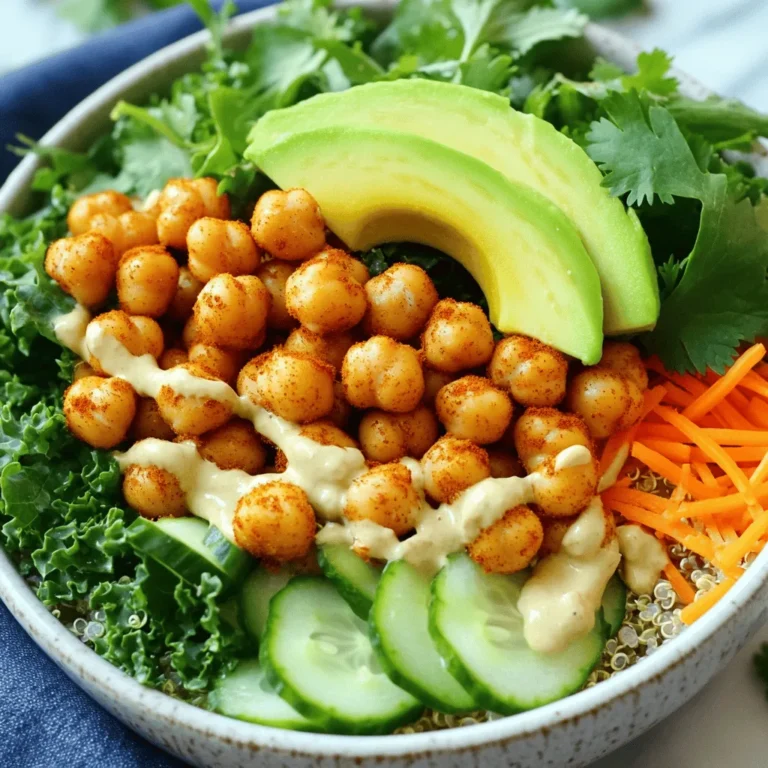
Crispy Chickpeas and Spinach Salad Fresh and Wholesome
Are you ready for a salad that shines? This Crispy Chickpeas and Spinach Salad is fresh, healthy, and full of
Read more…
Lemon Herb Grilled Chicken Flavorful and Easy Recipe
Looking for a delicious and simple way to grill chicken? You’ve come to the right place! In this Lemon Herb
Read more…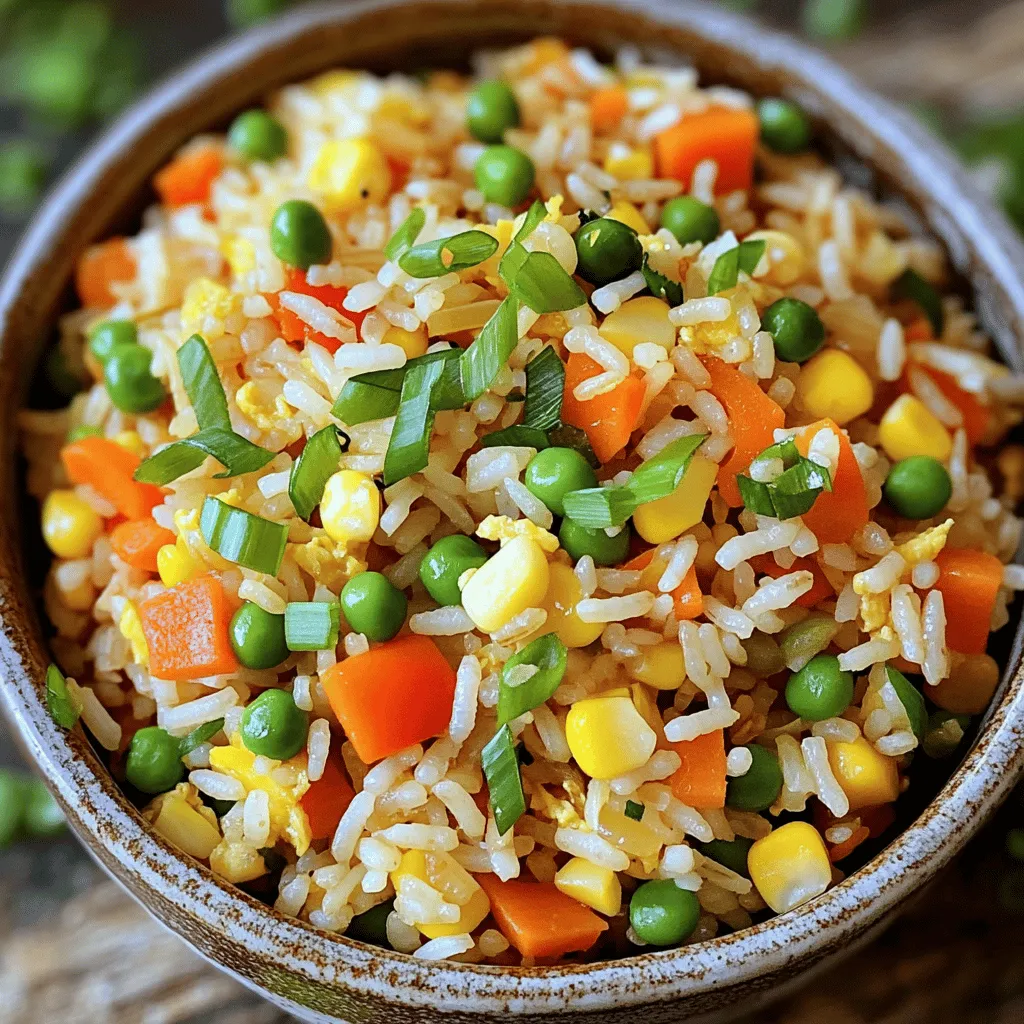
Vegetable Fried Rice Flavorful and Easy Recipe
Are you ready to elevate your weeknight dinners with a dish that’s both simple and delicious? My Vegetable Fried Rice
Read more…
Savory Mushroom Risotto Comforting Italian Delight
If you’re craving a warm, comforting dish, look no further than mushroom risotto! This creamy Italian delight invites you to
Read more…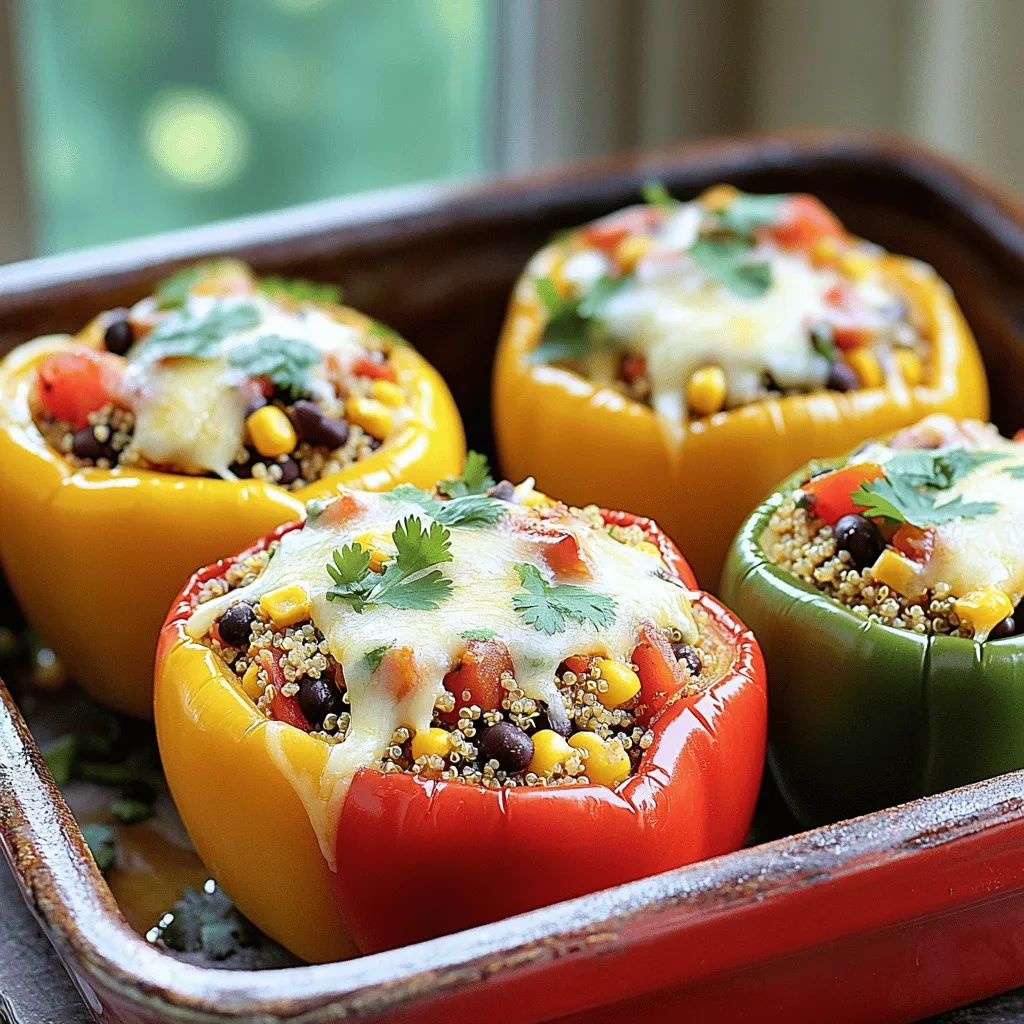
Stuffed Bell Peppers with Quinoa Flavorful and Easy
Are you ready to try a tasty and healthy dish? Stuffed bell peppers with quinoa are both easy and satisfying.
Read more…browse recipes


![- 4 large bell peppers (any color) - 1 cup cooked quinoa - 1 cup black beans, rinsed and drained - 1 cup corn kernels (fresh, frozen, or canned) - 1 cup diced tomatoes (canned or fresh) - 1 teaspoon ground cumin - 1 teaspoon chili powder - ½ teaspoon garlic powder - 1 cup shredded cheddar cheese (plus extra for topping) - ¼ cup chopped fresh cilantro (optional) - Salt and pepper to taste - Olive oil for drizzling These ingredients make cheesy stuffed bell peppers both tasty and healthy. The bell peppers are colorful and fun to eat. Quinoa adds protein and fiber, making this dish filling. Black beans bring extra protein and a nice texture. Corn kernels sweeten the mix, while tomatoes add moisture and flavor. Spices like cumin and chili powder kick up the flavor. Garlic powder gives it a nice aroma. Cheddar cheese makes it cheesy and rich. You can sprinkle some fresh cilantro on top for a fresh taste. Use olive oil to help the peppers cook and brown nicely. Each stuffed pepper has about 300 calories. It has 15 grams of protein, 45 grams of carbs, and 10 grams of fat. Key ingredients offer great health benefits: - Bell Peppers: High in vitamin C and antioxidants. - Quinoa: A complete protein with all nine essential amino acids. - Black Beans: Good source of fiber and protein. - Corn: Adds vitamins and minerals, plus a bit of sweetness. - Cheddar Cheese: Provides calcium and protein. You can find the full recipe in the article. Enjoy cooking! 1. Preheat your oven to 375°F (190°C). This ensures even cooking for our stuffed peppers. 2. Cut the tops off the bell peppers. Remove the seeds and membranes. You want them clean and ready for stuffing. 3. Brush the outside of each pepper with olive oil. This helps them roast nicely in the oven. 4. Place the peppers upright in a baking dish. This keeps them stable while they cook. 1. In a large bowl, mix together the filling ingredients: cooked quinoa, black beans, corn, diced tomatoes, ground cumin, chili powder, garlic powder, and half of the shredded cheddar cheese. Stir until everything is well combined. 2. Season the mixture with salt and pepper. Taste it to make sure the flavors pop! 3. Stuff each bell pepper with the quinoa mixture. Press down lightly to pack it in. Fill them generously for a hearty meal. 4. Top each stuffed pepper with the remaining cheddar cheese. This will melt beautifully and add flavor. 1. Cover the baking dish with aluminum foil. This traps steam and helps the peppers cook through. 2. Bake for 25 minutes. This softens the peppers and warms the filling. 3. Remove the foil and bake for an additional 10-15 minutes. You want the cheese to melt and bubble. 4. Once done, take them out of the oven and let cool for a few minutes. This makes serving easier and safer. For the full recipe, refer to the [Full Recipe]. To bring out the best in your cheesy stuffed bell peppers, use fresh herbs and spices. I love adding a pinch of smoked paprika for a subtle smokiness. You can also try oregano or thyme for extra depth. Always season your mix with salt and pepper. Taste as you go. This simple step helps ensure every bite is packed with flavor. Baking is key for even cooking. Preheat your oven to 375°F (190°C) for the best results. Place the stuffed peppers upright in a baking dish, allowing them to cook evenly. Cover the dish with foil for the first part of baking. This traps steam and helps the peppers get tender. After 25 minutes, remove the foil to let the cheese get bubbly and golden. To make your dish shine, garnish with fresh cilantro or parsley. A dollop of sour cream or a slice of avocado adds color and creaminess. Serve the peppers on a colorful plate to make them pop. Pair them with a simple side salad or some crusty bread. This balance makes for a delightful meal. {{image_2}} You can change the protein in cheesy stuffed bell peppers to fit your taste. Use ground turkey, chicken, or beef for a meaty twist. Each option adds a unique flavor to the peppers. If you want to go meat-free, try black beans, lentils, or chopped mushrooms. These choices keep the dish hearty and satisfying for everyone. Cheese is the star here, but you can mix it up. Cheddar is great, but try pepper jack for a spicy kick. Mozzarella gives a creamy texture. You can also add more flavor with herbs like oregano or basil. Want more crunch? Add diced bell peppers, corn, or even cooked grains like rice or farro for extra texture and taste. If you need gluten-free options, this recipe is naturally safe. Just make sure your ingredients, like the beans and corn, are gluten-free. For those on low-carb or keto diets, swap quinoa for cauliflower rice. This change keeps the dish light while still being full of flavor. You can enjoy cheesy stuffed bell peppers without worry about your diet. Check out the Full Recipe for more ideas! To store leftovers, let the stuffed peppers cool first. Place them in an airtight container. They will last for up to four days in the fridge. When you’re ready to eat, reheat them in the oven or microwave. Use a microwave-safe dish and cover with a damp paper towel to keep them moist. If reheating in the oven, set it to 350°F and heat for about 15-20 minutes. Freezing stuffed peppers is easy. First, let them cool completely. Wrap each pepper tightly in plastic wrap or foil. Place them in a freezer-safe bag or container. They can stay frozen for up to three months. To thaw, move them to the fridge overnight. For reheating, bake them at 375°F for about 30-35 minutes, or until hot. You can make these cheesy stuffed bell peppers ahead of time. Prepare the filling and stuff the peppers, then store them in the fridge for up to two days. This makes busy days easier. For portioning, cut the peppers in half if you want smaller servings. This way, you can have quick meals ready to go. To spice up your cheesy stuffed bell peppers, add diced jalapeños or chopped serrano peppers. You can also mix in hot sauce or crushed red pepper flakes into the filling. This will give your dish a nice kick without overpowering the other flavors. Don't be shy; taste as you go to find the heat level you like best! Yes, you can use many types of cheese! Try Monterey Jack for a creamy texture or pepper jack for extra spice. If you want a sharp flavor, go for aged cheddar or even feta for a tangy twist. Mixing two or more cheeses can create a rich experience that elevates your meal. The best way to reheat cheesy stuffed bell peppers is in the oven. Preheat your oven to 350°F (175°C). Place the stuffed peppers in a baking dish and cover with foil to keep them moist. Bake for about 20 minutes or until they are heated through. You can also microwave them, but the oven gives better results. Absolutely! Brown rice makes a great substitute for quinoa. You can also use farro, barley, or even couscous. Each grain will add a unique flavor and texture to the dish. Just make sure to cook the grain first before mixing it with the other ingredients. If you bake stuffed peppers at 400°F (200°C), they usually take about 25 to 30 minutes. Keep an eye on them to ensure they get tender and the cheese melts perfectly. If you like a crispier texture, leave them in for an extra 5 minutes with the foil off. For the full recipe, check out the earlier section! These stuffed bell peppers offer a healthy and tasty meal option. We covered the ingredients, preparation steps, and helpful tips to enhance flavor. I shared variations to suit different diets and how to store leftovers. Remember, these peppers are versatile. You can easily adjust them to fit your taste. In conclusion, stuffed bell peppers are simple to make and full of flavor. Give them a try and enjoy a healthy meal. You'll love how great they taste and how easy they are to prepare.](https://lisadishes.com/wp-content/uploads/2025/05/12f2af8c-30c2-43ec-b748-ad7f52256eb0.webp)
Cheesy Stuffed Bell Peppers Flavorful and Simple Recipe
Get ready to impress your taste buds with my flavorful and simple recipe for cheesy stuffed bell peppers! These vibrant peppers burst with fresh…
My Latest Desserts

Easy Strawberry Shortcake Simple and Delicious Recipe
If you’re craving a sweet treat that’s both simple and delicious, look no further! My Easy Strawberry Shortcake recipe is Read Full Recipe-
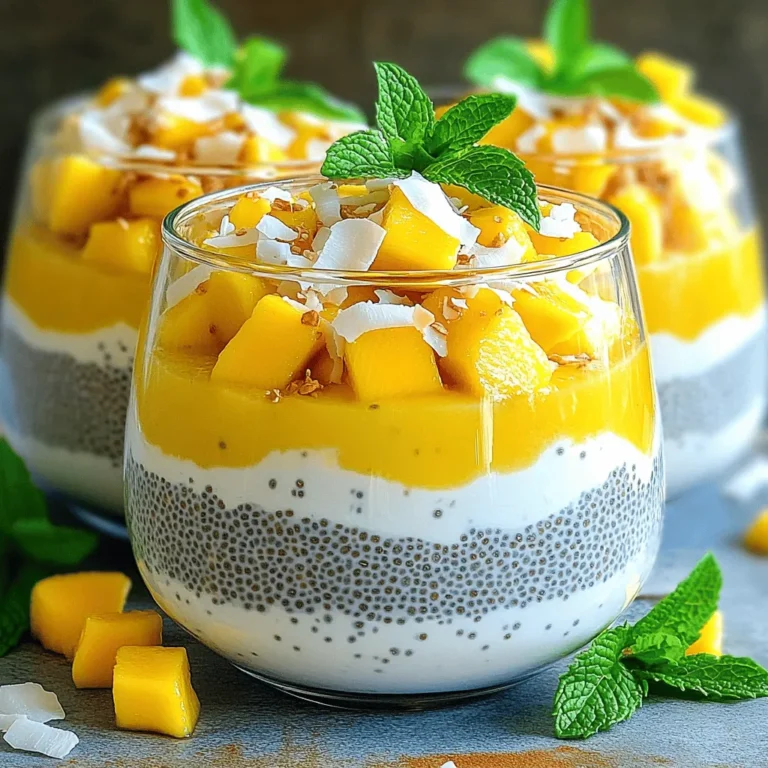
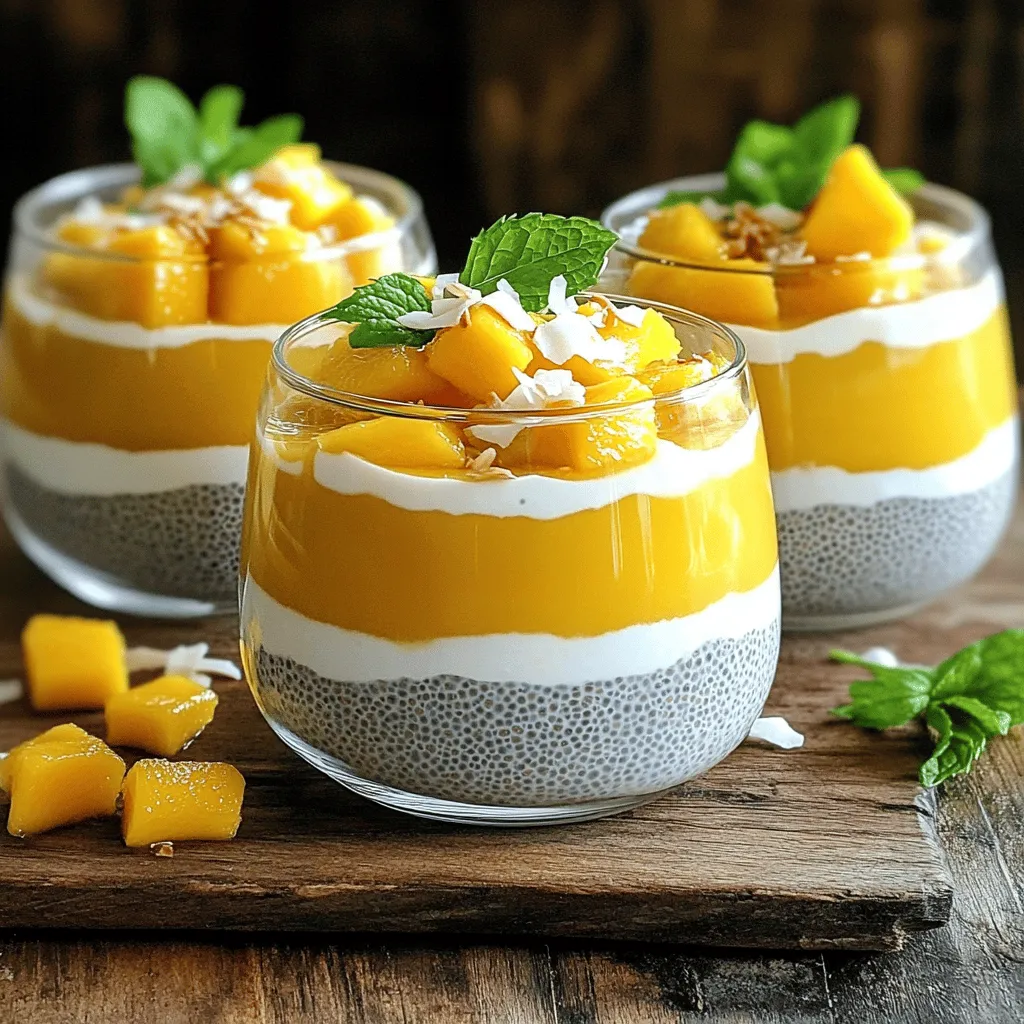
Mango Coconut Chia Pudding Delicious and Nutritious Treat
Are you ready to treat yourself to something truly delicious and nutritious? Mango Coconut Chia Pudding is the perfect way Read Full Recipe -
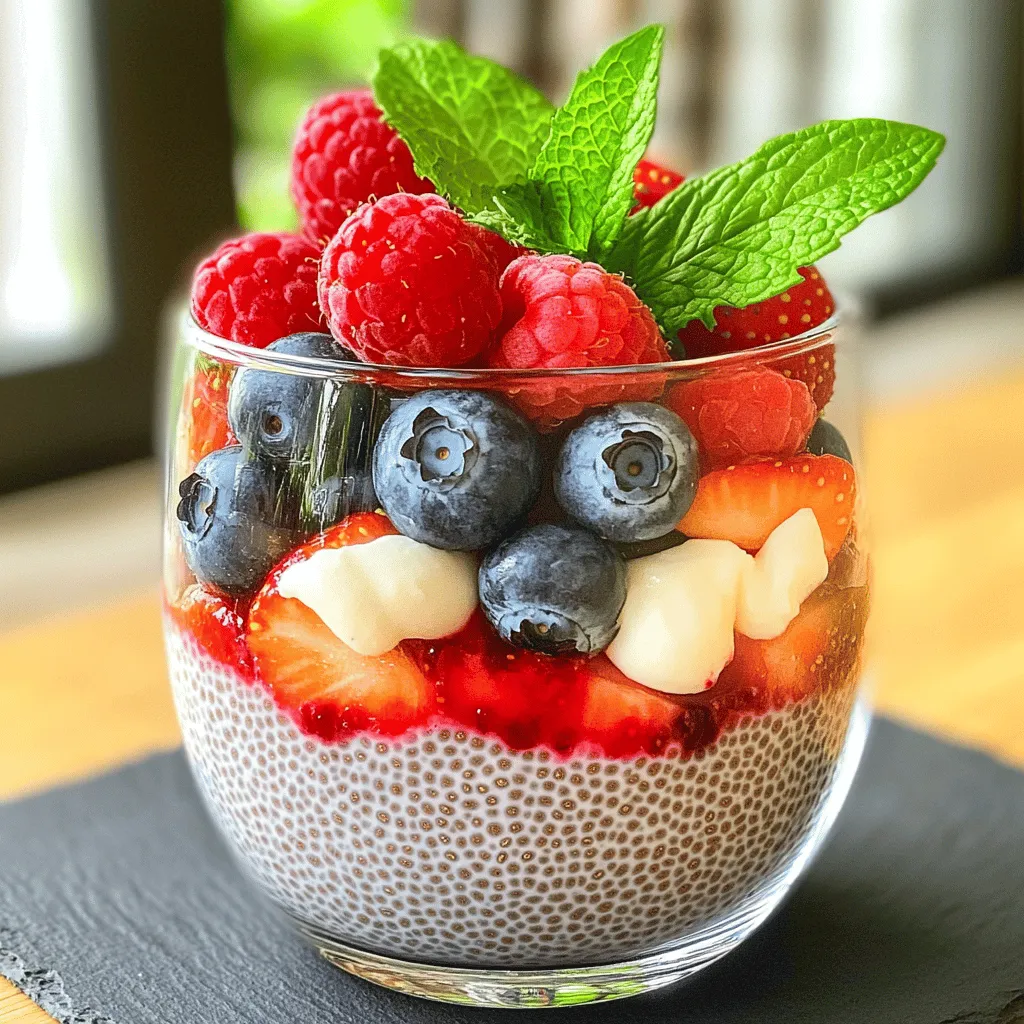
Berry Chia Pudding Simple and Healthy Delight
Berry Chia Pudding is a simple and healthy treat that packs a punch. With just a few easy ingredients, you Read Full Recipe -
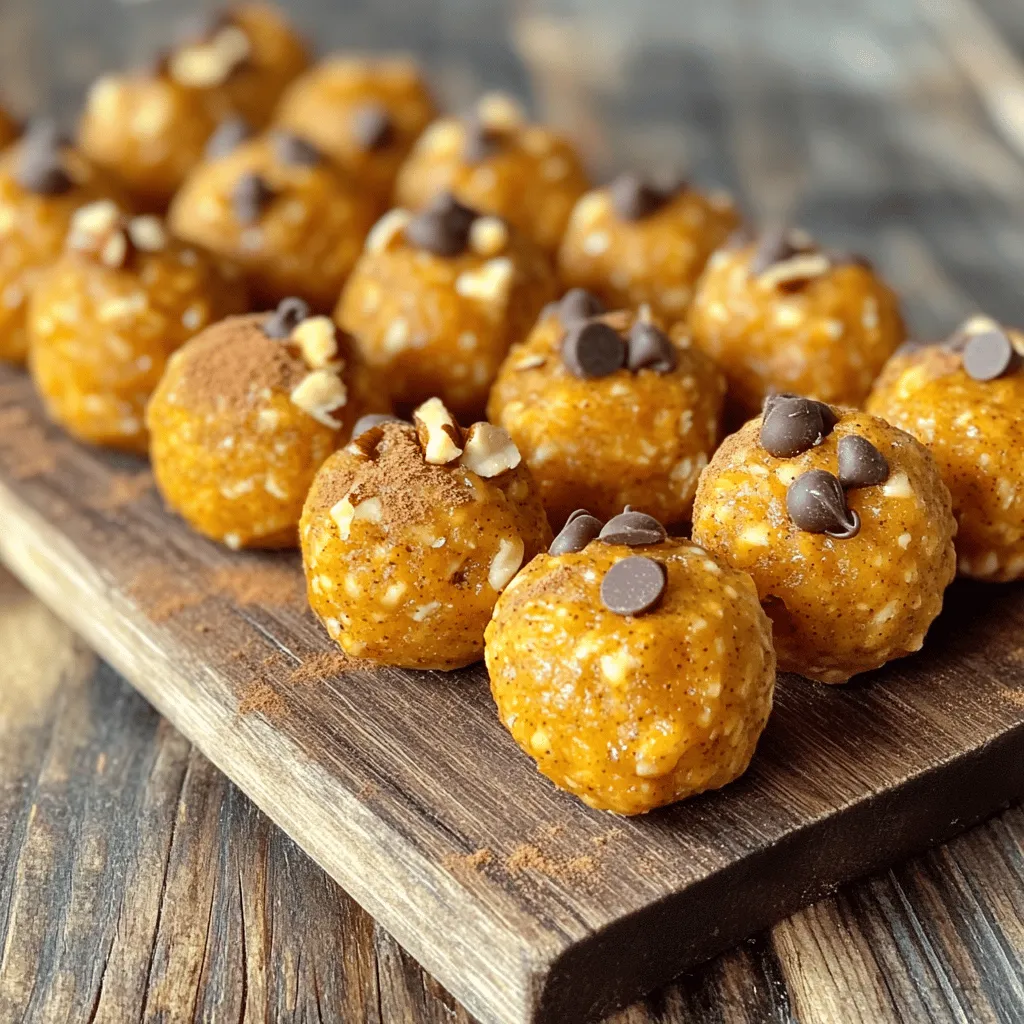
Pumpkin Spice Energy Bites Tasty and Healthy Snack
Looking for a tasty and healthy snack to fuel your day? This Pumpkin Spice Energy Bites recipe is your answer! Read Full Recipe -
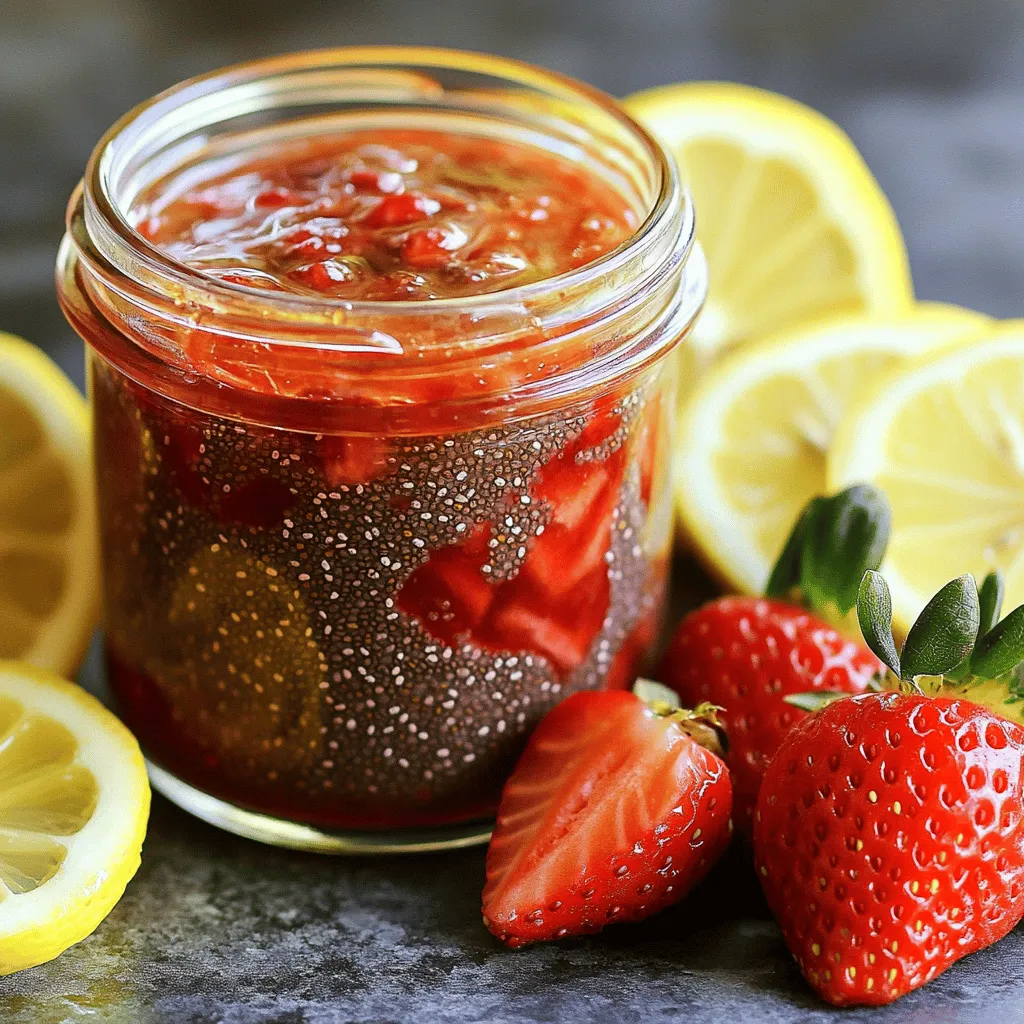
Strawberry Chia Seed Jam Tasty and Healthy Treat
If you’re craving a sweet treat that’s also good for you, I’ve got just the thing: Strawberry Chia Seed Jam! Read Full Recipe -
Pumpkin Spice Muffins Warm and Cozy Fall Treat
Fall is the perfect time for warm and cozy treats, and nothing says autumn like pumpkin spice muffins. These fluffy Read Full Recipe -
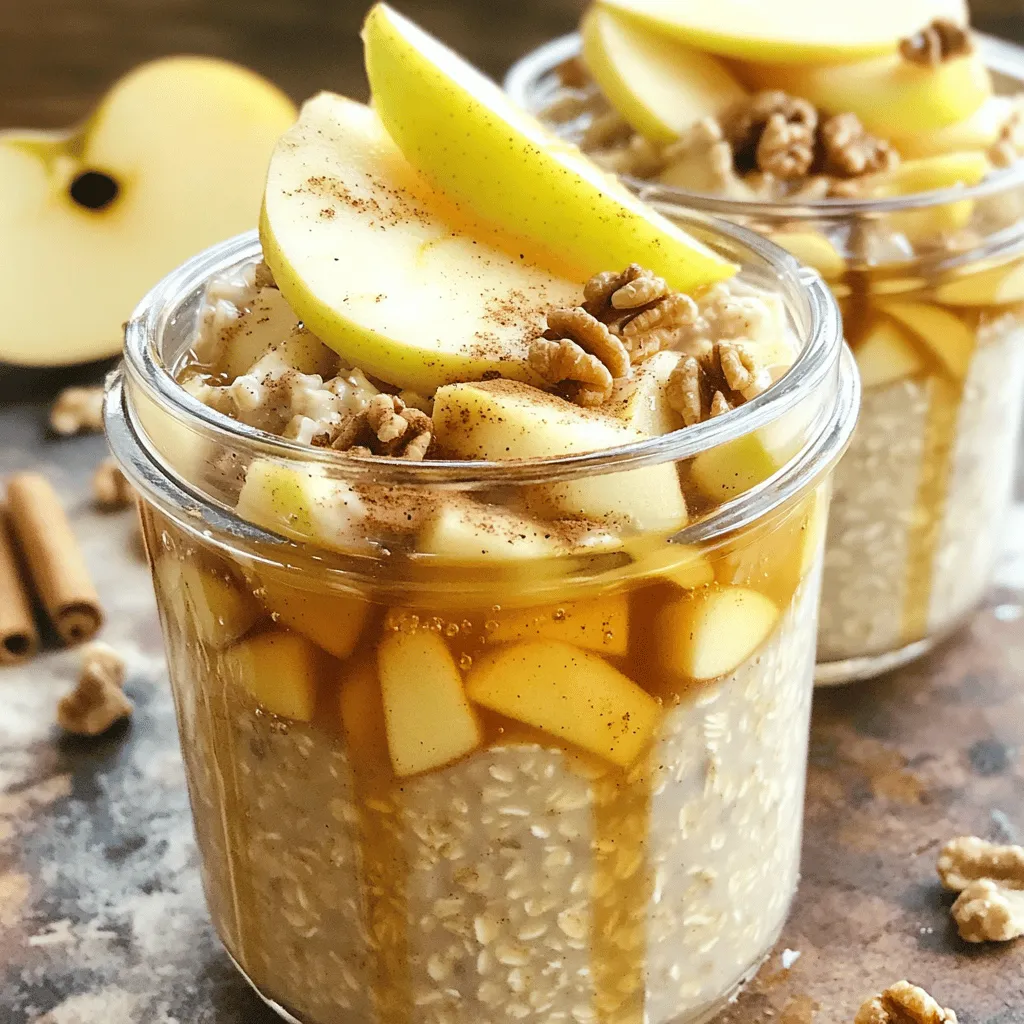
Apple Cinnamon Overnight Oats Healthy Breakfast Option
Looking for a quick and healthy breakfast? You’ve found it! Apple Cinnamon Overnight Oats are the perfect choice for busy Read Full Recipe -
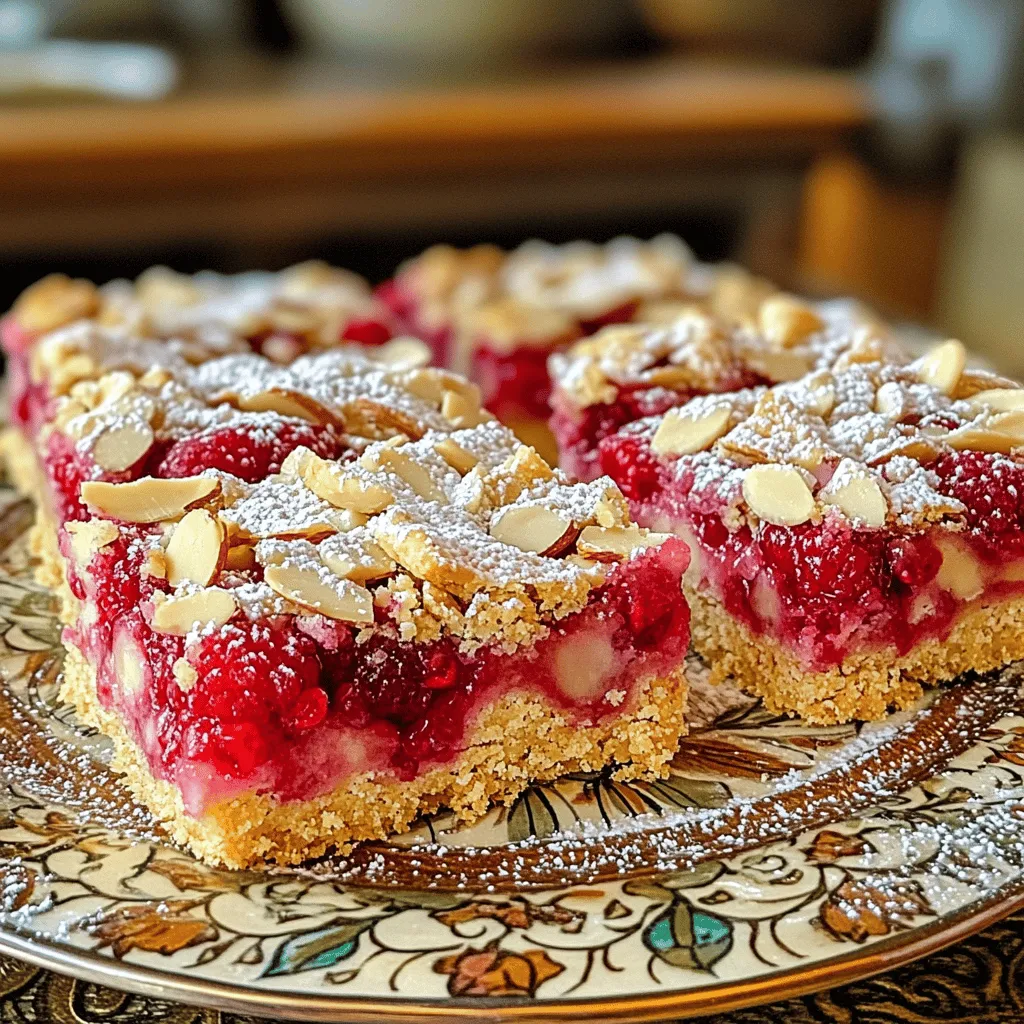
Raspberry Almond Shortbread Bars Simple and Tasty Treat
Looking for a sweet treat that’s easy to make and perfect for any occasion? Raspberry Almond Shortbread Bars are your Read Full Recipe -
Chocolate Covered Strawberry Pops Delightful Treats
Are you ready for a sweet treat? Chocolate Covered Strawberry Pops are delicious and fun to make. I’ll guide you Read Full Recipe -
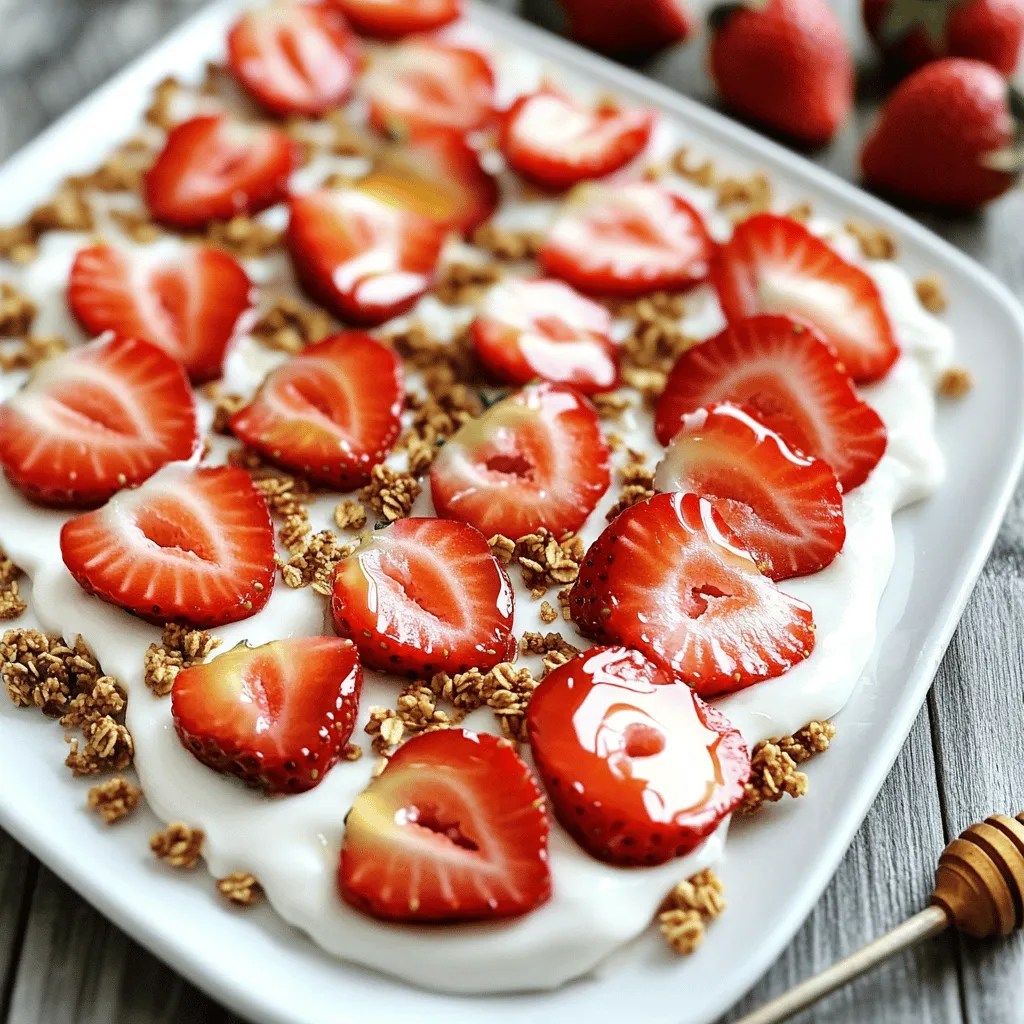
Fresh Strawberry Yogurt Bark Delicious and Easy Treat
Looking for a quick and tasty treat? Fresh Strawberry Yogurt Bark is your answer! This easy recipe combines creamy Greek Read Full Recipe -
No-Bake Snickers Bars Simple and Decadent Treat
Indulge in a simple and delicious treat with my No-Bake Snickers Bars recipe! These bars come together fast and need Read Full Recipe -
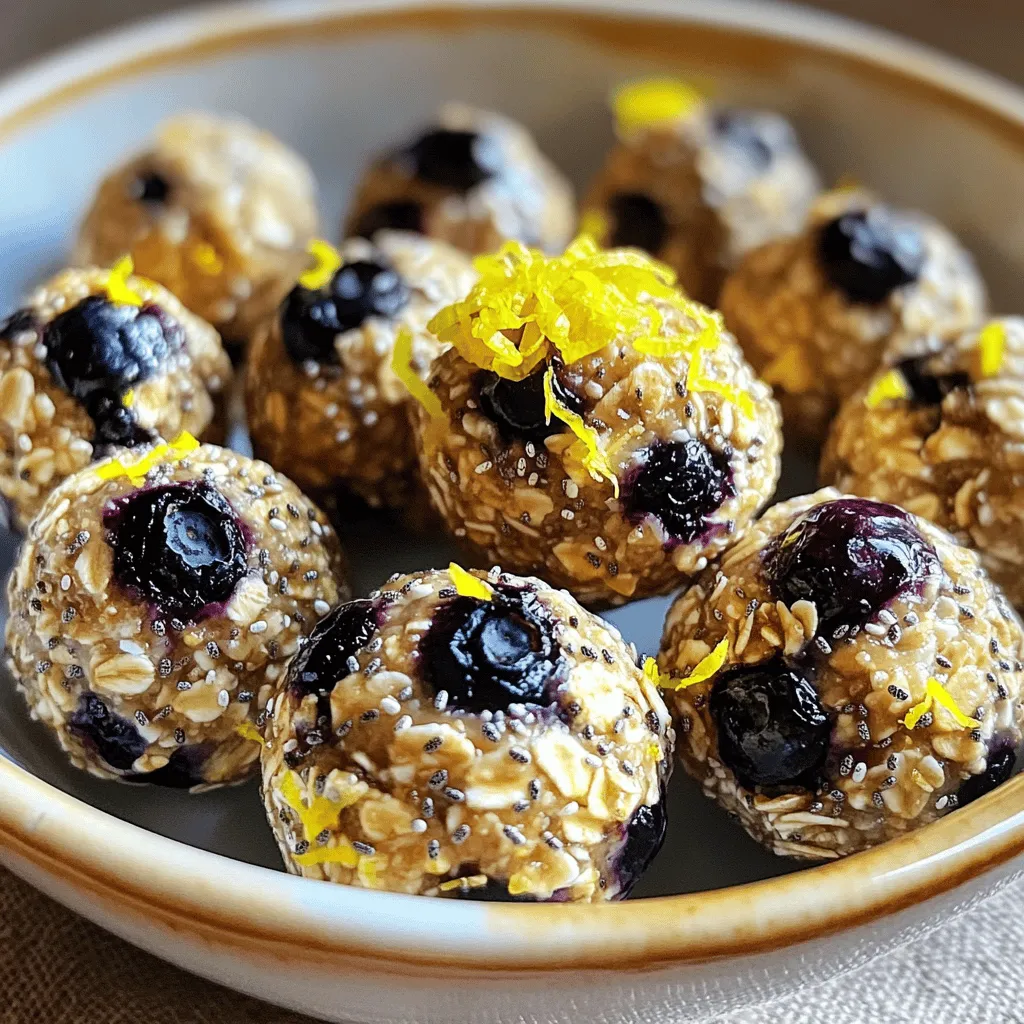
Lemon Blueberry Energy Bites Nourishing Snack Idea
Looking for a tasty, energy-packed snack? Try my Lemon Blueberry Energy Bites! These little balls are the perfect blend of Read Full Recipe


hey,
i’m !
I’m so happy you’re here!
Each recipe I share is a little piece of love from my kitchen. May they fill your heart and home with warmth. Let’s cook up something wonderful together.


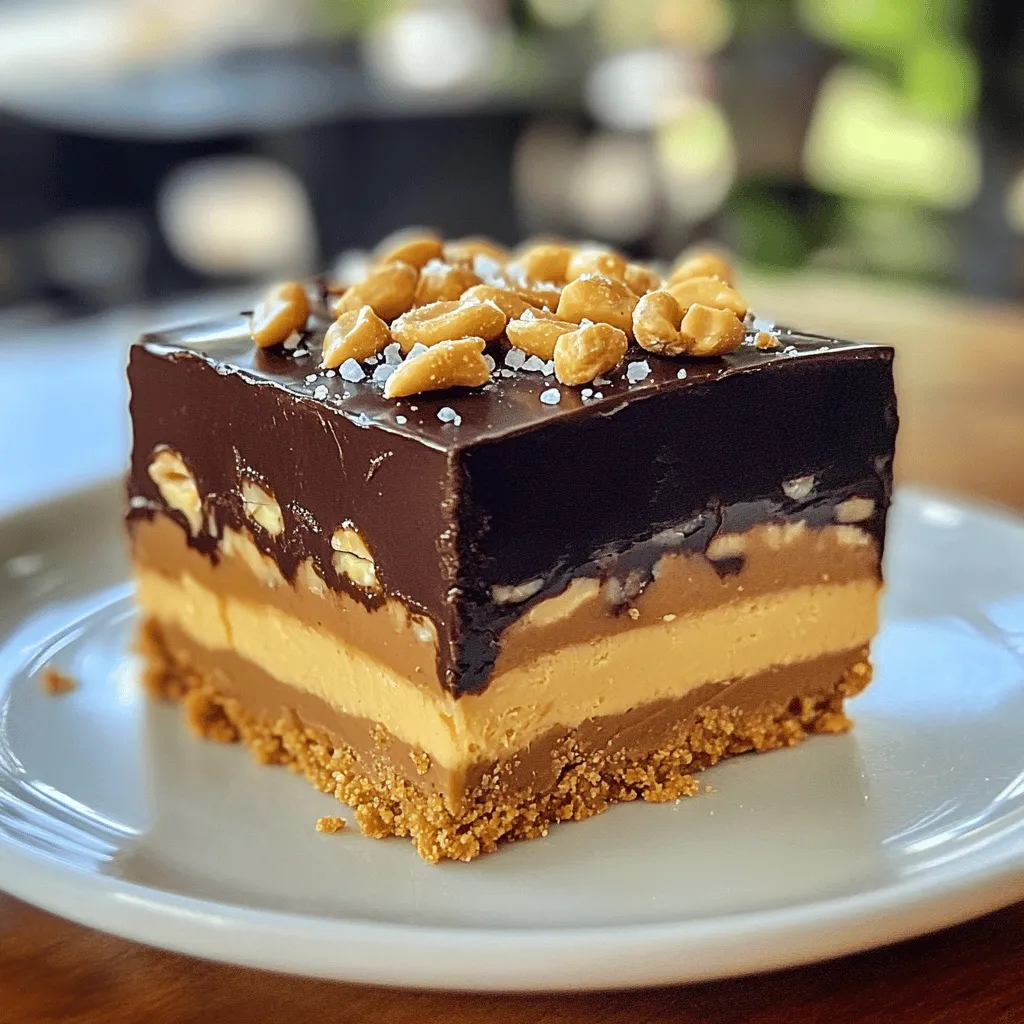
![Here are the key ingredients you'll need to create the rich and creamy chocolate peanut butter cheesecake: - 1 ½ cups graham cracker crumbs - ½ cup unsalted butter, melted - 1 tablespoon sugar - 16 oz cream cheese, softened - 1 cup powdered sugar - 1 cup creamy peanut butter - 1 teaspoon vanilla extract - ½ cup heavy cream - 4 oz semi-sweet chocolate, melted (and cooled slightly) - ½ cup chocolate chips (for topping) - ¼ cup mini peanut butter cups (for garnish, optional) Each of these ingredients plays a vital role in making this cheesecake a delight. The graham cracker crumbs bring a sweet crunch, while the melted butter binds the crust. Cream cheese gives the cheesecake its creamy texture, and peanut butter adds that rich, nutty flavor we all love. The melted chocolate enhances the taste, adding depth to each bite. Topping with chocolate chips and mini peanut butter cups makes it look stunning and adds extra flavor. You can find the full recipe with exact steps to craft this delicious treat. Start by mixing the graham cracker crumbs, melted butter, and sugar in a medium bowl. Make sure everything blends well. Next, press this mixture into the bottom of a 9-inch springform pan. It should form a nice, even layer. Once done, chill the crust in the refrigerator for 30 minutes. This helps it set up nicely. In a large bowl, beat together the softened cream cheese and powdered sugar. Keep mixing until the mixture is smooth and creamy. Then, add the creamy peanut butter and vanilla extract. Mix everything until fully combined. Now, it’s time to incorporate the melted chocolate. Pour it in gradually while mixing on low speed. You want a uniform filling, so take your time to ensure there are no lumps. Now, whip the heavy cream in a separate bowl until you see soft peaks. This adds lightness to your filling. Gently fold the whipped cream into the chocolate and peanut butter mixture. Be careful not to deflate the whipped cream. Once combined, pour this delicious mixture over the chilled crust. Smooth out the top using a spatula. Tap the pan lightly on the counter to release any air bubbles. Cover it and refrigerate for at least 4 hours, or overnight for the best results. For the complete details, check the Full Recipe. To make a smooth and creamy cheesecake, start with softened cream cheese. This step is key. Cold cream cheese will create lumps in your mixture. Leave it out for about an hour to warm up. You can also cut it into chunks to help it soften faster. When you mix in the melted chocolate, pour it in slowly. Keep the mixer on low to blend it well. This prevents lumps from forming. Scrape the sides of the bowl often. This will ensure all ingredients mix evenly. When it’s time to serve, use a sharp knife. Dip it in hot water and wipe it dry. This helps you cut neat slices. For a fun twist, you can make mini cheesecakes in muffin tins. Just adjust the crust and filling amounts. For toppings, add chocolate chips or mini peanut butter cups. Fresh whipped cream adds a nice touch too. You can even drizzle some melted chocolate on top for extra flair. Each slice should look as delicious as it tastes. For the full recipe, check out the recipe section. {{image_2}} You can change the flavors in this cheesecake to suit your taste. Instead of peanut butter, try almond butter for a nutty twist. If you want a nut-free option, use sun butter or another seed butter. These swaps keep the creamy texture while changing the taste. You can also play with chocolate types. For a richer flavor, use dark chocolate. If you prefer a sweeter taste, white chocolate works well too. Mixing different chocolates can add depth and surprise to your dessert. If you need a gluten-free option, use gluten-free graham cracker crumbs for the crust. Many brands offer great alternatives that taste just as good. Just make sure to check the labels to ensure they are truly gluten-free. For a vegan version, swap the cream cheese and heavy cream with plant-based alternatives. Look for vegan cream cheese and coconut cream. These choices will give you a similar rich and creamy texture while keeping it dairy-free. You can enjoy this cheesecake while sticking to your dietary needs! For the full recipe, visit [Full Recipe]. To keep your chocolate peanut butter cheesecake fresh, store it in the fridge. First, cover the cheesecake tightly with plastic wrap or aluminum foil. This prevents it from absorbing other smells from the fridge. You can also use an airtight container if you have one. Leftovers can last up to five days in the fridge. I recommend enjoying it within three days for the best taste. The flavors remain rich and creamy, but you may notice slight changes in texture after a few days. If you want to save some cheesecake for later, freezing works great. Start by slicing the cheesecake into individual pieces. Wrap each slice tightly in plastic wrap. Then, place them in a freezer-safe bag or container. This helps keep them fresh and easy to grab. To thaw, take a slice out of the freezer and place it in the fridge overnight. This way, it will defrost slowly and stay creamy. You can also thaw it at room temperature for about 30 minutes if you're in a hurry. Enjoy the cheesecake chilled for the best flavor and texture. You’ll love that rich and creamy delight anytime! For the full recipe, check out the earlier section. The cheesecake needs to chill for at least 4 hours. For the best taste, I suggest chilling it overnight. This allows the flavors to blend well. Plus, a longer chill helps it set firmly. Yes, you can make this cheesecake ahead of time. It is perfect for parties or special occasions. Prepare it a day or two before serving. Just keep it in the fridge. This way, you save time on the event day. If you don't have a springform pan, don't worry! You can use a regular pie dish or an 8x8 inch baking pan. Line the bottom with parchment paper for easy removal. Just be careful when slicing and serving. Keep in mind, the shape may be different, but the taste will still be amazing! For the full recipe, check out the details above. This blog post covered a delicious no-bake peanut butter cheesecake. You learned about the ingredients, step-by-step instructions, tips, variations, and storage methods. Remember, using softened cream cheese is key for the best texture. I hope you feel ready to make this tasty dessert. Whether you stick with the original recipe or try new flavors, enjoy every bite. Happy baking!](https://lisadishes.com/wp-content/uploads/2025/06/4b30f42f-6453-4286-851d-bf23e977d998-300x300.webp)
Baked Crunchy Hot Honey Chicken Delight Recipe
Get ready to spice up your dinner nights with my Baked Crunchy Hot Honey Chicken Delight! This easy recipe combines juicy chicken thighs, a…
![- 1.5 lbs chicken thighs, skinless and boneless - 1 cup buttermilk - 1 tablespoon hot sauce (adjust to taste) - 1.5 cups all-purpose flour - 1 cup regular breadcrumbs (for crunch) - 1 teaspoon garlic powder - 1 teaspoon onion powder - 1 teaspoon paprika - 1 teaspoon salt - ½ teaspoon black pepper - ½ teaspoon cayenne pepper (optional for extra heat) The main ingredients offer a tasty base. Chicken thighs are juicy and flavorful. The buttermilk and hot sauce marinade tenderizes the meat and adds spice. The blend of seasonings in the dry mixture gives the chicken its unique taste. - ½ cup honey - 2 tablespoons apple cider vinegar - 1 teaspoon chili flakes (for garnish) The hot honey sauce brings a sweet and spicy kick. Honey adds sweetness, while apple cider vinegar gives it a tangy twist. Chili flakes on top add heat and a pop of color. This sauce turns the chicken into a showstopper on your table. For the complete recipe, check out the [Full Recipe]. Marination is key for adding flavor. The buttermilk and hot sauce mix tenderizes the chicken. It also infuses it with a spicy, tangy taste. I suggest marinating for at least one hour. If you can, let it sit overnight in the fridge. This extra time boosts the flavor even more. Set your oven to 400°F (200°C) to preheat. In one shallow dish, mix together the flour and spices. You’ll add garlic powder, onion powder, paprika, salt, pepper, and cayenne pepper. Next, place the breadcrumbs in a second shallow dish. These steps set up a great breading station for the chicken. Once breaded, place the chicken on a wire rack over a baking sheet. This helps it cook evenly. Bake the chicken for about 25-30 minutes. The goal is for it to reach 165°F (75°C) inside and turn golden brown outside. While it bakes, make the hot honey sauce. In a small saucepan, mix honey and apple cider vinegar. Heat it gently and stir in chili flakes. Simmer for about 5 minutes. When the chicken is done, drizzle the hot honey sauce on top. Then, return it to the oven for another 5 minutes. This step ensures the glaze sticks. Enjoy this flavorful Baked Crunchy Hot Honey Chicken! For the complete guide, check out the Full Recipe. Marinating chicken is key for flavor. I suggest marinating for at least one hour. For the best results, let it sit overnight. This allows the buttermilk and hot sauce to tenderize the meat. The longer it marinates, the juicier and tastier it gets. Use a covered bowl in the fridge to keep it fresh. To get that crunchy coating, follow a few simple steps. First, use a wire rack for baking. This keeps the air flowing around the chicken, making it crispy. Also, press the breadcrumbs firmly onto the chicken. This helps them stick better. Lastly, avoid overcrowding the baking sheet. Each piece needs space to get crispy. You can customize the heat to fit your taste. If you like it mild, skip the cayenne pepper. For more spice, add extra hot sauce in the marinade. You can also increase the chili flakes in the hot honey sauce. Taste as you go to find your perfect balance. This dish can be as hot or mild as you want! {{image_2}} You can switch the chicken thighs for chicken breasts or wings. Each cut offers a unique texture and flavor. If you prefer plant-based options, try using tofu. Tofu will soak up the marinade well, yielding a tasty dish. Just press it to remove excess water before marinating. To add depth, consider using different sauces or spices. Try BBQ sauce for a smoky twist or teriyaki sauce for a sweet flavor. You can also mix in fresh herbs like rosemary or thyme. For those who love heat, add more hot sauce or use a spicy seasoning blend. This chicken pairs well with many sides. Try serving it with coleslaw for crunch and creaminess. Roasted vegetables, like carrots and broccoli, complement the sweet heat of the chicken. You can also serve it with rice or mashed potatoes to balance the flavors. For the full recipe, check out the details above! To store leftovers safely, let the chicken cool first. Place it in an airtight container. You can keep it in the fridge for up to three days. Make sure to separate pieces with paper towels. This will help keep the coating crunchy. To freeze baked chicken, let it cool completely. Wrap each piece in plastic wrap tightly. Then, place them in a freezer-safe bag. Squeeze out as much air as you can. You can freeze it for up to three months. For best results, label the bag with the date. To reheat, use the oven for the best texture. Preheat it to 375°F (190°C). Place the chicken on a baking sheet. Heat for about 15-20 minutes. You can also use an air fryer at 350°F (175°C) for about 10 minutes. This will help keep the chicken crispy. To make this dish gluten-free, use gluten-free flour and gluten-free breadcrumbs. These substitutes work well and keep the crunch. - Gluten-free flour (like almond or rice flour) - Gluten-free breadcrumbs (check the label) Switching to these options will help you enjoy the same great taste. Yes, you can prepare the chicken ahead of time. Marinate the chicken thighs the night before. This allows the flavors to really soak in. - Store the marinated chicken in the fridge. - Bread the chicken just before baking. This way, you save time and still get a delicious meal. Yes, air frying is a great option! Adjust the cooking time and temperature for the best results. - Preheat your air fryer to 375°F (190°C). - Cook the breaded chicken for about 15-20 minutes. Check the internal temperature to ensure it reaches 165°F (75°C). This method gives you a crispy finish without the extra oil. This blog post shared how to make delicious baked chicken with hot honey sauce. You learned about key ingredients, from chicken thighs to the sweet and spicy glaze. Marinating boosts flavor while the right breading creates crunch. Use our tips to adjust spice levels and try different proteins or sauces. Store leftovers safely and reheat them for the best texture. Enjoy experimenting with this recipe, and make it your own. Happy cooking!](https://lisadishes.com/wp-content/uploads/2025/04/5842e43f-2b3a-44dd-8392-59451eefa4c8.webp)
My Latest Dinners
-
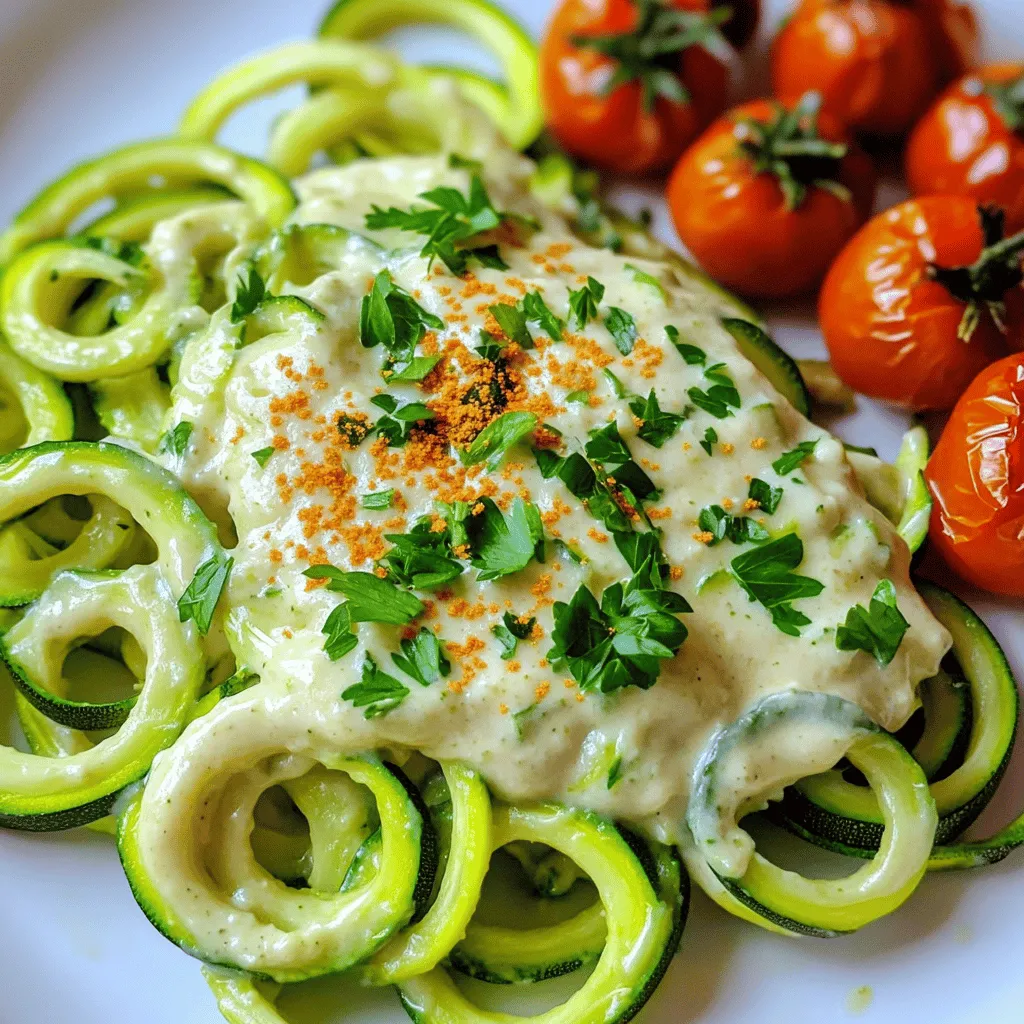
Zucchini Noodle Alfredo Creamy and Flavorful Delight
Zucchini Noodle Alfredo is a creamy and tasty dish that you can make at home. It’s a great choice if Read Full Recipe -
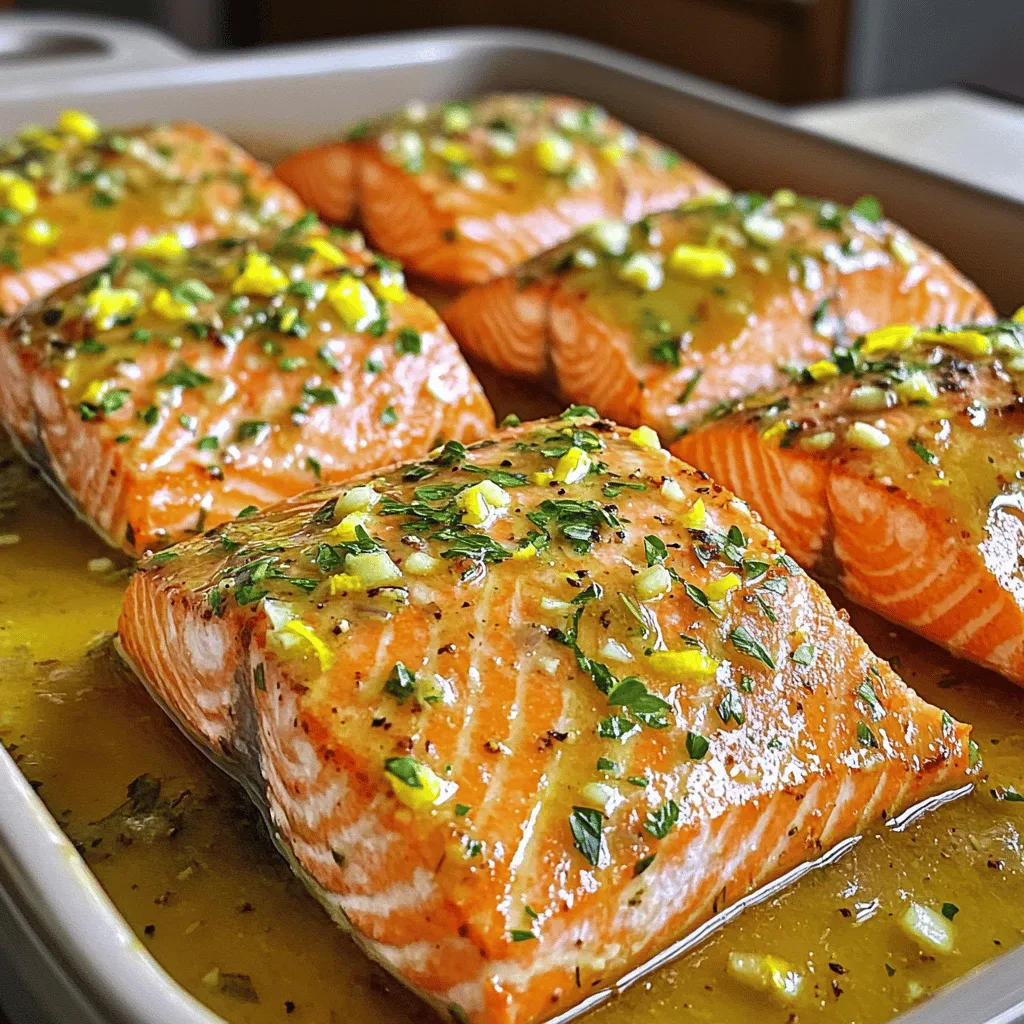
Lemon Garlic Roasted Salmon Flavorful and Simple Dish
Are you ready to impress with a dish that’s both simple and bursting with flavor? Lemon Garlic Roasted Salmon is Read Full Recipe -
Crispy Chickpea Buddha Bowl Energizing and Nutritious
Looking for a delicious, energizing meal? Try my Crispy Chickpea Buddha Bowl! Packed with protein, fresh veggies, and a zesty Read Full Recipe -
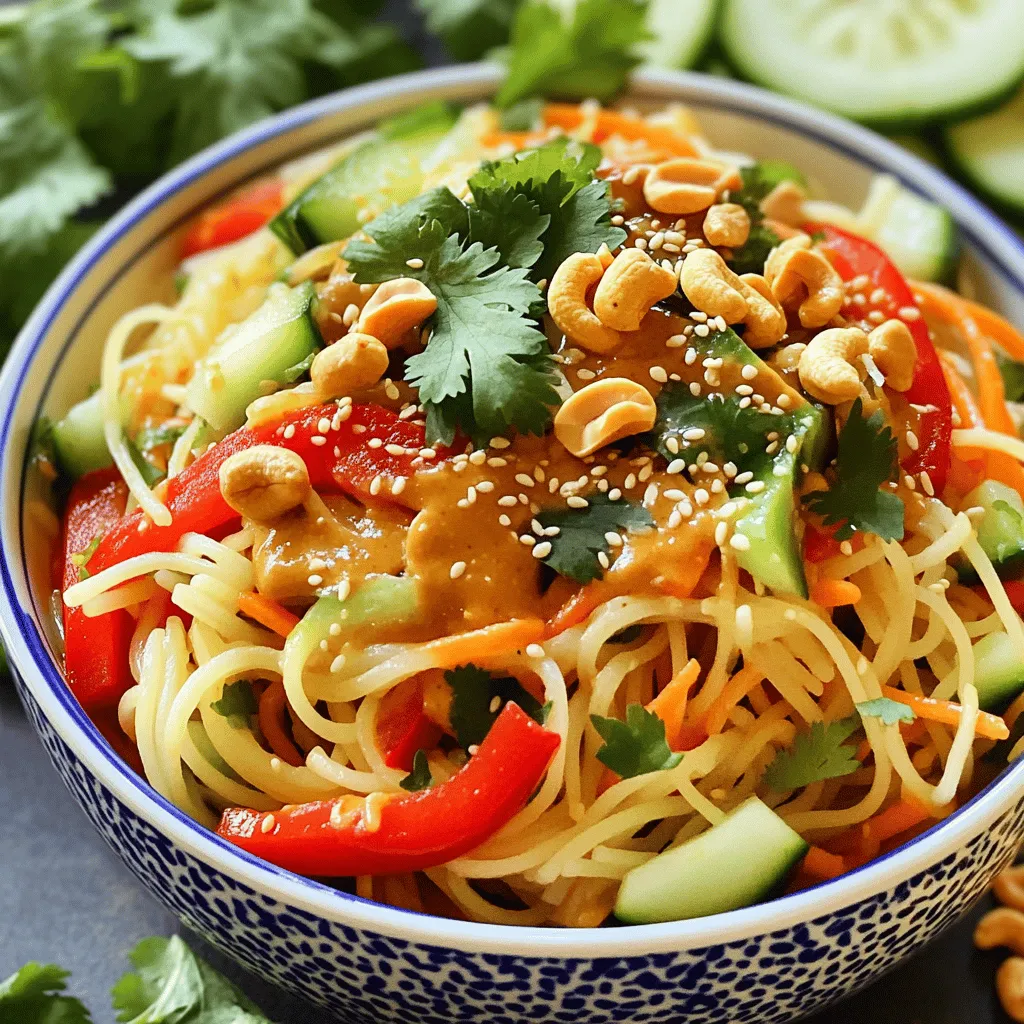
Spicy Cashew Noodle Salad Tasty and Simple Recipe
Are you ready to enjoy a tasty dish that packs a flavorful punch? My Spicy Cashew Noodle Salad is not Read Full Recipe -
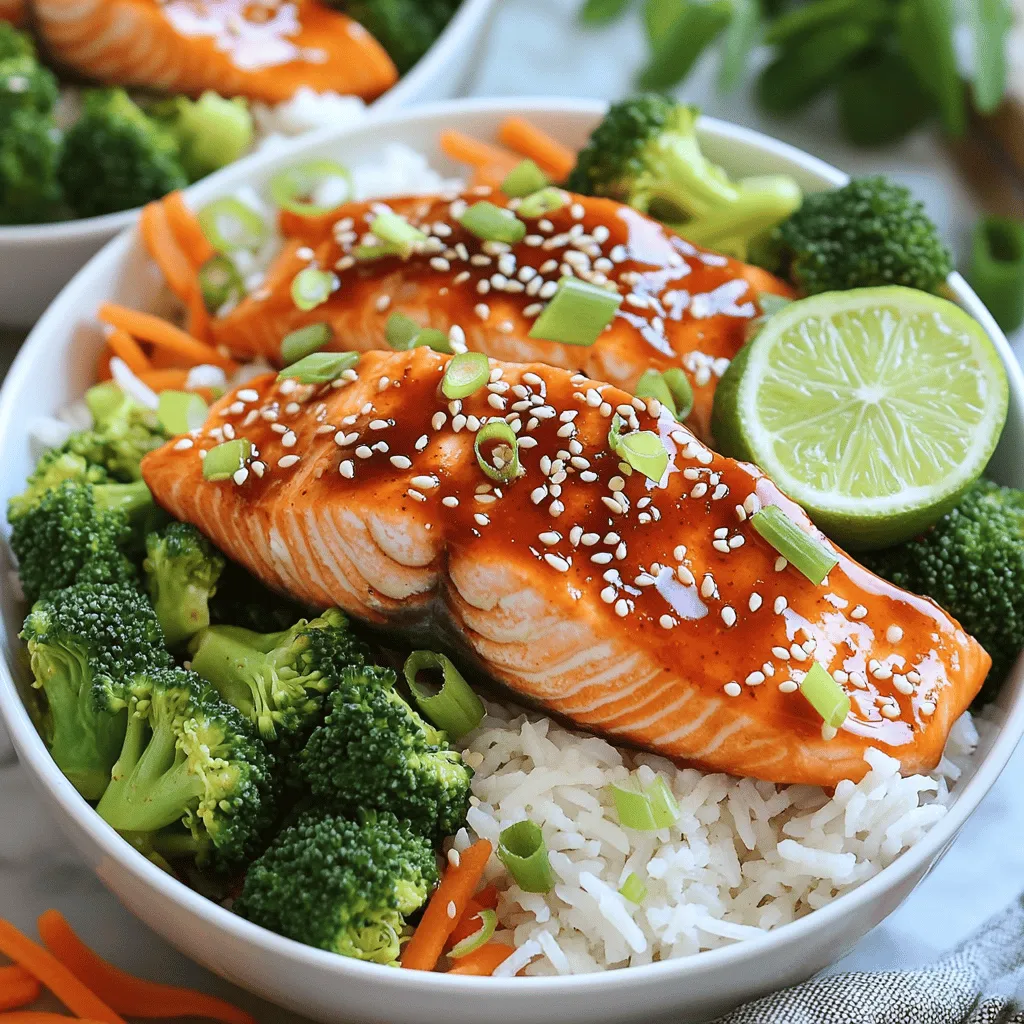
Sweet Chili Salmon Bowls Healthy and Flavorful Meal
Looking for a quick, healthy meal that’s bursting with flavor? Sweet Chili Salmon Bowls are the answer! I’ll walk you Read Full Recipe -
Chicken Taco Soup Flavorful and Simple Recipe Guide
Looking for a quick and tasty meal? I’ve got the perfect solution: Chicken Taco Soup! This flavor-packed recipe is easy Read Full Recipe