
Latest & Greatest
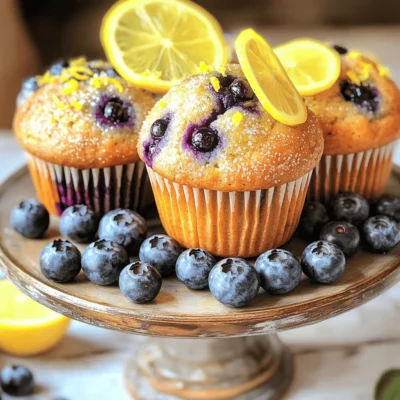
Lemon Blueberry Muffins Fresh and Flavorful Treat
Looking for a fresh and tasty treat? My Lemon Blueberry Muffins are just what you need! Bursting with zesty lemon
Read more…
Savory Herb and Cheese Scones Tasty and Simple Treat
Want to impress your family and friends with a delicious snack? Savory herb and cheese scones are the perfect treat.
Read more…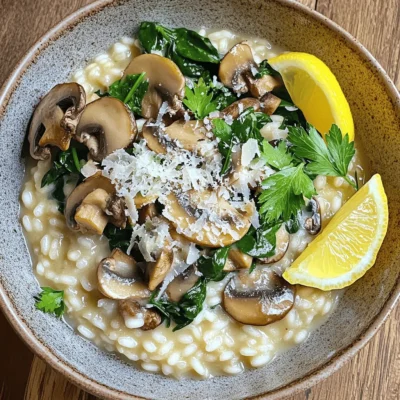
Creamy Mushroom Risotto Rich and Satisfying Dish
Looking to make a cozy meal that warms the heart? Creamy Mushroom Risotto is here to impress. With its rich,
Read more…
Spicy Chickpea Salad Flavorful and Nourishing Delight
Looking for a fresh, spicy twist on salad? Try this Spicy Chickpea Salad! It’s packed with vibrant flavors and nourishing
Read more…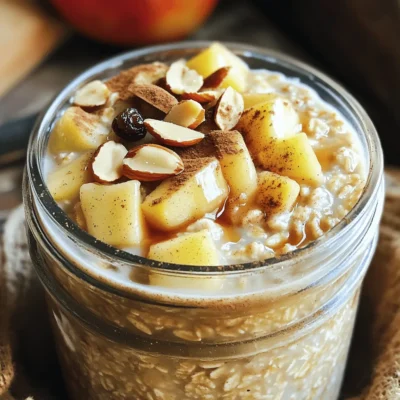
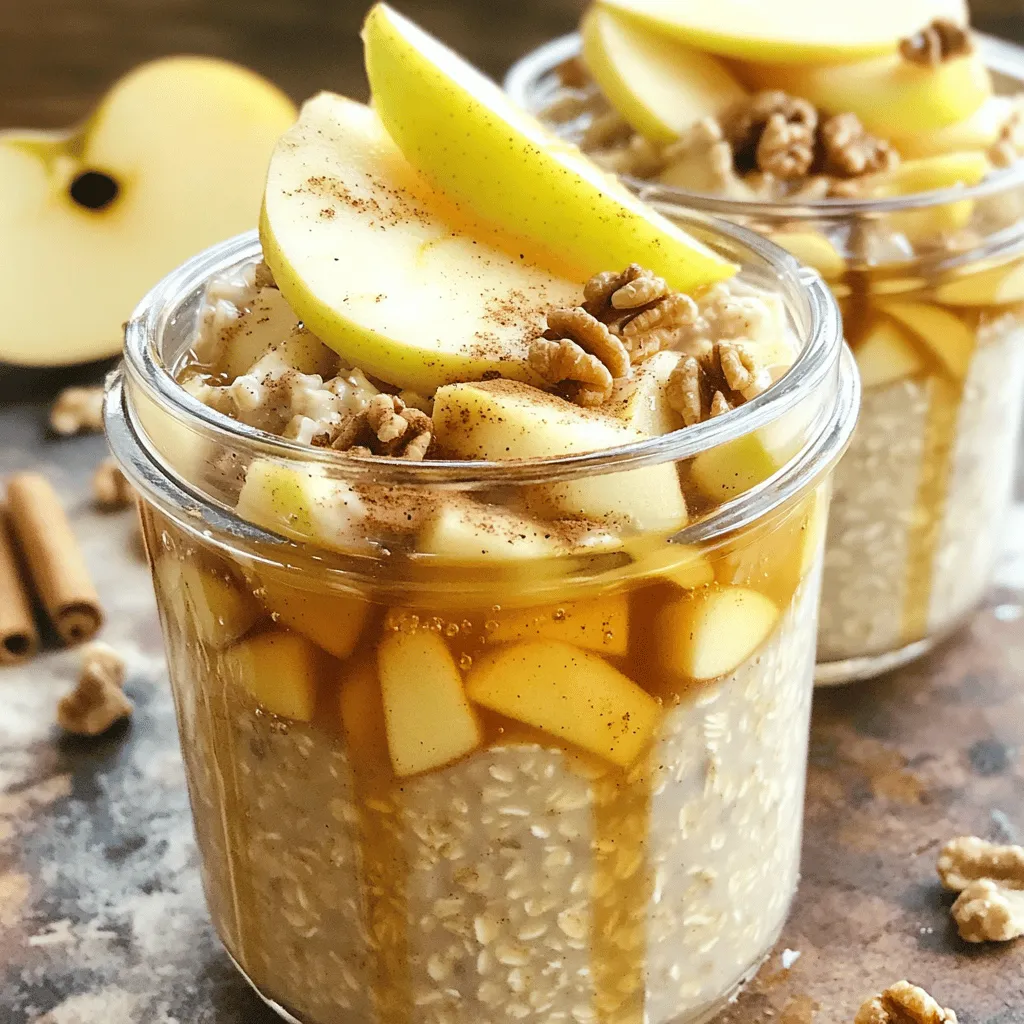
Apple Cinnamon Overnight Oats Tasty and Simple Recipe
Start your mornings right with a delicious bowl of Apple Cinnamon Overnight Oats! This simple recipe combines wholesome ingredients to
Read more…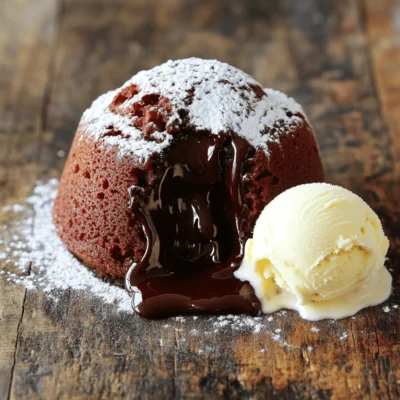
Easiest Chocolate Lava Cake Quick and Delicious Treat
Craving a sweet treat that impresses without complicated steps? You’ll love this Easiest Chocolate Lava Cake recipe! This dessert is
Read more…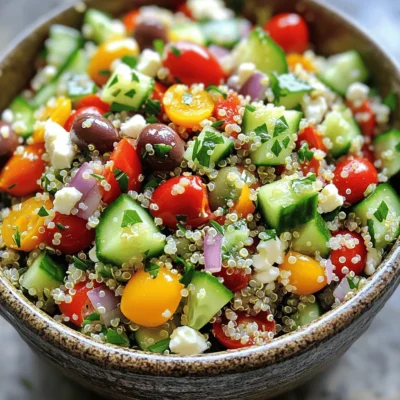
Mediterranean Quinoa Salad Fresh and Flavorful Delight
Are you ready to indulge in a burst of flavors with a healthy twist? My Mediterranean Quinoa Salad is the
Read more…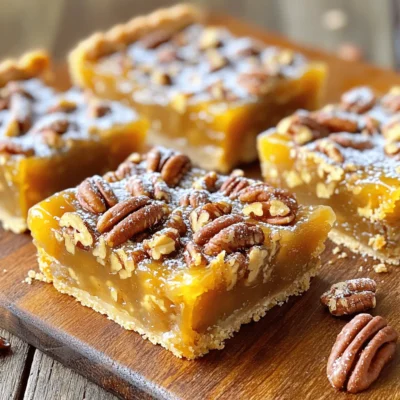
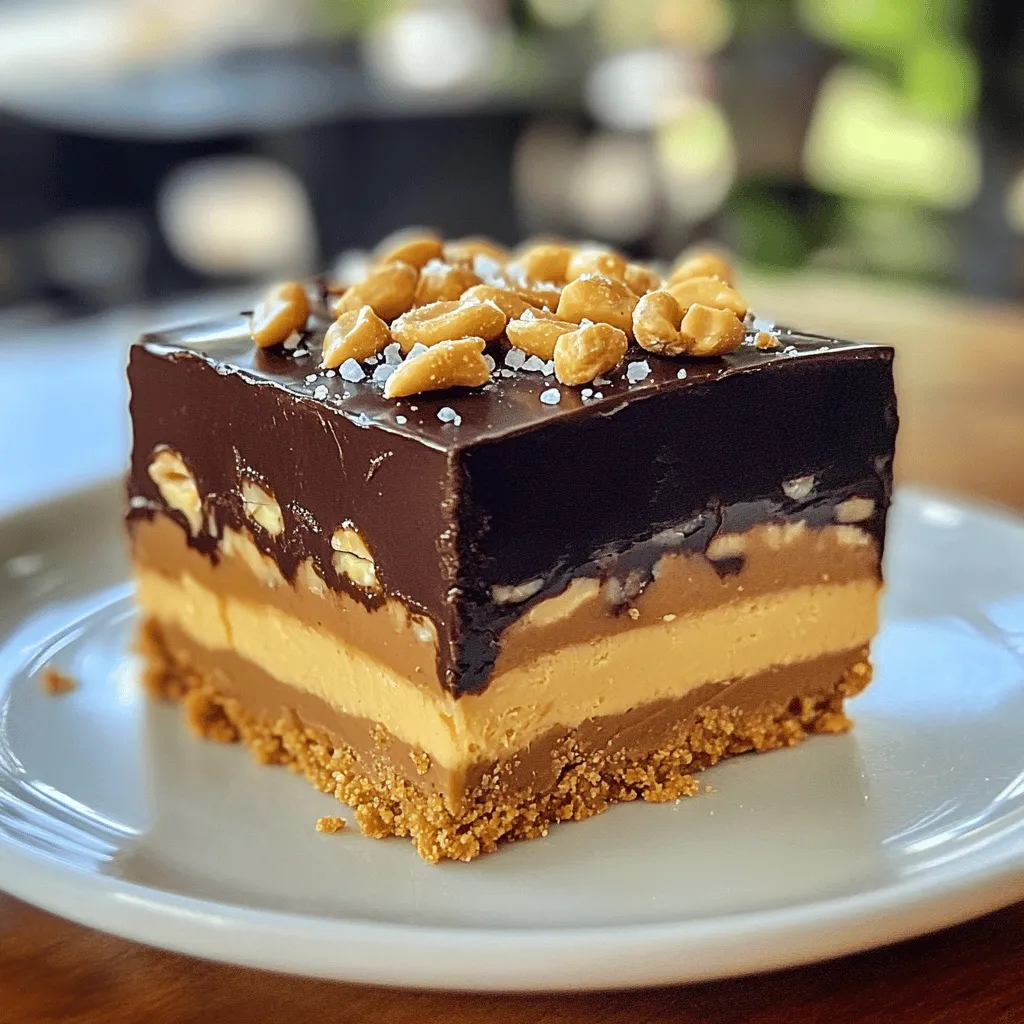
Maple Pecan Pie Bars Delightful Dessert Treat
Are you ready to indulge in a delightful dessert? These Maple Pecan Pie Bars are a sweet twist on a
Read more…browse recipes


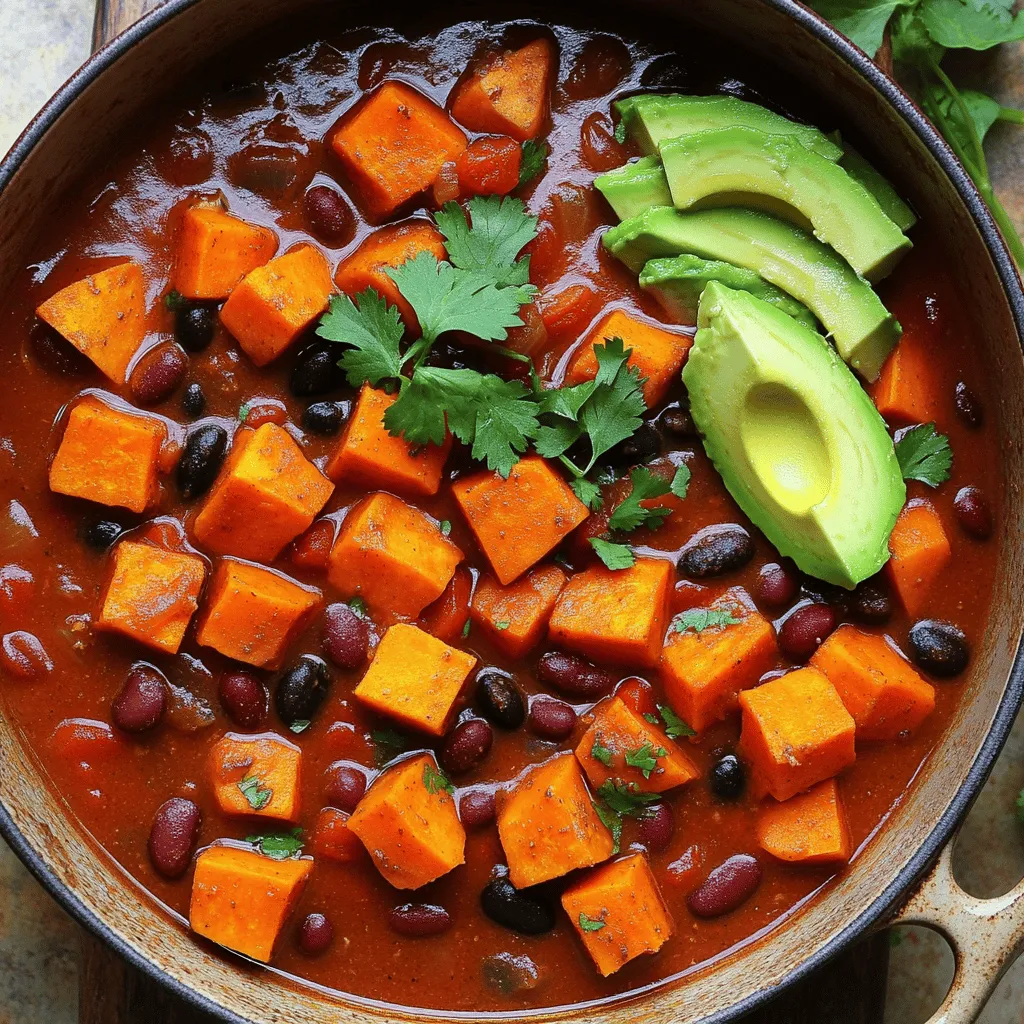
Vegan Sweet Potato Chili Flavorful and Hearty Dish
If you’re searching for a warm, hearty dish, look no further than Vegan Sweet Potato Chili. This recipe is not only packed with flavor…
My Latest Desserts

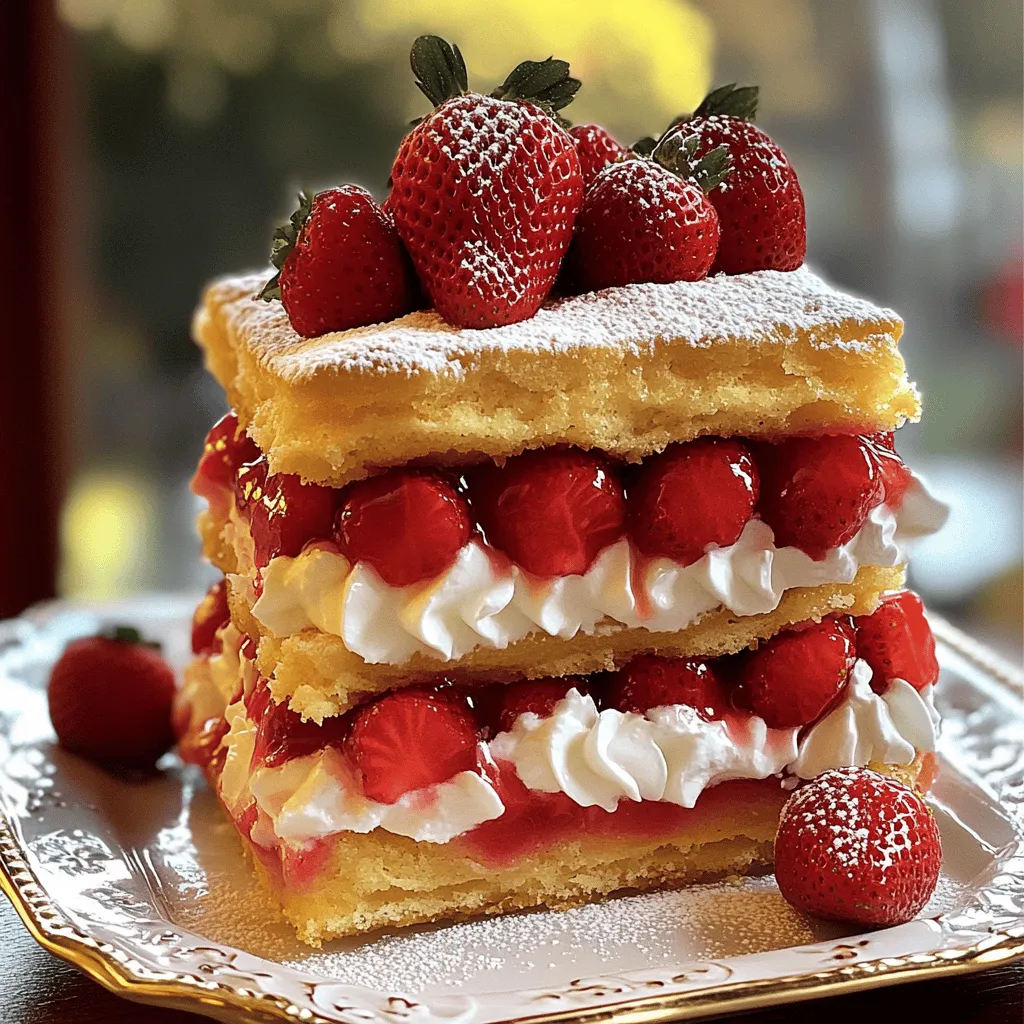
Easy Strawberry Shortcake Simple and Delicious Recipe
If you’re craving a sweet treat that’s both simple and delicious, look no further! My Easy Strawberry Shortcake recipe is Read Full Recipe-
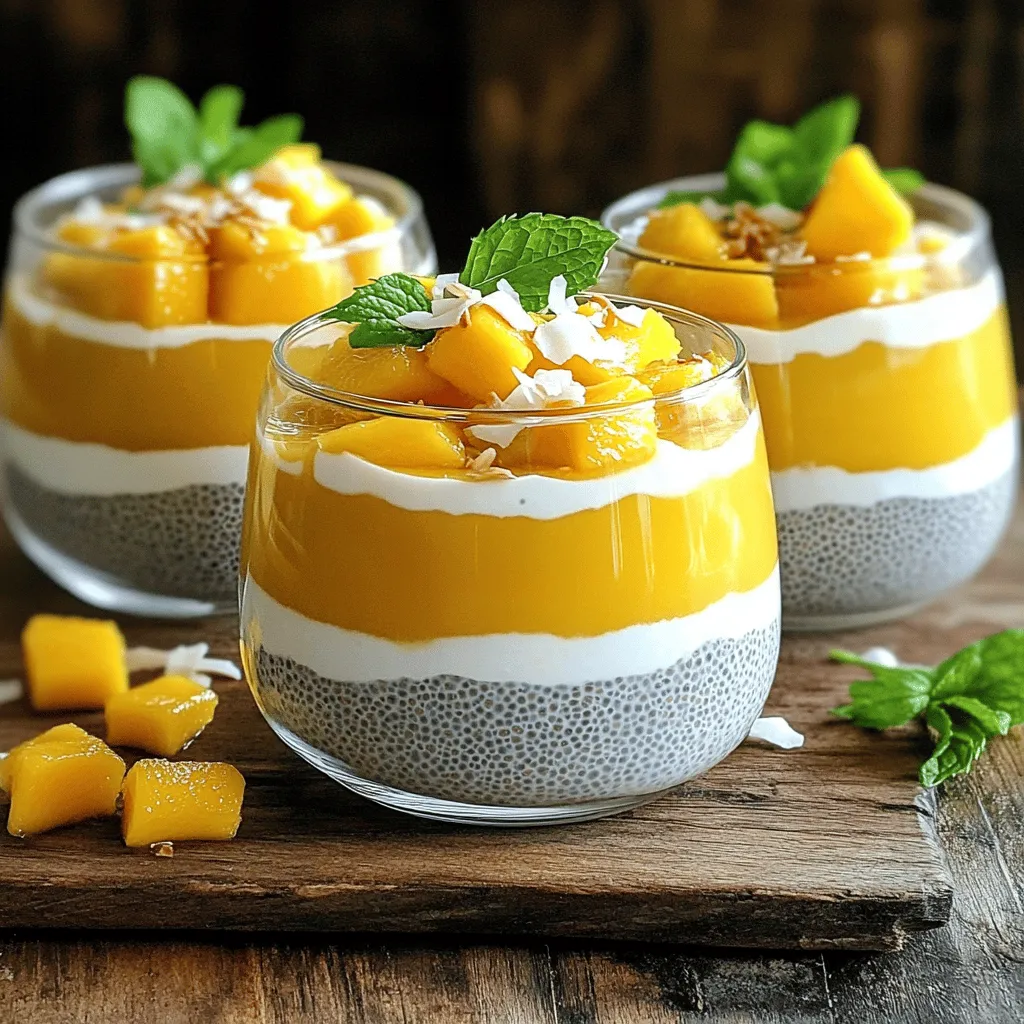
Mango Coconut Chia Pudding Delicious and Nutritious Treat
Are you ready to treat yourself to something truly delicious and nutritious? Mango Coconut Chia Pudding is the perfect way Read Full Recipe -
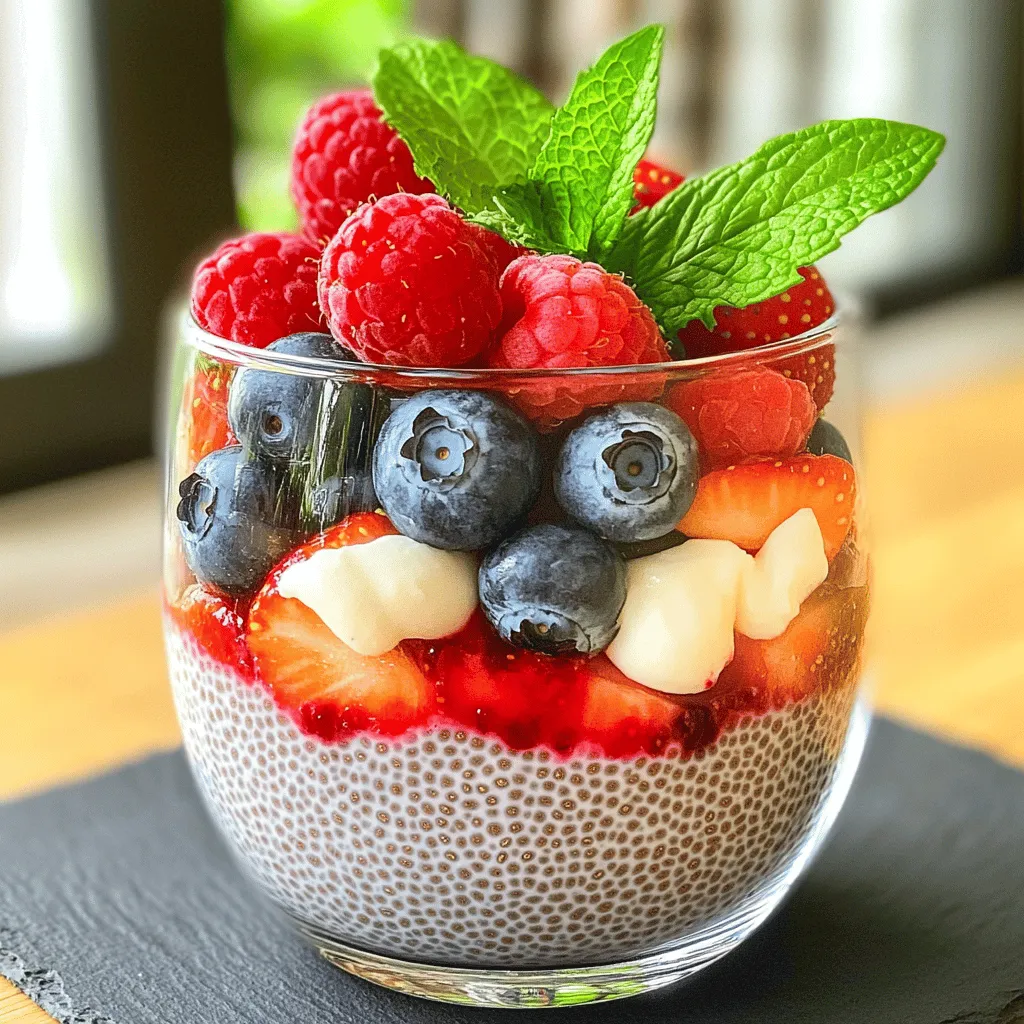
Berry Chia Pudding Simple and Healthy Delight
Berry Chia Pudding is a simple and healthy treat that packs a punch. With just a few easy ingredients, you Read Full Recipe -
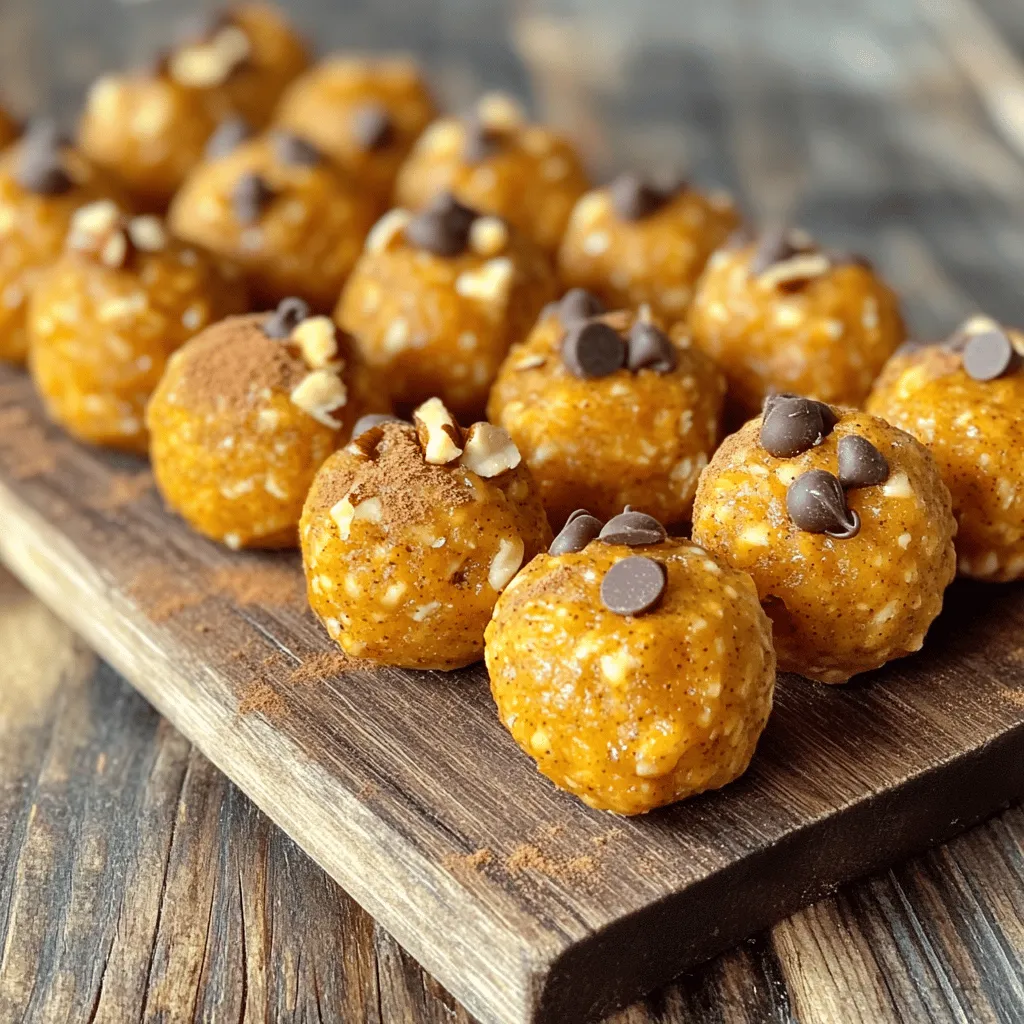
Pumpkin Spice Energy Bites Tasty and Healthy Snack
Looking for a tasty and healthy snack to fuel your day? This Pumpkin Spice Energy Bites recipe is your answer! Read Full Recipe -
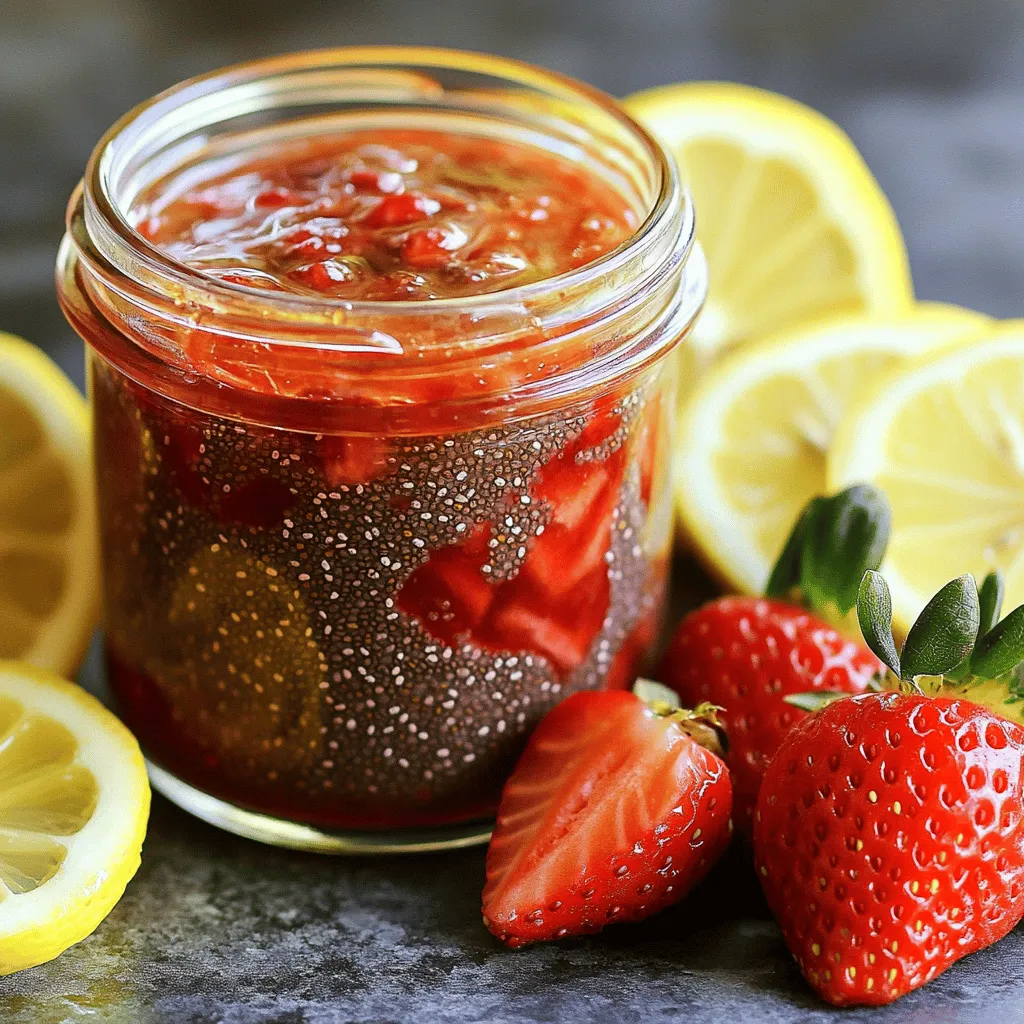
Strawberry Chia Seed Jam Tasty and Healthy Treat
If you’re craving a sweet treat that’s also good for you, I’ve got just the thing: Strawberry Chia Seed Jam! Read Full Recipe -
Pumpkin Spice Muffins Warm and Cozy Fall Treat
Fall is the perfect time for warm and cozy treats, and nothing says autumn like pumpkin spice muffins. These fluffy Read Full Recipe -
Apple Cinnamon Overnight Oats Healthy Breakfast Option
Looking for a quick and healthy breakfast? You’ve found it! Apple Cinnamon Overnight Oats are the perfect choice for busy Read Full Recipe -
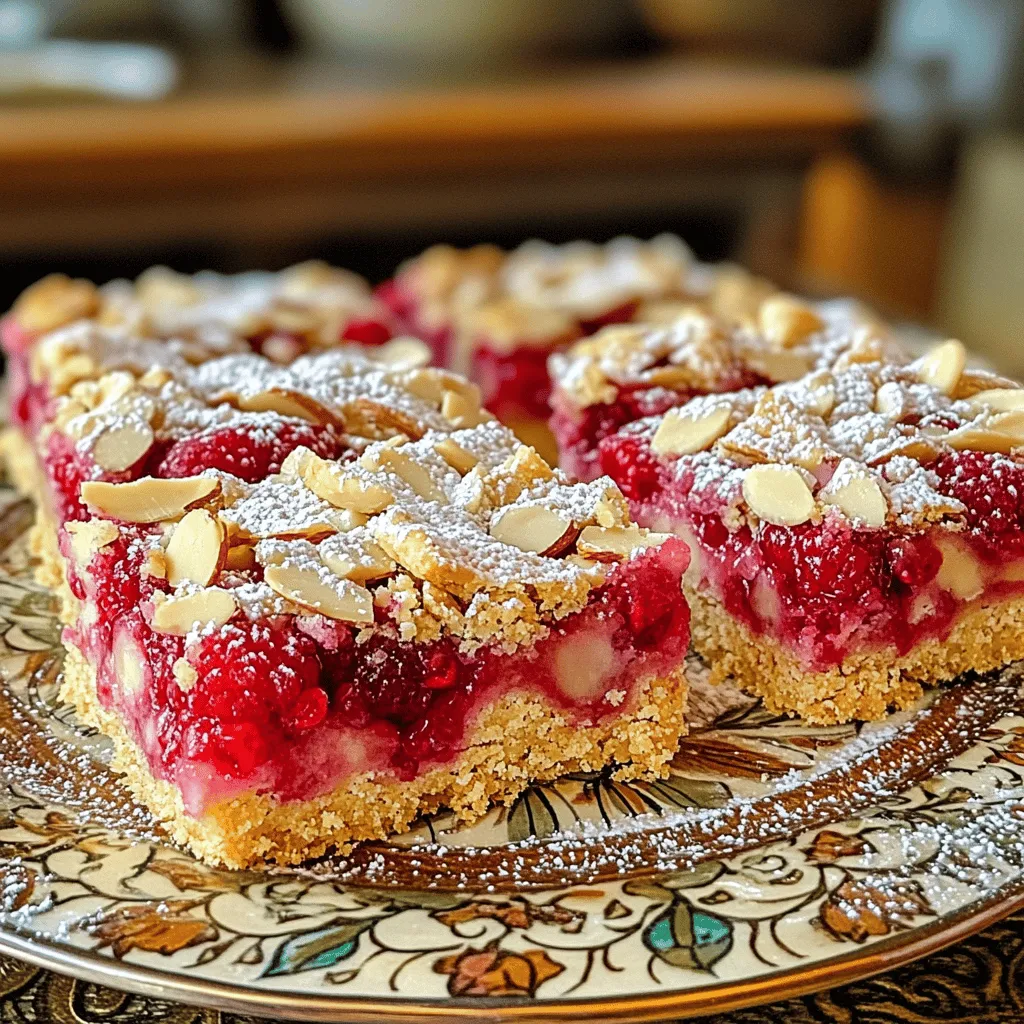
Raspberry Almond Shortbread Bars Simple and Tasty Treat
Looking for a sweet treat that’s easy to make and perfect for any occasion? Raspberry Almond Shortbread Bars are your Read Full Recipe -
Chocolate Covered Strawberry Pops Delightful Treats
Are you ready for a sweet treat? Chocolate Covered Strawberry Pops are delicious and fun to make. I’ll guide you Read Full Recipe -
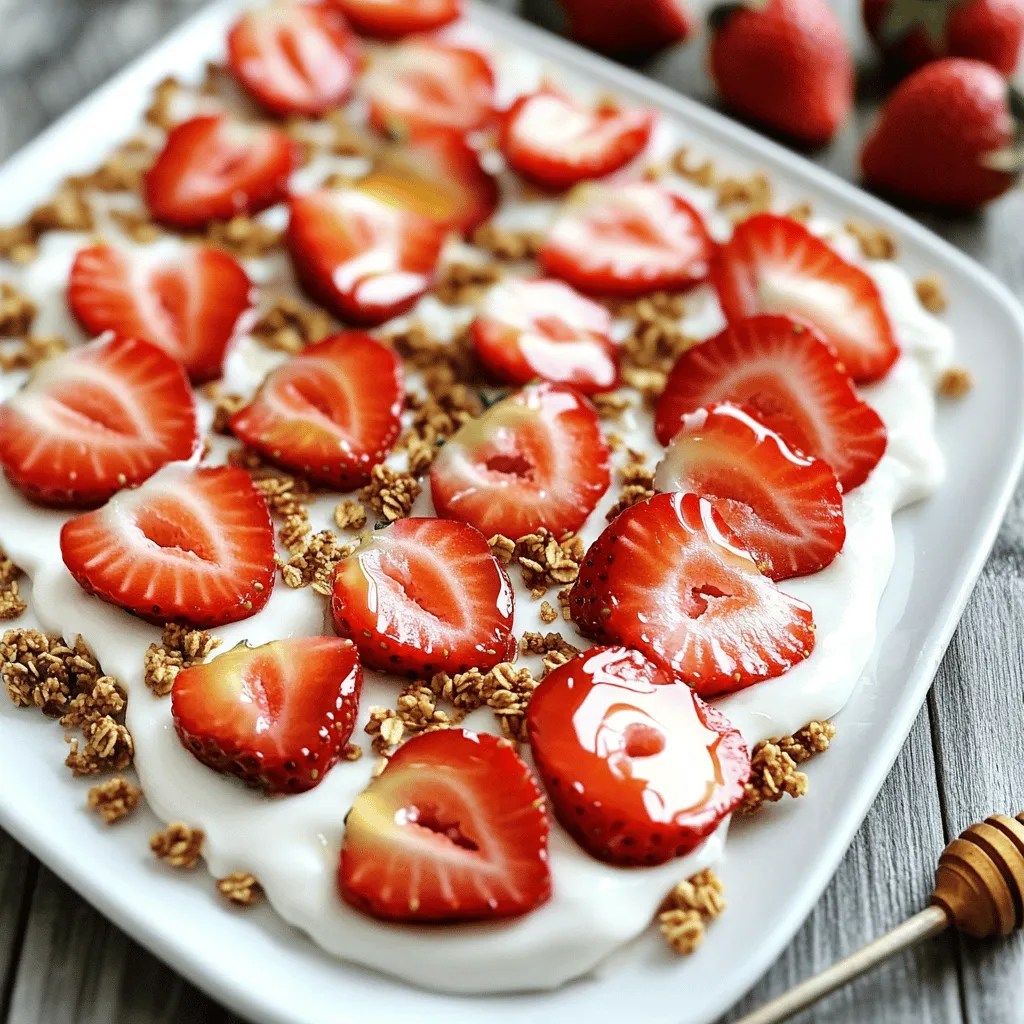
Fresh Strawberry Yogurt Bark Delicious and Easy Treat
Looking for a quick and tasty treat? Fresh Strawberry Yogurt Bark is your answer! This easy recipe combines creamy Greek Read Full Recipe -
No-Bake Snickers Bars Simple and Decadent Treat
Indulge in a simple and delicious treat with my No-Bake Snickers Bars recipe! These bars come together fast and need Read Full Recipe -
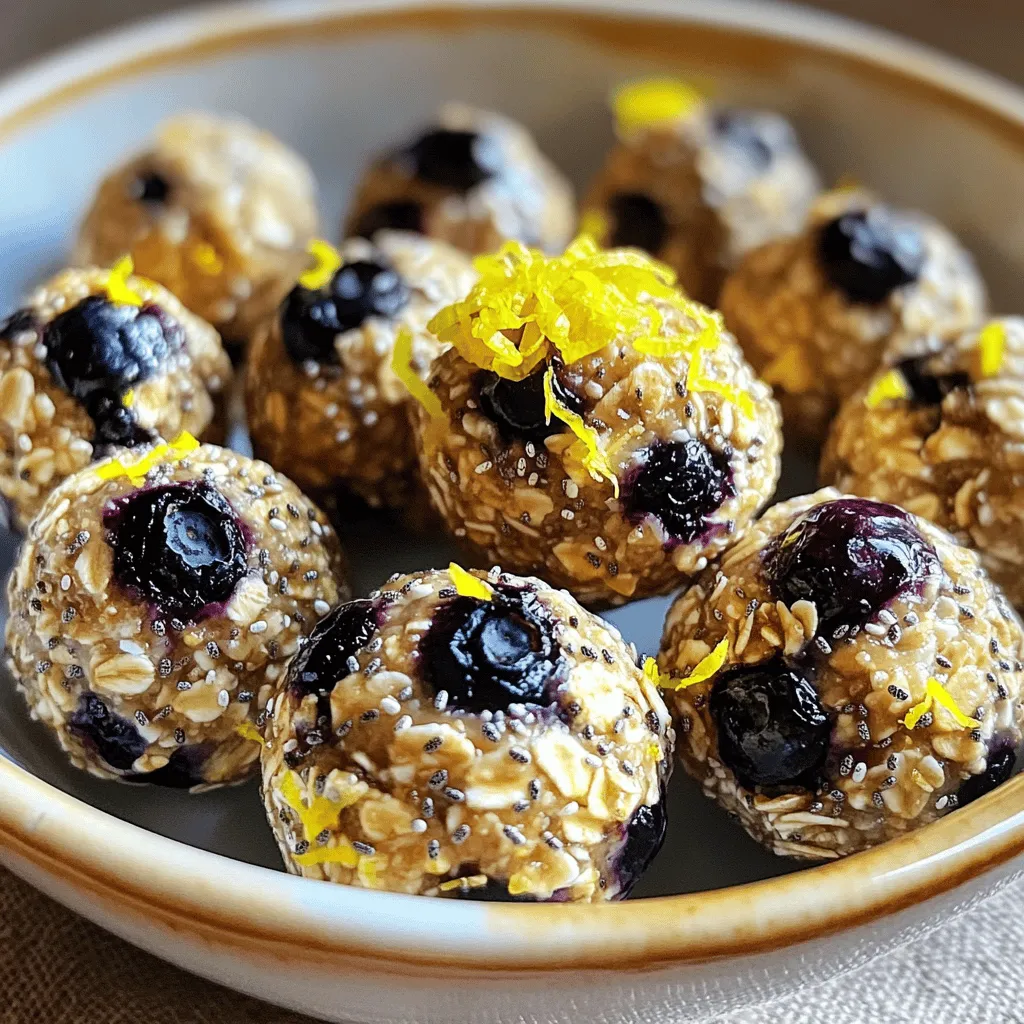
Lemon Blueberry Energy Bites Nourishing Snack Idea
Looking for a tasty, energy-packed snack? Try my Lemon Blueberry Energy Bites! These little balls are the perfect blend of Read Full Recipe


hey,
i’m !
I’m so happy you’re here!
Each recipe I share is a little piece of love from my kitchen. May they fill your heart and home with warmth. Let’s cook up something wonderful together.
. {{image_2}} You can make Bang Bang Shrimp Pasta vegetarian or vegan. Instead of shrimp, use tofu or tempeh. These options soak up the flavors well. Coat them with cornstarch and spices just like shrimp. Fry them until crispy for the best texture. For the sauce, swap mayonnaise with vegan mayo. The sweet chili sauce is often vegan, but always check the label. This way, you can still enjoy the creamy, spicy goodness. While linguine or fettuccine works great, you can switch up the pasta. Try penne, spaghetti, or even gluten-free pasta. Each type gives a different bite and texture. Cook the pasta as per package directions for the best results. The key is to choose a pasta that holds the sauce well. This ensures every bite is packed with flavor. If you love heat, making a spicy version is easy. Add more sriracha to the sauce for extra kick. You can also mix in some red pepper flakes. If you’re feeling bold, toss in some diced jalapeños with the garlic. They will add a fresh, spicy taste. Adjust the heat to your liking, and enjoy a fiery twist on this dish. For the full recipe, check the main section. To keep your Bang Bang Shrimp Pasta fresh, place it in an airtight container. Make sure to cool the pasta to room temperature before sealing. Store it in the fridge for up to three days. This way, you can enjoy it again without losing flavor. When you want to reheat, use a skillet on medium heat. Add a splash of water or broth to prevent sticking. Stir often until it warms through. You can also microwave it, but cover it with a damp paper towel. This keeps moisture in and heats evenly. If you want to freeze it, I suggest separating the shrimp and pasta. This helps keep the texture nice. Store each in a freezer-safe bag, pressing out as much air as possible. It will last for about one month. To eat, thaw in the fridge overnight and reheat as mentioned above. Enjoy your delicious meal again! For the full recipe, check out the [Full Recipe]. Bang Bang Shrimp Pasta is a fun dish that combines shrimp and pasta. You cook shrimp until they are crispy and coat them in a spicy mayo sauce. This mix is tossed with pasta, making a tasty meal. You can use linguine or fettuccine for a nice texture. The dish is creamy, spicy, and full of flavor. Each bite feels exciting and satisfying. Yes, you can use frozen shrimp! Just make sure to thaw them first. Place the shrimp in a bowl of cold water for quick thawing. It takes about 15 to 20 minutes. After thawing, pat them dry with a paper towel. This helps the shrimp get crispy when cooking. To make this dish gluten-free, choose gluten-free pasta. Many brands offer tasty options now. You can also check the labels on sauces. Ensure the mayonnaise and sweet chili sauce are gluten-free. By swapping these items, you can enjoy a delicious meal without gluten. Bang Bang Shrimp Pasta pairs well with fresh salads. A simple green salad with lemon dressing works great. You can also serve garlic bread for a crunchy side. Steamed vegetables like broccoli or asparagus add color and nutrients. These sides make the meal balanced and filling. Yes, you can prepare the sauce ahead of time! Mix the mayonnaise, sweet chili sauce, sriracha, and lemon juice in a bowl. Store it in the fridge for up to three days. When you’re ready to cook, just heat it up with garlic. This saves time and makes dinner even easier. For the full recipe, check the link. In this post, we explored Bang Bang Shrimp Pasta. We listed ingredients, shared cooking steps, and offered tips for the best sauce. You learned about variations, storage, and answered common questions. Bang Bang Shrimp Pasta is fun and easy to make. With all these tips, you can create a dish that impresses. Enjoy your cooking and savor each bite of this delightful meal.](https://lisadishes.com/wp-content/uploads/2025/04/69624b88-417b-4b5b-bf28-b21f93b18d5a-300x300.webp)

![To make Lemon Garlic Shrimp Pasta, you need these fresh ingredients: - 8 oz spaghetti or linguine - 1 lb large shrimp, peeled and deveined - 4 cloves garlic, minced - 1 lemon (juiced and zested) - 1/4 cup olive oil - 1/4 cup unsalted butter - 1/4 teaspoon red pepper flakes - Salt and pepper to taste - Fresh parsley, chopped for garnish - Grated Parmesan cheese for serving (optional) These ingredients bring bright flavors to your dish. Fresh shrimp and lemon add a nice touch. If you lack some ingredients, don’t worry! Here are some easy swaps: - Pasta: Use any pasta you like, such as penne or fettuccine. - Shrimp: You can use scallops or chicken instead of shrimp. - Garlic: Garlic powder works if you don’t have fresh garlic. - Olive oil: Any cooking oil, like avocado or canola, can work well. - Butter: You can skip butter for a lighter dish or use coconut oil. These substitutions keep your meal tasty while fitting your kitchen needs. Each serving of Lemon Garlic Shrimp Pasta offers a healthy balance. Here’s what you get: - Calories: 450 - Protein: 25g - Carbohydrates: 50g - Fat: 20g - Fiber: 2g This dish provides energy and protein while keeping it light. Enjoy it as a main meal or share it with friends. Check the [Full Recipe] for more details! To start, bring a large pot of salted water to a boil. I like to use a big pot so the pasta cooks evenly. Once it boils, add 8 oz of spaghetti or linguine. Cook it according to the package instructions until it’s al dente. This usually takes about 8 to 10 minutes. When it’s done, drain the pasta but save 1/2 cup of the pasta water. Set the pasta aside to wait for the shrimp. Next, grab a large skillet. Heat 1/4 cup of olive oil and 1/4 cup of unsalted butter over medium heat. When the butter melts and bubbles, add 4 cloves of minced garlic and 1/4 teaspoon of red pepper flakes. Sauté this mixture for about 1-2 minutes. Keep an eye on the garlic; you don’t want it to brown. Now, add 1 lb of large shrimp to the skillet. Lay them in a single layer. Cook for 2-3 minutes on each side. When they turn pink and opaque, they’re done. Season the shrimp with salt and pepper. Then, stir in the juice and zest of 1 lemon. This adds a bright flavor! Finally, add the cooked pasta and the reserved pasta water to the skillet. Toss everything together over low heat. Make sure the pasta and shrimp are well combined and heated through. Adjust the seasoning if you need to. To achieve the perfect al dente pasta, follow these tips: - Use plenty of salted water. This helps the pasta cook evenly. - Stir the pasta occasionally while it cooks to prevent sticking. - Taste the pasta one minute before the package time ends. It should be firm but not hard. - Always reserve some pasta water. It helps to create a creamy sauce later. Cooking shrimp to tender perfection is easy with these steps: - Use fresh or thawed shrimp. Frozen shrimp can become tough if overcooked. - Do not overcrowd the skillet. This helps them cook evenly. - Cook until they turn pink and opaque. This usually takes 2-3 minutes per side. - Remove from heat as soon as they’re done. Overcooking makes them rubbery. For the complete recipe, check out the [Full Recipe]. To make Lemon Garlic Shrimp Pasta, you will need a few key tools: - Large pot for boiling pasta - Skillet for cooking shrimp - Colander for draining pasta - Measuring cups for liquids - Zester for the lemon peel - Knife and cutting board for garlic and parsley These tools ensure a smooth cooking process and great results. Shrimp can be tricky to cook. Here are some pitfalls to avoid: - Overcooking: Shrimp cooks fast. Aim for 2-3 minutes per side. - Not seasoning enough: Salt and pepper enhance flavor. Don’t skip this step. - Crowding the pan: Give shrimp space to cook evenly. Cook in batches if needed. Avoiding these mistakes will help you serve perfect shrimp every time. Lemon Garlic Shrimp Pasta shines when paired with fresh sides. Consider these options: - A crisp green salad with vinaigrette - Garlic bread for a comforting touch - Steamed asparagus or broccoli for added color These sides balance flavors and create a well-rounded meal. Enjoy your delicious dish! For the complete recipe, check out the Full Recipe link. {{image_2}} You can easily make Lemon Garlic Shrimp Pasta healthier. Try using whole wheat pasta instead of regular pasta. Whole wheat adds fiber and nutrients. It also gives a nutty taste that pairs well with shrimp. If you're gluten-free, use gluten-free pasta. Many brands make great options that cook just like regular pasta. For a vegan version, swap shrimp with plant-based protein. Tofu or tempeh works well. You can also use chickpeas for a hearty texture. Use vegan butter and olive oil for cooking. Replace Parmesan cheese with a vegan alternative or nutritional yeast for a cheesy flavor. This way, you keep the dish delicious and satisfying. Adding herbs and spices can change the flavor of your dish. Fresh basil or cilantro adds a bright touch. You can also sprinkle in some oregano or thyme for depth. If you like heat, try adding more red pepper flakes. A dash of smoked paprika gives a lovely smoky flavor. Experiment with what you love to make this dish your own. For the full recipe, refer back to the main section. To keep your Lemon Garlic Shrimp Pasta fresh, store it in an airtight container. Make sure it cools down first. This helps avoid extra moisture. You can keep it in the fridge for up to three days. If you have a lot of leftovers, you can freeze it too. Just place portions in freezer bags. Remove as much air as you can to prevent freezer burn. When you're ready to enjoy your leftovers, reheating is key. The best way is to use a skillet. Add a splash of olive oil or a bit of water. Warm it over low heat, stirring gently. This method keeps the pasta moist. You can also use a microwave. Place the pasta in a bowl and cover it with a damp paper towel. Heat in short bursts, stirring in between. This prevents it from drying out. Lemon Garlic Shrimp Pasta will stay fresh in the fridge for about three days. If frozen, it can last for about three months. Always check for any changes in smell or texture before eating. If it smells off, it's best to toss it out. Enjoy your delicious meal knowing you stored it right! For the full recipe, refer back to the main section. Yes, you can use frozen shrimp. Just thaw them before cooking. Place them in cold water for quick thawing. Drain well after thawing. Frozen shrimp cooks well and saves time. They may take one or two extra minutes to cook. Always check that they are pink and opaque before serving. This ensures they are cooked through. Lemon Garlic Shrimp Pasta pairs well with several sides. A fresh green salad adds a nice crunch. Garlic bread is perfect for soaking up the sauce. You can also serve steamed vegetables for a healthy touch. Consider a light white wine like Pinot Grigio for a drink. These options enhance the meal without overpowering it. To spice up your dish, add more red pepper flakes. You can start with half a teaspoon more. If you like heat, try adding sliced fresh jalapeños. For a smoky flavor, add smoked paprika. Adjust the spice to your taste as you cook. Always taste before serving to find your perfect heat level. This blog post covered every aspect of making Lemon Garlic Shrimp Pasta. You learned about necessary ingredients, easy steps, and useful tips. We also explored variations and storage methods to keep your pasta fresh. With these insights, you can enjoy a delightful meal anytime. Cooking doesn’t have to be hard. Follow the steps, and you’ll impress your family and friends. Keep experimenting with flavors to make this dish your own!](https://lisadishes.com/wp-content/uploads/2025/05/af8bb54e-3a42-44b6-b609-3e3d0ea7e18d-300x300.webp)
![To make Garlic Butter Shrimp Pasta, you need fresh and simple ingredients. Here’s what you will need: - 8 oz spaghetti or linguine - 1 lb large shrimp, peeled and deveined - 4 tablespoons unsalted butter - 4 cloves garlic, minced - 1 teaspoon red pepper flakes (adjust to taste) - 1 teaspoon lemon zest - 2 tablespoons fresh lemon juice - 1/4 cup fresh parsley, chopped - Salt and pepper to taste - Grated Parmesan cheese, for serving These ingredients make the dish bright and flavorful. The shrimp brings protein, while the garlic and butter create a rich sauce. Fresh lemon juice and zest add a zing that perfectly balances the flavors. You can adjust the red pepper flakes to make it just the way you like. This recipe is all about freshness and simplicity. You can find the full recipe for Garlic Butter Shrimp Pasta to guide you through each step. - Bring a large pot of salted water to a boil. - Add 8 oz of spaghetti or linguine. Cook it until al dente. - Reserve 1 cup of the pasta cooking water, then drain the pasta. Cooking pasta is simple but key. The salted water adds flavor right away. Al dente means the pasta is firm but not hard. This keeps your dish from being mushy. - In a large skillet, melt 2 tablespoons of butter over medium heat. - Add 4 cloves of minced garlic and 1 teaspoon of red pepper flakes. - Stir for about 30 seconds until fragrant. - Add 1 lb of large shrimp to the skillet. - Season them with salt, pepper, and 1 teaspoon of lemon zest. - Cook for 2-3 minutes on each side until pink and opaque. Sautéing shrimp is quick. You want to see bright pink color. Overcooked shrimp can become rubbery, so watch the time. The garlic and red pepper flakes give a nice kick to the dish. - Add the cooked pasta to the skillet with the shrimp. - Pour in the remaining 2 tablespoons of butter and 2 tablespoons of fresh lemon juice. - Toss everything together. If needed, add a splash of reserved pasta water. Mixing the pasta and shrimp well is important. This helps all the flavors blend. Adding pasta water can make your sauce creamy. You can adjust the sauce to your liking by adding more water or butter. These steps make Garlic Butter Shrimp Pasta come alive. For the full experience, check out the Full Recipe. Enjoy your cooking! - Shrimp cook fast. Watch the color change. When they turn pink and opaque, they are done. - Overcooking shrimp makes them tough. Aim for 2-3 minutes on each side. - Fresh herbs like basil or thyme add a nice touch. You can also try spices like paprika or cayenne. - Different pasta shapes give a new vibe. Try penne or fettuccine for a fun twist. - Pair your pasta with a light salad or crusty bread. A glass of white wine works great too. - Fresh parsley or lemon wedges make lovely garnishes. They add color and flavor. For the full recipe, check the Garlic Butter Shrimp Pasta! {{image_2}} You can switch up the shrimp by using chicken or scallops. - Chicken: Cut chicken breast into small pieces. Cook them until golden before adding garlic. - Scallops: These cook fast, too. Sear them for just 2-3 minutes per side. If you prefer vegan or vegetarian options, try these: - Chickpeas: They add protein and a nice texture. - Mushrooms: Use hearty varieties like portobello for a meaty bite. You can enjoy this dish with a creamy sauce or stick with classic garlic butter. - Creamy options: Add heavy cream or cream cheese for a rich twist. - Spice lovers: Add more red pepper flakes or some diced jalapeños for heat. If you need gluten-free pasta, use rice noodles or zucchini noodles. - Gluten-free: These options cook quickly and taste great with the sauce. Also, if you don’t have fresh herbs, use dried versions. - Dried herbs: They are more concentrated, so use less than fresh. For the complete recipe, check the [Full Recipe]. Store your Garlic Butter Shrimp Pasta in an airtight container. This keeps it fresh. You can refrigerate it for up to three days. To reheat, add a splash of water or broth. This helps keep the pasta moist. If you want to freeze some pasta, use a freezer-safe container. Make sure to cool it first. It can last for up to two months in the freezer. When you're ready to eat, thaw it overnight in the fridge. Reheat in a skillet with a bit of water or broth. Reheat your pasta in a skillet on low heat. This method helps keep the texture nice. Stir often and add a little water if needed. Avoid using the microwave, as it can make the pasta mushy. Enjoy your meal again with the same great taste! It takes about 20 minutes to make Garlic Butter Shrimp Pasta. This includes 10 minutes for prep and 10 minutes for cooking. You can have a tasty meal in no time! Yes, you can make Garlic Butter Shrimp Pasta ahead of time. Cook the pasta and shrimp, then cool them. Store in an airtight container in the fridge for up to two days. When ready to eat, just reheat gently on the stove. Add a little extra butter or pasta water to keep it moist. You can serve Garlic Butter Shrimp Pasta with many tasty sides. Some good options include: - A fresh green salad - Garlic bread - Roasted vegetables - A glass of white wine or iced tea These pair well and add more flavor to your meal. Yes, this recipe is very easy to customize. You can change the pasta, add more veggies, or use a different protein. Try chicken, scallops, or even tofu for a vegan twist. You can also adjust the spice by adding more or fewer red pepper flakes. Make it your own! For the complete recipe, check out the Full Recipe. Garlic Butter Shrimp Pasta is a quick and tasty dish. We reviewed the ingredients, cooking steps, tips, variations, and storage info. You can adjust the recipe to suit your taste and needs. Whether you prefer shrimp, chicken, or a vegan option, this dish has something for everyone. Enjoy your meal and feel proud of what you made. With practice, you'll perfect this easy recipe. Trust me, everyone will love it. Happy cooking!](https://lisadishes.com/wp-content/uploads/2025/05/89285dad-8873-4964-8580-89c331156cae-300x300.webp)
Crispy Chickpea Tacos Flavorful and Healthy Delight
Are you ready to spice up your taco night with a healthy twist? Crispy Chickpea Tacos are not just packed with flavor; they’re also…
![- 1 can (15 oz) chickpeas, drained and rinsed - 1 tablespoon olive oil - 1 teaspoon ground cumin - 1 teaspoon smoked paprika - ½ teaspoon garlic powder - ½ teaspoon onion powder - Salt and pepper to taste - 8 small corn or flour tortillas To make crispy chickpea tacos, start with the chickpeas. They create the base of your taco. Drain and rinse one 15 oz can of chickpeas. This step removes excess sodium and makes them clean. Next, toss them in a bowl with olive oil and spices. I love using ground cumin and smoked paprika for flavor. Garlic and onion powder add depth, while salt and pepper balance the taste. Now, let's talk about tortillas. Choose between corn or flour. They hold the crispy chickpeas and toppings well. Warm them up in a skillet for a few seconds. This makes them soft and easy to fold. - 1 ripe avocado, sliced - 1 cup shredded cabbage (green or purple) - ½ cup fresh cilantro, chopped - ½ cup salsa or pico de gallo Fresh toppings add color and taste. I love ripe avocado for creaminess. It contrasts nicely with the crispy chickpeas. Shredded cabbage adds crunch and freshness. You can use green or purple cabbage, based on your choice. Cilantro brightens up the dish and adds a hint of herbiness. Finally, a spoonful of salsa or pico de gallo brings tangy goodness. - Lime wedges - Alternate protein sources Extras can elevate your tacos even more. Lime wedges add zesty flavor. A squeeze of fresh lime juice on top is a must! If you want alternatives, consider other protein sources. Black beans or lentils work well if you need a change. These options keep the meal healthy and satisfying. For the full recipe, check the [Full Recipe]. First, preheat your oven to 425°F (220°C). Grab a baking sheet and line it with parchment paper. This helps with easy cleanup. Now, let’s season the chickpeas. In a mixing bowl, combine the drained chickpeas, olive oil, ground cumin, smoked paprika, garlic powder, onion powder, salt, and pepper. Toss everything together until the chickpeas are well coated. This step is key for flavor. Next, spread the seasoned chickpeas in a single layer on the prepared baking sheet. Make sure they are not crowded. This helps them get crispy. Roast the chickpeas in the oven for 20-25 minutes. Halfway through, shake the pan to ensure even cooking. You want them golden brown and crunchy. Keep an eye on them to avoid burning! While the chickpeas roast, prepare your tortillas. Warm them in a dry skillet over medium heat for about 30 seconds on each side. This makes them soft and easy to fold. Once the chickpeas are crispy, take them out and let them cool slightly. Now, it’s taco time! Place a generous spoonful of crispy chickpeas on each tortilla. Top with sliced avocado, shredded cabbage, and fresh cilantro. For the final touch, add a spoonful of salsa or pico de gallo and squeeze some fresh lime juice on top. Enjoy your tasty creation! For the complete recipe, check [Full Recipe]. To get crispy chickpeas, start with dry ones. After rinsing, pat them dry. Moisture makes them soft. Use a high heat, around 425°F (220°C). Spread them out on the baking sheet. This helps with even roasting. Shake the pan halfway through to cook all sides. Avoid overcrowding; it makes them steam instead of roast. Common mistakes include not drying the chickpeas well. Another mistake is using low heat. It takes longer and may not crisp them up. Lastly, don’t skip the oil; it helps with browning. Layer your tacos smartly. Start with chickpeas, then add avocado and cabbage. This keeps the toppings from sliding off. Place cilantro on top for a fresh burst of flavor. For extra zing, add salsa last. To make your tacos look great, use colorful ingredients. Mix green cabbage with purple for a pop. Use lime wedges on the side for a nice touch. These tacos can easily fit many diets. For vegans, they are already perfect. Just make sure your tortillas are also vegan. If you need gluten-free options, use corn tortillas. They hold up well and taste great too. You can also try lettuce wraps for a low-carb choice. {{image_2}} You can spice up your chickpeas in fun ways. Adding cayenne pepper gives them a nice kick. You can also mix in chili powder or smoked salt for extra flavor. Fresh herbs like parsley or basil can brighten the taste. Try adding lemon zest for a fresh touch. Mix and match these spices to find your favorite blend. Tortillas come in many types, and each brings its own charm. You can use corn tortillas for a classic taste or flour tortillas for a softer bite. For a twist, try lettuce wraps for a low-carb option. You can also fill your tacos with roasted veggies or black beans for added texture. Consider adding cheese or sour cream for creaminess. Pair your crispy chickpea tacos with tasty side dishes. A simple rice salad or guacamole works well. You can also enjoy them with a side of roasted sweet potatoes. For garnishes, try fresh jalapeños or pickled onions. A sprinkle of feta cheese adds a nice salty bite too. These little touches make your meal even better. For the full recipe, check out the Crispy Chickpea Tacos recipe above. To keep leftover chickpeas fresh, store them in an airtight container. Place them in the fridge. They will stay good for about 3 to 5 days. If you want to keep them longer, freeze them. Spread the chickpeas on a baking sheet and freeze them first. Once frozen, transfer them to a freezer-safe bag. They can last up to 3 months in the freezer. When you are ready to eat, reheat them in the oven for crispness. Set your oven to 400°F (200°C). Bake for about 10 minutes. This will help regain their crunch. You can also use an air fryer for quick reheating. Just cook them for about 5 minutes at 375°F (190°C). Assembled tacos are best eaten fresh. However, if you have leftovers, wrap them tightly in foil. Place them in the fridge to keep them fresh for up to 1 day. Keep in mind that the tortillas may get soggy. To avoid this, store the components separately. For the tortillas, place them in a sealed bag to keep them soft. Store toppings like avocado and cabbage in separate containers. This will help maintain their texture and flavor. Chickpeas can last for years if stored dry. Once you open a can, use them within 3 to 4 days. Fresh veggies like avocado should be used within a few days. Signs of spoilage include browning and mushiness. Check the cabbage and cilantro as well. They last about 5 to 7 days in the fridge. Always inspect for wilting or an off smell. Keeping track of these shelf lives will help you enjoy your crispy chickpea tacos to the fullest. For the full recipe, check out the other sections. You can easily make these tacos gluten-free by choosing the right tortillas. Look for corn tortillas, as they are naturally gluten-free. Some brands also offer gluten-free flour tortillas. Check the labels to ensure they meet your needs. Yes, you can prepare the chickpeas ahead of time. Store them in an airtight container in the fridge for up to three days. To reheat, spread them on a baking sheet and bake them at 350°F (175°C) for about 10 minutes. This keeps them crispy. If you want to switch things up, you can try other legumes. Black beans or lentils work well. You can also use shredded chicken or tofu for a different protein source. Each option adds its own flavor and texture. To spice things up, add hot sauce to your tacos. Sriracha or chipotle sauce are great choices. You can also sprinkle red pepper flakes on top. For a kick, mix jalapeños into your salsa or pico de gallo. Crispy chickpea tacos are easy and fun to make. Start with roasted chickpeas, tasty toppings, and fresh tortillas. Follow the steps we covered for perfect texture and flavor. Don't hesitate to play with spices and fillings to match your taste. Enjoy customizing each taco, whether you're vegan or gluten-free. With these simple tips for storage and reheating, your tacos can stay fresh. Now, get cooking and bring your friends together for a tasty meal!](https://lisadishes.com/wp-content/uploads/2025/07/e5d4f8ed-5327-4ada-bc8d-089f935798b7.webp)
My Latest Dinners
-
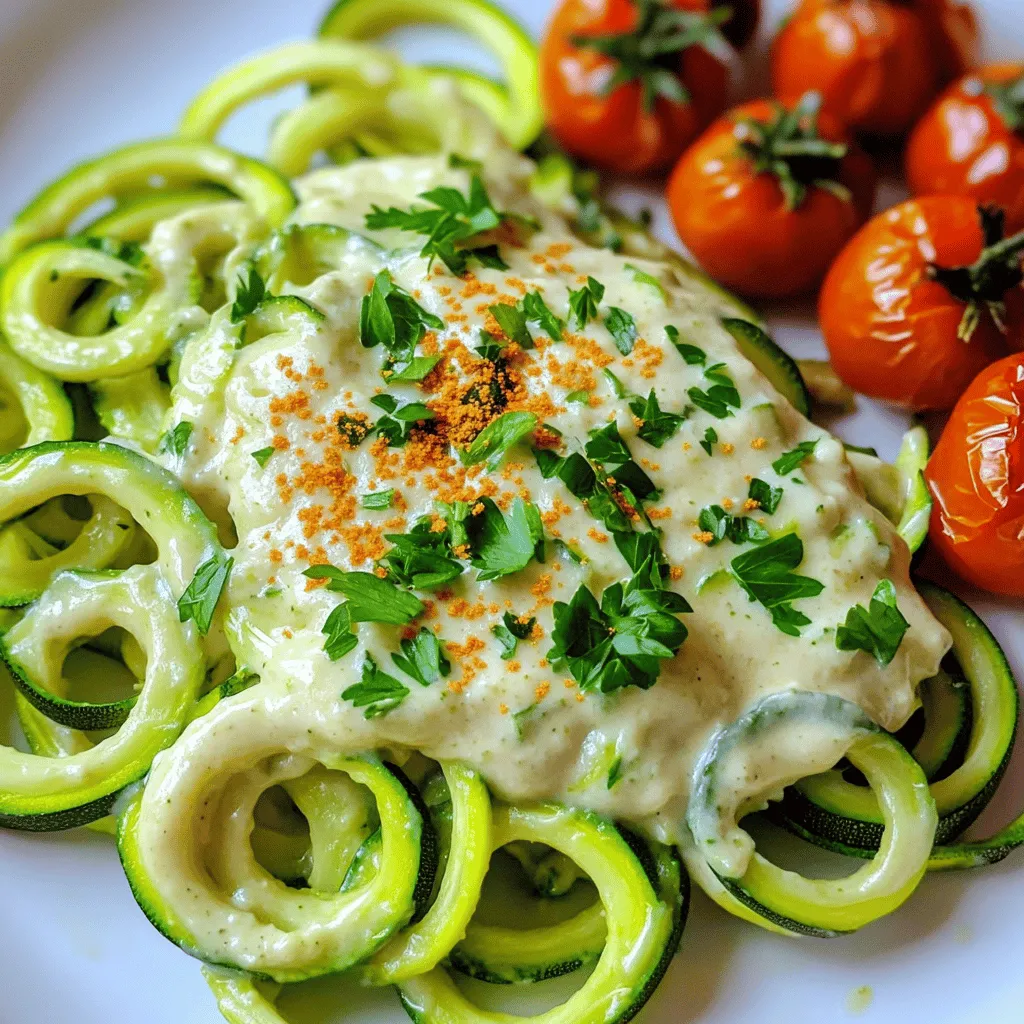
Zucchini Noodle Alfredo Creamy and Flavorful Delight
Zucchini Noodle Alfredo is a creamy and tasty dish that you can make at home. It’s a great choice if Read Full Recipe -
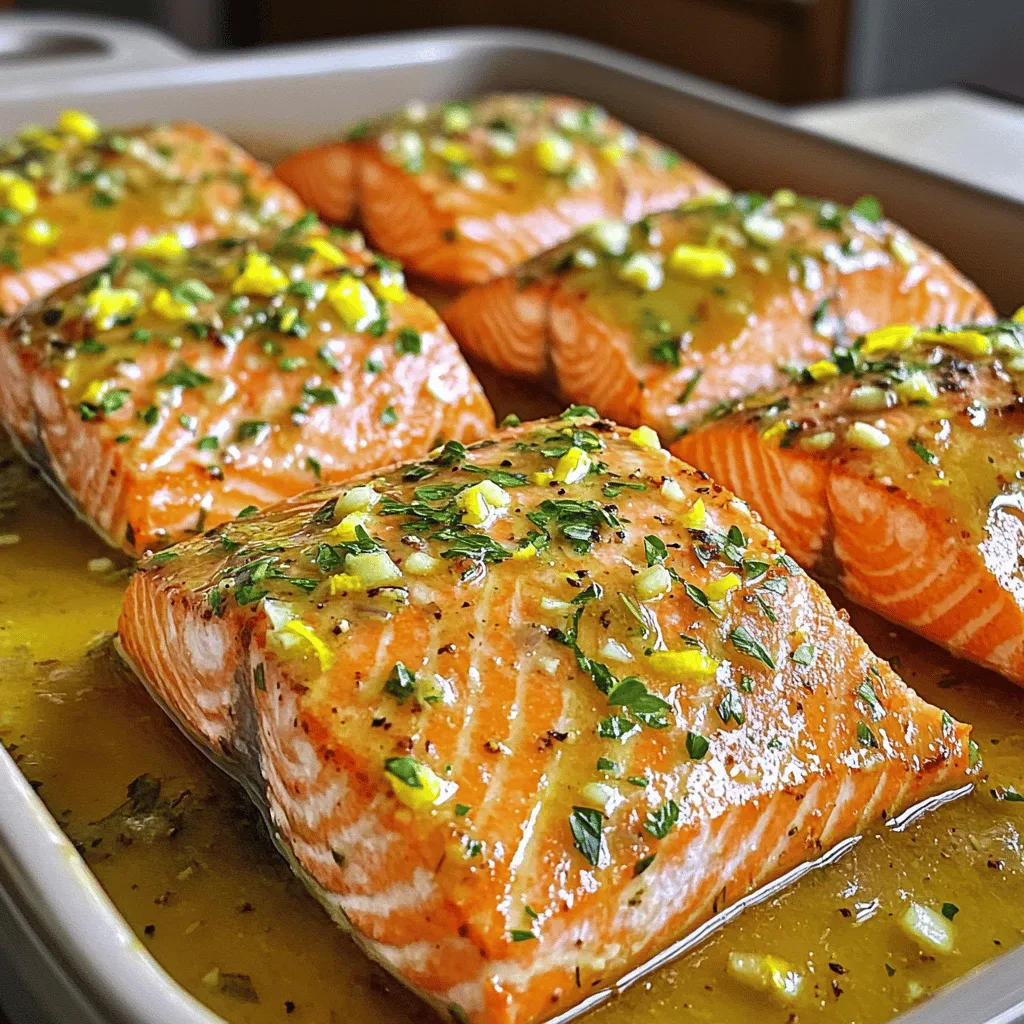
Lemon Garlic Roasted Salmon Flavorful and Simple Dish
Are you ready to impress with a dish that’s both simple and bursting with flavor? Lemon Garlic Roasted Salmon is Read Full Recipe -
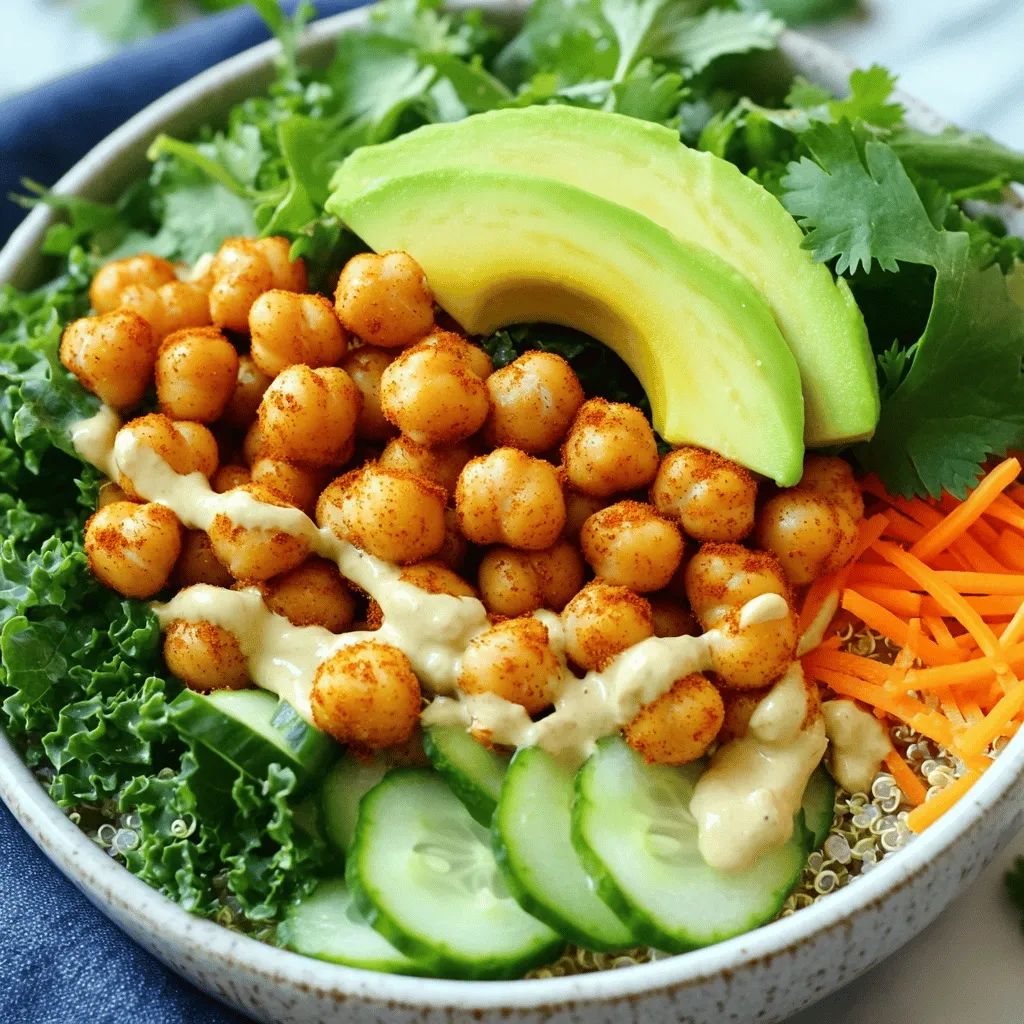
Crispy Chickpea Buddha Bowl Energizing and Nutritious
Looking for a delicious, energizing meal? Try my Crispy Chickpea Buddha Bowl! Packed with protein, fresh veggies, and a zesty Read Full Recipe -
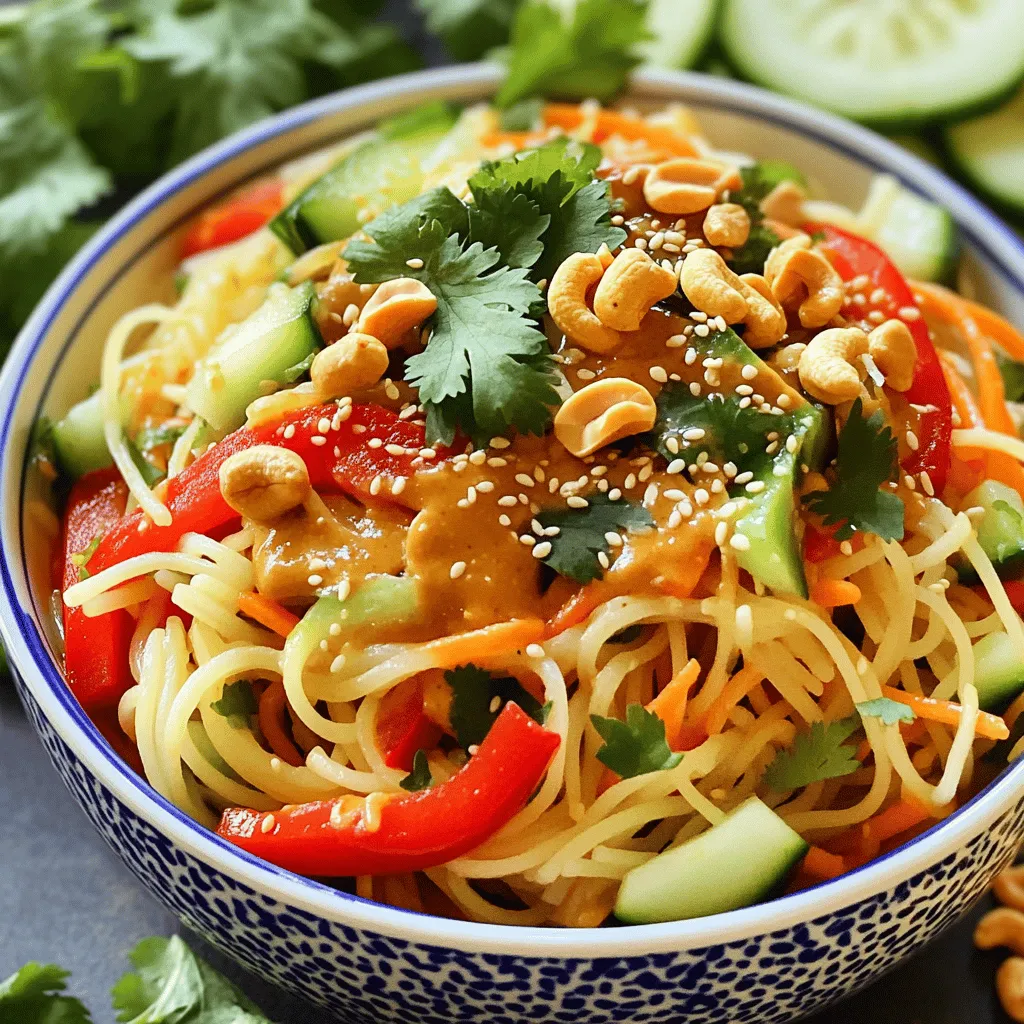
Spicy Cashew Noodle Salad Tasty and Simple Recipe
Are you ready to enjoy a tasty dish that packs a flavorful punch? My Spicy Cashew Noodle Salad is not Read Full Recipe -
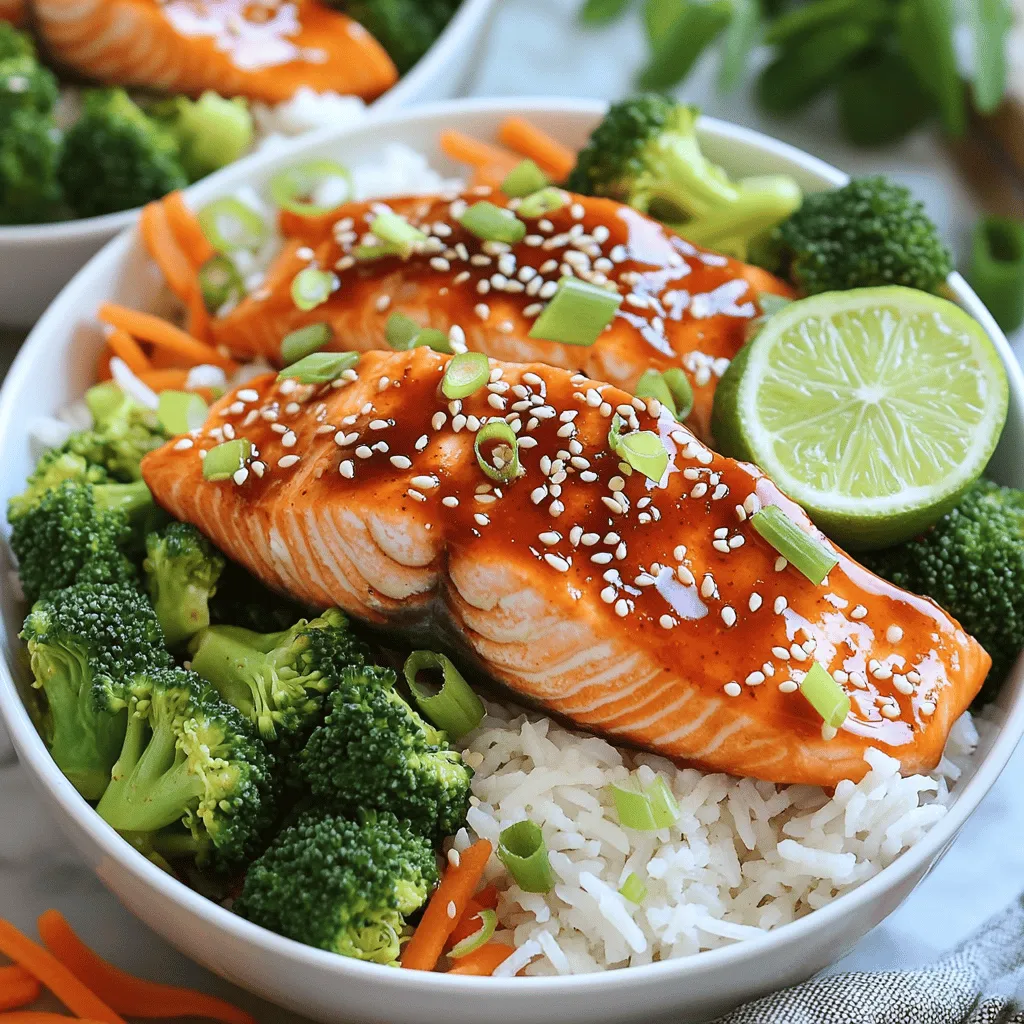
Sweet Chili Salmon Bowls Healthy and Flavorful Meal
Looking for a quick, healthy meal that’s bursting with flavor? Sweet Chili Salmon Bowls are the answer! I’ll walk you Read Full Recipe -
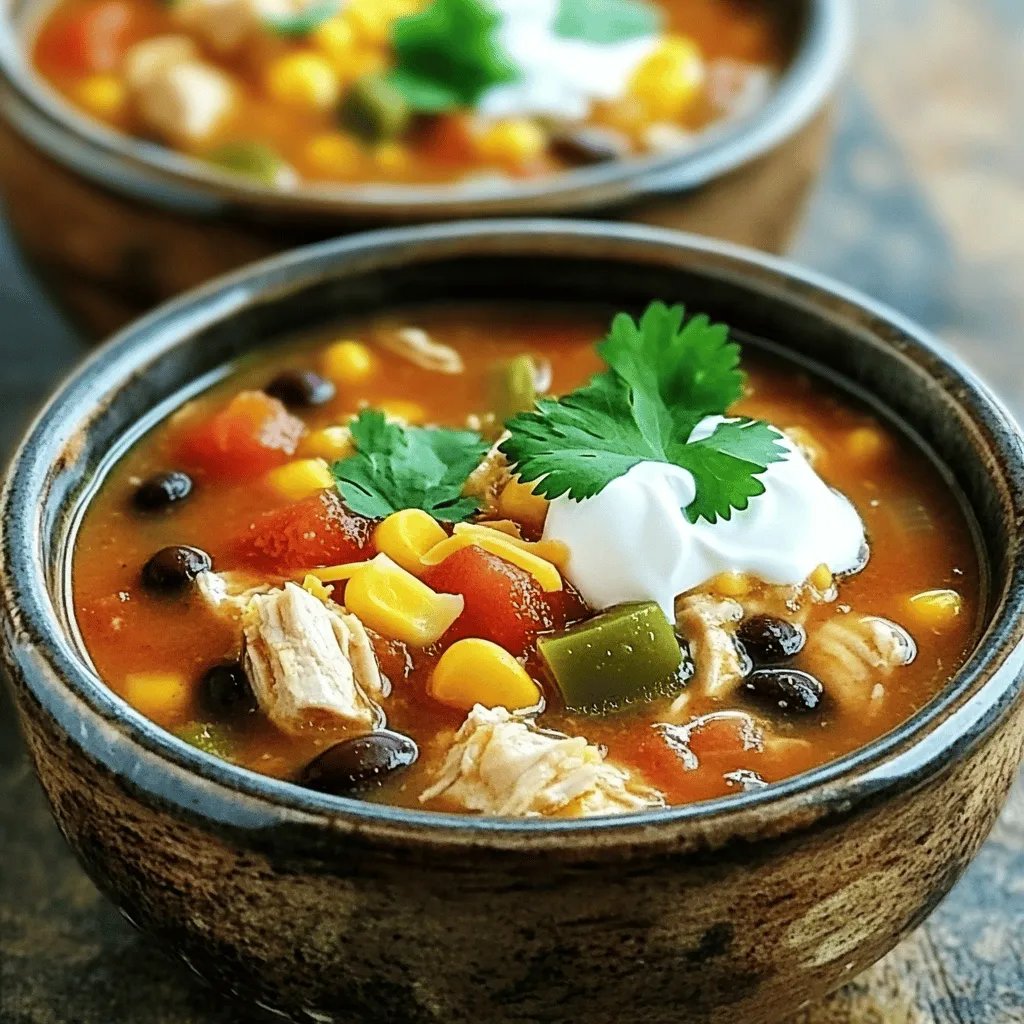
Chicken Taco Soup Flavorful and Simple Recipe Guide
Looking for a quick and tasty meal? I’ve got the perfect solution: Chicken Taco Soup! This flavor-packed recipe is easy Read Full Recipe