Dig into the ultimate no-bake dessert: Oreo Dirt Cake! This fun and delicious treat layers creamy chocolate and crunchy cookies for a dessert that’s sure to delight everyone. Perfect for parties or a cozy night in, you can whip this up in no time with just a few ingredients. Get ready to impress your friends and family with this easy recipe that makes dessert fun—and tasty! Let’s dive in!
Ingredients
List of Ingredients
– 1 package (15.25 oz) chocolate sandwich cookies (like Oreos)
– 8 oz cream cheese, softened
– 1 cup powdered sugar
– 1 tsp vanilla extract
– 1 tub (8 oz) whipped topping (like Cool Whip), thawed
– 2 cups milk
– 1 package (3.9 oz) instant chocolate pudding mix
– Gummy worms (for garnish)
– Fresh mint leaves (optional, for garnish)
To make Oreo Dirt Cake, you need simple and fun ingredients. Each ingredient plays a key role in creating this creamy and chocolatey treat. The chocolate sandwich cookies serve as the base, giving it that classic Oreo flavor. Cream cheese adds a rich texture, while powdered sugar sweetens the mix.
Whipped topping provides lightness and fluffiness. Milk helps to make the pudding, adding moisture and creaminess. The instant chocolate pudding mix is crucial for that thick and smooth layer. Finally, gummy worms and mint leaves make it fun and visually appealing.
Optional Ingredients
– For a twist, try mini chocolate chips or crushed nuts for toppings.
– Use dairy-free cream cheese or whipped topping for a vegan option.
– Swap the chocolate pudding with vanilla or butterscotch for new flavors.
These optional ingredients allow you to customize the dirt cake. They cater to different tastes and dietary needs. You can make it your own while keeping the fun spirit of this dessert.
Step-by-Step Instructions
Preparation Steps
– Crush the cookies: You can crush the chocolate sandwich cookies using a food processor or a sealed plastic bag. If using a bag, place the cookies inside, seal it, and crush them with a rolling pin. Aim for a fine crumb texture, as this will make the cake look great. Reserve about 1 cup of the crumbs for later use on top.
– Prepare the cream cheese mixture: Start with softened cream cheese. Place it in a large mixing bowl. Beat it with a hand mixer or a whisk until smooth. Gradually add the powdered sugar and vanilla extract. Keep mixing until everything is well combined. This mixture should be creamy and fluffy.
Combining Ingredients
– How to combine the whipped topping and cream cheese: Take the thawed whipped topping and gently fold it into the cream cheese mixture. Use a spatula to combine them. Be careful not to deflate the whipped topping. You want this mix to stay light and airy.
– Instructions on mixing in the pudding: In another bowl, whisk together the milk and instant chocolate pudding mix for about 2-3 minutes. This will thicken the pudding. Once it’s thickened, carefully fold this pudding into the cream cheese and whipped topping mixture. This step brings all the flavors together.
Layering the Cake
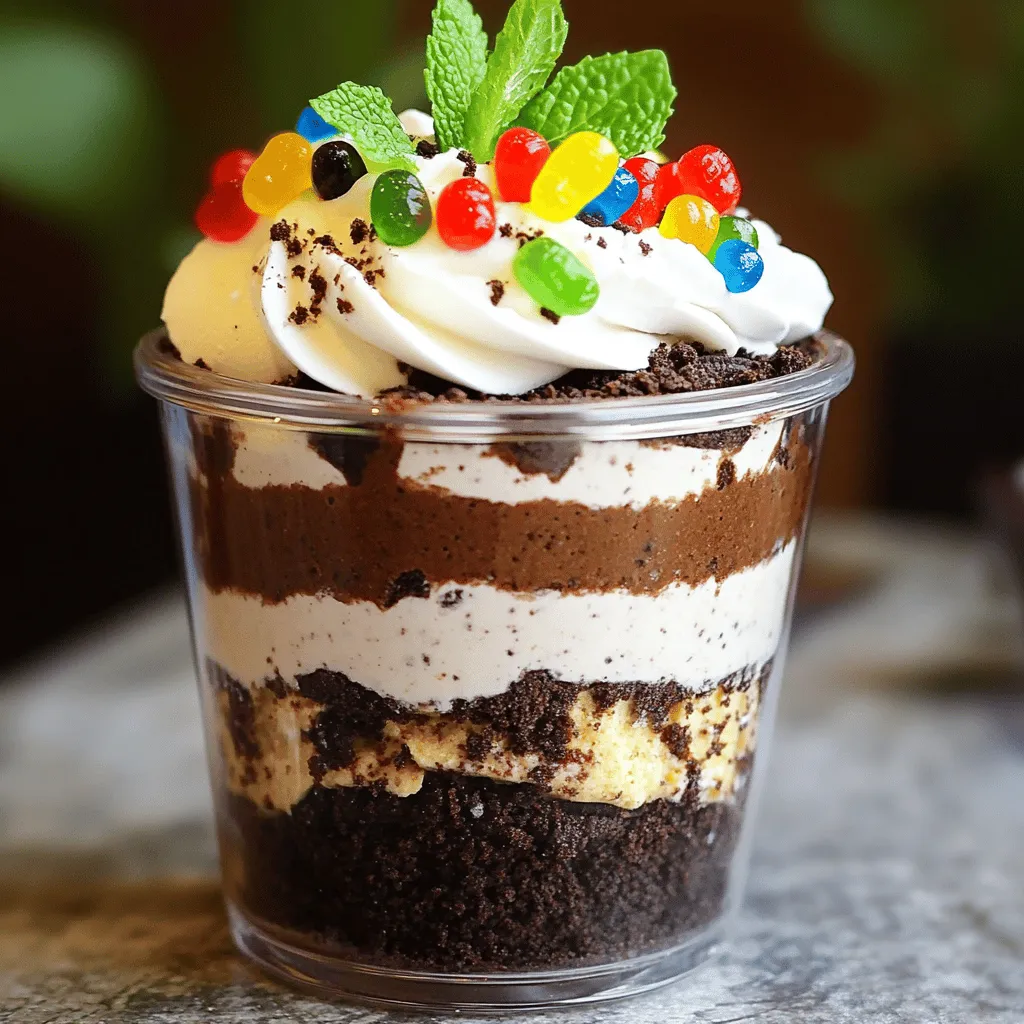
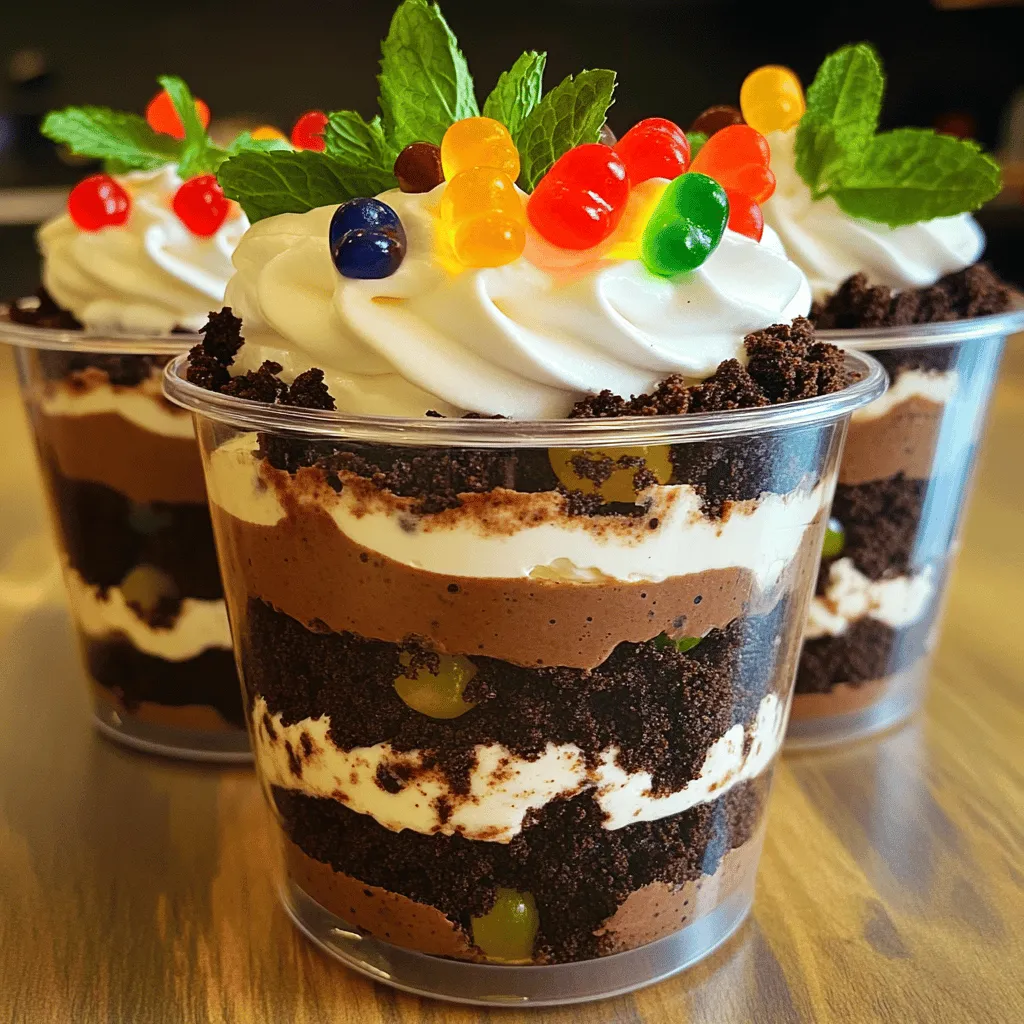
– Techniques for constructing layers: Grab a large serving dish or individual cups. Start with a layer of crushed cookie crumbs at the bottom. Follow with a layer of the pudding mixture. Repeat these layers until all ingredients are used up. It’s fun to see the layers build up!
– Tips for achieving a visually appealing presentation: Finish with a layer of cookie crumbs on top. This looks nice and gives a dirt-like effect. For extra flair, add gummy worms sticking out and some fresh mint leaves for color. Serve in clear cups if you want to show off those beautiful layers.
Tips & Tricks
Perfecting Your Oreo Dirt Cake
To make the best Oreo Dirt Cake, avoid some common mistakes. First, don’t rush the chilling process. Chilling helps the layers set properly. If you cut it too soon, it might fall apart. Second, ensure your cream cheese is soft. This will help it mix well and become smooth. If it’s too hard, you’ll end up with lumps in your cake.
Best practices for chilling and serving include using clear cups. This way, you can show off the pretty layers. Chill for at least four hours, but overnight is even better. The flavors will meld, and the cake will taste amazing.
Serving Suggestions
For portion sizes, aim for about half a cup per serving. This dessert is rich and sweet, so small servings work well. You can also make mini cups for a fun party treat.
When it comes to presentation, don’t forget the fun! Decorate with gummy worms and fresh mint leaves. Stick the gummy worms into the top layer to make it look extra playful. Mint leaves add a nice pop of color and a hint of freshness. This makes your Oreo Dirt Cake not just tasty, but also fun to look at!
Variations
Flavor Variations
You can switch up the flavors of your Oreo dirt cake easily. Try using different cookies, like peanut butter or vanilla sandwich cookies. These cookies can give a fun twist to your dessert. For pudding, opt for vanilla or butterscotch to change the taste.
Want to add some crunch? Sprinkle chopped nuts or crushed candy bars on top. You can also layer in some chocolate chips or mini marshmallows for a sweet surprise. Mix and match these ideas to find your favorite flavors.
Theme-Based Variations
Creating a theme for your Oreo dirt cake can make it even more fun. For Halloween, add candy eyeballs and use orange and black sprinkles. For birthday parties, use colorful sprinkles and candles on top.
You can also customize your cake for allergies. Use gluten-free cookies and dairy-free pudding to make it safe for everyone. Let your imagination run wild with these theme-based ideas. They will surely impress your guests!
Storage Info
How to Store Oreo Dirt Cake
To keep your Oreo dirt cake fresh, follow these simple steps:
– Refrigerate: Place the cake in the fridge, covered with plastic wrap.
– Shelf Life: It lasts about 3 to 5 days when stored properly.
– Avoid moisture: Keep it in a cool spot without excess moisture.
Freezing Options
You can freeze Oreo dirt cake, but do it with care:
– Freezing Instructions: Cut the cake into portions. Wrap each piece in plastic wrap, then in foil.
– Thawing: When ready to enjoy, thaw in the fridge overnight.
– Texture Impact: Freezing may change the cream’s texture, but the flavor stays great.
– Flavor Notes: Some find the taste even better after thawing!
FAQs
Common Questions
What is Oreo Dirt Cake?
Oreo Dirt Cake is a fun, no-bake dessert. It layers crushed Oreos with a creamy mix of cream cheese and chocolate pudding. This dessert looks like dirt, often topped with gummy worms. It’s great for kids and adults alike.
How long can it be stored in the fridge?
You can store Oreo Dirt Cake in the fridge for about 3 to 5 days. Keep it covered to maintain freshness. This dessert tastes even better after chilling, as the flavors meld together.
Can I make this recipe in advance?
Yes, you can make this recipe in advance. In fact, it’s best to prepare it a day ahead. This way, it has time to chill and set properly. Just cover it tightly in the fridge.
Tips from Other Cooks
What do others say about their experience with this recipe?
Many cooks love how easy and fun this dessert is to make. They enjoy the creamy texture and the crunchy cookie layers. It’s a crowd-pleaser for parties and gatherings. Some even share tips on personalizing their creations!
What are common ingredient substitutions that work well?
You can swap the cream cheese for Greek yogurt for a lighter option. Instead of Oreos, use chocolate graham crackers for a different taste. For a dairy-free version, try coconut cream instead of whipped topping.
Nutritional Information
Is Oreo Dirt Cake suitable for special diets?
Oreo Dirt Cake is not suitable for all diets. It contains dairy and gluten. Those with allergies should be cautious. However, you can make it safe for some diets by using substitutions.
Suggestions for healthier alternatives without sacrificing flavor
To make it healthier, use low-fat cream cheese and sugar-free pudding mix. You can also add fresh fruit, like berries, for flavor and nutrition. These swaps keep the taste delicious without all the calories.
Oreo Dirt Cake is a fun and easy dessert. We explored the ingredients, preparation, and tips for success. You learned how to layer the cake and serve it with flair. Remember to adjust ingredients as needed for different tastes and dietary needs. Enjoy getting creative with flavors and themes. With proper storage, this dessert stays fresh and delightful. Now, you have everything to make your own Oreo Dirt Cake and impress everyone. Happy baking!