Get ready to impress your friends and family with a delightful dessert that requires no baking! This Festive No-Bake Peppermint Oreo Delight combines creamy layers of sweetened cream cheese with the classic crunch of Oreos and a refreshing peppermint twist. In just a few simple steps, you’ll have a stunning treat that’s perfect for any holiday gathering. Let’s dive into this easy and joyful recipe that you’ll want to make again and again!
Why I Love This Recipe
- Decadent Flavor: This dessert combines the rich taste of Oreo cookies with the refreshing zing of peppermint, creating a delightful harmony that’s perfect for the holidays.
- No Baking Required: With this no-bake recipe, you can save time and avoid the oven, making it an easy and convenient option for busy festive seasons.
- Easy to Prepare: With simple ingredients and straightforward steps, this recipe is approachable for bakers of all skill levels, ensuring everyone can impress their guests!
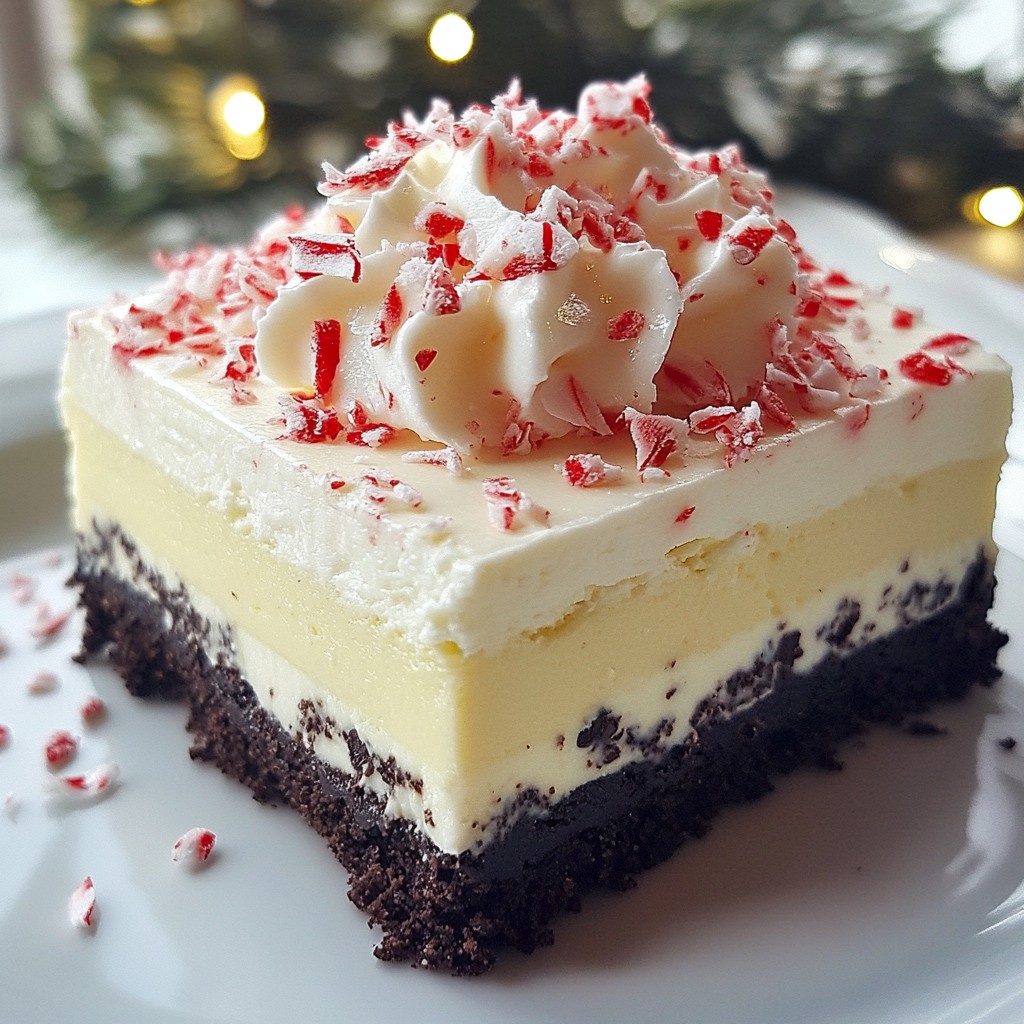
- Visually Stunning: The layers of cream cheese filling, crushed peppermint, and Oreo crust create a beautiful presentation that will wow your friends and family.
Ingredients
Here’s what you need for the Festive No-Bake Peppermint Oreo Delight:
- 24 Oreo cookies (regular or peppermint-flavored)
- 1/2 cup unsalted butter, melted
- 2 (8-ounce) packages cream cheese, softened
- 1 cup powdered sugar
- 1 teaspoon vanilla extract
- 1 cup whipped cream (or Cool Whip)
- 1/2 cup crushed peppermint candies
- Optional garnishes: chocolate shavings or cocoa powder, extra crushed peppermint candies for topping
Gathering these ingredients will set you up for a fun treat that everyone will love. The chocolatey Oreos bring a rich flavor, while the peppermint adds a festive touch. You can even use peppermint-flavored Oreos for an extra kick!
Make sure your cream cheese is soft. This helps it mix well without lumps. You want that creamy texture in your filling. The whipped cream makes it light and fluffy, perfect for a no-bake dessert.
Crushed peppermint candies give a nice crunch. You can save some for the top to make it even prettier! If you want to get fancy, add chocolate shavings or a dusting of cocoa powder. They look great and taste amazing too.
Now that you have your ingredients, let’s make something special!

Step-by-Step Instructions
Preparing the Crust
Crush 24 Oreo cookies in a food processor. You want fine crumbs, so blend well. Next, mix the cookie crumbs with 1/2 cup of melted butter until it’s combined. Press this mixture firmly into a 9x9 inch baking dish. This creates a strong base for your dessert. Set this crust aside while you make the filling.
Making the Filling
In a large mixing bowl, beat 2 packages of softened cream cheese until it’s smooth. This usually takes about 2 minutes. Gradually add 1 cup of powdered sugar, mixing until it’s fully combined. Then, add 1 teaspoon of vanilla extract. Mix again until everything is well-blended.
Incorporating Whipped Cream
Now, gently fold in 1 cup of whipped cream. Use a spatula for this. Carefully mix until the filling is fluffy and smooth. Be sure not to deflate the whipped cream during this step. This will give your dessert a light texture.
Adding Peppermint
Next, fold in 1/2 cup of crushed peppermint candies. Distribute the candies evenly in the cream cheese mixture. This adds a festive flavor and crunch to your dessert.
Assembling the Dessert
Pour the cream cheese filling over the Oreo crust in the baking dish. Spread it evenly with a spatula. Make sure the top is smooth for a nice finish.
Chilling and Serving
Cover the dessert with plastic wrap. Refrigerate for at least 4 hours, or overnight if you have time. Once it’s set, slice it into squares. Before serving, sprinkle extra crushed peppermint candies on top for a festive touch. You can also add chocolate shavings or cocoa powder for some extra flavor. Enjoy your Festive No-Bake Peppermint Oreo Delight!
Tips & Tricks
Ensuring a Perfect Crust
To make the crust, crush the Oreo cookies in a food processor. This helps get fine crumbs. If you don’t have a food processor, place the cookies in a zip-top bag and crush them with a rolling pin.
Mix the crushed cookies with melted butter until it looks like wet sand. Next, press this mixture firmly into the bottom of your baking dish. Use the bottom of a measuring cup for even pressure. This helps create a solid base.
Making the Cream Cheese Mixture
Softening cream cheese is key. To do this, take it out of the fridge 30 minutes before starting. You can also cut it into small cubes for faster softening.
When mixing, beat the cream cheese until it's smooth. Gradually add the powdered sugar and mix well. This helps avoid lumps. To finish, mix in the vanilla extract until combined.
Storage Tips
After making your dessert, cover it tightly with plastic wrap. Refrigerate it for at least four hours. This helps the layers set properly.
When you store leftovers, keep them in the fridge. If you notice any texture changes, try adding a bit of whipped cream before serving. This keeps the dessert creamy and fresh.
Pro Tips
- Use Fresh Ingredients: For the best flavor and texture, make sure your cream cheese is fresh and at room temperature before mixing.
- Chill Time: Allowing the dessert to chill overnight enhances the flavors and helps it set perfectly.
- Customize the Toppings: Feel free to experiment with different toppings, such as crushed nuts or a drizzle of chocolate sauce, for added flavor and texture.
Variations
Flavor Alternatives
You can switch up the flavor by using different cookies. Try chocolate cookies instead of Oreos for a rich taste. You can also use gingerbread cookies for a warm, spicy twist. If you prefer, swap the peppermint candies for holiday flavors like crushed ginger snaps or toffee bits. These small changes can create a new festive treat.
Dietary Modifications
For gluten-free options, use gluten-free cookies. Many brands offer gluten-free Oreos. You can also make the crust with crushed gluten-free chocolate cookies. If you need a lactose-free choice, opt for lactose-free cream cheese. There are also great non-dairy cream cheeses available. These options let everyone enjoy this dessert.
Serving Suggestions
To make your dish pop, pair it with hot fudge or caramel sauce. A drizzle adds flavor and a nice look. For a holiday-themed display, serve the dessert in festive cups or on a decorated platter. You can add sprigs of mint or edible flowers for a colorful touch. These ideas make your dessert more fun and inviting at any gathering.
Storage Info
Refrigeration Guidelines
The Festive No-Bake Peppermint Oreo Delight lasts about 4 to 5 days in the fridge. To store leftovers, cover the baking dish with plastic wrap. This keeps the dessert fresh and prevents any odors from seeping in. If you want to slice the dessert first, place each piece in an airtight container. This way, you can grab a piece anytime!
Freezing Instructions
You can freeze the dessert for longer storage. Cut it into squares before freezing. Place the squares in a single layer on a baking sheet. Freeze them for about 1 to 2 hours until firm. Then, transfer the squares to an airtight container, separating layers with parchment paper. This prevents sticking. When you're ready to enjoy, thaw the dessert in the fridge overnight before serving. This keeps the texture nice and creamy.
FAQs
Can I make this dessert in advance?
Yes, you can make this dessert ahead of time. I suggest preparing it a day before you plan to serve it. This gives the layers time to set well. The longer it chills, the better the flavors blend. Just cover it tightly with plastic wrap to keep it fresh in the fridge. When you’re ready, slice it into squares and add the toppings.
Can I use reduced-fat cream cheese?
You can use reduced-fat cream cheese, but it might change the texture. The dessert may not be as rich and creamy. It will still taste good, but the filling might be a bit denser. If you're looking for a lighter option, this is a fine choice. Just remember that the flavor may change slightly.
What if I don’t have peppermint candies?
If you don’t have peppermint candies, don’t worry! You can use chocolate chips or crushed nuts instead. Crushed cookies can add a fun crunch, too. Another option is to use flavored extracts, like mint or almond, to give a twist to the taste. Feel free to get creative with what you have on hand!
This dessert combines delicious flavors and easy steps. You learned how to make a crust from Oreo cookies and create a creamy filling with cream cheese and peppermint. With tips for perfecting the crust and variations to suit everyone, you have all you need. Remember to refrigerate leftovers properly. This recipe will impress your guests. Enjoy making and sharing it!