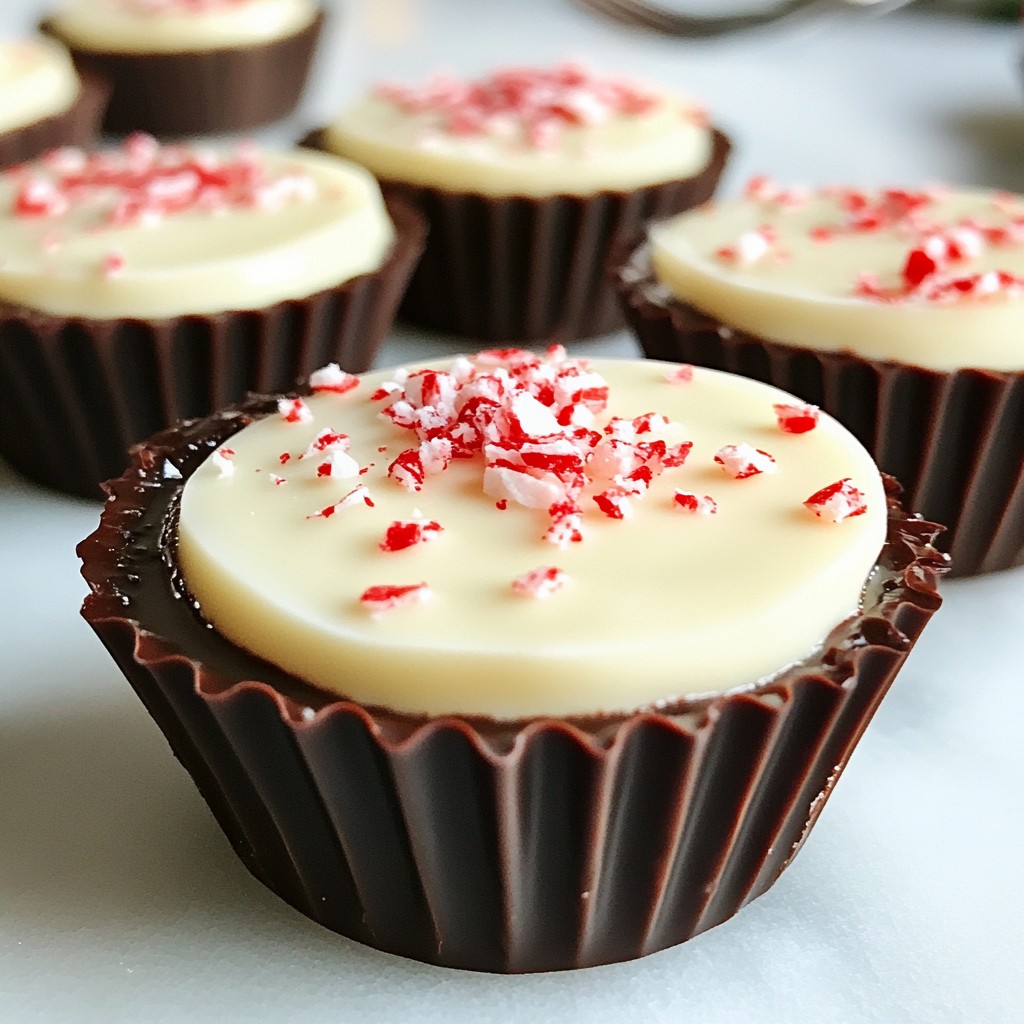
Get ready to impress your friends and family with my Festive No-Bake Peppermint Chocolate Cups! These easy, yummy treats combine rich dark chocolate and a refreshing peppermint cream. Perfect for any holiday gathering, we’ll explore simple steps, fun variations, and handy tips to make your cups stand out. Let’s dive into this festive delight that everyone will love and enjoy!
Why I Love This Recipe
- Delicious Combination: The rich dark chocolate paired with the refreshing peppermint creates a perfect balance of flavors that captures the essence of the holiday season.
- No Baking Required: This recipe is a breeze to make, allowing you to enjoy a festive treat without spending hours in the kitchen.
- Customizable Toppings: You can easily personalize these cups by adding different toppings like nuts or sprinkles, making them a fun treat for everyone.
- Perfect for Sharing: These mini chocolate cups are great for parties or gifting, allowing you to treat friends and family to a delightful homemade dessert.
Ingredients
Key Ingredients for Peppermint Chocolate Cups
To make these tasty peppermint chocolate cups, you need:
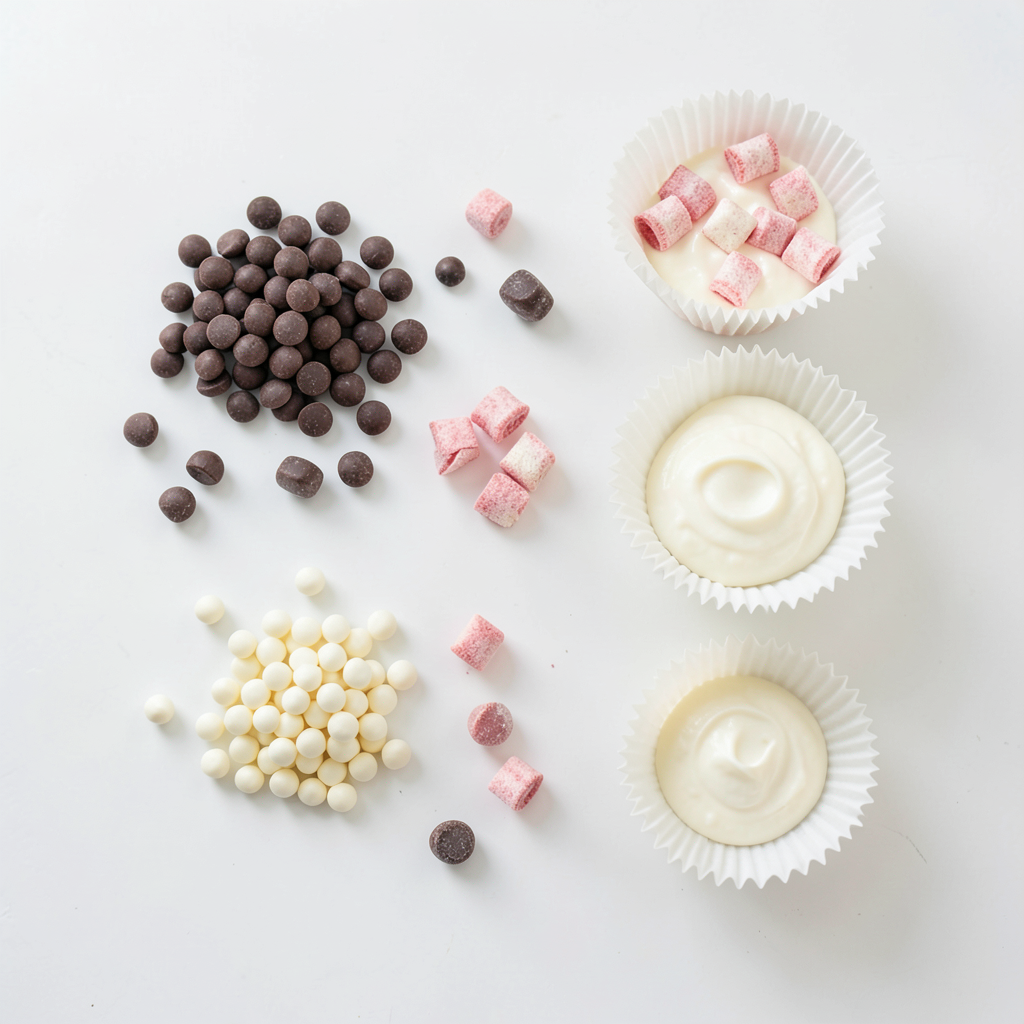
- 1 cup dark chocolate chips
- 1/2 cup white chocolate chips
- 1/2 teaspoon peppermint extract
- 1/4 cup crushed peppermint candies (or candy canes)
- 1/4 cup heavy cream
- Mini cupcake liners
Each of these ingredients brings a unique flavor. The dark chocolate gives a rich taste, while the white chocolate adds sweetness. The peppermint extract gives a refreshing kick. Crushed peppermint candies add a nice crunch.
Optional Ingredients for Personalization
You can add some fun twists to your peppermint chocolate cups. Here are a few ideas:
- Sea salt for a sweet and salty mix
- Different extracts like vanilla or almond
- A splash of coffee for a mocha flavor
- Nuts like almonds or walnuts for texture
Feel free to get creative! Each addition can change the flavor and make it your own.
Substitutions and Alternatives
Not all ingredients need to be the same. Here are some easy swaps:
- Use milk chocolate chips instead of dark for a sweeter taste.
- Try coconut cream in place of heavy cream for a dairy-free option.
- Use sugar-free chocolate chips for a lower-sugar treat.
These substitutions can help fit your dietary needs or preferences. Always remember to adjust the amounts so the flavors stay balanced.
Step-by-Step Instructions
Melting Dark Chocolate
To start, grab a microwave-safe bowl. Add 1 cup of dark chocolate chips to the bowl. Heat the chocolate in the microwave. Use 30-second bursts and stir in between. This helps the chocolate melt evenly. Keep heating until it is smooth and free of lumps.
Preparing the Mini Cupcake Liners
Next, take a mini muffin tin and line it with cupcake liners. This helps each chocolate cup pop out easily. Using a spoon, scoop about one teaspoon of melted dark chocolate into each liner. Make sure to coat the bottom and sides well. Use the back of the spoon to spread the chocolate evenly.
Making the Peppermint Cream Layer
While the chocolate sets, it’s time for the peppermint cream. In a small saucepan, heat 1/4 cup of heavy cream over medium heat. Wait for it to simmer, then remove it from the heat. Add in 1/2 cup of white chocolate chips and 1/2 teaspoon of peppermint extract. Stir until it becomes smooth and glossy.
Assembling the Chocolate Cups
Once the dark chocolate cups are set, it’s time to fill them. Carefully spoon about one teaspoon of the peppermint cream into each cup. Fill them just below the rim to avoid overflow. Next, reheat any remaining dark chocolate if it has cooled too much. Spoon more melted dark chocolate over the peppermint layer. This seals the cups.
Final Chill and Serving Tips
Before serving, sprinkle the crushed peppermint candies on top of the chocolate. This adds a festive touch. Return the muffin tin to the freezer for 15-20 minutes. This helps the chocolate cups harden completely. Once set, gently peel away the cupcake liners before serving. Enjoy your tasty treats chilled!
Tips & Tricks
Ensuring Perfectly Melted Chocolate
To melt chocolate well, use a microwave-safe bowl. Place your dark chocolate chips inside. Microwave in 30-second bursts. Stir the chocolate after each burst. This method stops it from burning. It should melt smoothly and be shiny. If it gets too thick, add a bit of cream. This keeps it silky for your cups.
How to Achieve the Best Peppermint Flavor
For the best peppermint taste, use pure peppermint extract. Just 1/2 teaspoon is enough for great flavor. Mix it into your warm white chocolate and cream. This allows the taste to blend well. You can also add crushed peppermint candies on top. They give a nice crunch and stronger minty flavor.
Avoiding Common Mistakes
Avoid overcooking the chocolate in the microwave. Keep a close eye on it. Stir often to help it melt evenly. Another mistake is filling the cups too full. Leave a little room when adding the cream layer. This way, you can top it with more chocolate without spilling. Lastly, be patient when chilling. Letting them set fully ensures a nice, firm cup.
Pro Tips
- Use Quality Chocolate: Opt for high-quality chocolate chips for a richer flavor in your cups. The better the chocolate, the better the dessert!
- Chill Between Layers: Make sure to chill each layer thoroughly before adding the next to ensure a clean separation and avoid mixing the layers.
- Crushed Peppermints: Crush your peppermint candies just before using them to keep them fresh and crunchy. A rolling pin works great for this!
- Storage Tips: Keep these cups in an airtight container in the fridge for up to a week, or freeze them for longer storage. Just remember to let them thaw before serving!
Variations
Alternative Flavor Combinations
You can switch up flavors for a fun twist. Try using milk chocolate instead of dark. This adds a sweet touch. If you love nutty flavors, add a spoon of almond extract. For a fruity vibe, consider using orange zest. The fresh taste pairs nicely with chocolate. You can even mix in some coconut for a tropical feel. Each change gives a new taste to these peppermint chocolate cups.
Decorating Ideas
The fun doesn't stop with flavor! You can decorate your cups. Use colored sprinkles for a festive look. Add some whipped cream on top for a creamy finish. Drizzle melted chocolate over the tops. This creates a beautiful pattern. You can also place a whole peppermint candy on each cup. This makes each one special and fun. Get creative and let your style shine!
Serving Suggestions
These cups are perfect for any gathering. Serve them on a festive platter for holiday parties. They also make great gifts. Place them in a cute box and share them with friends. For a sweet touch, pair them with hot cocoa. This makes a delightful dessert combo. You can also enjoy them as a sweet snack any time. They’re sure to impress everyone!
Storage Info
How to Store Leftover Chocolate Cups
To keep your peppermint chocolate cups fresh, place them in an airtight container. Make sure to layer them with parchment paper to prevent sticking. Store the container in the fridge. This helps maintain their cool texture and flavor.
Shelf Life and Best Practices
These chocolate cups last about one week in the fridge. After that, they may lose their taste. Always check for any signs of spoilage. If they look or smell off, it's best to toss them. Enjoy them while they are fresh for the best experience.
Freezing Tips for Longer Storage
If you want to save some for later, freezing is a great option. Place the chocolate cups in a single layer on a baking sheet. Freeze them until solid, then transfer them to an airtight container. They can last up to three months in the freezer. To enjoy, thaw them in the fridge overnight before serving.
FAQs
Can I use milk chocolate instead of dark?
Yes, you can use milk chocolate instead of dark chocolate. Milk chocolate has a sweeter taste. This makes the cups creamier but less rich. Be careful not to overheat it when melting.
How do I make these vegan?
To make these cups vegan, swap the heavy cream for coconut cream. Use dairy-free chocolate chips. You can also substitute the peppermint extract with a natural vegan flavor.
What's the best way to melt chocolate?
The best way to melt chocolate is in a microwave. Use a microwave-safe bowl. Heat in 30-second bursts. Stir often to check for smoothness. You can also melt chocolate on the stove using a double boiler.
Can I use other types of extracts?
Yes, you can use other extracts like vanilla or almond. Just remember to adjust the amount. Start with a small amount and taste as you go.
How can I make these for a crowd?
To make these for a crowd, double the recipe. Use a larger muffin tin or multiple tins. You can also prepare them ahead of time and freeze them. This way, they are ready when guests arrive.
You now have a full guide to making peppermint chocolate cups. We covered key ingredients, steps to make them, and tips for perfect flavor. Remember to enjoy these treats and make them your own with different flavors. With proper storage, they will last longer, too. I hope you feel ready to create these tasty bites for yourself and others. Happy cooking!