Looking for a sweet treat that’s easy to make and packed with rich flavors? These Decadent No-Bake Chocolate Matcha Truffles are the perfect solution! With just a few simple ingredients, you can whip up these delightful bites in no time. Imagine the creamy dark chocolate paired with earthy matcha for a gourmet treat you can enjoy anytime. Ready to dive into this delicious recipe? Let's get started!
Why I Love This Recipe
- Rich Flavor Profile: The combination of dark chocolate and matcha offers a unique and indulgent taste that is both satisfying and sophisticated.
- No-Bake Convenience: These truffles are incredibly easy to make without the need for an oven, making them perfect for warm days or quick cravings.
- Healthy Ingredients: With almond flour and matcha, these truffles provide a boost of nutrients, making them a guilt-free treat.
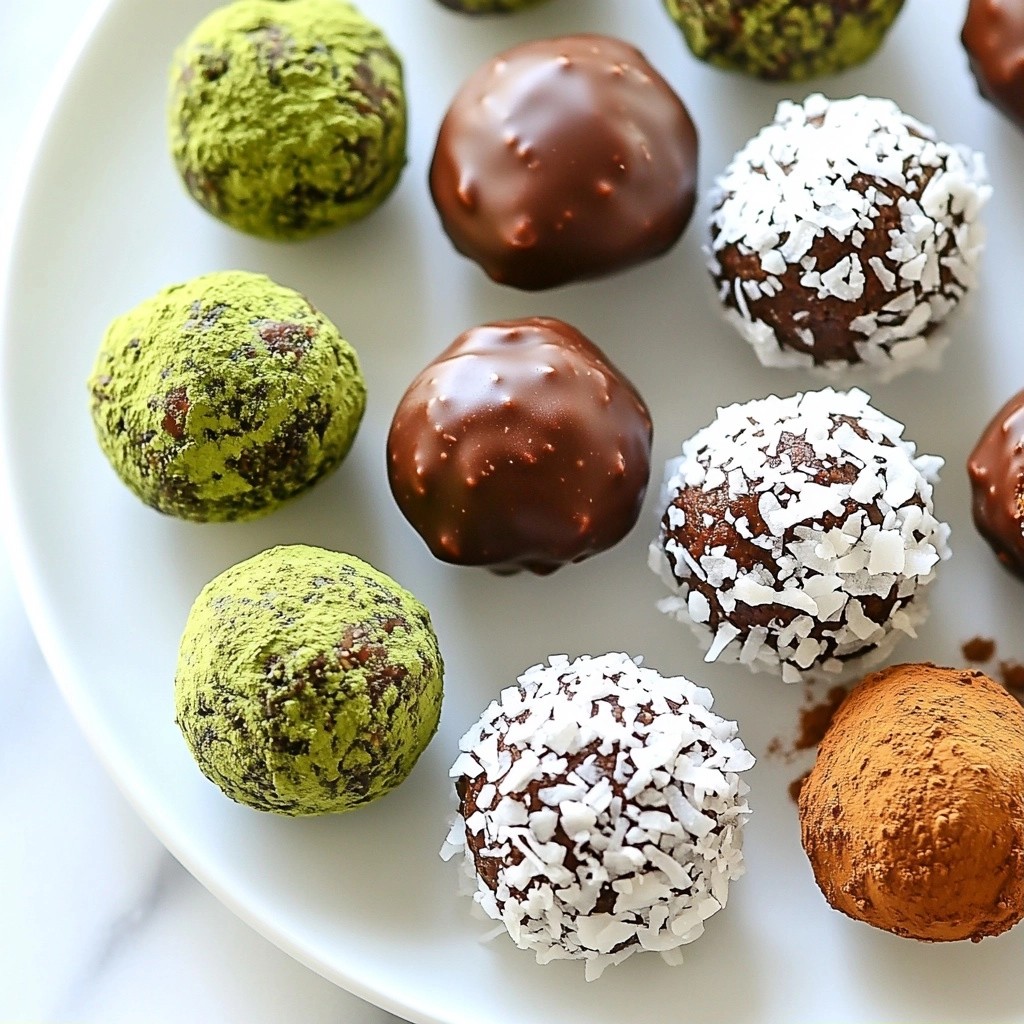
- Customizable Coating: You can easily switch up the rolling ingredients, choosing between coconut, cacao, or even nuts for added texture and flavor.
Ingredients
List of Ingredients
- Key Ingredients:
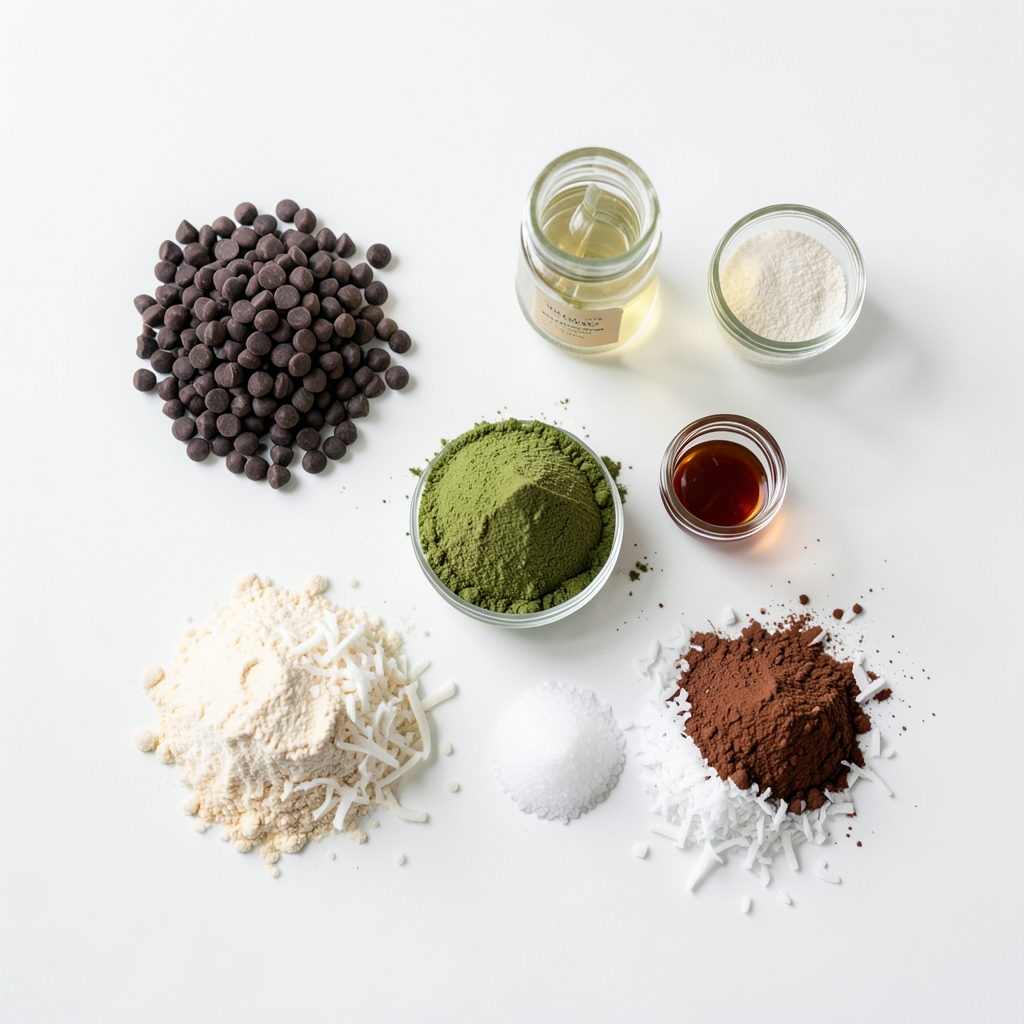
- 1 cup dark chocolate chips (70% cocoa or higher)
- 1 cup almond flour
- 2 tablespoons matcha green tea powder
- Optional Ingredients:
- 2 tablespoons maple syrup
- 1 teaspoon vanilla extract
- A pinch of sea salt
- 1/4 cup shredded coconut (unsweetened, for rolling)
- 1/4 cup cacao powder (for rolling)
These ingredients make the truffles rich and tasty. The dark chocolate gives a deep flavor. Almond flour adds a nice texture. Matcha powder brings a unique taste and color. You can add maple syrup for sweetness. Vanilla extract enhances the flavor. A pinch of sea salt balances the sweetness. For rolling, shredded coconut and cacao powder give an extra layer of flavor. This mix makes these truffles truly decadent.
Step-by-Step Instructions
Melting the Chocolate
To melt chocolate well, use a microwave-safe bowl. Heat the dark chocolate chips in 30-second bursts. Stir the chocolate after each interval until it is smooth. This method helps prevent burning. If you heat it too long at once, it can seize up.
Mixing Dry Ingredients
Mixing the dry ingredients is key to flavor. In a bowl, combine almond flour and matcha powder. Add maple syrup, vanilla extract, and a pinch of sea salt. Measure each ingredient carefully. Use a kitchen scale or measuring cups for accuracy. This ensures even taste and texture in your truffles.
Combining the Mixtures
Pour the melted chocolate into the dry mix. Stir until everything is combined. You want a thick dough to form. If the mixture seems too wet, add more almond flour. After mixing, chill the dough for about 30 minutes. This makes it easier to roll into balls.
Rolling the Truffles
When rolling the truffles, scoop out about one tablespoon of the mix. This keeps each truffle uniform in size. Roll them into balls using your hands. If the dough sticks, wet your hands slightly. This helps prevent mess.
Final Touch and Setting
Once rolled, prepare two plates with shredded coconut and cacao powder. Roll half of the truffles in coconut and half in cacao. This adds flavor and texture. Place them on a parchment-lined tray. Chill again for about 15 minutes. This helps the truffles set perfectly. For a pretty touch, serve them on a decorative plate. Enjoy these truffles chilled for a delightful treat!
Tips & Tricks
Best Ways to Roll Truffles
Rolling truffles can be fun, but it can also get messy. Here are some tips to keep your hands clean:
- Use a small ice cream scoop to portion the mixture. This keeps your hands from getting sticky.
- Wet your hands slightly before rolling the truffles. This helps the mixture slide off easily.
For tools, consider using:
- Disposable gloves to avoid direct contact with the truffle mixture.
- A cookie scoop for even portions, ensuring uniform truffles every time.
Flavor Enhancements
To take your truffles to the next level, consider these flavor ideas:
- Add a pinch of cinnamon for warmth.
- Try a splash of orange zest for a citrus twist.
- Experiment with a touch of espresso powder to deepen the chocolate flavor.
Pairing suggestions include:
- A cup of herbal tea, which complements the matcha.
- Almond milk, which adds a nice creaminess to the experience.
Making Ahead Tips
You can prep these truffles in advance for easy snacking later. Here’s how:
- After rolling, store them in an airtight container in the fridge. They will stay fresh for about a week.
- For long-term storage, freeze the truffles. Place them in a single layer on a tray, then transfer to a freezer bag once frozen.
To thaw, simply leave them in the fridge overnight before serving. Enjoy your sweet treats without the rush!
Pro Tips
- Use High-Quality Chocolate: The flavor of your truffles largely depends on the chocolate you choose. Opt for high-quality dark chocolate with at least 70% cocoa for a rich taste.
- Chill for Easier Rolling: Chilling the mixture for 30 minutes makes it easier to handle. If the dough becomes too soft while rolling, you can chill it again briefly.
- Experiment with Coatings: While coconut and cacao powder are delicious, feel free to experiment with other coatings like chopped nuts, sesame seeds, or powdered sugar for variety.
- Store for Freshness: Keep your truffles in an airtight container in the refrigerator. They can last for up to a week, but they’re best enjoyed fresh!
Variations
Substituting Ingredients
You can easily change the almond flour in this recipe. Try using cashew flour or coconut flour. Both options give a nice flavor and texture. If you want a nut-free option, consider using oat flour. It works well and adds a gentle taste.
When it comes to sweeteners, maple syrup is just one choice. You can also use agave nectar or honey. Each sweetener adds its own twist. If you want a low-calorie option, try using stevia or erythritol. Adjust the amount as needed to match the sweetness you like.
Flavor Combinations
Matcha comes in different types, and each has a unique taste. You can use ceremonial grade matcha for a rich flavor or culinary grade for a milder taste. Mixing matcha with flavored powders, like chai or turmeric, can create a new twist.
You can also experiment with chocolate types. Dark chocolate gives a deep taste, while milk chocolate adds creaminess. White chocolate can add sweetness, but it may need more matcha to balance the flavors. Each chocolate type changes the truffle's overall vibe.
Dietary Adaptations
These truffles can fit many diets easily. For a vegan-friendly option, make sure to use dairy-free chocolate chips. They melt just as well and taste great.
If you need a gluten-free option, this recipe is already gluten-free with almond flour. Just check that any alternative flour you use is also gluten-free. This way, everyone can enjoy these tasty treats without worry.
Storage Info
Short-Term Storage
To keep your truffles fresh, store them in the fridge. Use an airtight container. This helps maintain their taste and texture. You can also layer parchment paper between truffles to prevent sticking.
- Recommended container: Airtight glass or plastic
- Best temperature: Around 32°F to 40°F
Long-Term Storage
If you want to save truffles for later, freezing works great. Place them in a single layer on a baking sheet. Freeze for about an hour until firm. Then, transfer them to a freezer-safe bag or container. Make sure to remove as much air as possible to prevent freezer burn.
- Recommended freezing tips:
- Use parchment paper to separate layers
- Label with the date for easy tracking
When you're ready to enjoy them, take out the desired amount. Let them thaw in the fridge for about 30 minutes. This keeps them tasty and smooth. You can serve them chilled or at room temperature.
FAQs
How do I make the truffles non-dairy?
To make these truffles non-dairy, choose dairy-free chocolate chips. Look for brands that use almond or coconut milk instead of dairy. You can often find these at health food stores or in the vegan section of your grocery store. Make sure to check the label to ensure it is dairy-free. This simple swap keeps the truffles creamy and rich without any dairy.
Can I use a different type of sweetener?
Yes, you can use other sweeteners! Here are some options:
- Honey: Use the same amount as maple syrup.
- Agave syrup: Use the same amount as maple syrup.
- Stevia: Use about 1 teaspoon, as it is much sweeter.
Each sweetener can change the taste a bit, so pick what you like best!
How long do these truffles last?
When stored properly, these truffles can last about one week in the fridge. Keep them in an airtight container to keep them fresh. If you want to store them longer, you can freeze them. They will last up to three months in the freezer. Just let them thaw in the fridge before enjoying.
In this article, we explored how to make delicious chocolate truffles. We discussed key ingredients like dark chocolate, almond flour, and matcha powder. I shared step-by-step instructions for melting chocolate, mixing dry ingredients, and rolling the truffles.
Remember, you can get creative with flavors and adaptations. Use different sweeteners and chocolates to meet your needs. Store your truffles properly for the best taste and texture. Enjoy the joy of making and sharing your tasty treats!