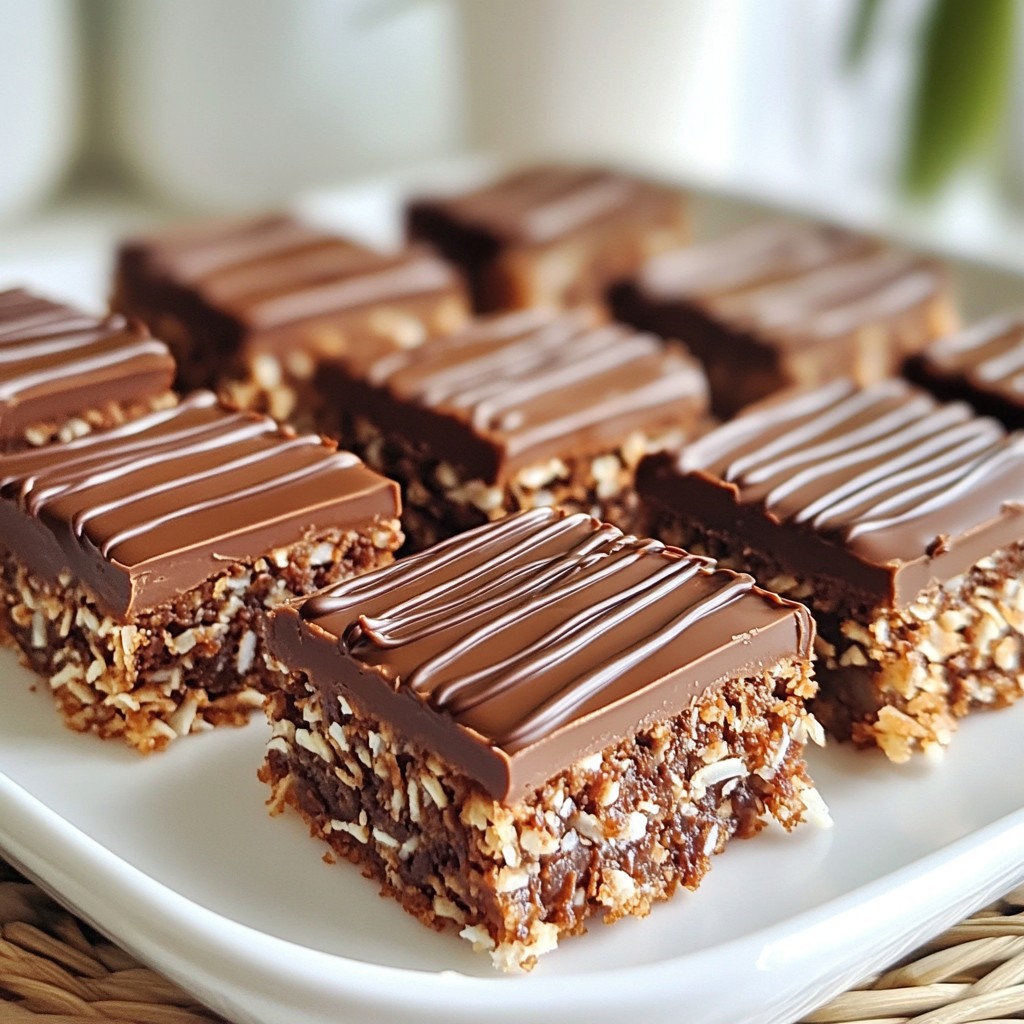
Indulge your taste buds with my Decadent No-Bake Chocolate Coconut Bars! These treats blend rich chocolate and sweet coconut into a delightful snack. Plus, they’re easy to make and require no baking! In this post, I’ll guide you through simple steps and tips to create the perfect bars. Ready to impress your friends and family? Let’s dive into the ingredients and get started on this chocolatey joy!
Why I Love This Recipe
- Easy to Make: This recipe requires no baking, making it a quick and hassle-free option for satisfying your sweet tooth.
- Wholesome Ingredients: Packed with natural ingredients like dates, oats, and coconut, these bars offer a healthier alternative to traditional desserts.
- Customizable: You can easily tweak the recipe by adding your favorite nuts or seeds, or adjusting the sweetness to your liking.
- Perfect for Meal Prep: These bars store well in the refrigerator, making them an ideal snack for busy days or on-the-go energy boosts.
Ingredients
Main Ingredients for Chocolate Coconut Bars
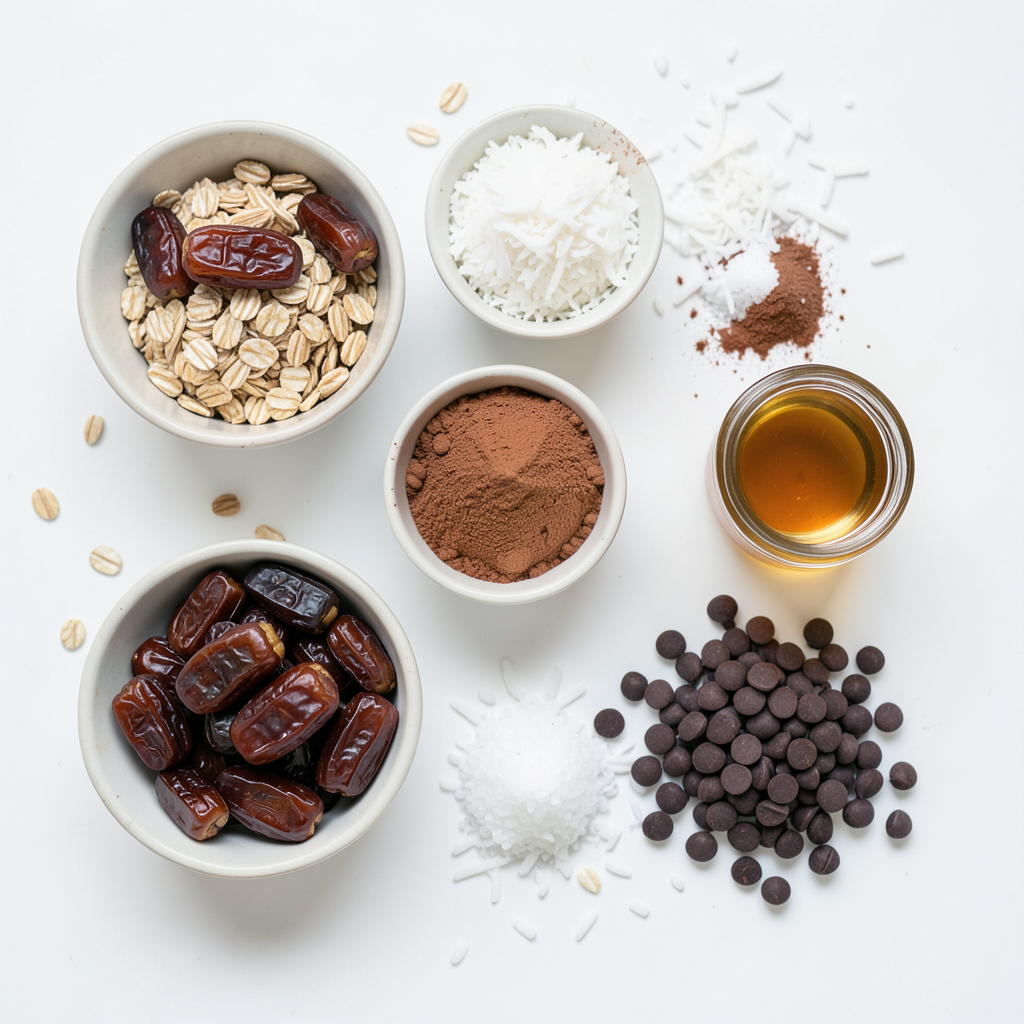
To make these delicious bars, you need the following main ingredients:
- 2 cups pitted dates, packed
- 1 cup rolled oats
- 1 cup unsweetened shredded coconut
- 1/2 cup almond butter (or any nut/seed butter)
- 1/4 cup cocoa powder
- 1/4 cup maple syrup
- 1 teaspoon vanilla extract
- A pinch of sea salt
These ingredients create a sweet and rich base. The dates add natural sweetness and stickiness. The oats and coconut give it great texture. Almond butter is creamy and ties it all together. Cocoa powder adds that deep chocolate flavor.
Optional Ingredients for Customization
You can customize your bars by adding these optional ingredients:
- 1/4 cup dark chocolate chips (optional)
- Extra shredded coconut for topping
The dark chocolate chips provide extra sweetness and a delightful crunch. Adding more shredded coconut on top enhances the coconut flavor and appearance.
Notes on Ingredient Quality
Using high-quality ingredients makes a big difference. Choose fresh, pitted dates for the best flavor. Look for organic rolled oats and unsweetened shredded coconut. If you can, use natural almond butter without added oils or sugars. This ensures your bars are both tasty and healthy. Good ingredients lead to amazing results you will love.
Step-by-Step Instructions
Preparation of the Base Mixture
Start by gathering all your ingredients. You need pitted dates, rolled oats, shredded coconut, almond butter, cocoa powder, maple syrup, vanilla, and sea salt.
In a food processor, add the pitted dates and rolled oats. Next, toss in the shredded coconut and almond butter. Then, sprinkle in the cocoa powder, maple syrup, and vanilla extract. Finally, add a pinch of sea salt.
Process the mixture until it becomes smooth and sticky. Make sure everything blends well. This step is key for a great texture.
Pressing and Shaping the Bars
Now, take an 8x8 inch baking dish and line it with parchment paper. Leave some paper hanging over the sides. This will help you lift the bars out later.
Transfer the mixture into the lined dish. Use your hands or a spatula to press it down evenly. Aim for a solid layer. If you want, sprinkle dark chocolate chips on top. Gently press them into the mixture. For a fun touch, add more shredded coconut on top.
Chilling and Cutting the Bars
Once you shape the bars, it’s time to chill them. Place the dish in the refrigerator for at least 2 hours. This helps the bars firm up.
After chilling, pull the bars out using the parchment paper. Place them on a cutting board. Cut into squares or rectangles. Your decadent no-bake chocolate coconut bars are ready to enjoy!
Tips & Tricks
Best Practices for Blending Ingredients
When blending, use a food processor. This tool saves time and makes mixing easy. Start with dates and nut butter. They need to blend well first. Add oats and coconut next. These ingredients help to bind everything together. Blend until the mix is sticky and smooth. Scrape down the sides often to ensure even mixing. If your mix is too dry, add a bit more almond butter. If too wet, a few more oats can help.
How to Ensure Perfect Texture
Texture is key to great bars. You want them chewy, not crumbly. The sticky mix helps hold everything together. Press the mixture firmly into your dish. Use your hands or a spatula for this. Make sure it is even across the surface. After pressing, let the bars chill for at least two hours. This step helps them firm up. If they feel too soft after chilling, they may need more time.
Presentation Tips for Serving
Presentation can make a big difference. Arrange the bars on a pretty plate. For a special touch, drizzle melted dark chocolate on top. This adds flavor and looks elegant. You can also sprinkle extra shredded coconut over the bars. This gives a nice visual contrast. Cut the bars into squares or rectangles for easy serving. Guests will love the look and taste of these bars.
Pro Tips
- Use Fresh Dates: For the best flavor and texture, opt for fresh, soft pitted dates. If your dates are hard, soak them in warm water for 10 minutes to soften before processing.
- Customize Your Nuts: Feel free to substitute almond butter with any nut or seed butter of your choice, such as peanut butter or sunflower seed butter, to suit your taste or dietary needs.
- Add Extra Texture: For additional crunch, mix in some chopped nuts or seeds into the mixture before pressing it into the pan.
- Storage Tips: Store the bars in an airtight container in the refrigerator for up to two weeks, or freeze them for longer shelf life. Just make sure to separate layers with parchment paper to prevent sticking.
Variations
Flavor Variations
You can make these bars even more fun by adding nuts or spices. Try adding chopped walnuts, almonds, or pecans for a nice crunch. If you like a bit of heat, sprinkle in some cinnamon or nutmeg. You can also mix in some sea salt for a sweet and salty twist. Each choice makes your bars unique and tasty.
Vegan and Gluten-Free Options
This recipe is already vegan and gluten-free! You can feel good knowing it fits many diets. Use gluten-free oats to keep it safe for those who can't have gluten. For a nut-free option, use seed butter, like sunflower seed butter. These swaps make it easy for everyone to enjoy.
Substitutions for Nut Butters
If you want to change the nut butter, you have lots of options. Sunflower seed butter works well and keeps it nut-free. You can also use cashew butter for a creamy taste. Each nut or seed butter adds its own flavor, so choose what you love. Just remember, the texture will stay smooth and delicious no matter what you pick.
Storage Info
How to Store Chocolate Coconut Bars
To keep your chocolate coconut bars fresh, store them in an airtight container. This will help maintain their taste and texture. Place a piece of parchment paper between layers to avoid sticking. You can keep them in the fridge for best results.
Freezing Tips for Longer Storage
If you want to store the bars longer, freezing works well. Cut the bars into squares before freezing. Wrap each square in plastic wrap or foil. Then, place them in a freezer-safe bag. This method keeps them tasty for up to three months. When you're ready to eat, just thaw them in the fridge overnight.
Shelf Life and Quality Maintenance
These chocolate coconut bars last about a week in the fridge. For maximum freshness, check for any signs of spoilage. Look for changes in color or smell. If they look or smell off, it’s best to toss them. Enjoy your tasty treat while it's at its best!
FAQs
What can I substitute for almond butter?
You can use any nut or seed butter. Peanut butter works well. Sunflower seed butter is a great option for nut-free diets. These substitutes add creaminess and flavor like almond butter.
How long do these bars last in the fridge?
These bars last up to two weeks in the fridge. Store them in an airtight container. This helps keep them fresh and tasty.
Can I add protein powder to the recipe?
Yes, you can add protein powder to boost nutrition. Start with one scoop and mix it in. It may change the texture slightly, so adjust the liquid if needed.
You now know how to make tasty chocolate coconut bars. We covered the key ingredients and optional ones for custom flavors. I shared step-by-step instructions to prepare, shape, and chill your bars. Tips helped ensure a great texture, and variations let you have fun with flavors. Finally, you learned how to store them for long life. Enjoy making these delicious treats at home!