Craving a treat that is both crunchy and sweet? Let me introduce you to my Crunchy No-Bake Hazelnut Chocolate Clusters Delight! This easy recipe combines rich dark chocolate, creamy hazelnuts, and crispy cereal for a snack you’ll adore. Plus, you don’t even need an oven! Follow this quick guide, and you'll whip up these tasty bites in no time. Let’s dive into the delightful details!
Why I Love This Recipe
- Quick and Easy: This no-bake recipe comes together in just 15 minutes, making it a perfect last-minute treat.
- Deliciously Crunchy: The combination of hazelnuts and crispy rice cereal provides a satisfying crunch in every bite.
- Healthier Sweet Treat: Made with dark chocolate and natural sweeteners like maple syrup, these clusters are a guilt-free indulgence.
- Versatile Flavor: You can easily customize these clusters by adding your favorite nuts or dried fruits for a unique twist.
Ingredients
List of Ingredients
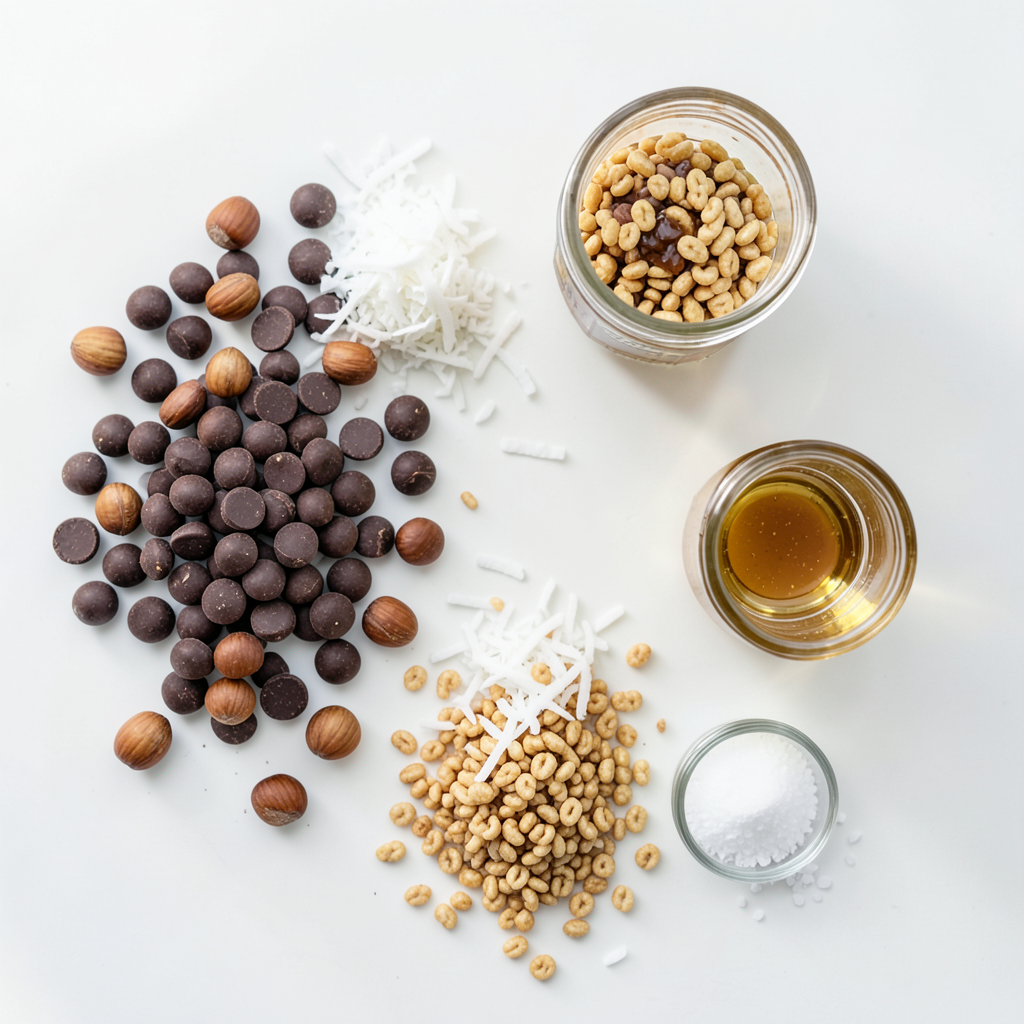
- 1 cup dark chocolate chips
- 1/2 cup chopped hazelnuts
- 1/2 cup crispy rice cereal
- 1/4 cup shredded coconut (unsweetened)
- 2 tablespoons maple syrup
- 1/2 teaspoon vanilla extract
- A pinch of sea salt
To make Crunchy No-Bake Hazelnut Chocolate Clusters, gather these tasty ingredients. Start with dark chocolate chips for richness. Chopped hazelnuts add a nutty crunch. The crispy rice cereal gives a fun texture. Unsweetened shredded coconut brings a touch of sweetness. Maple syrup acts as a natural sweetener. Vanilla extract adds flavor depth. Finally, sea salt balances the sweetness.
Each ingredient plays a key role in flavor and texture. The dark chocolate melts into a luscious coating. Hazelnuts offer a satisfying bite. The crispy rice cereal gives a light crunch. Coconut adds a chewy element. Together, they create a delightful mix.
Keep these ingredients ready. You’ll need them when you start making your clusters. Enjoy the process of combining them, and get ready for a treat!
Step-by-Step Instructions
Preparing the Baking Sheet
Begin by lining a baking sheet with parchment paper. This step keeps your clusters from sticking. If you skip this, the clusters may break apart when you try to lift them. Parchment paper helps maintain their shape.
Melting the Chocolate
Next, melt the dark chocolate chips in a microwave-safe bowl. Use 30-second intervals to heat the chocolate. Stir in between these intervals to ensure it melts evenly. This method helps avoid any burnt chocolate. You want it smooth and glossy for the perfect coating.
Combining Ingredients
Once melted, stir in the maple syrup and vanilla extract. Mix until well combined. You want to add flavor and sweetness without overpowering the chocolate. Then, add the chopped hazelnuts, crispy rice cereal, and shredded coconut. Gently fold everything together. Ensure the dry ingredients are fully coated with chocolate.
Forming the Clusters
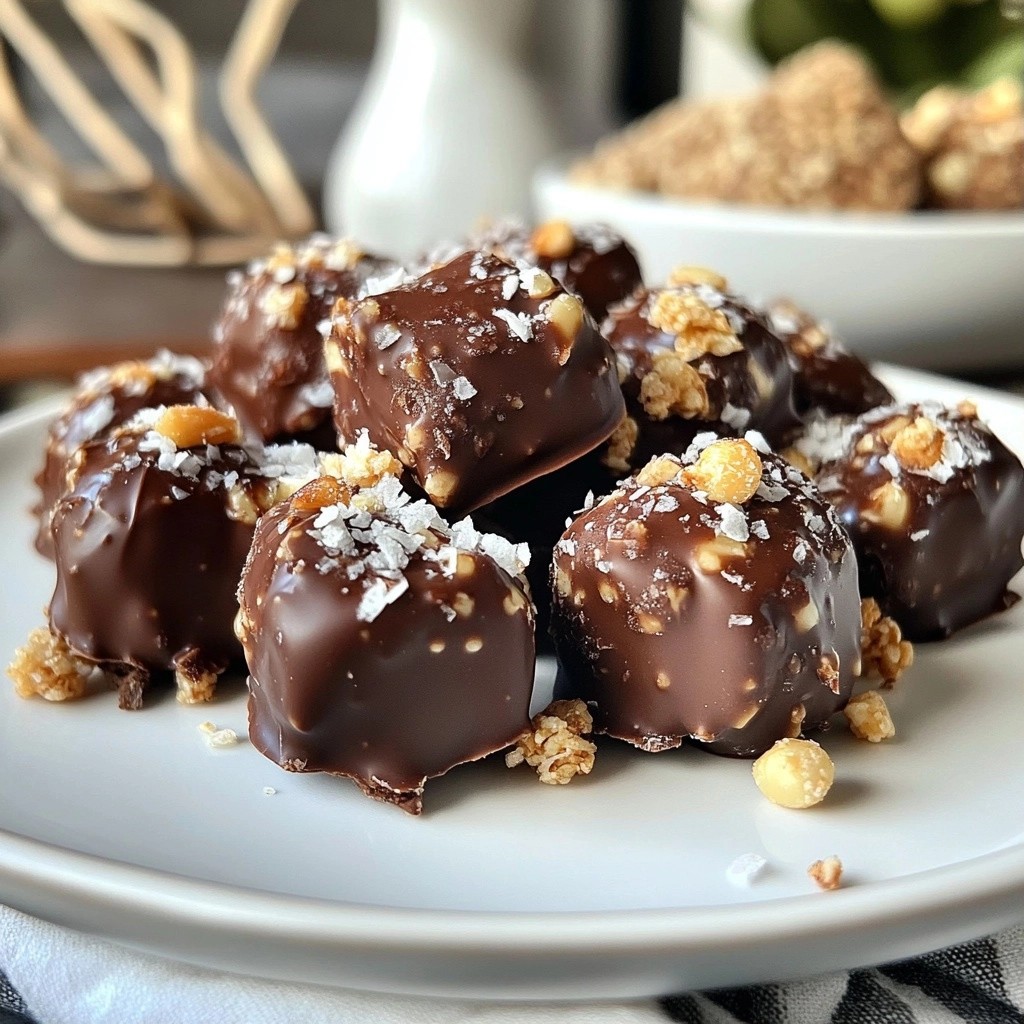
Now it’s time to form the clusters. Use a spoon or a small cookie scoop to drop the mixture onto your baking sheet. Aim for clusters about 1-2 inches wide. This size gives you a perfect bite. You can use a spoon for a more casual look, or a scoop for a uniform shape.
Setting the Clusters
Finally, place the baking sheet in the refrigerator. Let the clusters chill for about 30 minutes. This time helps them firm up nicely. To check for firmness, gently press a cluster. If it holds its shape, they are ready. Once set, lift them off the parchment paper and enjoy!
Tips & Tricks
Best Practices for Melting Chocolate
To melt chocolate, avoid overheating. Heat it slowly. If you use a microwave, set it at low power. Melt in 30-second intervals. After each interval, stir well. This way, the chocolate stays smooth and creamy.
If you don’t have a microwave, use a double boiler. Fill a pot with water and bring it to a gentle simmer. Place a heat-safe bowl on top. Stir the chocolate until it melts evenly.
Flavor Enhancements
Want to enhance the flavor? Try adding spices or extracts. A pinch of cinnamon gives warmth. A drop of almond extract adds a nutty twist.
For toppings, consider adding sea salt flakes. They balance the sweetness. You can also sprinkle cocoa powder or shredded coconut on top. These toppings add a fun texture and look.
Presentation Ideas
When serving, think about the display. Arrange clusters on a decorative platter. Use a colorful plate to make them pop.
For an elegant touch, sprinkle whole hazelnuts or coconut flakes around the clusters. This makes your dessert look fancy and inviting. You could even use edible flowers for a spring vibe.
Pro Tips
- Use Quality Chocolate: Opt for high-quality dark chocolate chips for the best flavor and texture in your clusters.
- Customize Your Nuts: Feel free to substitute hazelnuts with your favorite nuts like almonds or pecans for a different taste.
- Make Them Vegan: Ensure the chocolate chips are dairy-free and substitute maple syrup with agave nectar if desired.
- Storage Tips: Store the clusters in an airtight container in the refrigerator to maintain their crunchiness.
Variations
Ingredient Substitutions
You can swap out hazelnuts for different nuts or seeds. Almonds or walnuts work great. If you prefer seeds, try sunflower or pumpkin seeds. These options add unique flavors and textures.
For a sweetener, if you want to change the maple syrup, use honey or agave nectar. Both provide sweetness and a hint of flavor. You can even use coconut nectar for a different twist.
Flavor Combinations
Adding spices can give your clusters a fun kick. Try cinnamon for warmth or a dash of chili for heat. Both choices add depth to the chocolate flavor.
Dried fruits can also enhance your clusters. Chopped dried cherries or cranberries add sweetness and chewiness. This makes each bite even more delightful.
Dietary Adjustments
To make these clusters gluten-free, use certified gluten-free crispy rice cereal. This small change ensures everyone can enjoy them.
If you want vegan options, switch the dark chocolate chips for dairy-free versions. Many brands offer tasty vegan chocolate. Use maple syrup as your sweetener to keep it plant-based.
Storage Information
Best Storage Practices
Store your Crunchy No-Bake Hazelnut Chocolate Clusters in airtight containers. This keeps them fresh. If you live in a warm area, refrigeration is best. However, you can keep them at room temperature for a short time. Just make sure it's cool and dry.
Shelf Life
These clusters stay fresh for about one week at room temperature. If you refrigerate them, they can last up to two weeks. Look for signs of spoilage like a white film or strange smell. If you see these, it's best to throw them out.
Freezing for Longer Storage
To freeze your clusters, place them in a single layer on a baking sheet. Once frozen, transfer them to a freezer-safe bag or container. This way, they stay safe for up to three months. When you're ready to enjoy them, take out what you need. Let them thaw in the fridge for a few hours or at room temperature for about 30 minutes. Enjoy your tasty treat!
FAQs
How to make Crunchy No-Bake Hazelnut Chocolate Clusters?
To make these clusters, start by lining a baking sheet with parchment paper. This helps prevent sticking. Next, melt 1 cup of dark chocolate chips in a microwave-safe bowl. Heat them in 30-second bursts, stirring after each. Once smooth, mix in 2 tablespoons of maple syrup and 1/2 teaspoon of vanilla extract.
Now, add 1/2 cup of chopped hazelnuts, 1/2 cup of crispy rice cereal, and 1/4 cup of shredded coconut. Stir gently to coat all the dry ingredients. Use a spoon or cookie scoop to drop the mixture onto your baking sheet. Each cluster should be about 1-2 inches wide. Refrigerate for 30 minutes until firm. Enjoy your delicious creation!
Can I use milk chocolate instead of dark chocolate?
Yes, you can use milk chocolate, but the taste will change. Milk chocolate is sweeter and creamier. This will make the clusters softer and less intense in flavor. If you want a richer taste, dark chocolate is better. It balances the sweetness of the maple syrup and adds depth. Try both to see which you prefer!
How long do these clusters last?
These clusters can last up to a week if stored correctly. Keep them in an airtight container at room temperature. This keeps them crunchy and fresh. If you want them to last longer, store them in the fridge. They may last up to two weeks but could lose some crunch. Check for any signs of spoilage, like a change in smell or texture.
Can I make these clusters nut-free?
Absolutely! You can swap out the hazelnuts for seeds like sunflower or pumpkin seeds. These will give a nice crunch too. You can also use extra crispy rice cereal for added texture. If you want to keep the flavor, try adding a bit of extra vanilla or a dash of cinnamon. Enjoy your nut-free treat!
You now know how to make crunchy no-bake hazelnut chocolate clusters. We covered the key ingredients, easy steps for preparation, and useful tips. With a few simple swaps, you can create your own variations or make these treats fit any diet.
Enjoying these clusters is about sharing joy and taste. Don't hesitate to experiment and make them your own. Happy snacking!