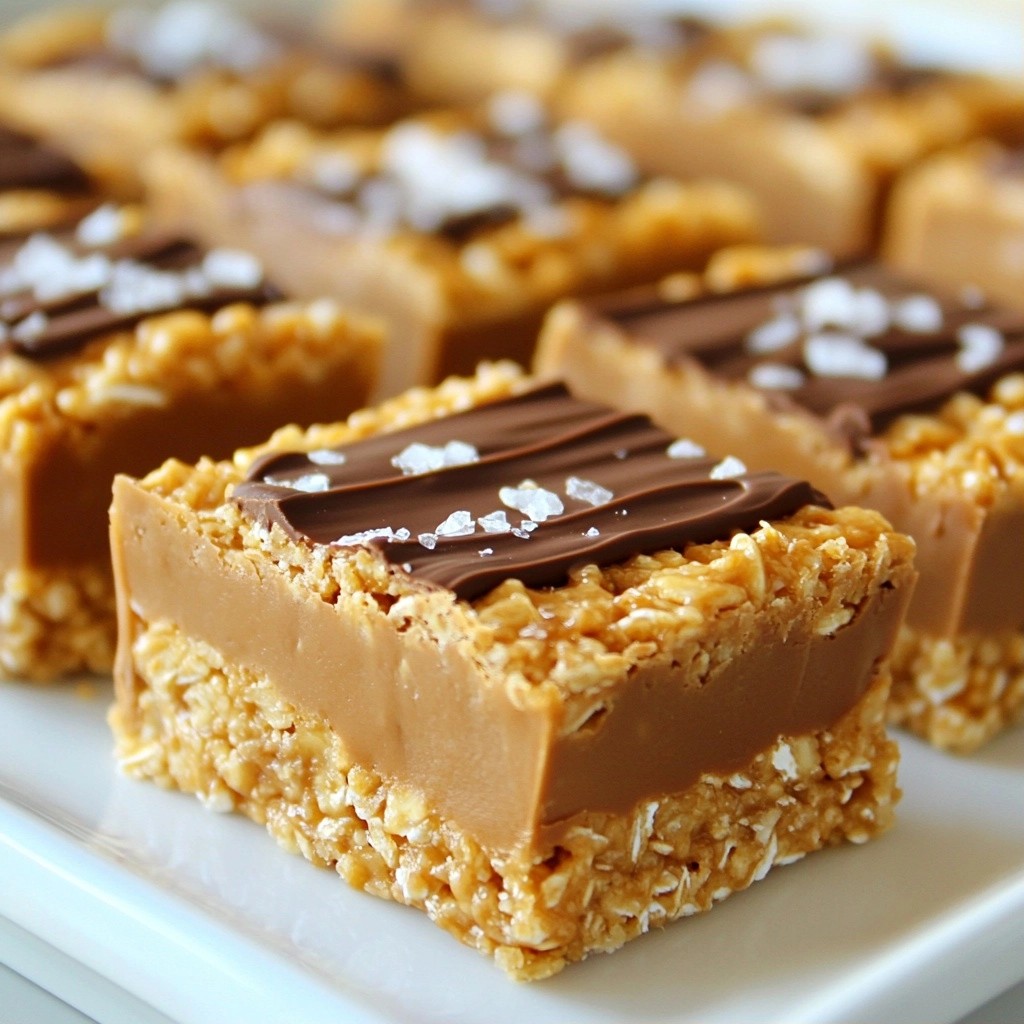
Looking for a tasty treat that's quick and easy? These Crispy No-Bake Peanut Butter Cereal Bars will delight your taste buds without heating up the kitchen. Packed with crispy rice cereal, oats, and creamy peanut butter, this recipe is simple enough for anyone to make. Plus, it's customizable! Whether you want to add chocolate chips or stick with classic flavors, these bars are perfect for snacks or dessert. Let’s dive into making these delicious bars!
Why I Love This Recipe
- Quick and Easy: This recipe takes only 10 minutes to prepare, making it a perfect last-minute snack or treat.
- No-Bake Delight: No baking is required, which means less time in the kitchen and no oven to heat up!
- Customizable Ingredients: You can easily swap out ingredients like honey for maple syrup or add your favorite mix-ins like nuts or dried fruit.
- Healthy Snack Option: With wholesome ingredients like oats and peanut butter, these bars provide a satisfying and nutritious snack.
Ingredients
Dry Ingredients
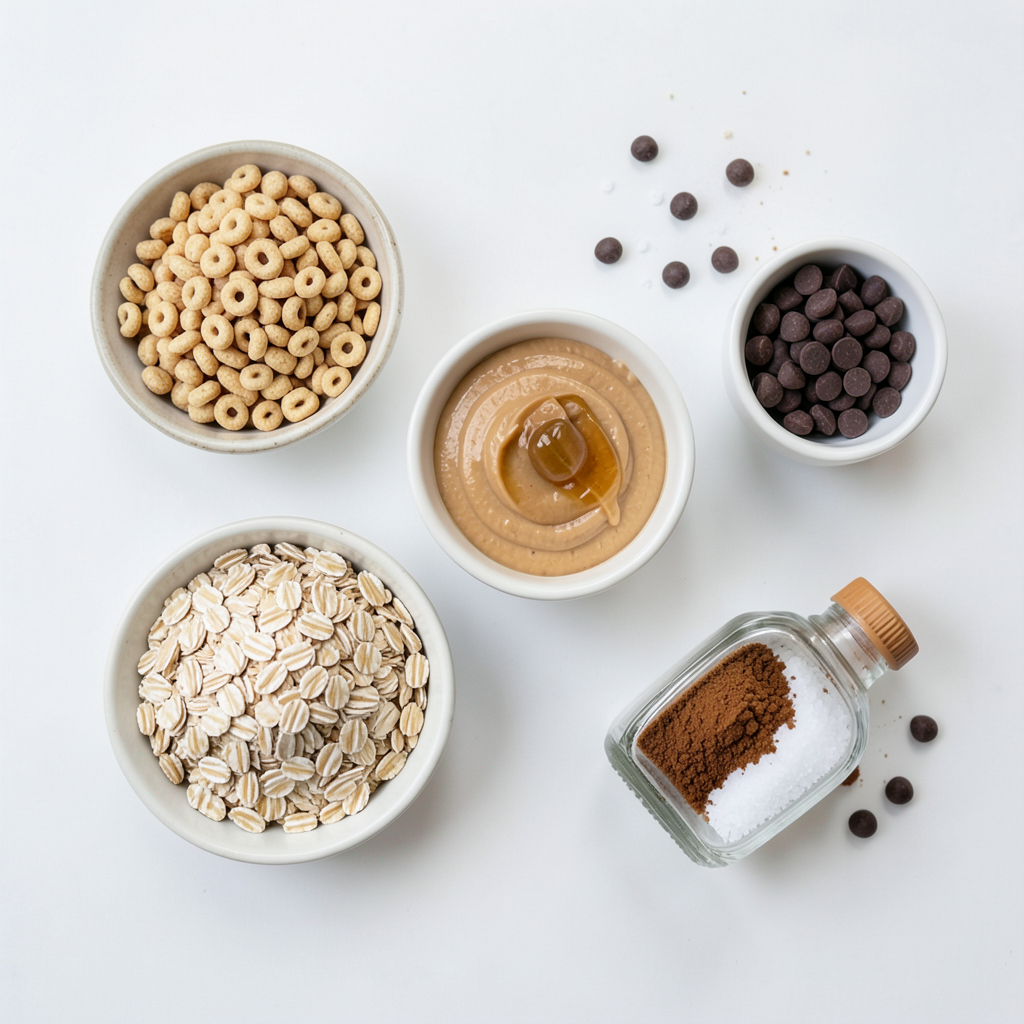
- 2 cups crispy rice cereal
- 1 cup rolled oats
Liquid Ingredients
- 1/2 cup creamy peanut butter
- 1/4 cup honey or maple syrup
- 1/4 cup brown sugar
- 1/2 teaspoon vanilla extract
- 1/4 teaspoon sea salt
Optional Add-ins
- 1/2 cup chocolate chips (optional)
Gather these ingredients before you start. The crispy rice cereal gives these bars their crunch. The rolled oats add fiber, making them more filling.
For the liquid part, creamy peanut butter is a must. It binds the bars and adds rich flavor. Honey or maple syrup provides sweetness and helps everything stick together. Brown sugar adds a deeper flavor. Don't forget the vanilla extract for warmth and the sea salt to enhance the taste.
If you love chocolate, consider adding chocolate chips. They bring a nice touch of sweetness and make the bars even more fun to eat. You can mix and match based on your taste.
This recipe is simple and uses common ingredients. You can find everything at your local store. Let’s get ready to make some delicious crispy no-bake peanut butter cereal bars!
Step-by-Step Instructions
Preparing the Dry Mixture
First, grab a large mixing bowl. Add 2 cups of crispy rice cereal and 1 cup of rolled oats. Stir them together well. This mix gives the bars their crunch. Set this bowl aside for now.
Making the Peanut Butter Mixture
Next, take a small saucepan. On medium heat, combine 1/2 cup of creamy peanut butter, 1/4 cup of honey or maple syrup, 1/4 cup of brown sugar, 1/2 teaspoon of vanilla extract, and 1/4 teaspoon of sea salt. Stir it gently. Keep stirring until the mix is smooth and starts to bubble, which takes about 2-3 minutes.
Combining Ingredients
Now, pour the warm peanut butter mixture over your cereal and oats. Use a spatula to mix everything together. Make sure the dry ingredients are evenly coated. If you want to add chocolate chips, fold in 1/2 cup at this stage.
Pressing and Setting the Mixture
Line an 8x8 inch square baking pan with parchment paper. This helps with easy removal later. Pour your mixture into the pan. Press it down firmly with the back of the spatula to create an even layer. Refrigerate the mixture for at least 1 hour, or until it is firm. After it sets, lift the bars out using the parchment paper. Cut them into squares or rectangles.
Tips & Tricks
Ensuring the Right Texture
To get the best texture, you must press the mixture firmly into the pan. When you do this, it helps the bars hold their shape. If you don’t press hard enough, the bars may crumble when you cut them. Use the back of a spatula to push down. Make sure the mixture is even. This will give you perfect, crispy bars.
Best Practices for Ingredients
Choosing the right peanut butter is key. I recommend creamy peanut butter for a smooth mix. It helps blend well with the other ingredients. Natural peanut butter can work too, but it may make the bars a bit crumbly. Check the label for added sugars. You want to stick to simple ingredients for the best flavor.
Customizing Flavor and Texture
You can add fun flavors and textures to your bars! Try adding dried fruits like raisins or cranberries for a chewy bite. Nuts add crunch and healthy fats. If you love chocolate, sprinkle some chocolate chips on top or mix them in. You could also try a dash of cinnamon or a splash of almond extract for extra flavor. Mix and match until you find your favorite combination!
Pro Tips
- Use a Non-Stick Spray: Lightly coat your spatula with non-stick spray to make pressing the mixture into the pan easier and prevent sticking.
- Chill for Better Cutting: Allow the bars to chill for longer than 1 hour if you prefer a firmer texture, making them easier to cut into clean squares.
- Mix-in Variations: Experiment with different mix-ins like dried fruits, nuts, or seeds to customize your bars and add extra flavor and nutrition.
- Store Properly: Keep the bars in an airtight container in the refrigerator for up to a week for maximum freshness and flavor.
Variations
Nut-Free Version
If you need a nut-free option, swap out the peanut butter. Use sun butter or almond butter instead. Both work well and still give you that creamy texture. Sun butter has a slight sweetness, while almond butter adds a lovely nutty flavor. This change makes the bars safe for schools and kids with allergies.
Gluten-Free Adaptation
For a gluten-free treat, choose gluten-free cereal. Many brands offer crispy rice options that fit this need. Just check the label to ensure no gluten sneaks in. This keeps your bars safe for those with gluten sensitivities. You can enjoy these bars without worry.
Flavor Variations
Want to mix things up? Try adding spices or extracts. A dash of cinnamon gives warmth and depth. Almond extract adds a nice twist, too. You can even experiment with a pinch of cocoa powder for a chocolatey flavor. These small changes can turn a simple bar into something special.
Storage Info
Best Storage Practices
To keep your crispy no-bake peanut butter cereal bars fresh, store them in an airtight container. Layer parchment paper between the bars to prevent sticking. You can keep them at room temperature for up to three days, but I prefer to store them in the fridge. The cool air helps maintain their crisp texture.
Shelf Life
These bars last about one week in the pantry. If you store them in the fridge, they can stay fresh for up to two weeks. The fridge slows down spoilage and keeps the bars firm. Always check for any signs of spoilage before eating.
Freezing Instructions
To freeze your bars, first cut them into squares. Wrap each piece in plastic wrap, then place them in a freezer-safe bag. They can last up to three months in the freezer. When you want to enjoy a bar, take it out and let it thaw at room temperature for about 30 minutes. This method keeps the bars tasty and crunchy!
FAQs
How do I make these bars healthier?
To make these bars healthier, you can cut down on sugar. Use less brown sugar or honey. You can also add more fiber by mixing in seeds like chia or flaxseed. These seeds boost nutrition without changing the taste much. If you want, swap the chocolate chips for dried fruits. This adds natural sweetness and fiber too.
Can I use a different type of cereal?
Yes, you can use other cereals. Cheerios or corn flakes work well. They give a nice crunch and blend well with peanut butter. If you want a gluten-free option, look for rice or corn-based cereals. Just check the label to ensure they are gluten-free. This way, you can enjoy the bars without worry.
What can I do if the mixture is too sticky?
If the mixture is too sticky, you can fix it easily. Try adding more crispy rice cereal. Start with a small amount, mix it in, and check the texture. If it remains sticky, you might heat the peanut butter mixture a bit longer. This helps it blend better. Just be careful not to burn it!
Are these bars suitable for kids?
These bars are great for kids! They contain healthy oats and peanut butter. However, watch for allergies. If a child has a nut allergy, use sun butter instead. These bars are also good for picky eaters. They are sweet and fun to eat. Plus, kids can help make them. It’s a fun kitchen project!
We explored how to make tasty and simple snack bars. You learned about all the ingredients, from crispy rice cereal to creamy peanut butter. I shared step-by-step instructions and tips for the right texture. You can even customize with flavors or make nut-free versions. Proper storage keeps your bars fresh for longer. This easy recipe offers fun options for snacks that kids will enjoy. With these tips, you’ll create delicious bars everyone loves. Enjoy your cooking!