Craving a sweet treat that's easy to make? You'll love these Creamy No-Bake Chocolate Peanut Butter Cups! With just a handful of simple ingredients, you can whip up a delicious dessert that will impress your friends and family. Perfect for any occasion, these cups are creamy, rich, and downright delightful. Let me guide you step-by-step to create this tasty treat that satisfies your chocolate and peanut butter fix!
Why I Love This Recipe
- Easy to Make: This recipe requires no baking, making it perfect for a quick treat.
- Rich Flavor: The combination of dark chocolate and creamy peanut butter is irresistible.
- Customizable: You can easily adjust the sweetness or add toppings to suit your taste.
- Perfect for Sharing: With 12 cups, there's plenty to share with friends and family!
Ingredients
Main Ingredients
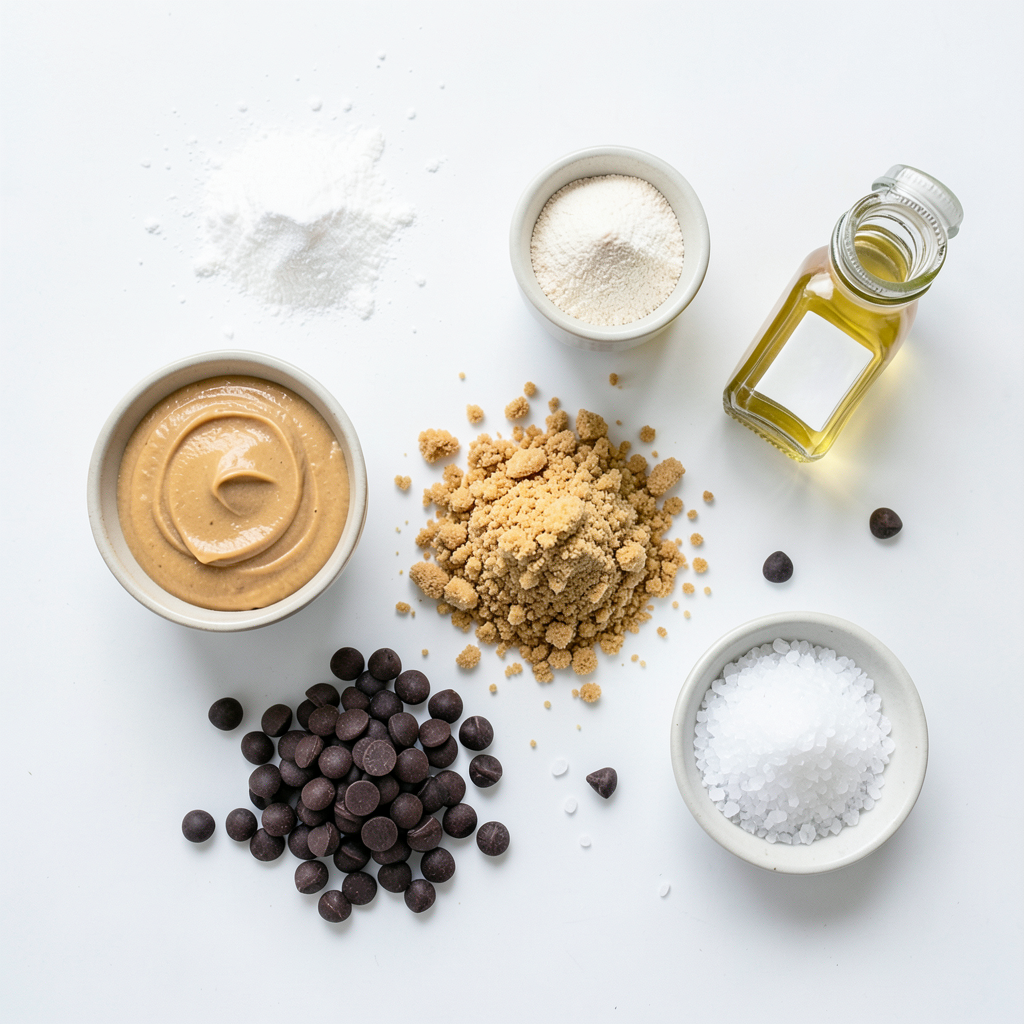
- 1 cup creamy peanut butter
- 1 cup powdered sugar
- 1 ½ cups graham cracker crumbs
- 1 cup dark chocolate chips
- 2 tablespoons coconut oil
- Sea salt (for sprinkling)
To make these creamy no-bake chocolate peanut butter cups, you need simple ingredients. Creamy peanut butter is the star here. It adds richness and smoothness. Powdered sugar gives sweetness and helps the mixture hold together. Graham cracker crumbs add texture and a nice crunch.
Next, dark chocolate chips bring a rich flavor. You need good chocolate for the best taste. Coconut oil helps the chocolate melt smoothly. Finally, a sprinkle of sea salt ties all the flavors together.
Equipment Needed
- Muffin tin
- Cupcake liners
- Microwave-safe bowl
- Mixing bowl
You will also need some kitchen tools. A muffin tin helps shape the cups. Cupcake liners keep them neat and easy to remove. A mixing bowl is perfect for combining the peanut butter and sugar. A microwave-safe bowl is where you will melt the chocolate. With these tools, you can create a messy yet delightful treat!
Step-by-Step Instructions
Preparing the Peanut Butter Base
First, mix 1 cup of creamy peanut butter with 1 cup of powdered sugar. Use a medium mixing bowl. Stir until it feels smooth and creamy. This step makes the base rich and sweet. Next, add 1 ½ cups of graham cracker crumbs. Mix well until it becomes a thick dough. This dough holds the shape and adds crunch.
Assembling the Peanut Butter Cups
Now, line a muffin tin with cupcake liners. Take about 1 tablespoon of the peanut butter mixture and place it in each liner. Use the back of a spoon to press it down firmly. Make sure it flattens well. Continue this until you fill all the liners. This creates a nice base for the chocolate.
Melting the Chocolate
In a microwave-safe bowl, combine 1 cup of dark chocolate chips with 2 tablespoons of coconut oil. Microwave the mixture in 30-second bursts. Stir in between each burst to avoid burning. Keep going until the chocolate is smooth and shiny. This step is key for a smooth topping.
Final Assembly and Chilling
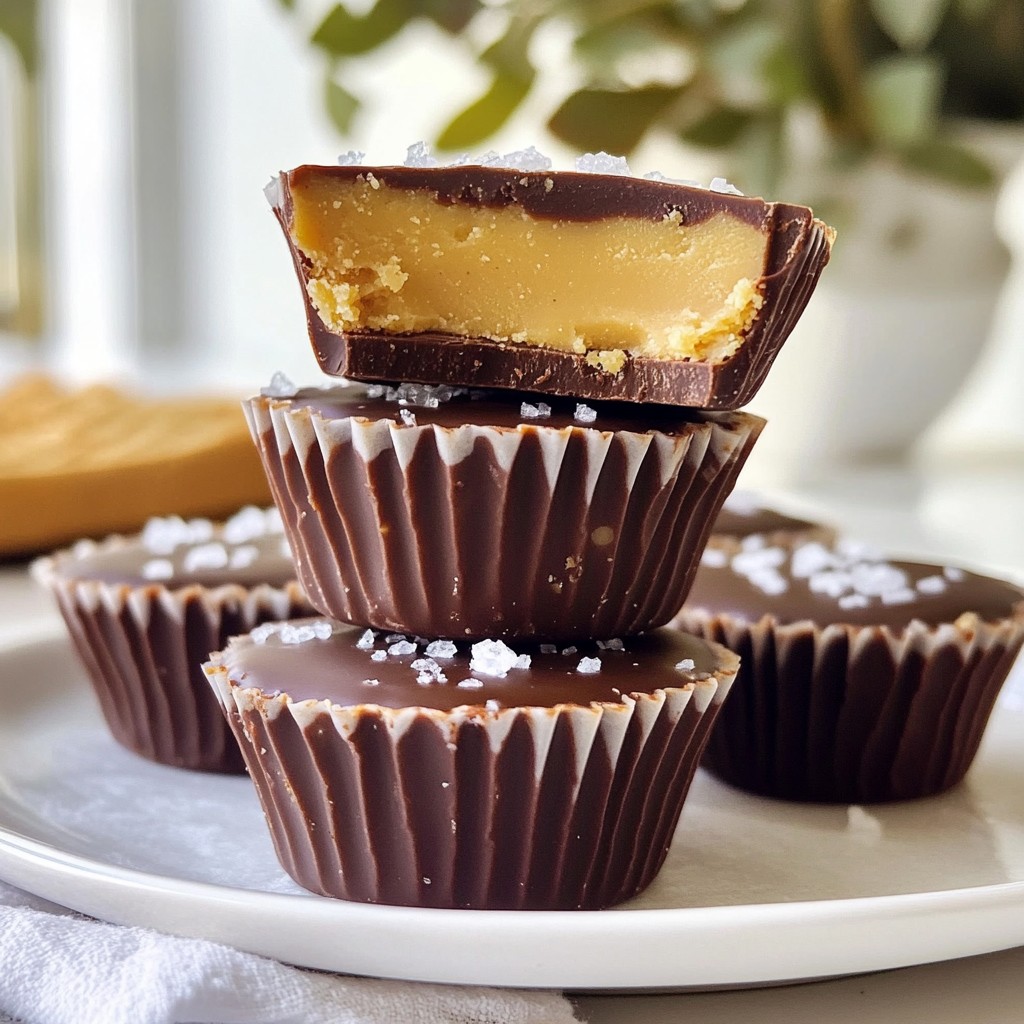
Spoon the melted chocolate over each peanut butter layer. Make sure to cover it completely. Then, gently tap the muffin tin on the counter. This helps to remove any air bubbles. Finally, sprinkle a pinch of sea salt over the top. This adds a nice contrast to the sweet chocolate. Place the muffin tin in the fridge for at least 2 hours. Let the cups chill until they are set. Once ready, simply peel off the liners and enjoy these tasty treats!
Tips & Tricks
Perfecting the Texture
To ensure the right consistency, mix your peanut butter and powdered sugar well. You want a smooth mixture that holds shape. If it feels too dry, add a little more peanut butter. For a grainy mixture, add more powdered sugar slowly. Mix until smooth again.
Creative Serving Ideas
Pair these chocolate peanut butter cups with ice cream or fresh fruit. They also work well with whipped cream on top. For gatherings, arrange them on a pretty plate. You can sprinkle some extra sea salt for a fancy touch. This adds a nice contrast and looks great.
Making Ahead
You can prepare these cups in advance. Make them the day before your event. Just store them in the fridge until you're ready to serve. If you need more time, you can freeze them. Just let them thaw in the fridge before serving.
Pro Tips
- Use high-quality chocolate: The flavor of your chocolate will greatly affect the overall taste of your peanut butter cups. Opt for good quality dark chocolate for the best results.
- Chill your mixture: If your peanut butter mixture feels too soft to handle, refrigerate it for about 10-15 minutes before pressing it into the muffin liners. This will make it easier to shape.
- Experiment with toppings: Besides sea salt, consider adding crushed nuts, or a drizzle of caramel on top for a gourmet touch that enhances the flavor profile.
- Storage tips: Store your finished chocolate peanut butter cups in an airtight container in the refrigerator. They will stay fresh for up to a week (if they last that long!).
Variations
Alternate Ingredients
You can switch out the nut butter for other options. Almond butter or cashew butter works great. They give a different taste but keep it creamy. For sweeteners, try maple syrup or honey. Both add a nice flavor. They also change the sweetness level.
Flavor Variations
Want to boost the flavor? Add a splash of vanilla or a spoon of cocoa powder. These small changes make a big difference. You can also try different types of chocolate. Milk chocolate gives a sweeter taste. Dark chocolate is richer and less sweet. Experiment and find your favorite!
Dietary Modifications
To make these cups gluten-free, swap graham cracker crumbs for gluten-free options. You can use almond flour or gluten-free cookies. If you want a vegan version, look for vegan chocolate chips. Also, use maple syrup instead of powdered sugar. These changes keep the taste while meeting dietary needs.
Storage Info
Storing the Peanut Butter Cups
To keep your creamy no-bake chocolate peanut butter cups fresh, store them in an airtight container. This method helps prevent the cups from drying out or absorbing other flavors. I recommend placing parchment paper between layers if you stack them. This step keeps them from sticking together. The ideal temperature for storage is in the fridge. Keeping them cold helps maintain their shape and flavor.
Shelf Life
In the fridge, these tasty cups last about one week. They will be at their best during this time. If you want to enjoy them longer, consider freezing them. They freeze well for up to three months. To freeze, wrap each cup in plastic wrap and then place them in a freezer-safe bag. This way, they stay fresh and ready for a quick treat. When you want one, just let it thaw in the fridge for a few hours before enjoying.
FAQs
Can I use crunchy peanut butter instead of creamy?
Yes, you can use crunchy peanut butter. It adds extra texture and flavor. The taste will change a bit, but it will still be delicious. Just mix it the same way you would with creamy peanut butter.
How do I get the chocolate to harden properly?
To make sure the chocolate hardens, melt it slowly. Use a microwave and check every 30 seconds. Stir it well to avoid burning. After pouring on the cups, chill them in the fridge. This helps the chocolate firm up nicely.
What can I use instead of graham cracker crumbs?
You can use crushed cookies or oats instead of graham cracker crumbs. Try vanilla wafers or digestive biscuits for a fun twist. If you prefer a gluten-free option, use gluten-free cookies.
Is it possible to make these without coconut oil?
Yes, you can skip the coconut oil. Instead, use butter or another neutral oil. This change will still let the chocolate blend well. Just keep in mind that the texture may vary slightly.
How do I prevent the cups from sticking to the liners?
To stop sticking, use good-quality cupcake liners. You can also spray them lightly with cooking spray. After chilling, gently peel away the liners for easy removal. This way, you keep your cups intact and lovely!
You learned how to make delicious peanut butter cups using simple ingredients. You need creamy peanut butter, powdered sugar, graham cracker crumbs, dark chocolate chips, coconut oil, and sea salt. With a muffin tin and a microwave-safe bowl, you can easily follow the steps.
Remember to experiment with flavors and variations. You can store these treats in the fridge or freezer for later. Now, you are ready to enjoy these tasty snacks.