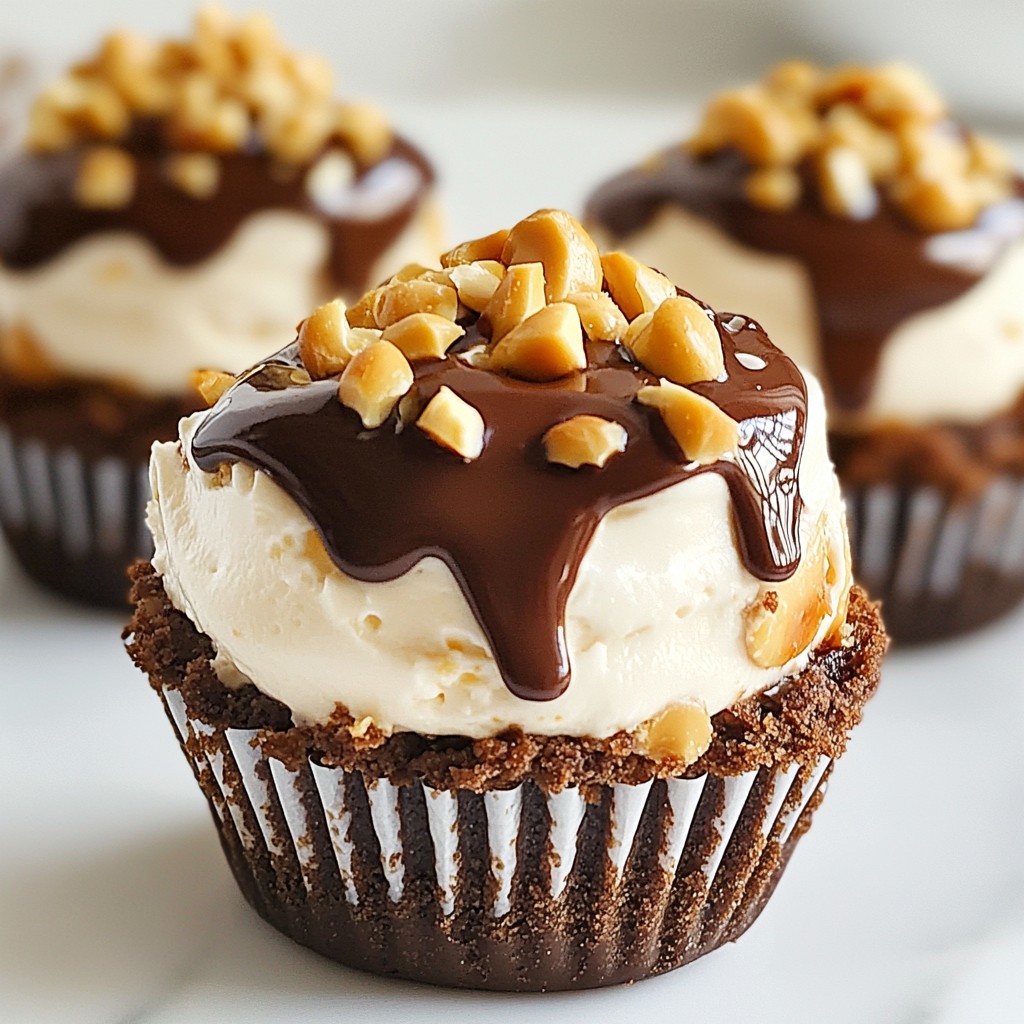
If you love chocolate and peanut butter, you’re in for a treat! These Chocolate Peanut Butter Cheesecake Cups are rich, creamy, and oh-so-delicious. In this post, I’ll guide you through easy steps and helpful tips to create these delightful desserts. Whether you're a seasoned pro or a kitchen newbie, you’ll impress everyone with this sweet treat. Let’s dive in and start making these irresistible cheesecake cups!
Why I Love This Recipe
- Decadent Flavor: The rich combination of chocolate and peanut butter creates an irresistible flavor profile that satisfies any sweet tooth.
- Individual Servings: These cheesecake cups are perfectly portioned, making them great for sharing or enjoying a personal treat.
- No-Bake Delight: This recipe requires minimal baking time, allowing you to create a delicious dessert without heating up the kitchen.
- Customizable Toppings: Feel free to get creative with garnishes like chopped peanuts or extra chocolate drizzle to make each cup your own.
Ingredients
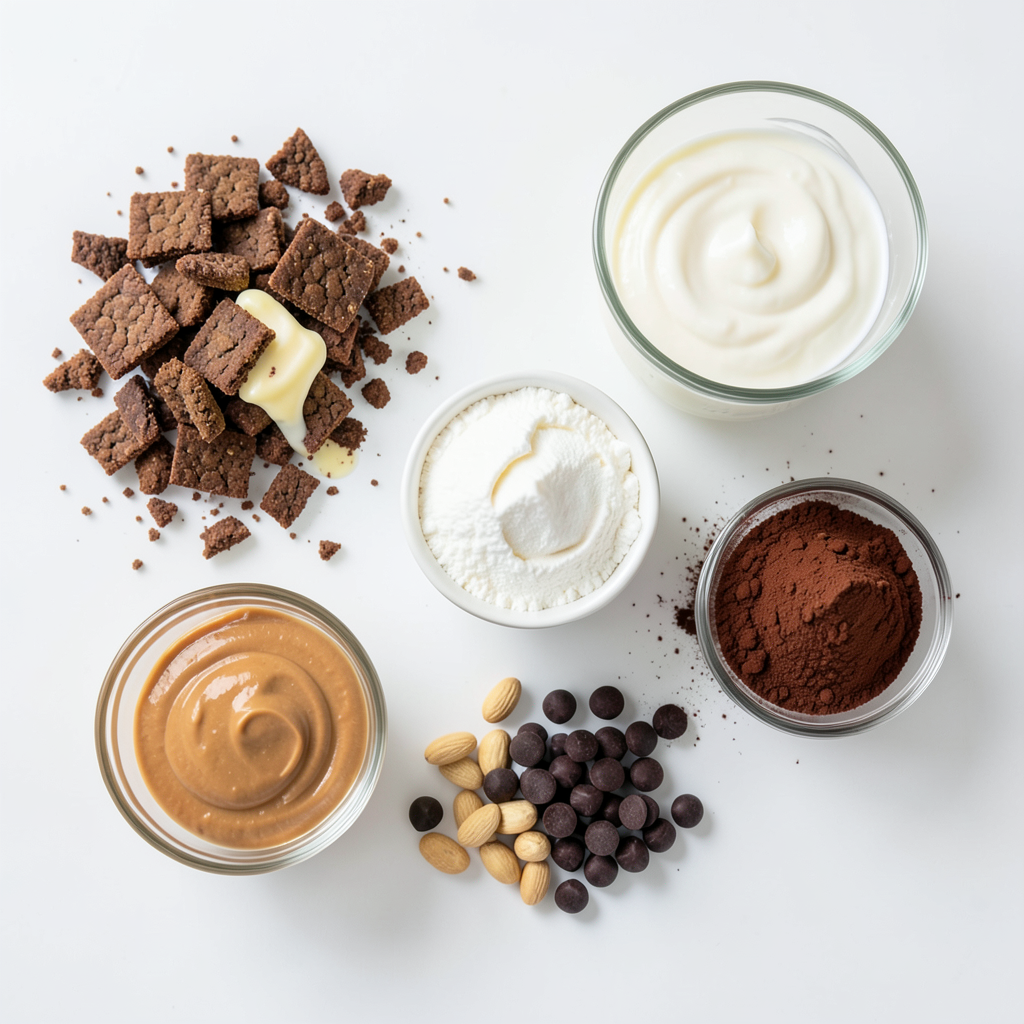
List of Ingredients with Measurements
To make the chocolate peanut butter cheesecake cups, you'll need:
- 1 cup crushed chocolate graham crackers
- 4 tablespoons unsalted butter, melted
- 8 oz cream cheese, softened
- 1/2 cup creamy peanut butter
- 1/3 cup powdered sugar
- 1 teaspoon vanilla extract
- 1 cup heavy whipping cream
- 1/4 cup cocoa powder
- 1/2 cup chocolate chips (optional, for garnish)
- Chopped peanuts (optional, for garnish)
Essential Tools Needed
You will want a few tools to make this recipe easy:
- Mixing bowls
- Muffin tin
- Cupcake liners
- Whisk or electric mixer
- Spatula
- Microwave-safe bowl (if using chocolate chips for ganache)
Ingredient Substitutions
You can swap some ingredients based on your taste:
- Use gluten-free graham crackers for a gluten-free option.
- Swap creamy peanut butter with almond or cashew butter for a nut twist.
- Replace heavy cream with coconut cream for a dairy-free version.
- Choose a sugar substitute if you prefer a low-sugar option.
- Use dark chocolate chips instead of milk chocolate for a richer flavor.
These options keep the fun while changing the taste. Explore what works for you!
Step-by-Step Instructions
Preparing the Crust
To start, grab a mixing bowl. You will need 1 cup of crushed chocolate graham crackers and 4 tablespoons of melted unsalted butter. Mix these together until it looks like wet sand. This mixture will form a tasty crust.
Making the Cheesecake Filling
Next, take another bowl. Add 8 oz of softened cream cheese and 1/2 cup of creamy peanut butter. Beat this mixture until it is smooth and creamy. Then, slowly mix in 1/3 cup of powdered sugar and 1 teaspoon of vanilla extract. Keep mixing until everything is well combined.
Whipping the Cream and Combining Ingredients
In a separate bowl, pour in 1 cup of heavy whipping cream. Whip it until you see stiff peaks. This makes your cheesecake light and fluffy. Now, gently fold the whipped cream into the cream cheese mixture. Mix until it is fully combined, but be careful not to deflate the whipped cream.
Assembling the Cheesecake Cups
Now, take your muffin tin lined with cupcake liners. Spoon the cheesecake filling over the chilled crusts. Fill each liner about 3/4 full. Use a spatula to smooth the tops. If you want to add a chocolate ganache, melt 1/2 cup of chocolate chips in the microwave. Drizzle it over each filled cup for extra flavor.
Chilling and Serving Instructions
Finally, place your muffin tin in the fridge. Chill the cheesecake cups for at least 4 hours until they set. When ready to serve, gently remove them from the muffin tin. You can garnish with chopped peanuts and a bit more chocolate drizzle if you like. Enjoy your delightful treat!
Tips & Tricks
How to Achieve a Perfect Crust
To get a great crust, mix crushed chocolate graham crackers and melted butter. This mix should feel like wet sand. Press about one tablespoon into the bottom of each cupcake liner. Make sure it is even. Chilling the crust helps it hold its shape. So, put it in the fridge while you prepare the filling.
Making the Cheesecake Light and Fluffy
For a light and fluffy cheesecake, use cold heavy cream. Whip it until stiff peaks form. This step is key. Gently fold the whipped cream into the cream cheese mixture. Use a spatula to avoid deflating the cream. This helps keep your cheesecake airy and smooth.
Presentation Tips for Serving
For a simple yet elegant look, use cupcake liners. They make serving easy. Before serving, drizzle melted chocolate on top for a rich touch. You can also add chopped peanuts for crunch. These little details make your cheesecake cups shine.
Pro Tips
- Chill the Mixing Bowls: For an extra fluffy cheesecake filling, chill your mixing bowls and beaters in the freezer for about 10 minutes before whipping the cream.
- Use Room Temperature Ingredients: Ensure that your cream cheese and peanut butter are at room temperature for easier mixing and a smoother texture.
- Garnish Wisely: Add chopped peanuts or a sprinkle of sea salt on top for a delightful contrast to the sweetness of the cheesecake.
- Experiment with Flavors: Try adding a splash of coffee or a hint of cinnamon to the filling for a unique twist on the classic chocolate-peanut butter combination.
Variations
Nut-Free Option
You can easily make these cups nut-free. Swap out peanut butter for sunbutter. Sunbutter is made from sunflower seeds and tastes great. Just use the same amount as the peanut butter. This way, you keep the creamy texture without nuts.
Different Flavors (e.g., Cookies and Cream)
Want to try a new flavor? You can make cookies and cream cheesecake cups. Just mix crushed Oreo cookies into your crust. You can also add crushed cookies into the filling. This gives a nice crunch. Another option is to use flavored cream cheese. Try strawberry or caramel for a fun twist.
Toppings and Garnishes for Customization
Toppings make your cheesecake cups even better. You can use whipped cream or chocolate ganache. To make chocolate ganache, melt chocolate chips in the microwave. Drizzle it over the cups for a rich taste. You can also sprinkle crushed cookies or chopped peanuts on top. This adds texture and flavor. Be creative! Use your favorite toppings to make it your own.
Storage Info
How to Store Cheesecake Cups
To keep your chocolate peanut butter cheesecake cups fresh, store them in the fridge. Use an airtight container to prevent drying out. Place a layer of plastic wrap over the cups if you don't have a container. This will help keep them moist and tasty.
Freezing Instructions
You can freeze these cheesecake cups if you want to save them for later. First, chill them completely in the fridge. Then, place them in a freezer-safe container. You can also wrap each cup in plastic wrap for extra protection. They can last up to three months in the freezer.
Shelf Life and Best Practices
These cheesecake cups will stay fresh in the fridge for about five days. It’s best to eat them within this time for the best taste. Always check for any signs of spoilage before eating. If they look or smell off, it's safer to throw them away. Enjoy your delicious treat while it's fresh!
FAQs
Can I make these cheesecake cups ahead of time?
Yes, you can make these cheesecake cups ahead of time. They taste even better after chilling. Prepare them a day before your event for best results. Just remember to cover them well. This keeps them fresh and tasty.
What type of chocolate is best for garnishing?
I recommend using semi-sweet chocolate for garnishing. It balances the sweetness of the cheesecake. You can also use dark chocolate for a richer flavor. Milk chocolate works too if you prefer a sweeter touch.
Can I use a different type of nut butter?
Absolutely! You can use almond butter or cashew butter instead of peanut butter. Each nut butter will change the flavor slightly, but they will still taste great. Just make sure to choose a smooth variety for the best texture.
Is this recipe suitable for a specific dietary restriction?
This recipe is not gluten-free or dairy-free. However, you can make it gluten-free by using gluten-free graham crackers. For a dairy-free option, try using non-dairy cream cheese and coconut cream. Adjusting these key ingredients makes it more versatile.
You learned how to make tasty cheesecake cups from scratch. I shared the key ingredients, tools, and easy steps. I also covered fun tips for the perfect crust, yummy variations, and how to store these treats.
Remember, you can make these cups your own with flavors and toppings. Now it’s time to enjoy these delightful desserts. Happy baking!