Chocolate Covered Strawberry Cups No Bake Delight

WANT TO SAVE THIS RECIPE?

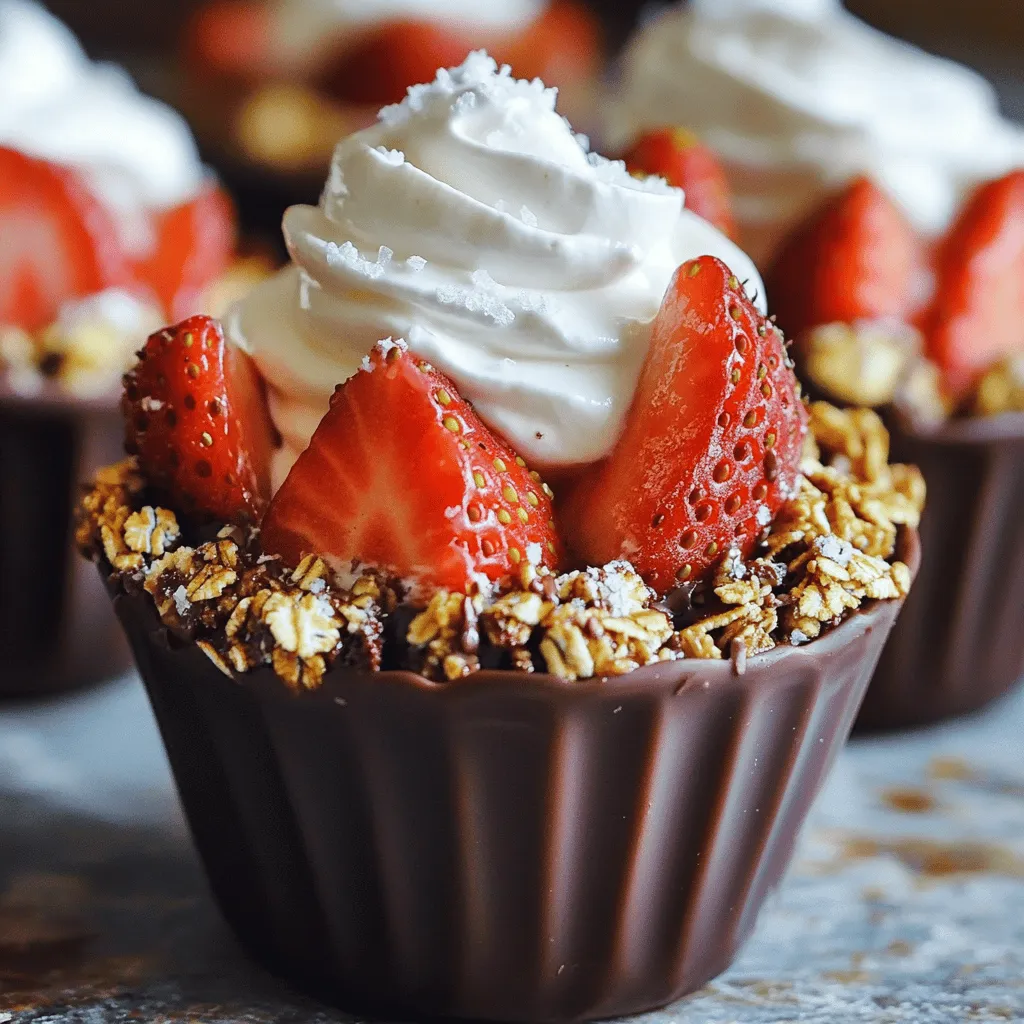
Welcome to Chocolate Covered Strawberry Cups No Bake Delight! If you crave a sweet treat that’s easy to make and perfect for any occasion, you’re in for a treat. I’ll show you how to whip up these delightful cups without baking. You only need a few simple ingredients and tools. Let’s dive into the world of chocolate and strawberries together, and create a dessert that will impress your friends and family!

Ingredients

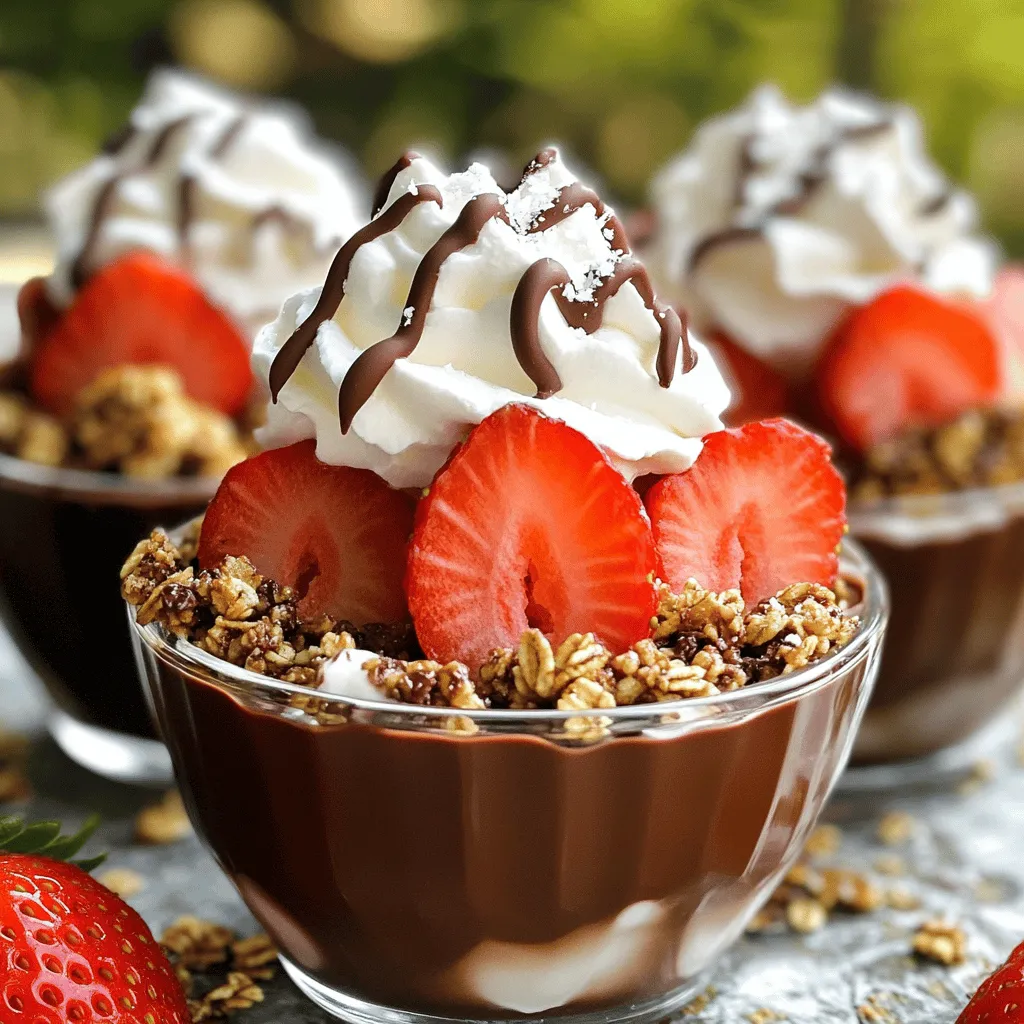
Essential Ingredients for Chocolate Covered Strawberry Cups

To make these delicious chocolate covered strawberry cups, you need a few key ingredients:

– 1 cup dark chocolate chips

– 2 cups fresh strawberries, hulled and halved

– 1 cup granola or crushed graham crackers

– 1/2 cup whipped cream or coconut cream

– 1 teaspoon vanilla extract

– Sea salt for garnish (optional)

Each ingredient plays a role in creating the perfect flavor and texture. The dark chocolate brings a rich taste, while the strawberries add freshness. The granola or graham crackers give a nice crunch. The whipped cream adds creaminess, and the vanilla enhances the overall flavor.

Optional Ingredients for Variations

You can customize these cups to fit your taste. Here are some optional ingredients:

– Milk chocolate or white chocolate chips

– Other berries like raspberries or blueberries

– Chopped nuts such as almonds or walnuts

– Different extracts like almond or mint

These options let you mix flavors and find what you love best. Feel free to experiment!

Recommended Tools and Equipment

Having the right tools makes the process easier. Here’s what you need:

– Microwave-safe bowl for melting chocolate

– Silicone muffin cups or paper cupcake liners

– Spoon for spreading chocolate

– Mixing bowl for whipped cream

– Refrigerator for chilling

Using these tools helps ensure your cups come out just right. With everything ready, you can start your sweet journey!

Step-by-Step Instructions

Melting the Chocolate

Start by measuring 1 cup of dark chocolate chips. Place them in a microwave-safe bowl. Heat the chocolate in 30-second bursts. After each burst, stir the chocolate. This keeps it from burning. Your goal is smooth, melted chocolate. If it’s still lumpy, heat for a few more seconds. Be careful not to overheat.

Preparing the Cups

Grab your silicone muffin cups or paper cupcake liners. Spoon a bit of melted chocolate into each cup. Use the back of a spoon to spread it. Cover the sides well to form a cup shape. Make sure the bottom has enough chocolate too. Once done, place the cups in the fridge. Chill them for about 10 to 15 minutes until firm.

Assembling the Layers

After the chocolate has set, take the cups out of the fridge. Add a layer of granola or crushed graham crackers. This layer goes at the bottom of each cup. Press the granola down gently to make it firm. Next, place the halved strawberries on top. Arrange them nicely to make it pretty.

In a separate bowl, mix the whipped cream with 1 teaspoon of vanilla extract. Spoon or pipe this cream over the strawberries. For a final touch, drizzle some leftover chocolate over the cream. If you like, sprinkle a pinch of sea salt on top. This adds flavor and looks great. Chill the cups again for 10 minutes to set everything.

Tips & Tricks

Best Practices for Melting Chocolate

To melt chocolate well, use a microwave-safe bowl. Heat dark chocolate chips in 30-second bursts. Stir the chocolate after each burst. This helps it melt evenly. Watch closely, as chocolate can burn quickly. If you see any lumps, keep stirring. The heat from the melted chocolate will smooth it out. You want it to be silky and glossy.

How to Achieve the Perfect Cup Shape

To make great cups, use silicone muffin cups or paper liners. Start by adding a spoonful of melted chocolate to each cup. Use the back of a spoon to spread the chocolate up the sides. This creates a nice cup shape. Make sure the chocolate is thick enough to hold its shape. Chill the cups in the fridge for about 10-15 minutes. This helps them set firmly.

Enhancing Flavor with Add-ins

You can boost the flavor with fun add-ins. For example, mix in some crushed nuts or a sprinkle of sea salt. Add a dash of cinnamon for warmth. You can also use flavored whipped cream. Vanilla extract adds a nice touch. Feel free to experiment with your favorite flavors. Each add-in can change the taste in a fun way.

Variations

Flavor Variations (Fruit, Nuts, etc.)

You can change the flavor of your Chocolate Covered Strawberry Cups easily. Try using other fruits like raspberries or blueberries. They add a fresh twist. Nuts also work well. Chopped almonds or walnuts can give a nice crunch. Mix and match your favorites. The options are endless.

Alternative Toppings

Toppings can make your cups even better. Try adding crushed cookies, like Oreos or Digestives, for extra texture. You can also use a drizzle of caramel or white chocolate for a sweet touch. Shredded coconut adds a tropical vibe too. Get creative with what you have at home.

Dietary Adjustments (Vegan, Gluten-Free)

Making these cups vegan is simple. Use dairy-free chocolate chips and coconut cream instead of whipped cream. For gluten-free options, make sure to use gluten-free granola or graham crackers. These easy swaps keep your dessert tasty and friendly for all diets. Enjoy your healthy treats without worry!

Storage Info

How to Store Chocolate Covered Strawberry Cups

To keep your chocolate covered strawberry cups fresh, store them in an airtight container. This helps prevent them from drying out or absorbing other smells from your fridge. Place a piece of parchment paper between layers if you stack them. This keeps them looking pretty and intact.

Shelf Life and Freezing Options

These delightful cups last up to 3 days in the fridge. They taste best when fresh, but you can freeze them for up to a month. To freeze, place the cups in a single layer on a tray. Once frozen, move them to a freezer-safe bag. This keeps them safe from freezer burn.

Reheating Instructions for Leftovers

You won’t need to reheat these cups, as they are best enjoyed cold. If you prefer a softer texture, let them sit at room temperature for about 10-15 minutes before serving. This way, the chocolate can get a bit melty and the flavors can shine.

FAQs

Can I use milk chocolate instead of dark chocolate?

Yes, you can use milk chocolate. It will give a sweeter taste. Just melt it the same way you would with dark chocolate. The cups will still be yummy and fun!

How long do these cups need to chill?

These cups need to chill for about 10-15 minutes after you coat them with chocolate. After adding the other layers, chill again for another 10 minutes. This helps everything set nicely.

Can I make these ahead of time?

Yes, you can make these cups a day before you plan to serve them. Just store them in the fridge. They will taste great and stay fresh!

What can I substitute for whipped cream?

If you want a different topping, you can use coconut cream or a dairy-free option. You can also try yogurt or a non-dairy whipped topping. Each will add its own nice flavor!

In this post, we explored how to make chocolate-covered strawberry cups. We covered essential ingredients, step-by-step instructions, and tips for success. You learned about fun variations and how to store your tasty treats. These cups are easy to make and can delight anyone. Get creative with flavors and toppings to match your taste. Try these tips, and you will impress friends and family with your skills. Enjoy your delicious creations!

To make these delicious chocolate covered strawberry cups, you need a few key ingredients: - 1 cup dark chocolate chips - 2 cups fresh strawberries, hulled and halved - 1 cup granola or crushed graham crackers - 1/2 cup whipped cream or coconut cream - 1 teaspoon vanilla extract - Sea salt for garnish (optional) Each ingredient plays a role in creating the perfect flavor and texture. The dark chocolate brings a rich taste, while the strawberries add freshness. The granola or graham crackers give a nice crunch. The whipped cream adds creaminess, and the vanilla enhances the overall flavor. You can customize these cups to fit your taste. Here are some optional ingredients: - Milk chocolate or white chocolate chips - Other berries like raspberries or blueberries - Chopped nuts such as almonds or walnuts - Different extracts like almond or mint These options let you mix flavors and find what you love best. Feel free to experiment! Having the right tools makes the process easier. Here’s what you need: - Microwave-safe bowl for melting chocolate - Silicone muffin cups or paper cupcake liners - Spoon for spreading chocolate - Mixing bowl for whipped cream - Refrigerator for chilling Using these tools helps ensure your cups come out just right. With everything ready, you can start your sweet journey! Start by measuring 1 cup of dark chocolate chips. Place them in a microwave-safe bowl. Heat the chocolate in 30-second bursts. After each burst, stir the chocolate. This keeps it from burning. Your goal is smooth, melted chocolate. If it’s still lumpy, heat for a few more seconds. Be careful not to overheat. Grab your silicone muffin cups or paper cupcake liners. Spoon a bit of melted chocolate into each cup. Use the back of a spoon to spread it. Cover the sides well to form a cup shape. Make sure the bottom has enough chocolate too. Once done, place the cups in the fridge. Chill them for about 10 to 15 minutes until firm. After the chocolate has set, take the cups out of the fridge. Add a layer of granola or crushed graham crackers. This layer goes at the bottom of each cup. Press the granola down gently to make it firm. Next, place the halved strawberries on top. Arrange them nicely to make it pretty. In a separate bowl, mix the whipped cream with 1 teaspoon of vanilla extract. Spoon or pipe this cream over the strawberries. For a final touch, drizzle some leftover chocolate over the cream. If you like, sprinkle a pinch of sea salt on top. This adds flavor and looks great. Chill the cups again for 10 minutes to set everything. To melt chocolate well, use a microwave-safe bowl. Heat dark chocolate chips in 30-second bursts. Stir the chocolate after each burst. This helps it melt evenly. Watch closely, as chocolate can burn quickly. If you see any lumps, keep stirring. The heat from the melted chocolate will smooth it out. You want it to be silky and glossy. To make great cups, use silicone muffin cups or paper liners. Start by adding a spoonful of melted chocolate to each cup. Use the back of a spoon to spread the chocolate up the sides. This creates a nice cup shape. Make sure the chocolate is thick enough to hold its shape. Chill the cups in the fridge for about 10-15 minutes. This helps them set firmly. You can boost the flavor with fun add-ins. For example, mix in some crushed nuts or a sprinkle of sea salt. Add a dash of cinnamon for warmth. You can also use flavored whipped cream. Vanilla extract adds a nice touch. Feel free to experiment with your favorite flavors. Each add-in can change the taste in a fun way. {{image_2}} You can change the flavor of your Chocolate Covered Strawberry Cups easily. Try using other fruits like raspberries or blueberries. They add a fresh twist. Nuts also work well. Chopped almonds or walnuts can give a nice crunch. Mix and match your favorites. The options are endless. Toppings can make your cups even better. Try adding crushed cookies, like Oreos or Digestives, for extra texture. You can also use a drizzle of caramel or white chocolate for a sweet touch. Shredded coconut adds a tropical vibe too. Get creative with what you have at home. Making these cups vegan is simple. Use dairy-free chocolate chips and coconut cream instead of whipped cream. For gluten-free options, make sure to use gluten-free granola or graham crackers. These easy swaps keep your dessert tasty and friendly for all diets. Enjoy your healthy treats without worry! To keep your chocolate covered strawberry cups fresh, store them in an airtight container. This helps prevent them from drying out or absorbing other smells from your fridge. Place a piece of parchment paper between layers if you stack them. This keeps them looking pretty and intact. These delightful cups last up to 3 days in the fridge. They taste best when fresh, but you can freeze them for up to a month. To freeze, place the cups in a single layer on a tray. Once frozen, move them to a freezer-safe bag. This keeps them safe from freezer burn. You won’t need to reheat these cups, as they are best enjoyed cold. If you prefer a softer texture, let them sit at room temperature for about 10-15 minutes before serving. This way, the chocolate can get a bit melty and the flavors can shine. Yes, you can use milk chocolate. It will give a sweeter taste. Just melt it the same way you would with dark chocolate. The cups will still be yummy and fun! These cups need to chill for about 10-15 minutes after you coat them with chocolate. After adding the other layers, chill again for another 10 minutes. This helps everything set nicely. Yes, you can make these cups a day before you plan to serve them. Just store them in the fridge. They will taste great and stay fresh! If you want a different topping, you can use coconut cream or a dairy-free option. You can also try yogurt or a non-dairy whipped topping. Each will add its own nice flavor! In this post, we explored how to make chocolate-covered strawberry cups. We covered essential ingredients, step-by-step instructions, and tips for success. You learned about fun variations and how to store your tasty treats. These cups are easy to make and can delight anyone. Get creative with flavors and toppings to match your taste. Try these tips, and you will impress friends and family with your skills. Enjoy your delicious creations!

Chocolate Covered Strawberry Cups No Bake

Indulge in the ultimate dessert with these Chocolate Strawberry Bliss Cups! Perfect for chocolate lovers, these sweet treats are made with dark chocolate, fresh strawberries, and creamy whipped topping that will melt in your mouth. Easy to prepare and visually stunning, they're perfect for any occasion. Click through to discover this delightful recipe and impress your family and friends with your amazing dessert skills!

Ingredients
  

1 cup dark chocolate chips

2 cups fresh strawberries, hulled and halved

1 cup granola or crushed graham crackers

1/2 cup whipped cream or coconut cream

1 teaspoon vanilla extract

Sea salt for garnish (optional)

Instructions
 

Melt the Chocolate: In a microwave-safe bowl, heat dark chocolate chips in 30-second intervals, stirring in between until fully melted and smooth. Be careful not to overheat.

    Prepare the Cups: Using silicone muffin cups or paper cupcake liners, add a spoonful of melted chocolate to each cup. Use the back of a spoon to spread the chocolate up the sides, creating a cup shape.

      Chill: Place the chocolate-coated cups in the refrigerator for about 10-15 minutes, or until the chocolate is firm.

        Layer with Granola: Remove the cups from the fridge and add a layer of granola or crushed graham crackers at the bottom of each cup. Press down gently to create a firm base.

          Add Strawberries: Place the halved strawberries on top of the granola layer, arranging them in a visually appealing way.

            Whipped Cream Layer: In a bowl, mix the whipped cream with vanilla extract to incorporate the flavor. Spoon or pipe the whipped cream over the strawberries to create a lovely topping.

              Final Chocolate Drizzle: Drizzle any remaining melted chocolate over the whipped cream for a decorative finish.

                Garnish (Optional): Sprinkle a pinch of sea salt over each cup to enhance the chocolate flavor and add a gourmet touch.

                  Chill Again: Place the cups back into the refrigerator for another 10 minutes to set everything together.

                    Serve: Once set, carefully peel away the silicone or paper liners, and serve chilled as a delightful dessert.

                      Prep Time: 20 minutes | Total Time: 45 minutes | Servings: 6

                        WANT TO SAVE THIS RECIPE?

                        Leave a Comment

                        Recipe Rating