Craving a sweet, chewy treat? You’re in the right place! These Chewy No-Bake Chocolate Almond Bars are simple to make and delicious. With just a few wholesome ingredients, you can whip up a healthy snack in no time. I’ll guide you through easy steps, helpful tips, and fun variations. Perfect for lunchboxes or a quick pick-me-up, these bars will satisfy your sweet tooth without the fuss! Let’s dive in!
Why I Love This Recipe
- Easy to Make: This recipe requires no baking, making it a quick and convenient treat to whip up anytime.
- Nutritious Ingredients: Packed with oats, almond butter, and nuts, these bars provide a healthy energy boost.
- Customizable: You can easily modify the ingredients to suit your taste by adding different nuts or sweeteners.
- Deliciously Satisfying: With a perfect balance of chocolate and almond flavors, these bars are a delightful snack.
Ingredients
Complete List of Ingredients
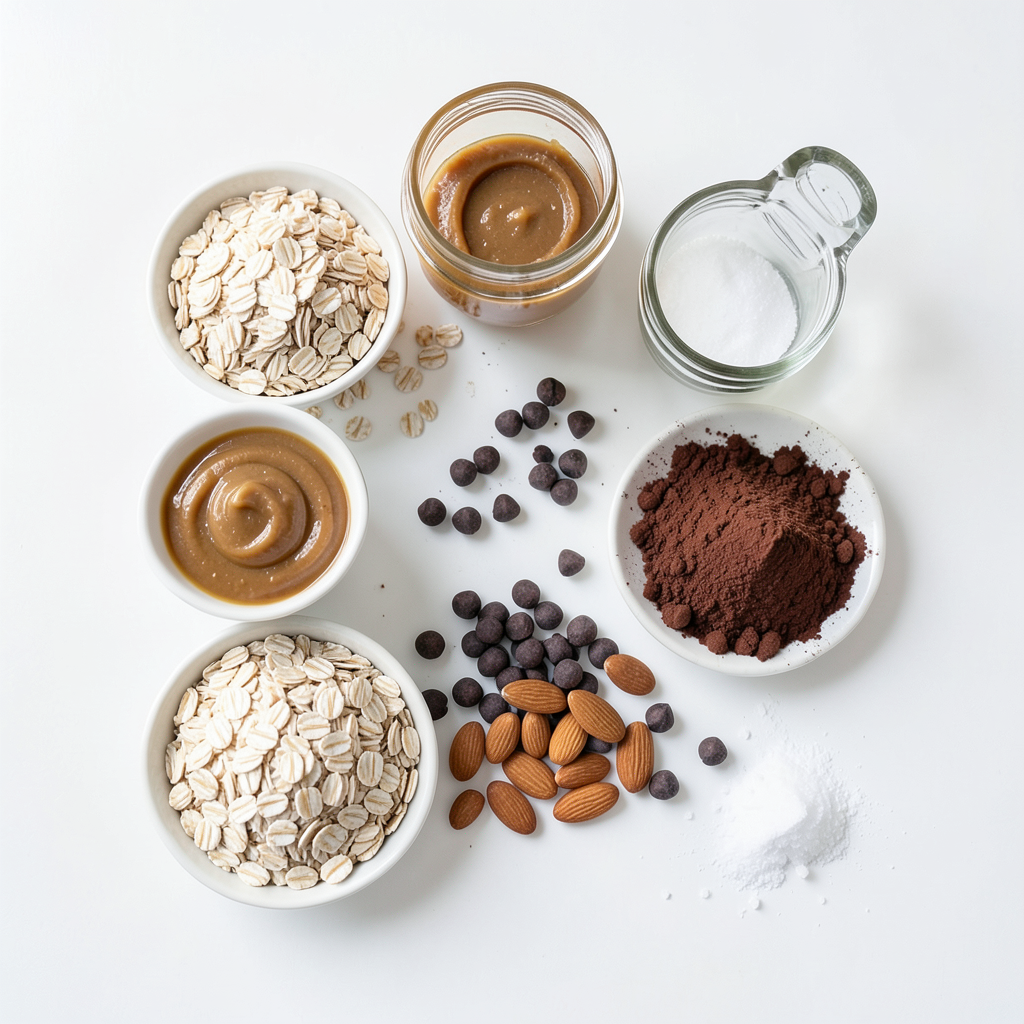
To make Chewy No-Bake Chocolate Almond Bars, gather these simple ingredients:
- 1 cup rolled oats
- 1 cup almond butter
- 1/2 cup honey or maple syrup
- 1/2 cup dark chocolate chips
- 1/2 cup sliced almonds
- 1/4 cup unsweetened cocoa powder
- 1 teaspoon vanilla extract
- A pinch of salt
These ingredients create a sweet, chewy, and nutty treat that you will love.
Substitutions and Alternatives
If you need swaps, here are some options:
- Use peanut butter instead of almond butter for a different flavor.
- Swap honey with agave nectar for a vegan option.
- Use any nut or seed butter if you want to change it up.
- Instead of dark chocolate chips, try milk chocolate or white chocolate.
- You can replace sliced almonds with chopped walnuts or pecans for a new taste.
These substitutions keep your bars tasty while fitting your needs.
Nutritional Information Per Serving
Each bar is packed with good energy. Here’s what you get per serving (1 bar):
- Calories: 180
- Protein: 5g
- Carbohydrates: 22g
- Fat: 9g
- Fiber: 3g
- Sugar: 8g
These bars provide a healthy snack or treat that fuels your day. Enjoy knowing you made a delicious choice!
Step-by-Step Instructions
Mixing the Ingredients
First, grab a large bowl. Add 1 cup of rolled oats. Then, add 1 cup of almond butter. Pour in 1/2 cup of honey or maple syrup. Next, add 1/4 cup of unsweetened cocoa powder. Don’t forget 1 teaspoon of vanilla extract and a pinch of salt. Mix everything well until it sticks together. This step is key for texture.
After that, fold in 1/2 cup of dark chocolate chips and 1/2 cup of sliced almonds. Make sure they spread out evenly in the mix. You want each bite to be full of flavor.
Preparing the Pan
Now, take an 8x8-inch pan. Line it with parchment paper. Leave some paper hanging over the sides. This makes it easy to lift the bars out later. Press the paper down well so it stays put. A lined pan helps the bars keep their shape.
Setting the Bars
Next, transfer your mixture into the lined pan. Use the back of a spatula or your hands to press it down. Make sure it’s flat and even. This helps the bars set together nicely.
Now, place the pan in the fridge for at least 2 hours. If you want a faster option, you can use the freezer. Once the bars are firm, take them out. Lift them out using the parchment paper. Cut them into squares or rectangles, depending on your preference. Enjoy your chewy no-bake chocolate almond bars!
Tips & Tricks
Achieving the Perfect Texture
To get that chewy texture, mix your ingredients well. When you combine the rolled oats, almond butter, and honey, make sure it feels sticky. This stickiness helps the bars hold together. If your mix seems too dry, add a bit more almond butter or honey. For a softer bar, chill them for less time. Aim for at least two hours in the fridge to set.
Serving Suggestions
These bars shine on their own, but you can make them even better! Try drizzling melted dark chocolate on top. This adds a nice touch and makes them look fancy. You can also sprinkle some whole almonds for a crunch. Serve them as a snack or a quick breakfast. They pair well with a glass of milk or a cup of coffee.
Common Mistakes to Avoid
One common mistake is not pressing the mixture firmly enough in the pan. This can lead to crumbly bars. Be sure to use the back of a spatula or your hands to pack it down well. Another mistake is using too much cocoa powder. Stick to the 1/4 cup to maintain sweetness. Lastly, don’t skip the fridge time! Proper chilling helps the bars set and makes them easier to cut.
Pro Tips
- Use Fresh Ingredients: Fresh almond butter and high-quality dark chocolate will enhance the flavor and texture of your bars.
- Customize Your Sweetener: Feel free to swap honey with maple syrup for a vegan option or adjust the sweetness level to your liking.
- Experiment with Mix-Ins: You can add dried fruits, seeds, or protein powder to the mixture for added nutrition and flavor variations.
- Storage Tips: Store the bars in an airtight container in the refrigerator for up to a week or freeze for longer shelf life.
Variations
Customizing Add-ins
You can change the bars by adding your favorite ingredients. Want more crunch? Toss in some chopped walnuts or pecans. You can also use dried fruits like cranberries or raisins for a sweet twist. For a tropical vibe, try adding shredded coconut. If you love spice, a dash of cinnamon or nutmeg can add warmth. Mix and match to suit your taste!
Flavor Options
These bars are great on their own, but you can switch up the flavors too! Instead of dark chocolate chips, use milk chocolate or white chocolate for a different taste. You can also play with flavored almond butter, like honey or chocolate, for extra richness. If you like a minty kick, add a few drops of peppermint extract. Each change brings a new treat!
Dietary Adaptations
If you're watching your sugar, use sugar-free syrup instead of honey. You can easily make these bars gluten-free by using certified gluten-free oats. For nut-free options, sunflower seed butter works well instead of almond butter. You can also skip the chocolate chips for a lighter version. These bars can fit many diets while still being delicious!
Storage Info
Best Storage Methods
To keep your Chewy No-Bake Chocolate Almond Bars fresh, store them in an airtight container. This helps to keep the bars moist and prevents them from drying out. You can place parchment paper between layers to avoid sticking. If you want to keep them even fresher, wrap each bar in plastic wrap before placing them in the container.
Shelf Life
These bars can last up to one week in the fridge. If you notice any changes in texture or smell, it’s best to discard them. For the best taste, eat them within the first few days after making them.
Freezing Recommendations
You can also freeze these bars for longer storage. Wrap each bar tightly in plastic wrap, then place them in a freezer-safe bag or container. They can last up to three months in the freezer. When you’re ready to enjoy them, let them thaw in the fridge overnight. This method keeps the bars tasty and chewy.
FAQs
Can I use peanut butter instead of almond butter?
Yes, you can use peanut butter. The bars will taste a bit different, but they will still be delicious. Peanut butter adds a nice flavor and creamy texture. If you have a nut allergy, try sun butter or soy nut butter as a safe option.
How long do these bars last in the fridge?
These bars last about one week in the fridge. To keep them fresh, store them in an airtight container. You can also place parchment paper between layers to prevent sticking. If you want a longer shelf life, consider freezing them.
Can I make these bars vegan-friendly?
Absolutely! To make these bars vegan, use maple syrup instead of honey. All other ingredients are plant-based. This change keeps the bars tasty and suitable for a vegan diet. Enjoy knowing everyone can enjoy this sweet treat!
In this post, we covered all aspects of making delicious bars. You learned about the ingredients, mixing them, and preparing your pan. I shared tips for perfect texture and common mistakes to avoid. You can customize your bars with different flavors and store them for longer use. Remember to have fun and experiment with add-ins. Enjoy your tasty creation, and make it your own!