
Craving a sweet treat that's easy to make? This Blackberry Peach Galette is the perfect answer. Juicy blackberries and ripe peaches create a delicious mix, while the rustic crust adds charm. I’ll guide you through every step, from prepping the fruit to perfecting the bake. Plus, I’ll share tips for variations and storage. Let’s bring some homemade joy to your kitchen with this delightful dessert!
Why I Love This Recipe
- Seasonal Fruit Delight: This galette celebrates the sweet, juicy flavors of summer with fresh blackberries and ripe peaches.
- Easy to Make: With a pre-made crust and simple filling, this recipe is perfect for both novice and experienced bakers.
- Versatile Serving Options: Serve warm with ice cream or at room temperature for a delightful dessert any time of day.
- Beautiful Presentation: The rustic look of a galette makes it an impressive centerpiece for any gathering.
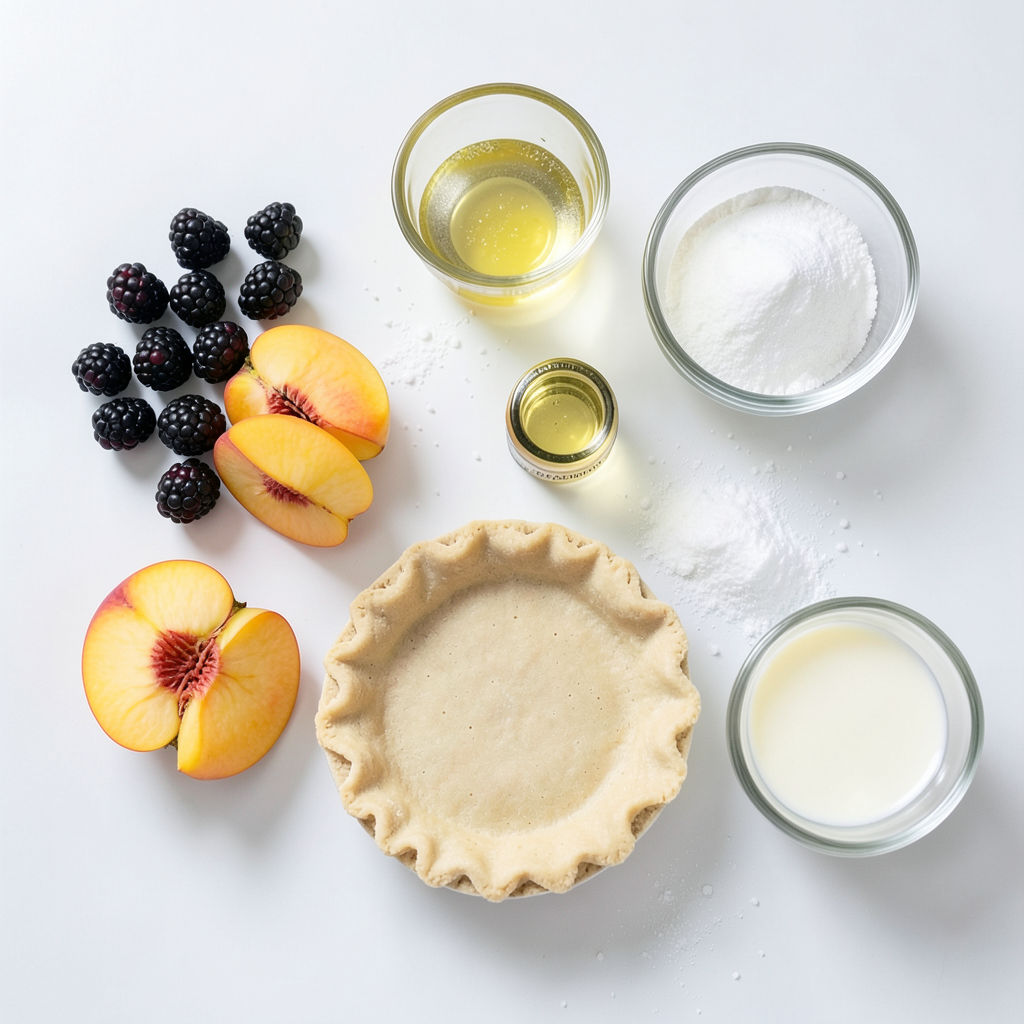
Ingredients
Fresh Blackberries
I love using fresh blackberries in this galette. They offer a juicy burst of flavor. Choose blackberries that are plump and shiny. Make sure they are free from mold or soft spots. You will need one cup of blackberries for a perfect balance with peaches.
Ripe Peaches
Ripe peaches bring sweetness and a lovely texture. Look for peaches that feel slightly soft when you press them gently. Two peaches, sliced, work well in this recipe. Their sweet juice mixes perfectly with the blackberries.
Additional Ingredients
Here are the other ingredients you will need:
- 1/3 cup granulated sugar (adjust for your taste)
- 1 tablespoon cornstarch (for thickening)
- 1 teaspoon lemon juice (for brightness)
- 1 teaspoon vanilla extract (for extra flavor)
- 1 pre-made pie crust (store-bought or homemade)
- 1 egg (for egg wash)
- 1 tablespoon milk (for egg wash)
- A pinch of salt (to enhance flavors)
- Extra sugar for sprinkling (optional, for a sweet crunch)
These ingredients come together to create a tasty and rustic dessert. Each one plays a key role in making the galette delicious and memorable.
Step-by-Step Instructions
Prepping the Fruit
Start by washing one cup of fresh blackberries. Place them in a large bowl. Next, slice two ripe peaches. Add the peach slices to the blackberries. Sprinkle in 1/3 cup of granulated sugar. This sugar helps bring out the fruit's natural sweetness. Add one tablespoon of cornstarch to thicken the filling. Then, squeeze in one teaspoon of lemon juice for brightness. Stir in one teaspoon of vanilla extract for flavor. Finally, add a pinch of salt. Mix gently, so you don’t smash the fruit. Let this mixture sit while you roll out the crust.
Assembling the Galette
Roll out your pre-made pie crust on a lightly floured surface. Aim for a rough circle, about 12 inches wide. Carefully transfer it to a parchment-lined baking sheet. Spoon the blackberry-peach mix into the center. Leave a 2-inch border around the edges. Now, fold the crust edges over the fruit filling. Create a pleated effect, keeping some fruit exposed in the center. This lets everyone see those lovely colors.
Baking the Galette
In a small bowl, whisk together one egg and one tablespoon of milk. This mixture will be your egg wash. Brush it over the crust to give it a golden shine. If you want extra sweetness, sprinkle a little sugar on top. Bake the galette in your preheated oven at 400°F (200°C) for 25 to 30 minutes. Watch for a golden crust and bubbling fruit. Once done, take it out and let it cool on a wire rack for at least 10 minutes. This cooling time helps set the filling. Then, slice and serve!
Tips & Tricks
Achieving the Perfect Crust
To get a great crust, keep your ingredients cold. Use chilled butter or shortening for better results. This helps create a flaky texture. Roll out the pie crust gently. Aim for a rough circle, about 12 inches wide. Don’t worry about making it perfect; rustic is the style here.
Tips for Fruit Preparation
When you prepare the fruit, slice the peaches thin. This lets them cook evenly. Combine the blackberries and peaches gently. You want to avoid smashing the fruit. Add sugar, cornstarch, lemon juice, and vanilla extract. Let the mix sit for a few minutes. This step helps the fruits release their juices.
How to Know When It's Done
Check for a golden brown crust. This color shows that the crust is cooked well. Look for bubbling fruit juice in the center. If you see this, your galette is ready. Let it cool for at least 10 minutes. This makes slicing easier and helps flavors blend.
Pro Tips
- Use Fresh Ingredients: Opt for the freshest blackberries and peaches available to enhance the flavor of your galette.
- Adjust Sweetness: Feel free to adjust the amount of sugar based on the sweetness of your fruit and personal preference.
- Allow to Cool: Let the galette cool for at least 10 minutes before slicing to allow the filling to set properly.
- Experiment with Flavors: Try adding a pinch of cinnamon or nutmeg to the filling for a warm, aromatic twist.
Variations
Using Different Fruits
You can swap blackberries and peaches for other fruits. Try blueberries, cherries, or apples. Each fruit brings its own flavor and texture. For example, apples add a sweet crunch, while cherries give a tart bite. Mix and match for fun combinations. Just keep the same sugar and cornstarch amounts. This way, your filling stays perfectly balanced.
Flavor Enhancements
To make your galette even tastier, add spices or extracts. A dash of cinnamon or nutmeg warms the flavor. You could also use almond or orange extract for a twist. A bit of citrus zest brightens the dish, too. Consider mixing in herbs like thyme or basil for a fresh touch. These additions can elevate your galette and surprise your guests.
Gluten-Free Options
If you need a gluten-free galette, use a gluten-free pie crust. Many stores sell ready-made gluten-free options. You can also make your own with gluten-free flour blends. Ensure that all other ingredients are gluten-free, especially the sugar and cornstarch. This way, everyone can enjoy a slice of your delightful dessert without worry.
Storage Info
How to Store Leftovers
You can store leftover galette easily. Allow it to cool completely. Place it in an airtight container. You can also wrap it tightly in plastic wrap. Store it in the fridge for up to three days. This keeps the crust and filling fresh. If you want, you can also leave it at room temperature for one day.
Reheating Guidelines
Reheating your galette is simple. Preheat your oven to 350°F (175°C). Place the galette on a baking sheet. Heat it for about 10-15 minutes. This warms it through and keeps the crust crisp. Avoid using the microwave, as it can make the crust soggy.
Freezing Tips
Freezing is a great option if you have extra galette. Wrap the cooled galette tightly in plastic wrap. Then, place it in a freezer-safe bag or container. It can last for up to two months in the freezer. When ready to eat, thaw it in the fridge overnight. Reheat it in the oven for the best taste.
FAQs
Can I make the crust from scratch?
Yes, you can make the crust from scratch. Use flour, butter, and salt. Mix them until they form crumbs. Add cold water to bind the mixture. Chill the dough for about 30 minutes. This step helps create a flaky crust. If you want, you can use a food processor for ease.
How can I adjust the sweetness?
You can adjust the sweetness easily. Add more or less sugar to the fruit mix. Taste the fruit mixture before baking. If you want it sweeter, add extra sugar. If it’s too sweet, you can reduce it. You can also add a bit of honey or maple syrup for a different flavor.
What can I serve with a Blackberry Peach Galette?
You can serve many tasty sides with your galette. A scoop of vanilla ice cream works great. Whipped cream is another delicious option. Fresh mint leaves can add a nice touch. You could even pair it with a dollop of yogurt for a tangy twist. Enjoy your dessert with a warm drink too!
This blog showed how to make a delicious blackberry peach galette. We covered key ingredients, steps for prep and baking, plus tips for the perfect crust. You learned about tasty variations and how to store leftovers well. Experiment with different fruits or adjust sweetness to fit your taste. Try serving it warm with ice cream for a special touch. Now, you have the tools to create a delightful galette. Enjoy your baking adventure!