Skip to content
DisclaimerTerms Of UseGDPR PolicyCookie Policy

Lisa Dishes

  • Home
  • Drinks
  • Appetizers
  • Dinner
  • Dessert
  • About
  • Contact
  • Privacy Policy
DisclaimerTerms Of UseGDPR PolicyCookie Policy

lisa

To make these delicious crab stuffed cheddar bay biscuits, gather the following items: - 2 cups all-purpose flour - 1 tablespoon baking powder - 1/2 teaspoon garlic powder - 1/2 teaspoon onion powder - 1 teaspoon salt - 1/4 teaspoon cayenne pepper (optional) - 1/2 cup cold unsalted butter, cubed - 1 cup shredded sharp cheddar cheese - 3/4 cup whole milk - 1 cup lump crab meat, picked over for shells - 2 tablespoons cream cheese, softened - 1 tablespoon fresh parsley, chopped - 1 tablespoon lemon juice - 1/4 teaspoon paprika for garnish (optional) You can change some ingredients to fit your taste. Here are some easy swaps: - Flour: Use whole wheat flour for a nuttier flavor. - Butter: Replace cold butter with a dairy-free alternative for a vegan option. - Cheese: Swap sharp cheddar for mozzarella for a milder taste. - Crab Meat: Use shrimp or lobster if crab is not available. - Cream Cheese: Substitute with Greek yogurt for a lighter filling. When choosing crab meat, freshness is key. Follow these tips: - Look for Color: Fresh crab meat should be a bright white or off-white color. - Smell Test: It should smell like the ocean, not fishy. - Check for Shells: Ensure there are no hard shell pieces mixed in. - Buy Local: If possible, buy from local markets or seafood shops to ensure quality. These tips help you find the best ingredients for this crab stuffed cheddar bay biscuit recipe. For the full recipe, check the details above. Start by preheating your oven to 425°F (220°C). This step is key for that perfect golden finish. Line a baking sheet with parchment paper. This helps prevent sticking and makes cleaning easier later. In a large bowl, add the dry ingredients: 2 cups all-purpose flour, 1 tablespoon baking powder, 1/2 teaspoon garlic powder, 1/2 teaspoon onion powder, 1 teaspoon salt, and 1/4 teaspoon cayenne pepper if you want some heat. Mix these well. Next, add 1/2 cup of cold, cubed unsalted butter. Use your fingers or a pastry cutter to blend it until the mix looks like coarse crumbs. Stir in 1 cup of shredded sharp cheddar cheese. Then, slowly add 3/4 cup of whole milk. Mix just until it combines, but don’t overdo it. The dough should remain a bit lumpy. In another bowl, mix 1 cup of lump crab meat, 2 tablespoons of softened cream cheese, 1 tablespoon of chopped fresh parsley, and 1 tablespoon of lemon juice. Be gentle when mixing. You want to keep those nice crab lumps intact. This filling packs a lot of flavor. For each biscuit, take about 1/4 cup of dough and flatten it in your hand. Put a tablespoon of crab filling in the middle. Fold the dough around the filling and seal it carefully. Roll it into a ball and place it on the baking sheet. Repeat this step until all the dough and filling are used. If you like, sprinkle some paprika on top for a pop of color. Bake in the preheated oven for 15-18 minutes. They are ready when they turn a lovely golden brown. Trust me, serving these warm is the best way to enjoy them. If you want the full recipe, don't forget to check it out! If your biscuits don't rise, check your baking powder. It should be fresh. If they are too dry, add a bit more milk next time. If they turn out tough, mix the dough gently. Overmixing makes them dense. To boost flavor, add more spices. You can try smoked paprika or Old Bay seasoning. Fresh herbs like dill or chives also add zest. If you want a kick, mix in some diced jalapeños. Serve these biscuits warm with a side of garlic butter. They pair well with a light salad or a bowl of soup. You can also enjoy them as a snack with a cold drink. For extra flair, garnish with chopped parsley before serving. For the full recipe, check out the Crab Stuffed Cheddar Bay Biscuits section above! {{image_2}} You can switch up the cheese in these biscuits. While sharp cheddar shines, other cheeses work well too. Try mozzarella for a stretchier texture. Aged gouda offers a nutty taste. For a rich option, use cream cheese mixed into the dough. You can even blend different cheeses for a unique twist! If you like heat, add some spice! Try mixing in diced jalapeños or a splash of hot sauce into the crab filling. For a kick without the extra heat, you can increase the cayenne pepper in the dough. This gives the biscuits a nice warmth that pairs well with the crab. Want to skip the crab? You can create a veggie version! Use sautéed mushrooms, spinach, and cream cheese as a filling. Another option is roasted bell peppers and ricotta. These flavors mix nicely with the cheesy biscuit dough. This way, everyone can enjoy a tasty biscuit! For the complete recipe, check out the [Full Recipe]. To keep your crab stuffed cheddar bay biscuits fresh, let them cool first. Place them in an airtight container. Store them in the fridge for up to three days. If you want to keep them longer, freezing is a great option. When you are ready to enjoy your leftovers, preheat your oven to 350°F (175°C). Place the biscuits on a baking sheet. Heat them for about 10 minutes or until warm. This helps keep the biscuits soft and delicious. You can also use the microwave, but they may not be as good. To freeze the biscuits, wrap each one tightly in plastic wrap. Place them in a freezer bag, removing as much air as possible. They can be frozen for up to three months. When you want to eat them, thaw in the fridge overnight. Then reheat as mentioned above. This way, you can enjoy your crab stuffed cheddar bay biscuits anytime! For the full recipe, check the earlier sections. You can serve these biscuits with a fresh salad. A light Caesar salad works well. You might also enjoy them with a bowl of creamy soup, like clam chowder. If you want something fun, try dipping them in garlic butter. The rich flavor pairs great with the crab. Look for a golden brown color on top. The edges should be firm but soft. If you tap the bottom, it should sound hollow. Use a toothpick to check the center; it should come out clean. Yes, you can! Make the dough and chill it in the fridge. You can store it for up to 24 hours. When you’re ready, shape and bake as usual. This saves time on a busy day. You can find tasty recipes online. Websites like food blogs or cooking sites have great options. You can also check cookbooks focused on seafood or Southern cooking for similar recipes. For this specific recipe, check the Full Recipe. The key is to handle the dough gently. Over-mixing will make them dense. Cold butter is also important; it creates steam while baking. This steam helps the biscuits rise and stay light. Use a light hand when shaping, and you’ll have fluffy biscuits! In this post, we explored the key ingredients for crab stuffed cheddar bay biscuits. You learned about ingredient substitutions and how to choose fresh crab meat. I detailed step-by-step instructions for making the dough and stuffing. You got tips for troubleshooting and adding flavors. We also looked at fun variations and smart storage tips. Try these biscuits at your next gathering. They are sure to impress!

Crab Stuffed Cheddar Bay Biscuit Savory Delight Recipe

If you love warm, cheesy biscuits, I have a treat for you! My Crab Stuffed Cheddar Bay Biscuit recipe combines

To create this delightful cheesecake, you need a few key ingredients. Here is what you will need: - 1 ½ cups graham cracker crumbs - ½ cup unsalted butter, melted - 2 cups cream cheese, softened - 1 cup powdered sugar - 1 cup heavy whipping cream - ½ cup orange juice (freshly squeezed if possible) - Zest of 1 orange - 1 teaspoon vanilla extract - Optional: Whipped cream and orange slices for garnish Each of these ingredients plays a special role. The graham cracker crumbs form a tasty crust. The cream cheese gives the cheesecake its rich and creamy texture. Fresh orange juice and zest add bright flavor, making each bite refreshing. Choosing the best ingredients can make a big difference. Here are my tips: - Cream Cheese: Look for full-fat cream cheese. It gives a creamy texture and rich taste. - Butter: Use unsalted butter for more control over the saltiness. - Orange Juice: Freshly squeezed orange juice tastes brighter than store-bought. - Whipping Cream: Choose heavy whipping cream. It whips better and gives a fluffier texture. Quality ingredients enhance the flavor and texture of your cheesecake, making it a true delight. If you have dietary needs, you can still enjoy this cheesecake. Here are some easy swaps: - Gluten-Free: Use gluten-free graham cracker crumbs for the crust. - Dairy-Free: Substitute cream cheese and heavy cream with plant-based alternatives. - Lower Sugar: Use a sugar substitute in place of powdered sugar for a lighter option. These substitutions help you create a cheesecake that fits your lifestyle while keeping the delicious taste. For the complete recipe, check the Full Recipe. Start with a medium bowl. Add 1 ½ cups of graham cracker crumbs and ½ cup of melted butter. Mix these until the crumbs are coated. The texture should feel like wet sand. Now, take a 9-inch springform pan. Press the crumb mixture into the bottom. Use a measuring cup or your fingers to pack it tightly. Make sure it’s even all around. This crust will hold the cheesecake filling well. In a large bowl, beat 2 cups of softened cream cheese until smooth. Use a hand mixer on medium speed. Next, add 1 cup of powdered sugar, ½ cup of orange juice, the zest of 1 orange, and 1 teaspoon of vanilla extract. Mix until everything is creamy and well combined. In another bowl, whip 1 cup of heavy whipping cream until it forms stiff peaks. Gently fold this whipped cream into your cream cheese mixture. Be careful, as you do not want to lose the air in the whipped cream. This gives your cheesecake a light texture. Pour the cheesecake filling over the prepared crust in the springform pan. Use a spatula to smooth the top. Cover the pan with plastic wrap and refrigerate. Let it chill for at least 4 hours, or overnight for the best set. When ready, carefully release the sides of the pan. Slice the cheesecake into wedges. For a fun touch, you can add whipped cream and orange slices on top. This makes it look extra special. Check out the Full Recipe for more details! To get that perfect fluffy texture, I suggest using room temperature cream cheese. Cold cream cheese will create lumps in your mix. Beat it well until smooth before adding other ingredients. When you fold in the whipped cream, do it gently. This keeps the air in and helps the cheesecake rise. Chill your cheesecake for at least four hours, but overnight is best. This time allows the flavors to blend well. Make sure to cover it tightly with plastic wrap. This prevents any fridge odors from sneaking in. If you want a firmer slice, let it chill a bit longer. To make your cheesecake look fancy, add a dollop of whipped cream on each slice. A slice of fresh orange on top adds color and zest. You can also sprinkle some orange zest around the plate for a lovely touch. For an extra treat, serve it with a scoop of vanilla ice cream. This No-Bake Orange Creamsicle Cheesecake is sure to impress! {{image_2}} You can add fun flavors to your cheesecake! Try folding in mini chocolate chips or crushed candy. For a citrus twist, add lemon zest or lime juice. These small changes can make a big difference! Experiment with your favorite flavors to find your perfect mix. If you're not a fan of graham crackers, try using crushed cookies. Oreo cookies make a great crust that adds a chocolatey touch. You can also use nut-based crusts for a gluten-free option. Blend nuts with a bit of butter to form a tasty base. The crust can change the whole vibe of the cheesecake! Want a vegan version? Swap cream cheese for cashew cream or silken tofu. Use coconut cream instead of heavy cream for a rich texture. You can find dairy-free cream cheese in stores too. With these swaps, everyone can enjoy this creamy treat! For full details on making the No-Bake Orange Creamsicle Cheesecake, check out the Full Recipe. To keep your No-Bake Orange Creamsicle Cheesecake fresh, cover it well. Use plastic wrap or foil to seal the top. This helps keep the flavors in and prevents drying out. You can store it in the fridge for up to five days. Just make sure it's in a cool spot. If you notice a change in texture or smell, it’s best to toss it. Want to save some cheesecake for later? You can freeze it! First, let the cheesecake set in the fridge for at least four hours. Once set, slice it into pieces. Wrap each piece in plastic wrap, then place them in a freezer bag. This keeps them safe from freezer burn. Your cheesecake can last in the freezer for about three months. When you’re ready to enjoy, thaw it in the fridge overnight. The right container makes a big difference. For short-term storage, a covered cake stand works well. It keeps the cheesecake fresh while allowing easy access. For longer storage, use airtight containers. Glass containers are great as they are sturdy and keep odors out. Avoid using metal containers, as they can react with the cheesecake's ingredients. Always remember to label your containers with the date to track freshness. For the complete No-Bake Orange Creamsicle Cheesecake recipe, check out the [Full Recipe]. Yes, you can use a store-bought crust. It saves time and effort. Look for a graham cracker crust for the best flavor. Just make sure it fits your pan well. This way, you can focus on the creamy filling. This cheesecake lasts about 5 days in the fridge. Keep it covered with plastic wrap or a lid. This helps it stay fresh and tasty. After 5 days, the flavor might fade. So, eat it while it's still delicious! Absolutely! You can make this cheesecake a day or two ahead. Just store it in the fridge. This gives the flavors time to blend, making it even better. Plus, it saves you time on the day you want to serve it. For the full recipe, check the details above. In this blog post, we explored how to make a No-Bake Orange Creamsicle Cheesecake. We covered essential ingredients, tips for selecting quality items, and adjustments for dietary needs. The step-by-step guide helped you prepare the crust, make the filling, and assemble the cheesecake. Remember to check out the storage tips to keep leftovers fresh and tasty. Try different variations to make this dessert your own. With these simple steps, you can enjoy a delicious treat anytime. Happy baking!

No-Bake Orange Creamsicle Cheesecake Delight Recipe

Get ready to treat your taste buds with a delightful No-Bake Orange Creamsicle Cheesecake! This easy recipe combines creamy cheesecake

- 12 oz ziti pasta - 2 cups cooked, shredded chicken - 1 (8 oz) package cream cheese, softened - 1 cup ranch dressing Crack Chicken Baked Ziti has simple but tasty ingredients. Ziti pasta gives it a hearty base. I like using cooked, shredded chicken for ease and flavor. Cream cheese adds richness, while ranch dressing brings a zesty twist. - 1 cup shredded sharp cheddar cheese - 1 cup shredded mozzarella cheese - 1/2 teaspoon garlic powder - 1/2 teaspoon onion powder - 1/4 teaspoon black pepper - 1/4 teaspoon paprika Cheese makes this dish creamy and gooey. I use sharp cheddar for a bold flavor and mozzarella for meltiness. The spices, like garlic and onion powder, add depth to each bite. Black pepper and paprika give a slight kick. - 1 cup cooked and crumbled bacon (optional) - Chopped green onions for garnish Bacon adds a nice crunch and smoky flavor. If you want to impress, sprinkle crumbled bacon on top. Green onions give a fresh touch and bright color when serving. You can find the full recipe for all these tasty elements in one place. 1. First, preheat your oven to 375°F (190°C). This step is key for even baking. 2. Next, cook the ziti pasta. Follow the package instructions until it is al dente. Drain the pasta and set it aside. 3. In a large mixing bowl, combine an 8 oz package of softened cream cheese and 1 cup of ranch dressing. Mix until the mixture is smooth and creamy. This is the heart of the dish. 1. Now, add 2 cups of cooked, shredded chicken to the bowl. Also, add 1/2 teaspoon of garlic powder, 1/2 teaspoon of onion powder, 1/4 teaspoon of black pepper, and 1/4 teaspoon of paprika. Stir well until the chicken is fully coated with the creamy mixture. 2. Gently fold in the cooked ziti pasta along with 1 cup of shredded sharp cheddar cheese and 1 cup of shredded mozzarella cheese. Make sure everything is evenly combined for the best flavor. 1. Transfer the entire mixture into a greased 9x13 inch baking dish. Spread it out evenly to ensure it bakes well. 2. Top the mixture with the remaining shredded cheddar and mozzarella cheeses. This will create a delicious, cheesy crust. 3. Bake in your preheated oven for 25-30 minutes. Look for a bubbly and slightly golden top. 4. Once done, remove from the oven and let it cool for a few minutes. Garnish with chopped green onions before serving. Enjoy this comforting meal! For more details, refer to the Full Recipe. To get the right pasta texture, cook the ziti until it is al dente. This means it should still have a slight bite. If you cook it too long, it can become mushy in the oven. Always drain the pasta well. This keeps it from adding extra moisture to your dish. Mixing ingredients evenly is key. I recommend using a large bowl. Start with the cream cheese and ranch dressing. Blend them well before adding anything else. Then, mix in the chicken and seasonings. Finally, fold in the cooked ziti and cheese slowly. This way, everything gets coated nicely. To boost the flavor, you can add more spices. Try adding a pinch of red pepper flakes for heat. Fresh herbs, like parsley or basil, can brighten the dish too. If you want a tangy twist, add a splash of lemon juice. Adjust spice levels to your taste. If you like it mild, stick to the basic seasonings. For more kick, add cayenne pepper or more black pepper. Always taste the mix before baking. This way, you can tweak it to your liking. To avoid soggy pasta, remember to drain and cool the ziti. Don't let it sit in water. The key is to mix it in right away with the creamy sauce. Watch the cheese while it bakes. Cover the dish with foil for the first half of baking. This keeps the cheese from burning. After 15 minutes, you can remove the foil. This lets the cheese melt and bubble nicely without overcooking. For a full recipe, check the details above. {{image_2}} You can change this dish to suit your taste. Here are some ideas: - Different cheese options: Try using gouda or pepper jack for a fun twist. You can also mix in some feta for tanginess. The cheese really makes this dish shine. - Using leftover rotisserie chicken: This is a great way to save time. Just shred the chicken right off the bone. It adds lots of flavor and makes prep quicker. We all have different needs when we eat. Here are some ways to adapt this dish: - Gluten-free substitutions: Use gluten-free ziti or any gluten-free pasta. This way, everyone can enjoy the meal without worry. - Vegetarian or low-carb adaptations: For a vegetarian version, swap out the chicken for mushrooms or zucchini. For a low-carb option, use spaghetti squash instead of pasta. Both choices keep the dish tasty. Pair this baked ziti with great sides to make a meal. Here are some ideas: - Pairings that complement the dish: Serve with garlic bread or a fresh green salad. A light vinaigrette works well to balance the creamy ziti. - Ideas for sides and salads: A classic Caesar salad or a simple cucumber salad can add crunch. These sides brighten the meal and bring freshness. These variations and ideas will help you create a dish that's just right for you. For the full recipe, be sure to check the main sections above. To keep your Crack Chicken Baked Ziti fresh, use an airtight container. This helps prevent spoilage and keeps flavors intact. Place it in the fridge right after it cools. It will last about 3 to 4 days. Make sure to enjoy it within this time frame for the best taste. If you want to save some for later, freezing is a great option. First, let the baked ziti cool completely. Then, cut it into portions for easy meals. Wrap each portion tightly in plastic wrap. Place them in a freezer-safe bag or container. It can last for up to 3 months in the freezer. To reheat, let it thaw in the fridge overnight. Then, bake it at 350°F (175°C) until hot. Preparing Crack Chicken Baked Ziti ahead of time is simple. Cook the ziti and chicken the day before. Store them separately in the fridge. You can mix the creamy sauce and spices too. This way, all components are ready to go. When you are ready to cook, just combine everything and bake. This makes for quick assembly and a hassle-free dinner. Crack Chicken Baked Ziti is a creamy pasta dish full of flavor. It combines ziti pasta, shredded chicken, and a creamy sauce made with cream cheese and ranch dressing. The cheese melts into gooey perfection, creating a comforting meal. The addition of spices like garlic powder and paprika gives it a nice kick. If you want more flavor, crumbled bacon adds a tasty crunch. This dish is rich, hearty, and perfect for any night. Yes, you can make Crack Chicken Baked Ziti ahead of time! Prepare the dish up to the baking step. Cover it tightly and store it in the fridge. You can keep it there for about two days. When you're ready to eat, just bake it as directed. If it's cold from the fridge, it may take a bit longer to cook. To reheat leftovers, use the oven for the best results. Preheat the oven to 350°F (175°C). Place the ziti in an oven-safe dish. Cover it with foil to keep it moist. Heat for about 20 minutes or until warm. You can also microwave it, but add a splash of water to keep it from drying out. Heat in short bursts, stirring often, until it's hot. Enjoy your delicious leftovers! Crack Chicken Baked Ziti combines easy ingredients for a tasty meal. With ziti pasta, shredded chicken, and creamy cheese, it’s hard to resist. Follow the steps to bake it perfectly, avoiding common mistakes. Personalize it with favorite spices or optional toppings like bacon. Remember to store and reheat leftovers correctly. This dish is flexible for everyone, no matter their diet. Explore variations to find what you love most in this comforting meal. Enjoy creating and sharing this dish often!

Crack Chicken Baked Ziti Delicious and Easy Comfort Meal

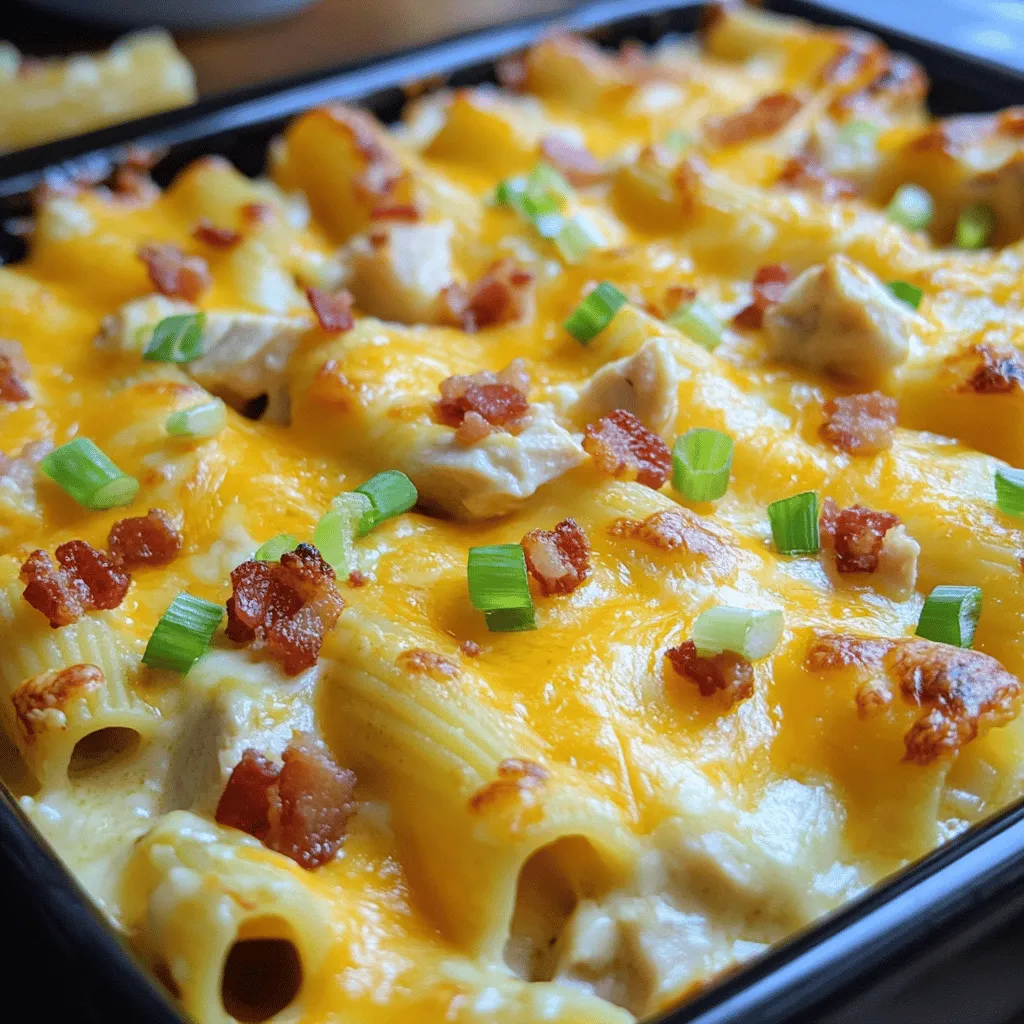
If you’re craving a dish that combines ease with flavors that’ll make you swoon, you’ve got to try Crack Chicken

- 1 pound large shrimp, peeled and deveined - 2 tablespoons olive oil - 3 cloves garlic, minced - 1 teaspoon smoked paprika - 1 teaspoon lemon zest - Salt and pepper to taste - 4 cups cooked quinoa or brown rice - 1 cup cherry tomatoes, halved - 1 cup cucumber, diced - ½ cup feta cheese, crumbled (optional) - Fresh parsley, chopped, for garnish - Lemon wedges, for serving When making a grilled shrimp bowl, these ingredients bring bold flavors. The shrimp is your star. It needs to be fresh or thawed if frozen. The olive oil and minced garlic create a rich, tasty base. Smoked paprika adds a nice kick. The lemon zest brightens the dish. You can choose either quinoa or brown rice for a hearty base. Both add fiber and nutrients. Cherry tomatoes and cucumber add freshness and crunch. Feta cheese is optional but adds creaminess and saltiness. Fresh parsley makes it look beautiful. Lemon wedges on the side give a zesty finish. This dish is colorful and healthy, making it a perfect meal. You can find the full recipe linked above. To start, grab a mixing bowl. Combine these marinade ingredients: - 2 tablespoons olive oil - 3 cloves garlic, minced - 1 teaspoon smoked paprika - 1 teaspoon lemon zest - Salt and pepper to taste Mix these well. Then, add 1 pound of peeled and deveined shrimp. Toss the shrimp in the marinade to coat every piece. Let the shrimp sit for at least 20 minutes. This step builds flavor. Next, we need to prepare the grill. Preheat your grill or grill pan over medium-high heat. This step is key for even cooking. Then, oil the grill grates. Use a paper towel dipped in oil. This prevents the shrimp from sticking. Now it’s time to grill the shrimp. Place the marinated shrimp on the hot grill. Grill for about 2-3 minutes on each side. Look for the shrimp to turn pink and opaque. Overcooking can make shrimp tough, so stay close. Once done, remove the shrimp and set them aside. For the final assembly, grab large serving bowls. Start by layering 4 cups of cooked quinoa or brown rice in each bowl. Next, arrange the grilled shrimp on top of the grain. Add fresh toppings like these: - 1 cup cherry tomatoes, halved - 1 cup cucumber, diced - ½ cup feta cheese, crumbled (optional) Finish with freshly chopped parsley for garnish. Serve with lemon wedges for a zesty kick. Your Grilled Shrimp Bowl with Garlic Sauce is now ready! For the complete recipe, refer to the Full Recipe. To get the best flavor from your sauce, balance is key. You want the garlic to shine but not overwhelm. Start with the right amount of olive oil. This will help the garlic flavor spread evenly. Add smoked paprika and lemon zest for depth. These bring out the garlic and enhance the dish. When it comes to mincing garlic, technique matters. Use a sharp knife and chop finely. This ensures maximum flavor release. For even better results, sprinkle a bit of salt on the minced garlic. This helps break it down further and intensifies its taste. Make your bowl look as good as it tastes. Start with a mound of quinoa or rice. This creates a nice base for your shrimp. Next, arrange the grilled shrimp on top, making sure they are evenly spaced. Add halved cherry tomatoes and diced cucumber for a splash of color. For a garnish, sprinkle fresh parsley over everything. This adds visual appeal and a fresh taste. You can also add lemon wedges on the side. They not only look great but add a zesty kick when squeezed over the bowl. Grilling shrimp can be tricky. One common mistake is overcooking. Shrimp cooks fast, usually in just 2-3 minutes per side. Keep an eye on them; they should turn pink and opaque when done. For best results, preheat your grill to medium-high heat. A hot grill helps get those lovely grill marks and a nice char. If your grill is too cool, the shrimp will steam instead of grill, losing flavor. Always oil the grill grates to prevent sticking. This makes flipping the shrimp much easier. {{image_2}} You can switch shrimp for chicken or tofu. Chicken gives a nice, hearty bite. Tofu is great for a plant-based option. If you use chicken, cut it into small pieces. Cook it longer, about 6-8 minutes, until it’s no longer pink. For tofu, use firm or extra-firm tofu. Press it to remove extra water, then grill it for about 4-5 minutes on each side. This way, it gets crispy and holds flavor well. Add spices or herbs to boost flavor. Try cumin or coriander for a warm touch. Fresh herbs like basil or cilantro can brighten the dish. You can also explore different sauces. A sweet chili sauce adds sweetness, while a soy sauce mix gives a savory kick. Just drizzle or mix in after grilling for extra flair. Try serving the bowl with different grains. Couscous or farro can add fun textures. For a lighter meal, use leafy greens like spinach or arugula instead of grains. This makes it fresh and crisp. You can also add avocado for creaminess or nuts for crunch. These changes keep the dish exciting and full of flavor. Store leftover grilled shrimp in an airtight container. Make sure to cool the shrimp first. Place them in the fridge within two hours of cooking. They will stay fresh for up to three days. Use clear, stackable containers to save space and keep track of what you have. To reheat grilled shrimp, use the stovetop or microwave. Heat them on low in a pan for even warmth. If using a microwave, cover the shrimp with a damp paper towel to keep them moist. This method helps prevent overcooking. You want the shrimp to stay juicy and flavorful. Yes, you can freeze the shrimp bowl! Follow these steps to freeze: - Let the dish cool completely before freezing. - Place it in a freezer-safe container or bag. - Remove as much air as possible to avoid freezer burn. To thaw, place the container in the fridge overnight. You can also use the microwave. Reheat gently to keep the shrimp tender. Enjoy your delicious grilled shrimp bowl later! For the detailed cooking process, check the Full Recipe. You can tell shrimp is done when it turns pink and opaque. The flesh should be firm to the touch. For large shrimp, grill for about 2-3 minutes on each side. Smaller shrimp will cook faster, so check them at 1-2 minutes per side. Yes, you can use frozen shrimp. First, thaw them in the fridge overnight or under cold running water for about 10-15 minutes. After thawing, pat them dry before marinating. This helps the shrimp absorb more flavor. Great side dishes include a garden salad or grilled veggies. You can also serve crusty bread alongside the bowl. For drinks, try a light white wine or a refreshing iced tea. Lemonade pairs well too. You can find the complete recipe for Grilled Shrimp Bowl with Garlic Sauce in the recipe section. You've learned how to make a tasty Grilled Shrimp Bowl. From picking fresh ingredients to grilling tips, every step matters. Remember, marinating shrimp adds flavor, and fresh veggies brighten the dish. You can switch proteins or grains for your tastes, making this bowl your own. Storing leftovers correctly keeps them fresh for later. Enjoy this healthy meal and share it with friends. You’ll impress them with your cooking skills!

Grilled Shrimp Bowl with Garlic Sauce Flavor Boost

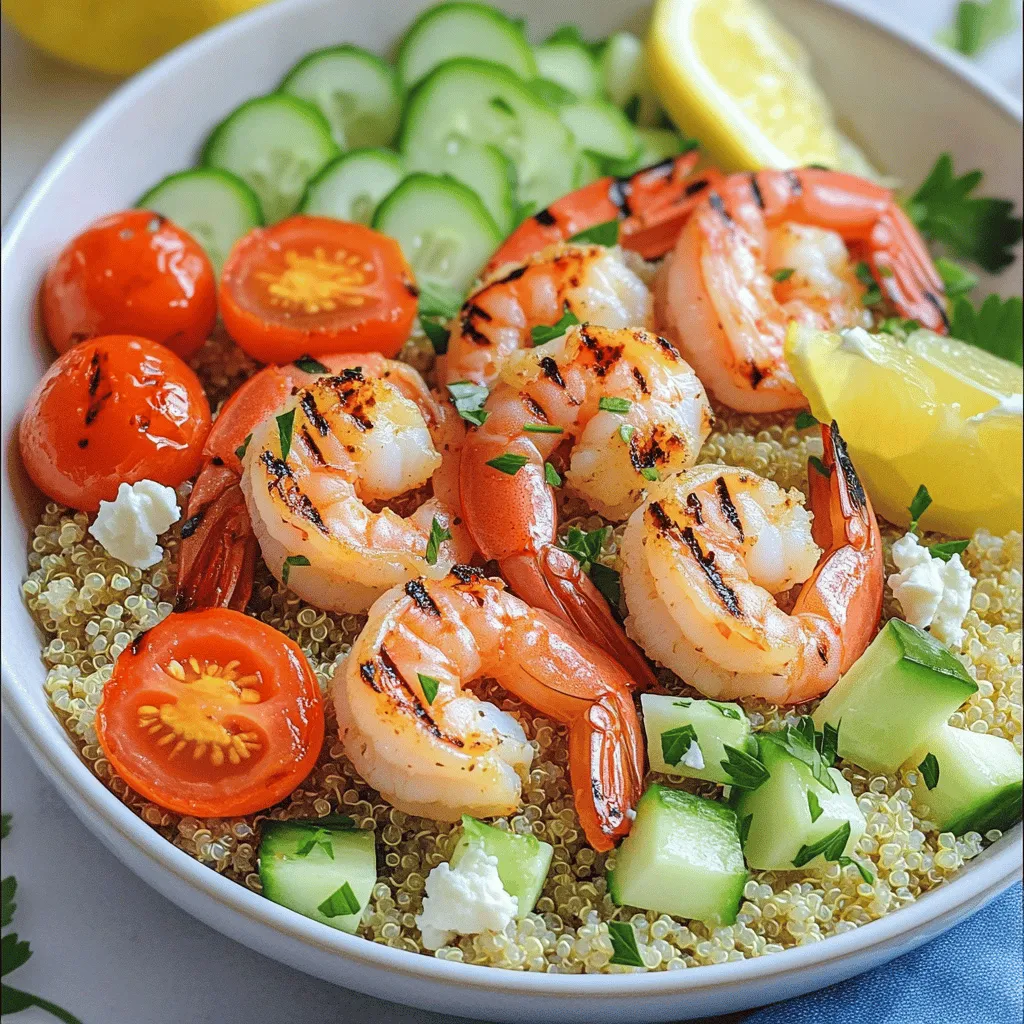
Dive into the delicious world of grilled shrimp with this easy Grilled Shrimp Bowl with Garlic Sauce! I’m excited to

To make a tasty Chicken Taco Casserole, you need a few simple items. Here’s what you will need: - 2 cups cooked chicken, shredded - 1 can (15 oz) black beans, rinsed and drained - 1 can (15 oz) corn, drained - 1 can (10 oz) diced tomatoes with green chilies - 1 packet taco seasoning - 1 cup sour cream - 1 cup shredded cheddar cheese - 1 cup tortilla chips, crushed - 1/2 cup green onions, sliced - 1/2 cup fresh cilantro, chopped (optional) - Salt and pepper to taste Each ingredient adds flavor and texture. The shredded chicken gives protein and heartiness. Black beans add fiber, while corn brings sweetness. Diced tomatoes with green chilies add a mild spice that wakes up the dish. Taco seasoning ties all the flavors together. Sour cream adds creaminess, while cheese gives that gooey finish we all love. The crushed tortilla chips add a nice crunch. Green onions and cilantro brighten everything up. Once you gather these ingredients, you are ready to create a delicious meal. For the full recipe, check out the detailed steps that follow. - Preheat the oven to 350°F (175°C). - Prepare the baking dish by greasing it lightly. - In a large bowl, mix shredded chicken, black beans, corn, and diced tomatoes. - Add taco seasoning and sour cream. - Stir well until all ingredients blend. - Spread half of the crushed tortilla chips at the bottom of the baking dish. - Spoon the chicken mixture over the chips, spreading it evenly. - Layer the remaining crushed tortilla chips on top. - Sprinkle the shredded cheddar cheese evenly over everything. - Bake in the preheated oven for 25-30 minutes. - Remove from the oven and let it cool for 5 minutes before serving. - Ensure chicken is shredded evenly for better mixing. This helps each bite be tasty. - Use low-sodium beans and seasoning if watching salt intake. This keeps it healthy for all. - Garnish with green onions and cilantro. This adds color and fresh taste. - Serve with a dollop of sour cream or guacamole. These toppings make it even better. - Use a non-stick spray for easy cleanup. This saves time after cooking. - A 9x13 inch dish is ideal for this recipe. It holds all the flavors well. To explore how to make this dish, check out the Full Recipe. {{image_2}} You can easily make this dish vegetarian. Just swap the shredded chicken for a mix of sautéed vegetables. Bell peppers, zucchini, and mushrooms work great together. This change keeps the flavors bold while adding more colors. You can still use black beans and corn for protein and texture. If you like heat, try adding jalapeños to the chicken mixture. Slice them thin or chop them small for even heat. This spicy twist brings a new level of flavor to your casserole. You can adjust the amount based on your taste. It’s fun to experiment and find your perfect level of spice. Cheese is key in this dish. While cheddar is classic, you can try different cheese types. Monterey Jack or pepper jack can add a nice, creamy texture. Mixing cheeses also creates a richer flavor. Feel free to get creative and find the combination you love. Store leftovers in an airtight container for up to 3 days. This keeps the chicken taco casserole fresh. I recommend letting it cool before sealing. This helps avoid steam buildup inside the container. Freeze portions in freezer-safe containers for up to 2 months. Make sure to label the containers with the date. This way, you can keep track of how long they have been in the freezer. When you’re ready to eat, just thaw overnight in the fridge. Reheat in the oven or microwave until heated through. If using the oven, cover it to keep the top from burning. In the microwave, heat in short bursts for even warming. Enjoy your tasty casserole just like it was fresh out of the oven! Can I use rotisserie chicken for this recipe? Yes, rotisserie chicken works great. It saves time and adds flavor. Just shred the chicken before mixing it with the other ingredients. How can I make this gluten-free? You can make it gluten-free by using gluten-free tortilla chips and taco seasoning. Check labels to ensure all ingredients are safe. What side dishes pair well with Chicken Taco Casserole? Some great sides are a fresh salad, guacamole, or corn on the cob. You can also serve it with rice or beans for a filling meal. Can I add more vegetables to the casserole? Absolutely! You can add bell peppers, zucchini, or spinach. Just chop them small and mix them in. Is it possible to make this dish dairy-free? Yes, use dairy-free sour cream and cheese. There are many great options available today. How long can I store leftovers? Store leftovers in an airtight container for up to three days in the fridge. What is the best way to ensure the casserole is cooked through? Check that the cheese is bubbly and golden. You can also use a food thermometer to ensure it reaches 165°F (74°C) for safety. This Chicken Taco Casserole blends easy cooking with great flavors. You learned the ingredients, step-by-step instructions, and helpful tips. I shared ways to make it vegetarian or spicy too. Remember, whether you enjoy it fresh or save some for later, this dish is fun to make and share. Try it with friends or family next time. Happy cooking!

Chicken Taco Casserole Flavorful and Simple Dinner

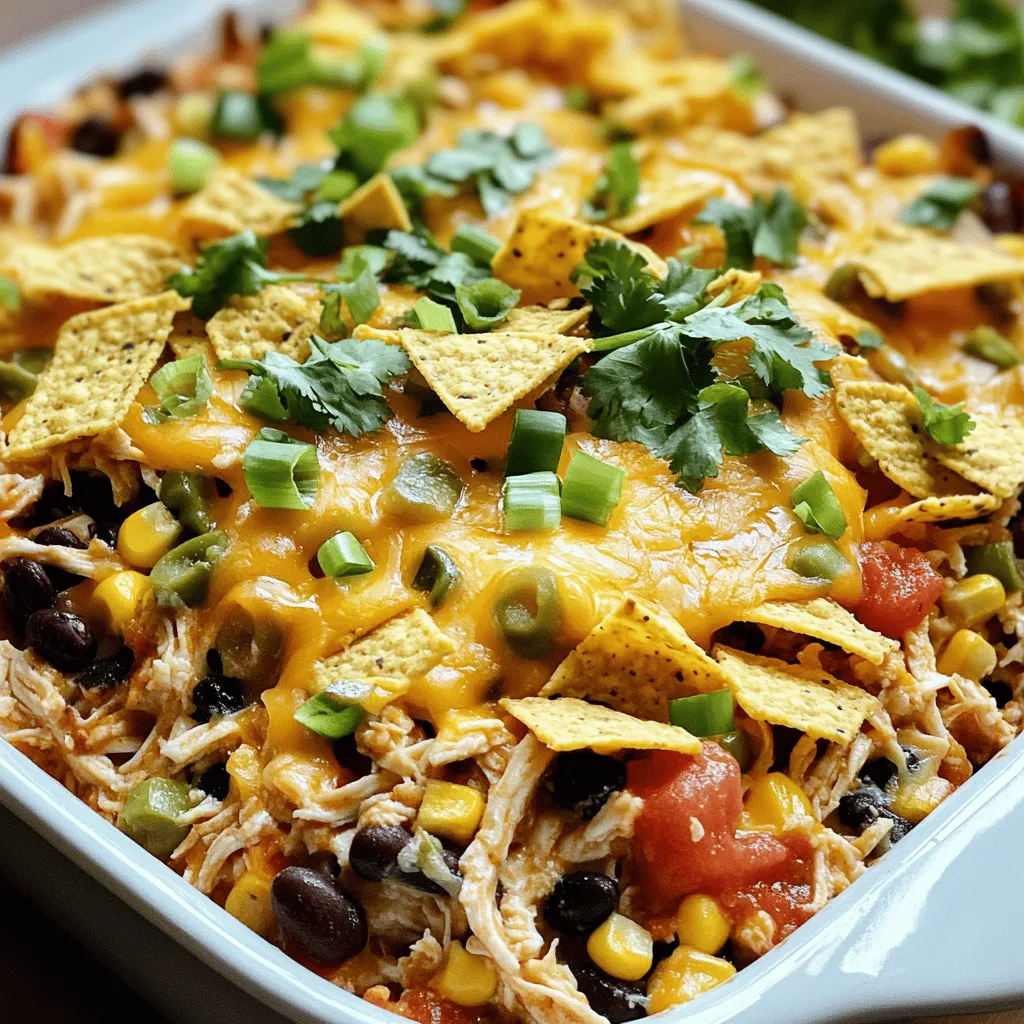
Craving a quick and tasty meal? Look no further! My Chicken Taco Casserole is easy to make and packed with

To make sweet cornbread, you need these simple ingredients: - 1 cup cornmeal - 1 cup all-purpose flour - 1/3 cup granulated sugar - 1 tablespoon baking powder - 1/2 teaspoon salt - 1 cup buttermilk (or substitute with milk and 1 tablespoon vinegar) - 1/4 cup unsalted butter, melted - 2 large eggs - 1 cup corn kernels (fresh, frozen, or canned) - 1/2 cup honey These ingredients work together to create a soft, moist bread that is sweet and flavorful. You can make a few changes if you need to. - For buttermilk, you can use regular milk mixed with vinegar. This gives a similar tang. - If you want a different sweetness, try maple syrup instead of honey. - Feel free to add cheese or jalapeños for a twist. Both add great flavor and texture. By using these substitutions, you can customize your cornbread to fit your taste. You can also explore the full recipe for more details on preparation. First, let's preheat the oven to 400°F (200°C). This step is key for a nice rise. While the oven heats up, grab your baking pan. Grease a 9-inch round cake pan or a square dish with butter or oil. This helps the cornbread pop out easily after baking. In a large bowl, combine the cornmeal, all-purpose flour, granulated sugar, baking powder, and salt. Use a whisk to mix these ingredients well. This step ensures even distribution of flavors. The cornmeal gives a lovely texture, and the sugar adds sweetness. In another bowl, mix the buttermilk, melted butter, eggs, and honey. Stir until you have a smooth blend. This mixture brings moisture and richness. The honey adds a touch of natural sweetness that pairs perfectly with the corn. Now, pour the wet ingredients into the dry mix. Stir gently until just combined. It's okay if there are a few lumps; don’t overmix! Next, fold in the corn kernels. They add a burst of sweet flavor and a nice pop in every bite. Pour the batter into your prepared pan. Smooth the top with a spatula for an even bake. Bake for 20 to 25 minutes. Check for doneness by inserting a toothpick into the center. If it comes out clean, your cornbread is ready! Let it cool slightly in the pan before lifting or slicing. Enjoy the warm, sweet aroma! To get the best texture in your cornbread, avoid overmixing. When you mix the wet and dry ingredients, stir gently. A few lumps are okay. Overmixing makes the cornbread tough. Always use fresh ingredients. Fresh corn kernels add flavor and sweetness. Fresh buttermilk improves the batter's richness. Serve your cornbread warm. A pat of butter or a drizzle of honey makes it extra yummy. You can also pair it with soups or stews. The soft, sweet bread complements spicy or hearty meals well. It adds a nice touch to chili or chicken soup. To make your cornbread even better, try adding spices or herbs. A pinch of cayenne or smoked paprika gives it a warm kick. Fresh herbs like thyme or chives can add a nice twist. You can also experiment with toppings. Try adding cheese, jalapeños, or even nuts for crunch. Each option can transform the dish into something unique. For the complete recipe, check out the Full Recipe. {{image_2}} You can make your cornbread even sweeter by adding more honey. Just stir in an extra 1/4 cup of honey into the wet mix. This adds a rich flavor that pairs well with butter. You can even drizzle some honey on top after baking for extra sweetness! If you want a twist, try adding cheese or spices. Sharp cheddar cheese adds a nice salty bite. You could also mix in spices like cumin or paprika for warmth. For a kick, jalapeño cornbread is a fun option. Just chop fresh jalapeños and fold them into the batter. This adds a spicy punch that many enjoy! Are you looking for a gluten-free choice? You can use gluten-free flour blends instead of all-purpose flour. Make sure to check the blend for xanthan gum, which helps bind the ingredients. This way, everyone can enjoy a slice of sweet cornbread! To keep your sweet cornbread fresh, store it in an airtight container. This helps seal in moisture and flavor. You can also wrap it tightly in plastic wrap. If you have leftover cornbread, keeping it in the fridge is a good idea. This will help it last longer, typically up to a week. Just make sure to let it cool completely before storing. If you want to save some cornbread for later, freezing is easy. First, let the cornbread cool down. Then wrap it in plastic wrap and place it in a freezer bag. This will keep it fresh for about three months. When you're ready to eat it, thaw it in the fridge overnight. To reheat, place the cornbread in the oven at 350°F (175°C) for about 10-15 minutes. This will help restore its soft texture. Enjoy your sweet cornbread again with ease! Sweet cornbread has a rich, sweet flavor. This comes from added sugar or honey. Regular cornbread is more savory and often contains less sugar. The texture of sweet cornbread is moist and fluffy. Regular cornbread tends to be drier and crumbly. You can enjoy sweet cornbread on its own or with butter and honey. Regular cornbread pairs well with savory dishes like chili or stew. Yes, you can make cornbread ahead of time. I suggest baking it up to two days before you need it. Store it in an airtight container at room temperature. You can also refrigerate it to keep it fresh longer. If you want to serve it warm, simply reheat it in the oven. Wrap it in foil to keep it from drying out. This way, you can enjoy your sweet cornbread without the rush. To check if your cornbread is done, look for a golden brown top. Insert a toothpick into the center; it should come out clean. If the toothpick has batter on it, bake the cornbread a little longer. You can also tap the top; it should sound hollow. When it looks and sounds right, it's ready to enjoy. This sweet cornbread will be soft and moist, perfect for any meal. We explored key ingredients for sweet cornbread, like cornmeal and buttermilk. I shared step-by-step methods to make it easy for you. Don't forget tips for texture and serving ideas to enhance flavor. You can try different variations, like adding honey or cheese, to suit your taste. Storing and freezing cornbread correctly keeps it fresh. Experiment with these ideas, and enjoy delicious cornbread every time you bake!

Sweet Cornbread Recipe Easy and Delicious Treat

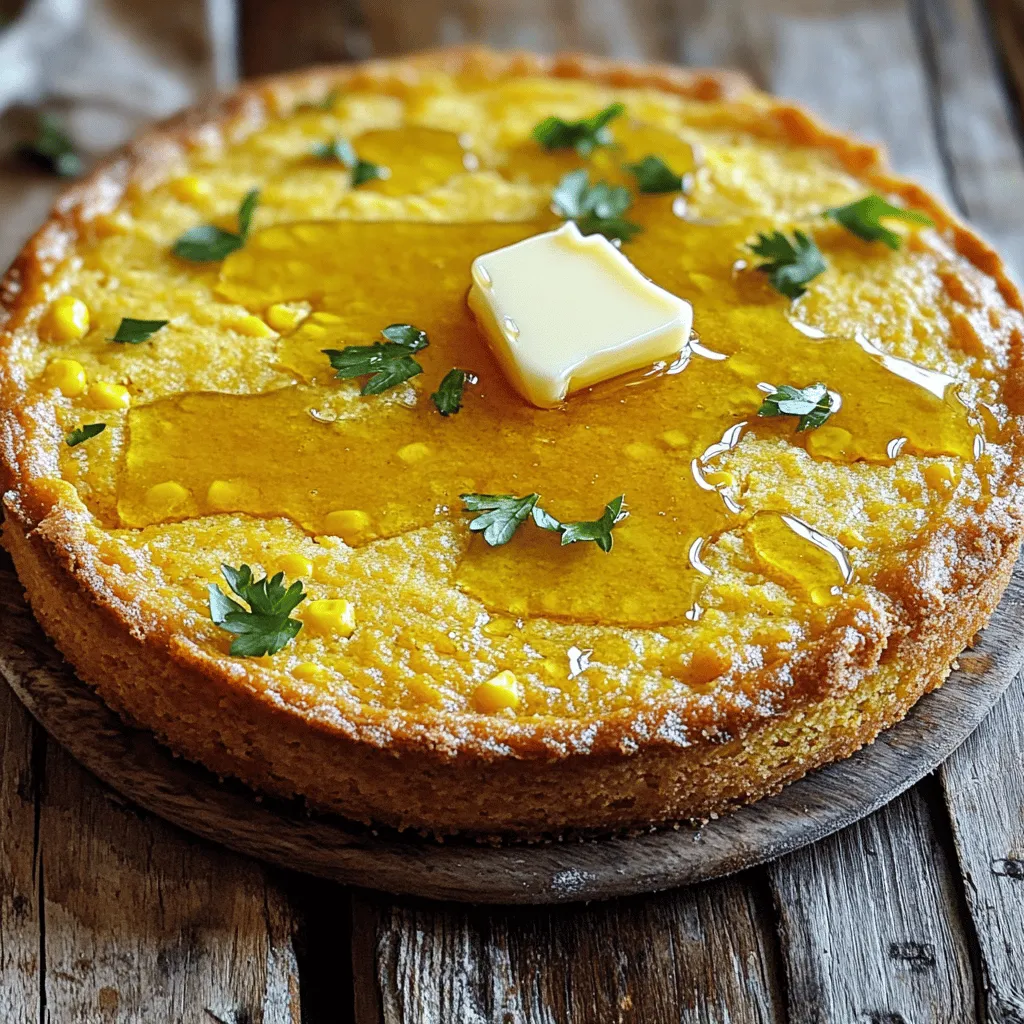
Are you looking for a treat that’s both sweet and easy to make? Look no further! My sweet cornbread recipe

- 4 chicken thighs (skin-on, bone-in) - 1/2 cup unsalted butter, melted - 3 tablespoons fresh lemon juice - Zest of 1 lemon - 4 cloves garlic, minced - 1 teaspoon dried oregano - 1 teaspoon salt - 1/2 teaspoon black pepper - Fresh parsley, chopped (for garnish) - Lemon slices (for garnish) You can swap unsalted butter for olive oil or coconut oil. If you want less sodium, use a low-sodium salt. For fresh lemon juice, try bottled lemon juice. You will need a baking dish for cooking. A mixing bowl helps to mix the ingredients. Use a basting brush or spoon to coat the chicken well. Gather these items before starting. Having everything ready makes cooking easy and fun. Each ingredient adds flavor and moisture to your chicken, making it juicy and tender. You can find the full recipe above to guide you through the steps. First, preheat your oven to 400°F (200°C). This step is key for even cooking. Next, grab a bowl and mix your melted butter, lemon juice, lemon zest, minced garlic, oregano, salt, and pepper. Stir until it combines well. Take your chicken thighs and place them in a baking dish, skin-side up. Pour the lemon butter mixture over the chicken. Make sure each piece is well coated. Now, it's time for baking. Place the dish in your preheated oven. Set the timer for 35-45 minutes. The goal is to reach an internal temperature of 165°F (74°C). Halfway through, use a brush or spoon to baste the chicken with the juices in the dish. This adds more flavor to the skin and meat. To check if your chicken is done, use a meat thermometer inserted into the thickest part. Look for a reading of 165°F (74°C). You can also check the skin; it should be golden brown and crispy. If the chicken is firm to the touch, it’s likely done. Let the chicken rest for about 5 minutes before serving. This helps keep it juicy. Enjoy your meal! For the full recipe, refer to the details mentioned above. To get crispy skin on your chicken, start by patting the skin dry with paper towels. This step helps remove moisture. Then, coat the chicken well with the lemon butter mixture. Basting halfway through cooking adds flavor and helps crisp the skin. You can also try using fresh herbs like thyme or rosemary. These herbs brighten the dish and add depth to the flavor. Baked lemon butter chicken pairs well with many sides. I love serving it with roasted vegetables or fluffy rice. A fresh salad with lemon vinaigrette also works nicely. For plating, place the chicken on a large plate. Arrange colorful sides around it. Add lemon slices and a sprinkle of parsley for a bright touch. One big mistake is overcooking the chicken. Always check the internal temperature with a meat thermometer. It should reach 165°F (74°C) for safe eating. Another mistake is forgetting to baste the chicken. Basting keeps the meat moist and flavorful. Make sure to baste every 15 minutes for the best results. {{image_2}} You can easily change the Baked Lemon Butter Chicken recipe to suit your taste. - Adding vegetables: Toss in some chopped carrots, bell peppers, or broccoli. They add color and flavor to the dish. The veggies soak up the lemon butter sauce, making them tasty. - Spicy lemon butter version: If you love spice, add red pepper flakes or a splash of hot sauce. This will give your chicken a nice kick. It balances well with the lemony flavor. Baked Lemon Butter Chicken isn’t just for chicken. You can switch up the protein. - Using chicken breasts or drumsticks: Chicken thighs are juicy, but breasts work, too. Drumsticks are fun and easy to eat. Just adjust your cooking time as needed. - Adapting for fish or tofu: You can use salmon or cod for a lighter meal. Tofu is great for a plant-based option. Just be gentle with the cooking time to avoid drying out the fish or tofu. Want to make this dish fit your diet? Here are some ideas. - Making it gluten-free: This recipe is gluten-free as is. Just ensure your butter and seasonings are gluten-free. - Suggestions for a low-calorie version: Swap out the butter for olive oil. You can also use skinless chicken. This helps cut calories without losing flavor. For the full recipe, check out the complete details. Enjoy these variations and make the dish your own! To keep your baked lemon butter chicken fresh, store it in the fridge. First, let the chicken cool down. Then, place it in an airtight container. This helps keep the chicken moist and tasty. Make sure to eat the leftovers within three to four days for best results. You can also wrap the chicken tightly in plastic wrap before placing it in the container. When you reheat chicken, you want to keep it juicy. The best way is to use the oven. Preheat the oven to 350°F (175°C). Place the chicken in a baking dish and cover it with foil. Heat for about 20-25 minutes. Check the internal temperature; it should be at least 165°F (74°C). If using a microwave, heat in short bursts and cover it to trap steam. Always check that the chicken is hot all the way through. You can freeze baked lemon butter chicken for later use. First, make sure the chicken is completely cool. Wrap each piece in plastic wrap tightly. Then, place it in a freezer-safe bag or container. This helps avoid freezer burn. You can freeze it for up to three months. When you are ready to eat, move the chicken to the fridge to thaw overnight. For best results, do not refreeze once thawed. For the full recipe, check the earlier sections. Enjoy your meal! You can pair Baked Lemon Butter Chicken with many tasty sides. Here are some great options: - Best side dishes: - Steamed green beans - Roasted potatoes - Garlic bread - Mixed salad with lemon vinaigrette - Beverage pairings: - Crisp white wine, like Sauvignon Blanc - Iced tea with lemon - Sparkling water with mint These choices will make your meal even more enjoyable! Yes, you can use different cuts of chicken. Here are some tips: - Different cuts and their cooking times: - Chicken breasts: Cook for 25-30 minutes. - Drumsticks: Cook for 35-40 minutes. - Adjustments for boneless vs. bone-in chicken: - Boneless chicken cooks faster. Reduce the time by about 10 minutes. Choose the cut you like best! Baked Lemon Butter Chicken stays fresh for a while. Here’s what you need to know: - Shelf life in the fridge vs. freezer: - In the fridge, it lasts 3-4 days. - In the freezer, it can last up to 3 months. - Signs of spoilage: - Look for a change in color. - If it smells sour or off, it’s best to throw it away. You can find the full recipe details in our recipe section. Just look for Baked Lemon Butter Chicken, and you’ll get all the steps and tips to make this dish at home! This blog post covered how to make a tasty baked lemon butter chicken. We discussed key ingredients, equipment, and steps for perfecting your dish. You learned about tips for cooking and serving, and even how to store leftovers. I hope these ideas inspire you to create a delicious meal. Enjoy your cooking and share it with others. Simple steps and fresh flavors will make your chicken shine. Happy cooking!

Baked Lemon Butter Chicken Juicy and Flavorful Meal

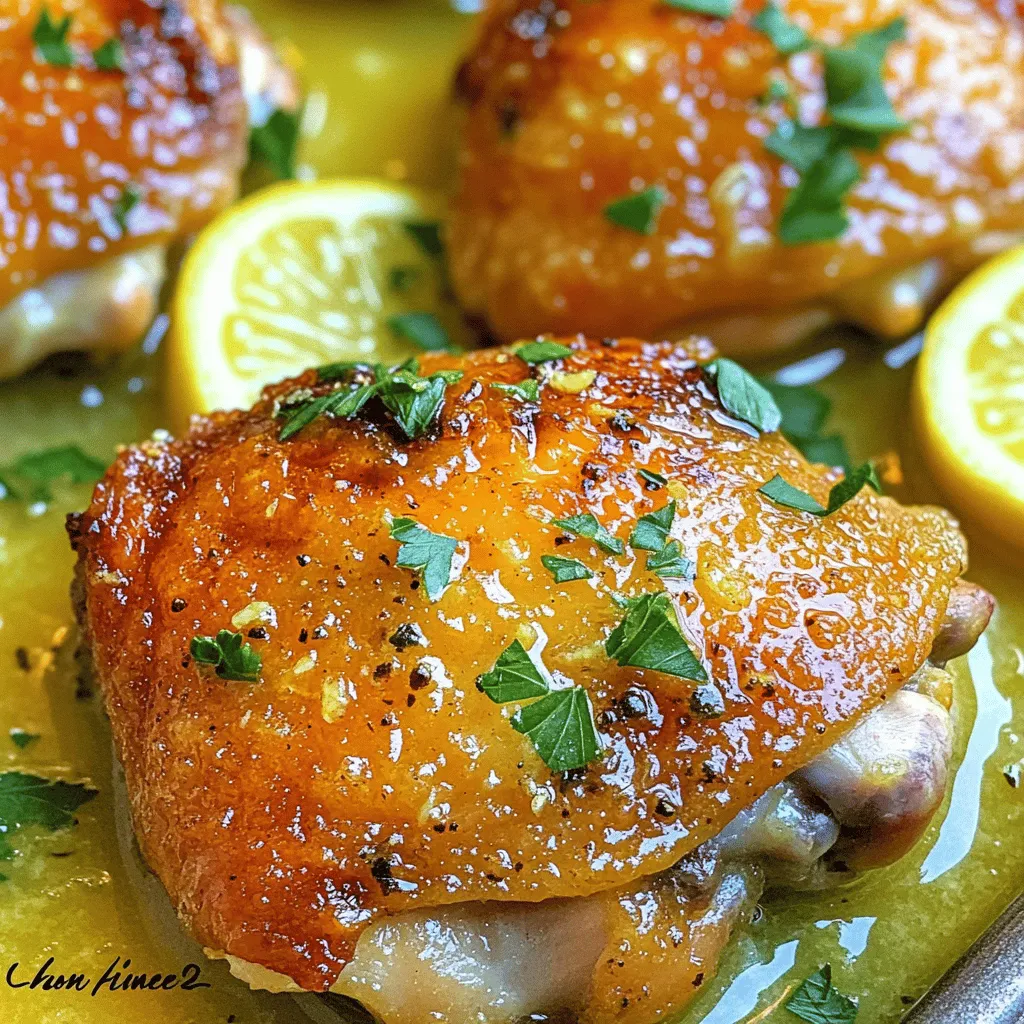
If you’re craving a dish that’s both juicy and packed with flavor, you’re in the right place! My Baked Lemon

To make these delightful strawberry cheesecake sweet rolls, gather the following ingredients: - 2 cups all-purpose flour - 2 tablespoons sugar - 1 teaspoon instant yeast - 1/2 teaspoon salt - 1/2 cup warm milk (110°F) - 2 tablespoons unsalted butter, melted - 1 large egg - 1 cup fresh strawberries, diced - 4 ounces cream cheese, softened - 1/4 cup powdered sugar - 1 teaspoon vanilla extract - 1/4 cup strawberry jam - 1 egg wash (1 egg beaten with 1 tablespoon of water) - Optional: additional powdered sugar for dusting Each ingredient plays a key role in creating the sweet rolls. The flour gives structure, while sugar adds sweetness. Yeast makes the rolls light and fluffy. Warm milk helps activate the yeast. Butter adds richness, and the egg gives moisture and binding. The cream cheese filling brings that classic cheesecake flavor. Fresh strawberries add a burst of fruity goodness. Strawberry jam enhances the sweetness and flavor. If you like, you can dust with powdered sugar for a beautiful finish. For the full recipe, check out the instructions that follow to craft these irresistible rolls. 1. Mixing dry ingredients: Start by grabbing a large mixing bowl. Add 2 cups of all-purpose flour, 2 tablespoons of sugar, 1 teaspoon of instant yeast, and 1/2 teaspoon of salt. Stir them well until mixed evenly. 2. Combining wet ingredients: In a different bowl, whisk together 1/2 cup of warm milk (110°F), 2 tablespoons of melted unsalted butter, and 1 large egg. Mix until smooth and combined. 3. Kneading the dough: Gradually add the wet mixture to the dry bowl. Use your hands to knead the dough for about 5-7 minutes. The dough should feel smooth and elastic. Once done, place it in a greased bowl. Cover it with a damp cloth and let it rise in a warm spot for 1 hour, or until it doubles in size. 1. Mixing cream cheese and sugar: While the dough rises, prepare the filling. In a bowl, mix 4 ounces of softened cream cheese with 1/4 cup of powdered sugar and 1 teaspoon of vanilla extract. Beat until you get a creamy and smooth texture. 2. Preparing strawberries: Take 1 cup of fresh strawberries and dice them into small pieces. Set them aside for later. 1. Rolling out the dough: After the dough has risen, punch it down to release air. Roll it out on a floured surface into a rectangle, about 12x18 inches. 2. Spreading the filling and strawberries: Spread the cream cheese mixture evenly over the dough, leaving a 1-inch border. Sprinkle the diced strawberries over the cream cheese layer. Drizzle 1/4 cup of strawberry jam on top. 3. Cutting and placing in baking dish: Starting from one end, tightly roll the dough into a log shape. Cut the log into 12 equal rolls. Place the rolls in a greased baking dish. Cover them with plastic wrap and let them rise for another 30 minutes. 1. Preheating the oven: Preheat your oven to 350°F (175°C) while the rolls rise. 2. Applying egg wash: Brush the tops of the rolls with an egg wash made from 1 beaten egg mixed with 1 tablespoon of water. This gives them a nice golden color. 3. Baking time and indicators: Bake the rolls for 20-25 minutes. They should turn golden brown and look fully cooked. Allow them to cool slightly before serving. You can find the Full Recipe for this delightful treat in the previous sections. To get the best dough, knead it well. Kneading helps develop the gluten. Use your palms to press and roll the dough. Aim for about 5-7 minutes of kneading. You want the dough to feel smooth and elastic. Resting time is key. After kneading, let the dough rise. This step makes it light and fluffy. Keep it in a warm spot, covered with a cloth. Allow it to double in size, which takes about 1 hour. The filling is where you can get creative! You can try other flavors with the cream cheese. Mix in lemon zest for a zesty twist. You can also add a dash of cinnamon for warmth. If you want to switch up the fruit, think beyond strawberries. Blueberries and raspberries work great. You can also use diced peaches or apples for a fun change. Each fruit brings its own unique taste. When serving, presentation matters. Place the rolls on a fancy platter. Dust them with powdered sugar for a sweet touch. Drizzle extra strawberry jam on top for added flair. For extra flavor, serve with sauces. A simple vanilla glaze can enhance the taste. You can also offer whipped cream or a scoop of ice cream. This makes for a delightful treat! For the full recipe, check out the Strawberry Cheesecake Sweet Rolls 🥐. {{image_2}} You can switch up the fruit in these rolls. Try blueberries or raspberries for a twist. They add fresh flavor and vibrant color. Seasonal fruits work well too. In summer, peaches or cherries can shine. In fall, consider apples or pears. Each fruit brings its own charm. This keeps your rolls exciting and new. You don’t have to stick with traditional dough. Using crescent roll dough saves time. It gives a flaky texture, which many enjoy. If you need gluten-free options, there are good choices available. Many brands offer gluten-free dough. Just follow the package instructions for best results. This way, everyone can enjoy these sweet rolls. Want a vegan option? You can easily make these rolls dairy-free. Use plant-based cream cheese and milk. Almond or soy milk works great. For the dough, swap the egg with a flaxseed meal. Mix one tablespoon of flaxseed with three tablespoons of water. Let it sit until it thickens. This will help bind your dough without eggs. Enjoy creating your own version of strawberry cheesecake sweet rolls! For the detailed instructions, check out the Full Recipe. To store leftover rolls, place them in an airtight container. This keeps them fresh for a few days. You can also wrap them in plastic wrap for added protection. If you want to reheat them, use the oven. Preheat it to 350°F (175°C). Heat the rolls for 5-10 minutes until warm. This method keeps the rolls soft and tasty. For long-term storage, you can freeze the rolls. Let them cool completely first. Then, wrap each roll in plastic wrap and place them in a freezer bag. They can last for up to three months in the freezer. When you want to enjoy them, take the rolls out of the freezer. Thaw them in the fridge overnight. To refresh them, preheat the oven to 350°F (175°C). Bake for 10-15 minutes. This brings back their fresh-baked flavor. You can also microwave them for a quick treat, but they may not be as soft. For the full recipe, check out the earlier section. Enjoy your sweet rolls any time! Can I make the dough ahead of time? Yes, you can prepare the dough a day before. Just let it rise, then refrigerate it. When you are ready to bake, let it sit at room temperature for about 30 minutes before rolling it out. What can I substitute for strawberries? If you don’t have strawberries, you can use blueberries, raspberries, or diced peaches. Each fruit adds its unique flavor. Just make sure to adjust the sweetness if needed. How do I know when the rolls are done baking? The rolls should turn golden brown on top. You can also tap the bottom; a hollow sound means they are baked through. If you have a thermometer, the center should reach 190°F. Where can I find ready-made strawberry cheesecake sweet rolls? You can find them at local bakeries, grocery stores, or specialty shops. Some places even sell them frozen. Check the bakery section for fresh options or the frozen aisle for convenience. How long do these rolls last at room temperature? The rolls last for about 2 days at room temperature if kept in an airtight container. For longer storage, consider refrigerating them, which can extend their freshness for up to a week. In this blog post, we covered how to make delicious strawberry cheesecake sweet rolls. We discussed the key ingredients, the step-by-step instructions, and tips to perfect your dough and filling. I shared variations for different tastes and storage tips to keep your rolls fresh. Making these rolls is fun and rewarding. They’re perfect for breakfast, snacks, or special occasions. Enjoy the process, and share your tasty results with friends and family!

Strawberry Cheesecake Sweet Rolls Irresistible Delight

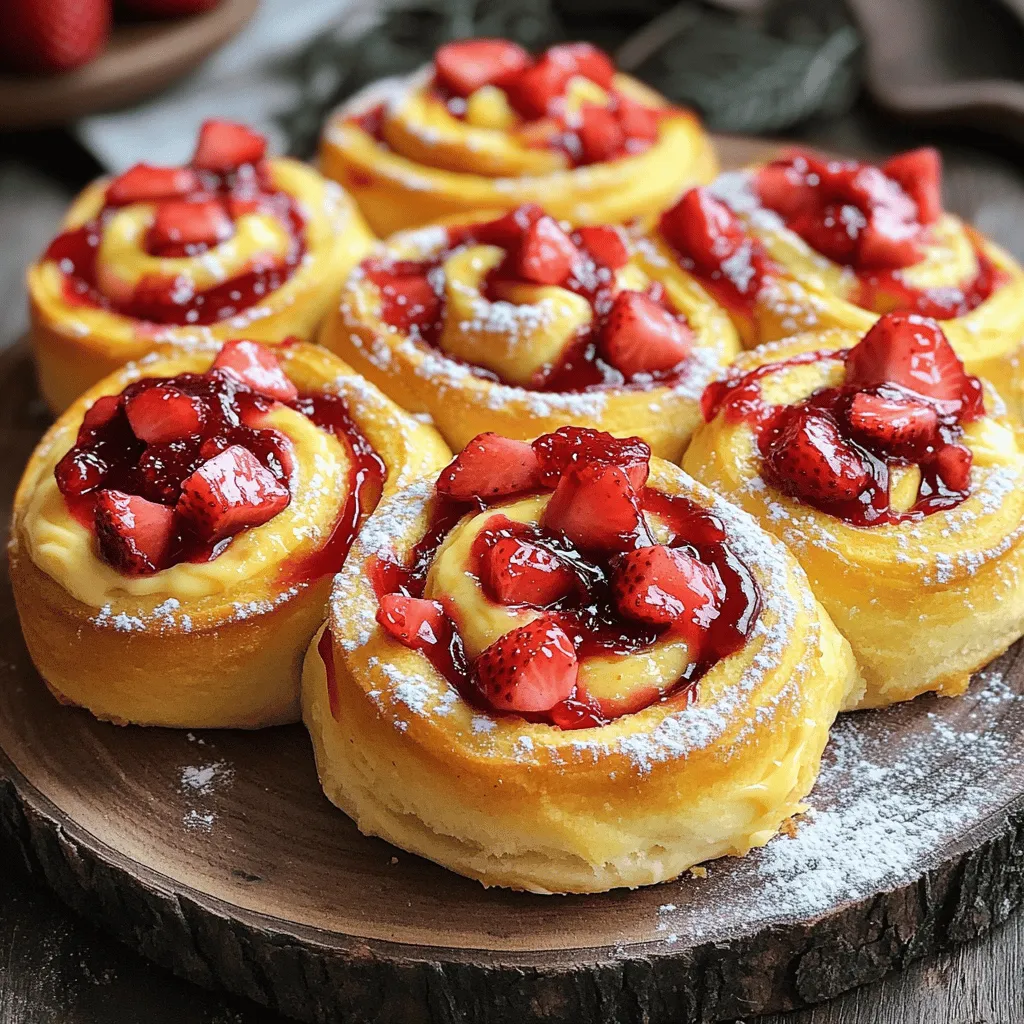
If you’re craving a sweet treat that combines the best of strawberry cheesecake and warm rolls, you’re in for a

For a hearty Dwarven Feast, you need some key ingredients. Gather the following: - 2 pounds beef chuck, cut into large chunks - 1 pound lamb, cut into large chunks - 4 large carrots, chopped - 3 potatoes, cubed - 2 onions, quartered - 4 cloves garlic, minced - 4 cups beef broth These meats and veggies create a rich, flavorful base for your dish. Next, you'll need some cooking staples to boost the flavor. Get these: - 2 tablespoons olive oil - 2 tablespoons tomato paste - 1 tablespoon Dijon mustard - 1 tablespoon Worcestershire sauce - 1 tablespoon fresh rosemary, chopped - 1 tablespoon fresh thyme, chopped - Salt and black pepper to taste These staples add depth and richness to the stew. To enjoy your Dwarven Feast fully, consider these accompaniments: - Crusty bread (for serving) - A fresh green salad - Pickled vegetables These sides complement the stew and make your meal more complete. For the full recipe, check out the earlier section. Enjoy cooking! First, gather all your ingredients. Here’s what you need: - 2 pounds beef chuck, cut into large chunks - 1 pound lamb, cut into large chunks - 4 large carrots, chopped - 3 potatoes, cubed - 2 onions, quartered - 4 cloves garlic, minced - 4 cups beef broth - 2 tablespoons olive oil - 2 tablespoons tomato paste - 1 tablespoon Dijon mustard - 1 tablespoon Worcestershire sauce - 1 tablespoon fresh rosemary, chopped - 1 tablespoon fresh thyme, chopped - Salt and black pepper to taste - Crusty bread (for serving) Now, season the beef and lamb with salt and black pepper. This step adds flavor to your meat. Next, heat the olive oil in a large Dutch oven over medium-high heat. When the oil is hot, add the beef chunks. Brown them on all sides. This step locks in the juices and flavor. Once browned, remove the beef and set it aside. Now, add the lamb chunks to the pot. Brown them just like the beef. Remove the lamb and place it with the beef. Then, it’s time to sauté the veggies. Add the onions, garlic, carrots, and potatoes to the pot. Cook for about 5-7 minutes until the onions are clear. This step makes the dish aromatic and rich. Now, it’s time to combine the flavors. Stir in the tomato paste, Dijon mustard, and Worcestershire sauce. Cook for another minute to blend the flavors. Return the browned beef and lamb to the pot. Pour in the beef broth and add the rosemary and thyme. Bring this mixture to a gentle simmer. Cover the pot and turn down the heat. Let it simmer for 2-3 hours, stirring occasionally. This slow cooking helps the meat become tender and the flavors to meld. If the stew becomes too thick, add more broth or water. Before serving, taste the stew. Adjust the seasoning with salt and pepper as needed. Serve it hot, with crusty bread on the side. The bread is perfect for soaking up the hearty stew. Enjoy your Dwarven Feast! Browning meat is key for flavor. Start with dry meat. Pat it with paper towels. Heat the oil until it shimmers. Add the chunks in batches. Give them space to brown well. Don’t crowd the pan; this makes steaming, not browning. Turn the pieces when they release easily. Brown each side for about three minutes. Remove the meat and set it aside. This step adds a rich, deep flavor. To boost flavors, use fresh herbs. Rosemary and thyme bring warmth. Add them at the end of cooking for a fresh taste. Mustard and Worcestershire sauce add tang and depth. Tomato paste gives a rich base. Stir these in with the veggies. Let them cook for a minute before adding broth. This helps meld the flavors well. Taste your stew as it cooks. Adjust salt and pepper to match your taste. For the best texture, cut the meat into even chunks. This ensures uniform cooking. Use a mix of hearty veggies like carrots and potatoes. They add body and balance. If the stew gets too thick, add broth or water a little at a time. Stir it gently to keep the texture smooth. Let it simmer long and slow for tender meat. The longer it cooks, the better the flavors blend. Enjoy the warm, cozy feel of your Dwarven Feast. For a full recipe, check out the complete guide. {{image_2}} You can make a tasty vegetarian version of the Dwarven feast. Use hearty vegetables like mushrooms, eggplant, and bell peppers. Instead of meat, add lentils or chickpeas for protein. Use vegetable broth instead of beef broth. This swap keeps the dish rich and savory. You can still use the same spices and herbs. They add depth and flavor to your stew. Serve it with crusty bread, just like the original recipe. The Dwarven Feast is flexible with meats. You can mix and match to your liking. Try using pork, chicken, or even game meats like venison. Each type of meat brings its own unique taste. For a lighter dish, chicken works great. For a heartier option, use a mix of beef and lamb. The key is to brown the meats well for deep flavors. This step is crucial, no matter the meat choice. Feel free to swap ingredients based on what you have. If you can't find fresh herbs, use dried ones. They can still give great flavor, though fresh is best. You can also change the vegetables according to the season. Add sweet potatoes, parsnips, or turnips for a different twist. Each region has its own special ingredients. This makes the dish unique to your location. Explore the full recipe to see how these changes can bring your feast to life! After you enjoy your Dwarven Feast, store leftovers in an airtight container. Keep it in the fridge. This stew lasts for about 3 to 4 days. Make sure to let it cool down first. Hot food can raise the fridge temperature, which isn't safe. Want to save some for later? You can freeze the stew. Use freezer-safe containers or bags. Leave some space at the top for expansion. It stays fresh for about 2 to 3 months in the freezer. Label containers with the date so you know when you made it. When you're ready to eat it again, take the stew out of the fridge or freezer. If frozen, let it thaw overnight in the fridge. Reheat it on the stove over low heat. Stir often to make sure it heats evenly. You can also use a microwave, but stir halfway through to help it heat well. Enjoy it again with crusty bread! A Dwarven Feast is a big meal full of hearty dishes. It comes from tales of dwarves who enjoy rich food. This feast often includes meat, root veggies, and thick stew. It brings friends and family together for fun and laughter. The Dwarven Feast is perfect for gatherings, game nights, or special events. To make this recipe gluten-free, swap regular broth for gluten-free beef broth. Check the labels on tomato paste and Worcestershire sauce, as some contain gluten. Use gluten-free bread instead of crusty bread for dipping. These swaps keep your meal tasty and safe for those with gluten issues. Yes, you can prepare the stew ahead of time. Cook the stew and let it cool before storing it in the fridge. It tastes even better the next day, as flavors meld together. Just reheat it on the stove when you are ready to serve. A Dwarven Feast pairs well with fantasy-themed games like Dungeons & Dragons. You can set a medieval table, complete with goblets and rustic decor. Board games, card games, or role-playing games work great too. The fun atmosphere enhances the meal and keeps everyone engaged. Crusty bread is the best choice for a Dwarven Feast. It holds up well against the thick stew. You can use sourdough, baguette, or rustic whole grain. These breads are perfect for soaking up all the flavors and adding a satisfying crunch. In this blog post, we explored the rich world of a Dwarven Feast. We covered key ingredients, cooking steps, and useful tips. You learned how to prepare meats and veggies for great flavor. Variations can suit many diets, like vegetarian or vegan. Proper storage and reheating advice ensure your feast lasts. Embrace this hearty meal for gatherings or fun themes. Enjoy creating your Dwarven Feast and make it memorable!

Dwarven Feast Delightful Recipe for Flavorful Fun

If you crave a hearty meal filled with flavor and fun, the Dwarven Feast is your answer. This delightful recipe

- 2 cups cooked chicken, shredded - 8 oz cream cheese, softened - 1 can (10 oz) green enchilada sauce - 1 cup shredded cheddar cheese - 1 cup shredded Monterey Jack cheese - 8 small flour tortillas To make these easy cream cheese chicken enchiladas, you need simple and tasty main ingredients. The chicken adds protein, while the cream cheese gives a rich and creamy texture. The green enchilada sauce adds a zesty punch that balances the dish. Using both cheddar and Monterey Jack cheese creates a delicious flavor blend. Lastly, the flour tortillas wrap everything together perfectly. - 1 teaspoon garlic powder - 1 teaspoon onion powder - 1/2 teaspoon cumin - Salt and pepper to taste Seasonings are key to enhancing the flavor of your enchiladas. Garlic powder and onion powder add depth. Cumin brings a warm, earthy note that ties all the ingredients together. Always adjust salt and pepper to your taste for a well-seasoned dish. - Fresh cilantro, for garnish Garnish your enchiladas with fresh cilantro. It adds a bright, fresh flavor and makes the dish look appealing. A little sprinkle goes a long way in elevating your meal. For the full recipe, check out the details above. First, you need to preheat your oven to 350°F (175°C). This step warms up the oven, making it ready for baking. A preheated oven helps the enchiladas cook evenly. In a large bowl, mix 2 cups of shredded chicken with 8 oz of softened cream cheese. Add 1 teaspoon of garlic powder, 1 teaspoon of onion powder, and 1/2 teaspoon of cumin. Season with salt and pepper to taste. Use a fork or spatula to blend everything until it’s smooth and creamy. This mixture is the heart of your enchiladas. Next, take a small flour tortilla. Scoop about a third of a cup of the chicken-cream cheese mixture and place it in the center. Carefully roll the tortilla tightly. Make sure the seam is down when you place it in a greased baking dish. Repeat this with all 8 tortillas. Each roll should be snug but not too tight. Once your tortillas are in the baking dish, pour 1 can (10 oz) of green enchilada sauce evenly over the top. This sauce gives flavor and moisture to the enchiladas. After that, sprinkle 1 cup of shredded cheddar cheese and 1 cup of shredded Monterey Jack cheese on top. Cover the enchiladas completely with cheese for a gooey finish. Cover the dish with aluminum foil. Bake in your preheated oven for 20 minutes. After that, remove the foil and bake for another 10 minutes. You want the cheese to get bubbly and golden. This creates a delicious crust on top. When your enchiladas are done baking, take them out and let them cool for a few minutes. Before serving, sprinkle fresh cilantro on top. This adds a burst of color and flavor. Now, your easy cream cheese chicken enchiladas are ready to enjoy! For the complete recipe, check out the full recipe. To make the chicken-cream cheese mixture shine, you can add a few extras. Try mixing in some chopped green onions for a fresh crunch. A squeeze of lime juice adds a zesty kick. If you like heat, diced jalapeños give a nice spice. You can also experiment with spices. Add some chili powder or paprika for extra flavor. These simple tweaks can elevate your enchiladas and impress your family. If you have leftover enchiladas, store them properly to keep them tasty. Let the dish cool completely before storing. Use an airtight container to seal in freshness. They can stay in the fridge for up to three days. For longer storage, freeze them. Wrap each enchilada in plastic wrap, then place them in a freezer bag. They can last for up to three months. When ready to eat, thaw them in the fridge overnight. Reheat in the oven at 350°F until warmed through. Pairing sides and drinks with your enchiladas can make the meal even better. A fresh salad with lime vinaigrette adds a light touch. You could also serve rice seasoned with cilantro and lime. For drinks, try a chilled margarita or a light beer. These options balance the rich flavors of the enchiladas. Enjoy your meal with family and friends! {{image_2}} You can easily add vegetables to the enchiladas for extra flavor and nutrition. Here are some great options: - Spinach: Add fresh or cooked spinach to the filling. It adds color and nutrients. - Bell Peppers: Dice red, green, or yellow bell peppers for sweetness and crunch. - Corn: Sweet corn adds a nice pop of flavor and texture. - Zucchini: Shredded zucchini blends well with the chicken and cream cheese. Mix these vegetables in with the chicken and cream cheese for a tasty twist. If you want to switch up the cheese, many options work well: - Pepper Jack: This cheese adds a nice kick with its spices. - Feta: Crumbled feta gives a tangy flavor that pairs well with the chicken. - Mozzarella: For a milder taste, use mozzarella cheese for a gooey texture. Feel free to mix and match these cheeses to find your favorite blend. You can easily control the spice level in your enchiladas. Here’s how: - Mild: Use a mild green enchilada sauce and skip any hot spices. - Medium: Add a pinch of chili powder or cayenne for a bit of heat. - Spicy: Mix in diced jalapeños or use a spicy enchilada sauce. Adjust the spice to fit your taste and enjoy a customized dish. You can keep your leftover enchiladas in the fridge. Place them in an airtight container. They stay fresh for up to four days. If you want to keep them longer, freezing is the best choice. Always let the enchiladas cool to room temperature before storing. To freeze your enchiladas, follow these steps: - Wrap each enchilada tightly in plastic wrap. - Place them in a freezer-safe bag or container. - They can stay in the freezer for up to three months. When you are ready to eat, thaw them overnight in the fridge. To reheat your enchiladas without losing flavor, try these methods: - Use the oven: Preheat to 350°F (175°C). Place enchiladas in a baking dish, cover with foil, and heat for about 20 minutes. - Use the microwave: Place one enchilada on a microwave-safe plate. Cover with a damp paper towel. Heat for 1 to 2 minutes, checking often. These methods keep your enchiladas warm and tasty. Enjoy them hot! Yes, you can use rotisserie chicken. It saves time and adds great flavor. Just shred the chicken and mix it with the cream cheese. This shortcut makes the recipe even easier. I often recommend this method for busy nights. To make these enchiladas gluten-free, switch to gluten-free tortillas. Many brands offer tasty options. Look for ones made from corn or rice flour. They work well and hold the filling nicely. Just follow the same steps as the recipe. These enchiladas pair well with many sides. Consider serving them with a fresh salad, rice, or beans. You can also add some guacamole or sour cream for extra flavor. Chips and salsa make a fun appetizer too. Enjoy mixing and matching! This blog post shared a tasty recipe for cream cheese chicken enchiladas. You learned about the main ingredients, seasonings, and how to prepare them step by step. We explored tips for perfecting the filling and storing leftovers. You also got ideas for variations, storage info, and frequently asked questions. Enchiladas are versatile and sure to please. Enjoy making them your way!

Easy Cream Cheese Chicken Enchiladas Simple and Tasty

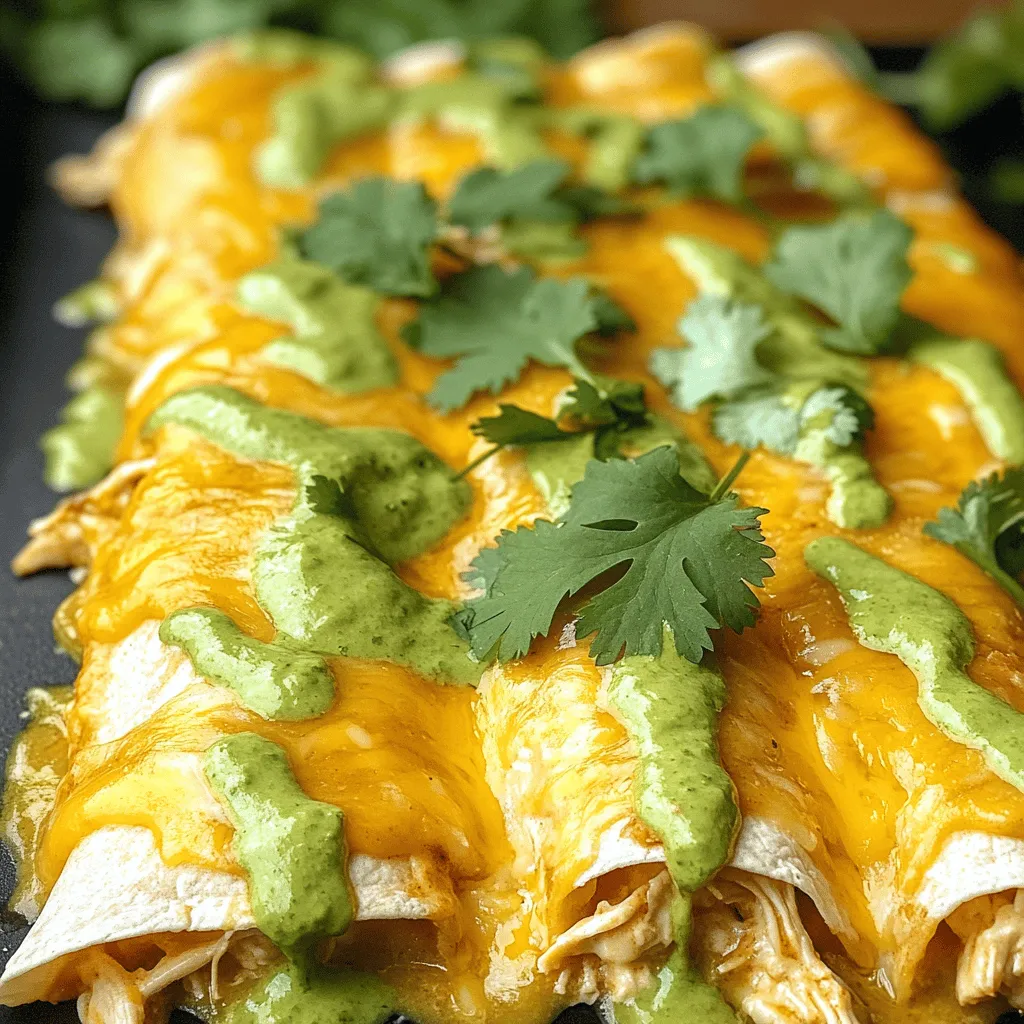
Looking for a quick dinner that’s both simple and delicious? These Easy Cream Cheese Chicken Enchiladas are perfect for you!

Older posts
Newer posts
← Previous Page1 … Page39 Page40 Page41 … Page55 Next →

dsad

© 2025 Lisa Dishes • Built with GeneratePress

Our Policies

  • Copyright Policy
  • Cookie Policy
  • GDPR Policy
  • Privacy Policy
  • Disclaimer
  • Terms Of Use

More Information

  • Home
  • About
  • Contact
  • Appetizers
  • Dessert
  • Dinner
  • Drinks
©2025, Lisa Dishes About Back To Top