Savory Spaghetti Aglio e Olio Quick and Easy Recipe
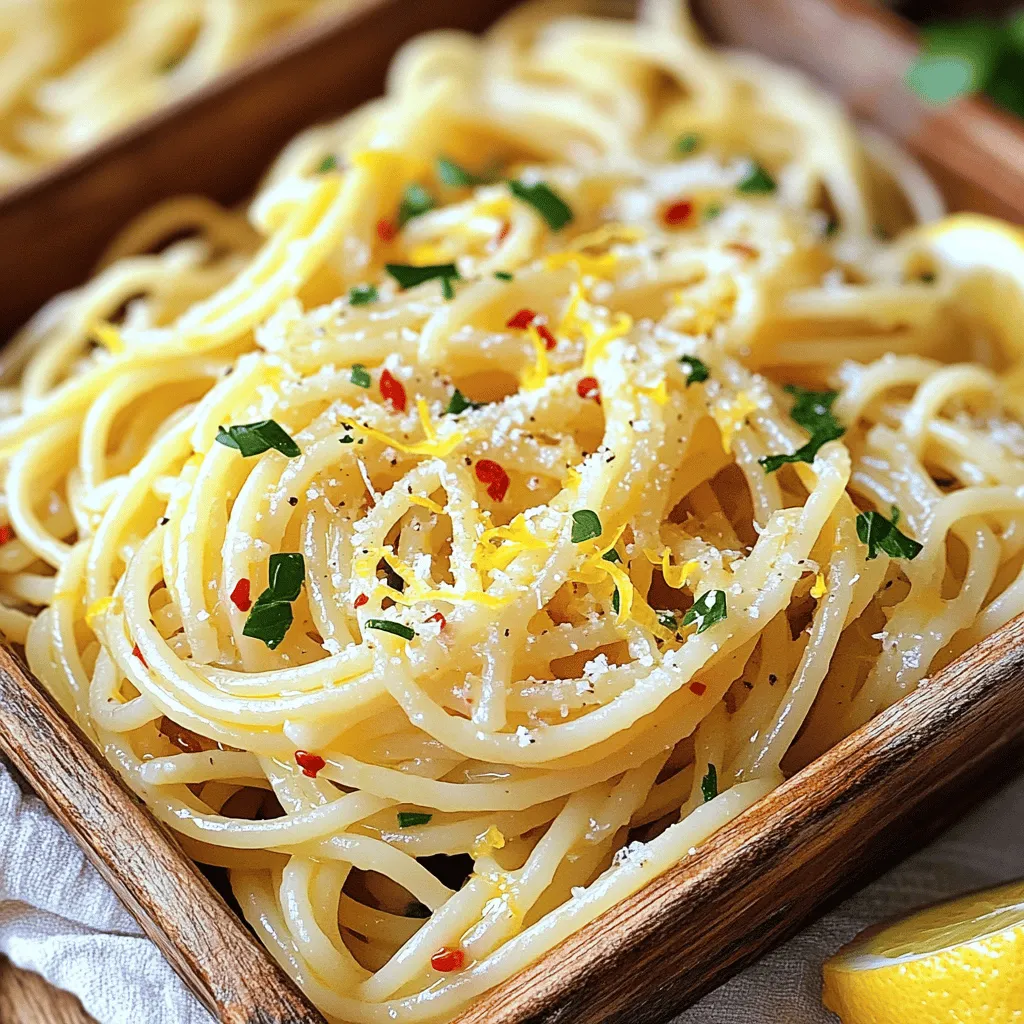
If you crave a quick and tasty meal, Spaghetti Aglio e Olio fits the bill. This classic Italian dish is
If you crave a quick and tasty meal, Spaghetti Aglio e Olio fits the bill. This classic Italian dish is

Looking for a fun and simple treat? Chocolate-dipped pretzel rods are your answer! These tasty snacks combine sweet and salty
![To make teriyaki salmon bowls, you need fresh and tasty ingredients. Here’s what you will need: - Salmon fillets - Teriyaki sauce (homemade or store-bought) - Cooked jasmine rice - Broccoli florets - Carrot (julienned) - Cucumber (thinly sliced) - Green onions (chopped) - Sesame seeds - Olive oil - Salt and pepper - Optional: pickled ginger These ingredients create a meal that is both flavorful and nutritious. Salmon gives you healthy fats and protein. The colorful vegetables add vitamins and crunch. Jasmine rice makes a great base, soaking up the tasty teriyaki sauce. Using fresh ingredients enhances the flavors in the bowl. You can buy the salmon and veggies at your local market. If you want to make your own teriyaki sauce, it’s simple and fun! Just mix soy sauce, sugar, and some ginger. This dish is quick to prepare and perfect for any meal. You can find the full recipe to guide you through the steps. Enjoy cooking! First, take your salmon fillets and place them in a bowl. Pour the teriyaki sauce over the salmon. Make sure it covers the fish well. Let it marinate for 15 to 30 minutes. This step adds a lot of flavor. While the salmon marinates, get a pot of water boiling. Add the broccoli florets to the pot. Blanch them for about 2 to 3 minutes. You want them bright green and slightly tender. Once done, transfer the broccoli to a bowl of ice water. This stops the cooking. Drain the broccoli and set it aside. Next, heat a large skillet on medium heat. Add a tablespoon of olive oil. Once the oil is hot, place the marinated salmon fillets in the skillet. Cook them for about 4 to 5 minutes on each side. The salmon should be cooked through and flaky. Remove it from heat and slice the fillets into strips. Now it’s time to build your bowls. Start with a base of cooked jasmine rice. Next, add the salmon strips on top. Then, layer the blanched broccoli, julienned carrots, and sliced cucumber. Drizzle some extra teriyaki sauce over the top for more flavor. Sprinkle chopped green onions and sesame seeds on your bowl. For a fun touch, you can add pickled ginger on the side. It adds a nice zing. Enjoy your delicious teriyaki salmon bowls! For the full recipe, check out the previous section. To cook salmon just right, aim for 4-5 minutes on each side. This gives you flaky, moist fish. The cook time may vary based on thickness. Use a fork to check for doneness; it should flake easily. If you want extra flavor, let the salmon marinate longer. A longer soak in teriyaki sauce makes a big difference. You can make your teriyaki sauce even better. Add fresh ginger or garlic for a spicy kick. A splash of lime juice brightens the sauce and balances sweetness. You can also mix in a teaspoon of honey or brown sugar for more depth. If you want more heat, try a pinch of red pepper flakes. Creating a beautiful bowl is easy! Start with a layer of rice at the bottom. Arrange salmon strips on top, then add colorful veggies like carrots and cucumbers. Use a rainbow of colors to make the dish pop. Finally, sprinkle sesame seeds and green onions for a finishing touch. Serve with pickled ginger for extra flair. For the full recipe, check out the details to impress your guests! {{image_2}} If you want different flavors, try using tofu or chicken. Tofu is a great choice for a plant-based meal. Press the tofu to remove excess water, then cut it into cubes. Marinate it in teriyaki sauce just like the salmon. Cook it in a skillet until golden brown. Chicken is another option. Use boneless, skinless chicken breasts. Season and cook them until they reach 165°F. Slice and add them to your bowl. Both options give you tasty alternatives to salmon. If jasmine rice isn't your favorite, swap it for other grains. Brown rice adds more fiber and has a nutty taste. Quinoa is another great choice. It's high in protein and cooks quickly. You can also try cauliflower rice for a low-carb option. Each of these will change the flavor and texture, making your bowl unique. Boost your bowl's nutrition with seasonal veggies. Broccoli is a classic, but you can add bell peppers or snap peas for a crunch. Spinach or kale can add green nutrients. Use whatever is fresh and in season. Not only do these veggies enhance the taste, but they also make your dish colorful and appealing. Get creative and mix different vegetables to keep things exciting! For a full recipe, check out the [Full Recipe]. You can keep your teriyaki salmon bowls in the fridge. Store them in airtight containers. They stay fresh for up to three days. Make sure the salmon is covered well to maintain its flavor. To reheat, place the salmon bowl in the microwave. Heat for about one to two minutes. Check if it’s warm all the way through. You can also reheat it on the stove. Just use a non-stick pan over low heat. Add a splash of water to keep it moist. If you want to freeze your bowls, do it before adding fresh veggies. The salmon and rice freeze well for about one month. Wrap each portion tightly in plastic wrap, then place it in a freezer bag. When you’re ready to eat, thaw it in the fridge overnight. Reheat and add fresh veggies before serving. You can make teriyaki sauce easily at home. Combine soy sauce, mirin, and sugar in a small pot. Heat it on low until the sugar dissolves. Add minced garlic and ginger for extra flavor. Let it simmer for a few minutes to thicken. This sauce is great for marinating salmon or drizzling over your bowl. Teriyaki Salmon Bowls go well with a variety of sides. Here are a few ideas: - Steamed edamame - Seaweed salad - Pickled vegetables - Miso soup - Sautéed bok choy These sides add color and flavor to your meal. Yes, Teriyaki Salmon Bowls are a healthy choice. Salmon is high in omega-3 fatty acids, good for your heart. The veggies add fiber and vitamins. Jasmine rice provides energy through carbohydrates. Just watch the teriyaki sauce, as it can be high in sugar. Use a homemade version for better control over ingredients. Yes, you can use frozen salmon. Just make sure to thaw it first. Place it in the fridge overnight or run it under cold water. Pat it dry before marinating. Frozen salmon can taste great too, as long as you cook it properly. Follow the same cooking times as fresh salmon for best results. For the complete recipe, check out the Full Recipe section! This blog post covered how to make delicious teriyaki salmon bowls. We discussed the important ingredients, like salmon and teriyaki sauce, and how to prepare them. We shared tips for cooking, variations to try, and safe storage methods. Remember, you can use other proteins or veggies if you want. With these steps, you can create a tasty meal. Enjoy experimenting in your kitchen and feel good about your cooking!](https://lisadishes.com/wp-content/uploads/2025/05/4f9a6b12-1966-4e85-a7d8-ae7b9a93d390.webp)
Love a tasty meal that’s also good for you? Teriyaki Salmon Bowls hit the spot! You get flaky salmon, fresh

Looking for a quick and tasty meal? Sweet and Sour Chicken Stir Fry is perfect for you! This dish combines
![- 2 ripe avocados - 1/2 cup unsweetened cocoa powder - 1/2 cup maple syrup or honey - 1/2 cup almond milk or any milk of choice - 1 teaspoon vanilla extract - A pinch of sea salt - Fresh berries and mint leaves for garnish To make my chocolate avocado mousse, I start with ripe avocados. They give the mousse its creamy texture. You want them soft but not brown. Next, I grab unsweetened cocoa powder. This adds that rich chocolate flavor we all love. I use maple syrup or honey for sweetness. Both work well. You can adjust the amount based on your taste. Then, I pour in almond milk. It helps blend everything smoothly. You can use any milk you like, even dairy milk. I add a teaspoon of vanilla extract for extra flavor. Finally, a pinch of sea salt balances the sweetness. It enhances the chocolate taste. For garnish, fresh berries and mint leaves add color and a nice touch. They make the mousse look beautiful on the table. - Nut butter for added creaminess - Dark chocolate shavings for garnish If you want an even creamier mousse, you can add nut butter. It gives a richer taste. Dark chocolate shavings also make a great garnish. They add a fancy touch and extra chocolate flavor. This chocolate avocado mousse recipe is easy and fun to make. For the full details, check the [Full Recipe]. Enjoy creating this delicious treat! - Start by blending the ripe avocados until they are smooth. - Next, mix in the unsweetened cocoa powder and your choice of sweetener. - Scrape down the sides of your food processor to combine everything. - Blend again until the mixture is silky and smooth. - Once ready, transfer the mousse into serving bowls or dessert glasses. - Refrigerate the mousse for at least 30 minutes. - This chilling time helps the mousse firm up and taste even better. - Serve the mousse chilled for a rich and creamy delight. For the full recipe, check out the instructions above. To get a silky consistency, use very ripe avocados. They should have a slight give when you press them. This softness helps the mousse blend smoothly. If your avocados are not ripe, the mousse will be chunky. Always check for dark green or black skin and feel for softness. You can add spices like cinnamon for extra depth. Just a pinch can make a big difference. Maple syrup and honey work well, but feel free to try other sweeteners like agave or stevia. Each option brings its own unique taste. This mousse pairs well with fresh fruits like berries or banana slices. You can also serve it with a dollop of whipped cream for a rich touch. For garnishing, use mint leaves on top for a pop of color. Drizzle with chocolate sauce for added flair. Try these ideas to impress your guests! For more detailed steps, refer to the [Full Recipe]. {{image_2}} For a vegan twist, use maple syrup instead of honey. This swap keeps the mousse plant-based. The creamy avocado pairs well with the rich cocoa. Maple syrup adds a unique sweetness. You still get that delightful texture. Just blend everything as usual. Your guests won’t even know it’s vegan! This mousse is naturally gluten-free. Just make sure all your ingredients are certified gluten-free. Cocoa powder and maple syrup are safe choices. Using almond milk or any other milk works too. This dessert is great for anyone avoiding gluten. You can serve it with confidence. Want to mix it up? Try adding espresso for a coffee kick. It brings out the chocolate flavor nicely. If you prefer something minty, add peppermint extract. Just a drop or two will do. These twists can change the whole taste. Experiment and find your favorite version! To keep your mousse fresh, cover it tightly with plastic wrap. You can also use an airtight container. This helps prevent any air from getting in and keeps it smooth. The mousse will stay good in the fridge for about three days. Yes, you can freeze chocolate avocado mousse! It’s a great way to save leftovers. Just place it in a freezer-safe container. Make sure to leave some space at the top, as it may expand when frozen. After freezing, you should thaw the mousse in the fridge overnight. Once thawed, blend it again for a smoother texture. If it seems too thick, add a splash of almond milk and mix until creamy. Enjoy your mousse just like fresh! For the full recipe, check out the details above. Yes, you can use dairy milk in this mousse. Almond milk adds a nutty taste. However, whole milk or cream will give a richer flavor. If you prefer dairy, go for it! Just keep in mind the mousse may be a bit heavier. Absolutely! Kids love this mousse. Avocados are packed with healthy fats and vitamins. They provide energy and support growth. Plus, the chocolate flavor makes it a fun treat. This dessert can be a great way to sneak in some nutrition. To make this mousse sugar-free, swap maple syrup for a low-carb sweetener. Options like stevia or erythritol work well. Adjust the amount based on your taste. You can still enjoy the rich flavor without added sugars! If you want to switch cocoa powder, try carob powder. It has a similar taste but is sweeter. Another option is chocolate protein powder, which adds extra nutrition. Just adjust the sweetness as needed for the best flavor. To check if avocados are ripe, gently squeeze them. They should feel slightly soft but not mushy. Look for dark green skin. If the stem comes off easily and is green underneath, the avocado is ready. Use ripe avocados for the best mousse texture and taste. This blog post shared a simple and tasty recipe for chocolate avocado mousse. You learned about the key ingredients, step-by-step instructions, and tips to make it perfect. Explore fun variations like vegan and gluten-free options. Store leftovers properly, and enjoy this treat when you want something sweet. With ripe avocados, you'll create a creamy dessert everyone will love. Try it, and I bet you'll impress your friends and family! Enjoy your cooking and the delicious results!](https://lisadishes.com/wp-content/uploads/2025/05/ca7f7be2-30be-412d-a36b-11ba15cc35fe.webp)
Get ready to indulge in a rich and creamy dessert that’s both delicious and healthy! I’m excited to share my
![- 1 pound Brussels sprouts, trimmed and halved - 4 cloves garlic, minced - ¼ cup grated Parmesan cheese - 3 tablespoons olive oil - 1 teaspoon garlic powder - 1 teaspoon onion powder - Salt and pepper to taste - 1 tablespoon balsamic vinegar (optional) - Fresh parsley for garnish Brussels sprouts shine when you roast them. The heat brings out their natural sweetness. Garlic adds a bold kick, while Parmesan gives a rich, savory boost. Olive oil helps everything crisp up beautifully. The garlic powder and onion powder enhance the flavor profile, making every bite delicious. Salt and pepper round out the taste, ensuring a perfect balance. If you prefer a tangy twist, balsamic vinegar is a fantastic option. It elevates the dish and makes it even more special. A sprinkle of fresh parsley at the end adds color and freshness. - Calories per serving: Approximately 150 - Carbohydrates: 12 grams - Protein: 5 grams - Fat: 10 grams Knowing the nutritional breakdown helps you stay on track with your meals. This dish is low in calories and packed with flavor. It's a great side that fits well into many diets. - Baking sheet - Parchment paper - Mixing bowl Having the right tools makes cooking easier and more fun. A baking sheet helps the sprouts roast evenly. Parchment paper prevents sticking and makes cleanup a breeze. A mixing bowl is essential for tossing the sprouts with oil and spices. All these items help you create the perfect Garlic Parmesan Roasted Brussels Sprouts. For the full recipe, check here: [Full Recipe]. - Preheat the oven to 400°F (200°C). - Prepare the Brussels sprouts by trimming and halving. - Toss the Brussels sprouts in a large bowl with olive oil and spices. - Spread them on a baking sheet lined with parchment paper. - Roast in the oven for 20-25 minutes until golden brown. Stir halfway through for even cooking. - Remove from the oven and sprinkle with grated Parmesan cheese. - Drizzle with balsamic vinegar if you like. Return to the oven for another 5 minutes. This melts the cheese nicely. - Once done, take them out and toss gently to mix. - Garnish with fresh parsley before serving. - These Brussels sprouts go well with grilled chicken or as part of a salad. You can also serve them with rice or quinoa for a healthy meal. To boost the taste of Garlic Parmesan Roasted Brussels Sprouts, try adding spices. A pinch of red pepper flakes gives a nice kick. For a sweet twist, drizzle honey or maple syrup on top. You can also experiment with smoked paprika for a deeper flavor. The key to crispy Brussels sprouts is high heat. Roast them at 400°F (200°C) until golden brown. Spread them in a single layer on the baking sheet. Avoid crowding the sprouts; this helps them crisp up. Stir halfway through to ensure even cooking. Common mistakes include not using enough oil and not preheating the oven. Make sure your oven is hot before adding the sprouts. This keeps them from steaming and helps them brown nicely. Garlic Parmesan Roasted Brussels Sprouts pair well with many dishes. Serve them alongside roasted chicken or grilled fish for a balanced meal. They also work great as a side for pasta or risotto. For plating, use a white dish to make the colors pop. Garnish with fresh parsley for a touch of green. A squeeze of lemon juice adds brightness and complements the garlic and cheese. For the full recipe, check the [Full Recipe]. {{image_2}} You can change some ingredients to fit your taste or diet. For a vegan option, use nutritional yeast instead of Parmesan. It gives a cheesy flavor without dairy. If you want a twist, try using kale or green beans instead of Brussels sprouts. They cook well and absorb flavors nicely. If you’re short on time, air frying works great! It cooks Brussels sprouts quickly and makes them crispy. Just toss them in the air fryer at 375°F for about 15 minutes. For a smoky flavor, grill the sprouts. Toss them in olive oil and spices, then place them on a hot grill. This method adds a nice char and depth of flavor. You can explore flavors from other cuisines by adding new ingredients. For a Mediterranean style, mix in olives, sun-dried tomatoes, or feta cheese. These ingredients add a bright taste. If you want an Asian twist, try soy sauce, sesame oil, or ginger. These flavors give a unique kick to your roasted Brussels sprouts. You can find the full recipe [here](#). To keep your Garlic Parmesan Roasted Brussels Sprouts fresh, store them in the refrigerator. Use an airtight container to prevent moisture loss. This keeps the sprouts crispy for your next meal. Let them cool before sealing to avoid steam build-up. If you want to freeze these tasty sprouts, first let them cool completely. Spread them out on a baking sheet and freeze until solid. Then, transfer them to a freezer bag. When ready to eat, thaw in the fridge overnight. Reheat in the oven for the best taste and texture. In the fridge, these Brussels sprouts last about 3 to 4 days. In the freezer, they can last up to 3 months. Watch for signs of spoilage like an off smell or slimy texture. If you see these signs, it’s best to toss them. For the full recipe, check out the detailed steps above. Yes, you can make Garlic Parmesan Roasted Brussels sprouts in advance. Prepare them and store in the fridge for up to two days. To reheat, place them in the oven at 350°F (175°C) until warm. This helps keep them crispy. If your Brussels sprouts are soggy, they likely need more time in the oven. Increase the heat to 425°F (220°C) for a few minutes. You can also try patting them dry before cooking. This helps remove extra moisture. Yes, you can use frozen Brussels sprouts. However, thaw them first and pat them dry. Frozen sprouts may not get as crispy, but they will still taste great. Adjust cooking time as needed. To add protein, consider adding cooked chicken, bacon, or chickpeas. Toss them with the Brussels sprouts before roasting. This adds flavor and makes the dish more filling. Enjoy your Garlic Parmesan Roasted Brussels sprouts with these protein boosts! For the full recipe, check out the [Full Recipe]. This guide covers garlic Parmesan roasted Brussels sprouts from start to finish. You learned about the ingredients, preparation steps, and cooking tips for the best flavor. We explored variations to suit different tastes and storage methods to keep your sprouts fresh. Remember, roasting is key to crunchy texture. Try adding your own flair with spices or different veggies. Enjoy making this dish and impress your family and friends with your cooking skills!](https://lisadishes.com/wp-content/uploads/2025/05/fb13aa00-97f0-4796-b218-933e7a089640.webp)
Looking to elevate your side dish game? My Garlic Parmesan Roasted Brussels Sprouts deliver a great flavor boost! With crispy

If you’re craving a rich, flavorful meal that’s easy to whip up, look no further than my Instant Pot Chicken
![- 4 ears of fresh corn, husked - 1 cup cherry tomatoes, halved - 1/2 red onion, finely diced Fresh corn is vital for this dish. It gives a sweet crunch. I love using cherry tomatoes for their bright flavor and color. Red onion adds a nice bite. Together, these ingredients create a tasty base for the salad. - 1 avocado, diced - 1/2 cup crumbly queso fresco (or feta cheese) - 1/4 cup fresh cilantro, chopped The avocado brings creaminess that makes each bite smooth. Queso fresco adds a salty flavor that is so good. Fresh cilantro gives the salad a burst of green freshness. These ingredients balance the dish perfectly. - 2 tablespoons lime juice - 1 tablespoon olive oil - 1 teaspoon chili powder - Salt and pepper to taste Lime juice brightens the whole dish. Olive oil adds richness and helps blend the flavors. Chili powder gives a kick. You can adjust the salt and pepper to your taste. This mix ties all the flavors together, making a delicious dressing. For the full recipe, check out the recipe details above! - Bring a large pot of water to a boil. - Cook the corn for 5-7 minutes until tender. Start by bringing a large pot of water to a rolling boil. This is key to cooking the corn just right. Once the water bubbles, add the husked corn. Let it cook for about 5 to 7 minutes. The corn should be tender but still crisp. When it's done, remove the corn and let it cool slightly. - Cut the kernels off the cob and place them in a mixing bowl. - Add tomatoes, red onion, and avocado to the bowl. Once the corn is cool enough to touch, cut the kernels off the cob. I like to use a sharp knife for this. Place the fresh kernels in a mixing bowl. Next, chop the cherry tomatoes, red onion, and avocado. Add these colorful ingredients to the bowl with the corn. The mix of colors makes the salad look great. - Whisk together lime juice, olive oil, chili powder, salt, and pepper. - Pour dressing over the salad mixture and gently toss. Now, let’s make the dressing. In a small bowl, whisk together lime juice, olive oil, chili powder, salt, and pepper. This dressing adds a zesty kick. Once mixed, pour it over the salad ingredients. Gently toss everything together. Be careful not to mash the avocado. You want it to stay chunky. - Fold in queso fresco and cilantro. - Chill the salad for 20 minutes. For the final touches, fold in the crumbled queso fresco and chopped cilantro. This adds creaminess and fresh flavor. After mixing, chill the salad for about 20 minutes in the refrigerator. This helps all the flavors come together. Enjoy your refreshing Mexican street corn salad! For the full recipe, check out the details above. - Use fresh lime juice for maximum brightness. Lime juice adds a zesty kick to the salad. It brightens every bite and makes the flavors pop. - Experiment with different chili powders for varying heat levels. You can try mild or spicy chili powders to match your taste. Each type adds a unique warmth to the dish. - Make sure to cut the avocado last to retain its shape. This keeps the chunks firm and fresh. If cut too early, they may turn mushy. - Chill before serving for optimal flavor blending. Letting the salad rest allows the tastes to marry. A cool salad is also refreshing on hot days. - Serve in a large bowl or individual cups. This adds a fun touch and makes it easy for guests to serve themselves. A large bowl can be a centerpiece, while cups are great for parties. - Garnish with extra cilantro and a sprinkle of chili powder. This adds color and a final burst of flavor. It makes the dish look vibrant and inviting. Explore the [Full Recipe] to create your own delicious Mexican Street Corn Salad! {{image_2}} You can easily change this salad to suit your taste. Try adding black beans for extra protein. They boost the nutrients and make the dish heartier. If you like spice, incorporate some jalapeños. They will add a nice kick to every bite. Using seasonal ingredients can enhance your salad. Substitute summer squash or bell peppers for a fresh twist. They add color and crunch to your dish. For a smoky flavor, use grilled corn instead of boiled corn. The charred taste makes a big difference. If you need a vegan option, switch to dairy-free cheese. This keeps the salad creamy without using any animal products. For a gluten-free version, use quinoa instead of corn. This change gives a new texture while keeping the flavors intact. Feel free to explore these options. Each choice opens doors to fun flavors and textures. For the full recipe, check out the [Full Recipe]. After you enjoy your Mexican street corn salad, store leftovers in an airtight container in the refrigerator. This keeps it fresh and tasty. Aim to eat it within 2-3 days for the best flavor and texture. You can freeze this salad, but consider freezing the components separately. Freeze the corn and dressing in different containers. Be aware that the avocado may turn brown once frozen. This can change the look, but it will still taste good. I recommend serving this salad cold. Avoid reheating it, as heat can change the texture. The crunchiness of the corn and freshness of the other ingredients shine best when served chilled. For the full recipe, check out the detailed instructions above. Mexican Street Corn Salad is a fresh and lively dish. It features sweet corn, juicy tomatoes, and creamy avocado. You mix these with zesty lime juice and flavorful queso fresco. Chili powder adds a nice kick, making each bite exciting. The salad is colorful and perfect for gatherings or a light meal. Yes, you can prepare this salad ahead of time. I recommend making it a few hours before serving. Store it in an airtight container in the fridge. This allows the flavors to blend well. Just remember to add the avocado last to keep it fresh. Mexican Street Corn Salad pairs well with many dishes. Try it with grilled chicken or fish for a tasty meal. It also complements tacos or burritos nicely. For a light lunch, serve it with crusty bread or a simple soup. To add heat, mix in fresh jalapeños or a dash of hot sauce. You can also use a spicier chili powder than what the recipe calls for. If you like it very hot, consider adding diced chipotle peppers. Adjust the spice level to match your taste. You can easily swap ingredients based on your needs. Use canned corn instead of fresh if needed. Swap avocado for diced cucumber for a crunch. If you don’t have queso fresco, feta cheese works well too. For a vegan option, try dairy-free cheese. This blog post covered how to make fresh and tasty Mexican Street Corn Salad. We discussed key ingredients like corn and tomatoes, creamy avocado, and zesty lime dressing. I shared step-by-step instructions so you can easily prepare it. Plus, I offered storage tips and fun ways to customize your salad. Enjoy experimenting with flavors. Make it your own, and impress your family and friends. This colorful dish brightens any meal, and it’s perfect for warm days. Dive in and enjoy the freshness of every bite!](https://lisadishes.com/wp-content/uploads/2025/05/3ca91e69-a069-4133-a545-20cde8a1e393.webp)
If you love vibrant flavors, you’ll enjoy this Mexican Street Corn Salad. It’s colorful, fresh, and easy to make! With
![- 1 lb chicken breast, cut into cubes - 1/4 cup fresh lemon juice - Zest of 1 lemon - 1/4 cup olive oil - 2 cloves garlic, minced - 1/4 cup fresh basil, chopped - 1 teaspoon honey - Salt and pepper to taste - Wooden or metal skewers (if using wooden skewers, soak them in water for 30 minutes) For the Lemon Basil Chicken Skewers, gathering the right ingredients is key. Start with 1 lb of chicken breast, cut into bite-sized cubes. This keeps the cooking even and quick. You need 1/4 cup of fresh lemon juice and the zest of 1 lemon for a bright flavor. The 1/4 cup of olive oil adds richness and helps the marinade stick. Next, include 2 cloves of minced garlic and 1/4 cup of chopped fresh basil. These two ingredients will give the skewers a fresh, aromatic taste. Add 1 teaspoon of honey for a hint of sweetness, and salt and pepper to taste for seasoning. Don't forget about the skewers! Use either wooden or metal ones. If you choose wooden skewers, soak them in water for 30 minutes to prevent burning on the grill. This simple step keeps your Lemon Basil Chicken Skewers juicy and tasty. You can find the full recipe in the preceding sections for more details. To start, grab a bowl and whisk together the following ingredients: - 1/4 cup fresh lemon juice - Zest of 1 lemon - 1/4 cup olive oil - 2 cloves garlic, minced - 1/4 cup fresh basil, chopped - 1 teaspoon honey - Salt and pepper to taste Whisk these until they blend well. This mix creates a bright, zesty flavor that makes the chicken shine. Marination is important! Let it sit for at least 30 minutes. If you have time, two hours gives even better flavor. Next, it’s time to thread the chicken onto skewers. Take your chicken breast, cut into bite-sized cubes, and coat them in the marinade. After marinating, simply slide the chicken pieces onto the skewers. Make sure to leave a small gap between each piece. This helps the chicken cook evenly and get those nice grill marks. Now, preheat your grill or grill pan to medium-high heat. This step is key for getting a good sear on the chicken. Once heated, place the skewers on the grill. Cook for about 10-12 minutes. Remember to turn them occasionally. The chicken should reach an internal temperature of 165°F (75°C). When done, take the skewers off the heat and let them rest for a few minutes before serving. Enjoy the juicy, vibrant flavors of your Lemon Basil Chicken Skewers! For the full recipe, check out the complete guide! To make your Lemon Basil Chicken Skewers shine, marination is key. I recommend marinating the chicken for at least 30 minutes. For even more flavor, let it sit for up to 2 hours. The longer the chicken soaks, the better the taste. You can also use leftover marinade after cooking. Just brush it on the skewers before serving. This adds a nice touch without wasting any flavors. Check the doneness of your chicken using a meat thermometer. The internal temperature should reach 165°F (75°C). If you use a charcoal grill, you might need to adjust the heat. For gas grills, aim for medium-high heat. Make sure to turn the skewers often for even cooking. This will help you get those perfect grill marks. Pair your skewers with fresh sides. A light salad or grilled veggies works great. You can also serve them with rice or flatbreads. For a beautiful presentation, add some extra basil leaves or lemon wedges. These simple garnishes make your dish look and taste even better. For the complete recipe, check the [Full Recipe]. {{image_2}} You can change the marinade if you want to mix things up. If you don’t have lemon, try lime juice for a different zing. Fresh herbs like parsley or cilantro can also work well. If you feel adventurous, add spices like smoked paprika or cumin. These spices can add warmth and depth to your dish. You can also switch oils. Instead of olive oil, try avocado oil or sesame oil for a unique flavor twist. Chicken is great, but you can use other proteins too. Shrimp works wonderfully with this marinade. Just remember, shrimp cooks faster, so grill it for about 6-8 minutes. Beef can be another option. If you choose beef, cut it into bite-sized pieces like the chicken. It may need a bit longer, around 12-15 minutes. Tofu is a fantastic plant-based choice. Use firm or extra-firm tofu and cut it into cubes. It will take about 10-12 minutes to grill. For a plant-based skewer, you can use a mix of colorful veggies. Bell peppers, zucchini, and cherry tomatoes are great choices. You can also add mushrooms for that meaty texture. Just toss your veggies in the same marinade as the chicken. Skewer them and grill for about 10-12 minutes until they are tender. These veggie skewers are not only tasty but also add beautiful colors to your plate. For the best results, try to keep the pieces similar in size for even cooking. To keep your Lemon Basil Chicken Skewers fresh, place them in an airtight container. This will prevent moisture loss and keep the flavors intact. You can refrigerate the skewers for up to three days. If you notice any strong odors or changes in texture, it’s best to discard them. To freeze cooked chicken skewers, wrap them tightly in plastic wrap or aluminum foil. Place them in a freezer-safe bag. They can last for up to three months in the freezer. When you’re ready to enjoy them, thaw the skewers in the fridge overnight. Heat them in the oven at 350°F (175°C) for about 10-15 minutes, or until warmed through. Food safety is key when handling chicken. Always wash your hands before and after touching raw chicken. Use separate cutting boards for raw meat and other foods to avoid cross-contamination. Never place cooked skewers back on the same plate that held raw chicken. These simple steps will help keep your meals safe and delicious. You should marinate the chicken for at least 30 minutes. This will give the flavors time to soak in. If you want a stronger taste, marinate for up to 2 hours. Avoid marinating for too long, as the acid in lemon juice can change the chicken's texture. A good marination helps keep the chicken tender and juicy. Yes, you can prepare these skewers in advance. Marinate the chicken, then place it in the fridge. You can assemble the skewers up to a day ahead. Just remember to keep them covered. When ready to cook, simply grill them straight from the fridge. This saves time and allows for easy entertaining. Many sides go well with these skewers. Consider a fresh salad with mixed greens and a light dressing. Grilled veggies like bell peppers and zucchini also work great. For something heartier, serve with rice or quinoa. These sides enhance the meal while keeping it light and fresh. In this post, we covered how to make tasty Lemon Basil Chicken Skewers. We looked at the best ingredients, step-by-step instructions, and helpful tips to achieve great flavor. Enjoy perfect chicken with our grilling techniques and serving suggestions. Remember, you can switch up the ingredients for new flavors or use different proteins. Store leftovers properly for later. With these easy steps, you can impress everyone at your next barbecue. Happy grilling!](https://lisadishes.com/wp-content/uploads/2025/05/8b65d1fa-1179-4ba6-84d1-d16b5bed8b3c.webp)
Are you ready to elevate your grilling game? Lemon Basil Chicken Skewers are a fresh and tasty option that will
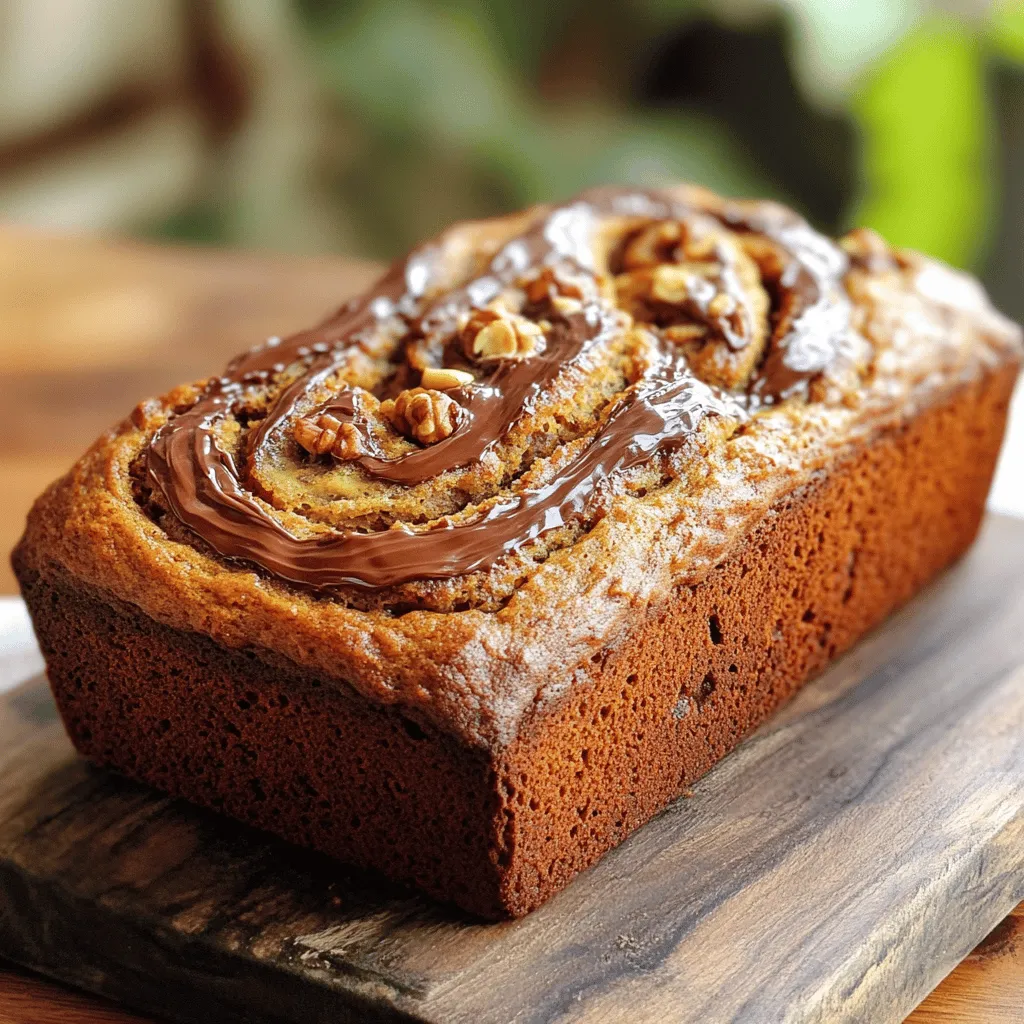
Are you ready to elevate your banana bread game? My Nutella Banana Bread recipe is both delightful and moist, making
