Skip to content
DisclaimerTerms Of UseGDPR PolicyCookie Policy

Lisa Dishes

  • Home
  • Drinks
  • Appetizers
  • Dinner
  • Dessert
  • About
  • Contact
  • Privacy Policy
DisclaimerTerms Of UseGDPR PolicyCookie Policy

lisa

- 1 lb ground turkey or beef - 1 can (15 oz) black beans, rinsed and drained - 1 can (10 oz) diced tomatoes with green chilies - 1 packet taco seasoning - 1 cup frozen corn - 2 cups tortilla chips, slightly crushed - 2 cups shredded cheddar cheese - 1 cup sour cream - ½ cup green onions, sliced - Fresh cilantro for garnish (optional) - Avocado slices for topping (optional) In this Easy Taco Casserole, you can choose ground turkey or beef as your main meat. For a meatless option, swap in extra beans or even grilled veggies. This dish shines with toppings. Sour cream, green onions, and cilantro add a fresh touch. Avocado slices can boost the flavor too. With these ingredients, you create a warm, comforting meal. - 9x13 inch baking dish - Large skillet for cooking - Mixing spoon for combining ingredients - Measuring cups and spoons for accuracy - Aluminum foil for baking Having the right tools makes cooking easier. A 9x13 inch dish fits all the layers perfectly. Use a large skillet to cook the meat and mix in the beans and spices. A good mixing spoon helps combine everything well. Measuring cups ensure you add just the right amount of each ingredient. Lastly, aluminum foil is key to baking the casserole evenly. For the full recipe, check out the detailed steps to make this delicious dish! 1. Preheat your oven to 350°F (175°C). This helps the casserole cook evenly. 2. Grease a 9x13 inch baking dish. Use cooking spray or a little oil to coat it well. 3. In a large skillet, cook 1 pound of ground turkey or beef over medium heat. Stir often until it turns brown and is fully cooked. If there’s extra fat, drain it. - Start by layering half of the crushed tortilla chips in the bottom of your prepared dish. This forms a crunchy base. - Next, spread half of the meat and bean mixture over the chips. Make sure to cover them well. - Add 1 cup of shredded cheddar cheese on top of the meat mixture. This adds flavor and helps bind the layers. - Repeat these layers. Add the remaining chips, meat mixture, and finish with the last cup of cheese on top. - For even distribution, spread each layer out gently. This ensures every bite is tasty. 1. Cover the casserole with aluminum foil. This helps steam the dish and keeps it moist. 2. Bake it in the preheated oven for 20 minutes. This allows the flavors to meld together. 3. After 20 minutes, remove the foil. Bake for another 10 minutes. Watch closely for the cheese to melt and bubble. 4. Once it’s done, take the casserole out of the oven. Let it cool slightly before serving. For the full recipe, check out the detailed instructions above. - Overcooking ground meat: Cook your meat just until brown. This keeps it juicy. - Layering pitfalls: Make sure your layers are even. This helps with baking and taste. - Suggestions for spice adjustments: If you like heat, add more chili powder. For milder flavor, cut back on spices. - Use of fresh herbs vs. dried spices: Fresh herbs add brightness. Use cilantro or green onions for a fresh touch. Dried spices can work but may need extra time to bloom. - Serving suggestions for visual appeal: Serve directly from the dish. Use colorful sides like salsa and guacamole for a pop. - Accompaniments that complement the dish: Extra tortilla chips on the side are a hit. You can also add a side salad for crunch and freshness. You can find the full recipe for this tasty taco casserole [here](#). {{image_2}} You can easily swap out the ground meat for chicken or tofu. Both work great and add new flavors. If you want more color and texture, try different beans. Black beans are classic, but pinto or kidney beans also shine. You can even toss in some chopped bell peppers or zucchini for extra veggies. Want to spice things up? Add jalapeños for heat or chipotle seasoning for a smoky twist. For a cheesy experience, mix in pepper jack cheese or even cream cheese for a creamy touch. If you’re feeling traditional, use just cheddar and stick to the classic taco flavor. Each choice changes the dish in fun ways. This casserole shines as a main dish, but it loves some sides. Serve it with fresh salsa, guacamole, or a simple salad. You can also use Easy Taco Casserole for meal prep. It stores well, so make a big batch for quick lunches. Just scoop, heat, and enjoy! To store your Easy Taco Casserole, let it cool first. Then, cover it tightly with plastic wrap or foil. This keeps moisture in and prevents drying out. You can also use an airtight container for storage. It stays fresh in the fridge for up to three days. If you want to enjoy it later, make sure to check for any off smells before reheating. You can freeze the casserole before or after baking. If you freeze it before baking, prepare it as usual, but skip the oven. Wrap it tightly and place it in the freezer. This way, you can bake it fresh later. If you freeze it after baking, allow it to cool completely. Then, wrap it well and store it in the freezer. For best taste, eat frozen casserole within three months. When ready to eat, thaw it in the fridge overnight. To heat it up, place it in the oven at 350°F (175°C) until hot, about 30-40 minutes. Checking the center for warmth ensures every bite is delicious. Enjoy your Easy Taco Casserole even after storing! Yes, you can make Easy Taco Casserole ahead of time. It saves time on busy days. Start by preparing the casserole as usual. Layer it in your baking dish and cover it well. You can store it in the fridge for up to two days. When ready to bake, simply preheat your oven and bake it straight from the fridge. This method keeps all the flavors intact. If you want alternatives to tortilla chips, there are several options. You can use crushed cornflakes for a crunchy base. Alternatively, try using nacho chips for added flavor. You can also opt for baked pita chips. If you prefer a healthier route, consider using baked sweet potato chips. Each option gives a unique twist to the dish. Reheating leftover taco casserole is easy. You can use your oven or microwave. For the oven, preheat to 350°F (175°C). Place the casserole in an oven-safe dish and cover it with foil. Heat for about 20 minutes or until warm. In the microwave, cut a portion and heat for 2-3 minutes. Stir halfway for even heating. Both methods work well and keep the casserole tasty. Yes, you can easily make this dish gluten-free. First, use gluten-free tortilla chips or corn tortillas as the base. Make sure to check your taco seasoning. Some brands contain gluten, so choose gluten-free options. You can also use gluten-free beans and canned tomatoes. This way, everyone can enjoy the delicious flavors without worry. In this blog post, we explored the Easy Taco Casserole, covering ingredients, tools, and steps. I shared tips to enhance flavors and avoid common mistakes. You learned about variations to fit your tastes and how to store leftovers properly. Remember, this dish is versatile and can fit any meal. Try different meats or toppings to make it your own. Enjoy the process of making it and sharing it with others. Cooking should be fun and easy!

Easy Taco Casserole Quick and Tasty Comfort Dish

Looking for a dish that’s as quick to make as it is comforting? You’ll love my Easy Taco Casserole! This

- 1 large head of cauliflower, cut into bite-sized florets - 1 cup all-purpose flour - 1 cup buffalo sauce Buffalo Cauliflower Bites start with fresh cauliflower. The large head of cauliflower gives the best crunch. Cut it into bite-sized florets for easy eating. The all-purpose flour creates a tasty batter that sticks well. The buffalo sauce adds heat and flavor, making these bites addictive. - 1 teaspoon garlic powder - 1 teaspoon onion powder - ½ teaspoon smoked paprika Seasoning is key for flavor. Garlic powder brings a strong taste. Onion powder adds sweetness. Smoked paprika gives a slight smokiness that enhances the dish. Mix these into the batter for a full flavor punch. - Celery sticks - Dipping options: blue cheese or ranch dressing These bites shine when served with crunchy celery sticks. Celery cools down the heat from the buffalo sauce. You can also offer blue cheese or ranch dressing for dipping. These flavors complement the spicy bites perfectly. For the full recipe, check out the complete instructions. 1. First, preheat your oven to 450°F (230°C). This helps the bites get crispy. 2. Line a baking sheet with parchment paper. This keeps the bites from sticking. 3. Next, cut the large head of cauliflower into bite-sized florets. Make sure they are even in size for even cooking. 1. In a large bowl, whisk together 1 cup of all-purpose flour, 1 cup of water, and the spices: 1 teaspoon garlic powder, 1 teaspoon onion powder, ½ teaspoon smoked paprika, ½ teaspoon salt, and ¼ teaspoon black pepper. 2. Mix until smooth and well combined. This batter will coat the florets evenly. 1. Dip each cauliflower floret into the batter. Allow any excess to drip off. 2. Place them in a single layer on the prepared baking sheet. 3. Bake the florets for 20 minutes. Flip them halfway through for even browning. 4. While they bake, combine 1 cup of buffalo sauce and 2 tablespoons of olive oil in a large bowl. 5. When the cauliflower is golden brown and crispy, remove it from the oven. 6. Transfer the hot bites directly into the bowl with the buffalo sauce. 7. Toss gently to coat all the florets evenly in the sauce. 8. Return the sauced cauliflower to the baking sheet. Bake for an additional 10 minutes for extra crispiness. 9. Finally, remove them from the oven and garnish with chopped fresh parsley. Serve hot with celery sticks and your choice of blue cheese or ranch dressing on the side. For the full recipe, check out the detailed instructions above. Enjoy your delicious Buffalo Cauliflower Bites! To make your Buffalo Cauliflower Bites extra crispy, there are a few secrets I use. First, I let the batter sit for a few minutes. This helps it thicken a bit, which clings better to the cauliflower. Second, I bake them at a high temperature, around 450°F (230°C). This creates a nice crunch. Flipping the bites halfway through baking is key. It helps them cook evenly on both sides and ensures they brown nicely. You can choose between store-bought or homemade buffalo sauce. Store-bought sauces save time and are widely available. They also come in various heat levels. If you want to make your own, combine hot sauce with melted butter and a bit of vinegar. Homemade sauce allows for more control over the flavor and heat. You can spice it up or tone it down to fit your taste. Garnishing adds a fun touch to your dish. Fresh parsley is a bright, tasty option. It gives your bites a pop of color and flavor. You can also serve them with celery sticks for a crunchy contrast. For dips, blue cheese or ranch dressing is a classic choice. Both add creaminess to balance the spicy flavor. To make it special, arrange the bites on a platter with the dips in the center. This makes for a fun and inviting presentation. For the full recipe, check the earlier sections. {{image_2}} You can easily change the flavor of your Buffalo Cauliflower Bites. Try using different spices and seasonings. For a spicy kick, add cayenne pepper or chili powder. If you prefer a smoky taste, smoked paprika works great. You can also experiment with ranch seasoning for a herbal twist. Each seasoning creates a unique flavor, keeping your bites fresh and fun. If you want a healthier option, consider baking instead of frying. Baking gives you that crispy texture without added fat. You can still achieve great flavor by using a light coating of buffalo sauce. If you choose to fry, use an air fryer. It uses hot air to cook food, giving you crispiness without much oil. This way, you enjoy the taste while keeping it light. Buffalo Cauliflower Bites are not just for snacking. You can turn them into a meal! Add them to a bowl with rice and veggies for a tasty lunch. They also work well in salads. Toss them with greens, avocado, and your favorite dressing. This adds crunch and spice to your salad. The bites make any dish more exciting! For the complete recipe, check out the Full Recipe section. To keep your Buffalo Cauliflower Bites fresh, use airtight containers. I recommend glass or BPA-free plastic. Make sure to let them cool before sealing. This helps prevent sogginess. Store them in the fridge for up to three days. If you follow this, they'll taste almost as good as fresh! The oven is the best way to reheat these bites. Preheat it to 350°F (175°C). Place the bites on a baking sheet and heat for about 10-15 minutes. This method helps keep them crispy. The microwave works too, but they may not stay crispy. Heat for 1-2 minutes, checking often. You can freeze your Buffalo Cauliflower Bites for later use. First, let them cool completely. Then, arrange them in a single layer on a baking sheet. Freeze for about 1-2 hours. Once frozen, transfer them to a freezer bag. They can last up to three months in the freezer. To use, thaw them in the fridge overnight before reheating. This keeps them tasty and ready to enjoy! You can serve Buffalo Cauliflower Bites at many occasions. They make a great snack for game day or movie night. You can also serve them at parties or as an appetizer. Pair them with celery sticks for crunch and freshness. They go well with blue cheese or ranch dressing for dipping. You can also add a side salad for a light meal. Yes, you can easily make these bites gluten-free. Instead of all-purpose flour, use gluten-free flour blends. Almond flour or chickpea flour works well too. You can also use cornstarch mixed with water for a crispy batter. These options keep the bites tasty and enjoyable for everyone. Buffalo Cauliflower Bites are perfect for meal prep. You can make a large batch and store them in the fridge. Just let them cool before placing them in an airtight container. When you want to eat them, reheating in the oven keeps them crispy. For quick meals, you can also microwave them, but they may lose some crunch. Enjoy these bites throughout the week! Buffalo Cauliflower Bites are tasty, easy, and fun to make. We covered the main ingredients, batter tips, and how to bake them perfectly. You now know how to serve and store these bites. Play with flavors or make them healthier. Enjoy as snacks or meal prep. You can impress your friends and family with these delicious bites. Get cooking and enjoy the tasty crunch!

Buffalo Cauliflower Bites Tasty and Easy Snack Recipe

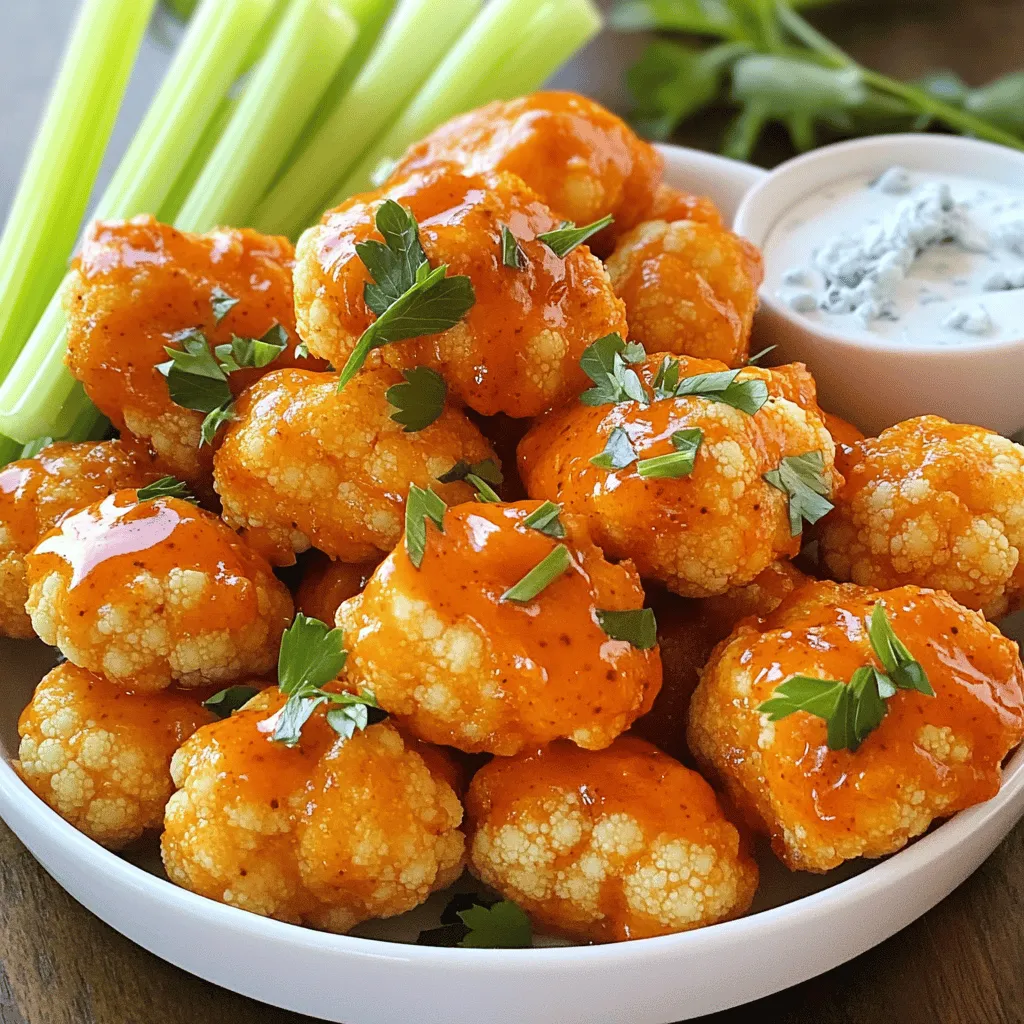
Are you craving a tasty snack that feels indulgent but is healthy too? Buffalo Cauliflower Bites deliver that spicy, buttery

To make these delicious cinnamon sugar donut muffins, you'll need a few simple ingredients. Here’s the complete list: - 2 cups all-purpose flour - 1 cup granulated sugar - 2 teaspoons baking powder - 1 teaspoon baking soda - 1 teaspoon ground cinnamon - 1/2 teaspoon salt - 1/2 cup unsalted butter, melted - 2 large eggs - 1 cup buttermilk - 1 teaspoon vanilla extract - 1/4 cup granulated sugar (for coating) - 1 tablespoon ground cinnamon (for coating) - 2 tablespoons unsalted butter, melted (for coating) Each ingredient plays a key role in creating that light, fluffy texture. The flour gives structure, while the sugar adds sweetness. Baking powder and baking soda help the muffins rise. Cinnamon brings warmth and flavor, making each bite a treat. Using buttermilk keeps the muffins moist and tender. When you combine the melted butter with eggs and vanilla, it creates a rich base. The cinnamon sugar coating adds a sweet crunch that makes these muffins hard to resist. For the full recipe, check out the details. Enjoy baking! - Preheat the oven to 350°F (175°C). - Grease a muffin tin or line it with paper liners. - In a large bowl, whisk together the dry ingredients. This includes the flour, 1 cup of sugar, baking powder, baking soda, 1 teaspoon of cinnamon, and salt. Mix well for an even blend. - In another bowl, combine the wet ingredients. Mix the melted butter, eggs, buttermilk, and vanilla extract until smooth. - Gradually pour the wet mixture into the dry ingredients. Gently fold them together until just combined. Remember, it's okay if there are a few lumps. Over-mixing will make your muffins tough. - Spoon the batter into the prepared muffin tin. Fill each cup about 3/4 full for the best rise. - Bake in the preheated oven for 18-20 minutes. Keep an eye on them until they turn golden. Use a toothpick to check if they're done. Insert it into the center; if it comes out clean, the muffins are ready. You can find the full recipe for these delightful treats in the earlier sections! To avoid over-mixing the batter, mix until just combined. A few lumps are fine. This keeps your muffins soft and tender. Checking for doneness is easy. Insert a toothpick into the center of a muffin. If it comes out clean, your muffins are ready! For the best cinnamon sugar coating, use warm muffins. Brush each muffin with melted butter first. This helps the cinnamon sugar stick well. Then, roll them in the cinnamon sugar mixture. Make sure to cover all sides for a nice, sweet finish. When serving Cinnamon Sugar Donut Muffins, place them on a pretty plate. You can also dust some extra cinnamon sugar on top for a fun look. To keep muffins fresh, store them in an airtight container. They stay tasty for about three days at room temperature. If you want them to last longer, freeze them! Just thaw before serving for the best taste. {{image_2}} You can change the flavor of your muffins easily. Try adding chocolate chips or nuts for a fun twist. These additions give a rich taste and nice texture. For a chocolate chip variation, mix in about 1 cup of semi-sweet chocolate chips. If you like nuts, consider 1/2 cup of chopped walnuts or pecans. If you or your guests have dietary needs, swap ingredients to make these muffins gluten-free or dairy-free. Use gluten-free flour instead of all-purpose flour. For dairy-free options, replace buttermilk with almond milk or oat milk mixed with a tablespoon of vinegar. Cinnamon sugar donut muffins are great on their own, but you can make them more fun. Pair them with dips or spreads like cream cheese or chocolate spread. This adds a new layer of flavor and makes for a delightful snack. You can also be creative with dessert ideas. Try crumbling the muffins over ice cream or using them in a parfait. Layer muffin pieces with yogurt and berries for a tasty treat. Adjust the sweetness according to your taste. If you like a sweeter muffin, add an extra 1/4 cup of sugar into the mix. For a less sweet option, you can reduce the sugar by the same amount. You can also play with spices. If you want more spice, add a pinch of nutmeg or allspice. This gives the muffins a warm flavor that pairs well with cinnamon. For the full recipe, check out the Cinnamon Sugar Donut Muffins section! To keep your cinnamon sugar donut muffins fresh, store them in an airtight container. This helps them stay soft and tasty. You can keep them at room temperature for up to three days. If you want to store them longer, put them in the fridge for a week or freeze them for up to three months. When you're ready to enjoy these muffins again, reheating is key. The best way to reheat them is in the oven. Preheat your oven to 350°F (175°C) and place the muffins on a baking sheet. Heat them for about 5-10 minutes. This will help them regain their soft texture. Avoid microwaving, as this can make them dry. Always check your muffins before eating. If they smell off or have a strange color, it's best to toss them. Also, if they feel hard or dry, they may not taste good anymore. Trust your senses; if they seem off, it's better to be safe. What can I substitute for buttermilk? You can use milk mixed with vinegar or lemon juice. Just add one tablespoon of vinegar or lemon juice to one cup of milk. Let it sit for five minutes. This will mimic buttermilk well in your muffins. How do I make these muffins healthier? To make these muffins healthier, you can use whole wheat flour. You can also reduce the sugar by using less or substituting with honey or maple syrup. Adding applesauce can keep the muffins moist without extra fat. Can I freeze Cinnamon Sugar Donut Muffins? Yes, you can freeze these muffins. Let them cool completely, then wrap each muffin tightly in plastic wrap. Place them in a freezer-safe bag. They will stay fresh for up to three months. Why are my muffins dense? Dense muffins often result from over-mixing the batter. Mixing too much can develop gluten, making the muffins tough. Ensure you mix just until combined; some lumps are okay. How to ensure my muffins rise properly? To help your muffins rise, make sure your baking powder is fresh. Preheat your oven fully before baking. Avoid opening the oven door too often while they bake, as this can cause them to sink. What drinks pair well with these muffins? These muffins go great with coffee or tea. A glass of cold milk can also enhance the sweet flavor. For a fun twist, try serving them with hot chocolate. How do I store leftover muffins? Store leftover muffins in an airtight container at room temperature for up to three days. If you need to keep them longer, refrigerate them for up to a week. Always let them cool completely before storing. To make perfect Cinnamon Sugar Donut Muffins, follow the steps outlined. Use the right ingredients and tips for the best results. Remember, baking is about practice and fun. You can try different flavors or toppings too. Store your muffins properly to keep them fresh. Enjoy sharing these delicious treats with friends and family. Now, get baking and make some tasty memories!

Cinnamon Sugar Donut Muffins Sweet and Tasty Treats

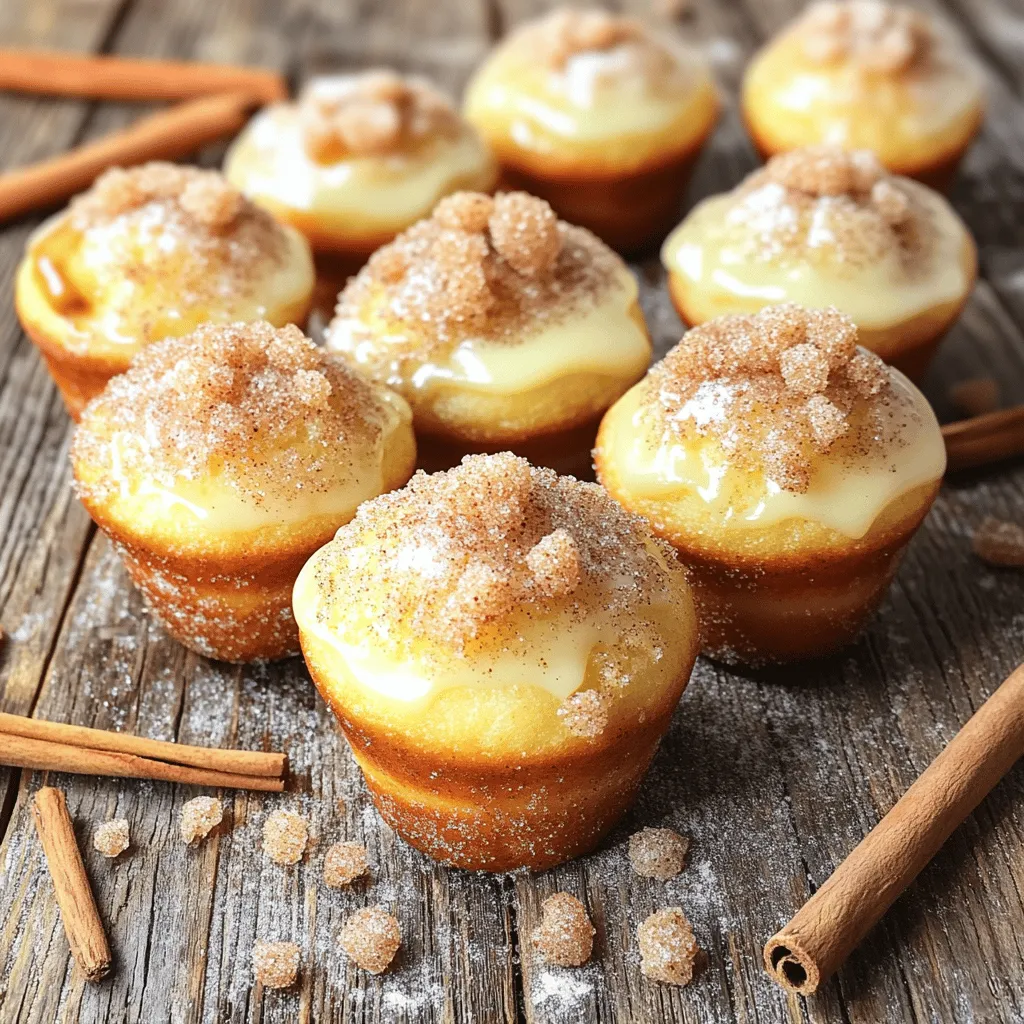
Welcome to a world of sweet delight with my Cinnamon Sugar Donut Muffins! These muffins combine tender cake and a

- 1 cup quinoa - 2 cups vegetable broth or water - 1 medium zucchini - 1 red bell pepper - 1 yellow bell pepper - 1 medium red onion - 1 cup cherry tomatoes - Additional ingredients for garnish When you make a roasted vegetable quinoa bowl, you want fresh ingredients. Quinoa is a great base. It’s gluten-free and packed with protein. I recommend rinsing the quinoa before cooking. This helps remove any bitter taste. Next, pick colorful vegetables. Zucchini, bell peppers, and red onions add crunch and flavor. Cherry tomatoes bring a sweet burst when roasted. Use firm vegetables that hold their shape well. They will roast nicely and not turn mushy. - Olive oil - Garlic powder - Smoked paprika - Salt and pepper Seasonings can make or break your dish. I love using olive oil to coat the veggies. It adds richness and helps them roast evenly. Garlic powder gives a warm, savory note. Smoked paprika adds a unique twist and a hint of smoke. Don’t forget salt and pepper to enhance all the flavors. - Fresh spinach - Avocado - Fresh parsley or cilantro - Lemon wedges For extra nutrition, toss in fresh spinach. It wilts nicely into the warm quinoa. Sliced avocado adds creaminess, making each bite satisfying. Garnish with parsley or cilantro for a fresh touch. Lemon wedges are perfect for a bright finish. Squeeze some on just before eating for a zesty kick. For the full recipe, check out the details to start cooking! - Preheat the oven to 425°F (220°C). - Prepare a baking sheet for roasting the vegetables. Start by making the kitchen warm. Preheating the oven helps the veggies roast well. Line a baking sheet with parchment paper or foil. This makes cleaning easy later. - Toss diced vegetables with olive oil and seasonings. - Roast vegetables and stir halfway through. Take your diced zucchini, bell peppers, red onion, and cherry tomatoes. Toss them with olive oil, garlic powder, smoked paprika, salt, and pepper. Spread them out evenly on the baking sheet. Pop them into the oven for about 25-30 minutes. Stir halfway through to ensure even cooking. You want them tender and slightly caramelized for the best flavor. - Rinse quinoa and combine with vegetable broth or water. - Bring to a boil and simmer until fluffy. While the veggies roast, it’s quinoa time! Rinse 1 cup of quinoa under cold water. This helps remove any bitterness. In a medium saucepan, combine the rinsed quinoa with 2 cups of vegetable broth or water. Bring it to a boil. Then, reduce the heat to low, cover, and let it simmer for about 15 minutes. When done, the quinoa should be fluffy and have absorbed all the liquid. - Fluff quinoa and mix in fresh spinach. - Assemble the bowl with quinoa, roasted vegetables, and avocado. Once the quinoa is ready, remove it from heat. Let it sit covered for 5 minutes. Then fluff it with a fork. Mix in fresh spinach until it wilts slightly. Now, it’s time to build your bowl! Start with a base of quinoa. Top it with the roasted vegetables and slices of avocado. For a nice touch, garnish with fresh parsley or cilantro. Serve with lemon wedges on the side for a zesty kick. For the full recipe, check out the details above! Rinsing quinoa is key for a better texture. It removes the natural coating called saponin, which can taste bitter. To rinse, place quinoa in a fine mesh strainer and run cold water over it for a minute. This small step makes a big difference in taste. The roasting time for vegetables matters too. Each type of vegetable cooks at a different rate. For example, bell peppers roast faster than zucchini. Check your veggies halfway through cooking. Stir them to ensure even roasting. This brings out their sweet flavors. Layering ingredients makes your bowl look great. Start with a base of quinoa. Then, add the roasted vegetables on top. Place avocado slices in a fan shape for a pretty touch. Use a deep bowl for a more striking display. Drizzling olive oil on top adds shine. It also boosts the flavor. A light drizzle gives a restaurant-quality finish. You can use a squeeze of lemon juice for a fresh touch too. Seasoning variations can change the whole dish. Try adding spices like cumin or chili powder for a kick. You can also mix in fresh herbs, like basil or mint, for a new taste. Adding nuts or seeds brings crunch. Try sunflower seeds, slivered almonds, or chopped walnuts. They add texture and extra nutrients. Toss them on top before serving for a delightful surprise. For the full recipe, check out the details above. {{image_2}} You can boost your Roasted Vegetable Quinoa Bowl by adding protein. Grilled chicken works great. Its smoky flavor complements the roasted veggies well. If you prefer a meatless option, try tofu. Firm tofu absorbs flavors and adds texture. For a quick vegetarian source, add beans or chickpeas. They provide protein and fiber, making your meal more filling. Changing the vegetables based on the season can enhance flavors. In spring, consider using asparagus and peas. In summer, zucchini and corn shine. Fall brings pumpkins and sweet potatoes, while winter is perfect for root veggies like carrots and beets. If fresh vegetables aren't available, frozen ones are a great option. They save time and still offer good nutrition. Dressing can elevate your bowl's taste. A simple lemon vinaigrette pairs well. Just mix lemon juice, olive oil, salt, and pepper. For something creamier, try a tahini dressing. Blend tahini, lemon juice, garlic, and water until smooth. You can also use store-bought dressings for convenience. Experiment with different flavors to find your favorite. For more ideas, check the Full Recipe. To keep your Roasted Vegetable Quinoa Bowl fresh, store it in an airtight container. Place it in the fridge right after it cools down. This way, it can last for about 3 to 5 days. I always recommend checking for any signs of spoilage before eating. If you see any changes in color or smell, it’s best to throw it away. You can freeze the cooked quinoa and roasted vegetables for longer storage. Divide the dish into portions and place them in freezer-safe bags. Squeeze out any air before sealing. This method helps avoid freezer burn. You can freeze it for up to 3 months. To thaw, simply place it in the fridge overnight. For reheating, you can use the microwave or a pan on low heat. Just add a bit of water to keep it moist. Preparing ingredients ahead saves time and keeps meals fresh. You can chop the vegetables and store them in the fridge for up to 2 days. Cook the quinoa in advance and keep it in an airtight container. When you’re ready to eat, just assemble your bowl. This method maintains the flavors and textures perfectly. Enjoy your meal, knowing you made it fresh! You can find the full recipe for the Roasted Vegetable Quinoa Bowl to get started. You can store a Roasted Vegetable Quinoa Bowl in the fridge for about three days. Keep it in an airtight container to maintain freshness. If you want to keep it longer, you can freeze it. When frozen, it can last up to three months. Just make sure to thaw it in the fridge before reheating. Yes, you can swap quinoa for other grains. Farro is a great choice and adds a chewy texture. Brown rice works well too and is widely available. You might also try barley or bulgur for a unique twist. Each grain will bring its own flavor and texture to your bowl. Quinoa is packed with nutrients. It is high in protein, making it a great meat substitute. It also contains fiber, which helps with digestion. Quinoa is rich in vitamins and minerals, like magnesium and iron. Including quinoa in your diet can boost your overall health and keep you feeling full longer. This guide covered everything about a Roasted Vegetable Quinoa Bowl. We explored key ingredients and seasonings, followed by clear steps for cooking. You learned tips to enhance flavors, presentation, and even ways to store leftovers. In closing, this dish is not just tasty; it’s versatile. You can adapt it to your tastes with different veggies and proteins. Enjoy cooking and make this bowl your own!

Roasted Vegetable Quinoa Bowl Flavorful and Healthy Meal

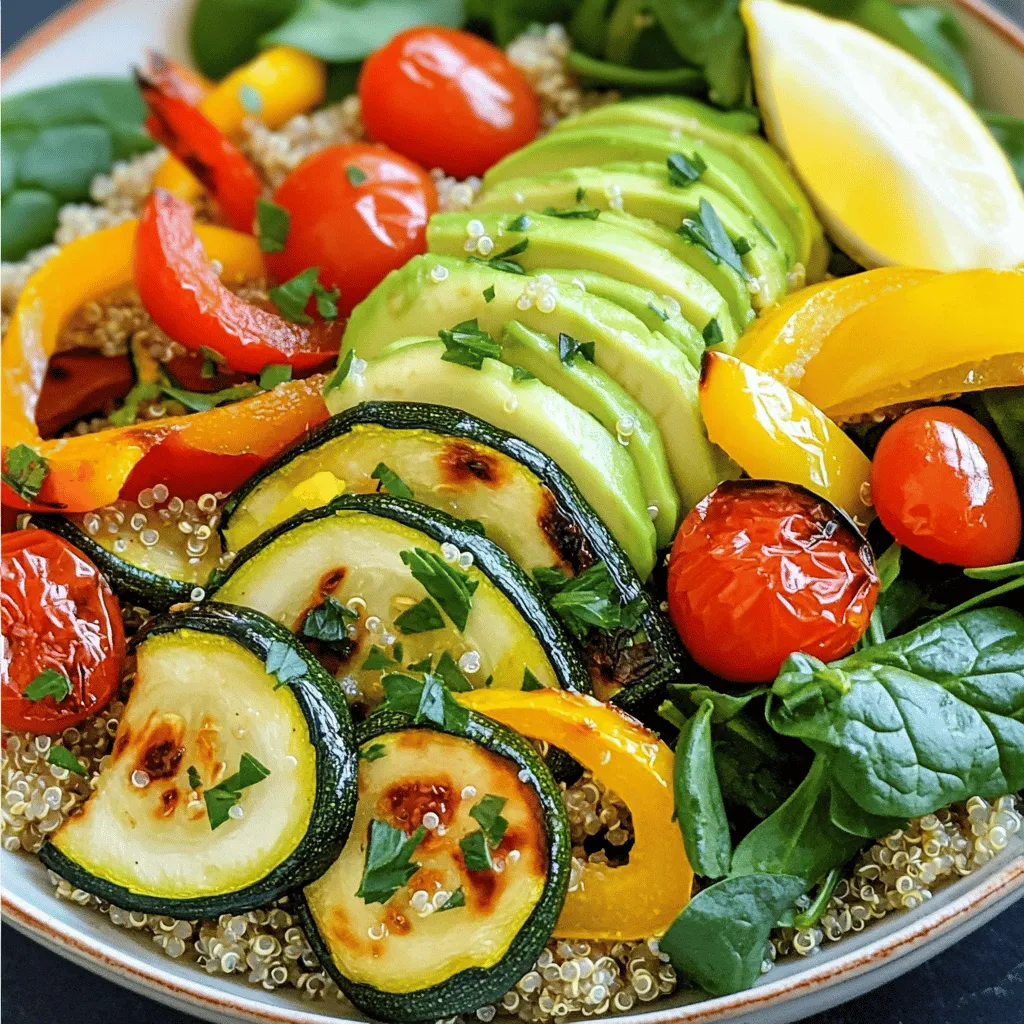
Looking for a meal that’s both healthy and bursting with flavor? Dive into my Roasted Vegetable Quinoa Bowl! With vibrant

To make a great Classic Eggplant Parmesan, gather these main ingredients: - 2 large eggplants, sliced into 1/4-inch rounds - 1 teaspoon salt - 2 cups marinara sauce - 2 cups ricotta cheese - 2 cups shredded mozzarella cheese - 1 cup grated Parmesan cheese - 2 tablespoons fresh basil, chopped (plus extra for garnish) - 1 teaspoon dried oregano - 1/2 teaspoon black pepper - 1 cup all-purpose flour - 3 large eggs, beaten - 1 cup breadcrumbs (preferably Italian seasoned) - Olive oil for frying You can add these optional ingredients to boost the taste: - Fresh garlic, minced - Red pepper flakes for heat - Sliced mushrooms for earthiness - Spinach for added nutrition - Zucchini for a different texture These extras can make your dish unique and flavorful. Make sure to have these tools handy for a smooth cooking process: - A large skillet for frying - A colander for draining eggplant - Shallow dishes for breading - A 9x13-inch baking dish for assembly - Aluminum foil to cover while baking - Paper towels for draining excess oil With the right ingredients and tools, you will make an amazing Classic Eggplant Parmesan. For the full recipe, refer to the detailed steps provided. To start, you need to prepare the eggplant. Take your sliced eggplant and sprinkle it with salt. This step removes moisture and bitterness. Place the slices in a colander and let them sit for about 30 minutes. After that, rinse each slice under cold water. Pat them dry with paper towels. The eggplant is now ready for breading. Next, set up a simple breading station. You will need three shallow dishes. In the first dish, add the flour. In the second dish, place the beaten eggs. Finally, fill the third dish with breadcrumbs. Take each eggplant slice and dip it in the flour first. Make sure both sides are coated. Then, dip it in the beaten eggs, letting any excess drip off. Lastly, coat the slice in breadcrumbs, ensuring it is well covered. This process gives the eggplant a crispy texture. Now it’s time to cook the eggplant. Heat olive oil in a large skillet over medium heat. Fry the breaded eggplant slices in batches. Cook each side for about 3-4 minutes or until golden brown. Place the fried slices on a paper towel-lined plate to soak up extra oil. After frying, preheat your oven to 375°F (190°C). In a 9x13-inch baking dish, spread a thin layer of marinara sauce on the bottom. Layer half of the fried eggplant slices over the sauce. Add half of the ricotta cheese next. Then, sprinkle half of the mozzarella and half of the Parmesan on top. Finish this layer with chopped basil and oregano. Repeat this process with the remaining ingredients. Top with another layer of marinara sauce and a generous sprinkle of mozzarella and Parmesan cheese. Cover the dish with aluminum foil and bake for 25 minutes. After that, remove the foil and bake for an additional 15 minutes. Look for bubbly and golden cheese. Let the dish cool for about 10 minutes before slicing. Garnish with extra fresh basil. You can now enjoy your eggplant goodness! For the complete recipe, check the Full Recipe section. To get crispy eggplant, start with salting. Salt draws out water and bitterness. After 30 minutes, rinse and pat dry. This step helps the eggplant fry better. When frying, use medium heat. Too hot, and the outside burns before the inside cooks. Too low, and it soaks up oil. Fry in batches and do not overcrowd the pan. Each slice should have space to get crispy. Drain the fried eggplant on paper towels to remove excess oil. Marinara sauce is key to a great Eggplant Parmesan. You can choose store-bought or homemade. A good marinara has fresh flavors. Look for a sauce with real tomatoes, garlic, and herbs. If you like spice, try a marinara with red pepper flakes. For a deep flavor, add some fresh basil or oregano to your sauce. This small change can make a big difference in taste. Cheese adds richness to Eggplant Parmesan. If you want to change it up, you can use goat cheese instead of ricotta. This creates a tangy flavor. For a dairy-free option, try cashew cheese or vegan mozzarella. Mix different cheeses for extra flavor. Try adding Fontina or Gruyère for a unique twist. Don’t forget to sprinkle fresh herbs on top before serving for added aroma and color. You can find the Full Recipe for the perfect blend of flavors. {{image_2}} You can easily add spinach or zucchini to your eggplant parmesan. Spinach adds a nice color and nutrition. You can use fresh or frozen spinach. If using fresh, just sauté it for a few minutes. For zucchini, slice it thin, just like the eggplant. Layer them with the eggplant for extra taste and texture. To make eggplant parmesan gluten-free, swap the breadcrumbs and flour. Use gluten-free breadcrumbs and almond flour instead. This keeps the dish tasty and safe for those avoiding gluten. The rest of the recipe stays the same, so you won’t miss out on any flavor. You can also bake the eggplant instead of frying it. Baking is easier and less messy. To bake, brush the eggplant slices with olive oil and place them on a baking sheet. Bake at 400°F (200°C) for about 20 minutes. This method keeps the eggplant soft but still gives you that delicious flavor. If you want more crunch, you can still fry them. Both methods work well, so choose what suits you best. For the full recipe, check out the Eggplant Paradise section above. Store leftover eggplant parmesan in an airtight container. This keeps it fresh. Let it cool to room temperature first. You can keep it in the fridge for up to three days. If you want to enjoy it later, consider freezing it. To freeze eggplant parmesan, wrap it well in plastic wrap. Then, wrap it again in aluminum foil. Make sure to label the package with the date. It can last in the freezer for up to three months. When you're ready to eat it, thaw it overnight in the fridge. For the best taste, reheat eggplant parmesan in the oven. Preheat your oven to 350°F (175°C). Place the dish in the oven for about 20 minutes. You want it heated through and the cheese to melt. If you're in a hurry, you can use the microwave. Heat individual portions for 1-2 minutes, but the oven is best for flavor. Enjoy your meal! You can make Classic Eggplant Parmesan vegetarian by ensuring all your ingredients are plant-based. Use marinara sauce without meat. Stick to cheeses like ricotta, mozzarella, and Parmesan. All these ingredients are naturally vegetarian. If you want more veggies, add spinach or mushrooms for extra flavor. Yes, you can prepare Eggplant Parmesan ahead of time. You can fry the eggplant and layer the dish in advance. Cover the baking dish and store it in the fridge for up to 24 hours. When ready to bake, just pop it in the oven. You may want to add a few extra minutes to the baking time to ensure it heats through. Eggplant Parmesan pairs well with many sides. A fresh, green salad adds crunch. Garlic bread is always a hit. You might also enjoy it with pasta or a light vegetable side. For a complete meal, serve with a glass of red wine. Each side enhances the rich flavors of the dish. For the complete recipe, you can check the Full Recipe. You learned about making Eggplant Parmesan today. I shared key ingredients, tools, and steps. The tips I provided will enhance your dish, from frying to sauce choices. I also covered variations, storage, and common questions. Remember, cooking is a fun journey. Use what you learned to make a great meal. Enjoy sharing your Eggplant Parmesan with friends and family!

Classic Eggplant Parmesan Flavorful and Easy Recipe

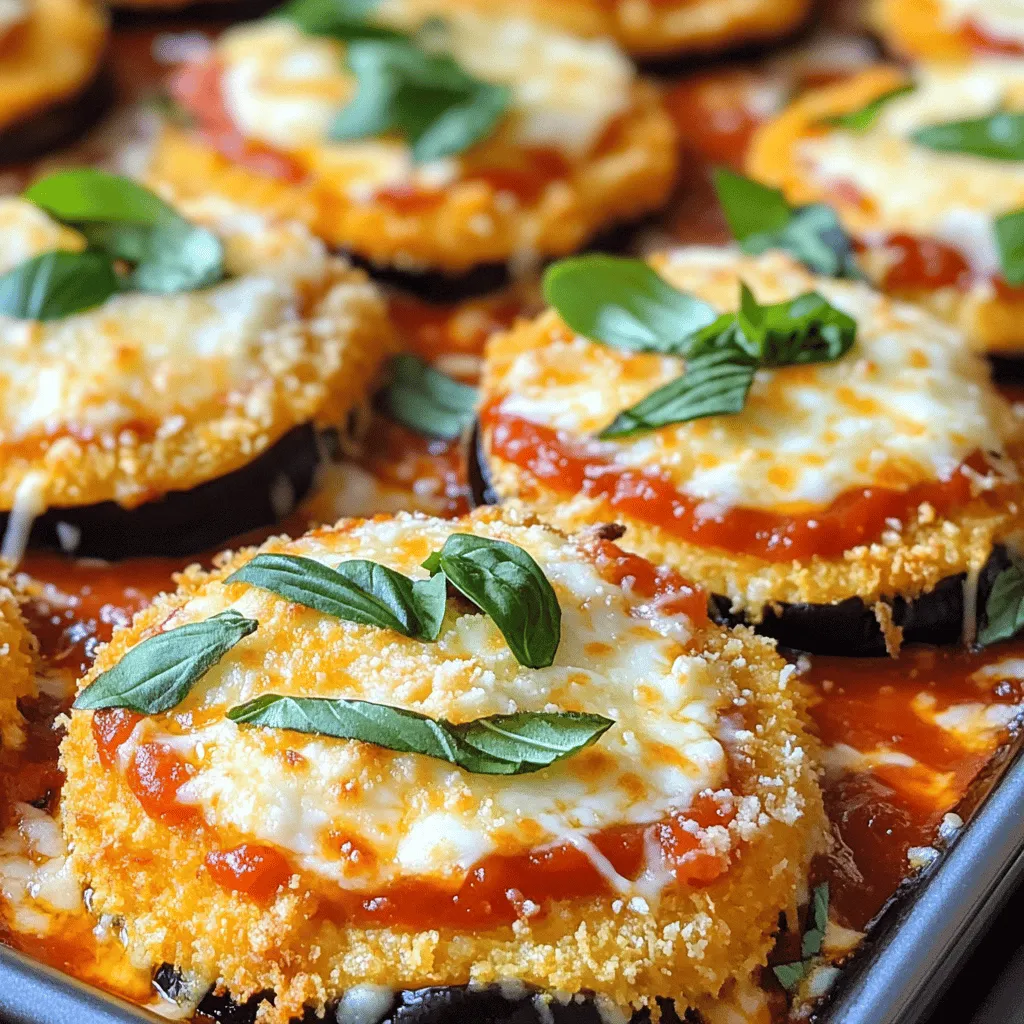
Are you ready to elevate your dinner game? Classic Eggplant Parmesan is both flavorful and easy to make! I’m excited

- Apples: I recommend using Granny Smith or Honeycrisp apples. They hold their shape well and provide a nice tartness that balances the sweetness of the dish. - Spices and Sugars: You will need cinnamon, nutmeg, and brown sugar. These add warmth and depth to your apple filling. - Topping Ingredients: Gather rolled oats, all-purpose flour, nuts (like walnuts or pecans), melted butter, and caramel sauce. The combination of oats and nuts gives the crisp a great texture. For the full recipe, you can check out the detailed instructions provided. Each ingredient plays a key role in making your Caramel Apple Crisp a delicious fall treat. To make the crisp, start with the apples. First, peel them with a vegetable peeler. Next, use a knife to core and slice the apples into thin pieces. I like to use Granny Smith or Honeycrisp apples for their tartness. After slicing, place the apples in a bowl. Add 1 tablespoon of lemon juice, 1 teaspoon of cinnamon, 1/2 teaspoon of nutmeg, and 1/4 cup of brown sugar. Mix well so the apples are coated. This blend gives the apples a bright flavor. Now, let’s make the topping. Grab a separate bowl and combine 1 cup of rolled oats, 1/2 cup of all-purpose flour, and 1/2 cup of brown sugar. Mix these dry ingredients. Next, pour in 1/2 cup of melted butter. If you like, add 1/2 cup of chopped walnuts or pecans for crunch. Stir until the mixture becomes crumbly. This will form a nice, crispy layer on top. Preheat your oven to 350°F (175°C). Take the apple mixture and spread it evenly in a greased 9x13-inch baking dish. Then, sprinkle the oat mixture over the apples. Bake for 30 to 35 minutes. You’ll know it’s done when the topping is golden brown and the apples are bubbling. Keep an eye on it to avoid burning. When it's ready, take it out and let it cool for a few minutes. Before serving, drizzle warm caramel sauce on top for extra sweetness. Enjoy your caramel apple crisp! To get the best crisp, the butter and nut ratio is key. Use half a cup of butter for richness. If you want more crunch, add nuts like walnuts or pecans. They give great flavor and texture. Even baking is vital too. Spread the oat mixture evenly on top of the apples. This helps it cook nicely and brown evenly. Check your oven's temperature with a thermometer. Sometimes, it may run hot or cold. Choosing the right apples matters a lot. I recommend using Granny Smith for tartness or Honeycrisp for sweetness. Both hold their shape well when baked. The right apple helps balance flavors in the dish. Think about texture too. You want apples that are firm and juicy. This prevents them from turning mushy during baking. Mixing sweet and tart apples can give a nice depth of flavor. For serving, warm Caramel Apple Crisp is best. A scoop of vanilla ice cream on top makes it even better. The cold ice cream with the warm crisp is a delight. Presentation also counts. Drizzle caramel sauce over the top. This adds a glossy finish and extra sweetness. Sprinkle chopped nuts for a nice look and crunch. Serve it in bowls to make it cozy and inviting. For the full recipe, check out the details above. Enjoy making this tasty fall dessert! {{image_2}} Want to spice things up? You can add more flavors to your Caramel Apple Crisp. Try mixing in spices like cloves or allspice. These spices can give your dish a warm and cozy feel. You can also explore flavored caramel sauces, like sea salt or vanilla. They add a nice twist to the classic taste. If you need a gluten-free version, it’s easy to make changes. Instead of all-purpose flour, use gluten-free flour blends. These blends can keep the crisp tasty and enjoyable. The texture may change a bit, but it will still be delicious. It’s a great way to cater to those with gluten sensitivities. Avoiding nuts? No problem! Just leave them out of the topping. You can still have a crunchy top by using extra oats or crushed graham crackers. These alternatives give a nice texture without nuts. Your Caramel Apple Crisp will still taste amazing and be enjoyed by everyone. For the full recipe, check out the detailed guide. To keep your Caramel Apple Crisp fresh, store it in the fridge. Use an airtight container to keep moisture out. You can also cover it tightly with plastic wrap or aluminum foil. This helps the flavors stay vibrant and the topping from getting soggy. Your crisp can last in the fridge for up to five days. When you're ready to enjoy your leftovers, you can reheat them in the oven or microwave. If using the oven, preheat it to 350°F (175°C). Place the crisp in an oven-safe dish and cover it loosely with foil. Heat for about 15-20 minutes or until warm. This keeps the topping crisp. If you prefer the microwave, heat it in 30-second intervals. This method warms it up quickly but may soften the topping. To freeze leftover Caramel Apple Crisp, let it cool completely first. Place it in a freezer-safe container or bag. Squeeze out as much air as possible to prevent freezer burn. It can stay in the freezer for up to three months. When you’re ready to eat it, thaw it in the fridge overnight. After that, reheat it in the oven for the best texture. Caramel Apple Crisp stays fresh for about 3 to 5 days in the fridge. Make sure to cover it tightly with plastic wrap or foil. If you want to keep it longer, you can freeze it. In the freezer, it lasts for up to 3 months. Just place it in an airtight container or a freezer bag. When you're ready to eat, thaw it in the fridge overnight. Yes, you can mix other fruits with apples. Pears work well and add a nice sweetness. You might also try berries like blueberries or raspberries for a tart kick. Peaches and plums can add a juicy flavor to your crisp. Just remember to adjust the sugar if your fruits are very sweet or tart. If you need a substitute for caramel sauce, you can use maple syrup or honey. Another option is to make a quick sauce with brown sugar, butter, and cream. Cook them together until smooth. You could also try a chocolate sauce for a fun twist. To make Caramel Apple Crisp vegan, replace the butter with coconut oil or vegan butter. Use a plant-based caramel sauce or make your own using coconut milk and brown sugar. For the topping, skip the nuts if you prefer. You can also use a flaxseed meal as a binding agent. These simple swaps keep your dessert tasty and plant-based. For the full recipe of Caramel Apple Crisp, check out the earlier section! This blog post covered how to make a perfect Caramel Apple Crisp. We talked about choosing the right apples, mixing spices, and creating a crunchy topping. You learned tips for baking and serving, plus fun variations and storage methods. Enjoy this dish fresh, warm, and topped with ice cream. With the steps and tips provided, you can create a delicious dessert for any occasion. Happy baking!

Caramel Apple Crisp Flavorful Fall Dessert Recipe

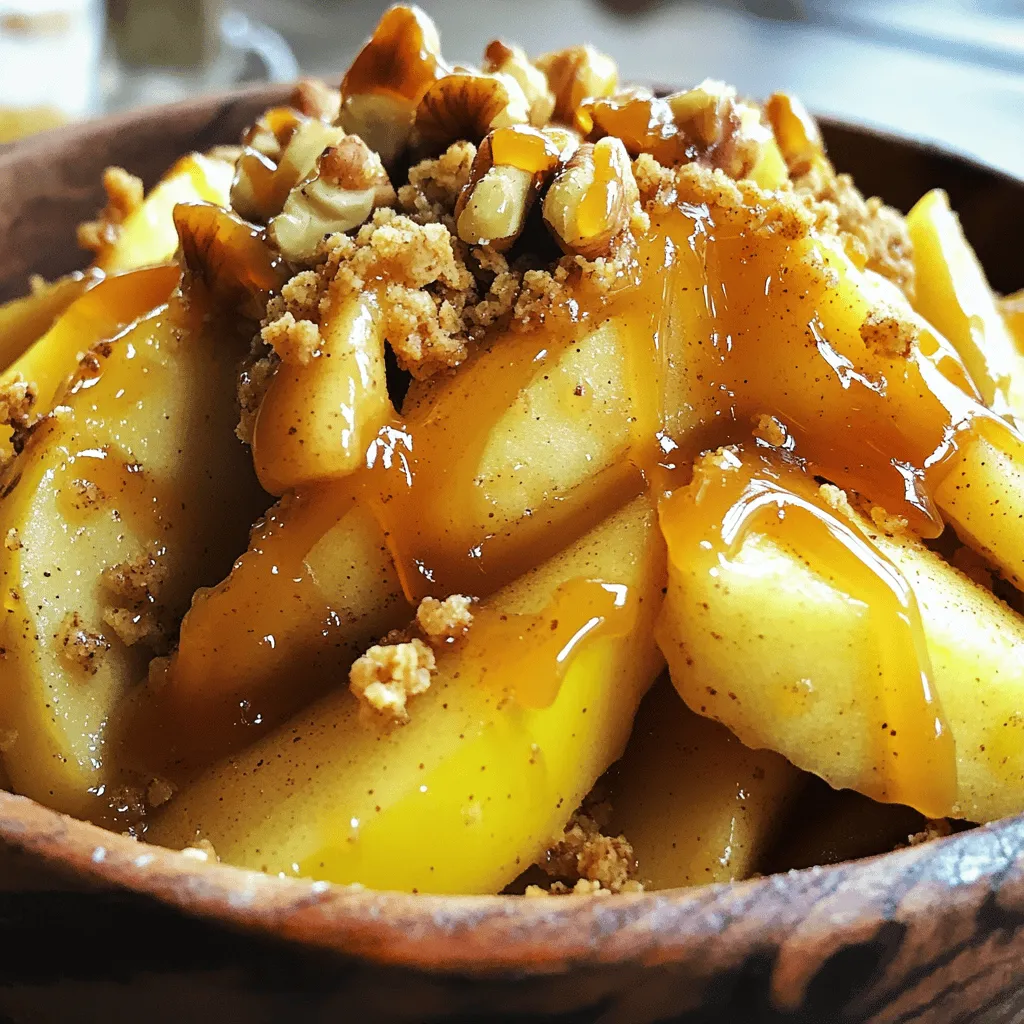
Fall is here, and it’s time to embrace the cozy flavors of the season with a delightful Caramel Apple Crisp!

- 1 medium-sized eggplant, cut into fries - 1 cup breadcrumbs (panko for extra crunch) - 1/2 cup all-purpose flour - 2 large eggs, beaten - 1 teaspoon garlic powder - 1 teaspoon onion powder - 1 teaspoon smoked paprika - Salt and pepper to taste - Olive oil spray To make crispy air fryer eggplant fries, you need fresh and simple ingredients. Start with one medium-sized eggplant. Slice it into fry shapes. This gives you the perfect bite-sized pieces. Next, grab one cup of breadcrumbs. I recommend using panko breadcrumbs. They add a delightful crunch. Then, you need half a cup of all-purpose flour. This helps the fries hold onto the coating. You will also need two large eggs. Beat them well in a bowl. The egg wash helps the breadcrumbs stick nicely to the eggplant. Now, for the seasoning! Garlic powder adds a nice kick, while onion powder brings sweetness. Don’t forget smoked paprika. It gives a great smoky flavor. Add salt and pepper to taste to enhance all the flavors. Lastly, keep some olive oil spray handy. It helps the fries get that golden, crispy finish. For the full recipe, check out the entire guide on making these tasty treats. To start, preheat your air fryer to 400°F (200°C). This step is key for crispy fries. While that heats, set up your dredging station. You need three bowls: one with flour, one for beaten eggs, and one for breadcrumbs mixed with seasonings. This setup makes coating easy and fun. Now let’s get to coating the fries. First, dip each eggplant fry into the flour mixture. Make sure to shake off any extra flour. Next, dip it in the beaten eggs. Finally, coat it well in the breadcrumb mixture. Press gently to make sure the crumbs stick. This is where the magic happens! Once coated, arrange the fries in the air fryer basket. Be careful not to overcrowd them. This helps them cook evenly. Lightly spray the fries with olive oil spray. This step ensures they get that perfect crispy texture. Air fry for about 12-15 minutes. Flip them halfway through to brown both sides. They should come out golden and crunchy. Enjoy your crispy air fryer eggplant fries with your favorite dip! For more details, check the Full Recipe. To get the best crunch, I always use panko breadcrumbs. They add great texture. Regular breadcrumbs can work, but panko gives more bite. Make sure to coat the fries evenly for a nice crunch. Another key tip is to use olive oil spray. It helps the fries crisp up in the air fryer. A light, even spray ensures they cook well without being greasy. You want that golden look and satisfying crunch. For dips, marinara sauce or garlic aioli pairs perfectly with eggplant fries. The rich flavors complement the crispy outside. You can also try tzatziki for a cool, refreshing option. When serving, garnish the fries with fresh parsley. This adds color and a hint of flavor. A sprinkle of parmesan cheese can also elevate the dish. Presentation matters, and these touches make your fries pop. You can prepare the fries in advance. Coat them and place them in the fridge for up to a day. When you’re ready to cook, just pop them in the air fryer. For reheating, the air fryer works best. Set it to 350°F (175°C) for about five minutes. This keeps them crispy without drying them out. Avoid the microwave if you can; it makes them soggy. If you want the full recipe, check it out! {{image_2}} You can change the taste of your eggplant fries easily. Add spices like cayenne pepper for heat or Italian herbs for a classic twist. For a fun flavor, try using curry powder or cumin. You can also switch up the breadcrumbs. Use gluten-free breadcrumbs if needed. They work just as well and keep the fries crispy. Eggplant is great, but you can use other veggies too. Zucchini, sweet potatoes, or carrots all make tasty fries. Just cut them into similar shapes for even cooking. If you pick a softer veggie, like zucchini, adjust the cooking time. These might need less time in the air fryer to avoid mushiness. You can serve these fries in many fun ways. Create a sandwich by placing the fries in a bun with your favorite toppings. Pair them with some fresh veggies and a creamy sauce. Another idea is to sprinkle the fries on top of a salad. They add a tasty crunch and a nice twist to your greens. Try them with a side of marinara sauce or garlic aioli for dipping. For the full recipe, check the previous sections. To keep your eggplant fries fresh, store them in an airtight container. Make sure the fries are completely cool before sealing them. This step helps prevent sogginess. You can keep them in the fridge for up to three days. If you want to reheat them, use the air fryer again for the best crispiness. You can freeze both raw and cooked eggplant fries. To freeze raw fries, place them in a single layer on a baking sheet. Freeze until solid, then transfer them to a freezer bag. For cooked fries, let them cool first. Then, store them in an airtight container or bag. When you're ready to enjoy them, thaw the raw fries in the fridge overnight. Cook them directly from frozen in the air fryer for about 15-20 minutes. If you have cooked fries, reheat them in the air fryer for 5-10 minutes until crispy. Eggplant fries stored in the fridge last about three days. If frozen, they can last up to three months. Always check for signs of spoilage, like off smells or a slimy texture. If you see these signs, throw them away to stay safe. To make eggplant fries crispy, follow these tips: - Preheat your air fryer to 400°F (200°C). This helps create a nice crunch. - Use panko breadcrumbs instead of regular ones. They add extra crunch. - Lightly spray the fries with olive oil before cooking. This helps them crisp up. - Cook in a single layer. Avoid overcrowding the basket. This ensures even cooking. - Flip the fries halfway through cooking. This helps both sides get crispy. By following these steps, you will get perfect crispy eggplant fries every time! Yes, you can use an egg substitute. Some great options include: - Flaxseed meal mixed with water (1 tablespoon flaxseed meal, 2.5 tablespoons water). - Unsweetened applesauce (1/4 cup per egg). - Silken tofu blended until smooth (1/4 cup per egg). These substitutes work well for coating the fries. They help the breadcrumbs stick just like eggs do. Crispy eggplant fries are tasty with various dipping sauces. Here are some popular choices: - Marinara sauce: A classic that adds a rich flavor. - Garlic aioli: A creamy and garlicky option that pairs well. - Ranch dressing: Adds a cool and tangy twist. - Spicy sriracha mayo: For those who like some heat. Feel free to mix and match sauces to find your favorite! Crispy air fryer eggplant fries are easy to make and fun to enjoy. We covered the main ingredients and the step-by-step process. You learned how to season and coat the fries for maximum crunch. Remember to use panko breadcrumbs and olive oil spray for the best results. Explore different flavors and serving ideas to make this dish your own. These fries store well, and you can easily reheat them. With these tips, you’ll impress your family and friends. Enjoy your crispy treats and the cooking adventure!

Crispy Air Fryer Eggplant Fries Simple and Tasty Treat

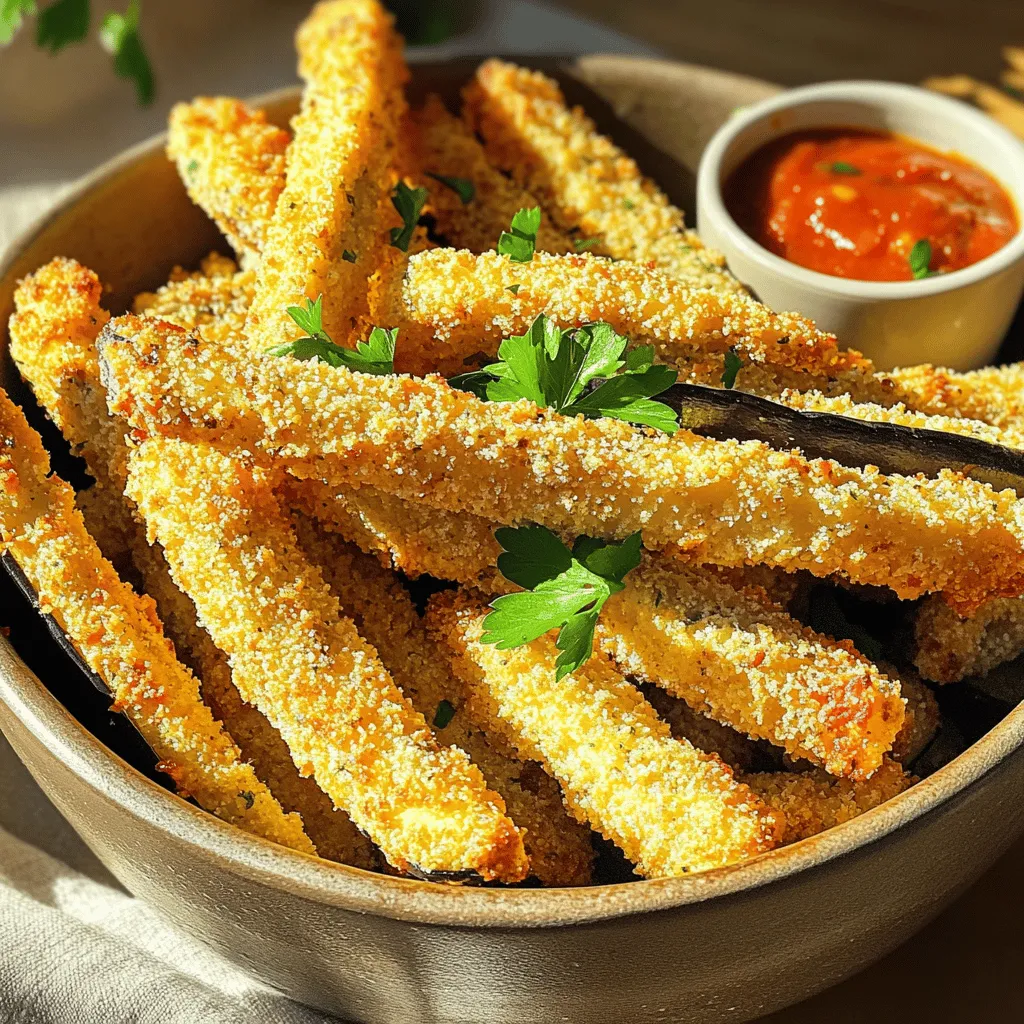
If you’re craving a snack that’s both crispy and healthy, these air fryer eggplant fries are the answer! You can

- Diced chicken breasts - Enchilada sauce - Black beans - Corn - Cheese - Cumin - Chili powder - Salt and pepper - Fresh cilantro Gather these ingredients before you start cooking. The diced chicken breasts form the base of the dish. They cook quickly and soak up all the flavors. Enchilada sauce adds depth and spice. Black beans and corn give texture and nutrition. The cheese is the star, melting into a gooey topping. Next, you'll need seasonings. Cumin and chili powder bring warmth and richness. Adding salt and pepper enhances all the flavors. These simple ingredients make your meal stand out. If you want to add a fresh touch, use cilantro as a garnish. It adds color and a burst of flavor. You can find the full recipe for Cheesy Chicken Enchilada Skillet in the article. This dish is not only tasty but also quick to make. Enjoy cooking! To start, heat the olive oil in a large skillet over medium heat. You want the oil hot, but not smoking. Next, add the diced chicken. Season it with salt, pepper, cumin, and chili powder. Cook the chicken for about 5 to 7 minutes. Make sure it is no longer pink in the center. Stir occasionally to brown the chicken evenly. Once your chicken is cooked, add the chopped onion, minced garlic, and diced bell pepper to the skillet. The colors of the bell pepper can be any shade you like. This adds a nice touch! Sauté the mixture for about 3 to 4 minutes. You want the vegetables to soften but not get mushy. Stir them often to cook evenly and release their flavors. Now it’s time to bring everything together. Stir in the enchilada sauce, black beans, corn, and cooked rice. Mix all the ingredients well. Make sure everything is coated with the sauce. Heat the mixture through for about 5 minutes. It should be hot and ready for the next step. For the full recipe, check the section above! To make sure your chicken is just right, avoid overcooking. Cook the diced chicken for about 5-7 minutes. Stir it often until it turns white and no longer pink. Use a meat thermometer to check doneness; it should reach 165°F (75°C). This ensures your chicken is safe to eat and juicy. Melting cheese is a key step for a creamy finish. After cooking, broil the skillet to melt the cheese. Place it under the broiler for 2-3 minutes. Watch closely to prevent burning. The cheese should bubble and turn golden brown, adding a delicious layer of flavor. To make your dish pop, add extra spices. A pinch of smoked paprika or cayenne can boost the heat. You can also mix different cheese types. Try Monterey Jack for creaminess or Pepper Jack for a spicy kick. These simple changes can take your Cheesy Chicken Enchilada Skillet from good to great. For the full recipe, check the earlier section! {{image_2}} You can make this dish meat-free by swapping chicken for tofu or beans. Tofu works great. Just press it first to remove extra water. Cut it into small cubes and cook it in the skillet until golden. You can also add more black beans for protein. This keeps it filling and tasty! If you like heat, add jalapeños or hot sauce. Dice fresh jalapeños and toss them in with the onion. You can also drizzle hot sauce on top before serving. This gives your Cheesy Chicken Enchilada Skillet a nice kick. Adjust the spice to your taste! Feel free to use different veggies like zucchini or spinach. Chop these vegetables and add them with the onion and garlic. They add color and nutrition. You can mix in other favorites too. Try corn or even diced tomatoes. Each swap makes the dish unique! For the full recipe, check the earlier section on ingredients and instructions. To store leftovers, let them cool completely. Then, place the Cheesy Chicken Enchilada Skillet in an airtight container. This keeps it fresh for later meals. Make sure to eat it within 3 to 4 days for the best taste. If you want to freeze it, first cool it down. Then, transfer the skillet to a freezer-safe container. You can also use freezer bags. Seal tightly, removing air to prevent freezer burn. When it’s time to eat, thaw it in the fridge overnight. Reheat it on the stove over low heat. Stir occasionally until warmed through. In the fridge, the Cheesy Chicken Enchilada Skillet stays fresh for about 3 to 4 days. If you freeze it, it can last up to 2 to 3 months. Just remember, while it may still taste good after that time, the quality may drop. Enjoy your delicious meals! For the full recipe, check out the detailed instructions above. Yes, you can prep the Cheesy Chicken Enchilada Skillet in advance. You can cook the chicken and veggies, then mix in the sauce, beans, corn, and rice. Store it in the fridge for up to two days. When you're ready to eat, just heat it up on the stove. You can add cheese and broil it right before serving. This makes for an easy meal on busy days. You have many tasty options for sides. Here are some ideas: - Mexican rice: A perfect match with the flavors. - Guacamole: Adds creaminess and taste. - Salad: A fresh side with lettuce, tomatoes, and avocado. - Tortilla chips: Crunchy and fun to munch on. - Sour cream: A cool dip that enhances the dish. Yes, it is kid-friendly! To make it even better for children: - Mild sauce: Use a mild enchilada sauce to reduce spice. - Less seasoning: Cut down on cumin and chili powder. - Add veggies: Include veggies that your kids like, like sweet corn or peas. - Cut chicken small: This makes it easy for little mouths to eat. These tweaks help kids enjoy the meal and ask for more! You learned how to make a tasty Cheesy Chicken Enchilada Skillet. We covered key ingredients, including chicken, sauce, and spices. You also know how to prepare, cook, and store your dish. Plus, we shared tips to ensure perfect chicken and melted cheese. Remember, you can adjust this recipe with different ingredients. Whether you prefer it spicy or vegetarian, this dish adapts well. Enjoying your cooking journey is just as important as the meal itself. Try it out, share it with friends, and savor every bite!

Cheesy Chicken Enchilada Skillet Quick and Easy Meal

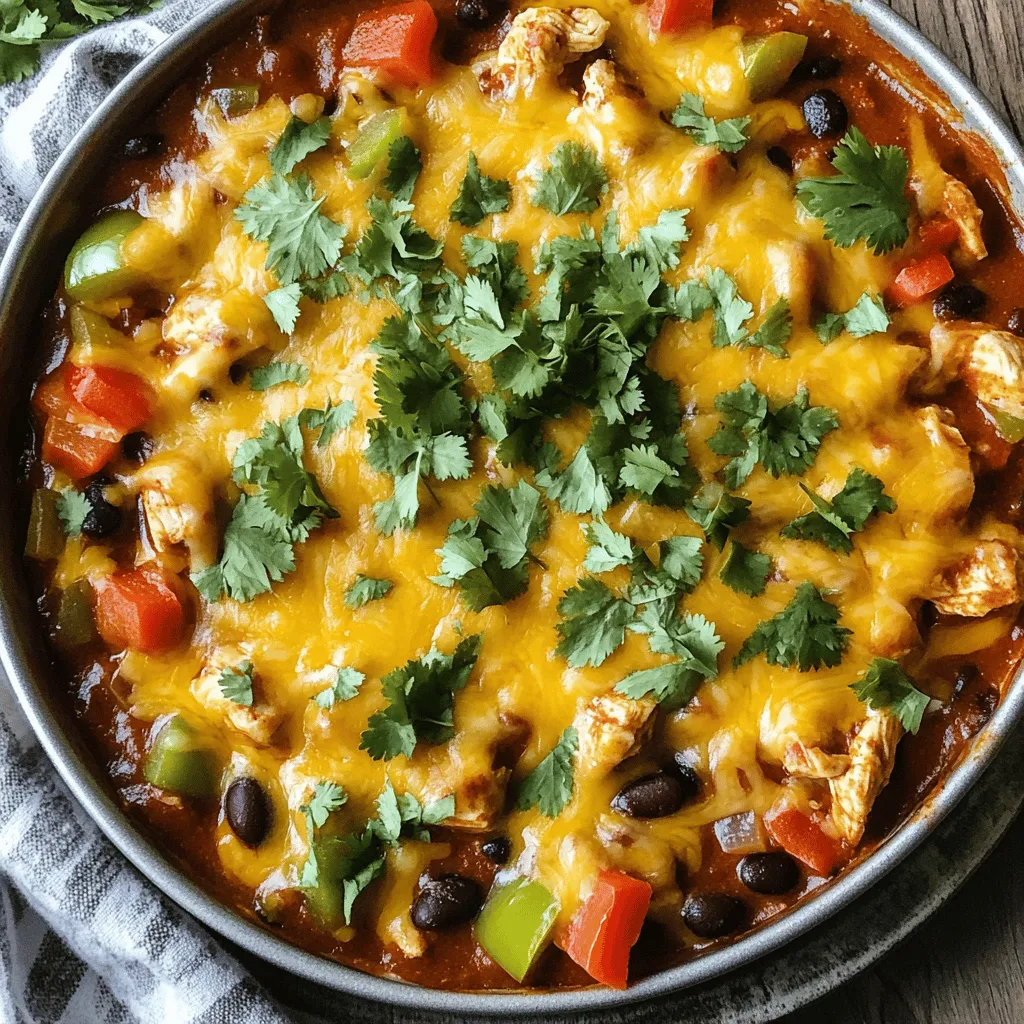
Are you looking for a quick and easy meal that packs a cheesy punch? Meet my Cheesy Chicken Enchilada Skillet!

To create a rich and creamy no bake pumpkin cheesecake, you will need the following ingredients: - 1 ½ cups graham cracker crumbs - ½ cup unsweetened cocoa powder - ⅓ cup melted butter - 1 cup cream cheese, softened - 1 cup canned pumpkin puree - 1 cup powdered sugar - 1 teaspoon vanilla extract - 1 teaspoon pumpkin pie spice - 1 cup heavy whipping cream These ingredients blend well to form a smooth and tasty filling. The graham cracker crumbs and cocoa powder create a delightful crust. The cream cheese and pumpkin puree give the cheesecake its creamy texture and rich flavor. You can enhance your cheesecake with these tasty toppings: - Whipped cream - Cinnamon or nutmeg - Chocolate shavings These garnishes add flair and flavor to your finished cheesecake. A dollop of whipped cream brings a lightness. A sprinkle of cinnamon or nutmeg gives warmth and spice. Chocolate shavings add a touch of luxury and sweetness. For this recipe, you’ll need some basic kitchen tools: - 9-inch springform pan - Mixing bowls - Electric mixer - Spatula Using a springform pan makes it easy to remove the cheesecake without damage. An electric mixer speeds up the process of making the filling. A spatula helps you smooth the filling and scrape bowls clean. With these ingredients and tools, you are ready to create a no bake pumpkin cheesecake that is sure to impress. For the full recipe, check the details outlined above. First, you need to combine graham cracker crumbs, cocoa powder, and melted butter. Use a bowl and mix well until the texture feels like wet sand. This helps the crust stick together. Once mixed, press the crumb mixture into the bottom of a 9-inch springform pan. Make sure it is even. Chill the pan in the fridge while you work on the filling. Next, take a mixing bowl and beat the softened cream cheese until it is smooth. This step is key for a creamy texture. After that, add in the pumpkin puree, powdered sugar, vanilla extract, and pumpkin pie spice. Mix everything until it is fully combined and creamy. This filling is where all the pumpkin flavor shines through. Now comes the fun part! In a separate bowl, whip the heavy cream until stiff peaks form. This makes your cheesecake light and fluffy. Gently fold the whipped cream into the pumpkin mixture. Be careful not to overmix; you want to keep that airy texture. Make sure no white streaks remain. Once your filling is ready, pour it over the chilled crust. Smooth the top with a spatula to make it pretty. Then, cover the cheesecake with plastic wrap. Refrigerate it for at least 4 hours or overnight to let it set. This waiting time builds great flavor and texture. When you’re ready, remove the sides of the springform pan and slice the cheesecake into wedges. Enjoy this rich and creamy delight! For the full recipe, check out the details above. To get a creamy filling, start with softened cream cheese. This ensures no lumps in your mix. Make sure to let it sit at room temperature for about 30 minutes. Once it's soft, beat it well until smooth. When you whip the heavy cream, whip it until stiff peaks form. This adds lightness to the cheesecake. Be careful not to overmix the whipped cream into the pumpkin mixture. Gentle folding keeps the texture airy and fluffy. I love serving this cheesecake with a big dollop of whipped cream on top. It adds a nice touch! A dusting of pumpkin pie spice looks great and adds flavor. This dessert pairs well with coffee or any fall-themed drinks. Hot cider or spiced chai are perfect choices too. One common mistake is not chilling the cheesecake long enough. Chill it for at least four hours, or even better, overnight. This helps it set properly. Another mistake is skipping the folding process. If you don’t fold the whipped cream carefully, your cheesecake may turn out dense instead of light and fluffy. Remember, patience is key for that perfect texture. For the full recipe, check out the details above! {{image_2}} You can easily change up the flavor of your no bake pumpkin cheesecake. One fun idea is to add chocolate. By mixing in some cocoa powder or melted chocolate, you create a chocolate pumpkin cheesecake that is rich and tasty. Another option is to spice things up. Try adding spices like ginger or allspice. These spices will give your cheesecake a warm and cozy flavor. You will love how they brighten the pumpkin taste. If you need to adjust for dietary needs, I have some great tips. For a gluten-free version, swap the graham cracker crust for almond flour or gluten-free cookies. You can still enjoy that crunchy base without the gluten. For those who want a dairy-free option, use dairy-free cream cheese. There are many brands available that taste great. You can still enjoy the creamy texture without dairy in your dessert. When the seasons change, so can your cheesecake! For Halloween, you can get creative with your decorations. Try topping the cheesecake with candy corn or spooky chocolate shapes. It makes the dessert festive and fun. For Thanksgiving, think about serving styles. You can slice the cheesecake into wedges and serve with a dollop of whipped cream. You could also sprinkle some cinnamon or nutmeg on top. This adds a lovely fall touch that everyone will enjoy. Explore all these variations to make your no bake pumpkin cheesecake unique and delightful. For the full recipe, check out the details above. To keep your no bake pumpkin cheesecake fresh, you must store it right. First, make sure to refrigerate any leftovers in an airtight container. This step keeps the cheesecake moist and tasty. If you don’t have one, wrap the cheesecake tightly in plastic wrap. It will stay fresher longer this way. If you want to store the cheesecake for a long time, freezing is an option. To freeze, wrap the cheesecake tightly in plastic wrap and then in aluminum foil. This method prevents freezer burn. You can freeze it for up to three months. When you are ready to enjoy it, thaw it in the fridge overnight. This slow thawing helps maintain its creamy texture. You should eat your no bake pumpkin cheesecake within five to seven days when stored in the fridge. Look for signs of spoilage, such as a sour smell or changes in texture. If you see any mold, it’s best to discard it. Always trust your senses when judging food freshness. This ensures you enjoy your dessert at its best! Yes, you can use fresh pumpkin! Start with a small pumpkin. Cut it in half, remove the seeds, and bake it cut-side down at 350°F for about 45 minutes. After it cools, scoop out the flesh and puree it until smooth. This fresh pumpkin adds a lovely flavor but will require some extra steps compared to canned. Canned pumpkin is smooth and ready to use, which saves time. Check your cheesecake after chilling for at least four hours. It should feel firm to the touch but still have a slight jiggle in the center. If it wobbles too much, let it chill longer. You want it to be firm enough to slice but still creamy. Remember, it will set more as it cools. Absolutely! If you prefer a nutty flavor, try a crust made from crushed almonds or pecans. You can also use a cookie crust if you want something sweeter. For a crustless version, simply pour the filling directly into a greased springform pan. This way, it will still taste great! Pair your cheesecake with whipped cream, a sprinkle of cinnamon, or chocolate shavings. It also goes well with coffee or a spiced chai tea. For added crunch, consider serving with candied pecans or walnuts. These options elevate the flavors and make each bite special. Yes, it can be gluten-free! Use gluten-free graham cracker crumbs for the crust. Check labels on ingredients like powdered sugar and pumpkin pie spice to ensure they are gluten-free too. If you're unsure, making a crustless version is a great option. Enjoy this treat without worry! You learned how to make a tasty no-bake pumpkin cheesecake. We covered essential ingredients, step-by-step instructions, tips for success, and fun variations. This dessert is simple to make and packed with flavor. You can impress friends and family, especially during fall. Remember to chill it well for the best taste and texture. Enjoy exploring your creativity with toppings and flavor tweaks. I hope you feel confident making this cheesecake and sharing it with others. Now, grab your ingredients and start baking!

No Bake Pumpkin Cheesecake Rich and Creamy Delight

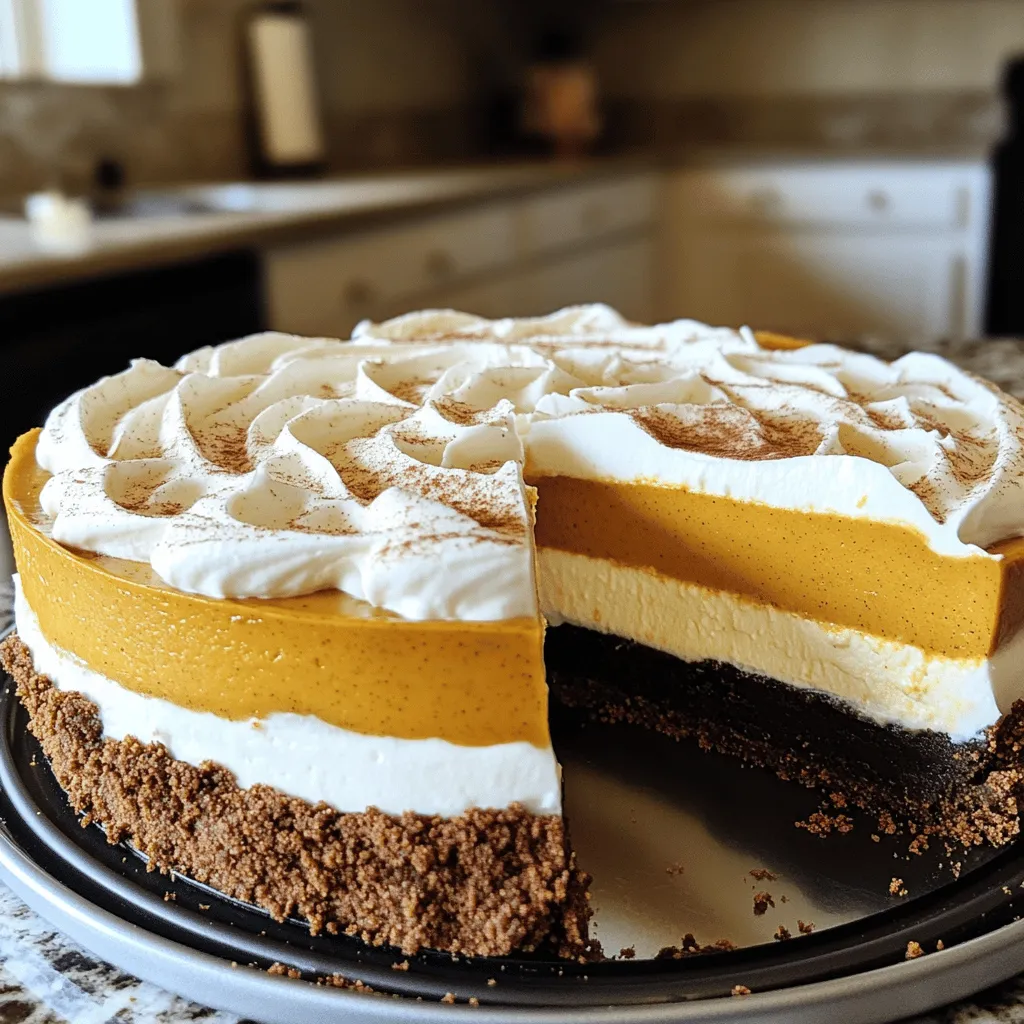
If you love fall flavors but want a quick and easy dessert, you’ve found it! This No Bake Pumpkin Cheesecake

- 4 cups fresh broccoli florets - 1 medium onion, chopped - 2 cloves garlic, minced - 3 cups vegetable broth - 1 cup heavy cream - 2 cups shredded sharp cheddar cheese - 1 teaspoon mustard powder - Salt and pepper to taste - 2 tablespoons olive oil You can change some ingredients if you want. Here are a few ideas: - Cheese: Use vegan cheese for a dairy-free option. - Cream: Coconut milk works well instead of heavy cream. - Broccoli: Fresh broccoli has a better taste, but frozen broccoli is okay too. These choices help you meet your dietary needs while keeping the soup tasty. 1. Start by heating 2 tablespoons of olive oil in a large pot over medium heat. 2. Add 1 medium chopped onion. Sauté it for about 5 minutes until it turns soft and clear. 3. Next, add 2 minced garlic cloves. Sauté for 1 more minute until it smells nice. 4. Now, toss in 4 cups of fresh broccoli florets. Stir everything together and cook for about 3 minutes. 5. Pour in 3 cups of vegetable broth. Turn up the heat to bring it to a gentle boil. Cook for 10-15 minutes until the broccoli is soft. - If you have an immersion blender, use it to blend the soup right in the pot. This keeps it easy and saves time. - If you use a standard blender, be careful! Hot soup can splash. Blend in small batches and let it cool slightly. 1. Once blended, pour the soup back into the pot. Stir in 1 cup of heavy cream and 1 teaspoon of mustard powder for flavor. 2. Gradually add 2 cups of shredded sharp cheddar cheese. Stir until it melts and mixes well. 3. Taste the soup and add salt and pepper to make it just right. If it’s too thick, add a splash of vegetable broth or cream. This step-by-step guide ensures you create a creamy and delicious broccoli cheddar soup quickly. For the exact measurements and further details, check the Full Recipe. To make this soup great, start by sautéing your onions and garlic. Heat olive oil in your pot. Add the onions first and cook until they are soft and clear. This takes about five minutes. Next, add garlic for one more minute. This step brings out their best flavors. For a smooth soup texture, using an immersion blender is best. Blend until creamy. If you use a regular blender, do it in small batches. Be careful; hot soup can splash! One common mistake is overcooking broccoli. You want it tender but not mushy. Cook it just until bright green and soft, about 10 to 15 minutes. This way, it keeps its flavor and nutrients. Another mistake is adding cheese too quickly. Add it slowly after the soup is blended. Stir until melted. This keeps your soup creamy and smooth. For extra depth, try adding spices like paprika or cayenne pepper. These add a nice kick! You can also use herbs like thyme or parsley for fresh notes. When serving, pair your soup with crusty bread or a light salad. This makes a delicious meal. For a fun twist, serve it with a sprinkle of crispy bacon or croutons on top. {{image_2}} You can change the cheese in your soup for a new flavor. Mild cheddar gives a smooth taste, while sharp cheddar adds a nice bite. If you want to mix it up, try Gruyère. Gruyère melts well and adds a nutty flavor. You can even use a blend of cheeses for a unique twist. Want to make your soup heartier? Add some protein! You can stir in cooked chicken for a meaty touch. If you prefer a veggie option, add canned beans. Beans like white beans or chickpeas work well. They add fiber and keep the soup filling, perfect for a meal. To boost the taste, use fresh herbs. Thyme and rosemary add depth and aroma. Just a small amount can change the whole dish. For a bright finish, add a splash of lemon juice before serving. This adds freshness and balances the creaminess of the soup. Enjoy exploring these easy variations to make your broccoli cheddar soup your own! How long will it last in the fridge? Your broccoli cheddar soup will stay fresh in the fridge for about 3 to 4 days. Best ways to store leftovers Store the soup in an airtight container. Make sure it cools down before sealing. This helps keep it fresh and tasty. Tips for freezing soup To freeze your soup, let it cool completely. Pour it into freezer-safe containers, leaving some space at the top for expansion. You can also use freezer bags for easy storage. Reheating frozen broccoli cheddar soup When you are ready to enjoy your soup, thaw it in the fridge overnight. Heat it on the stove over low heat, stirring often. Add a splash of broth or cream if it’s too thick. For the full recipe, check out the Cheesy Broccoli Bliss Soup 🥦. To thicken broccoli cheddar soup, you have a few simple options. First, you can add more cheese. Cheese not only enhances flavor but also adds thickness. Another way is to include a cornstarch slurry. Mix equal parts cornstarch and cold water, then stir it into the soup while it simmers. Let it cook for a few minutes to thicken. Lastly, you can blend more of the soup until smooth. This will create a creamier texture without adding extra ingredients. Yes, you can make this soup vegan! Use vegetable broth as your base. Replace heavy cream with coconut milk or a cashew cream for a rich taste. For cheese, try a vegan cheese that melts well. Nutritional yeast can also add a cheesy flavor without dairy. Adjust the mustard powder as needed, as some vegan cheeses may already have added flavor. This way, you keep all the deliciousness while making it plant-based! This soup pairs well with many dishes. Try serving it with crusty bread or a fresh salad. Grilled cheese sandwiches also complement the soup perfectly. For a heartier meal, consider adding a side of roasted vegetables. You could even serve it in a bread bowl for a fun twist. Each of these options enhances the soup's flavor and makes for a filling meal. For the full recipe, check out the Cheesy Broccoli Bliss Soup 🥦. This recipe will guide you step-by-step to create a creamy and delicious dish. In this blog post, we explored how to make a delicious broccoli cheddar soup. I shared the key ingredients and offered helpful tips for cooking, blending, and adding flavors. You learned about substitutions and variations to suit your needs. Storage advice ensures your soup stays fresh. Remember, the right techniques and careful seasoning make all the difference. Enjoy experimenting with new flavors, and don’t forget to share your creations! Happy cooking!

Easy Broccoli Cheddar Soup Creamy and Quick Recipe

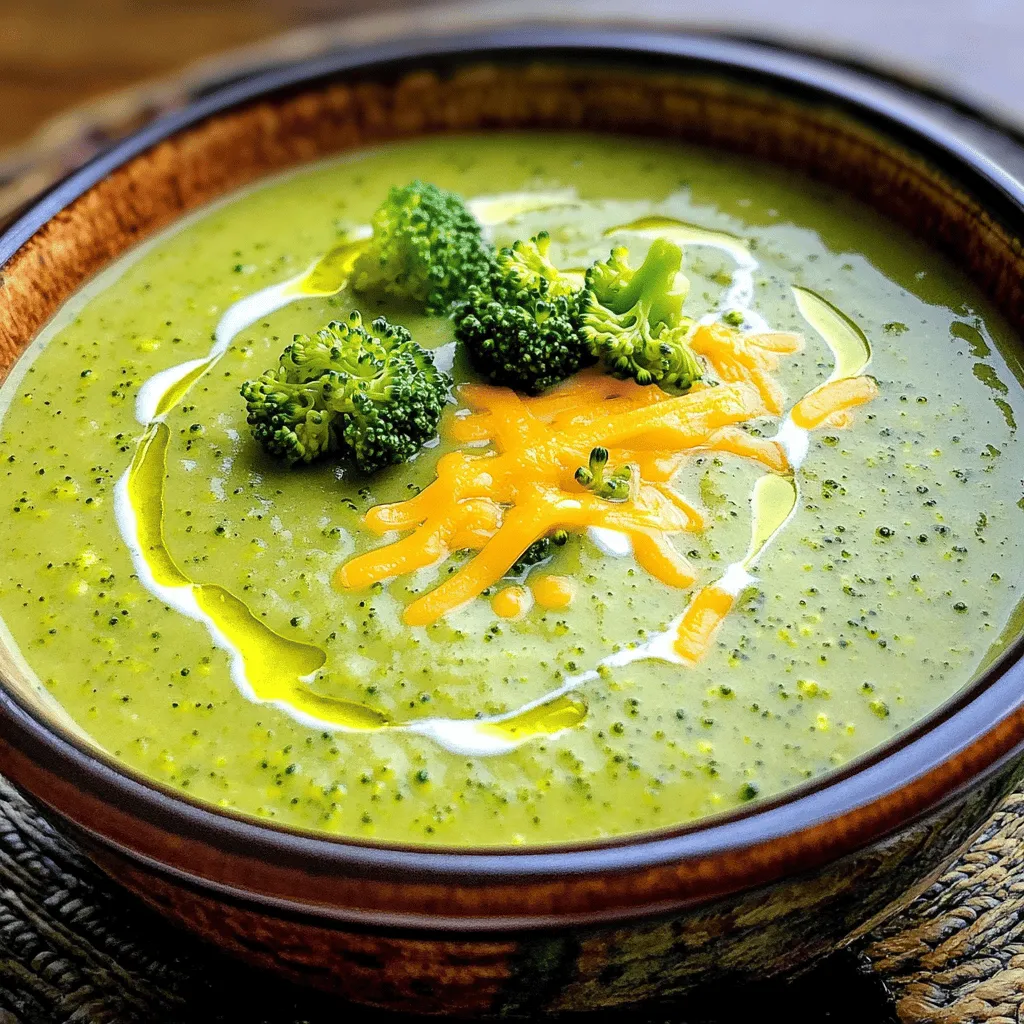
Looking for a quick and tasty way to enjoy broccoli? This Easy Broccoli Cheddar Soup is your answer! In just

Older posts
Newer posts
← Previous Page1 … Page17 Page18 Page19 … Page55 Next →

dsad

© 2025 Lisa Dishes • Built with GeneratePress

Our Policies

  • Copyright Policy
  • Cookie Policy
  • GDPR Policy
  • Privacy Policy
  • Disclaimer
  • Terms Of Use

More Information

  • Home
  • About
  • Contact
  • Appetizers
  • Dessert
  • Dinner
  • Drinks
©2025, Lisa Dishes About Back To Top