![- Chicken breast details: Use 1 lb (450g) of boneless chicken breast, diced. Chicken breast is lean and cooks quickly. It absorbs all the flavors well, making it ideal for this dish. - Yogurt and its purpose: One cup of plain yogurt is key to this recipe. It tenderizes the chicken and adds creaminess. The yogurt also helps to infuse the spices into the meat. - Tikka masala spice mix: You need 2 tablespoons of tikka masala spice mix. This blend includes spices like cumin, coriander, and paprika. It gives the dish its signature flavor and warmth. - Suggested vegetables or side options: You can add vegetables like bell peppers or peas. They add color and nutrition. Serve with rice or naan to soak up the sauce. - Alternatives for coconut milk: If you want a lighter option, use low-fat yogurt instead of coconut milk. You can also use almond milk for a nutty flavor. - Sweetener choices: Use honey or maple syrup to add a touch of sweetness. This balances the spices and makes the dish more appealing. Marinating the chicken is key. It adds flavor and makes the meat tender. I suggest marinating for at least 30 minutes. If you have time, let it sit overnight. This gives the spices a chance to soak in. Start by heating vegetable oil in a large skillet over medium heat. Add the finely chopped onion. Sauté it until it turns translucent and slightly golden. This should take about 5 to 7 minutes. Next, toss in the minced garlic and grated ginger. Cook them for 1 to 2 minutes until they smell wonderful. Now, it's time to add crushed tomatoes. Stir them in and let the mix cook for 5 minutes. This step helps the flavors blend together. Add the marinated chicken to the pan. Make sure to scrape in all the marinade too. Stir everything well and cook for about 10 minutes. You want the chicken to cook through. Next, pour in the coconut milk and honey. Mix everything together. Bring it to a gentle simmer. Cook for an extra 5 to 10 minutes. This thickens the sauce nicely. Don't forget to taste and add salt if needed. Enjoy the rich flavors of your Easy Chicken Tikka Masala. For the full recipe, check out the detailed steps provided earlier. To marinate chicken well, start with good yogurt. The yogurt helps tenderize the meat. Mix it with the tikka masala spice mix. This step adds deep flavors. Aim for at least 30 minutes of marination. For more flavor, let it sit overnight. Add lemon juice for extra zing. It brightens the dish and balances the spices. For cooking, a skillet works best. Heat oil over medium heat. Sauté onions until golden brown. This builds a tasty base. Add garlic and ginger, cooking until fragrant. Stir in crushed tomatoes next. Cook until they break down. After that, add the marinated chicken. Make sure to scrape in all the marinade. For a creamy sauce, pour in coconut milk. Let it simmer until thickened. Adjust the seasoning with salt to taste. Serve Chicken Tikka Masala with warm naan or rice. Basmati rice is a great choice. It soaks up the sauce well. Fresh cilantro adds a nice touch on top. You can also add a squeeze of lime for brightness. For a colorful plate, add a side salad. This adds crunch and freshness. Try these tips for a delightful meal. For the full recipe, check out the Easy Chicken Tikka Masala section. {{image_2}} You can easily make Chicken Tikka Masala vegetarian or vegan. Simply substitute the chicken with tofu or chickpeas. Tofu absorbs flavors well. It gives a delightful texture. Chickpeas add protein and fiber. For a creamy touch, use dairy-free yogurt. Look for coconut or almond yogurt. They complement the dish's rich flavors. You can adjust spice levels based on your taste. If you love heat, add fresh chilies or extra tikka masala. You might use smoked paprika for a unique kick. For a milder dish, reduce the spice mix. You can also remove seeds from fresh chilies. This helps tame the heat. Always taste as you go! Explore other cultural influences for fun twists. You could add curry leaves or lemongrass for a fresh flavor. These spices bring a new vibe to the dish. Unique ingredient substitutions can also shine. Try using yogurt from different cultures, like Greek yogurt, for added creaminess. Each twist makes the dish your own. For the full recipe, check out Easy Chicken Tikka Masala. To keep your chicken tikka masala fresh, follow these steps. First, let it cool to room temperature. Then, transfer it to an airtight container. Store it in the fridge. It stays fresh for about three to four days. Always check for any off smells before using leftovers. Freezing is a great option for long-term storage. Start by letting the dish cool completely. Then, portion it into freezer-safe bags or containers. Remove as much air as possible to prevent freezer burn. It can last up to three months in the freezer. To reheat, thaw it in the fridge overnight. Then, warm it on the stove or in the microwave until hot. You can get creative with leftover chicken tikka masala. Try using it in a wrap with fresh veggies. It also works well in a spicy quesadilla with cheese. You can even mix it into a rice bowl for a quick meal. Each option adds a fun twist to your leftovers. Enjoy experimenting with new ideas! You should marinate the chicken for at least 30 minutes. This will help the chicken absorb the flavors. If you can, marinate it overnight. Longer marination gives the chicken a deeper taste. Short marination time makes the chicken tasty but less flavorful. Longer marination can make the chicken tender and juicy. For the best results, aim for a minimum of 2 hours. You can use canned chicken, but it may not taste as fresh. Canned chicken is already cooked, so it won't need long cooking. This may work in a pinch, but fresh chicken is best. If you use canned chicken, rinse it before adding it to the dish. This helps remove some sodium and improves the flavor. However, I recommend sticking with fresh chicken for the best results. Chicken Tikka Masala pairs well with many sides. Traditional options include basmati rice or naan bread. These soak up the tasty sauce well. You can also serve it with a fresh salad. Greens with cucumber, tomatoes, and a light dressing work great. For a twist, try roasted vegetables on the side. They add color and crunch to your meal. For the full recipe, check the [Full Recipe]. In this article, we explored how to make a tasty Chicken Tikka Masala. We discussed key ingredients like chicken, yogurt, and the tikka spice mix. I shared tips on marinating the chicken and cooking the perfect base. Additionally, we covered variations, storing tips, and creative ways to use leftovers. Remember, cooking is about experimenting. Adjust the spices and try new ingredients to make this dish your own. Enjoy your cooking journey!](https://lisadishes.com/wp-content/uploads/2025/06/c4ae26a3-dfb0-4912-a5d5-5dbf0e4c70b3.webp)
Easy Chicken Tikka Masala Flavorful Dinner Delight
Ready to spice up your dinner? This Easy Chicken Tikka Masala is your flavorful solution! With simple ingredients and a
Ready to spice up your dinner? This Easy Chicken Tikka Masala is your flavorful solution! With simple ingredients and a
![- 3 ripe peaches, sliced - 8 oz fresh mozzarella, sliced - 8 oz fresh mozzarella, sliced - 1 cup fresh basil leaves - 3 tablespoons balsamic glaze - 2 tablespoons extra virgin olive oil - Sea salt to taste - Freshly cracked black pepper to taste For my Summer Peach Caprese Salad, I focus on fresh, ripe peaches. They bring sweetness and juice. Choose peaches that feel soft but not too mushy. Their bright yellow color means they are ready to enjoy. Next, I pick juicy tomatoes. While I did not list them in the recipe, you can add them for extra flavor. They add a nice touch of acidity that pairs well with the sweetness of peaches. For the dairy, I love fresh mozzarella. It has a creamy texture that complements the peaches. Look for mozzarella packed in water. It tastes fresher and is softer than the dry kind. When it comes to herbs and condiments, fresh basil leaves are a must. Their aroma and taste brighten the salad. I also recommend balsamic glaze for a sweet and tangy touch. Extra virgin olive oil adds richness, while sea salt and black pepper enhance all the flavors. This salad is all about balance. Each ingredient plays a key role. You can find the full recipe above to make this vibrant dish at home. First, wash your peaches under cool water. This helps remove any dirt. Next, slice the peaches into wedges and take out the pit. Aim for about six slices per peach. Now, slice the fresh mozzarella into rounds. Each slice should match the size of the peach slices. On a large serving platter, alternate the peach and mozzarella slices. You can create a circle or a straight line. Make it look pretty! Then, tuck fresh basil leaves between the peach and mozzarella. This adds color and a nice taste to the salad. Now, drizzle the extra virgin olive oil evenly over the salad. This adds richness. Next, drizzle the balsamic glaze on top for a sweet touch. Finally, season with a pinch of sea salt and freshly cracked black pepper. Let the salad rest for about 10 minutes before serving. This helps the flavors mix well. For the full recipe, check out the [Full Recipe]. Choosing the ripest peaches is key. Look for peaches that are slightly soft to the touch. They should smell sweet and fruity. This ensures they are juicy and flavorful. Balancing flavors with herbs is also important. Fresh basil adds a lovely aroma and taste. You can even try mint for a twist. Serve the salad on a rustic wooden board or a simple white platter. This makes the colors pop and looks appealing. Garnishing with extra basil adds a fresh touch. Just a few leaves on top can brighten the dish. Allowing flavors to meld is crucial. After mixing, let the salad rest for about 10 minutes. This time lets the juices combine. The result is a more flavorful and delicious dish. Enjoy your Summer Peach Caprese Salad right after this! For the full recipe, check the link above. {{image_2}} You can make this salad even better by adding other fruits. Try using ripe nectarines for a sweet twist. You can also mix in fresh berries like blueberries or strawberries. They add color and flavor. If you want more protein, grilled chicken or shrimp is a great choice. Just slice them thin and place them on top. Switching up the dressing can change the whole taste. Instead of balsamic glaze, use red wine vinegar. It gives a sharp flavor that balances the sweetness of the peaches. You can also try flavored olive oils. Look for options like garlic or lemon-infused oils. They add a unique touch to your salad. If you want a vegan or dairy-free option, swap out the mozzarella. Use a plant-based cheese or just skip it. The salad will still taste great with the peaches and basil. You can also use a tofu-based dressing for added creaminess without dairy. This keeps the salad fresh and light while meeting dietary needs. For the full recipe, check out the detailed instructions above. After enjoying your Summer Peach Caprese Salad, store any leftovers in the fridge. Use an airtight container to keep the salad fresh. This helps to stop moisture from ruining the flavors. The salad lasts about two days in the fridge. To maintain freshness and avoid sogginess, keep the components separate if you can. Store the peaches, mozzarella, and basil in separate containers. Only mix them when you are ready to eat. A little squeeze of lemon juice on the peaches can help them stay fresh longer. You can reuse the salad in other meals. Try adding it to a sandwich for a tasty lunch. Mix it with some cooked pasta for a quick dinner. You can even chop it up and use it as a topping for grilled chicken or fish. This way, the vibrant flavors shine in new ways! For the full recipe, check out the sections above. To pick the best peaches, look for these tips: - Color: Choose peaches with a rich, golden hue. - Feel: Gently press the peach; it should yield slightly. - Smell: A sweet scent means it’s ripe and ready. - Shape: Look for a round, plump shape without wrinkles. These signs show that your peaches are ready for a delicious salad. Using ripe peaches enhances flavor and sweetness. They make your Summer Peach Caprese Salad truly shine! Yes, you can prep some parts ahead! Here’s how: - Peach Prep: Slice the peaches a few hours before serving. - Storage: Use lemon juice to keep them from browning. - Assembly: Wait to add mozzarella and basil until serving. This keeps the salad fresh and bright. The flavors blend better when you assemble it just before eating. Enjoy the best taste possible! Pairing dishes can elevate your meal. Here are some great options: - Grilled Chicken: Adds protein and a smoky flavor. - Crusty Bread: Perfect for soaking up the juices. - Pasta Salad: A light side that complements the Caprese. These pairings bring out the freshness of your salad. They create a well-rounded dining experience that everyone will love! This blog post highlighted key ingredients, steps, and tips for a great salad. Fresh peaches and mozzarella create a tasty mix. Adding herbs like basil makes flavors pop. Don't forget to drizzle olive oil and balsamic glaze for extra flair. In the end, feel free to tweak the recipe. Add fruits or proteins that you love. Remember, fresh ingredients matter for the best taste. Enjoy creating your delicious salad masterpiece!](https://lisadishes.com/wp-content/uploads/2025/06/60671e17-7aa1-4fd5-a648-7922dc33b7cd.webp)
Looking for a light and refreshing dish for summer? Let me introduce you to the Savory Summer Peach Caprese Salad.

Are you ready to impress your guests with a bold twist on a classic appetizer? Spicy Sriracha deviled eggs bring
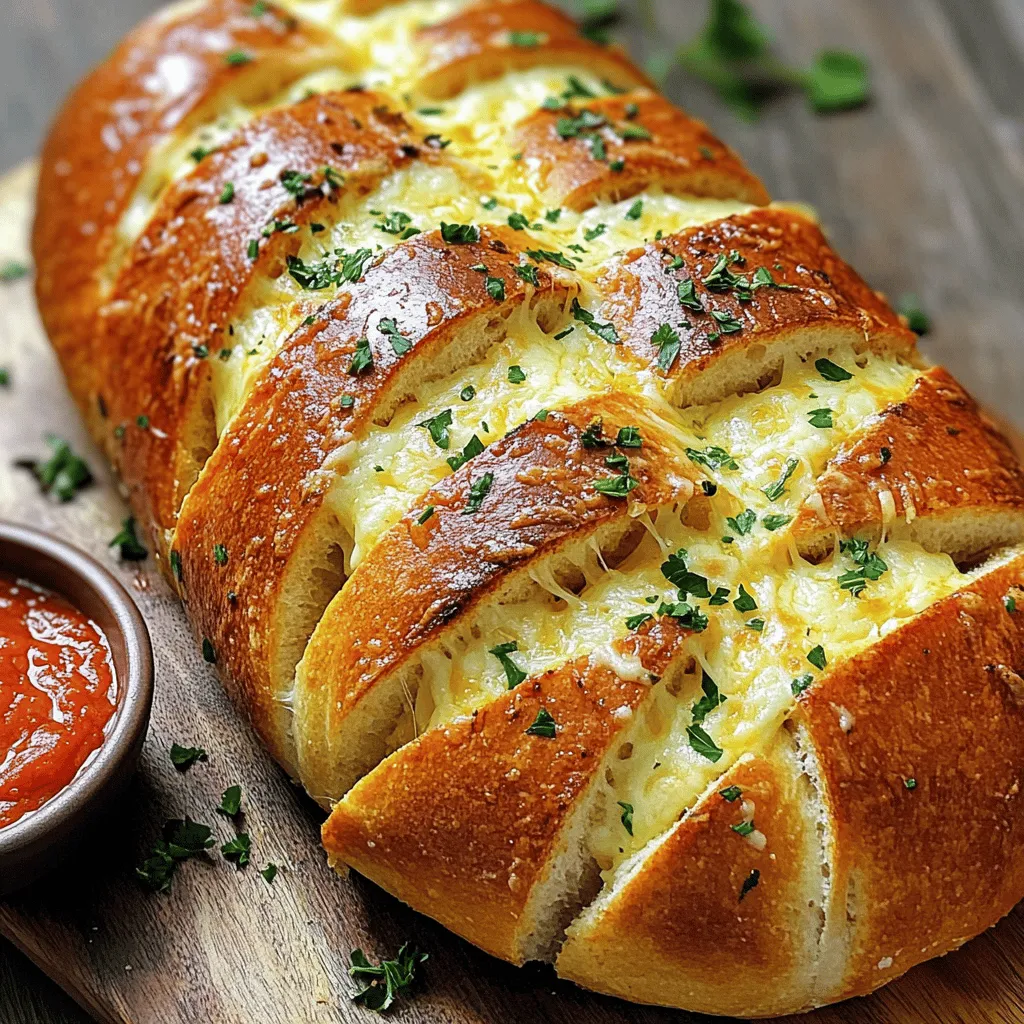
If you love cheesy, buttery goodness, this Cheesy Garlic Pull-Apart Bread will make your mouth water. Imagine tearing off soft,
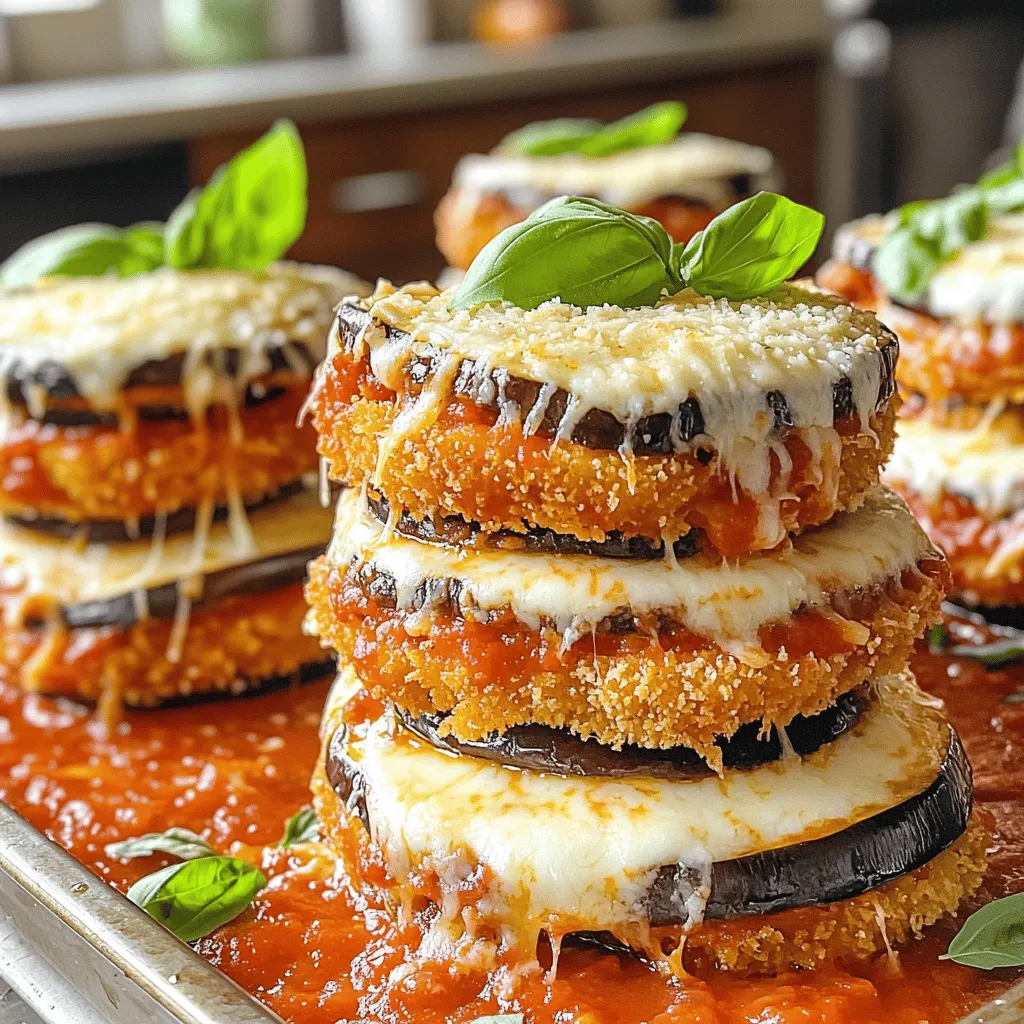
If you’re craving a comforting meal that bursts with flavor, Eggplant Parmesan Stacks are the perfect choice. This layered dish
![- 12 oz pasta (penne or fettuccine recommended) - 1 cup sun-dried tomatoes in oil, drained and chopped - 1 cup heavy cream - 1/2 cup grated Parmesan cheese - 3 cloves garlic, minced - 2 tablespoons olive oil - 1/4 cup fresh basil leaves, chopped - Salt and pepper to taste - Optional: red pepper flakes for heat For this creamy sun-dried tomato pasta, start with the main ingredients. The pasta is the base. Penne or fettuccine works best for this dish. Sun-dried tomatoes bring a rich flavor. Make sure to use ones in oil; they add extra taste. Heavy cream makes the dish creamy and dreamy. Parmesan cheese adds a nice salty touch, enhancing overall flavor. For the additional ingredients, garlic adds depth. Olive oil helps sauté the garlic and sun-dried tomatoes. Fresh basil adds a burst of freshness. Adjust salt and pepper to your liking. If you want some heat, add red pepper flakes. This recipe is simple yet full of flavor! For the full recipe, check out the complete instructions and make this dish shine! To cook the pasta, bring a large pot of salted water to a boil. Add 12 oz of your chosen pasta, like penne or fettuccine. Cook it until it is al dente, which means firm to the bite. This usually takes about 8 to 10 minutes, but check the package for exact times. Remember to reserve 1/2 cup of pasta water before draining. This water is starchy and will help adjust your sauce later. In a large skillet, heat 2 tablespoons of olive oil over medium heat. Once hot, add 3 minced garlic cloves and sauté for about 1 minute. You want the garlic to be fragrant but not browned. Next, stir in 1 cup of chopped sun-dried tomatoes. Let them cook for 2 to 3 minutes. This allows the flavors to mix well. Reduce the heat to low, then pour in 1 cup of heavy cream. Stir the mixture continuously for about 2 to 3 minutes until it thickens slightly. Now, add 1/2 cup of grated Parmesan cheese. Stir until it melts and combines with the cream, creating a rich sauce. Now, it’s time to mix everything together. Toss the drained pasta into the skillet with the sauce. Ensure every piece of pasta is coated. If the sauce feels too thick, gradually add some reserved pasta water until it reaches your desired consistency. Finally, season with salt, pepper, and optional red pepper flakes for a little heat. To finish, mix in 1/4 cup of chopped fresh basil, adding color and flavor. For a full recipe, check out the [Full Recipe]. To make your creamy sun-dried tomato pasta shine, focus on flavors. Start with salt and pepper. Taste as you go. If you want heat, add red pepper flakes. They’ll bring a nice kick. For that dreamy creamy texture, use heavy cream. When you stir it into the garlic and sun-dried tomatoes, let it simmer. This thickens the sauce. If it gets too thick, don't worry. Just add some of that reserved pasta water until you reach your perfect consistency. Presentation matters! Serve your pasta in nice bowls. Add fresh basil leaves on top for color. A sprinkle of Parmesan cheese makes it look fancy. You can drizzle a bit of oil from the sun-dried tomatoes for extra richness. As for side dishes, a simple green salad works well. Garlic bread is another great choice. It pairs perfectly with the creamy sauce and adds crunch. Showcasing your dish is key. Good photos make people want to try your recipe. Natural light works wonders for food photography. Take your pasta near a window for the best look. Keep the background simple to highlight your dish. Use a clean plate and arrange the pasta nicely. A few garnishes can help too. This way, your creamy sun-dried tomato pasta looks as good as it tastes! Check out the Full Recipe to get started. {{image_2}} You can make this dish even better by adding protein. Chicken, shrimp, or tofu work great. For chicken, slice it into thin strips. Season it with salt and pepper. Cook the chicken in the skillet until it's golden brown. This usually takes about 6-8 minutes. For shrimp, toss them in right after the garlic. Cook for 3-4 minutes until they turn pink. If you prefer tofu, cut it into cubes. Sauté the tofu until it's crispy on all sides, around 8-10 minutes. This gives your pasta a hearty twist. If you're looking for vegetarian or vegan options, you have choices. For heavy cream, use coconut cream or cashew cream. These still give a rich feel. Instead of Parmesan cheese, try nutritional yeast for a cheesy flavor. You can also use vegan cream cheese to keep it creamy. Blend all these together to maintain that delicious taste. With these swaps, you won't miss the dairy at all! Using seasonal vegetables makes your dish even healthier. In spring, add asparagus or peas for a fresh crunch. Summer tomatoes or zucchini can brighten up the meal. In fall, butternut squash or kale bring warmth. During winter, try adding sautéed spinach or broccoli. Just chop them up and mix them in with the sun-dried tomatoes. This way, your pasta adapts with the seasons and stays tasty year-round. For more ideas, check the Full Recipe for inspiration! To keep your creamy sun-dried tomato pasta fresh, place it in an airtight container. Make sure to let it cool first. You can store it in the fridge for up to three days. If you want to keep it longer, freezing is a good option. When reheating, use a skillet over medium-low heat. Add a splash of water or extra cream to help keep the sauce creamy. Stir it often to avoid burning. If you find the sauce is too thick, add more liquid slowly. Yes, you can freeze creamy sun-dried tomato pasta! To freeze, use a freezer-safe container. Make sure to leave some space at the top for expansion. When you want to eat it, thaw it overnight in the fridge. Reheat in a skillet, adding a bit of cream or water to revive its texture. What can I substitute for heavy cream? You can use half-and-half or coconut cream. Both give a nice texture. Silken tofu blended with a little water also works well for a dairy-free option. How do I make the sauce spicier? Add red pepper flakes while cooking. You can also mix in diced jalapeños for a fresh kick. If you like heat, try a dash of hot sauce too. Can I use fresh tomatoes instead of sun-dried? Yes, you can use fresh tomatoes. Just chop them and sauté until soft. You may need to cook a bit longer to deepen the flavor. How do I ensure my pasta is not sticky? Make sure to stir the pasta while it cooks. Drain it well and toss it with olive oil right after. This keeps the pasta separate and helps it absorb the sauce better. What is the best type of pasta for this recipe? Penne or fettuccine works best. They hold the sauce well and give a nice bite. You can also try rigatoni for a fun twist. What is the calorie count per serving? Each serving has about 600 calories. This can vary based on the exact ingredients used and portion sizes. Are there any healthy variations of this recipe? Yes! You can use whole wheat pasta for more fiber. Swap heavy cream for a lower-fat option. Adding spinach or broccoli boosts nutrients without losing flavor. You can find the full recipe [here](#). This blog post covered how to make creamy sun-dried tomato pasta. We explored main ingredients, step-by-step cooking, and tips to perfect your dish. You learned how to add proteins, make vegan swaps, and store leftovers effectively. In closing, this recipe is both simple and versatile. You can tailor it to your taste and dietary needs. Dive in and enjoy making this delicious meal for yourself or friends!](https://lisadishes.com/wp-content/uploads/2025/06/77d8bf3a-e361-44b4-ab63-77d2eda82372.webp)
Are you ready to impress your family with a dinner that’s easy and delicious? This Creamy Sun-Dried Tomato Pasta is
![- 2 medium zucchinis - 1 cup grated Parmesan cheese - 1 cup breadcrumbs - 2 large eggs - Olive oil spray - 1 teaspoon garlic powder - 1 teaspoon onion powder - 1 teaspoon dried oregano - Salt and pepper to taste - Fresh parsley - Marinara sauce or garlic aioli To make crispy Parmesan zucchini chips, start with the best ingredients. Zucchini is the star. Choose firm, fresh zucchinis for the best texture. Grated Parmesan cheese adds a sharp, salty flavor that makes these chips irresistible. I like to use Panko breadcrumbs because they create extra crunch. Seasonings bring life to the dish. Garlic powder adds depth, while onion powder gives a sweet touch. Dried oregano adds an earthy flavor that rounds out the mix. Don’t forget salt and pepper. They enhance all the flavors. For a lovely finish, consider optional garnishes. Fresh parsley adds color and brightness. Marinara sauce or garlic aioli makes great dips. These extra touches elevate your crispy zucchini chips, making them a true delight. For the complete cooking instructions, check out the Full Recipe. - Preheat the oven to 425°F (220°C). - Slice zucchini into thin rounds. Start by heating your oven. This helps the zucchini chips become nice and crispy. Use a sharp knife to cut the zucchini. Aim for thin, even slices. This ensures they cook well and get crunchy. - Mix Parmesan cheese, breadcrumbs, and seasonings. - Dip zucchini slices in beaten eggs. In a bowl, combine the grated Parmesan, breadcrumbs, and spices. This mix gives the chips great flavor. In another bowl, beat the eggs. Grab a zucchini slice, dip it in the eggs, then coat it in the cheese and breadcrumb mix. Press gently to make sure it sticks well. - Arrange coated slices on a baking sheet. - Bake for 20-25 minutes, flipping halfway. Lay the coated slices on a baking sheet. Spread them out so they don’t touch. This helps them cook evenly. Bake in the hot oven for 20 to 25 minutes. Flip them halfway through for even crispiness. When they are golden brown, they are ready to enjoy. For the full recipe, check the details above. To achieve the best crunch in your crispy Parmesan zucchini chips, follow these tips: - Use Panko breadcrumbs: Panko adds extra crunch and lightness compared to regular breadcrumbs. - Spray with olive oil: A light spray helps the chips crisp up beautifully during baking. To elevate the flavor of your zucchini chips, consider these additions: - Add crushed red pepper for spice: A pinch of crushed red pepper gives your chips a nice kick. - Experiment with different herbs: Feel free to try herbs like thyme or basil to change things up. Serving your crispy zucchini chips can be fun and creative: - Pair with dips like marinara sauce: Marinara complements the cheese and adds a tasty twist. - Garnish with fresh herbs: Chopped parsley or basil adds color and a fresh taste. For a full recipe, check out the [Full Recipe]. {{image_2}} You can switch up the cheese in this recipe. Try using cheddar for a sharp taste. You can also use mozzarella for a milder flavor. If you want to change the main veggie, use eggplant or yellow squash instead. These options add unique flavors and textures. For a quicker cooking time, use an air fryer. It gives you crispy chips in less time. Simply follow the same coating process and air fry them for about 10-15 minutes. If you want a different texture, try pan-frying. Heat some olive oil in a skillet and fry the coated zucchini until golden. This method adds a nice crunch and flavor. You can make these chips even more fun by adding seasonal spices. In fall, sprinkle in some pumpkin spice for a warm flavor. During summer, use fresh herbs like basil or thyme. These herbs enhance the taste and pair nicely with the zucchini. Keep your crispy zucchini chips in an airtight container. They stay fresh in the fridge for up to 3 days. This helps maintain their flavor and crunch. You can freeze your zucchini chips for later use. Freeze them uncooked or cooked. If you freeze them uncooked, they will keep their texture better when baked later. To reheat, use your oven. This method keeps the chips crispy and delicious. Set your oven to 350°F (175°C) and bake for about 10 minutes. Avoid microwaving your chips. Microwaving can make them soggy. You want that perfect crunch! For the full recipe, check out the Crispy Parmesan Zucchini Chips section above. To make your zucchini chips crispy, start by removing moisture. - Slice thinly: Cut zucchini into thin rounds for even cooking. - Salt them: Sprinkle salt on slices and let them sit for 15-20 minutes. This helps draw out moisture. - Dry thoroughly: Pat the slices dry with paper towels. Moisture leads to soggy chips. - Use Panko: Panko breadcrumbs give extra crunch. - Avoid overcrowding: Spread them out on the baking sheet. Chips need space to crisp up. - Spray with oil: Lightly spray the tops with olive oil before baking. Yes! You can use many vegetables instead of zucchini. Try these: - Eggplant: It has a similar texture. - Sweet potatoes: They add a sweet flavor. - Carrots: These become sweet and crunchy. - Kale: For a green chip, bake kale leaves. Experiment with your favorites to find new flavors! Dipping sauces can boost flavor. Here are some tasty pairings: - Marinara sauce: Great for a classic combo. - Garlic aioli: Creamy and rich, it adds depth. - Ranch dressing: A fun, tangy option. - Spicy salsa: For a fresh kick. You can also try hummus for a healthy spin! This blog gave you a detailed guide on making crispy zucchini chips. Starting with simple ingredients like zucchini and Parmesan, the steps are easy to follow. You learned tips for achieving the best crunch and storing them well. Feel free to explore variations with different veggies or flavors. These chips are tasty and fun to share. Enjoy your cooking adventure and impress others with your crunchy treats!](https://lisadishes.com/wp-content/uploads/2025/06/bbe23583-c842-4162-84c1-c7b531d353a7.webp)
Craving a crispy snack? Let me introduce you to my Crispy Parmesan Zucchini Chips recipe! These delicious chips are simple
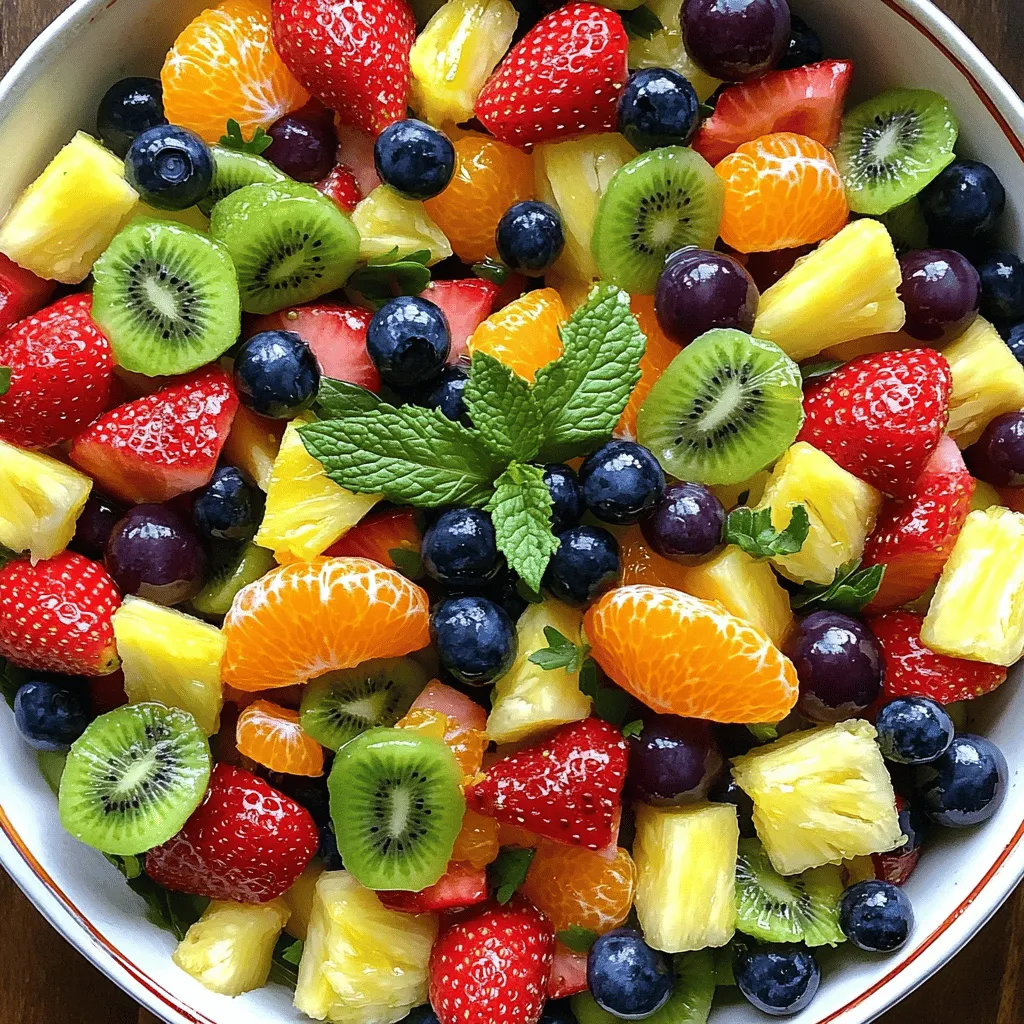
Looking for a fresh and fun way to enjoy fruit? Try my Rainbow Fruit Salad! It’s not just colorful; it’s
![To make a tasty garlic herb roasted chicken, you need fresh ingredients. Here’s what you will use: - Whole chicken (4-5 pounds) - 6 cloves garlic, minced - 1 lemon, halved - 1/4 cup fresh parsley, chopped - 2 tablespoons fresh thyme leaves - 2 tablespoons fresh rosemary, chopped - 1/4 cup olive oil - Salt and pepper to taste - 1 teaspoon paprika - 4 medium carrots, cut into 2-inch pieces - 3 medium potatoes, quartered These ingredients blend to create a dish that bursts with flavor. Fresh herbs add a wonderful aroma. The garlic brings a warm, savory taste. Lemon brightens the dish with its zesty flavor. I love using a whole chicken for this recipe. It cooks evenly and stays juicy. Pairing it with carrots and potatoes makes a complete meal. The veggies soak up all the tasty juices as they roast. Check the freshness of your herbs. They should be vibrant and fragrant. This ensures a robust flavor in your dish. You can find fresh herbs at local markets or grocery stores. Once you gather your ingredients, you will be ready to start cooking. For the full recipe, you can refer to the main instructions. Enjoy the process of preparing this delightful meal! 1. Preheat your oven to 425°F (220°C). This step is key for crispy skin. 2. In a small bowl, mix together the minced garlic, parsley, thyme, rosemary, olive oil, salt, pepper, and paprika to create a herb paste. This mixture packs a lot of flavor. 3. Pat the whole chicken dry with paper towels. This helps the skin get crispy. Place the chicken in a roasting pan. 4. Gently loosen the skin from the chicken breast and thighs using your fingers. Be careful not to tear it. Rub half of the herb mixture under the skin. This adds flavor directly to the meat. 5. Rub the remaining herb mixture all over the outside of the chicken. Coat it well for the best taste. 1. Squeeze the juice of one lemon half over the chicken. This adds brightness. Place the squeezed halves inside the cavity of the chicken, along with any leftover herbs. 2. Surround the chicken with the carrots and potatoes in the roasting pan. Drizzle with a little olive oil and season with salt and pepper. This will create tasty side dishes. 1. Roast the chicken in the preheated oven for about 1 hour and 15 minutes. Check the internal temperature with a meat thermometer. It should reach 165°F (74°C) for safe eating. 2. Let the chicken rest for 10-15 minutes before carving. This helps keep the meat juicy and tender. For the complete recipe, check out the [Full Recipe]. To get that golden, crispy skin, you must start by patting the chicken dry. Use paper towels to soak up any moisture. This simple step helps the skin crisp up during roasting. Next, apply your seasoning well. Rub the herb mix evenly on the chicken’s skin. Don’t forget to get under the skin too. This adds flavor right where it counts. Want to boost the flavor? Try adding different herbs or spices. Fresh basil or oregano can work wonders. You can also experiment with smoked paprika for a deeper taste. For the best results, marinate the chicken overnight. This gives the herbs time to soak in, creating a rich flavor. Just cover it and place it in the fridge until you’re ready to cook. When it’s time to carve, use a sharp knife for clean cuts. Start by separating the legs and thighs from the body. Next, slice down the breast to serve tender pieces. Allow the chicken to rest before carving; this helps the juices stay inside. Letting it sit for about 10-15 minutes makes a big difference in taste. Enjoy your perfectly roasted chicken! If you’re ready to make this dish, check out the Full Recipe for all the steps. {{image_2}} You can change the herbs based on what you have at home. If you don’t have fresh parsley, use basil or oregano. These herbs also add great flavor. For a twist, you can try garlic and orange instead of lemon. The orange gives a sweet touch that pairs well with garlic. Want some heat? Add spices to kick it up a notch. You can sprinkle in chili flakes or a dash of hot sauce. This will make your chicken spicy and exciting. Try adding cayenne pepper for an extra kick. Adjust the amount to fit your taste. You can cook your garlic herb roasted chicken in many ways. Use a slow cooker for a juicy chicken with little effort. Just follow the same steps and let it cook slowly. You can also grill the chicken for a smoky flavor. If you are short on time, use an Instant Pot. This method cooks the chicken quickly while keeping it tender. For more details on cooking methods, check the Full Recipe. After enjoying your garlic herb roasted chicken, let it cool first. This step is key! Place the chicken in an airtight container. If you have veggies left, store them in a separate container. Refrigerate both within two hours of cooking. They will stay fresh for three to four days. To reheat, use your oven for the best results. Preheat it to 350°F (175°C). Place the chicken on a baking sheet. Cover it loosely with foil. Heat for about 20 minutes. This keeps the chicken moist and delicious! If you want to keep your leftover chicken longer, freezing is a great option. First, carve the chicken into pieces. This helps it freeze and thaw more easily. Place the pieces in freezer-safe bags or containers. Remove as much air as possible. For veggies, follow the same steps. Spread them out on a tray first. Freeze them for about an hour. Then, transfer them to bags. This way, they won’t stick together. It prevents freezer burn too. Leftovers can last in the fridge for three to four days. If frozen, chicken stays good for four months. After this, the taste may change. Always check for signs of spoilage. If the chicken smells bad or looks off, it's best to toss it. Keep your meals safe and tasty. For the full recipe, check the instructions above! To season a chicken well, use a mix of herbs and spices. I love using garlic, lemon, and fresh herbs like parsley, thyme, and rosemary. First, make a paste with minced garlic, chopped herbs, olive oil, salt, pepper, and paprika. Rub this mixture under the skin for the best flavor. This method ensures the meat stays juicy and tasty. Yes, you can use frozen chicken, but it needs to thaw first. Plan ahead and place the chicken in the fridge for 24 hours before cooking. Thawing ensures even cooking and safe preparation. Avoid cooking from frozen, as it can lead to uneven texture and taste. The best way to check if chicken is done is by using a meat thermometer. Insert it into the thickest part of the thigh. The temperature should reach 165°F (74°C). If you don't have a thermometer, make sure the juices run clear when you cut into the thigh. No pink meat means it's safe to eat. - Additional questions about garlic herb roasted chicken: *What kitchen tools do I need?* A roasting pan, meat thermometer, and mixing bowl are great tools. *Can I make this dish in advance?* Yes, you can prepare the chicken ahead of time, apply the seasoning, and store it in the fridge for up to 24 hours. - Alternative sides or pairings for serving: I often serve garlic herb roasted chicken with roasted veggies like carrots and potatoes. Green beans or a simple salad also work well. For a twist, try adding a side of rice or couscous. These sides soak up the delicious juices from the chicken. This blog post covered the steps to make a flavorful garlic herb roasted chicken. We explored the ingredients you need and how to prepare the chicken. I shared tips for achieving crispy skin and enhancing flavor. You also learned about different cooking methods and how to store leftovers safely. In summary, this dish is simple and can be made your own. Enjoy experimenting with flavors and techniques to impress your family. Happy cooking!](https://lisadishes.com/wp-content/uploads/2025/06/38b0cf50-f4b7-4c7f-8843-b3d3f7ec4af0.webp)
Looking to impress your family with a tasty dinner? Garlic Herb Roasted Chicken is your answer! This dish delivers rich
![The classic BLT sandwich has simple but key ingredients. Each one plays a big role in its taste and texture. Here’s what you need: - Bacon varieties (turkey bacon or regular bacon) - Types of bread (whole grain or sourdough) - Fresh produce (lettuce, tomatoes) - Sauce components (mayonnaise, Dijon mustard) - Optional toppings (avocado, microgreens) 1. Bacon Varieties: You can choose turkey bacon for a lighter option or go for regular bacon for that classic crunch and flavor. Both types bring a unique taste that makes your sandwich delicious. 2. Types of Bread: Whole grain bread adds a nutty flavor, while sourdough gives a tangy twist. Choose what you love most. 3. Fresh Produce: Crisp lettuce and juicy tomatoes are essential. Use romaine or iceberg lettuce for crunch and vine-ripened tomatoes for the best taste. 4. Sauce Components: Mayonnaise adds creaminess, while Dijon mustard gives a slight kick. Mix them well for a tasty spread. 5. Optional Toppings: Want to get fancy? Add sliced avocado for creaminess or microgreens for a fresh bite. These extras can change the whole sandwich. For the full recipe, check out the details above. Enjoy your cooking adventure! To start, you need crispy bacon. I recommend using a skillet for the best results. Heat the skillet over medium heat. Add your bacon slices and cook for about 5-7 minutes on each side. This method gives you that perfect crunch. Once done, place the bacon on paper towels to drain excess grease. If you prefer an easier way, you can cook the bacon in the oven. Preheat your oven to 400°F (200°C). Lay the bacon on a baking sheet lined with foil. Bake for 15-20 minutes, flipping halfway. This method frees up your stovetop and gives you crispy bacon. Next, toast the bread. You can use the same skillet where you cooked the bacon. Just drain the grease if needed. Place the bread slices in the skillet and cook until golden brown, about 2-3 minutes per side. If you’d rather use a toaster, that works too! Toast the bread until it’s nice and brown. This adds a great crunch to your sandwich. Now it’s time to make the sauce. In a small bowl, mix together 2 tablespoons of mayonnaise and 1 teaspoon of Dijon mustard. Stir until smooth and well combined. You can tweak the flavor by adding a pinch of salt and pepper. If you want more zing, add a bit more mustard. This sauce brings everything together. Now, let’s build your BLT! Start with one slice of toasted bread. Spread a generous layer of your sauce on top. Next, add 2 slices of crispy lettuce. Then, place 2 slices of thick tomato on top of the lettuce. Sprinkle a little salt and pepper on the tomato for extra taste. Now, add 2 pieces of bacon. If you want, you can include slices of avocado or a handful of microgreens for added flavor and crunch. Top it off with another slice of toasted bread. Repeat this to make a second sandwich. For a nice presentation, cut each sandwich in half diagonally. This makes it easy to handle and looks great on the plate. You can serve your sandwiches on a rustic wooden board. Add a small bowl of pickles on the side and a serving of potato chips for that extra crunch. This simple touch makes your meal look delicious and inviting. Enjoy your iconic BLT Sandwich with your favorite sides! Using quality ingredients makes all the difference in a BLT. For bacon, I highly recommend crispy turkey bacon. It gives you the crunch without too much fat. If you prefer regular bacon, go for a thick cut. It adds a rich, smoky flavor. Fresh produce is key. Look for vine-ripened tomatoes; they are juicy and sweet. For lettuce, choose romaine or iceberg. Both add a nice crunch. Bread choices affect flavor and texture. I suggest whole grain or sourdough. Whole grain adds a nutty taste. Sourdough offers a tangy flavor and crispy crust. Achieving crispy bacon is an art. Cook it in a skillet over medium heat. Flip it often to ensure even cooking. It takes about 5-7 minutes per side. Drain the bacon on paper towels to remove extra grease. Toasting bread is simple yet crucial. You can use the same skillet once you cook the bacon. Toast each slice until it’s golden brown. This adds texture and keeps the sandwich from getting soggy. To boost flavor, think about adding spices or herbs. A pinch of smoked paprika can add depth. If you enjoy a bit of heat, try crushed red pepper flakes. Customizing the sauce can elevate your BLT. Mix mayonnaise with a teaspoon of Dijon mustard for a tangy kick. You can also add garlic powder for extra flavor. For a twist, consider sliced avocado or microgreens. They add creaminess and freshness to each bite. For the full recipe, visit [Full Recipe]. {{image_2}} You can make your BLT even better with a few easy changes. - Adding cheese for creaminess: Try adding slices of sharp cheddar or creamy goat cheese. The cheese melts a little, giving your sandwich a rich taste. - Switching up the greens: Instead of regular lettuce, use spinach or arugula. These greens add a peppery kick and extra nutrients. Want to shake things up? There are many fun ways to change your BLT. - Using flavored mayonnaise: Mix in chipotle for a smoky taste or garlic for a zing. These flavors will take your sandwich to a whole new level. - Exploring different bacon types: Use pork bacon for that classic taste, or try turkey bacon for a lighter option. You can even find vegetarian bacon made from plants! Eating healthy doesn’t mean giving up on flavor. - Low-calorie bread options: Choose whole grain or low-calorie bread. These options keep your sandwich tasty while cutting calories. - Using turkey bacon or veggie bacon: Both options give you the bacon flavor with less fat. They are great for anyone watching their diet. For the full recipe, check out my Classic BLT Sandwich! To keep your bacon and bread fresh, follow these tips: - Bacon: Store cooked bacon in an airtight container. It lasts about 4-5 days in the fridge. If it's uncooked, wrap it tightly and keep it in the fridge or freezer. - Bread: For leftover bread, place it in a zip-top bag. Keep it at room temperature for a few days. If you want it to last longer, freeze the bread. When it comes to mayonnaise-based mixtures, like the one in the BLT, follow these tips: - Store any leftover sauce in a sealed container. It will stay fresh in the fridge for about a week. - Always check for any off smells or changes in texture before using leftovers. If you want to prepare sandwiches in advance, here’s how: - Prepare the ingredients but don’t assemble the sandwich right away. Keep them separate for best results. - Store the bacon, lettuce, and tomatoes in separate containers. This helps maintain their freshness and flavor. - Assemble the sandwich just before eating. This keeps the bread from getting soggy. You might wonder if you can freeze sandwiches. The answer is yes, but with some rules: - You can freeze the bacon and the bread. However, avoid freezing assembled sandwiches. They may lose their texture. - If you freeze bacon, wrap it in plastic wrap and then place it in a freezer bag. This prevents freezer burn. - For bread, slice it before freezing. This makes it easier to grab what you need later. - When ready to eat, thaw the bacon in the fridge overnight and toast the bread for that perfect crunch. For a full recipe, check out the details above and enjoy your Classic BLT! You can cook bacon in a skillet or oven. The skillet gives you crispy bacon quickly. Cook it over medium heat for about 5-7 minutes. Watch it closely to avoid burning. You can also bake bacon in the oven. Preheat the oven to 400°F. Lay strips on a baking sheet and bake for about 15-20 minutes. This method is easy and keeps your kitchen clean. Yes, you can! Use meat substitutes like tempeh, tofu, or veggie bacon. For added flavor, try marinating these options. You can also add grilled vegetables, like eggplant or zucchini. They bring a nice texture and taste. Using avocado is another great choice. It adds creaminess and richness to the sandwich. To keep your bread dry, follow these tips: - Toast the bread well. This creates a barrier. - Use less mayonnaise or spread it on just one side. - Pat the tomatoes dry with a paper towel. - Layer the lettuce between the mayo and tomatoes. This helps absorb moisture. A prepared BLT lasts about 2-3 hours at room temperature. If you must store it, wrap it tightly in plastic. Keep it in the fridge for up to 1 day. Be aware that the bread may get soggy. It’s best to eat it fresh for the best flavor. Here are some great side dishes: - Potato chips for crunch. - A simple side salad for freshness. - Pickles for a tangy kick. - Sweet potato fries for something different. These options complement the BLT well and enhance your meal. For the full recipe, check out the section above. You learned how to create the perfect BLT sandwich. From selecting quality ingredients to crispy bacon and fresh bread, each step matters. You can customize flavors to suit your taste with sauces and toppings. Remember to store leftovers properly to maintain freshness. This classic sandwich is versatile, making it easy to adapt or enjoy as is. With these tips, you can make a tasty BLT that will impress anyone. Enjoy your sandwich-making journey!](https://lisadishes.com/wp-content/uploads/2025/06/a459258c-ae8f-4f4e-833f-9af8045d1a36.webp)
Are you ready to elevate your lunch game? The Classic BLT Sandwich is a timeless favorite, combining crispy bacon, fresh
