No-Bake Pumpkin Cheesecake Mousse Cups Delightful Treat

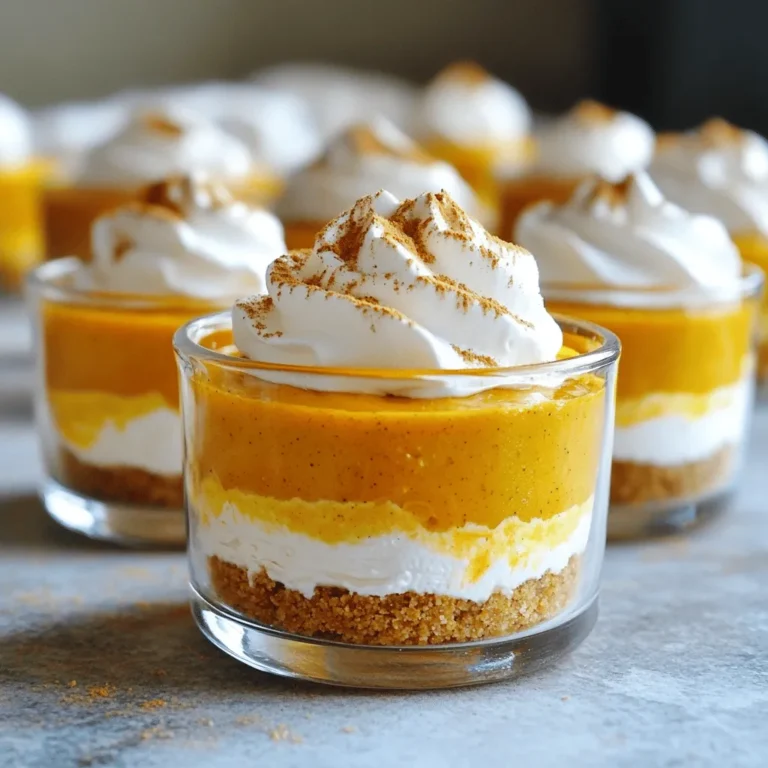
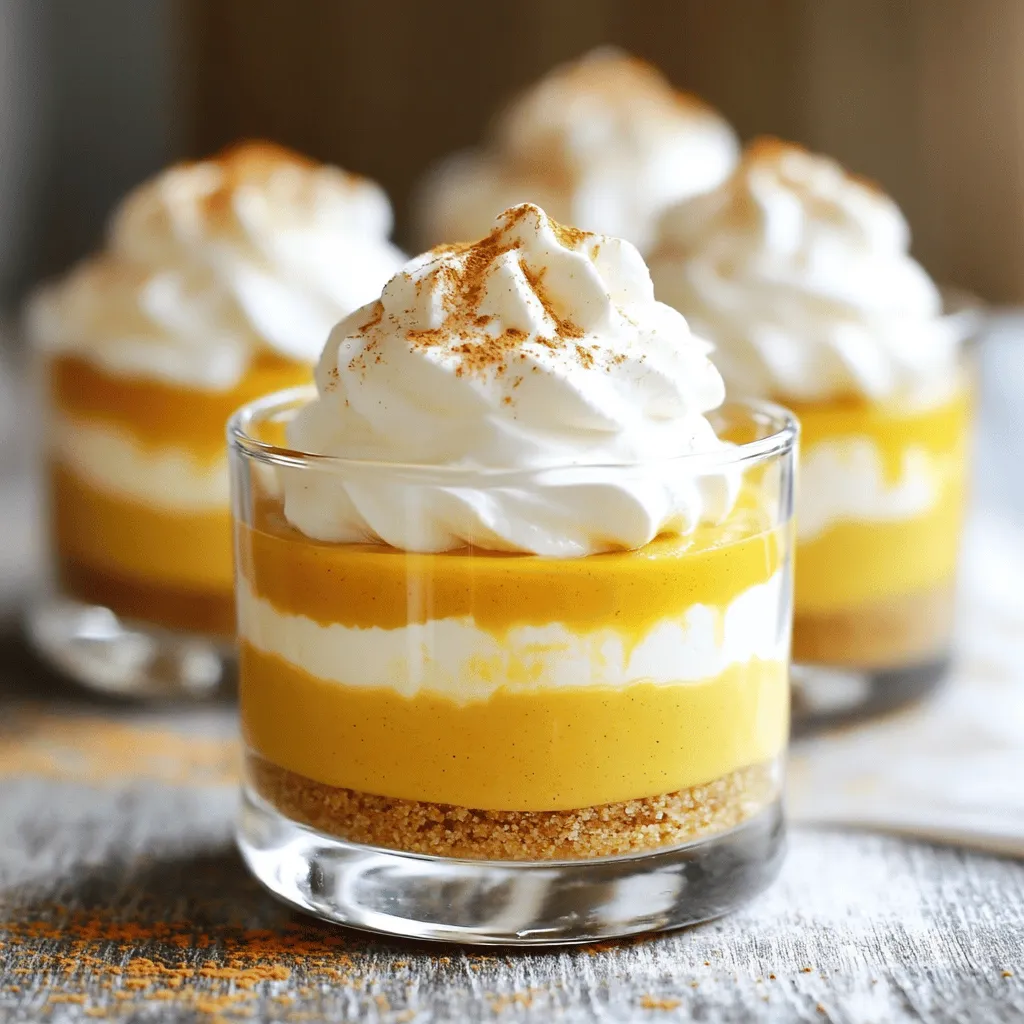
Indulge in the fall flavors of my No-Bake Pumpkin Cheesecake Mousse Cups! These delightful cups pair creamy pumpkin cheesecake with a crunchy graham cracker crust, all without turning on the oven. Perfect for festive gatherings or a cozy dessert at home, this treat is easy to make and oh-so-satisfying. Ready to impress your friends and family? Let’s dive into the sweet details that will make your taste buds dance!

Ingredients

List of Ingredients

– 1 cup pumpkin puree

– 8 oz cream cheese, softened

– 1/2 cup powdered sugar

– 1 teaspoon vanilla extract

– 1 teaspoon ground cinnamon

– 1/2 teaspoon ground nutmeg

– 1/4 teaspoon ground ginger

– 1 cup heavy whipping cream

– 1 cup graham cracker crumbs

– 4 tablespoons unsalted butter, melted

– Whipped cream for garnish

– Pumpkin pie spice for garnish

To make these no-bake pumpkin cheesecake mousse cups, gather all your ingredients first. The pumpkin puree gives a rich flavor. Cream cheese adds creaminess to the mixture. Powdered sugar sweetens it perfectly.

Vanilla extract brings a lovely scent. Ground cinnamon, nutmeg, and ginger add warmth and spice. Heavy whipping cream makes the mousse light and fluffy. For the crust, graham cracker crumbs mix well with melted butter.

You will also need whipped cream and pumpkin pie spice for a pretty topping. Keeping your ingredients fresh is key for the best taste. With the right components, you can create a delightful treat that everyone will love.

Step-by-Step Instructions

Preparing the Crust

Start by mixing graham cracker crumbs with melted butter. You want the mixture to feel like wet sand. Take your time to mix it well. Next, divide this mixture into 4 to 6 cups. Press it down gently to make a solid crust layer at the bottom. This crust will give a nice crunch to the soft mousse.

Making the Cheesecake Mixture

In a large bowl, beat the softened cream cheese until it is smooth. You can use an electric mixer or a whisk. Then, add in the pumpkin puree, powdered sugar, vanilla extract, ground cinnamon, nutmeg, and ginger. Mix everything together until it is fully combined. The flavors should blend nicely, giving you a rich, creamy texture.

Whipping the Cream

In another bowl, whip the heavy cream until you see soft peaks forming. It’s important not to over-whip. Once ready, carefully fold this whipped cream into the pumpkin cheesecake mixture. Use a spatula and be gentle. You want the mixture to stay light and fluffy, so take your time.

Assembling the Cups

Now, it’s time to layer! Spoon the pumpkin cheesecake mousse over the graham cracker crust in each cup. Fill them about three-quarters full. For a neat look, use a piping bag to layer the mousse. This makes it more fun and gives a nice presentation.

Chilling the Cups

Cover each cup with plastic wrap. Place them in the refrigerator for at least 2 to 4 hours. This chilling time allows the flavors to meld. It also helps the mousse to set up nicely. Trust me; the wait is worth it!

Serving the Mousse Cups

Once the mousse has set, take the cups out of the fridge. Top each mousse cup with a dollop of whipped cream. Then, sprinkle some pumpkin pie spice on top for decoration. This adds a lovely touch and a burst of flavor. Enjoy your delightful treat!

Tips & Tricks

Tips for Perfect Mousse Cups

Use soft cream cheese for better mixing: Start with room temperature cream cheese. It blends smoothly and helps avoid lumps.

Importance of not over-folding whipped cream: Gently fold the whipped cream into the mixture. This keeps your mousse light and fluffy.

Common Mistakes to Avoid

Avoiding grainy texture in the cheesecake: Blend the cream cheese until very smooth before adding other ingredients. This prevents a gritty feel.

Ensuring the crust is tightly packed: Press the graham cracker mixture firmly into the cups. A good base keeps the layers from mixing.

Presentation Ideas

Creative serving options for dessert tables: Use clear cups to show off the beautiful layers. Small mason jars also add a rustic charm.

Garnishing tips for an eye-catching finish: Top with a swirl of whipped cream and a sprinkle of pumpkin pie spice. Add a cinnamon stick for an extra touch!

Variations

Flavor Variations

You can easily switch up the flavors in your pumpkin cheesecake mousse. Adding chocolate or caramel layers can create a rich twist. Just melt some chocolate or warm caramel and layer it between the crust and mousse. It adds a sweet depth and surprises in every bite. You can also substitute spices. Instead of cinnamon, try allspice or clove for a different kick. You could even use pumpkin pie spice for more warmth.

Dietary Modifications

For those with dietary needs, making this dessert gluten-free is simple. Use almond flour or gluten-free crumbs for the crust. This keeps the treat tasty while meeting your needs. If you need a dairy-free option, swap cream cheese for a dairy-free cream cheese brand. Coconut whipped cream works well in place of heavy cream, adding a light coconut flavor.

Serving Suggestions

Pairing these mousse cups with coffee or tea enhances the experience. The warm drinks balance the cool, creamy dessert. For festive occasions, display the cups on a dessert table. You can add seasonal decorations, like mini pumpkins or fall leaves, for a cozy touch. These small cups work great for parties and gatherings, making them a perfect choice for fall celebrations.

Storage Info

Best Storage Practices

Store leftover mousse cups in the fridge. Use airtight containers to keep them fresh. This will help prevent moisture loss and keep the flavors intact. If you don’t have containers, wrap the cups in plastic wrap tightly. This also helps to seal in freshness.

Shelf Life

You can store the mousse cups for up to three days in the fridge. If you see any change in texture or smell, it’s best to throw them away. Signs of spoilage include a watery layer on top or an off smell. Always check before enjoying!

Freezing Options

Yes, you can freeze the mousse cups! To freeze, place them in freezer-safe containers. Make sure to leave some space at the top, as the mousse will expand. When you’re ready to eat them, thaw in the fridge overnight. Avoid refreezing after thawing for best results.

FAQs

Can I make these mousse cups ahead of time?

Yes, you can make these mousse cups ahead of time. I suggest preparing them 1 to 2 days before serving. This allows the flavors to blend and the mousse to set properly. Just remember to keep them covered in the fridge until you are ready to serve.

What is the best way to serve these cups?

Serve these mousse cups cold for the best taste. After chilling, top each cup with whipped cream. A sprinkle of pumpkin pie spice adds a nice touch. Use clear cups to show off the lovely layers. This makes for a pretty presentation that your guests will love!

Can I use fresh pumpkin instead of canned?

You can use fresh pumpkin puree, but it requires more work. Fresh pumpkin has a different texture and taste. Make sure to cook and blend the pumpkin well to get a smooth puree. Canned pumpkin is easy and consistent, making it a great choice for this recipe.

You now have a complete guide to making pumpkin cheesecake mousse cups. We covered the necessary ingredients, step-by-step instructions, and key tips. With these details, you can create delicious, festive desserts that impress your guests.

Remember, the right balance of flavors and textures is key. Feel free to experiment with variations for a unique twist. Enjoy the process, and happy baking!

- 1 cup pumpkin puree - 8 oz cream cheese, softened - 1/2 cup powdered sugar - 1 teaspoon vanilla extract - 1 teaspoon ground cinnamon - 1/2 teaspoon ground nutmeg - 1/4 teaspoon ground ginger - 1 cup heavy whipping cream - 1 cup graham cracker crumbs - 4 tablespoons unsalted butter, melted - Whipped cream for garnish - Pumpkin pie spice for garnish To make these no-bake pumpkin cheesecake mousse cups, gather all your ingredients first. The pumpkin puree gives a rich flavor. Cream cheese adds creaminess to the mixture. Powdered sugar sweetens it perfectly. Vanilla extract brings a lovely scent. Ground cinnamon, nutmeg, and ginger add warmth and spice. Heavy whipping cream makes the mousse light and fluffy. For the crust, graham cracker crumbs mix well with melted butter. You will also need whipped cream and pumpkin pie spice for a pretty topping. Keeping your ingredients fresh is key for the best taste. With the right components, you can create a delightful treat that everyone will love. Start by mixing graham cracker crumbs with melted butter. You want the mixture to feel like wet sand. Take your time to mix it well. Next, divide this mixture into 4 to 6 cups. Press it down gently to make a solid crust layer at the bottom. This crust will give a nice crunch to the soft mousse. In a large bowl, beat the softened cream cheese until it is smooth. You can use an electric mixer or a whisk. Then, add in the pumpkin puree, powdered sugar, vanilla extract, ground cinnamon, nutmeg, and ginger. Mix everything together until it is fully combined. The flavors should blend nicely, giving you a rich, creamy texture. In another bowl, whip the heavy cream until you see soft peaks forming. It’s important not to over-whip. Once ready, carefully fold this whipped cream into the pumpkin cheesecake mixture. Use a spatula and be gentle. You want the mixture to stay light and fluffy, so take your time. Now, it’s time to layer! Spoon the pumpkin cheesecake mousse over the graham cracker crust in each cup. Fill them about three-quarters full. For a neat look, use a piping bag to layer the mousse. This makes it more fun and gives a nice presentation. Cover each cup with plastic wrap. Place them in the refrigerator for at least 2 to 4 hours. This chilling time allows the flavors to meld. It also helps the mousse to set up nicely. Trust me; the wait is worth it! Once the mousse has set, take the cups out of the fridge. Top each mousse cup with a dollop of whipped cream. Then, sprinkle some pumpkin pie spice on top for decoration. This adds a lovely touch and a burst of flavor. Enjoy your delightful treat! - Use soft cream cheese for better mixing: Start with room temperature cream cheese. It blends smoothly and helps avoid lumps. - Importance of not over-folding whipped cream: Gently fold the whipped cream into the mixture. This keeps your mousse light and fluffy. - Avoiding grainy texture in the cheesecake: Blend the cream cheese until very smooth before adding other ingredients. This prevents a gritty feel. - Ensuring the crust is tightly packed: Press the graham cracker mixture firmly into the cups. A good base keeps the layers from mixing. - Creative serving options for dessert tables: Use clear cups to show off the beautiful layers. Small mason jars also add a rustic charm. - Garnishing tips for an eye-catching finish: Top with a swirl of whipped cream and a sprinkle of pumpkin pie spice. Add a cinnamon stick for an extra touch! {{image_2}} You can easily switch up the flavors in your pumpkin cheesecake mousse. Adding chocolate or caramel layers can create a rich twist. Just melt some chocolate or warm caramel and layer it between the crust and mousse. It adds a sweet depth and surprises in every bite. You can also substitute spices. Instead of cinnamon, try allspice or clove for a different kick. You could even use pumpkin pie spice for more warmth. For those with dietary needs, making this dessert gluten-free is simple. Use almond flour or gluten-free crumbs for the crust. This keeps the treat tasty while meeting your needs. If you need a dairy-free option, swap cream cheese for a dairy-free cream cheese brand. Coconut whipped cream works well in place of heavy cream, adding a light coconut flavor. Pairing these mousse cups with coffee or tea enhances the experience. The warm drinks balance the cool, creamy dessert. For festive occasions, display the cups on a dessert table. You can add seasonal decorations, like mini pumpkins or fall leaves, for a cozy touch. These small cups work great for parties and gatherings, making them a perfect choice for fall celebrations. Store leftover mousse cups in the fridge. Use airtight containers to keep them fresh. This will help prevent moisture loss and keep the flavors intact. If you don’t have containers, wrap the cups in plastic wrap tightly. This also helps to seal in freshness. You can store the mousse cups for up to three days in the fridge. If you see any change in texture or smell, it’s best to throw them away. Signs of spoilage include a watery layer on top or an off smell. Always check before enjoying! Yes, you can freeze the mousse cups! To freeze, place them in freezer-safe containers. Make sure to leave some space at the top, as the mousse will expand. When you’re ready to eat them, thaw in the fridge overnight. Avoid refreezing after thawing for best results. Yes, you can make these mousse cups ahead of time. I suggest preparing them 1 to 2 days before serving. This allows the flavors to blend and the mousse to set properly. Just remember to keep them covered in the fridge until you are ready to serve. Serve these mousse cups cold for the best taste. After chilling, top each cup with whipped cream. A sprinkle of pumpkin pie spice adds a nice touch. Use clear cups to show off the lovely layers. This makes for a pretty presentation that your guests will love! You can use fresh pumpkin puree, but it requires more work. Fresh pumpkin has a different texture and taste. Make sure to cook and blend the pumpkin well to get a smooth puree. Canned pumpkin is easy and consistent, making it a great choice for this recipe. You now have a complete guide to making pumpkin cheesecake mousse cups. We covered the necessary ingredients, step-by-step instructions, and key tips. With these details, you can create delicious, festive desserts that impress your guests. Remember, the right balance of flavors and textures is key. Feel free to experiment with variations for a unique twist. Enjoy the process, and happy baking!

No-Bake Pumpkin Cheesecake Mousse Cups

Indulge in the delightful flavors of fall with these No-Bake Pumpkin Cheesecake Mousse Cups! Perfect for any occasion, this easy recipe combines creamy pumpkin, cinnamon, and a buttery graham cracker crust. In just 20 minutes, you can create a delicious dessert that will impress your guests. Click through to explore the full recipe and enjoy a seasonal treat that requires no baking. Your taste buds will thank you!

Ingredients
  

1 cup pumpkin puree

8 oz cream cheese, softened

1/2 cup powdered sugar

1 teaspoon vanilla extract

1 teaspoon ground cinnamon

1/2 teaspoon ground nutmeg

1/4 teaspoon ground ginger

1 cup heavy whipping cream

1 cup graham cracker crumbs

4 tablespoons unsalted butter, melted

Whipped cream and pumpkin pie spice for garnish

Instructions
 

Prepare the Crust: In a mixing bowl, combine the graham cracker crumbs with melted butter until the mixture resembles wet sand. Divide the crumb mixture evenly into 4 to 6 small cups or glasses, pressing down gently to form a crust layer at the bottom.

    Make the Cheesecake Mixture: In a large bowl, beat the softened cream cheese until smooth. Add the pumpkin puree, powdered sugar, vanilla extract, ground cinnamon, nutmeg, and ginger. Mix until fully combined and smooth.

      Whip the Cream: In another bowl, whip the heavy cream until soft peaks form. Carefully fold the whipped cream into the pumpkin cheesecake mixture until light and fluffy, being cautious not to deflate the whipped cream.

        Assemble the Cups: Layer the pumpkin cheesecake mousse over the graham cracker crust in each glass, filling them about three-quarters full. Use a piping bag or a spoon for easier layering.

          Chill: Cover the cups with plastic wrap and refrigerate for at least 2-4 hours, allowing the flavors to meld and the mousse to set.

            Serve: Once set, remove from the fridge and top each mousse cup with a dollop of whipped cream and a sprinkle of pumpkin pie spice for decoration.

              Prep Time: 20 minutes | Total Time: 4 hours (including chill time) | Servings: 4-6 cups

                Leave a Comment

                Recipe Rating