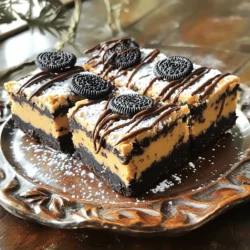
No-Bake Oreo Peanut Butter Bars
Indulge in these delicious No-Bake Oreo Peanut Butter Bars that are perfect for any occasion! With just a few simple ingredients, you can whip up a sweet treat that combines the rich flavors of Oreo and creamy peanut butter. This easy recipe requires no baking and will satisfy your cravings in no time. Click through to explore the full recipe and discover tips for serving these mouthwatering bars!