Skip to content
DisclaimerTerms Of UseGDPR PolicyCookie Policy

Lisa Dishes

  • Home
  • Drinks
  • Appetizers
  • Dinner
  • Dessert
  • About
  • Contact
  • Privacy Policy
DisclaimerTerms Of UseGDPR PolicyCookie Policy

NO-ING-IMG

To make classic French toast, you need the following ingredients: - 4 slices of thick brioche or challah bread - 2 large eggs - 1/2 cup milk (any kind you prefer) - 1 teaspoon vanilla extract - 1 teaspoon ground cinnamon - 1 tablespoon sugar (optional) - Pinch of salt - 2 tablespoons unsalted butter - Maple syrup, for serving - Fresh fruit (e.g., strawberries, blueberries, or bananas), for garnish - Powdered sugar, for dusting (optional) Each ingredient plays a key role. The bread gives it structure. Eggs create a rich texture. Milk adds creaminess. Vanilla and cinnamon bring flavor. Sugar adds sweetness, but it’s not a must. Butter helps with cooking and adds a nice taste. Toppings can elevate your French toast. Here are some suggestions: - Maple syrup: The classic choice. It adds sweetness and flavor. - Fresh fruit: Strawberries, blueberries, or bananas brighten the dish. - Powdered sugar: A light dusting offers a touch of elegance. - Whipped cream: Adds a fluffy texture and richness. - Nuts: Chopped walnuts or pecans add crunch. Feel free to mix and match. Make it your own! You can swap some ingredients if needed: - Bread: Use any thick bread, like sourdough or whole wheat. - Milk: Almond milk or oat milk works well for a dairy-free option. - Eggs: For a vegan option, use flaxseed meal mixed with water. - Sugar: Honey or maple syrup can replace sugar. These swaps still give you that delicious flavor. Enjoy experimenting! For the complete recipe, check out the Full Recipe. To start, gather your ingredients. You will need: - 4 slices of thick brioche or challah bread - 2 large eggs - 1/2 cup milk (any kind you prefer) - 1 teaspoon vanilla extract - 1 teaspoon ground cinnamon - 1 tablespoon sugar (optional) - Pinch of salt - 2 tablespoons unsalted butter - Maple syrup, for serving - Fresh fruit (e.g., strawberries, blueberries, or bananas), for garnish - Powdered sugar, for dusting (optional) In a large bowl, whisk together the eggs and milk. Add the vanilla, cinnamon, sugar, and salt. Mix well until smooth. This simple mixture holds the key to rich flavor. Now, preheat a non-stick skillet or griddle over medium heat. Add 1 tablespoon of butter and let it melt. This ensures that the bread cooks evenly. Next, dip each slice of bread into the egg mixture. Let it soak for about 10-15 seconds on each side. You want it to absorb enough liquid, but not fall apart. Place the soaked bread on the hot skillet. Cook for about 3-4 minutes on each side. Look for a golden brown color and a slight crisp. This gives your French toast a delightful texture. Repeat this process until all slices are cooked. - Use thick slices of bread. They hold more egg mixture and stay soft inside. - Don’t rush the soaking. Let the bread soak enough to absorb flavor. - Keep the heat medium. Too hot can burn the outside before the inside cooks. - Add more butter as needed for each batch. This keeps everything moist and tasty. - For a special touch, serve with maple syrup, fresh fruit, and a dusting of powdered sugar. These tips will help you enjoy classic French toast at its best! For the full recipe, check out the details above. To make the best classic French toast, use thick bread like brioche or challah. These types soak up the egg mixture well and stay soft inside. Start with fresh eggs and milk for the best flavor. Mix them in a bowl with vanilla, cinnamon, and sugar. Whisk until it’s smooth. When soaking the bread, dip each slice for about 10-15 seconds. Don’t let it sit too long; you want it moist, not soggy. Preheat your skillet on medium heat. Add butter to coat the pan, and then place the soaked bread on it. Cook each side for about 3-4 minutes. You want them golden brown and a bit crispy. Serve with maple syrup and fresh fruit for a treat. One common mistake is using thin bread. Thin bread cooks too fast and can fall apart. Another mistake is not preheating the skillet. If it’s not hot enough, the bread will absorb too much butter and become greasy. Also, don’t overcrowd the pan. Cook in batches to give each slice space to cook evenly. Avoid using too much egg mixture. If the slices are too wet, they won’t cook right. Lastly, don’t skip the cinnamon! It adds warmth and flavor that makes your French toast special. Want to save time? Prepare the egg mixture the night before. Store it in the fridge, and mix in your spices. In the morning, just dip and cook your bread. You can also use leftover bread. Stale bread works great for French toast. Cut it into slices ahead of time, and keep it in a bag. This way, you have your bread ready to go. If you want to serve a crowd, cook extra slices at once. Keep them warm in the oven until ready to serve. For a quick clean-up, use a non-stick skillet. It makes cooking easier and helps with clean-up. Follow these tips, and you’ll have a delicious breakfast in no time! For the full recipe, check out the details provided earlier. {{image_2}} You can add fun flavors to your French toast. Try adding a splash of orange juice to the egg mix. It gives a bright taste. You can also use almond or hazelnut extract instead of vanilla. Want a spicy kick? Mix in a dash of nutmeg or cardamom. For chocolate lovers, use cocoa powder in the egg mix. You can even use flavored creamers instead of milk for a rich twist. French toast is not just for sweet lovers. For a savory option, skip the sugar and vanilla. Add herbs like thyme or rosemary to the egg mix. Top it with cheese or crispy bacon after cooking. A sprinkle of salt can elevate the taste. Sweet options are great too! Use maple syrup, fresh fruit, or whipped cream. The choice is yours! During the holidays, you can spice things up. Add pumpkin puree and pumpkin spice for fall. In winter, try a peppermint extract twist. For summer, use fresh berries in the batter. You can even serve it with a berry compote. For special occasions, serve with a dollop of cream. These variations can make any time feel festive. If you want the full recipe, check it out [here](Full Recipe). To keep leftover French toast fresh, place it in an airtight container. Let it cool first. You can store it in the fridge for up to three days. This method helps maintain its taste and texture. If you want to store it longer, freezing is a great option. To reheat French toast, use a toaster or a skillet. If using a toaster, set it to medium heat. For a skillet, add a small dab of butter. Heat each side for two to three minutes until warm. Both methods help keep the toast crisp and tasty. If you want to freeze French toast, wrap each slice in plastic wrap. Place the wrapped slices in a freezer bag. They can stay in the freezer for up to three months. When ready to eat, thaw in the fridge overnight. Reheat using the methods mentioned above for best results. For the Full Recipe, check out the delicious steps to create your own Classic French Toast! You can use mashed bananas or applesauce as egg substitutes. These options add natural sweetness. Use 1/4 cup of either for each egg. Mix it with milk, vanilla, and spices. Dip your bread in this mixture, then cook as usual. This method makes a tasty French toast that everyone will love! Yes, you can use gluten-free bread! It works just as well in this recipe. Look for thick slices to keep the texture nice. Just treat it the same way as regular bread. Soak it in the egg mixture and cook until golden brown. This way, everyone can enjoy French toast, no matter their diet. Thick bread like brioche or challah is best for French toast. These breads soak up the egg mix without falling apart. They also give a soft, fluffy inside and a nice crust outside. You can also try sourdough or Texas toast for added flavor. Choose what you like, and enjoy the tasty results. To get crispy French toast, use a hot skillet and enough butter. Preheat the pan before adding the bread. Let each slice cook until golden brown for about 3-4 minutes. Flip and repeat on the other side. If your bread is soaked too long, it may get soggy. Soak just enough to coat the outside. Absolutely! Classic French toast is great for meal prep. You can cook a big batch and store it in the fridge. Reheat it in the toaster or microwave for quick breakfasts. It stays tasty and satisfying, making mornings easy. Just remember to save some syrup and fruit for serving! For more details, check out the Full Recipe. Classic French toast is simple and delicious, made with easy ingredients. You can customize it with toppings or substitutions. I shared step-by-step instructions to make it perfectly. I also covered common mistakes and time-saving tips. There are many fun variations, from sweet to savory. Lastly, I discussed how to store, reheat, and freeze leftovers. Enjoy your homemade French toast any day! With these tips, you can make breakfast special. Get creative and have fun cooking!

Classic French Toast Easy and Flavorful Recipe

If you’re craving a warm, delicious breakfast, Classic French Toast is the way to go! This easy and flavorful recipe

To make fluffy buttermilk biscuits, gather these simple ingredients: - 2 cups all-purpose flour - 1 tablespoon baking powder - 1 teaspoon baking soda - 1 teaspoon salt - 1/4 cup unsalted butter, chilled and cubed - 3/4 cup buttermilk (plus a splash for brushing) - 1 tablespoon honey (optional) Each ingredient plays a key role in the final product. The flour gives structure, while the baking powder and baking soda help the biscuits rise. Salt adds flavor, and cold butter creates those lovely, flaky layers. Buttermilk adds richness and tang, enhancing the overall taste. If you want a hint of sweetness, the honey is a nice touch but not necessary. For the best results, use high-quality ingredients. Fresh baking powder and soda ensure proper rising. Chilled butter is a must for flaky layers. Take your time to measure accurately for consistent results. Before you start, ensure you have everything ready. This way, you can focus on making the biscuits without interruptions. Ready to bake? Check out the [Full Recipe] for all the steps and tips you need! - Preheat your oven to 450°F (230°C). - Line a baking sheet with parchment paper. - In a large bowl, whisk together: - 2 cups all-purpose flour - 1 tablespoon baking powder - 1 teaspoon baking soda - 1 teaspoon salt This mix should be light and fluffy. - Add 1/4 cup of chilled, cubed butter to the flour mix. - Use your fingers or a pastry cutter to work in the butter. - Stop when the mix looks like coarse crumbs. - If you like a sweeter biscuit, stir in 1 tablespoon of honey. - Pour in 3/4 cup of buttermilk. - Gently mix until the dough starts to come together. Do not overmix! - Place the dough on a floured surface. - Pat it down until it is about 1-inch thick. - Use a biscuit cutter or a glass to cut out rounds. - Knead the scraps gently to make more biscuits. - Arrange the biscuits on the prepared baking sheet. - Brush the tops with a splash of buttermilk for shine. - Bake for 12-15 minutes. Look for a golden color and a nice rise. These steps will help you create fluffy buttermilk biscuits that are sure to impress! For the complete recipe and detailed tips, check out the Full Recipe. To make fluffy buttermilk biscuits, cold butter is key. Cold butter helps to create steam when baking. This steam lifts the dough and makes it rise. Use unsalted butter, and keep it in the fridge until you need it. Avoid overmixing the dough. When you add buttermilk, mix just until the dough combines. If you mix too much, the biscuits will turn out tough instead of light. Use a sharp biscuit cutter for clean edges. This allows the biscuits to rise better. If you squish the edges, they won’t rise as much. Kneading the dough is easy. After patting it out, fold it over a few times gently. This creates layers. Then, shape the dough into a circle that is about one inch thick. These biscuits shine with simple toppings. Spread butter on them while they are warm. Drizzle honey for a sweet touch. You can also add your favorite jam. Enjoy them fresh from the oven for the best taste. For the full recipe, check the Fluffy Buttermilk Biscuits section above. {{image_2}} You can add shredded cheese to your dough for a rich flavor. Cheddar, pepper jack, or even feta works well. Just fold in about one cup of cheese after mixing the dry ingredients. This small change brings a new twist to your fluffy biscuits. The cheese melts and gives a warm, gooey center. Enjoy them fresh from the oven. Incorporating fresh herbs into your recipe adds a burst of flavor. Rosemary, thyme, or chives are great choices. Finely chop about two tablespoons of your chosen herbs. Mix them in with the dry ingredients before adding the buttermilk. This simple addition makes your biscuits feel special and fresh. Serve them alongside soup or salads for a delightful pair. For a healthier twist, substitute some all-purpose flour with whole wheat flour. You can use half and half for a subtle change in flavor and texture. The nuttiness of whole wheat flour adds depth. Just remember, whole wheat can make the dough a bit denser. Adjust the liquid slightly if needed. This option is great if you want more fiber in your meal. Feel free to experiment with these variations or stick to the full recipe for a classic taste! To keep your leftover biscuits fresh, store them in an airtight container. They will last for about two days at room temperature. If you want to keep them longer, the fridge is an option, but it may dry them out. I suggest wrapping each biscuit in plastic wrap. This keeps them moist. You can freeze the biscuits either before or after baking. To freeze before baking, cut the biscuits and place them on a baking sheet. Freeze them until solid, then transfer to a freezer bag. To freeze after baking, let them cool completely. Then, place them in a freezer bag, removing as much air as possible. They can last up to three months in the freezer. When you're ready to enjoy your biscuits, reheating is key. For frozen biscuits, preheat your oven to 350°F (175°C). Bake them for about 10-12 minutes, or until warmed through. If you have leftover biscuits at room temperature, pop them in the microwave for about 15-20 seconds. For the best flavor, you can toast them in a skillet for a little crispiness. Yes, you can make these biscuits ahead of time. If you want to prepare them early, shape the dough into rounds. Then, place the biscuits on a baking sheet. Cover them with plastic wrap and refrigerate for up to 24 hours. When you're ready to bake, just preheat the oven. Bake them directly from the fridge, adding a couple of minutes to the baking time. For longer storage, freeze the shaped biscuits. Wrap them tightly and store in the freezer for up to three months. To reheat, bake from frozen for about 15-20 minutes. If your biscuits are not rising, check a few things. First, make sure your baking powder and baking soda are fresh. Old leavening agents won’t give your biscuits lift. Next, don’t overmix the dough. Mixing too much can create tough biscuits. Also, be sure to use cold butter. This helps create steam and adds fluffiness. Lastly, make sure your oven temperature is accurate. An oven thermometer can help ensure it’s at the right heat. You can use regular milk, but the biscuits may not be as fluffy. Buttermilk adds acidity, which reacts with baking soda for extra lift. If you don't have buttermilk, you can make a quick substitute. Add one tablespoon of vinegar or lemon juice to a cup of milk. Let it sit for five minutes before using. This will mimic the acidity of buttermilk and help your biscuits rise. You can tell your biscuits are done by looking for a golden brown color on top. The biscuits should also be tall and fluffy. Gently touch the tops; they should feel firm and not doughy. If you insert a toothpick into the center, it should come out clean. If you see any wet dough, give them a couple more minutes in the oven. Enjoy them warm for the best taste! This guide walks you through making easy, fluffy biscuits. We covered ingredients, step-by-step instructions, and tips to ensure success. You learned about variations and how to store biscuits, too. Keep your butter cold and avoid overmixing for the best results. Enjoy your freshly baked biscuits with butter, honey, or jam. Trust in your skills; making great biscuits is simple and rewarding!

Fluffy Buttermilk Biscuits Easy and Tasty Recipe

If you want fluffy buttermilk biscuits that wow your family, you’ve come to the right place! This easy recipe ensures

- 2 boneless, skinless chicken breasts - 1 tablespoon olive oil - 1 teaspoon chili powder - 1 teaspoon cumin - 1 teaspoon garlic powder - Salt and pepper to taste - 1 cup quinoa or brown rice, cooked - 1 can black beans, rinsed and drained - 1 cup corn, frozen or fresh - 1 red bell pepper, diced The main ingredients for Easy Chicken Burrito Bowls start with chicken. You need two boneless, skinless chicken breasts. This meat cooks quickly and stays juicy. Olive oil helps the spices stick and adds flavor. Keep chili powder, cumin, and garlic powder on hand. These spices give the chicken a tasty kick. Don't forget salt and pepper to season well. Next, choose your base. Quinoa or brown rice works great. Both provide good texture and nutrients. Then, add a mix of black beans, corn, and diced red bell pepper. This mix makes the bowl colorful and healthy. - Avocado and cherry tomatoes - Fresh cilantro and lime wedges For a finishing touch, consider optional toppings. Avocado adds creaminess to the bowl. Diced cherry tomatoes offer sweetness and color. Fresh cilantro enhances the flavor, making it bright and fresh. Finally, lime wedges give a zesty kick. Squeeze some on top for an extra burst of flavor. You can find the Full Recipe for these Easy Chicken Burrito Bowls to guide you through each step. Enjoy making this simple and flavorful meal! To start, I season the chicken breasts. I use olive oil, chili powder, cumin, garlic powder, salt, and pepper. Make sure to cover each piece well. This adds great flavor. Next, I heat a skillet over medium-high heat. Once it's hot, I add the seasoned chicken. I cook each side for about 6-7 minutes. The chicken is done when the inside reaches 165°F (75°C). After cooking, I let it rest for 5 minutes. This keeps it juicy. While the chicken cooks, I prepare quinoa or brown rice. I follow the package instructions for the best results. In a large bowl, I mix black beans, corn, diced red bell pepper, and halved cherry tomatoes. I rinse and drain the black beans first. This step is key for good flavor. I gently mix all the veggies together. Now, it’s time to build the burrito bowls! I start with a base of quinoa or brown rice in each bowl. On top, I add the black bean and vegetable mix. Then, I slice the cooked chicken and layer it right on top. Finally, I add diced avocado for creaminess. I finish with fresh cilantro for a pop of color. Serve with lime wedges on the side, and you have a tasty meal! For the complete guide, check out the Full Recipe. To make juicy chicken, I recommend using a good amount of spices. The spices add flavor and help keep the meat moist. The key is to season your chicken breasts well before cooking. Use olive oil to coat the chicken. This helps the spices stick and adds richness. I often use chili powder, cumin, and garlic powder for a tasty kick. You can adjust these spices to match your taste. Resting the chicken is very important. Once you cook it, let it sit for about five minutes. This allows the juices to redistribute. If you cut it too soon, the juices will run out. You want every bite to be full of flavor. You can swap out ingredients based on what you like. If you don’t have quinoa, use brown rice or even cauliflower rice. Want more veggies? Try adding zucchini, spinach, or even roasted sweet potatoes. These swaps make your bowl unique and fun! Adjust the spice levels to suit your taste. If you like heat, add some jalapeños or hot sauce. For a milder dish, skip the chili powder or use a smaller amount. Remember, it’s all about what you enjoy! For the full recipe, check out the Easy Chicken Burrito Bowls. {{image_2}} For those who prefer not to eat chicken, you have great options. You can use tofu, tempeh, or jackfruit as meat substitutes. These ingredients soak up flavors well. Simply season them like you would the chicken. If you want extra protein, consider adding lentils or chickpeas. They add a nice texture and taste. You can change the flavors of your burrito bowl easily. Swap out the chili powder for taco seasoning or smoked paprika. Add some salsa or hot sauce for a spicy kick. Want to go global? Try adding curry powder for an Indian twist. You can also use teriyaki sauce for a fun Asian vibe. Each change brings a new taste adventure! To keep your Easy Chicken Burrito Bowls fresh, store them in airtight containers. This helps prevent moisture loss and keeps flavors strong. Make sure to separate the chicken from the rice and beans if possible. This way, each part stays tasty longer. Place the containers in the fridge and use them within three to four days for the best quality. For longer storage, you can freeze the chicken and veggie mix in separate bags. Wrap them tightly to avoid freezer burn. Frozen meals can last up to three months. Just remember to label your containers with the date. To reheat your burrito bowls, the microwave is quick and easy. Place the bowl in the microwave for about 1-2 minutes. Stir halfway to heat evenly. If you want a crispy texture, use the oven. Preheat it to 350°F (175°C) and heat in a covered dish for about 15-20 minutes. Make sure to check the chicken reaches 165°F (75°C) for safety. Add a splash of water before reheating to keep the rice moist. This keeps your meal flavorful and prevents it from drying out. Enjoy your meal just as you made it! Yes, you can easily meal prep these bowls. Prepare all your ingredients in advance. Cook the chicken, quinoa, and veggies ahead of time. Store them in separate containers. When ready to eat, just mix and heat. This saves time during busy days. Yes, you can freeze the burrito bowls. Use airtight containers to keep them fresh. Make sure to cool the bowls completely before freezing. To thaw, place them in the fridge overnight. Reheat in the microwave or on the stove. Some great side dishes to pair with burrito bowls include: - Tortilla chips and salsa - Guacamole for dipping - A fresh side salad - Mexican street corn - Cilantro lime rice These sides will enhance the flavors and make your meal even better. Enjoy! This article covered how to make easy chicken burrito bowls. We discussed key ingredients like chicken, quinoa, and veggies. You learned how to cook the chicken and prepare a tasty base. Customizing your bowl with toppings like avocado can add flair. I also shared tips for storing and reheating leftovers. Overall, these bowls are versatile and can be tailored to your taste. Enjoy creating fun variations and exploring new flavors. Your perfect burrito bowl is just a recipe away!

Easy Chicken Burrito Bowls Flavorful and Simple Meal

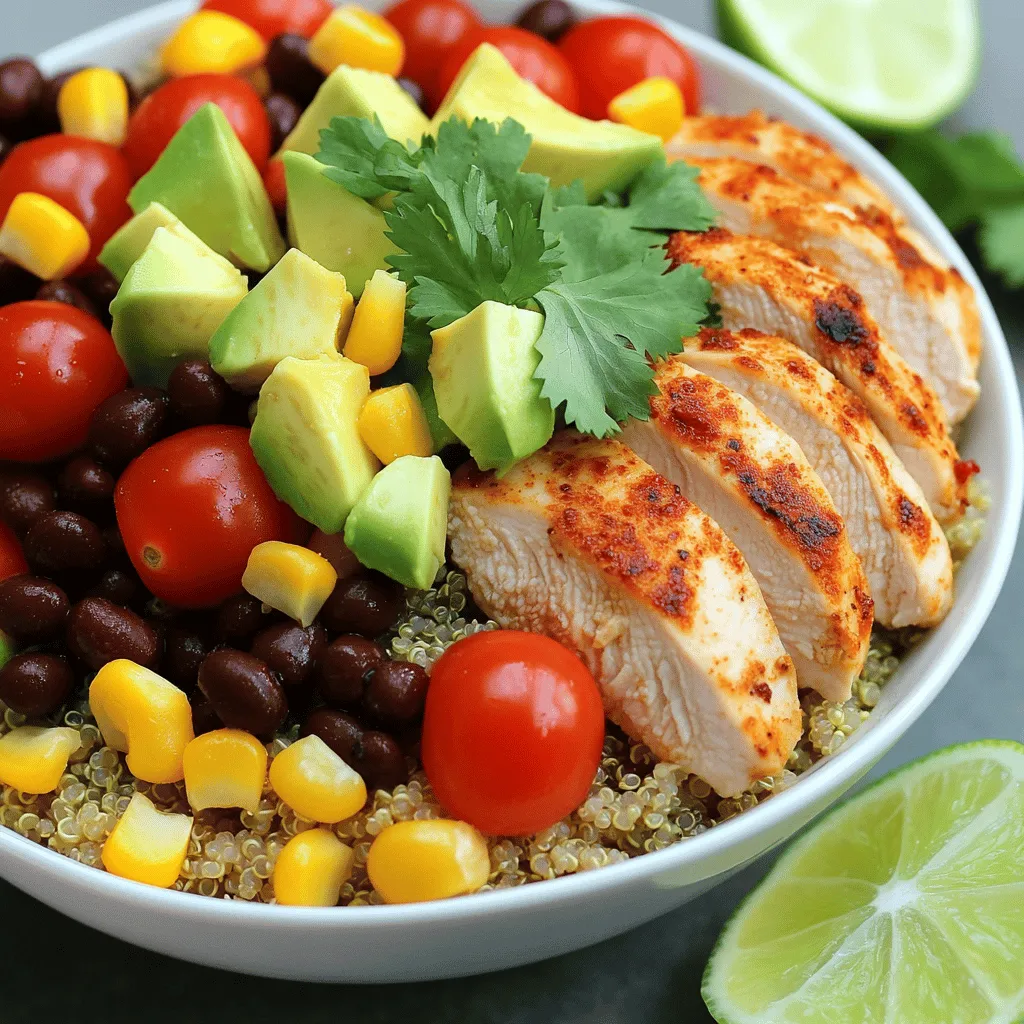
Craving a tasty meal that’s quick and easy? Let me introduce you to Easy Chicken Burrito Bowls! Packed with flavor

- 2 cups frozen corn kernels, thawed - 1 cup cream cheese, softened - 1 cup shredded Monterey Jack cheese - 1/2 cup grated cotija cheese - 1/2 cup sour cream - 1/4 cup mayonnaise - 2 tablespoons lime juice - 1 teaspoon chili powder - 1 teaspoon garlic powder - 1/2 teaspoon smoked paprika - 1/4 teaspoon cayenne pepper (optional) - 1/4 cup fresh cilantro, chopped - Salt and pepper to taste - Tortilla chips for serving Gather these ingredients for a tasty party dish. The corn brings sweetness, while the cheeses add creaminess. Cream cheese gives a rich base, and Monterey Jack melts perfectly. Cotija cheese adds a salty punch, making the dip special. You'll also need lime juice for a zesty flavor. Chili powder, garlic powder, smoked paprika, and cayenne add warmth and depth. Fresh cilantro brightens the dish and gives it a fresh taste. Don't forget salt and pepper to balance all the flavors. This dip is perfect with tortilla chips. The crunch pairs well with the creamy dip. You can also serve it with veggies for a healthy option. For the full recipe, check out the detailed steps! - Set to 350°F (175°C) First, you start by preheating your oven. This step is key for a perfect dip. It helps cook the dip evenly and makes it bubbly. - Combine corn kernels, cream cheese, Monterey Jack, cotija, sour cream, and mayonnaise Next, grab a big mixing bowl. Add the thawed corn kernels, softened cream cheese, shredded Monterey Jack, grated cotija cheese, sour cream, and mayonnaise. Mix these ingredients well. You want a smooth and creamy texture. Each bite should be rich and cheesy. - Mix in lime juice, chili powder, garlic powder, smoked paprika, cayenne (if using), and cilantro Now it's time to spice things up! Squeeze in the lime juice and sprinkle the chili powder, garlic powder, and smoked paprika. If you like it spicy, add cayenne. Toss in the chopped cilantro too. These flavors make the dip pop! Stir until everything blends nicely. - Transfer to baking dish and bake for 20-25 minutes After mixing, transfer your dip to a baking dish. Spread it evenly for even cooking. Bake it in your preheated oven for 20 to 25 minutes. Look for a bubbly top and a golden edge. This is when your Cheesy Mexican Street Corn Dip is ready! For the complete recipe, check the Full Recipe section. Serve this dip warm for the best flavor. When it’s hot, the cheeses melt nicely. This creates a rich and creamy texture that makes each bite delightful. If it cools down, it may not taste as good. So, keep it in the oven until ready to serve. Add extra cilantro and cotija cheese on top. This not only adds color but also boosts the flavor. Fresh cilantro brings a bright taste, while cotija adds a salty kick. You can even sprinkle some chili powder for a pop of color and heat. I recommend crispy tortilla chips for dipping. They add the perfect crunch to each bite. The chips also balance the creamy dip well. You can use store-bought chips or make your own for a fresher taste. Try cutting tortillas into triangles and baking them until crispy. Enjoy your dip! For the full recipe, check out the complete details and step-by-step guide! {{image_2}} You can spice up your Cheesy Mexican Street Corn Dip easily. Just add chopped jalapeños or a sprinkle of cayenne pepper. These spicy additions bring a nice kick to the dip. If you love heat, try both for a fiery twist. Adjust the amount to fit your taste. Cheese lovers can enjoy different cheesy options. Swap in queso blanco for a creamier feel. You can also use pepper jack for a spicy bite. Mixing cheeses can create a fun flavor experience. Don't hesitate to experiment and find the perfect blend for your taste buds. If you want a vegetarian option, replace sour cream with a vegan alternative. You can use cashew cream or coconut yogurt. These options keep the dip creamy without dairy. They also add unique flavors that can enhance the dish. Enjoy the same great taste while keeping it plant-based! To keep your Cheesy Mexican Street Corn Dip fresh, store it in an airtight container. Place it in the refrigerator. This helps preserve its creamy texture and flavors. When you want to enjoy leftovers, the oven is your best friend. Preheat it to 350°F (175°C). Place the dip in a baking dish, cover it with foil, and heat for about 15-20 minutes. This method keeps the dip creamy and prevents it from drying out. You can freeze the dip for later use, but it may change in texture. To freeze, place the dip in a freezer-safe container. When ready to eat, thaw it in the fridge overnight. Reheat it in the oven for the best results. Enjoy this tasty dip anytime! For the full recipe, check out the [Full Recipe]. Yes, you can prepare this dip a day in advance. Just mix all the ingredients and store it in the fridge. This dip tastes even better after the flavors blend overnight. When you're ready to serve, just bake it until hot and bubbly. Tortilla chips are a classic choice for dipping. You can also serve it with fresh veggies like carrots or bell peppers. Pita chips add a nice crunch too. This dip pairs well with anything that can scoop up its cheesy goodness. Typically, it lasts up to 3-4 days in an airtight container. Just make sure it's sealed tight to keep it fresh. If the dip looks or smells off, it's best to throw it out. Enjoy it while it's still creamy and delicious! This blog post shared the easy steps to make Cheesy Mexican Street Corn Dip. You learned about the simple ingredients, from corn to rich cheeses. I covered how to prepare, bake, and serve it. The tips offered help you enjoy it warm, with crispy chips and beautiful garnishes. Whether you keep it mild or spice it up, this dish fits all tastes. Remember, it’s great to make ahead and can even be frozen. Enjoy this tasty dip at your next gathering. It's sure to impress!

Cheesy Mexican Street Corn Dip Flavorful Party Dish

Get ready to impress your friends with a dish that packs a punch! Cheesy Mexican Street Corn Dip is the

- 10 chicken drumsticks - 1/2 cup soy sauce - 1/4 cup honey - 1/4 cup rice vinegar - 2 tablespoons sesame oil - 3 cloves garlic, minced - 1 inch ginger, grated - 1 tablespoon cornstarch (optional for thickening) - 1 tablespoon sesame seeds (for garnish) - 2 green onions, sliced (for garnish) You can swap honey for maple syrup or agave. If you want less salt, use low-sodium soy sauce. For ginger, fresh is best, but you can use powdered if needed. Choose high-quality chicken for the best flavor. Look for drumsticks that are fresh and have a nice pink color. Fresh garlic and ginger make a big difference in taste. Using real, fresh ingredients in your teriyaki sauce enhances the dish's overall flavor. 1. Preheat your oven to 400°F (200°C). This ensures even cooking. 2. Line a baking sheet with parchment paper. This helps with easy cleanup. 3. In a medium bowl, whisk together the soy sauce, honey, rice vinegar, sesame oil, minced garlic, and grated ginger. Mix until smooth. 4. If you want a thicker sauce, dissolve the cornstarch in a teaspoon of cold water. Add it to the sauce mix and whisk until smooth. - Marinate the chicken drumsticks for at least 30 minutes. For more flavor, go up to 2 hours. - Use a large resealable bag or bowl for marinating. Pour half the teriyaki sauce over the drumsticks. Seal or cover and refrigerate. - Make sure the chicken is well-coated in the sauce for maximum flavor. - Bake the drumsticks for 35 to 40 minutes. Check that they reach an internal temperature of 165°F (75°C). - To get crispy skin, turn on the broiler for 2 to 3 minutes at the end. Watch closely to avoid burning. - Once cooked, remove the drumsticks and let them rest for a few minutes. This helps keep them juicy. - Garnish with sesame seeds and sliced green onions before serving. Enjoy your flavorful dish! For the full recipe, refer to the above. To boost the flavor of your teriyaki chicken drumsticks, think about adding spices. Try a pinch of red pepper flakes for heat. You can also add a splash of lime juice for zest. Both will make your dish pop! Pair your chicken with simple side dishes. Steamed broccoli or fluffy rice go well with teriyaki. A fresh salad can also add great crunch and color. These sides help balance the sweet and savory flavors of the chicken. Use a sturdy baking sheet lined with parchment for easy clean-up. This helps the chicken cook evenly. A wire rack placed on the baking sheet can help the heat circulate around the chicken. For marinating, a large resealable plastic bag works great. It keeps the chicken covered in sauce well. A basting brush is also essential for applying more sauce while baking. One mistake to avoid is over-marinating your chicken. Too long in the sauce can make it mushy. Aim for a marinade time of 30 minutes to 2 hours. Another mistake is not checking the internal temperature. Always use a meat thermometer. Chicken should reach 165°F (75°C) to be safe and juicy. A quick check can save your meal! For the full recipe, check out the recipe section above. {{image_2}} You can swap chicken drumsticks for thighs or wings. Chicken thighs stay juicy and tender. Wings offer a fun, bite-sized option. Both will soak up the teriyaki flavor well. If you want a vegetarian twist, try tofu or veggies. Firm tofu absorbs the sauce nicely. Mushrooms or bell peppers add a meaty texture. Just marinate them in the same teriyaki sauce for great taste. You can choose between sweet or savory teriyaki sauces. Sweet sauces use more honey or brown sugar. Savory sauces add garlic and ginger for a stronger taste. Want a kick? Add sriracha to your sauce. It gives the dish a spicy edge that pairs well with the sweet teriyaki. Adjust the heat level to suit your taste. Serving baked teriyaki chicken drumsticks is fun and creative. Pair them with rice or noodles for a complete meal. You can serve the drumsticks on a bed of stir-fried veggies too. For garnish, sprinkle sesame seeds and sliced green onions on top. This adds color and crunch. Try adding a side of pickled veggies for a tangy contrast. You can find the full recipe to help you start cooking! To keep your baked teriyaki chicken drumsticks fresh, store them in the fridge. Place the drumsticks in an airtight container. They will stay good for up to four days. If you want to keep them longer, freezing is a great option. Wrap each drumstick tightly in plastic wrap and place them in a freezer bag. Squeeze out any extra air before sealing. You can freeze them for up to three months. You can reheat your drumsticks in two ways: using the microwave or the oven. If you use the microwave, place them on a plate and cover with a damp paper towel. Heat for one to two minutes. This helps keep the chicken moist. For the oven, preheat it to 350°F (175°C). Place the drumsticks on a baking sheet and heat for about 15 minutes. This method makes the skin crispy again, which is a nice touch. In the fridge, baked teriyaki chicken drumsticks last around four days. After that, they may not taste as good. Always check for signs of spoilage. If the drumsticks smell off or have a slimy texture, it’s best to throw them away. Keeping food safe is important for health. Enjoy your meal with peace of mind! To check if the chicken drumsticks are done, use a meat thermometer. The safe internal temperature for chicken is 165°F (75°C). Insert the thermometer into the thickest part of the drumstick without touching the bone. Look for these visual cues: - The juices should run clear, not pink. - The skin should be golden brown and crisp. - The meat should pull away from the bone easily. Yes, you can make teriyaki sauce at home. Here’s a simple recipe: - 1/2 cup soy sauce - 1/4 cup honey - 1/4 cup rice vinegar - 2 tablespoons sesame oil - 3 cloves garlic, minced - 1 inch ginger, grated Mix all these ingredients in a bowl for a fresh sauce. Homemade teriyaki sauce is fresher and has no preservatives. Store-bought sauces often have added sugars and sodium. Yes, you can prepare this recipe ahead of time. Marinating the chicken in advance enhances the flavor. For meal prep: - Marinate the chicken for at least 30 minutes. - You can marinate it overnight for richer taste. Store it in the fridge in a sealed bag or container. It will save time and make dinner easier. You now have a solid recipe for teriyaki chicken drumsticks. We covered key ingredients, prep steps, and baking tips. You learned about ingredient quality, substitutions, and even variations. Storing leftovers and reheating are also simple now. With everything we discussed, you can confidently make this dish. Don't hesitate to experiment with flavors or try new variations. Enjoy the cooking process and share your results with friends and family. Happy cooking!

Baked Teriyaki Chicken Drumsticks Flavorful and Easy

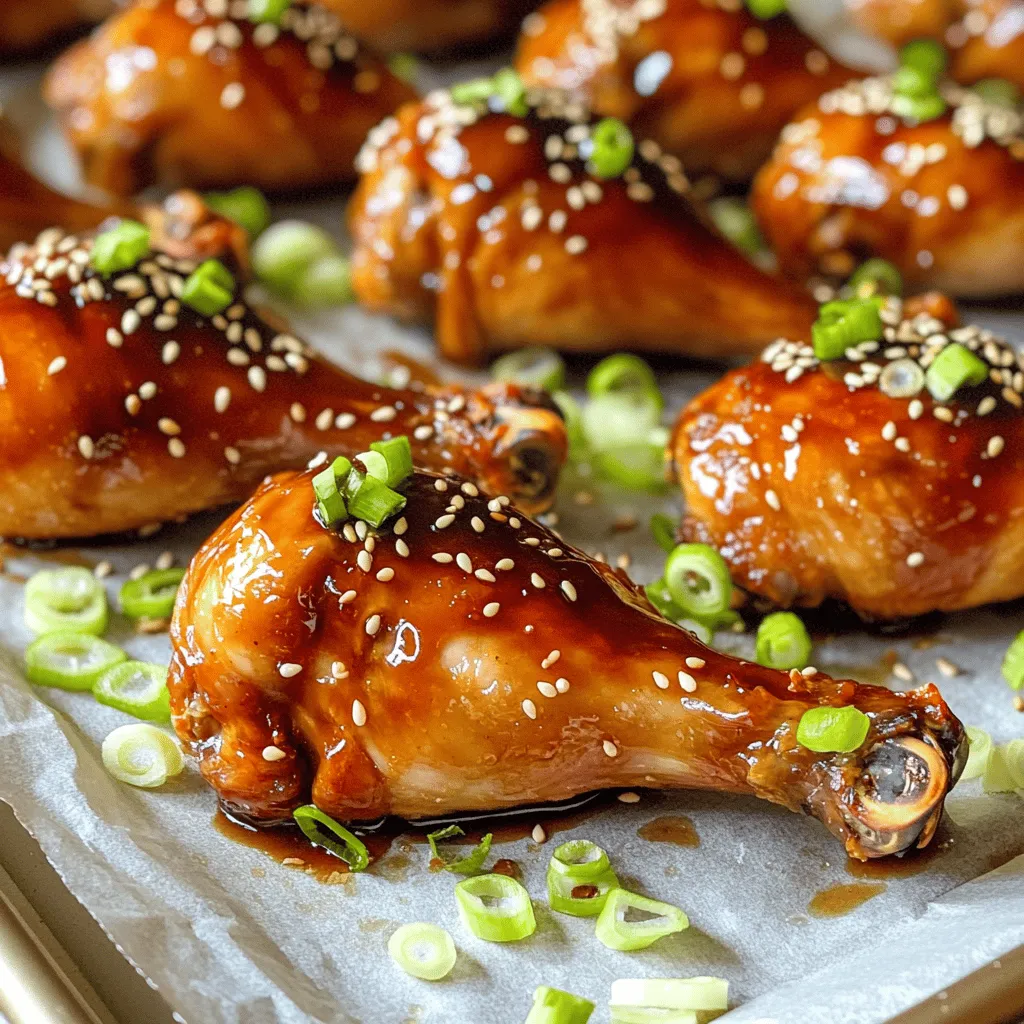
Craving something tasty yet simple? My Baked Teriyaki Chicken Drumsticks will become your new go-to recipe! These sticky, sweet chicken

- 1 pre-made pizza dough (or homemade if preferred) - 1 cup cooked chicken breast, diced - 1 cup Alfredo sauce (store-bought or homemade) - 1 ½ cups mozzarella cheese, shredded - ½ cup Parmesan cheese, grated - 1 cup spinach leaves, roughly chopped - 1 teaspoon garlic powder - ½ teaspoon black pepper - ¼ teaspoon salt - Fresh parsley for garnish (optional) To make a tasty Chicken Alfredo Pizza, gather your ingredients first. I like to use pre-made dough for convenience, but homemade dough adds a personal touch. You need cooked chicken breast, diced into small pieces. This gives you a nice protein boost. Alfredo sauce is key to this dish. Store-bought is fine, but homemade makes it special. Cheese is crucial too, so have mozzarella and Parmesan ready. Fresh spinach adds color and a healthy twist. Don't forget the garlic powder, black pepper, and salt for flavor. Finally, fresh parsley is optional but adds a nice look. With these ingredients, you're all set for a creamy and tasty pizza experience. Want the full recipe? Check the Full Recipe section for step-by-step guidance. - Preheat the oven to 475°F (245°C) and prepare your baking surface. - Roll out pizza dough on a floured surface and transfer it to your baking sheet or pizza stone. - Spread Alfredo sauce evenly over the dough, leaving a small border. - Sprinkle garlic powder, black pepper, and salt for added flavor. - Add the diced chicken and chopped spinach evenly over the sauce. - Top with mozzarella and Parmesan cheese before baking. - Bake for 12-15 minutes until cheese bubbles and the crust turns golden. - Let cool slightly and garnish with fresh parsley before slicing. This dish combines creamy Alfredo with tender chicken and fresh spinach. You will love the rich flavors! For a full recipe, check out the details above. - Use homemade Alfredo sauce for enhanced flavor. This sauce makes the pizza creamy and rich. - Don’t overload with toppings to avoid a soggy crust. Keep it simple for the best bite. - Let dough rise if using homemade to achieve the best texture. This step adds air and fluffiness to your crust. - Dust your surface to prevent sticking while rolling. A little flour helps the dough glide easily. - Pair with a side salad for a complete meal. A fresh salad balances the richness of the pizza. - Best served hot; reheat for leftovers to keep the cheese melty. This way, you enjoy that gooey goodness again! {{image_2}} You can switch up the protein on your pizza for fun. Shrimp adds a sweet touch. Bacon gives a nice crunch. Both options taste great with Alfredo sauce. If you want a meatless meal, try mushrooms or bell peppers. They soak up sauce well and add nice texture. Cheese can change your pizza's flavor. Mixing cheeses is a great idea! Try adding cheddar for a sharp bite. Feta cheese gives a tangy taste, too. If you prefer no dairy, look for dairy-free cheese options. They melt well and taste good on your pizza. While Alfredo is classic, other sauces can be fun. Pesto brings a fresh, herbal flavor. White garlic sauce adds a rich twist. For those who like heat, a red pepper Alfredo sauce is perfect. It spices things up and adds depth. Experimenting with sauces can create new favorite flavors. Keep your leftover pizza in an airtight container. It will stay fresh in the fridge for up to 3 days. This way, you can enjoy your Homemade Chicken Alfredo Pizza later without losing its creamy taste. For longer storage, freeze pizza slices. Wrap each slice in plastic wrap, then place them in a freezer bag. This helps keep them fresh. Your pizza tastes best within 1-2 months. After that, it might lose some flavor. To reheat, the oven is your best friend. It keeps the crust crispy and the cheese melty. If you need a quick fix, the microwave works too. Just remember that the oven gives you better texture. Yes, you can use gluten-free pizza dough available in stores. Many brands make tasty options. Just check the label to ensure it fits your diet. You can also make your own gluten-free dough if you prefer. To make a simple creamy Alfredo sauce, you need a few easy ingredients. Here’s a quick recipe: - 1 cup heavy cream - ½ cup butter - 1 cup Parmesan cheese, grated - Salt and pepper to taste 1. In a saucepan, melt the butter over low heat. 2. Add the cream and stir for about 5 minutes. 3. Gradually whisk in the Parmesan cheese until smooth. 4. Season with salt and pepper. This sauce works great for your pizza or other pasta dishes too! Some tasty sides to serve with Chicken Alfredo Pizza include: - Caesar salad for a nice crunch - Garlic bread for dipping - Steamed vegetables for a healthy balance These sides complement the creamy pizza perfectly. Enjoy! This blog post covered how to make a delicious Chicken Alfredo Pizza. We discussed ingredients, preparation, baking, and storage tips. You learned that using fresh ingredients makes a big difference in flavor. Try different proteins or sauces to keep it exciting. Don’t shy away from leftovers; they can be just as tasty with some care. Enjoy the taste you created yourself, and share it with friends and family for a fun meal!

Homemade Chicken Alfredo Pizza Creamy and Tasty Dish

Craving a creamy and delicious dinner? Let’s make Homemade Chicken Alfredo Pizza! This dish brings together tender chicken, rich Alfredo

- 4 salmon fillets (6 oz each) - 4 tablespoons unsalted butter - 4 cloves garlic, minced - 1 lemon (juiced and zested) - 1 teaspoon dried thyme - 1 teaspoon dried oregano - Salt and pepper to taste - Fresh parsley, chopped (for garnish) - Lemon slices (for garnish) When you make Garlic Butter Lemon Salmon, these ingredients bring the dish to life. The salmon fillets are the star. Choose fresh, high-quality salmon for the best taste. The butter adds richness, while the garlic gives a deep flavor. The lemon juice and zest brighten the dish. Dried thyme and oregano add a nice herbal note. Don't forget the salt and pepper. They enhance all the flavors. Finally, fresh parsley and lemon slices make great garnishes. They look pretty on the plate and add flair. For the full recipe, check out the detailed steps above. Start by getting your salmon fillets ready. Pat each fillet dry with a paper towel. This step helps the seasoning stick. Next, season both sides with salt, pepper, thyme, and oregano. These spices add great flavor. Set the fillets aside while you prepare to cook. Grab a large skillet and place it over medium heat. Melt the butter in the skillet until it bubbles. This will make your kitchen smell amazing! Once the butter is ready, add the minced garlic. Sauté it for about one minute, just until it is fragrant. Now, carefully place the salmon fillets skin-side down into the skillet. Let them cook for about 4 to 5 minutes. This will give the skin a nice crisp. After that, flip the fillets over. Squeeze in the lemon juice and sprinkle the zest over the top. Cook for another 4 to 5 minutes. You will know the salmon is done when it flakes easily with a fork. As the salmon cooks, baste it with the garlic butter. This adds extra flavor and keeps it moist. Once the salmon is fully cooked, take the skillet off the heat. Garnish the fillets with fresh parsley and lemon slices. Your Garlic Butter Lemon Salmon is now ready to serve! If you want to see the full recipe, check out [Full Recipe]. To cook salmon perfectly, keep a few tips in mind. First, always start with dry fillets. Wet salmon will steam instead of sear. This can lead to dryness. Season both sides with salt, pepper, and herbs before cooking. Next, use medium heat. This allows the salmon to cook evenly without burning. Basting is key to keeping the salmon moist. As you cook, spoon the garlic butter over the fillets. This adds flavor and helps retain moisture. Flip the salmon carefully to avoid breaking it. Cook until it flakes easily with a fork. You can boost flavor with herbs and spices. Fresh dill or tarragon pairs well with salmon. They add a fresh taste. For a kick, try adding red pepper flakes. Adjust the lemon flavor to your liking. If you want it tangy, add more lemon juice. If you prefer milder, use less. Plating is important for a beautiful dish. Serve the salmon on a bed of bright green asparagus. This adds color and makes the dish pop. For garnish, sprinkle fresh parsley on top. Add lemon slices for a fresh look. Drizzling some extra garlic butter over the salmon makes it shine. For a restaurant-style finish, arrange the salmon with care on the plate. Enjoy your meal! {{image_2}} You can easily switch out the salmon for other fish. Trout and cod work great in this recipe. They have mild flavors that pair well with garlic and lemon. Use the same cooking method for these fish. Just make sure to adjust cooking times based on thickness. Trout cooks quickly, so check it sooner than cod. If you need a dairy-free option, simply swap out the butter for olive oil. Olive oil gives a nice flavor and keeps the fish moist. Use the same amount of olive oil as butter in the recipe. This change makes the dish lighter while still being tasty. Pair Garlic Butter Lemon Salmon with delicious sides to make a full meal. Quinoa adds a nutty flavor and is full of protein. Roasted vegetables like broccoli or asparagus add color and nutrients. You can also serve it with a fresh green salad for a crisp bite. These sides balance the richness of the salmon and keep the meal light. For the full recipe, check out the earlier section. To store leftover Garlic Butter Lemon Salmon, place it in an airtight container. Make sure the salmon cools down before sealing. Keep it in the fridge for up to three days. This helps keep the flavors fresh. If you want to freeze the salmon, wrap each fillet tightly in plastic wrap. Then place them in a freezer bag. This will help keep the salmon's texture. Use the frozen salmon within three months for the best taste. When reheating, use a skillet on low heat. Add a splash of water or broth to keep it moist. Cover the skillet to trap steam. You can also use the microwave, but do it in short bursts. This helps prevent drying out the salmon. Enjoy your meal like it was just cooked! To tell if salmon is cooked, look for a few signs. First, check the color. Salmon should look opaque and no longer bright pink. Second, you can test the texture. Use a fork to gently flake the salmon. If it flakes easily, it’s done. The internal temperature should reach 145°F. This means it's safe to eat. Remember, overcooking salmon can make it dry. So, keep an eye on it! Yes, you can cook Garlic Butter Lemon Salmon in the oven. Preheat your oven to 400°F. Start by preparing the salmon as you would for the skillet. Place the seasoned salmon fillets on a baking sheet lined with parchment paper. Melt the butter and mix it with minced garlic, lemon juice, and zest. Pour this mixture over the salmon. Bake for about 12-15 minutes, or until the salmon is cooked through. This method makes for easy cleanup and still keeps the fish moist. Several sides go well with Garlic Butter Lemon Salmon. Here are some great options: - Steamed asparagus - Roasted broccoli - Garlic mashed potatoes - Quinoa salad - Fresh green salad These sides enhance the meal and balance the flavors. You can mix and match based on your taste! For more ideas, check out the Full Recipe. This blog post covers how to make Garlic Butter Lemon Salmon. You learned about key ingredients like salmon, butter, and garlic. I shared step-by-step instructions for preparing, cooking, and garnishing the dish. Tips helped ensure perfect cooking and suggested flavor enhancements. You explored variations and storage tips for leftovers. Try this recipe to enjoy a tasty and easy meal. Simple steps lead to great flavors. Happy cooking!

Garlic Butter Lemon Salmon Savory and Simple Recipe

If you’re searching for a quick, tasty dinner, check out my Garlic Butter Lemon Salmon recipe. This dish combines fresh

- Chicken: I use boneless, skinless chicken breasts for this dish. They cook quickly and stay juicy. You can also use thighs if you prefer dark meat. Just make sure they are similar in size for even cooking. - Mango Salsa Components: Fresh mangoes work best for flavor and texture. Ripe mangoes are sweet and add a lovely color. If fresh mangoes are hard to find, frozen mangoes can work too. Just thaw them and skip the dicing step. - Additional Flavoring Agents: The spices bring the dish to life. I use ground cumin and smoked paprika for warmth and depth. Fresh herbs like cilantro add a bright finish. Don’t forget the lime juice; it adds a zesty kick and balances the sweetness of the mango. The combination of fresh ingredients makes this spicy mango salsa chicken a delightful and vibrant dish. For the complete list of ingredients, check the Full Recipe section. Prepping the Chicken: Start with four boneless, skinless chicken breasts. Rub a mix of olive oil, ground cumin, smoked paprika, salt, and pepper all over the chicken. This spice blend gives the chicken a great flavor. Let it rest for a few minutes to soak in the taste. Making the Salsa: Grab two ripe mangoes and dice them up. Add a finely chopped red bell pepper and red onion for crunch. For heat, chop a jalapeño and remove the seeds. Mix these ingredients in a bowl with chopped cilantro, lime juice, and a pinch of salt. Stir well to create a fresh, zesty salsa. Cooking Methods: You can choose to grill or use a skillet. I love grilling because it adds a nice smoky flavor. If using a grill, preheat it to medium-high heat. For a skillet, heat it until hot. Both methods work well; just ensure the chicken cooks evenly. Grill Cooking Duration: Cook the chicken on the grill for 6-7 minutes on each side. Use a meat thermometer to check for doneness. The center should read 165°F (75°C). This will ensure juicy chicken that is safe to eat. Resting Period: After cooking, let the chicken rest for about five minutes. This step is key for keeping the chicken moist and flavorful. When you cut into it, the juices will stay inside, making each bite delicious. - Achieving Perfect Grilled Chicken: Use a meat thermometer. Cook the chicken until it reaches 165°F (75°C). This ensures it is safe and juicy. Let it rest for 5 minutes after cooking. This keeps the chicken moist. - Salsa Storage: Store leftover salsa in a sealed container. It stays fresh in the fridge for 2-3 days. You can also freeze it for longer storage. Just make sure to use an airtight container. - Serving Suggestions: Pair this chicken with rice or mixed greens. These sides add color and nutrition. You can also serve it with tortilla chips for a fun crunch. - Garnishing: Use fresh cilantro for garnish. It adds a pop of green and a fresh taste. Lime wedges on the side also look nice and add brightness. {{image_2}} Alternative Proteins: If you want a change from chicken, use shrimp or firm tofu. Both options work great with the mango salsa. Each provides a unique taste and texture. Shrimp cooks quickly and absorbs flavor well. Tofu is a good choice for a plant-based meal. Fruit Variations: You can switch up the fruits in the salsa. Try peaches or pineapple for a twist. These fruits add a sweet, juicy touch. You can even mix in some diced kiwi or papaya for more fun flavors. Experiment and find your favorite combination. Adjusting Heat: To change the heat, add more or less jalapeño. You can also try a different pepper like serrano for extra kick. For milder salsa, omit the jalapeño or use sweet peppers instead. This lets everyone enjoy the dish, no matter their spice tolerance. Flavor Profiles: Balancing sweetness and spice is key. If it’s too sweet, add a splash of lime juice. This gives zing and brightens the flavor. If it’s too spicy, add more mango or a sprinkle of brown sugar. This helps balance the heat while keeping the salsa tasty. For the complete recipe, check out the [Full Recipe]. To keep your spicy mango salsa chicken fresh, use airtight containers. Glass or plastic containers work well. Be sure to let the chicken cool first before storing. This helps keep it juicy and tasty. In the fridge, your chicken can last up to three days. The mango salsa can also stay fresh for about two days. If you want to freeze the chicken, wrap it tightly in plastic wrap. Then, place it in a freezer bag. This keeps out air and helps avoid freezer burn. When you’re ready to eat, thaw the chicken in the fridge overnight. Cook it within a day after thawing. For the salsa, freeze it in a separate container. Use a freezer-safe bag to maintain its flavor and texture. When you thaw the salsa, do it in the fridge. This helps keep the mango pieces intact. Enjoy your flavorful grilled delight whenever you want! For the full recipe, check out the details above. What to serve with Spicy Mango Salsa Chicken? I love to serve Spicy Mango Salsa Chicken with rice or mixed greens. The rice soaks up the salsa's juice. Mixed greens add a nice crunch. You can also try black beans or corn on the side. They pair well with the flavors. Can I make the salsa in advance? Yes, you can make the salsa ahead of time. Just store it in the fridge. It will stay fresh for up to two days. The flavors will blend nicely as it sits. Just stir it again before serving to mix everything. How do I know when the chicken is fully cooked? To check if the chicken is cooked, use a meat thermometer. It should read 165°F (75°C) in the center. If you don't have a thermometer, cut the chicken open. The meat should be white, not pink. Is this recipe gluten-free? Yes, Spicy Mango Salsa Chicken is gluten-free. All the ingredients are naturally gluten-free. Just ensure that your spices do not contain hidden gluten. Can I use other meats for this recipe? Absolutely! You can use pork or fish instead of chicken. Adjust the cooking time based on the meat you choose. Fish cooks faster, while pork may need more time. What are the nutritional facts for Spicy Mango Salsa Chicken? This dish is healthy and full of flavor. Each serving has about 280 calories. It offers lean protein and healthy fats. The mango adds vitamins and fiber too. For exact nutritional values, check the [Full Recipe]. In this post, we explored how to prepare Spicy Mango Salsa Chicken from start to finish. We looked at the key ingredients, step-by-step instructions, tips for cooking, variations, and storage methods. You can create a flavorful dish that impresses anyone. Remember, precise preparation and presentation matter. With a few simple tweaks, you can adjust spice levels and substitute ingredients. Enjoy experimenting in your kitchen. Safe cooking allows you to savor every bite of this delicious meal.

Spicy Mango Salsa Chicken Flavorful Grilled Delight

Ready to spice up your dinner? This Spicy Mango Salsa Chicken is a tasty treat that grills up beautifully. Bursting

- Ground chicken (or turkey) - Coleslaw mix (cabbage and carrots) - Garlic and ginger The main ingredients make this dish shine. I often use ground chicken, but turkey is great too. It is lean and cooks nicely. Coleslaw mix is my favorite for this recipe. It has shredded cabbage and carrots, adding crunch and color. Garlic and ginger bring a lovely aroma. They make the dish flavorful and vibrant. - Soy sauce (or tamari) - Rice vinegar - Honey (or maple syrup) The sauce is key to Egg Roll in a Bowl. I recommend soy sauce for a savory kick. If you need it gluten-free, tamari works well. Rice vinegar adds a nice tang. Honey or maple syrup sweetens it just right. The balance of sweet and salty makes it delicious. - Green onions - Sesame seeds - Salt and pepper Garnishes elevate the look and taste of this dish. I love adding sliced green onions for freshness. Sesame seeds give a nutty crunch. A sprinkle of salt and pepper enhances the flavors. You can mix and match these garnishes to make it your own. For the full recipe, check out the details above! Start by heating sesame oil in a large skillet over medium-high heat. This oil gives a nice flavor. Add minced garlic and grated ginger to the skillet. Sauté them for about 30 seconds. You want to smell the aroma! Next, add the ground chicken. Cook it while breaking it up with a spoon. Keep cooking until it is browned and fully cooked, which takes about 5 to 7 minutes. Now, it's time to stir in the coleslaw mix. This mix usually has cabbage and carrots. Cook it for about 3 to 4 minutes. You want the cabbage to wilt but still keep a little crunch. This gives your dish texture and color. In a small bowl, whisk together soy sauce, rice vinegar, and honey. Pour this sauce over the chicken and veggies in the skillet. Season with salt and pepper to taste. Make sure to stir well to combine everything. Cook for another minute or two. This allows all the flavors to meld perfectly together. Finally, remove from heat. Stir in sliced green onions and sesame seeds for extra flavor and crunch. You can find the full recipe to follow these steps easily! To cook the chicken well, use medium-high heat. This method helps the meat brown nicely. Stir the chicken often to break it apart. Cook it until there is no pink left, about five to seven minutes. Use a food thermometer if needed; the internal temp should reach 165°F. To keep the coleslaw crunchy, add it towards the end of cooking. Stir it in for just three to four minutes. You want the cabbage to wilt lightly but still have a bite to it. This keeps the texture fresh and adds a nice contrast to the chicken. For more flavor, try adding spices like red pepper flakes or five-spice powder. These options can really elevate your dish. You can also toss in a splash of lime juice for brightness. If you want more sweetness, increase the honey slightly. For saltiness, adjust the soy sauce to your taste. When serving, use deep bowls for a nice presentation. Garnish with extra green onions and sesame seeds for color. For added crunch, sprinkle crispy wonton strips on top. This makes the dish look great and taste even better. Serve with a side of rice or quinoa for a filling meal. {{image_2}} For a fun twist, try using tofu instead of chicken. Tofu adds a great texture. Press it first to remove extra water. This helps it absorb flavors better. You can also switch up the meat. Ground pork or beef are great alternatives. If you love seafood, shrimp works too! Each choice gives a new taste to the dish. If you need a gluten-free option, use tamari instead of soy sauce. Tamari tastes similar but is safe for gluten-free diets. Want to cut carbs? Use cauliflower rice or zucchini noodles instead of coleslaw mix. This keeps the meal low-carb and still full of flavor. To change the flavor, explore different sauces. Try hoisin or peanut sauce for a unique spin. If you like heat, add chili flakes or a splash of sriracha. These small changes can take your Egg Roll in a Bowl to a whole new level. To store your Egg Roll in a Bowl, let it cool first. Place it in an airtight container. This keeps it fresh in the fridge for up to four days. If you want to keep it longer, freezing is a great option. Freeze it in a freezer-safe bag or container for up to three months. This way, you can enjoy it later! When you’re ready to eat, use the microwave for quick reheating. Heat it for about one to two minutes. Stir halfway through for even warming. You can also use a skillet on medium heat. This helps keep the texture and flavor intact. Just add a splash of water to prevent drying out. Egg Roll in a Bowl stays fresh in the fridge for about four days. If you see any signs of spoilage, like a bad smell or strange color, it’s best to toss it out. Always trust your senses! Keeping track of how long it’s been stored helps you enjoy it at its best. What is Egg Roll in a Bowl? Egg Roll in a Bowl is a deconstructed version of a classic egg roll. It has all the same great flavors but in a simple stir-fry. You cook ground meat, coleslaw mix, and seasonings in one pan. It’s fast, easy, and full of flavor. Is it healthier than traditional egg rolls? Yes, Egg Roll in a Bowl is often healthier than traditional egg rolls. It skips the deep-frying, which cuts down on fat. You get more veggies in each bite, too. Plus, you control the ingredients and can choose lean meats. Can you make it ahead of time? You can make Egg Roll in a Bowl ahead of time. Just cook the dish, let it cool, and store it in the fridge. It’s great for meal prep. Reheat it when you’re ready to eat. The flavors will still taste fresh. What can I use instead of coleslaw mix? If you don't have coleslaw mix, use shredded cabbage and carrots. You can also try broccoli slaw or even spinach. Any mix of crunchy veggies works well in this dish. Are there any common allergies to consider? Yes, common allergies include soy (from soy sauce) and sesame (from sesame oil). If you have allergies, look for alternatives, like coconut aminos or olive oil. Always check labels to be safe. Can I use pre-cooked chicken to save time? Absolutely! Pre-cooked chicken is a great time saver. Just heat it up in the skillet and then add the veggies and sauce. This cuts down on your cooking time even more. For detailed instructions and a full list of ingredients, check out the Full Recipe. This blog gave you a clear guide on making Egg Roll in a Bowl. We covered ingredients, cooking steps, tips, variations, and storage. You learned how to mix flavors and keep crunch in the veggies. You can easily customize this dish to fit your diet. Try out these ideas and enjoy a tasty meal. It’s quick, healthy, and fun to make. Explore your options and make your own version. Happy cooking!

Egg Roll in a Bowl Flavorful and Easy Dinner Idea

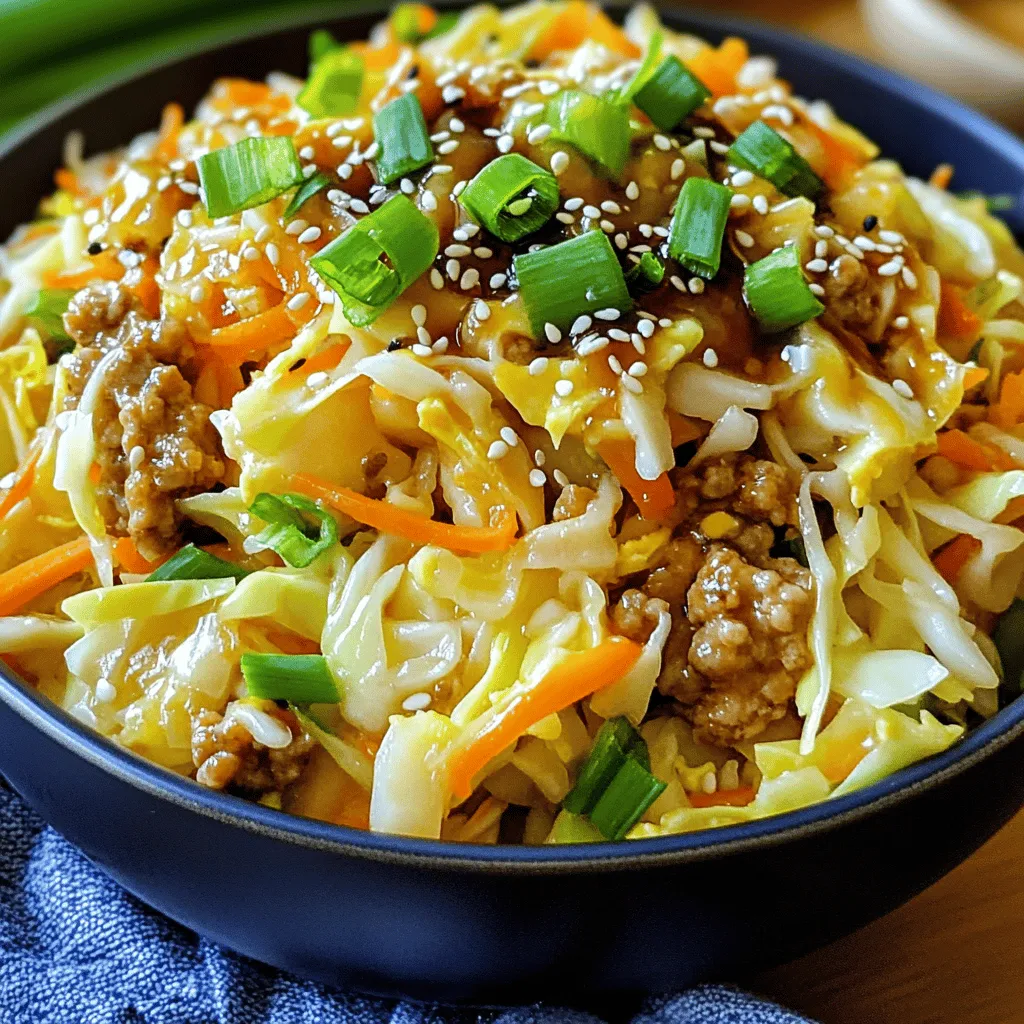
Are you looking for a quick, tasty dinner that’s packed with flavor? Let me introduce you to Egg Roll in

- 1 cup almond flour - 1/2 cup natural peanut butter - 1/4 cup maple syrup - 1 teaspoon vanilla extract - 1/4 teaspoon salt - 1/2 cup mini chocolate chips - 1/4 cup chopped nuts (optional) - 2 tablespoons chia seeds You can swap almond flour for oat flour or coconut flour. If you prefer, try almond butter or cashew butter instead of peanut butter. For sweeteners, honey works well. Maple syrup gives a nice flavor, but agave is also a good choice. If you need gluten-free options, ensure your nut butter and chocolate chips are certified gluten-free. Almond flour is low in carbs and high in protein. It’s rich in vitamin E, which helps your skin. Chia seeds add omega-3 fatty acids, which support heart health. They also provide fiber, which helps digestion. Using these ingredients makes your treats not just tasty, but also good for you! For the Full Recipe, check out the detailed steps to create these delightful bites. To start, gather your ingredients. You need almond flour, peanut butter, maple syrup, vanilla extract, and salt. 1. In a mixing bowl, combine these ingredients. Use a sturdy spoon or spatula for mixing. 2. Stir until the mixture becomes smooth and sticky. This texture is key for your dough bites. When mixing, aim for a dough that holds together well. If it feels too dry, add a little more nut butter. If it’s too wet, mix in a bit more almond flour. Now it’s time to shape your dough into bites. 1. Use your hands to scoop out tablespoon-sized portions of the dough. 2. Roll each portion into a small ball. Aim for a uniform size for even chilling. While rolling, keep your hands slightly damp. This prevents the dough from sticking to your fingers. Place the rolled bites on a parchment-lined baking sheet. Chilling is important for the bites to set properly. 1. Once all the dough is rolled, place the baking sheet in the fridge. 2. Let them chill for about 30 minutes. This step firms up the bites, making them easier to eat and enhancing their flavor. The chilling helps meld the ingredients together, creating a delightful treat. After chilling, enjoy your cookie dough bites as a delicious snack! For the full recipe, refer to the earlier section. To make the best no-bake cookie dough bites, focus on texture. Use almond flour for a smooth and nutty base. Make sure your peanut butter is creamy. This helps the dough stick together. If the mixture seems too dry, add a little more maple syrup. It’s all about balance. For easier rolling, keep your hands slightly damp. This stops the dough from sticking. Roll the bites gently and don’t worry about perfection. Each bite will taste amazing, no matter the shape. Serve your cookie dough bites on a pretty plate. You can drizzle melted dark chocolate over them. This adds a nice touch. For a sweet-salty flavor, sprinkle some sea salt on top. You can also use chopped nuts or coconut flakes as toppings. Arrange the bites in a fun pattern. This makes them look more inviting. You can even add fresh fruit around the plate for color. These small details make a big difference! If you want to save time, prep these bites in advance. You can make the dough a day before. Just keep it in the fridge until you are ready to roll. This way, you can enjoy fresh bites anytime. Store the rolled bites in an airtight container. They stay fresh for about a week. If you want to keep them longer, freeze them. Just let them thaw before serving. This method saves time and lets you enjoy these treats whenever you crave something sweet! {{image_2}} You can easily make vegan no-bake cookie dough bites. Just swap the honey for maple syrup. This keeps the bites sweet and plant-based. Use nut butters like almond or cashew for that creamy texture. For gluten-free options, you can choose different flours. Almond flour works great, but you could also try oat flour or coconut flour. Each flour gives a unique taste and texture, so feel free to experiment. Customizing your bites is fun! You can add mix-ins like dried fruits, nuts, or seeds. Try adding coconut flakes for a tropical twist or swap out chocolate chips for butterscotch chips. Seasonal variations can also be exciting. In fall, add pumpkin spice for a cozy flavor. In summer, use fresh berries for a fruity kick. Let your creativity shine through! Want to spice things up? Incorporate spices like cinnamon or nutmeg. A dash of cinnamon adds warmth, while nutmeg gives a holiday vibe. You can also boost nutrition by adding protein powders or superfoods. Mix in some vanilla protein powder to make them more filling. Chia seeds are another great addition for extra fiber and crunch. For the full recipe, check out the Cookie Dough Bliss Bites section. Enjoy making these tasty treats! To keep your no-bake cookie dough bites fresh, use an airtight container. Glass or plastic containers work well. Make sure the lid seals tightly. Store them in the refrigerator. This keeps them cool and tasty. You can also layer parchment paper between the bites. This helps prevent sticking. In the refrigerator, these bites last about one week. They stay soft and delicious. You can also freeze them for longer storage. They can last up to three months in the freezer. Just make sure to separate layers with parchment paper. This helps maintain their shape. For serving, I recommend two to three bites per person. This gives everyone a nice treat without overdoing it. If you have a gathering, double or triple the batch. This way, you will have enough for everyone to enjoy. You can easily adjust the recipe size to fit your needs. For the full recipe, check the earlier section. The prep time for no-bake cookie dough bites is just 10 minutes. After mixing, you need an extra 30 minutes to chill them. So, the total time is 40 minutes. This quick process makes these bites an easy treat for any time. Yes, you can customize the recipe to fit your taste. Try using different nut butters like cashew or sunflower seed butter. You can swap maple syrup for honey or agave syrup. Add in dried fruits, like raisins or cranberries, for a chewy texture. The options are endless! For those with nut allergies, there are safe substitutions available. Use sunflower seed butter instead of peanut butter. You can also replace almond flour with oat flour or coconut flour. These swaps make the bites safe and still tasty for everyone. The cookie dough bites take about 30 minutes to chill. This time allows them to firm up and hold their shape. It’s important to let them chill long enough for the best texture. Enjoy these bites straight from the fridge. They taste great as a snack or dessert. Serve them on a decorative plate with melted dark chocolate drizzled on top. A sprinkle of sea salt adds a nice contrast, making them even more delicious. For more ideas, check out the Full Recipe. You learned how to make tasty no-bake cookie dough bites. We covered the best ingredients, steps, and tips. You can even switch things up with fun flavors. This recipe is easy and healthy, making it perfect for any occasion. Enjoy your bites as a snack or dessert. With some practice, you’ll impress others with your skills. Have fun experimenting with new ideas and making these bites your own!

No Bake Cookie Dough Bites Perfect and Tasty Treat

Craving something sweet, yet healthy? No Bake Cookie Dough Bites are just the treat for you! Unlike traditional cookies, these

Older posts
Newer posts
← Previous Page1 … Page81 Page82 Page83 Page84 Next →

dsad

© 2026 Lisa Dishes • Built with GeneratePress

Our Policies

  • Copyright Policy
  • Cookie Policy
  • GDPR Policy
  • Privacy Policy
  • Disclaimer
  • Terms Of Use

More Information

  • Home
  • About
  • Contact
  • Appetizers
  • Dessert
  • Dinner
  • Drinks
©2026, Lisa Dishes About Back To Top