Skip to content
DisclaimerTerms Of UseGDPR PolicyCookie Policy

Lisa Dishes

  • Home
  • Drinks
  • Appetizers
  • Dinner
  • Dessert
  • About
  • Contact
  • Privacy Policy
DisclaimerTerms Of UseGDPR PolicyCookie Policy

NO-ING-IMG

To make a veggie packed breakfast burrito, gather these tasty items: - 4 large whole wheat tortillas - 1 cup black beans, drained and rinsed - 1 cup spinach, roughly chopped - 1 medium bell pepper, diced (any color) - 1 small zucchini, diced - 1/2 cup corn kernels (fresh or frozen) - 4 eggs (or flax eggs for a vegan option) - 1/2 teaspoon ground cumin - 1/2 teaspoon smoked paprika - Salt and pepper to taste - 1 avocado, sliced - 1/2 cup shredded cheese (cheddar or a vegan alternative) - Fresh cilantro, for garnish (optional) - Salsa or hot sauce, for serving You can play with flavors by adding: - Diced onions or garlic for extra zest - Mushrooms for a meaty texture - Jalapeños for heat - Different cheeses like feta or pepper jack - A squeeze of lime for brightness Feel free to mix and match! This burrito is all about your taste. Enjoy getting creative in the kitchen! Start by gathering your ingredients. You will need whole wheat tortillas, black beans, spinach, bell pepper, zucchini, corn, eggs, spices, cheese, and avocado. Wash and chop the veggies. Dice the bell pepper and zucchini into small pieces. Roughly chop the spinach. If you use fresh corn, cut it off the cob. Heat a large skillet over medium heat. Add a little olive oil to the pan. Once the oil is warm, add the diced bell pepper and zucchini. Sauté for about 3-4 minutes until they start to soften. Next, stir in the spinach and corn. Cook until the spinach wilts, which takes about 2 minutes. Then add the black beans, cumin, smoked paprika, salt, and pepper. Mix everything well and cook for 2 more minutes to heat through. In a separate bowl, whisk the eggs until smooth. Pour the eggs into the skillet with the veggies. Stir gently until the eggs cook through and become scrambled. This will take about 3-5 minutes. Once done, remove the skillet from heat. Warm the tortillas in a dry skillet or microwave until they are soft and pliable. For each burrito, place a portion of the veggie-egg mixture in the center of a tortilla. Add sliced avocado and a sprinkle of cheese on top. Fold the sides of the tortilla in, then roll it up from the bottom to enclose the filling. If you like, you can toast the burritos seam-side down in the skillet for 1-2 minutes on each side to add crunch. Serve these warm with salsa or hot sauce. For a fresh touch, garnish with cilantro. Enjoy your veggie packed breakfast burrito! To cook perfect eggs, start with a non-stick skillet. Heat it on medium. Add a little oil to prevent sticking. Crack your eggs into a bowl and whisk them until they are mixed well. This helps create fluffy eggs. Pour the eggs into the hot skillet. Stir gently with a spatula as they cook. Remove them from heat when they are soft and slightly runny. They will keep cooking after you take them off the heat. Warm your tortillas before wrapping. This makes them soft and easy to roll. Place your filling in the center of the tortilla. Fold the sides in first, then roll from the bottom up. Make sure to tuck in the filling as you roll. This keeps everything inside. If you want a crunch, place the wrapped burrito seam-side down in a hot skillet. Toast for 1-2 minutes on each side. Garnishing adds flavor and makes your burrito look great. Sliced avocado gives creaminess. Fresh cilantro adds a nice pop of flavor. You can also sprinkle cheese on top. If you like spice, add salsa or hot sauce. This gives a nice kick to your burrito. For a unique twist, try adding some fresh lime juice. It brightens up all the flavors beautifully. For the full recipe, check out the Veggie Packed Breakfast Burrito section. {{image_2}} You can easily make this breakfast burrito vegan. Swap out the eggs for flax eggs. To make one flax egg, mix one tablespoon of flaxseed meal with two and a half tablespoons of water. Let it sit for five minutes. This mixture works like eggs in the recipe. You can also use tofu to add protein. Crumble firm tofu and sauté it with the veggies for added texture. Feel free to play with your veggie choices. Try adding mushrooms for an earthy flavor. Carrots or sweet potatoes can add sweetness and crunch. Kale can replace spinach for a heartier bite. You can even add cherry tomatoes for a juicy burst. The key is to use what you love and what’s in season. If you want more protein, consider adding cooked quinoa or lentils. These options are filling and nutritious. You can also use tempeh for a nutty taste. For meat lovers, diced chicken or turkey can work well, too. Keep in mind that the balance of flavors is essential. Choose proteins that pair well with your veggies for a delicious meal. This recipe is flexible and fun! Just mix and match to fit your taste. For the full recipe, check out the section above. To keep your veggie packed breakfast burrito fresh, place leftovers in an airtight container. You can store them in the fridge for up to three days. Be sure to let the burritos cool before sealing them. This step helps prevent sogginess. When you’re ready to enjoy your burrito again, you can reheat it easily. For the best results, use a skillet. Heat the skillet over medium heat. Place the burrito seam-side down and cook for about 3-4 minutes on each side. This method gives you a warm, crispy burrito. If you prefer the microwave, heat it for 1-2 minutes, but the texture may not be as nice. If you want to save your burritos for later, freezing is a great option. Wrap each burrito tightly in plastic wrap. Then, place them in a freezer-safe bag or container. They can last up to three months in the freezer. When you’re ready to eat, thaw in the fridge overnight and follow the reheating instructions above. Enjoy your meal prep without stress! You can find the full recipe for this delicious breakfast burrito in the article. Yes, you can make this breakfast burrito ahead of time. Prepare the filling and store it in the fridge. It stays fresh for about three days. You can also wrap the burritos and freeze them. To reheat, just heat in a skillet or microwave until warm. This makes busy mornings easier! You can try many toppings! Here are some tasty ideas: - Sliced avocado for creaminess - Fresh cilantro for a burst of flavor - Salsa for spice and zest - Sour cream or Greek yogurt for richness - Hot sauce for heat These toppings add great flavor and texture. Mix and match to find your favorite! To make this recipe gluten-free, simply use gluten-free tortillas. Many brands offer tasty options. Always check the labels to be sure. All other ingredients are naturally gluten-free, so you can enjoy your burrito worry-free! This blog post covers every step for a tasty breakfast burrito. We started with the key ingredients and options for customization. Then, I shared clear steps for preparation and cooking. Next, we explored tips for cooking eggs, wrapping tortillas, and adding flavor. I also included variations, storage tips, and answers to common questions. Now, you can enjoy this fun meal any time. Try it out, make it your own, and impress your friends!

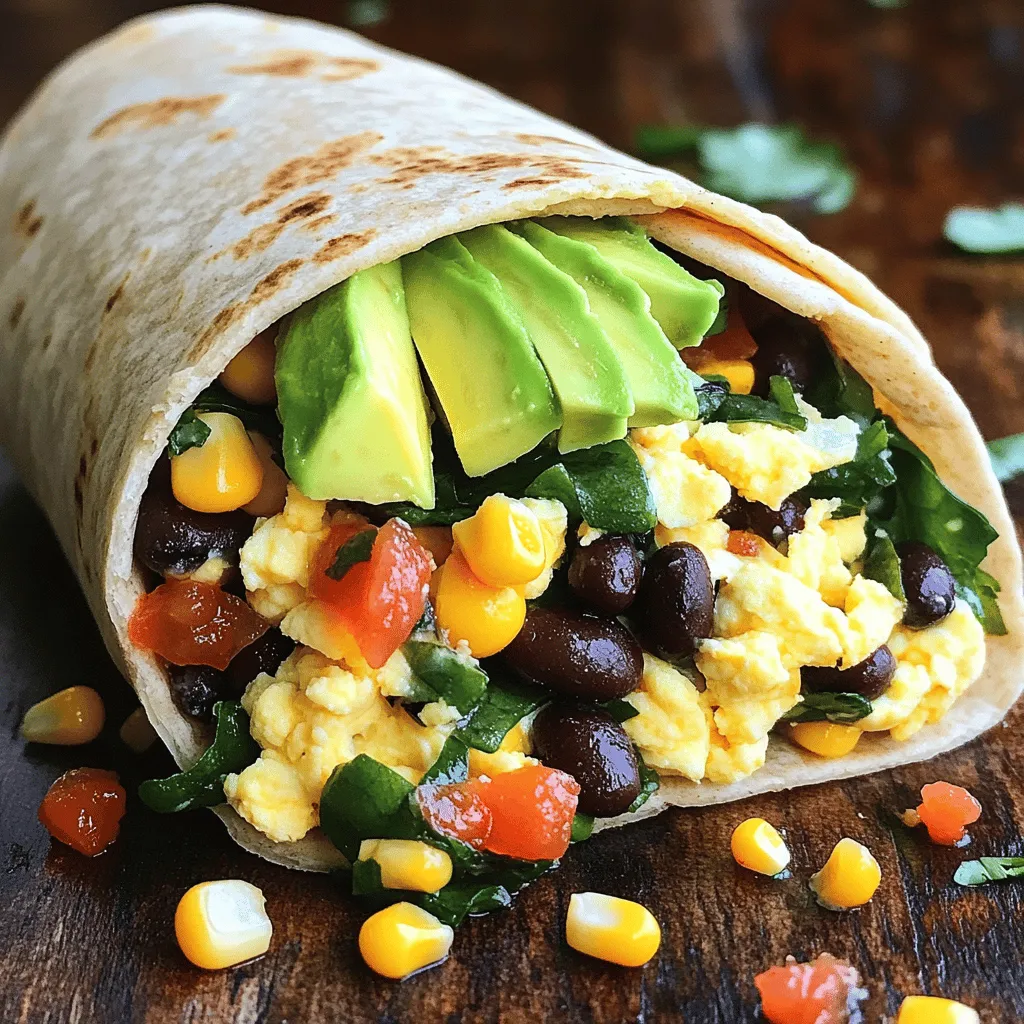
Veggie Packed Breakfast Burrito for a Nutritious Start

Start your day right with a Veggie Packed Breakfast Burrito! This tasty meal is full of fresh veggies, protein, and

To create these chocolate dipped frozen bananas, you will need a few simple items. Here is the list: - 4 ripe bananas - 1 cup dark chocolate chips - 1 tablespoon coconut oil - 1/4 cup crushed nuts (such as almonds or walnuts) - 1/4 cup shredded coconut (unsweetened) - Sea salt for garnish (optional) These ingredients come together to make a delicious and refreshing treat. Bananas are naturally sweet and healthy. Dark chocolate adds richness, while coconut oil helps the chocolate melt smoothly. You can choose your favorite nuts and coconut for added crunch and flavor. Sprinkle a little sea salt on top for a sweet-salty twist! This recipe is perfect for summer or any time you want a cool snack. Check out the Full Recipe for detailed instructions on how to make this delightful treat! Start by peeling the bananas. Slice them in half or into thick rounds. This makes them fun to eat. Next, insert a wooden skewer or toothpick into each piece. This step helps with dipping. Now, arrange your banana pieces on a baking sheet lined with parchment paper. Make sure they are not touching. Place the baking sheet in the freezer for about 1 to 2 hours. You want the bananas to be solid and ready for chocolate. In a microwave-safe bowl, combine 1 cup of dark chocolate chips and 1 tablespoon of coconut oil. This mix will make the chocolate smooth. Heat in the microwave in 30-second bursts. Stir after each round until the chocolate is fully melted. Once the bananas are frozen, take them out of the freezer. Dip each piece into the melted chocolate. Use a fork for an even coat. Quickly roll or sprinkle crushed nuts or shredded coconut on top. Do this before the chocolate hardens for the best results. After decorating, place the chocolate-dipped bananas back on the baking sheet. Return them to the freezer for about 30 minutes. This time allows the chocolate to set completely. After that, your chocolate-dipped bananas are ready to enjoy! For the full recipe, check out the earlier section. To get a smooth chocolate coating, proper melting is key. Start with good quality chocolate chips. Combine them with coconut oil in a bowl. Heat this mixture in short bursts. Use the microwave for 30 seconds at a time. Stir after each heating. This method helps prevent burning. The goal is to have a glossy, fluid chocolate. If it appears thick, it needs more time. For a fun presentation, arrange your chocolate-dipped bananas on a bright platter. Use colorful plates to make the treat stand out. You can also drizzle any leftover melted chocolate over the bananas. This adds style and a touch of extra flavor. You might also consider adding fresh fruit or mint leaves as a garnish. Want to kick up the flavor? Try adding spices or extracts to the melted chocolate. A hint of cinnamon can add warmth. A splash of vanilla gives a nice depth. These small changes can elevate your frozen bananas. Experimenting is part of the fun! {{image_2}} You can use different types of chocolate for your frozen bananas. Milk chocolate is sweet and creamy. It adds a fun flavor to the bananas. Dark chocolate has a rich taste. It is less sweet and gives a bold flavor. You can also try white chocolate. It is very sweet and pairs well with toppings. Each type of chocolate brings its own twist. Toppings can really enhance your chocolate-dipped bananas. You can use various nuts like pecans or hazelnuts. They add crunch and flavor. Sprinkles bring color and fun. You can also crush cookies to sprinkle on top. Dried fruit, like raisins or cranberries, adds a chewy texture. Mix and match toppings to find your favorite combo. Bananas are great, but other fruits work too! Strawberries are a popular choice. They are juicy and sweet. Pineapple chunks also dip well. They add a tropical twist. You can even try apples or pear slices. Each fruit brings its unique taste and texture. Get creative and see what you enjoy! For more details on making these delicious treats, check out the Full Recipe. To keep your chocolate-dipped bananas fresh, wrap each piece in plastic wrap or foil. Place them in a freezer-safe bag or container. This helps prevent freezer burn and keeps them tasty. Make sure to remove as much air as you can from the bag. Store them in the freezer for best results. Chocolate-dipped bananas can stay fresh for up to three months when stored properly. After that, they may lose flavor and texture. It's best to enjoy them within this time frame for the best taste. When you're ready to enjoy your frozen bananas, place them in the fridge for a few hours. This method keeps them from getting too soft. If you're in a rush, you can leave them out at room temperature for about 15-20 minutes. Avoid microwaving them, as it can make the chocolate melt and ruin the texture. Yes, you can use ripe frozen bananas. They add a nice creaminess. Just make sure they are fully thawed before dipping. This will help the chocolate stick better. To avoid cracking chocolate, temper it first. Slowly melt your chocolate chips with coconut oil. Stir often and cool it down slightly before dipping. This makes the chocolate shine and stay smooth. If you have extra melted chocolate, you can drizzle it on fruit, pancakes, or ice cream. You can also dip pretzels or graham crackers. It’s a fun way to use every bit of chocolate. Yes, you can prepare chocolate dipped frozen bananas ahead. Store them in an airtight container in the freezer. They stay fresh for up to two weeks. Just take them out when you need a sweet treat. Chocolate dipped frozen bananas can be a healthy snack. Bananas provide fiber and potassium. Dark chocolate adds antioxidants. Just watch the portion size to keep it balanced. You can enjoy this treat guilt-free! You can make simple and tasty chocolate-dipped bananas with just a few ingredients. I covered the steps, tips, and creative ideas to help you create this treat. Keep in mind the variations and storage tips for the best results. This fun recipe lets you enjoy a sweet snack that is also healthy. With these easy instructions, you'll impress friends and family. Enjoy your delicious, chocolate-coated bananas and have fun experimenting with flavors!

Chocolate Dipped Frozen Bananas Delightful Summer Treat

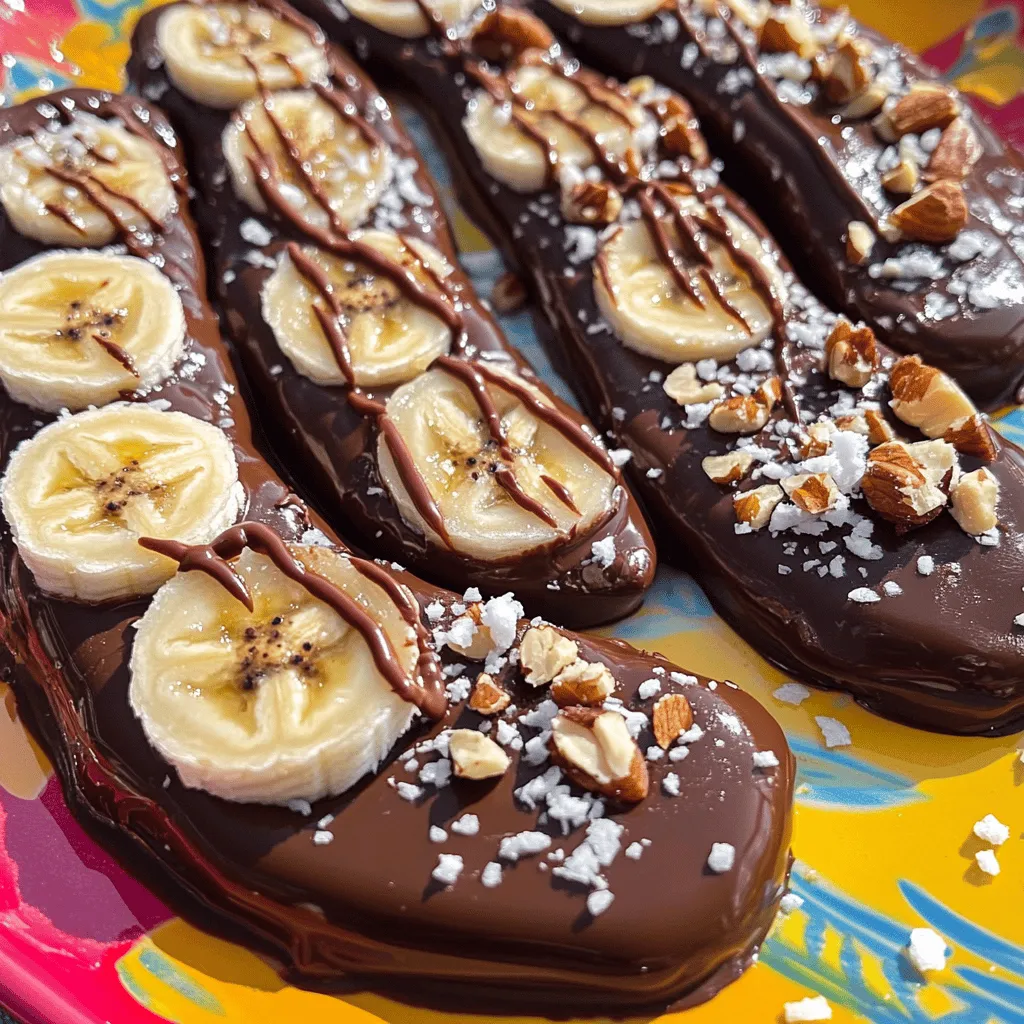
Looking for a fun and tasty summer treat? Chocolate-dipped frozen bananas are your answer! They are easy to make and

Sweet potato breakfast hash is a delightful mix of flavors. This dish is colorful and easy to make. It takes about 30 minutes from start to finish. You can serve it for breakfast or brunch. Here’s what you’ll need for this tasty meal. - 2 medium sweet potatoes, peeled and diced - 1 red bell pepper, diced - 1 small red onion, diced - 2 cloves garlic, minced - 1 teaspoon smoked paprika - ½ teaspoon cumin - Salt and pepper, to taste - 2 tablespoons olive oil - 4 large eggs - Fresh parsley, chopped (for garnish) These key ingredients bring out the best in this dish. Sweet potatoes give a natural sweetness. The bell pepper and onion add a nice crunch. Garlic and spices enhance the overall flavor. Beyond the key ingredients, you can play with seasonings. Here are some ideas: - Try adding chili powder for heat. - Use thyme or rosemary for herbal notes. - A splash of hot sauce can add a kick. These seasonings can elevate your hash and make it unique. Feel free to mix and match based on your taste. Cooking is fun when you explore new flavors! Start by peeling and dicing the sweet potatoes. Aim for bite-sized pieces. This helps them cook evenly. Next, chop the red bell pepper and the red onion. Mince the garlic cloves too. Having all your veggies ready makes cooking easy. Heat two tablespoons of olive oil in a large skillet over medium heat. Once hot, add the sweet potatoes. Cook them for about 10 to 12 minutes. Stir them often, so they don’t stick. You want them to soften and get a nice golden color. After that, toss in the diced red bell pepper and onion. Stir everything together. Cook for another 5 to 7 minutes until all the veggies are nice and tender. Now, add the minced garlic, smoked paprika, and cumin. Mix well. Season with salt and pepper to taste. Cook for 2 minutes until it smells amazing. Make four small wells in the sweet potato mix. Crack an egg into each well. Cover the skillet with a lid. Cook for about 5 to 7 minutes. This lets the eggs set just right. When the eggs are cooked to your liking, remove the skillet from heat. Sprinkle with fresh parsley for a pop of color. Serve your sweet potato breakfast hash right away! For the complete recipe, check out the Full Recipe section. To make the best sweet potato breakfast hash, start with fresh ingredients. Sweet potatoes should be firm and bright in color. Dice them evenly to ensure even cooking. Use a large skillet to give your hash enough space to brown well. Don’t rush the cooking process; let the sweet potatoes caramelize for deep flavor. Stir occasionally, but not too much. This will help create crispy edges. One common mistake is overcooking the sweet potatoes. They should be tender but not mushy. Another mistake is crowding the pan. If it’s too full, the hash will steam instead of brown. Also, don’t skip the spices. Smoked paprika and cumin add a warm depth. Lastly, avoid breaking the eggs too soon. Wait until the sweet potatoes are ready before adding them. Use a large skillet or a cast-iron pan for the best results. A sturdy spatula helps flip and mix the hash without damaging it. A good chef's knife is key for easy chopping. You might also want a lid for the skillet to cook the eggs. For the freshest taste, use a microplane for grating garlic. For the full recipe, check the Sweet Potato Breakfast Hash section. {{image_2}} To boost the taste of your sweet potato breakfast hash, consider some fun add-ins. You can mix in cooked bacon or sausage for a savory kick. For a spicy touch, add jalapeños or red pepper flakes. If you love cheese, sprinkle in some cheddar or feta. Fresh herbs like thyme or rosemary can also bring a new flavor layer. Each of these choices can make your dish unique. If you need to change the recipe for dietary reasons, it's easy to do. For a lower-carb option, swap sweet potatoes for cauliflower. If you need a gluten-free dish, ensure all your seasoning blends are gluten-free. You can also replace olive oil with avocado oil for a different fat. Each swap still gives you a tasty hash that fits your needs. To make this dish vegan, simply remove the eggs. You can replace them with tofu or chickpeas. Crumbled tofu can mimic eggs when cooked right. For a vegetarian version, keep the eggs but avoid meat add-ins. This way, you enjoy a delicious breakfast that fits your lifestyle. For the full recipe, check out the Sweet Potato Breakfast Hash! After you enjoy your sweet potato breakfast hash, store leftovers in an airtight container. Let it cool first. Keep it in the fridge for up to three days. Make sure to label the container with the date. This helps you know when to eat it. To reheat, use a skillet over medium heat. Add a splash of olive oil to keep it moist. Stir occasionally until heated through. You can also use the microwave. Place it in a microwave-safe bowl and cover it. Heat for 1-2 minutes, checking every 30 seconds. If you want to freeze your hash, store it in a freezer-safe container. It can last up to three months in the freezer. When ready to eat, thaw it in the fridge overnight. Reheat it in a skillet for the best taste. For a complete guide, check the Full Recipe. Sweet potatoes are very good for you. They are high in vitamins A and C. These vitamins help your skin and eyes. Sweet potatoes also have fiber, which keeps your tummy happy. Eating them may help with weight control. They can also help with blood sugar. This makes sweet potatoes a great choice for breakfast. Yes, you can make sweet potato breakfast hash ahead of time. Cook it fully and let it cool. Then, store it in the fridge. It will last for up to three days. When you’re ready to eat, just reheat it. You can heat it in a skillet or microwave. This saves time on busy mornings. You can serve many things with sweet potato breakfast hash. Try fresh fruit for a sweet taste. Toast or bagels can add crunch. A dollop of yogurt brings creaminess. If you want more protein, add bacon or sausage. You can also top it with avocado for extra flavor. Enjoy mixing and matching! We discussed how to create a delicious sweet potato breakfast hash. You learned about essential ingredients, their preparation, and cooking steps. I shared tips to make your dish perfect and common mistakes to avoid. You discovered tasty variations for different diets and how to store leftovers properly. Enjoy your cooking and impress others with your meals! Remember, food brings joy and good health.

Sweet Potato Breakfast Hash Tasty Morning Delight

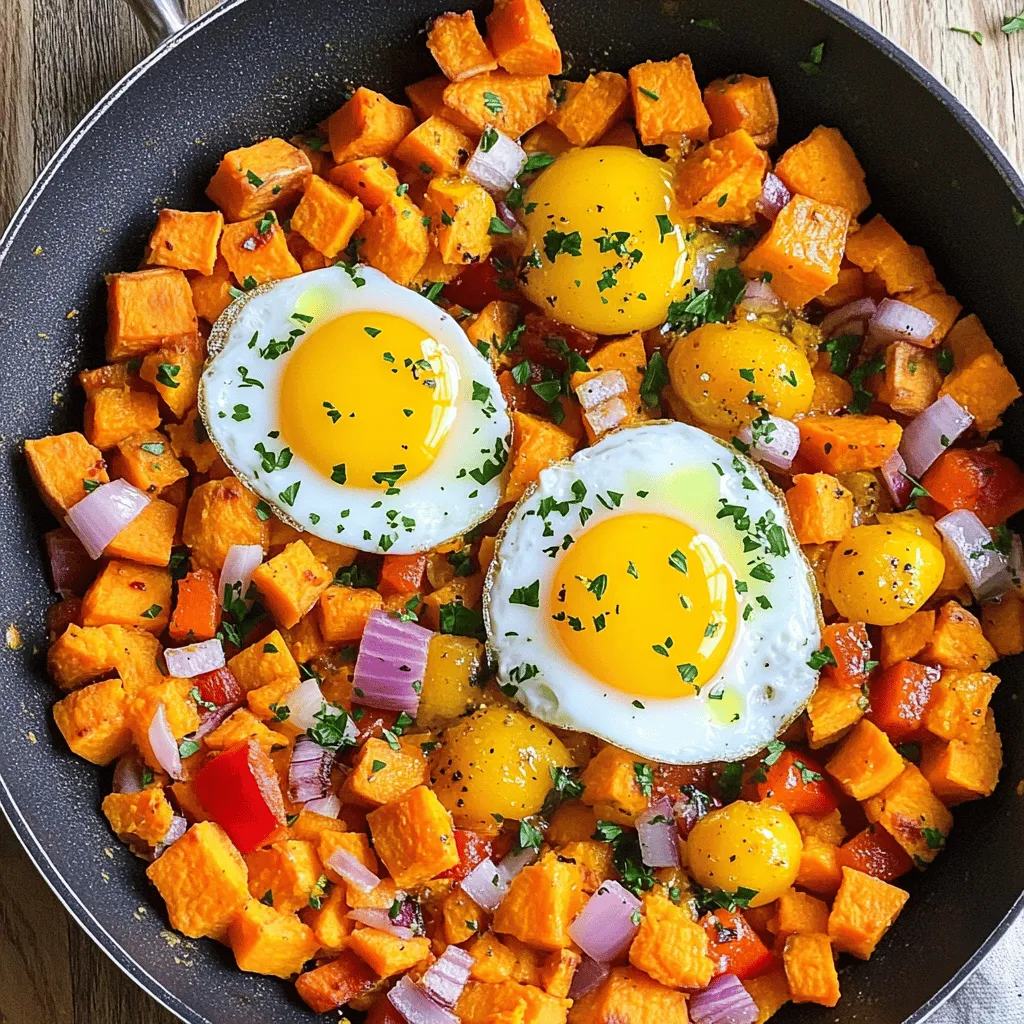
Looking for a tasty way to start your day? Try my Sweet Potato Breakfast Hash! This fun dish is packed

- 1 pound fresh asparagus, trimmed - 1 cup panko breadcrumbs - ½ cup grated Parmesan cheese - 2 large eggs - 2 tablespoons lemon zest - 1 tablespoon lemon juice - 1 teaspoon garlic powder - ½ teaspoon salt - ¼ teaspoon black pepper - Olive oil spray - Baking sheet - Parchment paper - Shallow bowls - Whisk - Prep Time: 10 minutes - Cook Time: 20 minutes - Servings: 4 servings When you gather your ingredients, make sure to choose fresh asparagus. It should look bright green and firm. The panko breadcrumbs give a nice crunch. Parmesan adds a rich flavor. The eggs help the coating stick well. For tools, a baking sheet is a must. Parchment paper saves you from scrubbing later. Shallow bowls help with easy dipping. A whisk makes mixing simple and fast. You can whip this dish up in just 10 minutes! After 20 minutes in the oven, you’ll have a tasty side for four people. This is a great way to enjoy veggies in a fun way. Check out the Full Recipe for more details on how to make this dish shine! - Set the oven to 425°F (220°C). - Line a baking sheet with parchment paper. - Whisk together eggs, lemon juice, salt, pepper, and garlic powder. - Mix panko breadcrumbs, grated Parmesan, and lemon zest in a bowl. - Dip each asparagus spear in the egg mixture. Let any excess drip off. - Roll the dipped asparagus in the panko mixture. Press gently to stick. - Place the coated asparagus on the baking sheet. Spray lightly with olive oil. - Bake for 15-20 minutes until crispy and golden brown. Enjoy this Crispy Lemon Parmesan Asparagus as a delightful side dish or snack. For the full recipe, check out the details above! To get the best crunch, use fresh panko breadcrumbs. They provide a light and airy texture. If you like a little heat, add a dash of cayenne pepper to the panko. This adds a nice kick to the dish. You can experiment with different cheeses. Asiago or Pecorino can enhance the taste. Fresh herbs like parsley or basil make a great garnish. They add color and freshness. You can also serve it with a tasty dip, like ranch or garlic sauce, to elevate the flavor. Crispy lemon parmesan asparagus pairs well with lemon wedges. They add brightness and zing. You can also serve it with a dipping sauce for extra fun. This dish shines alongside grilled meats or as a stand-alone appetizer. It works great for parties and family meals alike. For the full recipe, check the section above. {{image_2}} If you want a vegetarian version, swap out the Parmesan cheese for a plant-based cheese. Many brands offer great-tasting options. This change keeps the dish creamy and flavorful, making it perfect for all diets. I love using cashew-based cheese or nutritional yeast for a cheesy taste without dairy. They both melt well and add a nice flavor boost. You can cook Crispy Lemon Parmesan Asparagus in an air fryer for a quicker result. Preheat your air fryer to 400°F (200°C). Follow the coating steps from the oven method. Instead of baking, place the coated asparagus in the air fryer basket. Cook for about 10-12 minutes. Check halfway through and shake the basket for even cooking. You'll get crispy spears in no time! If you like some heat, add red pepper flakes or sriracha to the coating mixture. Mix in about a teaspoon of red pepper flakes with the panko and cheese. For sriracha, brush it on the asparagus before coating. This spicy twist gives the dish an exciting kick that I know you'll enjoy. Store leftovers in an airtight container in the fridge. This keeps them fresh for up to three days. Be sure to let the asparagus cool before sealing. The best way to reheat is in the oven. This keeps the asparagus crispy. Preheat the oven to 350°F (175°C). Place the asparagus on a baking sheet and heat for about 10 minutes. You can use a microwave, but this may soften the texture. You can freeze the asparagus before baking. Place each coated spear on a baking sheet and freeze for an hour. Once firm, transfer them to an airtight container or freezer bag. Use parchment paper to separate layers to avoid sticking. They can stay in the freezer for up to three months. When ready to bake, cook them directly from frozen, adding a few extra minutes to the baking time. Yes, but the texture may not be as crispy. Panko is preferred for crunch. Regular breadcrumbs can make the dish softer. For that perfect bite, stick with panko. Substitute panko with gluten-free breadcrumbs. Ensure all other ingredients are gluten-free. This way, you keep the same great taste. Just check labels to be safe. It pairs well with grilled chicken, fish, or as a side dish to any meal. You can also enjoy it on its own as a snack. The bright flavors shine alongside rich mains. Yes, you can coat the asparagus ahead of time and bake just before serving for freshness. This saves time when hosting. Just keep the coated asparagus in the fridge until you’re ready to cook. Look for a golden-brown coating and tender asparagus spears. The crunch is key! If the coating looks crispy and the asparagus feels soft, you’re ready to serve. This blog post showed how to make Crispy Lemon Parmesan Asparagus in a few simple steps. We covered the ingredients, cooking tools, prep time, and exact cooking instructions. You learned tips for extra crispiness and flavor, along with variations and storage advice. Enjoying this dish can elevate your meals. Try different cheeses or spices to make it your own. Now, you’re set to impress family and friends with this tasty recipe. Happy cooking!

Crispy Lemon Parmesan Asparagus Baked to Perfection

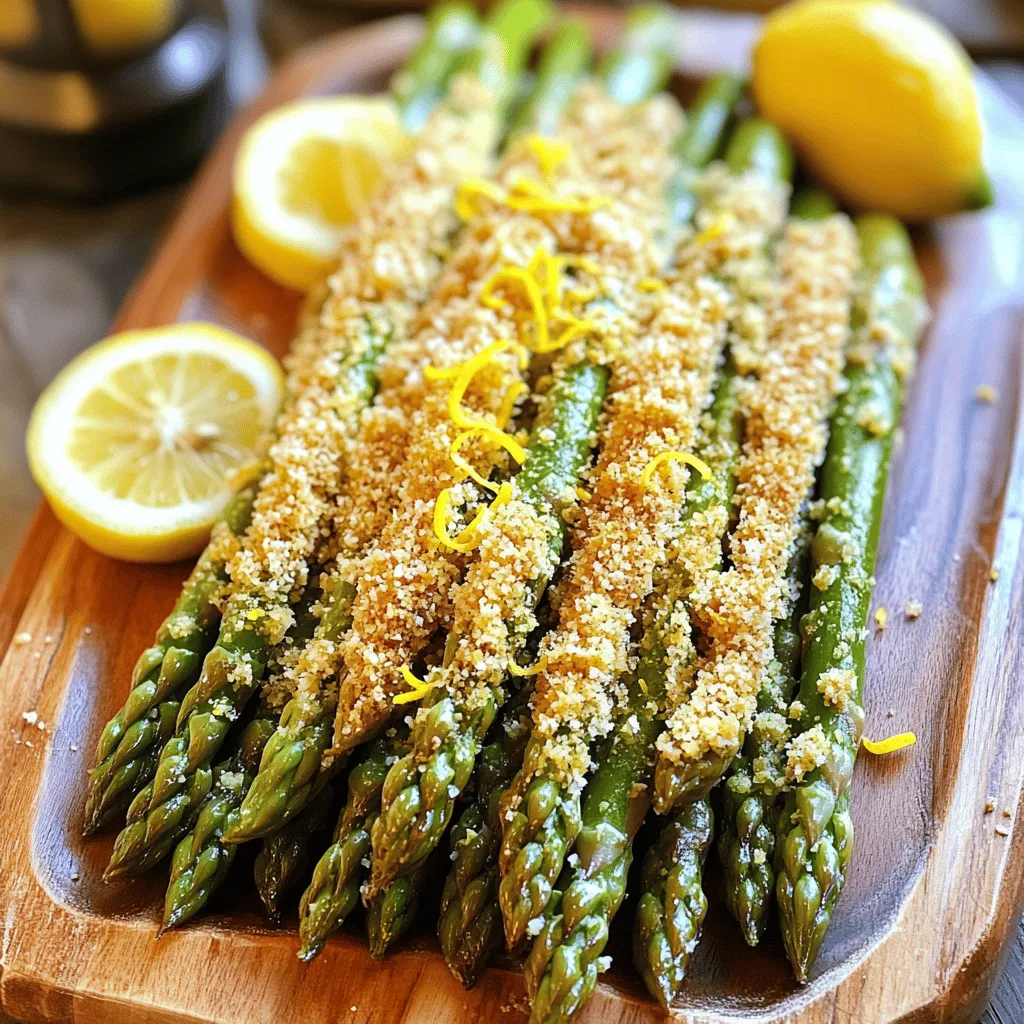
Want a quick, tasty side dish that steals the show? Crispy Lemon Parmesan Asparagus is your answer! This baked delight

- 1 can (15 oz) chickpeas, drained and rinsed - 2 tablespoons olive oil - 4 cloves garlic, minced Chickpeas are the star here. They add protein and fiber. They also have a nice texture. Olive oil helps the spices stick and adds great flavor. Garlic brings a fragrant punch to each bite. - 1 teaspoon dried oregano - 1 teaspoon dried thyme - 1 teaspoon paprika Oregano and thyme add a warm, earthy taste. Paprika gives a slight smokiness. These spices work together to create a savory blend that you will love. - Fresh parsley, chopped, for garnish - Salt and pepper to taste Fresh parsley adds color and a burst of freshness. A sprinkle of salt and pepper enhances all flavors. You can adjust these to fit your taste. You can find the full recipe at the end of this article. Enjoy making your Garlic Herb Roasted Chickpeas! First, rinse the chickpeas in cold water. Drain them well to remove any excess liquid. Then, lay the chickpeas on a clean kitchen towel or paper towels. Gently pat them dry. This step is key for getting them crispy. Next, preheat your oven to 400°F (200°C). This high heat helps the chickpeas roast nicely. Now, grab a large bowl. Combine the dried chickpeas with olive oil, minced garlic, oregano, thyme, paprika, salt, and pepper. Toss everything together until the chickpeas are coated evenly. This ensures every bite is packed with flavor. Line a baking sheet with parchment paper for easier cleanup. Spread the seasoned chickpeas in a single layer on the sheet. This helps them cook evenly. Roast them in the preheated oven for 25 to 30 minutes. Shake the pan halfway through cooking. This prevents burning and helps them get crispy. Keep an eye on them, as oven times can vary. When they are golden brown and crunchy, they’re ready to come out. Let them cool for a few minutes. They will get crisper as they cool. For a final touch, sprinkle freshly chopped parsley on top. Enjoy these as a tasty snack or sprinkle them on salads. For the complete recipe, check the Full Recipe. To get your chickpeas nice and crunchy, start by drying them well. After rinsing, spread them on a clean kitchen towel. Use another towel to pat them dry. This step helps remove extra moisture. The drier they are, the crunchier they will be. Next, set your oven to 400°F (200°C). This high temperature helps the chickpeas roast quickly and evenly. Make sure to spread them out in a single layer on the baking sheet. This allows hot air to circulate around each chickpea, enhancing crispiness. To boost the flavor, think about adding more spices. You can try cumin for a warm taste or chili powder for heat. Each spice brings a new twist to the dish. Experiment to find your favorite mix! Fresh herbs can also make a big difference. They often taste better than dried herbs. If you have fresh oregano or thyme, use them! Just chop them finely and add them to your chickpeas. You will taste the difference. Garlic Herb Roasted Chickpeas make a great snack on their own. But they pair nicely with dips too. Try serving them with hummus or tzatziki for a tasty treat. You can also use them as a crunchy topping. Sprinkle them on salads to add texture. They work well in soups too. The chickpeas add a satisfying crunch to warm dishes. Enjoy your flavorful bite! {{image_2}} You can change the flavor of your chickpeas in fun ways. For a spicy kick, add cayenne or chili powder. Just a little will make your snack fiery and exciting. You can also try sweet variations. A sprinkle of cinnamon or a drizzle of maple syrup can turn these chickpeas into a sweet treat. Both options give you a tasty twist. Garlic Herb Roasted Chickpeas fit many diets. They are naturally vegan and gluten-free. This makes them a great snack for everyone. If you are vegan, you can enjoy these without any worries. They provide protein and fiber, making them a healthy choice. If you want to try something new, use an air fryer. The air fryer cooks the chickpeas quickly and makes them very crispy. Just set it to 400°F (200°C) and cook for about 15-20 minutes. Shake the basket halfway for even cooking. Another method is using the stovetop. Heat a pan over medium heat and add the seasoned chickpeas. Stir them often until they are crispy, about 10-15 minutes. This method is quick and gives you a crunchy bite. For the full recipe, check out the details above. After roasting your chickpeas, let them cool for at least 10 minutes. This step helps them become extra crunchy. Place them on a wire rack if you have one. If not, a plate works too. Make sure they cool completely before storing. Use an airtight container for storage. Glass jars or plastic containers both work well. Choose a size that fits the amount you have. You can keep Garlic Herb Roasted Chickpeas at room temperature for up to three days. Make sure to store them in a cool, dry place. Avoid direct sunlight, as it can make them go stale. If you want to keep them longer, store in the refrigerator. They can last up to a week this way. Just remember that refrigeration may make them less crunchy. To bring back the crunch, reheat in the oven. Preheat it to 350°F (175°C). Spread the chickpeas on a baking sheet and heat for about 5-7 minutes. This method helps keep them crispy. You can also use an air fryer if you have one. Set it to 350°F (175°C) and heat for 3-5 minutes. This method works great for quick snacks! For more details, check out the Full Recipe. Yes, you can use dried chickpeas. First, soak them in water overnight. This helps them soften. After soaking, drain the chickpeas and cook them. Boil them for about 1 to 1.5 hours until they are tender. Once cooked, follow the Full Recipe to make Garlic Herb Roasted Chickpeas. To make chickpeas less chewy, dry them well before roasting. Use a clean towel to pat them dry. Make sure your oven is hot enough. Roast them until they are golden brown. This could take about 25 to 30 minutes. Check them halfway through. They should be crispy and not chewy. Garlic Herb Roasted Chickpeas are great as a snack. You can enjoy them alone or with dips. Try hummus or yogurt-based dips. They also work well on salads and soups. Add them on top for extra crunch and flavor. Garlic Herb Roasted Chickpeas are easy and tasty. You learned about the key ingredients, step-by-step instructions, and useful tips. We explored flavor variations and ways to store leftovers. Remember, you can tweak spices to fit your taste. Whether you use the oven or an air fryer, crispy chickpeas make great snacks or side dishes. Keep experimenting, and enjoy every bite. Easy recipes like this help you eat well without stressing.

Garlic Herb Roasted Chickpeas Crunchy and Flavorful Bite

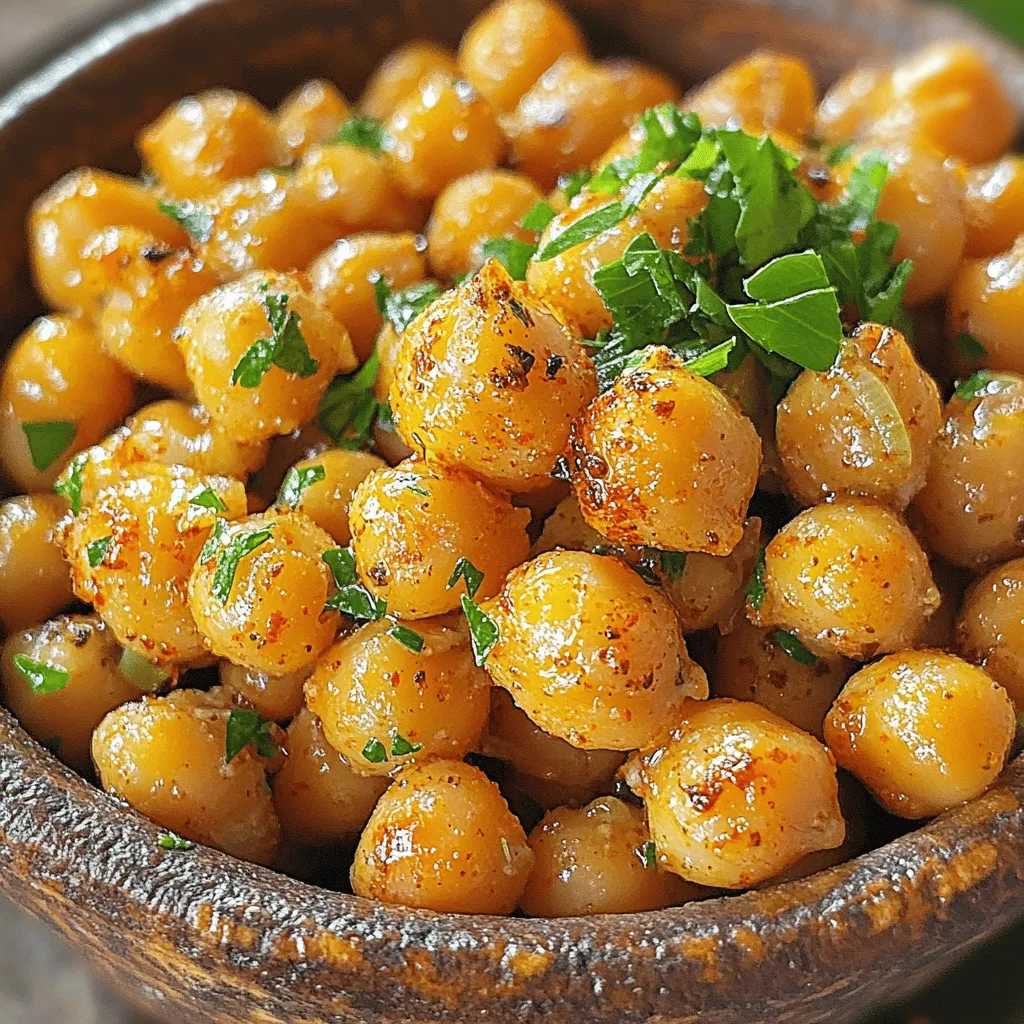
Looking for a tasty snack that’s both crunchy and flavorful? You’re in the right place! Garlic Herb Roasted Chickpeas are

To make this tasty Strawberry Coconut Chia Jam, you need just a few simple ingredients: - 2 cups fresh strawberries, hulled and halved - 1/4 cup coconut sugar (or regular sugar) - 1/4 cup unsweetened shredded coconut - 2 tablespoons chia seeds - 1 tablespoon lemon juice - Pinch of salt These ingredients blend together to create a sweet and fruity jam. The strawberries give a bright taste, while the coconut adds a nice texture. You can easily switch up some ingredients. If you don’t have coconut sugar, regular sugar works great. For the coconut, you could use coconut flakes for added crunch. You can also swap strawberries with other berries like raspberries or blueberries. This change gives the jam a new flavor. This jam is not just tasty; it's good for you too! Chia seeds pack a punch of fiber and omega-3 fatty acids. Strawberries add vitamins and antioxidants. Using coconut sugar instead of white sugar lowers the glycemic index, making it a better choice. Enjoying this jam can be a sweet treat without the guilt! Start by hulling and halving 2 cups of fresh strawberries. This step is key. Removing the green tops helps make the jam smooth. Place the strawberries in a medium saucepan. Add 1/4 cup of coconut sugar to the pan. This sugar adds sweetness and enhances the fruit's flavor. Cook the mixture over medium heat for about 5 to 7 minutes. Stir it occasionally. You want the strawberries to break down and release their juices. When they soften and become syrupy, you know you’re on the right track. After the strawberries are soft, use a fork or potato masher. Mash the fruit to your liking. Some like it smooth, while others prefer it chunky. Once you reach your desired consistency, add 1/4 cup of unsweetened shredded coconut and 2 tablespoons of chia seeds. The coconut gives a nice texture. The chia seeds help the jam set. Also, add 1 tablespoon of lemon juice and a pinch of salt. The lemon juice brightens the flavor, while salt balances the sweetness. Now, reduce the heat to low and let the mixture simmer for another 5 minutes. This allows the chia seeds to absorb the liquid and thicken the jam. Remove the saucepan from heat and let it cool for a few minutes. This cooling step helps the flavors meld together. Once it’s cooled, transfer the jam to a clean jar or airtight container. Allow it to cool completely at room temperature. For the best texture, refrigerate the jam for at least 1 hour before using. The chilling gives it that perfect spreadable texture. Now, you have a delicious Strawberry Coconut Chia Jam ready to enjoy! For more details, check the Full Recipe. To get the best texture for your jam, focus on the strawberries. When cooking them, stir gently to avoid burning. Use a fork or masher to break them down. If you want a smooth jam, mash thoroughly. For a chunkier feel, leave some pieces intact. The chia seeds will help thicken the jam as they absorb moisture. Let the jam sit for at least an hour in the fridge to reach its final thickness. You can boost the flavor with a few simple tricks. Adding lemon juice gives a bright taste. A pinch of salt balances the sweetness from the strawberries and sugar. If you want a tropical flair, add extra shredded coconut. You could also mix in a few drops of vanilla extract for a warm flavor. Experiment with spices like cinnamon or nutmeg for a cozy touch. Taste as you go and adjust until it’s just right. Enjoy your Strawberry Coconut Chia Jam in many ways. Spread it on warm toast or fresh bread for breakfast. It pairs well with pancakes or waffles too. Use it as a topping for yogurt or oatmeal. You can also swirl it into smoothies for a fruity treat. For a fun snack, serve it with cheese and crackers. The jam looks lovely in a glass jar, topped with whole strawberries and coconut. This adds a nice touch to your table. {{image_2}} You can mix in other fruits with strawberries. Try adding blueberries or raspberries for a berry blend. Peaches or mangoes give a tropical twist. Chop the fruit into small pieces before cooking. This helps them break down well. Each fruit adds its unique flavor, making your jam special. If you want to change the sweetener, use honey or maple syrup. These natural sweeteners work well and taste great. You can also use agave syrup for a vegan option. Adjust the amount based on how sweet you like it. Just remember that each sweetener has a different taste. Add extra flavors to make your jam pop! A splash of vanilla extract can enhance the taste. For a spicy kick, try a pinch of cinnamon or ginger. You can also add a few drops of almond extract. These flavors will give your jam a unique twist. Feel free to experiment and find your favorite mix! For the full recipe, check out the detailed instructions above. After making your jam, let it cool. Once it's cool, transfer it to a clean jar. Use an airtight container for the best results. Store it in the fridge. This keeps it fresh and tasty. Your Strawberry Coconut Chia Jam will last about one week in the fridge. Use it within this time for the best flavor. If you see any mold or changes, throw it away. Always check before you spread it on your toast! You can freeze your jam if you want to keep it longer. Pour the jam into freezer-safe containers. Leave some space at the top for expansion. It can last up to six months in the freezer. When you're ready to use it, thaw it in the fridge overnight. Enjoy your jam anytime! For the full recipe, check the section above. Yes, you can. But chia seeds help thicken the jam. If you skip them, the jam may be runny. You could try using ground flaxseeds instead. They work similarly as a thickener. Just remember, it may change the flavor a bit. You can change the sweetness easily. Add more coconut sugar if you want it sweeter. Start with a tablespoon at a time. If you prefer less sweetness, cut back on the sugar. You can also use honey or maple syrup for a different taste. Chia seeds offer many benefits. They are high in fiber, which helps digestion. They also provide healthy omega-3 fatty acids. These seeds can help you feel full longer. Plus, they absorb liquid and create a nice texture in the jam. You’ve learned all about making Strawberry Coconut Chia Jam. We covered essential ingredients, step-by-step instructions, and variations for great flavor. Nutritional highlights show this jam is not just tasty but healthy too. Remember to store it right for the best taste and freshness. Feel free to try new fruits or sweeteners to make it your own. This jam is fun to make and share! Enjoy your tasty creation!

Strawberry Coconut Chia Jam Tasty and Simple Recipe

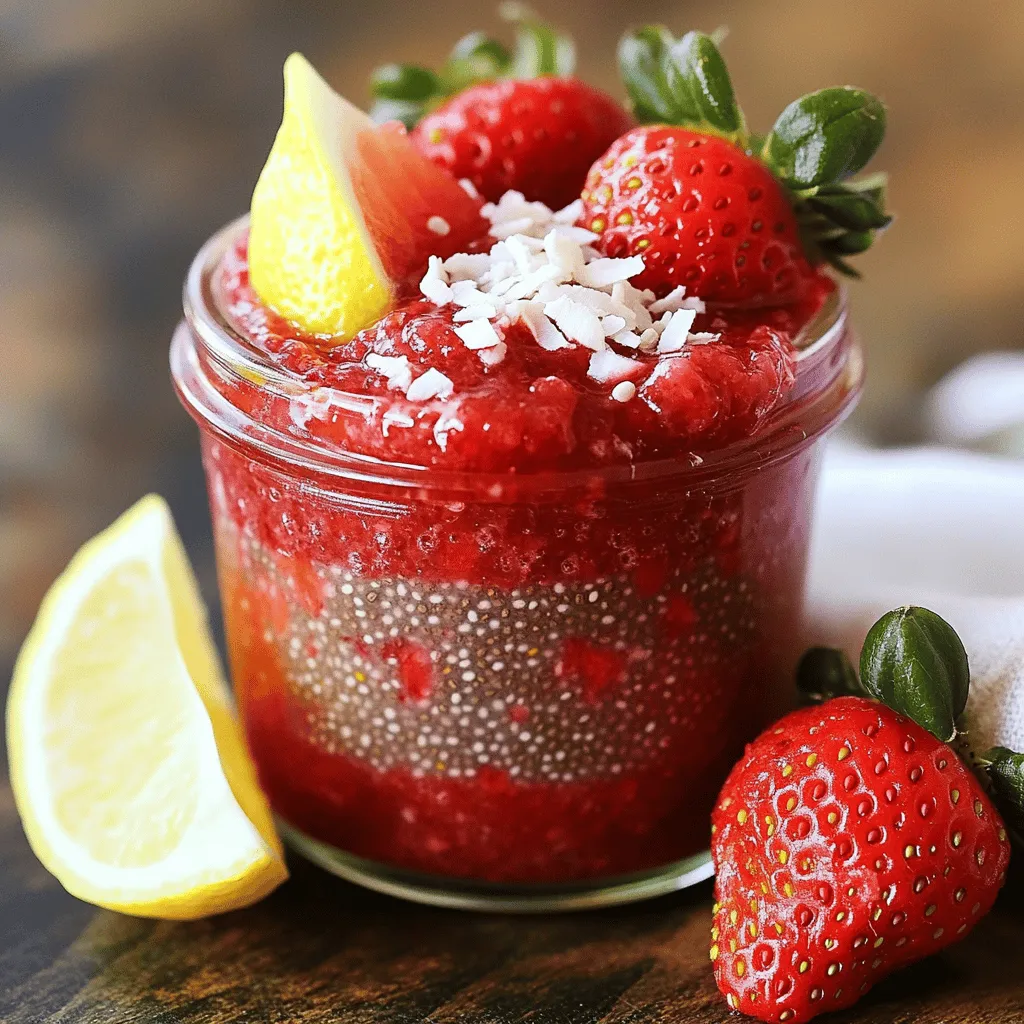
Ready to elevate your breakfast game? This Strawberry Coconut Chia Jam recipe is both tasty and super simple. With just

To make Peanut Butter Energy Balls, you need: - 1 cup natural peanut butter (smooth or crunchy) - 1/2 cup honey or maple syrup - 1 cup rolled oats - 1/2 cup ground flaxseed - 1/2 cup mini chocolate chips (or dark chocolate chips) - 1/4 cup unsweetened shredded coconut - 1 teaspoon vanilla extract - A pinch of sea salt Using high-quality ingredients makes these energy balls taste amazing. I prefer natural peanut butter without added sugar or oils. Honey or maple syrup should be pure, not mixed with other sweeteners. Rolled oats need to be whole and not instant for the best texture. Ground flaxseed should be fresh to give you maximum nutrition and flavor. When it comes to chocolate chips, choose dark chocolate for a richer taste. Always check for unsweetened coconut to keep the sweetness in check. If you have allergies or dietary needs, you can swap ingredients easily. For nut allergies, try sunflower seed butter or soy nut butter instead of peanut butter. Use agave syrup or brown rice syrup as a sweetener if you're vegan. You can replace ground flaxseed with chia seeds for a similar texture and health benefits. If you want a nut-free option, skip the chocolate chips or use carob chips. These swaps keep the energy balls delicious while meeting your needs. For the full recipe, check out the detailed instructions above. Start by gathering all your ingredients. You need natural peanut butter, honey, rolled oats, ground flaxseed, mini chocolate chips, shredded coconut, vanilla extract, and sea salt. This makes your prep easy. It takes about 15 minutes to mix everything. You can chill the mixture while you clean up. In a large bowl, combine the peanut butter and honey. Stir until you see a smooth mix. Next, add the vanilla and a pinch of sea salt. This makes the flavor pop! Now, slowly mix in the rolled oats and flaxseed. Keep stirring until it is fully combined. Finally, fold in the mini chocolate chips and shredded coconut. Make sure everything is evenly mixed. After mixing, place the bowl in the fridge for about 30 minutes. This helps the mixture firm up. When it’s ready, take small portions and roll them into balls. Aim for about 1 inch in size. Place the balls on a baking sheet lined with parchment paper. If you want, roll some in extra shredded coconut or crushed nuts for a fun twist. Return the balls to the fridge for another 15 to 20 minutes to set. Enjoy your tasty snack! For the full recipe, check out Nutty Delight Peanut Butter Energy Balls. Peanut Butter Energy Balls are packed with nutrition. Each ball offers protein, healthy fats, and fiber. The main ingredients provide essential nutrients. For example, peanut butter adds protein and healthy fats. Rolled oats give you fiber and energy. Ground flaxseed adds omega-3 fatty acids. Chocolate chips add a touch of sweetness. Peanut butter is a great source of protein. It helps you feel full longer. Honey or maple syrup adds natural sweetness and quick energy. Oats support heart health and digestion. Flaxseed is good for your heart and skin. Chocolate chips provide antioxidants. Coconut adds fiber and healthy fats, too. These energy balls are great anytime. They work well as a snack between meals. Enjoy them before or after a workout. They give you a quick energy boost. You can also eat them as a dessert. Keep them in your bag for a quick treat. Peanut Butter Energy Balls are simple, tasty, and good for you. Check out the Full Recipe for more details on making them! {{image_2}} To make sure your peanut butter energy balls have the right texture, use room-temperature peanut butter. This keeps it smooth and easy to mix. If you want them firmer, add a bit more ground flaxseed or oats. You can also try chilling the mixture longer for a better consistency. Keep your energy balls in an airtight container. This helps them last longer. Store them in the fridge for up to one week. You can also freeze them for up to three months. Just separate layers with parchment paper. This way, they won’t stick together. These energy balls are great for many occasions. You can pack them for a snack on the go. Serve them at parties or share with friends. They are tasty and fun to eat. For a special touch, drizzle some melted chocolate on top or sprinkle cocoa powder. You can find the full recipe for Nutty Delight Peanut Butter Energy Balls to try out these tips! You can change the flavor of your energy balls easily. Try adding different nut butters. Almond butter or cashew butter works well. You can also use flavored syrups instead of honey or maple syrup. Vanilla or almond extract adds a nice touch. For a fruity twist, mix in some dried fruits like raisins or apricots. Each choice gives a new taste. If you follow a special diet, you can adapt this recipe. For a vegan option, use maple syrup instead of honey. To make it gluten-free, use gluten-free oats. You can also swap out the chocolate chips for carob chips if you prefer. Just check labels to ensure all ingredients fit your diet. Get creative with the add-ins! You can toss in seeds like chia or sunflower seeds. These add crunch and extra nutrients. For a bit of spice, try adding cinnamon or nutmeg. You can even mix in protein powder for an extra boost. Experiment and find what you love! For the complete recipe, check out the Full Recipe. Peanut Butter Energy Balls stay fresh for up to one week in the fridge. Store them in an airtight container. If you keep them in a cool, dry place, they can last longer. I recommend checking for any signs of spoilage before eating them after several days. Yes, you can freeze Peanut Butter Energy Balls! They freeze well for up to three months. Just place them in a freezer-safe bag or container. When you want to enjoy them, take them out and let them thaw in the fridge. This makes for a quick snack anytime. Absolutely! Peanut Butter Energy Balls are a great snack for kids. They offer protein from peanut butter and fiber from oats and flaxseed. Plus, they contain healthy fats, making them a nutritious choice. Kids love the sweet taste, especially with the chocolate chips. You can easily customize Peanut Butter Energy Balls! Try adding dried fruits like raisins or cranberries for extra flavor. You can also swap the chocolate chips for nuts or seeds. Want a bit of spice? Add a dash of cinnamon or a splash of maple syrup. The options are endless! For the full recipe, check out the detailed instructions above. Peanut butter energy balls are easy to make and great for snacking. We covered the best ingredients, steps, and tips for success. You can adapt the recipe to fit your taste or diet. Enjoy these energy balls anytime for a quick boost. They’re tasty, healthy, and perfect for kids too. Try making them your own with fun variations. I hope you feel inspired to whip some up!

Peanut Butter Energy Balls Simple and Tasty Snack

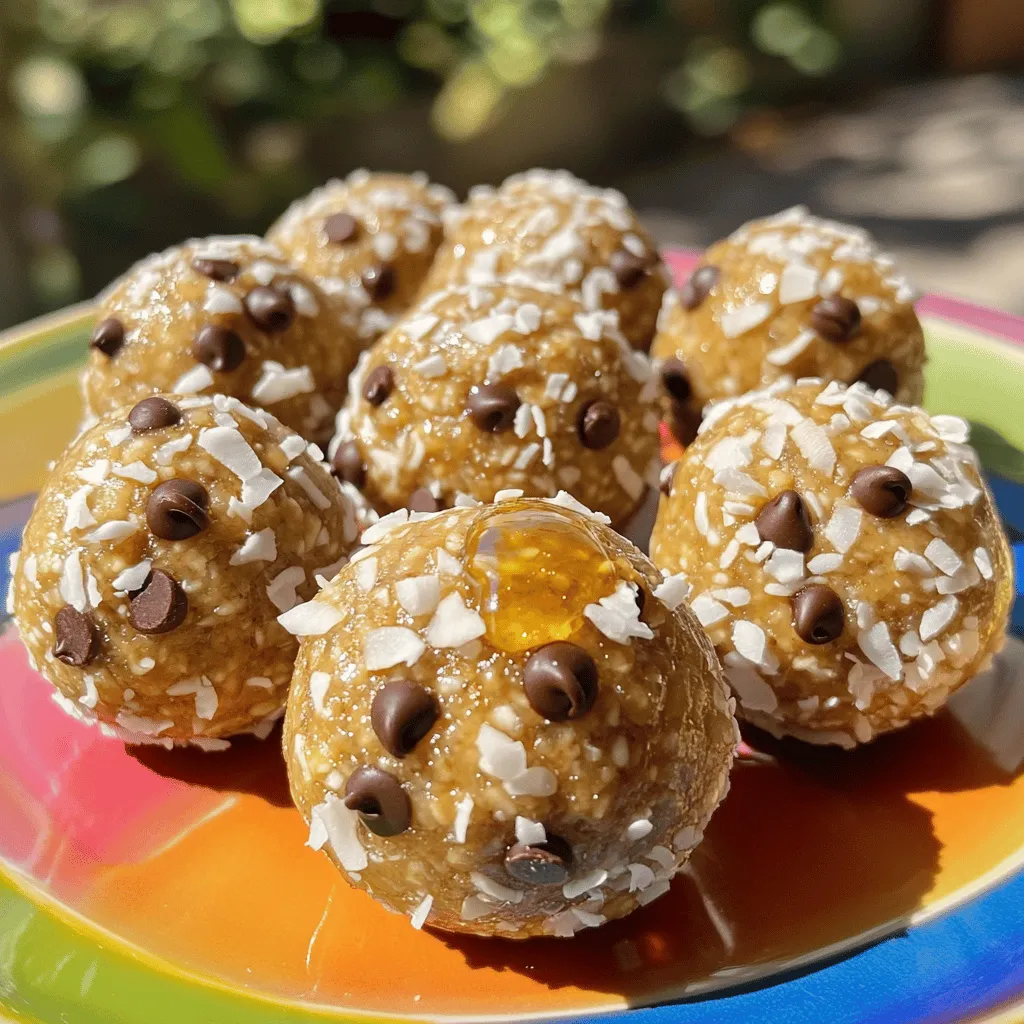
Looking for a quick and tasty snack that packs a nutritious punch? Peanut butter energy balls are your answer! These

- 1 large grapefruit, juiced - 2 sprigs of fresh rosemary - 2 tablespoons honey (or agave syrup for vegan option) - 1 cup sparkling water (chilled) - Ice cubes The key to a great Rosemary Grapefruit Spritzer is fresh, simple ingredients. The grapefruit gives a bright and tangy flavor. Fresh rosemary adds a lovely herbal note that makes the drink unique. Honey or agave syrup helps balance the tartness. Chilled sparkling water brings a refreshing fizz, making it perfect for hot days. Ice cubes keep your drink cool and enjoyable. - Grapefruit slices - Additional rosemary sprigs Garnishes play a big role in presentation. Slices of grapefruit add a pop of color. They also give a hint of what’s inside the drink. A sprig of rosemary on top not only looks nice but also adds aroma. The visual appeal makes your spritzer feel special. For the full recipe, you can explore the step-by-step instructions to create this delightful drink. To start, grab a small saucepan. Combine 1 cup of water, 2 tablespoons of honey, and 1 sprig of rosemary. Bring this mix to a gentle simmer over medium heat. Stir until the honey dissolves completely. This step brings out the rosemary's flavor. After simmering, remove the pan from heat. Let the rosemary steep for about 10 minutes. Strain the mixture to remove the leaves. Set the syrup aside to cool. Now it’s time to put it all together! In a large glass, combine the freshly squeezed juice from 1 large grapefruit and the cooled rosemary syrup. Stir well to mix the flavors. Next, add ice cubes halfway in the glass. Pour in 1 cup of chilled sparkling water. Gently stir again to combine everything. Once mixed, taste your spritzer. If you want it sweeter, add more honey or syrup to your liking. Finally, garnish your drink with grapefruit slices and a sprig of fresh rosemary. This adds a nice touch and makes it look beautiful. Enjoy your refreshing drink! Using fresh ingredients makes your rosemary grapefruit spritzer taste bright and lively. Fresh grapefruit juice gives a zesty kick. Fresh rosemary adds a fragrant touch. Avoid bottled juices; they lack the same flavor. Sweetness can vary based on taste. Start with two tablespoons of honey or agave syrup. After mixing, taste your spritzer. If it needs more sweetness, add a bit more honey. Adjust to find your perfect balance. Serve this drink right away for the best taste. If you chill your spritzer, it stays refreshing. Use clear glasses to show off the vibrant colors. A tall glass works well, but any glass you like will do. To make it fancy, garnish with grapefruit slices and rosemary sprigs. This not only looks great but also adds extra aroma. Enjoying this drink on a hot day makes it even better! For the full recipe, check out the details above. {{image_2}} You can make your Rosemary Grapefruit Spritzer even more exciting. Try adding other citrus juices. Orange or lemon juice can add a nice twist. Just use about a quarter cup of juice for balance. You can also use different herbs like mint or basil. Mint gives a fresh taste, while basil adds a warm flavor. Just muddle a few leaves in your glass before adding the other ingredients. If you want an adult beverage, consider adding gin or vodka. Both spirits mix well with grapefruit and rosemary. Start with one ounce of gin or vodka for each glass. This amount keeps the flavors bright and refreshing. Always taste your spritzer after mixing. You can adjust the spirit to suit your taste. Enjoy experimenting with these variations to find your favorite blend! If you have extra rosemary syrup, store it in the fridge. Use a clean glass jar. This keeps it fresh for your next drink. Homemade syrup stays good for about one week. After that, check for changes in smell or color. If it looks or smells off, throw it away. Want to impress guests? You can mix the grapefruit juice and syrup ahead of time. This way, you save time when friends arrive. Pour the mix into a clean pitcher. Seal it with a lid and place it in the fridge. It stays fresh for up to three days. When serving, add ice and sparkling water just before drinking. This keeps the fizz alive. For storage, a glass pitcher or jar works best. It helps maintain flavor and looks nice on the table. For the full recipe, check the main section. If you want a vegan option, use agave syrup. Maple syrup also works well. Both give a nice sweetness without losing flavor. You can also try stevia or coconut sugar for a different twist. Each sweetener has its own taste, so pick what you love! Yes, you can easily scale this recipe for parties. Just double or triple the amounts for the syrup and juice. Make sure to adjust the sparkling water too. Keep everything chilled and mix just before serving. This way, your spritzer stays bubbly and fresh. Absolutely! Just skip any alcohol and focus on the flavors in the drink. The rosemary and grapefruit shine through. You can add a splash of orange juice for extra sweetness. This makes a great family-friendly option everyone can enjoy. To chill sparkling water fast, use ice and water in a bowl. This method cools the bottles quickly. You can also place them in the freezer for about 15 minutes. Just be careful not to forget them, or they might freeze! This article covered how to make a delicious grapefruit spritzer with rosemary syrup. You learned about the key ingredients and easy steps to mix your drink. I shared tips for making it taste great and ideas for variations. Remember to use fresh ingredients for the best flavor. You can enjoy this spritzer at parties or as a refreshing drink at home. Making this recipe can be fun and simple, and you can impress your friends with your new skills. Enjoy your spritzer!

Rosemary Grapefruit Spritzer Refreshing Summer Drink

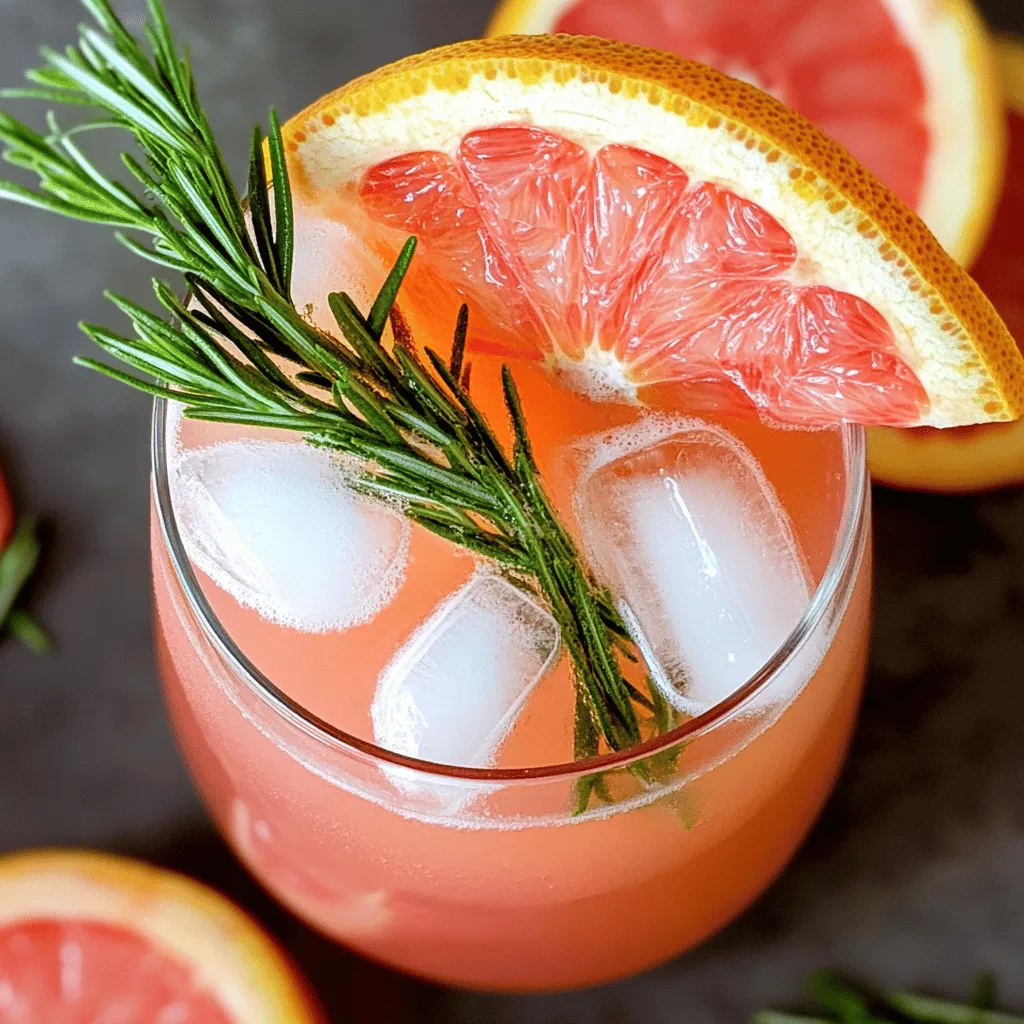
Looking for a refreshing drink to beat the summer heat? Look no further! The Rosemary Grapefruit Spritzer combines zesty grapefruit

- 1 cup unsweetened almond milk (or milk of choice) - 1 ripe banana - 1 scoop vanilla protein powder - 1 tablespoon chia seeds - 1 teaspoon ground cinnamon - 1 teaspoon ground ginger - 1/2 teaspoon ground cardamom - 1/4 teaspoon black pepper - 1 tablespoon maple syrup or honey (optional) - Ice cubes (as needed for desired thickness) Gather these ingredients before you start. The almond milk gives a creamy base. The banana adds natural sweetness and creaminess. Vanilla protein powder boosts nutrition. Chia seeds add fiber and omega-3s. The spices create that warm chai flavor. Maple syrup or honey can add more sweetness if you like. Ice cubes help make the smoothie thick and cold. - Calories per serving: Approximately 300 calories - Protein, fat, and carbohydrate breakdown: - Protein: 20g - Fat: 8g - Carbohydrates: 45g - Fiber content and health benefits: - Each serving has about 8g of fiber. - Fiber helps with digestion and keeps you full longer. This smoothie is a great choice for a quick breakfast or snack. It packs good nutrition and tastes amazing. Enjoy this treat while knowing it's good for your body! For the full recipe, check out the details above. - Step 1: Prepare the ingredients Start by gathering all your ingredients. You will need: - 1 cup unsweetened almond milk - 1 ripe banana - 1 scoop vanilla protein powder - 1 tablespoon chia seeds - 1 teaspoon ground cinnamon - 1 teaspoon ground ginger - 1/2 teaspoon ground cardamom - 1/4 teaspoon black pepper - 1 tablespoon maple syrup or honey (optional) - Ice cubes (as needed) - Step 2: Combine wet and dry ingredients in the blender In your blender, add the almond milk, banana, protein powder, and chia seeds. Next, sprinkle in the spices: cinnamon, ginger, cardamom, and black pepper. If you want a sweeter flavor, add maple syrup or honey. - Step 3: Blend until smooth and adjust consistency Blend all the ingredients on high speed until smooth. If the smoothie feels too thick, simply add more almond milk or ice cubes to reach your desired thickness. Taste it! If you want more sweetness or spice, adjust and blend again. Serve your smoothie in a tall glass for an eye-catching look. You can add a cinnamon stick for a warm touch. A slice of banana on the rim also makes it look nice. Enjoy your delicious Vanilla Chai Protein Smoothie! To get the right thickness for your smoothie, use ice cubes. Start with a few and add more if needed. If it’s too thick, pour in more almond milk. Blend on high speed for a creamy texture. Stop and scrape down the sides of the blender if needed. This helps mix everything well. You can adjust sweetness and spice to fit your taste. If you like it sweeter, add more maple syrup or honey. For spice, try more cinnamon or ginger, but start small. If you have allergies, replace the almond milk with oat or coconut milk. You can also swap the protein powder for a plant-based option if needed. Enjoy making this smoothie your own! {{image_2}} You can change the taste of your Vanilla Chai Protein Smoothie easily. Adding different fruits gives a new twist. Try mixing in berries or mango for a fruity flair. These fruits add sweetness and nutrition. They also blend well with the chai spices. You can also add more spices for depth. Nutmeg adds warmth, while vanilla extract boosts sweetness. Experimenting with spices can take your drink to the next level. Don’t be afraid to play around! Boosting nutrition is simple with this smoothie. Adding superfoods like spinach can enhance its health benefits. Spinach blends well and keeps the color nice and bright. It gives you vitamins and minerals without changing the taste. If you want more protein, consider Greek yogurt or nut butter. Greek yogurt makes the smoothie creamy and adds protein. Nut butter like almond or peanut provides healthy fats and a rich flavor. You can adjust these options based on your diet and taste preferences. For the full recipe, check out the details above! To keep your Vanilla Chai Protein Smoothie fresh, use an airtight container. A glass jar or a BPA-free plastic container works well. This helps keep the flavors intact. Store the smoothie in the fridge for up to 24 hours. Shake or stir it before drinking, as it may separate. If you want to save some for later, freezing is a great option. First, pour the smoothie into ice cube trays or small containers. This allows for easy thawing. Each portion should be about one cup or less. To thaw, just leave it in the fridge overnight or blend it frozen with a bit of almond milk. Enjoy your Vanilla Chai Protein Smoothie whenever you want! For the full recipe, check out the previous section. You can store your Vanilla Chai Protein Smoothie in the fridge for up to 24 hours. Make sure to keep it in a sealed container. If you want to store it longer, freezing is a great option. You can freeze it for up to a month. Just pour it into ice cube trays or freezer-safe bags. When you're ready to drink it, thaw in the fridge overnight or blend it straight from the freezer for a chilled treat. Yes, you can use many different liquids for your smoothie. Here are some great options: - Cow's milk - Soy milk - Oat milk - Coconut milk - Cashew milk Each option adds a unique flavor and texture. Choose one that fits your taste or dietary needs! While protein powder adds a boost of protein, it isn't a must. Here’s why you might want to use it: - It helps with muscle repair. - It keeps you full longer. - It adds a smooth texture. If you prefer not to use protein powder, consider these alternatives: - Greek yogurt for creaminess and protein. - Silken tofu for a plant-based option. - Nut butters for added flavor and healthy fats. These swaps will still make your smoothie tasty and nutritious. For the full recipe, check the earlier section! This blog post covered how to make a delicious Vanilla Chai Protein Smoothie. We discussed the key ingredients, step-by-step instructions, and tips for the perfect blend. You can customize flavors and nutrition to fit your needs. Store leftovers wisely to enjoy later. With its balance of protein and spices, this smoothie is great for a healthy boost. Give it a try and enjoy your tasty treat!

Vanilla Chai Protein Smoothie Quick and Tasty Recipe

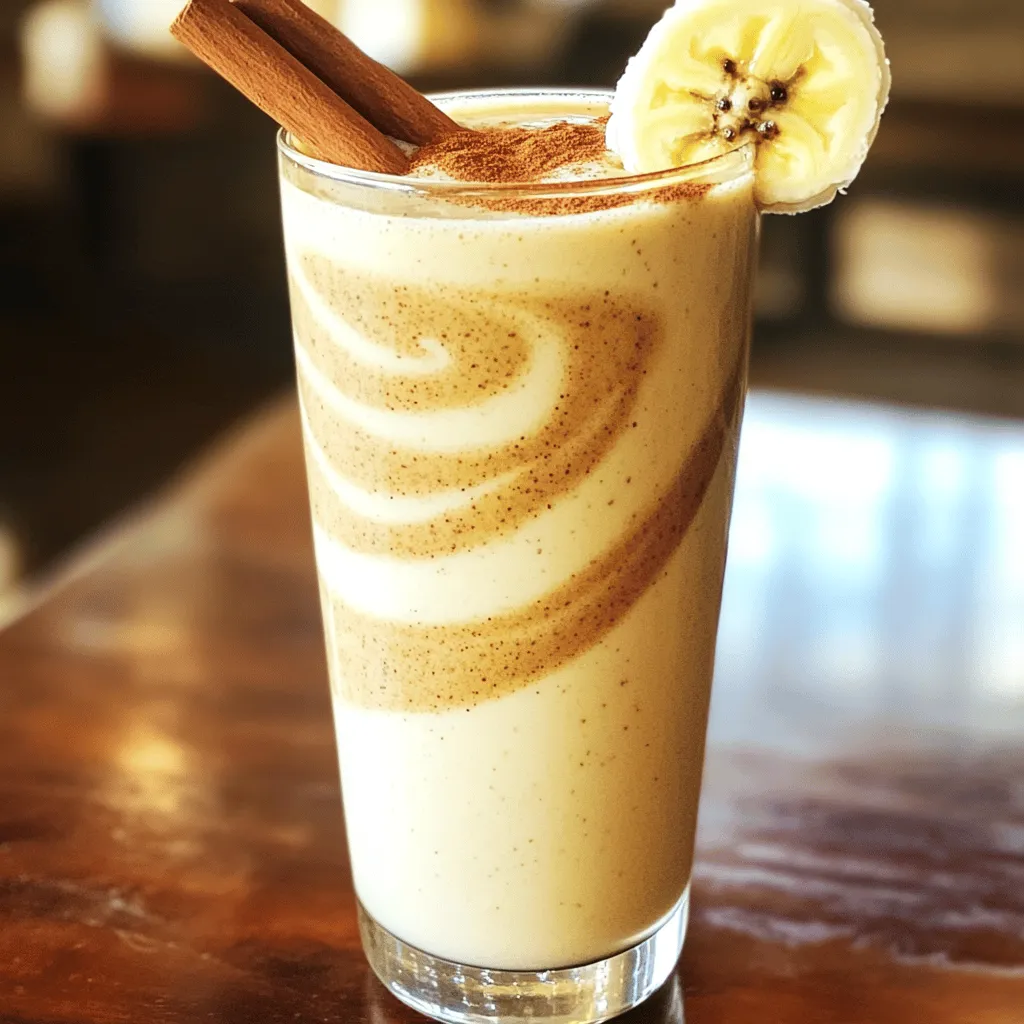
Are you looking for a quick, tasty treat that fuels your day? Look no further! This Vanilla Chai Protein Smoothie

To make a delicious birthday cake milkshake, gather these key items: - 2 cups vanilla ice cream - 1 cup milk (whole or 2%) - 1/4 cup birthday cake mix (dry) - 1/2 cup crumbled birthday cake (any flavor) - 2 tablespoons sprinkles (plus more for garnish) - Whipped cream (for topping) - Maraschino cherry (for garnish) These ingredients create a sweet and creamy treat. The vanilla ice cream adds richness, while the milk blends everything smoothly. The birthday cake mix and crumbled cake give that special flavor. Sprinkles add fun and color, making it festive. You can get creative with toppings. Here are some ideas: - Extra sprinkles on top - Chopped nuts for crunch - Chocolate syrup drizzle - Fresh fruit like strawberries or bananas These extras can change the taste and look. Use your favorites or what you have at home. If you don't have all the ingredients, don't worry! Here are some swaps you can try: - Use chocolate ice cream instead of vanilla for a twist. - Almond milk or oat milk works if you want a dairy-free option. - Any cake mix can replace the birthday cake mix. These changes can still give you a yummy birthday cake milkshake. Feel free to experiment and find what you like best. For the full recipe, check out the complete guide. To start, gather your ingredients. You will need: - 2 cups vanilla ice cream - 1 cup milk (whole or 2%) - 1/4 cup birthday cake mix (dry) - 1/2 cup crumbled birthday cake - 2 tablespoons sprinkles In a blender, add the ice cream, milk, birthday cake mix, and crumbled cake. Make sure to measure each ingredient carefully. This mix gives the shake its rich flavor. Blend the ingredients together until they are combined well. Blend the mixture on high speed. Stop the blender every so often to scrape down the sides. This helps to mix everything evenly. You want a smooth and creamy texture. If it seems too thick, add a bit more milk. Blend again until you're happy with the consistency. Once the base is ready, add the sprinkles. Pulse the blender a few times. This will mix in the sprinkles without blending them too much. Next, pour the milkshake into tall glasses. Top with whipped cream and add more sprinkles on top. Finish each glass with a maraschino cherry for a fun touch. Enjoy your birthday cake milkshake right away for the best taste! For the full recipe, check out the details above. To get a smooth and creamy milkshake, use high-quality vanilla ice cream. The ice cream should be slightly soft. Let it sit out for a few minutes before you scoop. Blend the ingredients for about 30 seconds. Stop to scrape the sides of the blender. This helps mix everything well. If your shake is too thick, add a bit more milk. If it’s too thin, add more ice cream. When serving your birthday cake milkshake, use tall glasses or mason jars. This adds a fun touch. Make sure to top it off with whipped cream. Add a generous sprinkle of colorful sprinkles on top. You can also place a maraschino cherry on the cream. For extra flair, stick a festive straw in each glass. This makes it look even more special! For added sweetness, try using flavored syrups. Vanilla, caramel, or even chocolate syrup can enhance the taste. Instead of birthday cake mix, you can use flavored mixes like chocolate or funfetti. If you want a less sweet shake, reduce the amount of cake mix or sprinkles. Always taste your shake before serving. Adjust the sweetness to your liking for the best birthday treat! Check out the Full Recipe for more details on making this fun treat! {{image_2}} You can mix things up with fun flavors! Try adding chocolate syrup for a chocolate birthday cake milkshake. This adds a rich taste. For a fruity twist, use strawberry syrup. Blend this with the ice cream for a fresh flavor. You can also add other favorite flavors like cookies and cream or mint. The options are endless! You don’t have to stick to vanilla cake. Use any cake you like! A chocolate cake gives a deep flavor. Lemon cake brings a nice zing. You can also use a red velvet cake for a fun color. Mix different milk types too. Almond milk or oat milk can add a new taste. Each change gives a unique twist! Want to make it healthier? Use low-fat ice cream or yogurt instead of regular ice cream. This keeps it creamy but cuts calories. You can also add fruits like bananas or berries. These add flavor and nutrients. Swap out regular milk for plant-based milk for a lighter option. This makes your treat both tasty and guilt-free! For the full recipe, check out the detailed instructions for making this delightful treat! If you have any leftover milkshake, store it in the fridge. Use an airtight container to keep it fresh. It’s best to drink it within a day for the best taste. If it separates, just give it a quick stir. You might have some leftover ingredients after making the milkshake. Save any extra cake scraps for another treat. You can mix them into yogurt for a quick snack. The leftover sprinkles can also jazz up cupcakes or cookies. You can freeze the milkshake for later. Pour it into ice cube trays, and freeze until solid. Later, you can blend the cubes with some milk for a quick treat. This way, you can enjoy a birthday cake milkshake anytime! For the full recipe, check out the guidelines above. To make your milkshake thicker, use less milk. You can also add more ice cream. Another tip is to chill your glass before pouring. This helps keep the shake cold and thick. You can also freeze the cake pieces before blending. This will add thickness and a nice texture. Yes, you can use any milk you like. Almond milk or oat milk works well for a dairy-free option. Each milk type adds a different taste. If you want a creamier milkshake, stick with whole milk. Try different types to find your favorite flavor. You can find great birthday cake milkshakes at local ice cream shops or diners. Some cafes and bakeries also serve fun milkshake options. Check online reviews or ask friends for their favorites. If you want a special treat, make one at home using the Full Recipe. A birthday cake milkshake lasts about one day in the fridge. It may separate, so stir it before drinking. If you want to keep it longer, consider freezing it. Just remember that the texture may change when you thaw it. This blog post explored how to make a delicious birthday cake milkshake. We looked at key ingredients, optional toppings, and smart substitutes that fit your taste. The step-by-step guide showed how to create the base, blend for the right texture, and add fun touches. I shared tips for great presentation and ways to vary the flavor. In the end, this milkshake is a fun and tasty treat for any celebration. Enjoy experimenting with different flavors and make it your own!

Delicious Birthday Cake Milkshake Fun Treat Recipe

Get ready to indulge in a sweet treat with my Delicious Birthday Cake Milkshake Fun Treat Recipe! This milkshake blends

Older posts
Newer posts
← Previous Page1 … Page69 Page70 Page71 … Page84 Next →

dsad

© 2026 Lisa Dishes • Built with GeneratePress

Our Policies

  • Copyright Policy
  • Cookie Policy
  • GDPR Policy
  • Privacy Policy
  • Disclaimer
  • Terms Of Use

More Information

  • Home
  • About
  • Contact
  • Appetizers
  • Dessert
  • Dinner
  • Drinks
©2026, Lisa Dishes About Back To Top