Skip to content
DisclaimerTerms Of UseGDPR PolicyCookie Policy

Lisa Dishes

  • Home
  • Drinks
  • Appetizers
  • Dinner
  • Dessert
  • About
  • Contact
  • Privacy Policy
DisclaimerTerms Of UseGDPR PolicyCookie Policy

NO-ING-IMG

To make your baked zucchini parmesan chips, gather these main ingredients: - 2 medium zucchinis, thinly sliced - 1 cup grated Parmesan cheese - 1 cup breadcrumbs (panko for extra crunch) - 1 teaspoon garlic powder - 1 teaspoon onion powder - 1 teaspoon dried oregano - 1 teaspoon paprika - Salt and pepper to taste - 2 large eggs, beaten - Olive oil spray These ingredients create a tasty snack. Zucchini gives a fresh crunch, while the Parmesan adds a salty kick. You can spice things up with these optional ingredients: - Red pepper flakes for heat - Fresh herbs like basil or thyme - A squeeze of lemon juice for brightness These extras let you customize your chips. Try them out to find your favorite combination! One serving of these baked zucchini parmesan chips has: - Calories: 210 - Protein: 10g - Carbohydrates: 14g - Fat: 14g This snack is not only tasty but also packed with nutrients. Enjoy these chips guilt-free! For the full recipe, check out the instructions above. Start by gathering all your ingredients. You need two medium zucchinis, grated Parmesan cheese, breadcrumbs, eggs, and seasonings. Slice the zucchinis thinly. Thin slices help them bake evenly and get crisp. In a shallow bowl, mix the breadcrumbs, Parmesan cheese, garlic powder, onion powder, oregano, paprika, salt, and pepper. This mix adds a great flavor. In another bowl, beat the eggs until smooth. You will dip the zucchini slices in this egg mix to help the coating stick. Preheat your oven to 425°F (220°C). This high heat helps the chips get crispy. Line a baking sheet with parchment paper for easy cleanup. Take a zucchini slice, dip it in the egg mix, and let the extra egg drip off. Then coat it in the breadcrumb mix, pressing lightly to ensure it sticks well. Place the coated slices on the baking sheet in a single layer. Lightly spray the chips with olive oil spray. This adds moisture and helps them crisp up. Bake for about 20-25 minutes, flipping halfway through. Look for a golden brown color on the chips to know they are done. To get the crispiest chips, remember a few key tips. First, ensure your zucchini slices are thin and evenly cut. Uneven slices lead to some being soft and others crispy. Second, do not overcrowd the baking sheet. Give each chip space to breathe. This allows hot air to circulate around them. Lastly, to add extra crunch, use panko breadcrumbs. They are light and airy, giving you that perfect crunch. For more delicious details, check the Full Recipe. When making baked zucchini Parmesan chips, avoid thick slices. Thin slices cook better. If your zucchini is wet, it will steam instead of crisp. Always pat the slices dry before coating. Another mistake is not using enough seasoning. A good amount of salt and spices makes a big difference. Lastly, don’t skip the olive oil spray. It helps with browning and crisping. To slice zucchini, use a sharp knife or a mandoline for even cuts. Aim for 1/4 inch thick slices. This size helps them cook evenly and get crispy. If you have a variety of zucchini, mix them for fun colors and flavors. Make sure to slice all the pieces the same thickness so they bake at the same rate. If you have leftover chips, let them cool completely. Store them in an airtight container at room temperature. They will stay crispy for about two days. If you want them to last longer, you can freeze them. Just place them in a single layer on a baking sheet, freeze until solid, then transfer to a freezer bag. When ready to eat, reheat them in the oven for that fresh, crispy texture. For the full recipe, check out the main article. {{image_2}} If you want to make these chips gluten-free, use gluten-free breadcrumbs. Some brands offer great taste and crunch. You can also use ground almonds or crushed rice crackers as a substitute. Both options will still give you a nice flavor and texture. To add a kick, mix in some cayenne pepper or chili powder into the breadcrumb mix. You can also use a mix of herbs like basil, thyme, or rosemary to boost the flavor. This simple change makes them exciting and unique. If you want to try different cheeses, use cheddar or a dairy-free cheese for a twist. These cheeses melt and crisp well, giving you a new taste. Experiment with your favorites to find the best combination. For the full flavor experience, refer to the Full Recipe. Baked zucchini parmesan chips are great on their own, but dipping sauces add fun. Try marinara sauce for a classic taste. Ranch dressing gives a creamy twist. You can also use a spicy sriracha mayo for a kick. These sauces make each bite exciting. Presentation matters! Serve your chips on a wooden board for a rustic look. Add small bowls of different dips. You can also include fresh veggies like carrot sticks or celery for color. This makes your platter not just tasty, but pretty too. These chips are perfect as a snack or side dish. Serve them with grilled chicken or fish for a balanced meal. They also pair well with salads. You can enjoy them during movie night or at a picnic. No matter when you eat them, they add crunch and flavor. To store your baked zucchini parmesan chips, place them in an airtight container. Keep them in your kitchen or pantry. They stay fresh for about two to three days. If you want to keep them longer, put them in the fridge. Just remember that they may lose some crunch. Yes, you can freeze zucchini chips. First, let them cool completely. Then, place them in a single layer on a baking sheet. Freeze them for about an hour. After that, transfer the chips to a freezer bag. They can last up to three months in the freezer. If your chips turn out soggy, you can try reheating them. Preheat your oven to 400°F (200°C). Spread the chips on a baking sheet and bake for about 5 to 10 minutes. This will help them crisp up again. You can also check the thickness of your slices next time. Thinner slices usually turn out crispier. To make baked zucchini chips without breadcrumbs, you can use ground nuts or seeds. Almond flour or crushed nuts can add flavor and crunch. Simply replace the breadcrumbs with your choice of ground nuts. Follow the same steps in the recipe. This makes a great option for grain-free diets. In summary, this blog post covers how to make delicious baked zucchini chips. We discussed the key ingredients, steps to prepare and bake, and tips for the perfect crisp. Avoid common mistakes and try different flavors for fun. Serving suggestions help you enjoy these chips in new ways. Remember, making these chips is easy and satisfying. With practice, you’ll become a pro at this healthy snack. Now, grab your zucchini and start baking!

Baked Zucchini Parmesan Chips Crispy and Flavorful Snack

Looking for a tasty snack that’s both crispy and flavorful? You’ve come to the right place! In this blog post,

To make the Spicy Cashew Noodle Salad, you will need these ingredients: - 200g rice noodles - 1 cup raw cashews - 1 red bell pepper, julienned - 1 medium cucumber, julienned - 1 cup shredded carrots - 3 green onions, thinly sliced - 1/4 cup fresh cilantro, chopped - 1/4 cup soy sauce (or tamari for gluten-free) - 2 tablespoons sriracha (adjust based on spice preference) - 2 tablespoons creamy peanut butter - 1 tablespoon sesame oil - Juice of 1 lime - 1 tablespoon honey (or maple syrup for vegan option) - Salt and pepper to taste - Sesame seeds for garnish You can easily swap some ingredients. Here are a few ideas: - Rice noodles: Use whole wheat noodles or gluten-free pasta. - Cashews: Almonds or peanuts work well too. - Soy sauce: Coconut aminos is a great gluten-free option. - Sriracha: Try chili paste or hot sauce if you prefer. - Honey: Use agave syrup for a vegan choice. - Veggies: Add bell peppers, snap peas, or cabbage for more crunch. Each serving of Spicy Cashew Noodle Salad offers: - Calories: Approximately 350 - Protein: 10g - Carbs: 45g - Fats: 15g - Fiber: 5g This salad is full of healthy fats, fiber, and protein! It’s a tasty way to enjoy a meal while being kind to your body. For the complete recipe and steps, check the Full Recipe. To start, bring a large pot of water to a boil. Add 200g of rice noodles. Cook them for about 4-5 minutes, or as the package says. You want them tender but firm. Drain the noodles and rinse them with cold water. This stops the cooking and keeps them from getting sticky. Set the noodles aside while you prepare the other ingredients. Next, take a skillet and heat it over medium heat. Add 1 cup of raw cashews to the pan. Toast them for 5-7 minutes. Stir them often to make sure they don’t burn. You want them to turn golden brown and smell good. Once done, remove them from the heat and let them cool a bit. After that, roughly chop the cashews for the salad. In a small bowl, whisk together the dressing. Combine 1/4 cup of soy sauce, 2 tablespoons of sriracha, and 2 tablespoons of creamy peanut butter. Add 1 tablespoon of sesame oil, the juice of 1 lime, and 1 tablespoon of honey. Mix until it’s smooth. This dressing packs a punch and ties the salad together. Now it’s time to mix everything. In a large bowl, add the cooked noodles. Then, toss in 1 red bell pepper, 1 medium cucumber, 1 cup of shredded carrots, and 3 sliced green onions. Don’t forget to add 1/4 cup of chopped cilantro. Pour the dressing over the noodles and veggies. Gently toss everything until well coated. Season with salt and pepper to taste. Now, you’re ready to enjoy a fresh and vibrant Spicy Cashew Noodle Salad. For the full recipe, check out the complete guide. You can change the heat in the salad to fit your taste. If you like it mild, cut the sriracha to one tablespoon. For more heat, add an extra tablespoon. Always taste as you go. That way, you can find the right level of spice for you. A great-looking salad makes it more fun to eat. Use a colorful bowl to serve. Arrange the veggies in a bright pattern. You can layer the carrots, cucumber, and bell pepper to create a rainbow effect. Finish by garnishing with extra cilantro and sesame seeds for a lovely touch. This salad is perfect on its own or as a side. Serve it with grilled chicken or shrimp for a full meal. You can also pair it with spring rolls for a fun lunch. For a quick snack, enjoy it cold right from the fridge. Check out the Full Recipe for more ideas! {{image_2}} You can easily make this dish vegan. Swap honey for maple syrup. This simple change keeps the sweetness while keeping it plant-based. You can also use vegan creamy peanut butter. Look for brands without added sugars or oils. These swaps make your salad just as tasty. To make your salad gluten-free, choose tamari instead of soy sauce. Tamari has a similar taste but is safe for gluten-free diets. Be sure to check the rice noodles for gluten. Most brands are gluten-free, but it's good to double-check. These easy swaps keep the flavor while making it safe for all. Want to make your salad heartier? Consider adding proteins like grilled chicken, shrimp, or tofu. These options bring extra flavor and texture. You can also toss in more veggies. Try snap peas, broccoli, or bell peppers. Each adds a nice crunch. Feel free to mix and match to suit your taste. You can store leftover spicy cashew noodle salad in the fridge. Use an airtight container. It stays fresh for about three days. Keep the salad cool and avoid leaving it out too long. If you want to keep the cashews crunchy, store them separately. This way, they stay nice and crisp. For longer storage, consider freezing the noodles. Cook the noodles and let them cool. Place them in a freezer-safe bag. Squeeze out as much air as possible. They can last up to three months in the freezer. However, the veggies and dressing do not freeze well. It’s best to use fresh ingredients when you plan to eat the salad. When you’re ready to enjoy your salad, if using frozen noodles, thaw them first. You can do this overnight in the fridge or use the microwave. After thawing, heat them in a pan over low heat. You can add a splash of water or oil to keep them moist. If you prefer, enjoy the salad cold. Just mix it well and add fresh toppings. You can find the full recipe to make this dish again and enjoy it fresh! You can add cooked chicken, shrimp, or tofu for extra protein. Grilled chicken gives a nice flavor. Shrimp adds a lovely texture. Tofu is great for a plant-based option. Each choice will boost the protein without changing the salad's fun taste. The salad lasts about three days in the fridge. Store it in an airtight container. This keeps the salad fresh and tasty. The veggies may lose some crunch, but the flavors will still shine. Yes, you can make the dressing ahead of time. It keeps well in the fridge for about a week. Just give it a stir before using. This saves time when you want to enjoy the salad quickly. You can find the full recipe for Spicy Cashew Noodle Salad above in the article. It includes all the steps and tips for making this delightful dish. Enjoy making it! This blog post covered how to make a tasty Spicy Cashew Noodle Salad. We discussed the key ingredients and easy substitutions. The step-by-step guide makes cooking simple. Tips helped with presentation and spice levels for your taste. In the variations section, you learned about vegan and gluten-free options. Finally, I shared storage tips for keeping your salad fresh. Now, you have all the tools to enjoy a great dish any time. Dive in and start creating!

Spicy Cashew Noodle Salad Tasty and Simple Recipe

Are you ready to enjoy a tasty dish that packs a flavorful punch? My Spicy Cashew Noodle Salad is not

To make Sweet Chili Salmon Bowls, you will need: - 2 salmon fillets - 1/4 cup sweet chili sauce - 1 tablespoon soy sauce - 1 teaspoon sesame oil - 1 cup jasmine rice - 2 cups water - 1 cup broccoli florets - 1 carrot, julienned - 1/4 cup green onions, sliced - 1 tablespoon sesame seeds - Salt and pepper to taste You can enhance your Sweet Chili Salmon Bowls with these optional ingredients: - Avocado slices for creaminess - Cucumber for crunch - Red pepper flakes for some heat - Cashews or peanuts for a nutty flavor Gather these tools to make the process smooth: - A medium saucepan for cooking rice - A non-stick skillet for cooking salmon - A steaming basket for veggies - A shallow dish for marinating salmon - A fork for fluffing rice - A knife and cutting board for prep This mix of ingredients and tools helps create a vibrant and tasty meal. Remember, the right tools make the cooking easier and more enjoyable! For the complete recipe, check out the Full Recipe. To start, I mix the sweet chili sauce, soy sauce, and sesame oil in a bowl. This mix makes the salmon taste great. Next, I place the salmon fillets in a shallow dish and pour the marinade over them. I make sure they are well coated. I let them marinate in the fridge for at least 15 minutes. This step is key for flavor. While the salmon marinates, I rinse the jasmine rice. I rinse it under cold water until the water runs clear. In a medium saucepan, I combine the rinsed rice with 2 cups of water. I bring it to a boil, then reduce the heat to low. I cover it and let it simmer for about 15 minutes. When the water is absorbed, I remove it from heat and let it sit covered for 5 minutes. This keeps the rice fluffy. Next, I bring a small pot of water to a boil. I place a steaming basket over the pot. I add the broccoli florets and julienned carrot. I cover the pot and steam for about 5 minutes. The vegetables should be tender but still bright in color. This keeps the nutrients intact. I preheat a non-stick skillet over medium heat. I take the salmon out of the marinade. I place it skin-side down in the skillet. I cook the salmon for about 4-5 minutes on each side. It's done when it flakes easily with a fork. I drizzle a little leftover marinade towards the end for extra flavor. I fluff the jasmine rice with a fork. I divide it into two serving bowls. I top each bowl with steamed broccoli and carrots. Then, I place a salmon fillet on top of each bowl. This step makes it look nice and colorful. To finish, I sprinkle sliced green onions and sesame seeds over the bowls. I adjust the seasoning with salt and pepper to taste. For a fun touch, I often add a slice of lime on the side. This gives a fresh flavor and brightens the dish. Check out the Full Recipe for more details! To cook salmon perfectly, start with fresh fillets. Look for bright color and firm texture. When cooking, heat your skillet over medium heat. Place the salmon skin-side down and let it sizzle. Cook for 4-5 minutes without moving it. This helps to get a nice crust. Flip the salmon gently with a spatula. Cook for another 4-5 minutes. The fish is done when it flakes easily with a fork. Drizzle some marinade on top for more flavor. Cooking jasmine rice is simple. Rinse the rice under cold water until it runs clear. This removes extra starch and keeps the rice fluffy. In a pot, combine the rinsed rice with double the amount of water. Bring it to a boil, then reduce the heat. Cover it and let it simmer for about 15 minutes. Afterward, let it sit for 5 minutes with the lid on. This resting time helps the rice become tender and fluffy. You can easily add more veggies to your salmon bowls. Try bell peppers, snap peas, or zucchini. Cut them into small pieces for even cooking. Steam or sauté them until they are tender. You can even roast them in the oven for extra flavor. Adding a variety of colors makes your bowl more appealing and adds nutrition too. Don’t be afraid to mix and match your favorite vegetables! If you want to switch up the flavor, try different sauces. Teriyaki sauce or a spicy sriracha can add a nice kick. You can also use a honey mustard mix for a sweet touch. Experiment with fresh herbs like cilantro or basil for more depth. Seasonings like garlic powder or paprika can enhance the dish too. The key is to find what you love and make it unique. For a full recipe, check out the Sweet Chili Salmon Bowls. {{image_2}} You can swap out rice for quinoa. Quinoa adds protein and a nutty flavor. It cooks fast and is easy. Just use the same amount of water as rice. Rinse it well, then boil and simmer, just like the rice. This change makes the dish even healthier! If you love heat, add more chili! Mix chopped fresh chili into the marinade. You can also drizzle some chili oil on the finished bowl. This adds a nice kick and depth of flavor. Be careful not to overdo it; you want to enjoy the meal, not sweat! You can make this dish vegetarian by using tofu instead of salmon. Firm tofu works best. Press and cube it first. Then marinate it in the same sauce. Cook it in the skillet until golden. Serve it just like the salmon. This way, everyone can enjoy a tasty bowl! You can find the full recipe for Sweet Chili Salmon Bowls linked above. Enjoy making these variations! To store leftover salmon bowls, first let them cool. Place the salmon, rice, and veggies in an airtight container. Make sure to keep the sauce separate to avoid sogginess. Store in the fridge for up to three days. If you want to keep them longer, consider freezing the salmon and rice. Just make sure to thaw them in the fridge before reheating. When you're ready to enjoy your leftovers, reheating is simple. For best results, use the oven. Preheat it to 350°F (175°C). Place the salmon and rice in an oven-safe dish, and cover with foil. Heat for about 15 minutes, or until warm. You can also use a microwave. Just cover the dish with a damp paper towel to keep moisture in. Heat in short bursts, stirring in between, until hot. If you want to prep ahead, make the salmon bowls in bulk. You can marinate several salmon fillets at once. Cook extra rice and steam more veggies to store in separate containers. This way, you can mix and match during the week. Just remember to keep the sauce on the side until you're ready to eat. For even more flavor, add fresh herbs or lime juice right before serving. For the full recipe, check out the Sweet Chili Salmon Bowls. You can use cod, tilapia, or trout instead of salmon. Each fish has a unique taste. Cod has a mild flavor and nice texture. Tilapia is a great budget option. Trout offers a rich taste and is also flaky. Choose any fish you like, but cooking times may vary. Yes, you can prepare many parts ahead of time. Cook the rice and steam the veggies a day before. Store them in airtight containers in the fridge. Marinate the salmon, but cook it fresh for the best taste. Salmon is done when it flakes easily with a fork. The inside should turn a light pink color. If you have a food thermometer, the safe temperature is 145°F (63°C). Try a fresh cucumber salad or a light seaweed salad. Roasted asparagus or snap peas also work great. These sides add crunch and balance the flavors. To make it spicier, add more chili sauce. You can also include red pepper flakes. If you prefer less heat, use half the chili sauce or add a bit of honey for sweetness. For the full recipe, check out the section above. In this post, we covered the key ingredients and tools needed for Sweet Chili Salmon Bowls. You learned step-by-step instructions for marinating, cooking, and assembling your meal. Tips helped you perfect your salmon and rice cooking. We explored tasty variations and storage tips to keep your meal fresh. Enjoy cooking these bowls for yourself, friends, or family. Simple meals can be delicious and satisfying. You now have all the tools to make these tasty bowls at home. Happy cooking!

Sweet Chili Salmon Bowls Healthy and Flavorful Meal

Looking for a quick, healthy meal that’s bursting with flavor? Sweet Chili Salmon Bowls are the answer! I’ll walk you

To make mango coconut chia pudding, you need a few simple ingredients. Each one plays a key role in making this dish both tasty and healthy. - 1 cup coconut milk (canned or fresh) - 1/3 cup chia seeds - 2 tablespoons honey (or maple syrup for a vegan option) - 1 ripe mango, pureed (plus extra for topping) - 1/2 teaspoon vanilla extract - A pinch of salt - Toasted coconut flakes (for garnish) - Fresh mint leaves (for garnish) Coconut milk gives the pudding a creamy texture. Chia seeds are tiny powerhouses packed with fiber and omega-3 fatty acids. You can sweeten it with honey or maple syrup. Ripe mango adds a natural sweetness and tropical flavor. The vanilla extract enhances the overall taste, while the salt balances the sweetness. For garnishing, toasted coconut flakes add crunch, and fresh mint leaves provide a burst of color and flavor. Each ingredient works together to create a delicious and nutritious treat. For the full recipe, check out the instructions to make this delightful pudding! Start by pouring 1 cup of coconut milk into a mixing bowl. I love using canned coconut milk for its rich taste. Add 2 tablespoons of honey or maple syrup for sweetness. Then, pour in 1/2 teaspoon of vanilla extract and a pinch of salt. Whisk these together until the mixture is smooth and creamy. This step creates a flavorful base for our pudding. Next, add 1/3 cup of chia seeds to the coconut mix. Use a spoon to stir the chia seeds in well. This is key to avoid clumps in your pudding. Chia seeds will absorb the liquid and expand, giving the pudding its unique texture. Now, it’s time to add the mango. Use a ripe mango and puree it until smooth. Gently fold the mango puree into the coconut mixture. Make sure to mix it well but do not over-stir. You want to keep some of that lovely mango flavor intact. After mixing, cover the bowl with plastic wrap. You can also use individual jars for serving. Place the bowl or jars in the refrigerator. Chill for at least 4 hours, or overnight if you can wait. This lets the chia seeds soak up the liquid and thicken the pudding perfectly. Once the pudding is set, give it a good stir. This helps break up any clumps formed. To serve, spoon the pudding into bowls or cups. Top with extra mango pieces, a sprinkle of toasted coconut flakes, and a few fresh mint leaves. It’s a beautiful and tasty treat that's sure to impress! For the full recipe, check out the details above. To avoid clumps in chia pudding, stir well as you mix in the seeds. This ensures they spread evenly throughout the liquid. After chilling, if you find clumps, just give it a good stir. The ideal chilling time is at least four hours, but overnight gives the best results. If you don’t have coconut milk, try almond milk or oat milk. These alternatives also work well in chia pudding. For a sweetener, you can use agave syrup or stevia instead of honey or maple syrup. Both options are tasty and keep it vegan. To boost the flavor, consider adding spices like cinnamon or nutmeg. A dash of cardamom can also add a unique twist. For toppings, I love using fresh fruits like berries or bananas. You can also sprinkle on granola or nuts for added crunch. Don't forget the toasted coconut flakes; they add a nice texture and are perfect for the garnish! For the full recipe, check out the complete instructions. {{image_2}} You can easily mix other fruits into your mango coconut chia pudding. Try adding pineapple for a sweet, tangy taste. Passion fruit adds a lovely tartness that really pops. Just puree these fruits like you did with the mango, then fold them into your pudding base. This gives you a colorful and vibrant treat! You can also layer different fruit purees for a beautiful presentation. Want a chocolate twist? Just add cocoa powder to the base mix. Use about 2 tablespoons of unsweetened cocoa powder. This change brings a rich flavor that pairs well with the mango. You can still keep the coconut and honey, making it a delightful chocolate dessert. This variation offers a fun way to enjoy your pudding, especially for chocolate lovers! You can swap out coconut milk for other plant-based milks. Almond milk gives a nutty flavor, while oat milk offers creaminess. Soy milk is another great option and adds some protein. Each milk gives a slightly different taste and texture. Feel free to experiment! Just make sure to choose a milk that you enjoy. This ensures your pudding tastes great no matter what variations you try. Check the full recipe for more tips! To store leftovers, place the chia pudding in a clean container. Make sure it has a tight lid. This keeps it fresh and safe. You want to avoid air exposure. If you used individual jars, just keep the lids on. The refrigerated chia pudding lasts about 5 days. After that, it may lose texture and flavor. Always check for any off smell or appearance before eating. If it looks or smells weird, toss it out. You can freeze mango coconut chia pudding. Just scoop it into airtight containers. Leave some space at the top for expansion. It will stay fresh for about a month. When you want to eat it, thaw it overnight in the fridge. Stir it well before serving. This will help restore its creamy texture. For the full recipe, check out the details above. Chia pudding is a creamy, healthy dessert made with chia seeds. When mixed with liquid, chia seeds absorb it and swell. This creates a thick, pudding-like texture. Chia seeds are packed with nutrients. They are high in fiber, protein, and omega-3 fatty acids. Nutritional benefits of chia seeds - High in fiber, which aids digestion - Rich in protein to keep you full - Packed with omega-3s for heart health - Contains calcium for strong bones - Loaded with antioxidants to fight free radicals Mango coconut chia pudding stays fresh for about five days in the fridge. Store it in an airtight container to keep it safe. You can freeze it, too, but it changes texture. If frozen, it lasts for about a month. Clarifying shelf life in fridge and freezer - Fridge: 5 days in a sealed container - Freezer: 1 month, but texture may change Yes, you can use other fruits! Strawberries, blueberries, and bananas work well. Just make sure to puree them. Each fruit adds its own flavor. This can change the taste of your pudding. Discussing fruit substitutions and their impact on the recipe - Strawberries: Adds a sweet and tangy taste - Blueberries: Gives a burst of antioxidants - Bananas: Adds creaminess and natural sweetness Yes, this recipe is vegan if you use maple syrup instead of honey. Maple syrup gives a nice sweetness, too. It blends well with the coconut and mango. Confirmation and explanation if using maple syrup - Maple syrup: A great vegan alternative to honey - Keeps the pudding plant-based and delicious You learned how to make mango coconut chia pudding in this post. We covered ingredients, steps, tips, variations, and storage. This dessert is delicious, easy to make, and healthy. You can add your favorite fruits or flavors to change it up. Following these steps ensures you will enjoy a creamy and tasty pudding. Now, you are ready to impress yourself and others with this treat!

Mango Coconut Chia Pudding Delicious and Nutritious Treat

Are you ready to treat yourself to something truly delicious and nutritious? Mango Coconut Chia Pudding is the perfect way

For a delicious berry chia pudding, you need these simple ingredients: - 1/2 cup chia seeds - 2 cups almond milk (or any non-dairy milk) - 2 tablespoons maple syrup (or honey) - 1 teaspoon vanilla extract - 1 cup mixed berries (strawberries, blueberries, raspberries) - 1/4 teaspoon cinnamon (optional) - Fresh mint leaves for garnish (optional) Chia seeds are tiny but packed with nutrients. They swell and create a thick, creamy pudding when mixed with liquid. Almond milk adds a nice, subtle flavor. You can use any non-dairy milk you prefer. Maple syrup or honey gives just the right amount of sweetness. Vanilla extract will enhance the flavor. Mixed berries bring freshness and color to your dish. You can add a bit of cinnamon for warmth if you wish. Fresh mint leaves make a lovely garnish. They add a pop of color and a refreshing taste. When you gather these ingredients, you set the stage for a tasty and healthy treat. If you want the full recipe, check out the instructions provided earlier. To start, take a medium bowl. Combine the chia seeds and almond milk. I love using almond milk, but you can use any non-dairy milk you prefer. Next, add your sweeteners. Maple syrup works great, or honey if you like. Don’t forget the vanilla extract; it adds a nice flavor! If you want a hint of spice, add a little cinnamon. Stir well to mix everything together. This step ensures the chia seeds spread out nicely. Now, it’s time for the mixture to chill. Cover the bowl with plastic wrap or a lid. Place it in the fridge for at least two hours. I often leave it overnight for the best results. The chia seeds will absorb the liquid and thicken. This is crucial for your pudding's texture. After about five minutes, stir the mixture again to avoid clumping. If you don’t stir, you might end up with a lumpy pudding! Once the pudding is set, stir it to make it creamy. Now comes the fun part! Grab some serving glasses or bowls. Layer the chia pudding and mixed berries. I like to alternate layers for a pretty look. You can use strawberries, blueberries, and raspberries for this. Finally, garnish with fresh mint leaves. This adds color and a fresh touch before serving. Enjoy your Berry Chia Pudding! For the full recipe, check out the details above. To get the best texture, chill your pudding for at least two hours. I recommend letting it sit overnight for optimal results. This time allows the chia seeds to soak up the almond milk and thicken nicely. Stir the mixture well after five minutes. This helps break up any clumps that may form. Use a whisk or a fork for the best results. If you notice clumps, just stir again. Picking the right sweetener is key. Maple syrup gives a rich flavor, while honey is great too. If you want less sweetness, start with one tablespoon of maple syrup. Taste it and add more if needed. You can also use stevia or agave for a sugar-free option. Adjusting sweetness helps make the pudding perfect for your taste. Chia seeds are tiny powerhouses of nutrition. They are high in fiber, protein, and omega-3 fatty acids. These nutrients help keep you full and support heart health. Berries add vitamins and antioxidants. They help fight inflammation and boost your immune system. Adding mixed berries to your diet can improve overall health and taste great in your pudding. {{image_2}} You can use many kinds of berries in your pudding. Fresh strawberries, blueberries, or raspberries work well. During summer, look for seasonal berries. They taste great and make your pudding colorful. Mixing different berries gives you unique flavors. Try combining tart raspberries with sweet strawberries for a tasty twist. Want to spice things up? Add a pinch of nutmeg to your pudding for warmth. You can also try coconut milk instead of almond milk for a tropical vibe. Fruit purees can add a new twist, too. Blend bananas or mangoes and mix them in for extra sweetness. If you prefer dairy, that’s fine! You can swap almond milk for regular milk. This gives a creamier texture that many enjoy. For an even richer taste, use cream or half-and-half. Try these variations to find what you love. You can easily make this recipe your own! For the full recipe, check out the details above. To keep your berry chia pudding fresh, use airtight containers. Glass jars work great and look nice too. Store it in the fridge for up to five days. If you notice any liquid on top, just stir it back in. This happens when the chia seeds soak up the liquid. For the best taste, eat it within three days. To maintain flavor, keep your pudding away from strong-smelling foods. The chia pudding can absorb odors easily. Always check for freshness before eating. If it smells off or has odd colors, it’s best to toss it out. Can you freeze chia pudding? Yes, you can! Freezing is a great option if you want to save some for later. Just make sure it’s in a freezer-safe container. You can freeze it for up to two months. When you’re ready to enjoy it again, thaw it in the fridge overnight. If you need it faster, put it in a bowl of cold water. After thawing, stir well to restore its creamy texture. You may want to add a bit of almond milk to make it smooth again. Enjoy your berry chia pudding as a quick snack or a healthy dessert! For the full recipe, check the section above. Yes, you can use many types of milk. Almond milk is my favorite, but soy, oat, or coconut milk also work well. Each milk adds its own flavor and texture. If you prefer dairy, regular milk is a great option too. Just remember, the creamier the milk, the richer your pudding will be. Berry chia pudding lasts up to five days in the fridge. Store it in an airtight container to keep it fresh. I often make a big batch for the week. Just give it a stir before serving, and it’s ready to go! Absolutely! Chia pudding is safe for kids. Chia seeds are full of fiber, protein, and healthy fats. They are great for growing bodies. Just make sure to soak the chia seeds well, so they are easy to eat. You can add many things to boost the flavor! Try fresh fruits like mango or banana. Nuts and seeds add a nice crunch. You can also sprinkle in spices like nutmeg or ginger for warmth. If you love chocolate, a bit of cocoa powder works wonders too! To make this recipe sugar-free, skip the maple syrup. Instead, use ripe fruits to sweeten your pudding. Mashed banana or pureed dates are great natural sweeteners. You can also try stevia or monk fruit as sugar substitutes. This blog post covered everything you need to know about making berry chia pudding. We discussed the best ingredients, steps for preparation, and tips to get the perfect texture. You learned about health benefits and various ways to customize the dish. Storing your pudding properly ensures it stays fresh. Explore these ideas and enjoy the process. Chia pudding is fun and good for you too! Start mixing and create your own delicious versions today.

Berry Chia Pudding Simple and Healthy Delight

Berry Chia Pudding is a simple and healthy treat that packs a punch. With just a few easy ingredients, you

For a tasty chicken taco soup, gather these items: - 1 lb boneless, skinless chicken breasts, diced - 1 can (15 oz) black beans, rinsed and drained - 1 can (15 oz) corn, drained - 1 can (10 oz) diced tomatoes with green chilies - 1 onion, chopped - 2 cloves garlic, minced - 1 bell pepper (any color), chopped - 1 packet taco seasoning - 4 cups chicken broth - 1 tablespoon olive oil - Salt and pepper to taste - Fresh cilantro, for garnish - Sour cream and shredded cheese, for serving If you cannot find an item, don’t worry! You can use: - Ground chicken or turkey instead of diced chicken. - Any canned beans like kidney or pinto beans. - Fresh corn if you prefer over canned corn. - Add lime juice for a fresh kick. These swaps will still keep your soup yummy. This recipe can fit many diets: - Gluten-Free: Use a gluten-free taco seasoning. - Low-Carb: Swap the corn for zucchini or cauliflower. - Dairy-Free: Skip the sour cream and cheese or use plant-based options. With these tips, you can enjoy this soup no matter your diet! This chicken taco soup is easy to make and so tasty! Start by heating one tablespoon of olive oil in a large pot over medium heat. Add one chopped onion and one chopped bell pepper. Cook these for about 3-4 minutes until they soften. Next, stir in two minced garlic cloves and cook for one more minute. This adds a nice flavor. Now, push the veggies to one side of the pot. In the center, add one pound of diced chicken breasts. Cook the chicken for about 5-6 minutes until it gets a nice brown color. After that, sprinkle one packet of taco seasoning over the chicken. Mix everything well to combine the flavors. Pour in four cups of chicken broth. Then, add one can of black beans, one can of corn, and one can of diced tomatoes with green chilies. Make sure to stir all the ingredients together. Bring the soup to a boil, then lower the heat. Let it simmer for 20-25 minutes. This simmering time helps the flavors mix well. Don’t forget to taste the soup! Adjust the seasoning with salt and pepper to make it perfect for you. For this dish, the total cooking time is about 35 minutes. The prep time is just 10 minutes. Be sure to keep the heat at medium when sautéing the vegetables. This keeps them from burning. When you bring the soup to a boil, watch it closely. Once boiling, lower the heat to let it simmer gently. This helps keep the chicken tender and juicy. When serving, ladle the soup into bowls. Top each bowl with a dollop of sour cream and a sprinkle of shredded cheese. Add a few leaves of fresh cilantro for a pop of color. This not only makes the dish look nice but also adds fresh flavor. Enjoy your chicken taco soup with tortilla chips or crusty bread for a complete meal. For the full recipe, you can refer back to the beginning of this guide. To make the best chicken taco soup, start with fresh ingredients. Use good quality chicken for flavor. I recommend boneless, skinless chicken breasts. Dice them into small pieces for even cooking. Sauté your veggies well. This builds a rich base for your soup. Cook your onions and bell pepper until soft. This takes about 3-4 minutes. Don’t skip the garlic. It adds great taste. Avoid overcooking the chicken. It can turn dry and tough. Cook it just until browned on all sides. Another mistake is not seasoning enough. Always taste your soup before serving. Adjust the salt and pepper to your liking. Lastly, don’t forget to stir in the taco seasoning. This gives your soup that signature flavor. You can boost the flavor of your chicken taco soup in many ways. Add a squeeze of lime juice for brightness. Fresh cilantro adds a nice touch, too. If you like heat, toss in some sliced jalapeños. For extra creaminess, add a dollop of sour cream. Consider using homemade chicken broth for a deeper taste. These tips will elevate your soup from good to great. For the complete recipe, check the [Full Recipe]. {{image_2}} You can make a vegetarian version of chicken taco soup. Replace chicken with diced tofu or jackfruit. Tofu gives protein and has a nice texture. Jackfruit adds a unique flavor with a meaty feel. Use vegetable broth instead of chicken broth for a vegan option. For beans, you can use kidney beans or pinto beans, too. Add spices to boost flavor. Try cumin, smoked paprika, or chili powder. These spices add warmth and depth. You can also mix in fresh jalapeños for heat. Top your soup with avocado, lime wedges, or diced radishes. A sprinkle of cheese or crispy tortilla strips makes it even better. You can use a slow cooker for easy cooking. Just add all ingredients to the pot. Set it on low for 6-8 hours or high for 3-4 hours. For a quick meal, the Instant Pot is great. Cook on high pressure for about 10 minutes, then let it release naturally. Both methods give you a rich and tasty soup. For the full recipe, check out the complete guide. After you enjoy your Chicken Taco Soup, let it cool first. Use a clean, airtight container to store it. This helps keep the soup fresh. Place it in the fridge if you plan to eat it soon. It will last for about 3 to 4 days. Make sure to label the container with the date. If you want to save it for later, freezing is a great choice. Pour the cooled soup into freezer-safe bags or containers. Leave some space at the top, as soup expands when frozen. Seal the bags tightly to prevent air from getting in. You can freeze the soup for up to 3 months. Remember to label it with the date. To reheat, you can use the stove or microwave. If using the stove, pour the soup into a pot. Heat it over medium heat, stirring often. This helps it heat evenly. If using the microwave, place your soup in a microwave-safe bowl. Cover it loosely and heat for 2-3 minutes. Stir halfway through to ensure even warming. Always check the temperature before eating, and enjoy your delicious Chicken Taco Soup again! For the full recipe, check the section above. Chicken taco soup is a warm, tasty dish. It mixes chicken, beans, corn, and spices. You can make it in one pot, which makes cleanup easy. The flavors are bold and remind you of tacos but in soup form. It’s perfect for cold days or quick dinners. To thicken chicken taco soup, you have a few options. You can add a cornstarch slurry. Just mix equal parts cornstarch and water, then stir it in. Another way is to let the soup simmer longer. This reduces liquid and thickens the soup naturally. You can also mash some beans in the soup for a creamier texture. Yes, you can make chicken taco soup in advance. It tastes even better the next day as flavors blend. Just let it cool before storing in the fridge. Use an airtight container for best results. Reheat it on the stove or in the microwave when ready to serve. You can serve chicken taco soup with many tasty sides. Try tortilla chips for crunch. Cornbread is another great choice; it pairs well with the soup. You can also add a simple salad or some avocado slices. For a fun twist, offer toppings like sour cream and cheese. This blog post covered everything you need for Chicken Taco Soup. We shared the full ingredient list, tips for substitutions, and dietary options. You learned how to cook it step by step and serve it well. We discussed common mistakes and how to enhance the flavor. You also got ideas for variations and how to store leftovers. Enjoy this easy, tasty soup any night of the week. Now, get cooking!

Chicken Taco Soup Flavorful and Simple Recipe Guide

Looking for a quick and tasty meal? I’ve got the perfect solution: Chicken Taco Soup! This flavor-packed recipe is easy

- 4 Tilapia fillets - 3 tablespoons olive oil - 4 cloves garlic, minced - 1 medium lemon (juice and zest) - 1 teaspoon dried oregano - 1 teaspoon dried parsley - Salt and pepper to taste - Lemon slices for garnish - Fresh parsley, chopped for garnish Using fresh fish makes a big difference in taste. Look for bright, shiny tilapia fillets. They should smell clean and mild. Choose a lemon that feels heavy for its size. This means it has lots of juice. Fresh herbs add great flavor too. If you can, use fresh parsley instead of dried. It makes the dish pop with color and taste. You can switch tilapia for other fish like cod or sole. Olive oil can be replaced with melted butter for a richer flavor. If you don’t have fresh garlic, use garlic powder in a pinch. You can also swap lemon for lime for a different twist. Dried herbs work too, but fresh is always best if you can find it. First, set your oven to 375°F (190°C). This temperature is perfect for baking fish. Preheating the oven makes sure the tilapia cooks evenly. A hot oven helps it become flaky and tender. Now, grab a small bowl. In it, mix together three tablespoons of olive oil and four minced garlic cloves. Add the juice and zest of one lemon. Then, stir in one teaspoon each of dried oregano and parsley. Finish with salt and pepper to taste. This mix will coat the fish in great flavor. Next, take your tilapia fillets and place them in a baking dish. Pour the olive oil mix over the fish. Make sure each fillet is well-coated. Lay lemon slices on top for extra flavor and a nice look. Pop the dish into the oven for about 15 to 20 minutes. The fish is ready when it flakes easily with a fork. After baking, carefully take the tilapia out of the oven. Let it rest for a few minutes. This helps keep it juicy. When you serve, sprinkle fresh chopped parsley on top. It adds color and taste. Enjoy this simple and tasty meal with your favorite sides. For the full recipe, check out the details above. To get the best tilapia, check the cooking time. Fish cooks fast. Bake it for 15 to 20 minutes at 375°F (190°C). Look for fish that flakes easily with a fork. Use a food thermometer if you want. Fish should reach 145°F (63°C). This way, you know it’s safe to eat and tasty. You can change the taste of your tilapia. Try adding different herbs. Basil, cilantro, or thyme can all work well. You can also use lime juice instead of lemon. If you like a spicy kick, add red pepper flakes or chili powder. Each change brings a new twist to your dish. Baked lemon garlic tilapia pairs well with many sides. You can serve it with rice or quinoa for a healthy meal. Steamed broccoli or green beans add color and nutrients. A fresh salad gives a nice crunch. Try a simple cucumber salad with lemon dressing. All these sides make your meal more balanced and tasty. For more details, check the Full Recipe. {{image_2}} You can add fresh herbs to make this dish even better. Try using thyme, basil, or dill. Just chop the herbs and mix them into your olive oil mixture. This will give your tilapia extra flavor and aroma. You can also sprinkle some herbs on top before baking. The herbs add a nice touch that makes the dish feel fancy. For an Asian twist, change the marinade. Replace lemon juice with soy sauce. Add a bit of ginger and sesame oil for a unique flavor. You can also toss in some sliced green onions. This version pairs well with rice or stir-fried veggies. It’s a fun way to explore new tastes while keeping the cooking simple. If you love creamy sauces, this variation is for you. After baking, add a quick sauce made with cream cheese and lemon juice. Just mix these in a bowl until smooth. Pour it over the tilapia right before serving. This adds richness and a nice tang. Serve with a side salad for a complete meal. These variations keep the dish fresh and exciting. You can easily switch things up based on what you have at home. After enjoying Baked Lemon Garlic Tilapia, you may have some leftovers. First, let the fish cool down to room temperature. Next, place the leftover tilapia in an airtight container. Make sure to cover it well to keep it fresh. Store it in the fridge for up to three days. This keeps the fish safe to eat later. If you want to save the tilapia for a longer time, freezing is a great option. Wrap each fillet tightly in plastic wrap. Then, place them in a freezer bag or container. Be sure to squeeze out any air to prevent freezer burn. You can freeze the tilapia for up to three months. When you're ready to eat, just thaw it in the fridge overnight. Reheating tilapia can be simple. Preheat your oven to 350°F (175°C). Place the fillets on a baking sheet lined with parchment paper. Cover them with foil to keep them moist. Heat for about 10-15 minutes or until warm. You can also reheat in a microwave. Just place the fish on a microwave-safe plate and cover it with a damp paper towel. Heat it in short bursts until warmed through. Enjoy your meal just like the first time with these tips! Bake tilapia for about 15 to 20 minutes. The fish is done when it flakes easily with a fork. This quick cooking time makes it perfect for busy nights. Yes, you can use other fish like cod or haddock. Each fish has a unique flavor, but the lemon and garlic work well with any white fish. Just watch the baking time, as different fish may need more or less time. Tilapia is a lean source of protein. It is low in calories, making it a great choice for healthy meals. This fish is also rich in vitamins and minerals like B12 and selenium. Eating tilapia may support heart health and muscle function. It is a smart addition to your diet! In this post, we explored how to prepare delicious baked tilapia using simple ingredients. We discussed quality ingredients, substitutions, and provided step-by-step instructions to ensure easy cooking. I shared tips for perfect cooking and variations to spice things up. Tilapia is versatile and healthy, making it a great choice for many meals. Try out these methods and enjoy a tasty dish that your family will love. Happy cooking!

Baked Lemon Garlic Tilapia Simple and Tasty Meal

Are you ready to whip up a meal that’s both simple and bursting with flavor? Baked Lemon Garlic Tilapia is

- 4 cups fresh baby spinach - 1 cup strawberries - ½ cup feta cheese - ¼ cup walnuts - ¼ cup red onion - ½ cup sunflower seeds - ¼ cup olive oil - 3 tablespoons apple cider vinegar - 2 tablespoons honey or maple syrup - 1 tablespoon poppy seeds - Salt and pepper, to taste For a vibrant Strawberry Spinach Salad, fresh ingredients shine. You need baby spinach, as it gives a soft, base layer. Strawberries add a sweet pop. Feta cheese provides a creamy, tangy bite. Walnuts give a nice crunch and rich flavor. Next, red onion brings sharpness, while sunflower seeds add extra crunch. Now, let’s talk about the dressing. Olive oil creates a smooth texture. Apple cider vinegar adds tang, while honey or maple syrup balances the flavors with sweetness. Finally, poppy seeds give a delightful crunch and a unique look. You can find the full recipe with all the steps to make this salad at home. Enjoy making this delicious dish! To make the dressing, first grab a small bowl. Whisk together the olive oil and apple cider vinegar. Add honey or maple syrup for sweetness. Then, sprinkle in the poppy seeds. Finally, season with salt and pepper to taste. This simple dressing adds a great flavor. In a large salad bowl, create a base with the fresh baby spinach. This makes a nice green layer. Next, layer the sliced strawberries on top. Follow that with crumbled feta cheese for a creamy touch. Add toasted walnuts for crunch. Then, sprinkle thinly sliced red onion for a bit of bite. Finally, finish with sunflower seeds for extra texture. Now comes the fun part! Drizzle the poppyseed dressing generously over the salad. Be sure to coat all the ingredients. Gently toss the salad to combine everything well. This helps the flavors mix perfectly. Serve immediately for the freshest taste. You can find the Full Recipe to guide you through this delightful dish. To make a great Strawberry Spinach Salad, start with fresh ingredients. When picking strawberries, look for bright red ones. They should feel firm and smell sweet. Avoid berries with green or white spots. Fresh spinach is just as important. Choose vibrant, crisp leaves. They should not have any brown edges or wilting. Fresh spinach adds a nice crunch to your salad. The poppyseed dressing makes the salad shine. You can adjust the sweetness by adding more honey or maple syrup. Taste it as you mix. If you want a sweeter dressing, add more. To store the dressing, keep it in a jar with a lid. It stays fresh in the fridge for about a week. Just give it a shake before using it again. This salad tastes best when served right away. The spinach stays crisp, and the flavors pop. If you want to add protein, grilled chicken or salmon works well. These pair nicely with the sweet strawberries and tangy feta. Enjoy your salad as a light meal or side dish! For the full recipe, check out the details above. {{image_2}} You can easily change this salad to fit your taste. Try adding other fruits like blueberries or diced apples. They add sweetness and color. You can also switch cheeses. Goat cheese or mozzarella can bring new flavors. These small changes can make the salad feel fresh and exciting. If you want a vegan option, swap honey for maple syrup. This keeps the salad sweet without using animal products. If you are gluten-free, you can choose different nuts. Pecans or pumpkin seeds work well and add crunch. You can change the salad with the seasons. In winter, try using kale instead of spinach. Kale is hearty and works well with the dressing. In summer, add more veggies like cucumbers or bell peppers. This keeps the salad light and refreshing. For the full recipe, check out the Sweet & Crunchy Strawberry Spinach Salad. To keep your leftover salad fresh, store it in an airtight container. Place it in the fridge right away. This helps keep the spinach crisp and the strawberries juicy. If you want to avoid sogginess, do not add the dressing until you are ready to eat. This keeps everything crunchy. You can store homemade poppyseed dressing in a jar. Seal it tightly and keep it in the fridge. It will stay fresh for about one week. If you notice any change in smell or texture, it’s best to toss it out. You can prep your salad ingredients ahead of time. Wash and dry the spinach, slice the strawberries, and chop the nuts. Store them separately in the fridge. This makes it easy to grab and assemble your salad for quick lunches. You can even make the salad a day in advance, but remember to add the dressing just before serving for the best taste. For the full recipe, check out [Full Recipe]. Yes, you can prepare the salad ahead of time. To do this, keep the dressing separate until you are ready to serve. Wash and slice the strawberries and keep them in the fridge. Store the spinach and other salad items in airtight containers. This way, they stay fresh and crisp. When you are ready to eat, mix everything together and add the dressing. This salad is very versatile. You can try other dressings like balsamic vinaigrette, honey mustard, or citrus dressings. Each dressing adds a new twist to the flavors. A creamy ranch or a yogurt-based dressing can also work well. Feel free to explore and find your favorite! If stored correctly, the salad can last for about two days in the fridge. Keep the dressing separate to avoid sogginess. Once you add the dressing, aim to eat it within a few hours for the best taste. Always check for freshness before serving. This salad combines fresh spinach, strawberries, and feta for a burst of flavor. You learned how to make a tasty poppyseed dressing and assemble the salad step-by-step. Remember to choose ripe produce for the best taste. Enjoy this salad fresh, but feel free to customize it with other fruits or nuts. Store leftovers correctly to keep them crisp. With these tips and variations, you can savor this dish all year round.

Strawberry Spinach Salad with Poppyseed Dressing Delight

If you’re looking for a fresh, vibrant dish, I have just the recipe for you: Strawberry Spinach Salad with Poppyseed

To make roasted garlic hummus, you will need: - 1 cup canned chickpeas, drained and rinsed - 1/4 cup tahini - 3-4 cloves of garlic, roasted - 2 tablespoons lemon juice - 2 tablespoons olive oil (plus extra for drizzling) - 1 teaspoon ground cumin - Salt to taste - Water (as needed for consistency) - Fresh parsley, chopped (for garnish) - Paprika (for garnish) - Chickpeas: High in protein and fiber, they help with digestion. - Tahini: Made from sesame seeds, it is rich in healthy fats and calcium. - Garlic: Good for heart health and boosts the immune system. - Lemon Juice: Provides vitamin C and adds a zesty flavor. - Olive Oil: Contains healthy fats and antioxidants. You can swap some ingredients if needed: - Chickpeas: Use cooked white beans for a different flavor. - Tahini: Almond or sunflower seed butter works well too. - Garlic: Use garlic powder if you do not have fresh garlic. - Lemon Juice: Lime juice can be a good alternative. - Olive Oil: Any neutral oil can replace olive oil if necessary. Creating this roasted garlic hummus is simple and fun. For the full recipe, check out the details above. Enjoy making this tasty treat! To make roasted garlic hummus, follow these simple steps. First, preheat your oven to 400°F (200°C). Wrap the garlic cloves in foil. Roast them for 20-25 minutes until soft and sweet. Let the garlic cool a bit before using. Next, drain and rinse the chickpeas. In a food processor, add the chickpeas, tahini, roasted garlic, lemon juice, olive oil, ground cumin, and a pinch of salt. Blend these ingredients until smooth. If the mixture is too thick, add water one tablespoon at a time. Blend again until you reach the right consistency. Taste it, and adjust the salt if needed. Once smooth, spoon the hummus into a serving dish. Make a small well in the center. Drizzle some olive oil on top. Roasting garlic is easy and fun! Start by choosing fresh garlic bulbs. Peel off the outer layers, but keep the cloves intact. Cut the top off the bulb to expose the cloves slightly. Drizzle the exposed cloves with olive oil. Wrap the bulb tightly in foil to keep it moist. Place it in the oven and roast. You will know it's done when the cloves are soft and golden brown. Roasted garlic adds a rich flavor to your hummus. To get the perfect hummus texture, it’s all about balance. If your hummus is too thick, add a little water and blend again. The water should help it become creamy. For a more vibrant taste, you can add more lemon juice. Always taste your hummus before serving. If you want it smoother, blend a bit longer. Remember, you can customize it to your liking! Enjoy this tasty recipe for roasted garlic hummus. You can find the full recipe above. To keep your roasted garlic hummus fresh, store it in an airtight container. This helps prevent it from drying out. You can keep it in the fridge for up to a week. If you want to store it longer, freeze it. Just make sure to leave some space in the container for expansion as it freezes. Roasted garlic hummus is great with many foods. Try serving it with warm pita bread or fresh veggie sticks. You can also add it to a mezze platter with olives and stuffed grape leaves. For a fun twist, use it as a spread on sandwiches or wraps. To boost the flavor, add herbs and spices. Fresh herbs like parsley or cilantro can brighten it up. You can also mix in some cumin or smoked paprika for a deeper taste. If you like heat, consider adding cayenne pepper or a dash of chili powder. For more ideas, check out the Full Recipe. {{image_2}} You can make many types of hummus. For a spicy kick, add chili flakes or jalapeños. This gives the hummus a fun heat. If you want a sweet twist, try beetroot. It adds color and a rich taste. Just blend cooked beetroot into your hummus for a vibrant dish. Feel free to get creative! Add roasted red peppers for a smoky flavor. You can mix in sun-dried tomatoes for extra zest. A handful of olives can make it briny and bold. Herbs like basil or cilantro also add fresh taste. Each of these options adds a new layer of flavor. Hummus pairs well with many dips. Try serving it with tzatziki for a cool contrast. Baba ghanoush is another great choice. It adds a creamy, smoky flavor that goes well with hummus. You can also serve it with a spicy salsa for a fun dip platter. Mix and match your dips to make an exciting spread! For the full recipe, check out the Roasted Garlic Hummus section. To keep your roasted garlic hummus fresh, store it in an airtight container. Make sure the lid closes tightly. This helps to keep out air and moisture, which can spoil the hummus. Place the container in the fridge right after you finish serving. Always use a clean spoon to scoop out your hummus. This prevents germs from getting in. Homemade roasted garlic hummus lasts about 4 to 7 days in the fridge. If you want to keep it longer, freezing works great. Put the hummus in a freezer-safe container or bag. Leave some space at the top, as it will expand when frozen. It can last up to three months in the freezer. When you are ready to eat it, let it thaw in the fridge overnight. Check your hummus before using it. If you see mold on top, throw it away. Also, if it smells sour or off, do not eat it. A change in texture can be a sign too. If it seems very watery or has a strange color, it is best to discard it. Always trust your senses when it comes to food safety. To make roasted garlic hummus, follow these steps: 1. Roast the Garlic: Preheat your oven to 400°F. Wrap garlic cloves in foil and roast for 20-25 minutes. They should be soft and sweet. 2. Blend Ingredients: In a food processor, add 1 cup of drained chickpeas, 1/4 cup tahini, the roasted garlic, 2 tablespoons of lemon juice, 2 tablespoons of olive oil, 1 teaspoon of ground cumin, and salt. 3. Process to Smooth: Blend until smooth. If it is thick, add water slowly until it reaches the right consistency. 4. Serve: Spoon it into a dish, create a well in the center, and drizzle with olive oil. 5. Garnish: Top with chopped parsley and paprika. You can find the full recipe above. Serve hummus with warm pita bread, fresh veggies, and crunchy crackers. It works great as a dip or spread. You can make a mezze platter with olives and stuffed grape leaves for more variety. Hummus is also tasty on sandwiches or wraps. Yes, many stores sell roasted garlic hummus. Look for it in the refrigerated section. Brands may vary in taste and texture. Homemade hummus tastes fresher and can be tailored to your liking. Roasted garlic hummus is nutritious. Here are some benefits: - High in Protein: Chickpeas provide plant-based protein. - Rich in Fiber: Good for digestion and keeps you full. - Heart-Healthy Fats: Olive oil adds healthy fats. - Antioxidants: Garlic has properties that may support your immune system. Enjoying hummus can add flavor and nutrition to your meals! Roasted garlic hummus combines rich flavors with simple steps. We covered key ingredients, cooking tips, and variations. You can customize it to your liking, whether you prefer spicy or herb-infused flavors. Storing it right ensures freshness, and knowing spoilage signs keeps you safe. Enjoy making this delicious dip at home. With practice, you’ll master the craft of creating tasty hummus that impresses everyone. It's easy, fun, and healthy! Enjoy the process of making something special for yourself and others.

Roasted Garlic Hummus Tasty and Simple Recipe

Are you ready to elevate your snack game? This delicious roasted garlic hummus is not just tasty, it’s easy to

- 3 ears of fresh corn, husked - 2 cups cherry tomatoes, halved - 1 medium cucumber, diced - 1/4 red onion, finely chopped - 1/4 cup fresh basil leaves, chopped - 1/4 cup feta cheese, crumbled - 3 tablespoons olive oil - 2 tablespoons balsamic vinegar - Salt and pepper to taste - Total Preparation Time: 15 minutes - Number of Servings: 4 Gathering fresh ingredients is key to this salad's success. The corn should be sweet, the tomatoes ripe, and the basil fragrant. Each element adds a unique flavor and texture, making the salad vibrant and delicious. You can find fresh corn in local markets during summer. Cherry tomatoes burst with sweetness, while cucumber adds crunch. Red onion gives a mild bite, and fresh basil ties it all together. Don't forget the feta for a creamy finish. This simple gathering of fresh produce makes the salad not only tasty but also refreshing. The prep time is quick, so you can enjoy this dish in no time. For the full recipe, refer to the Sunny Summer Corn & Tomato Salad section. Boiling Method Start by filling a large pot with water. Add a pinch of salt and bring it to a boil. Once the water is bubbling, add the husked corn. Boil the corn for about 5 to 7 minutes until it is tender. This method keeps the corn sweet and juicy. Cooling Process After boiling, carefully remove the corn from the pot. Let it cool for a few minutes on a cutting board. Once it's cool enough to handle, use a sharp knife to slice off the kernels. Place the fresh corn kernels in a large mixing bowl. Slicing of Tomatoes and Cucumber Next, take 2 cups of cherry tomatoes and slice them in half. Their sweetness adds a bright flavor. Then, grab one medium cucumber and dice it into small pieces. The cucumber adds a refreshing crunch to your salad. Chopping the Onion and Basil Now, finely chop 1/4 of a red onion. This adds a nice bite to the dish. Also, chop 1/4 cup of fresh basil leaves. The basil gives your salad a lovely aroma and taste. Creating the Dressing In a small bowl, whisk together 3 tablespoons of olive oil and 2 tablespoons of balsamic vinegar. Add salt and pepper to taste for a burst of flavor. This dressing brings everything together. Combining All Ingredients Now, add the halved tomatoes, diced cucumber, chopped onion, and basil to the bowl with the corn. Drizzle the dressing over the top and toss gently. Finally, sprinkle 1/4 cup of crumbled feta cheese on top. Give it one last gentle toss to mix the cheese throughout the salad. This Summer Corn Tomato Salad is a fresh and vibrant dish that captures the essence of summer. For the full recipe, check out the details above! Selecting Fresh Corn and Tomatoes To get the best flavor, look for fresh corn. Choose ears with bright green husks. The kernels should feel plump and milky when you press them. For tomatoes, pick ones that are firm and fragrant. Cherry tomatoes should be bright red and shiny. How to Pick a Ripe Cucumber For cucumbers, pick ones that are firm and dark green. Avoid any with soft spots or wrinkles. A ripe cucumber should feel heavy for its size. The skin should look smooth and shiny. Serving Suggestions Serve the salad in a large bowl or on a platter. This lets everyone see the bright colors. You can also use small bowls for individual servings. This adds a personal touch. Garnishing Tips For garnishing, add extra basil leaves on top. A sprinkle of feta cheese gives it a nice look. You can also drizzle a bit of balsamic vinegar over the top for shine. Additional Herbs or Spices To boost the taste, try adding fresh herbs like parsley or mint. A squeeze of lemon adds brightness, too. If you like heat, consider a pinch of red pepper flakes. Pairing Suggestions This salad pairs well with grilled chicken or fish. It makes a great side for summer barbecues. You can also serve it with crusty bread for a light meal. For the full recipe, check out Sunny Summer Corn & Tomato Salad! {{image_2}} When it comes to making a Summer Corn Tomato Salad, you can play with many ideas. Here are some fun variations to try. You can turn this salad into a filling meal. Adding protein boosts flavor and nutrition. Here are two great options: - Grilled Chicken: Slice grilled chicken breast and mix it in. The smoky flavor pairs well with the fresh veggies. - Shrimp or Tofu: Cook shrimp until pink, or use cubed tofu for a plant-based choice. Both add great texture. Cheese can change the whole taste of your salad. If you want to switch things up, consider these ideas: - Switch from Feta: Try goat cheese or mozzarella for a creamier bite. Each cheese brings its own flavor. - Dairy-Free Alternatives: Use cashew cheese or nutritional yeast for a tasty vegan option. They add a nice richness without dairy. You can adapt this salad to fit the season. Here’s how to incorporate seasonal produce: - Incorporating Other Summer Veggies: Toss in bell peppers, zucchini, or radishes for extra crunch and color. The more, the merrier! - Fall Versions with Different Ingredients: Use roasted squash or apples in the fall. These ingredients give a warm, cozy twist. Explore these variations to make your Summer Corn Tomato Salad even more exciting. For the full recipe, check out Sunny Summer Corn & Tomato Salad. To keep your salad fresh, store it in an airtight container. This helps prevent moisture and keeps flavors intact. Place a layer of paper towels at the bottom of the container to absorb excess moisture. This simple trick works wonders. For leftovers, it is best to store them in the same container. Just make sure to seal it tightly. If the salad has dressing, it is better to keep the dressing separate. This helps maintain the crispness of the veggies. In the refrigerator, this salad lasts about 3 days. After that, the veggies may become soggy. Always check for freshness before eating. Look for any changes in color or texture. Freezing this salad is not recommended. The tomatoes and cucumbers will lose their crunch. They may become mushy when thawed. If you need to freeze, consider only freezing the corn. It can be added to other dishes later. To refresh leftovers, add a splash of olive oil or vinegar. This brightens the flavors again. You can also toss in fresh herbs for an extra kick. Transform leftovers into a wrap or sandwich. Use a tortilla or bread. Spread a layer of hummus or cream cheese before adding the salad. This creates a tasty and healthy meal option. Yes, you can use frozen corn. Fresh corn has a sweet taste and crisp bite. However, frozen corn is handy and saves time. Just thaw it and drain excess water before adding it to your salad. For the best flavor, I recommend fresh corn when it's in season. If you want a different cheese, try goat cheese or ricotta. Both have creamy textures and blend well. For a dairy-free option, use crumbled tofu mixed with lemon juice. This will give you a similar taste without dairy. This salad stays fresh for about three days in the fridge. Store it in an airtight container to keep it crisp. The tomatoes may release juice over time, so enjoy it within a couple of days for the best flavor. To make this salad vegan, omit the feta cheese. Instead, use avocado for creaminess or add nuts for crunch. You still get all the flavors and freshness without any animal products. Yes, you can prepare this salad ahead. Just mix all ingredients except the dressing and cheese. Store it in the fridge. Add the dressing and cheese right before serving to keep everything fresh and tasty. Check out the Full Recipe for more details. This blog post provided a clear guide to making a fresh salad. You need fresh veggies like corn, tomatoes, and cucumber. Mixing in feta cheese and a tasty dressing enhances flavors. I shared tips on ingredients, presentation, and how to store leftovers properly. Now, you can add your twist with protein and different cheeses. Keeping your salad fresh is simple. Enjoy trying the recipe and making it your own!

Summer Corn Tomato Salad Fresh and Flavorful Dish

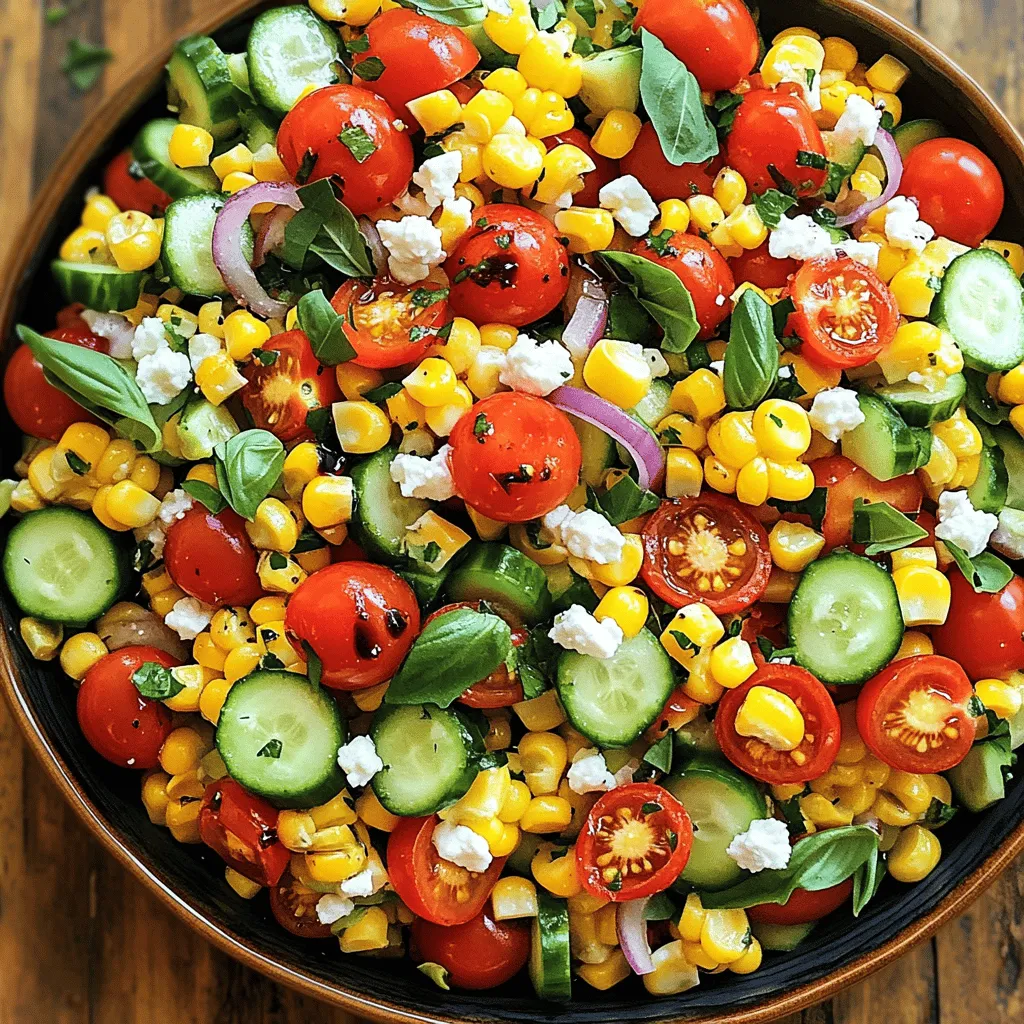
Looking for a bright and tasty dish that screams summer? This Summer Corn Tomato Salad combines fresh corn, ripe tomatoes,

Older posts
Newer posts
← Previous Page1 … Page60 Page61 Page62 … Page84 Next →

dsad

© 2026 Lisa Dishes • Built with GeneratePress

Our Policies

  • Copyright Policy
  • Cookie Policy
  • GDPR Policy
  • Privacy Policy
  • Disclaimer
  • Terms Of Use

More Information

  • Home
  • About
  • Contact
  • Appetizers
  • Dessert
  • Dinner
  • Drinks
©2026, Lisa Dishes About Back To Top