Skip to content
DisclaimerTerms Of UseGDPR PolicyCookie Policy

Lisa Dishes

  • Home
  • Drinks
  • Appetizers
  • Dinner
  • Dessert
  • About
  • Contact
  • Privacy Policy
DisclaimerTerms Of UseGDPR PolicyCookie Policy

NO-ING-IMG

To make these delightful no bake lemon cheesecake cups, gather these ingredients: - 1 cup graham cracker crumbs - 2 tablespoons granulated sugar - 1/4 cup unsalted butter, melted - 8 oz cream cheese, softened - 1/2 cup powdered sugar - 1/2 cup sour cream - 1/4 cup fresh lemon juice - Zest of 1 lemon - 1 teaspoon vanilla extract - Whipped cream for topping - Lemon slices and mint leaves for garnish You can easily swap some ingredients for different flavors or dietary needs: - Instead of graham crackers, try digestive biscuits or crushed cookies. - For a gluten-free option, use gluten-free graham crackers or nuts. - If you want a lighter option, use Greek yogurt instead of sour cream. - You can use any type of cream cheese, including reduced-fat or dairy-free varieties. - If you don’t have fresh lemon juice, bottled lemon juice works too, but fresh is best. Quality makes a big difference in taste. Here are my tips: - Choose fresh lemons for the best flavor. Look for bright, firm lemons. - For cream cheese, pick a full-fat variety. It gives the best creamy texture. - Use unsalted butter to control the salt in your crust. - Check expiration dates on dairy items like cream cheese and sour cream. - When buying graham crackers, aim for those with simple, wholesome ingredients. These tips will help you create the best no bake lemon cheesecake cups. For the complete recipe, check the [Full Recipe]. To make the crust, you first need graham cracker crumbs. I use about 1 cup. You can crush whole crackers or buy pre-made crumbs. Next, mix the crumbs with 2 tablespoons of granulated sugar. This adds sweetness. Then, pour in 1/4 cup of melted, unsalted butter. Mix well until it looks like wet sand. Now, take about 2 tablespoons of this mixture. Spoon it into the bottom of your serving cups. Press down firmly. This forms a solid crust layer. Set these cups aside. They will hold all the yummy filling later. Now it's time to make the filling. In a large bowl, add 8 oz of softened cream cheese. Use an electric mixer to beat it until smooth. Then, add 1/2 cup of powdered sugar. This makes the filling sweet. Keep mixing until it's creamy and fluffy. Next, mix in 1/2 cup of sour cream. This adds a nice tang. Now, squeeze in 1/4 cup of fresh lemon juice. Don't forget the zest of 1 lemon for extra flavor! Finally, add 1 teaspoon of vanilla extract. Mix everything until it is fully combined. Your lemon cheesecake filling is now ready! Spoon the lemon cheesecake mixture into each cup. Fill them about 3/4 full. Use a spatula to smooth the top. This makes it look nice and neat. Now, it's time to chill. Place the cups in the fridge for at least 4 hours. If you can, let them chill overnight. This helps the cheesecake set properly. Before you serve, add a dollop of whipped cream on top. You can also add a slice of lemon and a mint leaf for garnish. This will make your no bake lemon cheesecake cups look amazing! For the full recipe, check out the earlier section. Enjoy your treat! To get a smooth and creamy cheesecake, start with softened cream cheese. Cold cream cheese can make lumps. Beat it well with powdered sugar until it is smooth. Then add sour cream, lemon juice, and zest. Mix until fluffy. This will give your cheesecake a light texture. Chill your cheesecake cups for at least four hours. This helps them set and firm up. For the best taste and texture, refrigerate overnight. The longer they sit, the better the flavors blend. Make sure to cover them with plastic wrap to keep them fresh. Serve these cups with style! Top each with a dollop of whipped cream. A slice of lemon and a mint leaf add a nice touch. Use clear cups to show off the layers. This makes for a pretty dessert that guests will love. For the full recipe, check out the earlier section. {{image_2}} You can change up the flavor in your cheesecake cups. Try adding berries! Simply mix in fresh strawberries, blueberries, or raspberries. Use about one cup of berries in the cream cheese mixture. This adds a sweet twist and a pop of color. You can also top the cups with more berries after chilling. They look great and taste even better! If you want a different crust, think about cookies or nuts. You can use crushed Oreos or chocolate cookies for a rich flavor. For a nutty option, try crushed almonds or walnuts. Just mix the cookie or nut crumbs with melted butter, just like you do with graham crackers. This gives you a tasty base with a fun twist! You can make these cheesecake cups vegan or dairy-free. Use dairy-free cream cheese and coconut cream instead of sour cream. For the crust, ensure your cookies are vegan-friendly. Coconut milk can replace the cream cheese for a lighter option. This way, everyone can enjoy these delicious treats, no matter their diet! For the full recipe, check back to create your perfect no bake lemon cheesecake cups! To keep your no bake lemon cheesecake cups fresh, start with airtight containers. These help prevent moisture and air from spoiling your treat. Always let them cool completely before sealing. If you don't have a container, you can cover them tightly with plastic wrap. This keeps them safe in the fridge. You can store these cheesecake cups in the fridge for about 3 to 5 days. Just make sure they stay covered. The longer they sit, the more the crust may soften. They taste best when eaten fresh, but they still make a great treat after a few days. If you want to save your cheesecake cups for later, freezing works well. First, let them chill in the fridge until firm. Then, place them in a freezer-safe container. You can also wrap them individually in plastic wrap. They can last in the freezer for up to 2 months. When you're ready to eat, just move them to the fridge for a few hours to thaw. Enjoy these desserts later with the same great taste! For the full recipe, check out the details above. Yes, you can use lemon extract. However, use less than the juice. Start with one teaspoon. Lemon extract is stronger than fresh juice. Adjust to your taste. You will know the cheesecake is set when it feels firm. Lightly touch the top; it should not jiggle. Refrigerate for at least four hours. For the best taste, chill overnight. You can use Greek yogurt as a great substitute. It has a similar texture and tang. You can also use cream cheese if needed. Just make sure it’s softened well. This blog post covered how to make delicious no-bake lemon cheesecake cups. You learned about key ingredients, substitutions, and ways to choose quality items. We discussed preparing the crust and filling, along with assembly tips. You found variations for flavors and crusts, plus vegan options. Storing tips helped ensure freshness. These desserts are easy and fun to make. Enjoy the creative process and impress your friends! You have all the tools to create a tasty treat. Now, go make something great!

No Bake Lemon Cheesecake Cups Simple and Tasty Treat

Are you craving a sweet treat that’s easy to make? Look no further! My No Bake Lemon Cheesecake Cups are

To make the One Pot Creamy Mushroom Orzo, gather these simple ingredients: - 1 cup orzo pasta - 2 cups vegetable broth - 1 cup mushrooms, sliced (cremini or button) - 1 small onion, diced - 2 cloves garlic, minced - 1 cup spinach, fresh - ½ cup heavy cream or coconut cream for a dairy-free option - ¼ cup grated Parmesan cheese (optional) - 2 tablespoons olive oil - 1 teaspoon dried thyme - Salt and pepper to taste - Fresh parsley, chopped (for garnish) - Orzo pasta: This small pasta cooks quickly and soaks up flavor well. - Mushrooms: They add a rich, earthy taste and provide B vitamins. - Onion and garlic: These aromatics boost flavor and have health benefits. - Spinach: It packs in nutrients, like iron and vitamins A and C. - Heavy cream or coconut cream: They add creaminess and enhance the dish's texture. - Thyme: This herb brings a warm, savory note to your dish. - For a gluten-free option, swap orzo with gluten-free pasta. - If you want a vegan version, use coconut cream and skip the cheese. - You can replace mushrooms with zucchini or bell peppers for a different taste. - If you dislike spinach, try kale or Swiss chard for added greens. This ingredient list is your guide to making this comforting dish. You can find the Full Recipe above to get started. 1. Start by heating the olive oil in a large pot over medium heat. 2. Add the diced onions and sauté until they become soft and clear, about 3-4 minutes. 3. Next, toss in the minced garlic and sliced mushrooms. Cook them for 5-7 minutes until the mushrooms turn brown and release their juices. 4. Stir in the orzo pasta, dried thyme, salt, and pepper. Toast the orzo for just 1-2 minutes to boost its flavor. 5. Pour in the vegetable broth and raise the heat until it boils. Once boiling, lower the heat, cover the pot, and let it simmer for 10-12 minutes. Stir it occasionally until the orzo is tender. 6. After cooking, mix in the heavy cream or coconut cream, fresh spinach, and grated Parmesan cheese, if you like. Stir until the spinach wilts and everything blends together nicely. 7. Taste your orzo and add more salt or pepper if you want. 8. Remove the pot from the heat and let it sit for a few minutes to thicken up before serving. To help you visualize the steps, here’s a quick guide: - Step 1: Look for the shimmering oil in the pot. - Step 2: Onions should be soft and clear. - Step 3: Mushrooms should be browned and juicy. - Step 4: The orzo will look shiny and coated. - Step 5: Broth should be bubbling before you cover it. - Step 6: The mix will turn creamy and colorful with spinach. - Step 7: Taste to ensure it’s seasoned well. - Step 8: It should look thick and inviting when served. - Not stirring enough: Stirring helps prevent sticking and burning. - Overcooking the orzo: Keep an eye on the time. Overcooked orzo gets mushy. - Skipping seasonings: Salt and pepper are key for flavor. - Not letting it sit: Letting it thicken is crucial for the right texture. - Using low-quality broth: A good broth makes a big difference in taste. With these steps, your One Pot Creamy Mushroom Orzo will be a hit! For the complete recipe, check out the Full Recipe section above. To get that creamy texture in your one pot creamy mushroom orzo, use heavy cream or coconut cream. Both options give a rich taste. Stir the cream in at the end of cooking. This keeps it smooth and thick. If you want a lighter dish, add more vegetable broth and less cream. You still get great flavor without it being too heavy. Using the right tools makes cooking easier. A large pot or Dutch oven is perfect for this dish. It helps all the ingredients blend well. A wooden spoon works best for stirring. It won't scratch your pot and gives good control. A good knife is key for chopping vegetables. Sharp knives make prep fast and safe. Prep your ingredients before you start. Chop the onions, garlic, and mushrooms ahead of time. This way, you spend less time at the stove. Use pre-sliced mushrooms to save even more time. If you want a quick meal, consider using a microwave to wilt the spinach. Just pop it in for a minute or two while your orzo cooks. This keeps everything moving along smoothly. For the full recipe, check out the detailed instructions above. {{image_2}} You can make this dish vegetarian easily. Just skip the Parmesan. For a vegan twist, use coconut cream instead of heavy cream. You can also add more veggies. Try bell peppers, peas, or zucchini for extra color and flavor. If you want to add protein, chicken is a great choice. Cook it before adding the onion. Dice it into small pieces and sauté it until golden. For a plant-based option, use firm tofu. Press it to remove excess water, then cube and sauté it with the mushrooms. Boost the flavor with herbs and spices. Fresh thyme, basil, or rosemary work well. You can also add a bit of lemon juice for brightness. Don’t forget about spices like paprika or red pepper flakes for some warmth and depth. Each addition makes your creamy mushroom orzo unique and exciting. Explore these variations to find your favorite twist on this comforting dish. After you make One Pot Creamy Mushroom Orzo, let it cool down. Place the orzo in an airtight container. It will stay fresh in your fridge for 3 to 4 days. If you want to keep it longer, freezing is a great option. To reheat your leftovers, you can use a microwave or a stovetop. If using a microwave, heat in short bursts. Stir every minute to avoid hot spots. If you use the stovetop, add a splash of vegetable broth to keep it creamy. Heat over medium until warm, stirring often. If you want to freeze the orzo, use a freezer-safe container. It will keep well for up to 2 months. When you are ready to eat, thaw it overnight in the fridge. Reheat it using the instructions above. You may need to add a bit more cream for extra richness. One Pot Creamy Mushroom Orzo can last in the fridge for about three to four days. Store it in an airtight container for best quality. If you want to keep it longer, you can freeze it for up to three months. Just remember to thaw it in the fridge before reheating. Yes, you can swap orzo for other types of pasta. Choose small shapes like ditalini, or small shells. Just adjust the cooking time as needed. Each type of pasta has its own texture and flavor, so feel free to experiment. Mushroom Orzo pairs well with a variety of sides. A simple green salad adds freshness. Garlic bread or crusty rolls can complement it nicely. You could also serve it alongside grilled chicken or roasted vegetables for a balanced meal. For a fun twist, try topping it with crispy bacon or sautéed shrimp for extra flavor. For the full recipe, check out the detailed instructions above. This post shared key ingredients and their benefits for one pot creamy mushroom orzo. I provided easy steps and tips to avoid common mistakes. You learned options for dietary needs, like vegetarian choices or flavor boosts. I also covered how to store leftovers and reheat them properly. In the end, making this dish is simple and fun. You have the tools and knowledge to enjoy a tasty meal that fits your needs. Dive in and start cooking!

One Pot Creamy Mushroom Orzo Flavorful Comfort Food

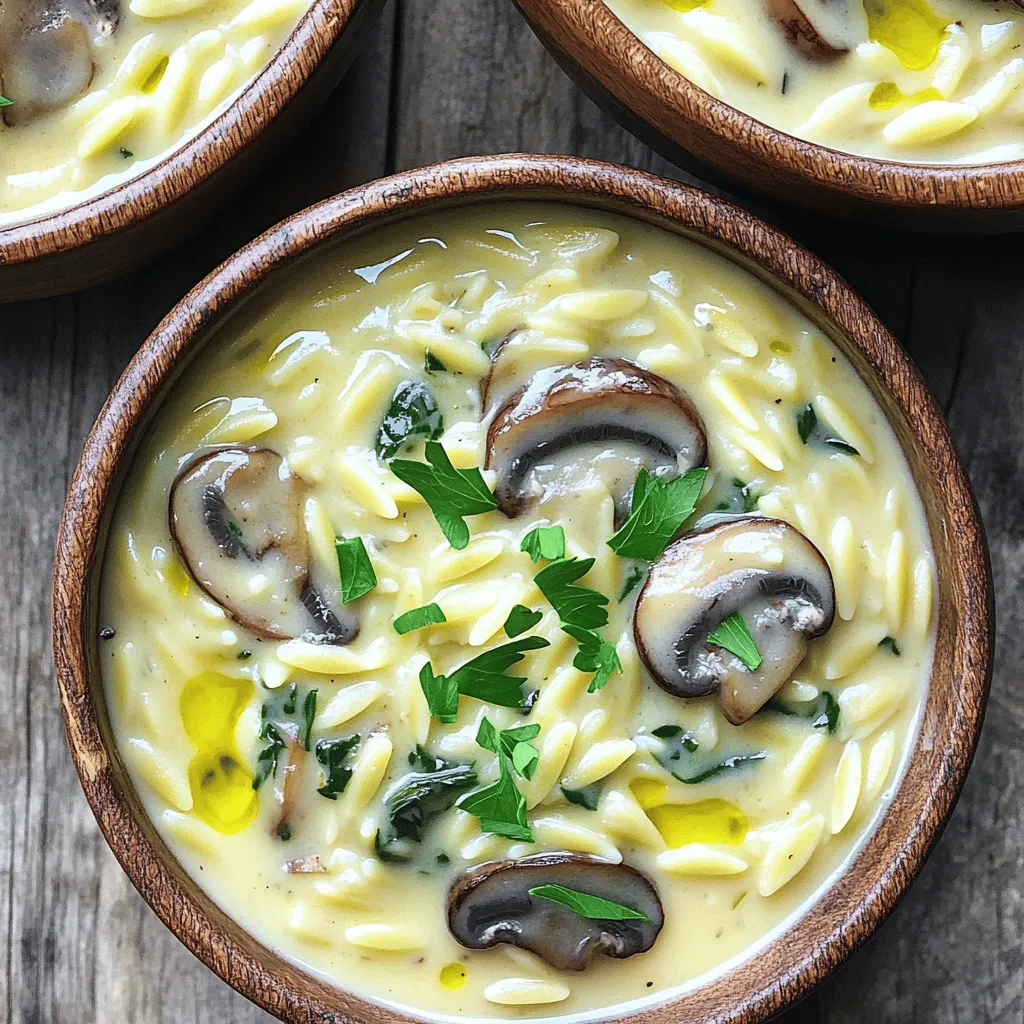
Craving a dish that warms your heart and fills your belly? Let me introduce you to One Pot Creamy Mushroom

To create your breakfast egg and cheese muffins, you’ll need: - 6 large eggs - 1 cup shredded cheddar cheese - ½ cup diced bell peppers (mix of colors for visual appeal) - ½ cup cooked and crumbled breakfast sausage (optional) - ¼ cup milk - 1 teaspoon garlic powder - 1 teaspoon onion powder - Salt and pepper to taste - 1 teaspoon chopped fresh chives or parsley (for garnish) - 6 English muffins, split Using fresh ingredients makes a big difference. Look for eggs that are local and organic. Fresh bell peppers should be bright and firm. If you opt for sausage, choose high-quality, fully cooked options. Fresh herbs, like chives or parsley, add a burst of flavor and color. You can use fresh vegetables too, such as spinach or zucchini, to boost nutrition. Cheddar is a classic choice for these muffins. It melts well and adds rich flavor. You can also try mozzarella for a milder taste or pepper jack for some spice. When it comes to meat, cooked bacon or turkey sausage works nicely. Always check the labels for additives and preservatives. You want options that are fresh and tasty. For the full recipe, refer to the scrumptious egg & cheese breakfast muffins section. To start, gather your ingredients. You need six large eggs, a cup of shredded cheddar cheese, and half a cup of diced bell peppers. If you like meat, include half a cup of cooked and crumbled breakfast sausage. In a bowl, crack the eggs and whisk them well. Add the milk, garlic powder, onion powder, salt, and pepper. Mix until it's smooth. Next, fold in the cheese, bell peppers, and sausage if you are using it. This egg mixture is rich and colorful. Now, let’s move to baking. Preheat your oven to 350°F (175°C). Prepare your muffin tin with non-stick spray or use muffin liners. This helps with easy removal later. Pour the egg mixture into each muffin cup, filling them about three-quarters full. Bake for 20-25 minutes. You want them slightly golden on top and set in the center. While they bake, toast your English muffins. This adds a nice crunch. Once they’re done, let them cool for a bit. Use a knife to run around the edges for easy removal. Serving is fun and simple! Place the baked egg muffins on top of the toasted English muffins. For a bright touch, garnish with fresh chives or parsley. You can also add a small bowl of salsa or hot sauce on the side for extra flavor. This makes for a tasty and colorful breakfast that everyone will enjoy. For the full recipe, check the earlier section. To make your muffins fluffy, beat the eggs well. Mix in the milk slowly. This helps create air pockets, making them light. Avoid over-mixing after adding the cheese and veggies. This keeps the texture airy. Bake them until they are just set; a little jiggle is okay. One big mistake is not preheating the oven. This can lead to uneven cooking. Another mistake is overfilling the muffin cups. Fill each cup only ¾ full. If you add too much, they will overflow. Lastly, don’t skip the cooling step. Letting them cool slightly helps them firm up for easy removal. Serve your muffins warm, right after baking. Place them on toasted English muffins for a nice crunch. Add fresh herbs on top for color and taste. Offer salsa or hot sauce on the side for extra flavor. For a fun twist, pair them with a fruit salad for a balanced meal. For the full recipe, check out the Scrumptious Egg & Cheese Breakfast Muffins section. {{image_2}} You can easily make these muffins without meat. Just skip the sausage and add more veggies. Try using spinach, mushrooms, or zucchini. These options add great taste and color. You can also swap the cheddar for a tasty cheese like feta or goat cheese. This gives a nice twist to the recipe. Feel free to mix up the ingredients. If you love spice, add diced jalapeños or a pinch of cayenne. Prefer a milder flavor? Use sweet bell peppers or even corn. You can also switch the cheese. Try mozzarella, pepper jack, or even a mix! Each choice changes the muffin's taste. Want to explore global tastes? Give these muffins an Italian twist. Add sun-dried tomatoes, basil, and mozzarella. For a Mexican flavor, mix in black beans, corn, and pepper jack cheese. You can even try a Mediterranean style with olives and feta. Each version brings a new adventure to your breakfast table. Check out the Full Recipe for more ideas! To keep your muffins fresh, let them cool completely. Place them in an airtight container. You can also wrap them in plastic wrap first. Store the container in the fridge if you plan to eat them within a week. For longer storage, use the freezer. When you want to enjoy your muffins again, preheat the oven to 350°F (175°C). Place the muffins on a baking sheet. Heat them for about 10-15 minutes. You can also use a microwave for quick reheating. Just heat each muffin for about 30 seconds to 1 minute. To freeze your muffins, wrap each one in plastic wrap. Then place them in a freezer bag. This keeps them from getting freezer burn. They can last up to three months in the freezer. To thaw, simply take them out and leave them at room temperature for a few hours. If you want them warm, reheat them in the oven or microwave. Enjoy your delicious breakfast anytime! For the full recipe, check out the instructions above. Yes, you can make these muffins ahead of time. I often prepare them the night before. Just follow the recipe and store them in the fridge. You can either bake them and reheat or make the egg mixture and bake fresh in the morning. This saves time and makes mornings easier. If you don’t have English muffins, you have options! You can use bagels, pita bread, or even tortillas. Each choice brings a unique twist to the muffins. Just remember to adjust the baking time if you change the base. These muffins last about four days in the fridge. Make sure to store them in an airtight container. If you want them to last longer, consider freezing them. They freeze well and can be reheated easily for a quick breakfast. For the full recipe, check the details above! In this post, we covered how to make tasty Breakfast Egg and Cheese Muffins. We discussed key ingredients, including fresh options, cheese, and meats. I shared step-by-step baking instructions and serving tips. We explored common mistakes and great storage ideas, too. These muffins are easy and fun to customize. Try different flavors to keep things fresh. Enjoy the process and make breakfast easier with these muffins. Happy baking!

Satisfying Breakfast Egg and Cheese Muffins Recipe

Looking for a quick, tasty way to start your day? You’re in the right place! My Breakfast Egg and Cheese

To make Vegan Sweet Potato Black Bean Chili, you'll need some key ingredients. Each one adds its unique flavor and texture. Here is a list of what you will need: - 2 medium sweet potatoes, peeled and diced - 1 can (15 oz) black beans, rinsed and drained - 1 can (15 oz) diced tomatoes - 1 large onion, chopped - 3 cloves garlic, minced - 1 bell pepper (any color), diced - 1 cup vegetable broth - 2 teaspoons chili powder - 1 teaspoon cumin - 1 teaspoon smoked paprika - 1/2 teaspoon cayenne pepper (adjust to taste) - Salt and pepper to taste - 2 tablespoons olive oil - Fresh cilantro for garnish - Avocado slices for serving (optional) This chili offers a great mix of flavors. Sweet potatoes provide natural sweetness. Black beans add protein and creaminess. The spices bring warmth and depth. You can add fresh cilantro or avocado on top for extra flavor. Each ingredient plays an important role, so don't skip any! For the full recipe, check out the details above. To make this chili, start with the sweet potatoes. First, wash them well. Then, use a peeler to remove the skin. Next, cut them into small cubes. Aim for pieces about half an inch wide. This size helps them cook evenly. Now, let’s chop the onion, garlic, and bell pepper. For the onion, slice off both ends. Cut it in half from top to bottom. Peel off the skin and chop it into small pieces. For the garlic, take three cloves, remove the skin, and mince them finely. For the bell pepper, cut it in half, remove the seeds, and chop it into small pieces. Having all your veggies ready makes cooking smooth and fun. Start cooking by heating olive oil in a large pot over medium heat. Once the oil is hot, add the chopped onion and bell pepper. Sauté them for about five minutes. You want the onion to look clear and soft. Then, add the minced garlic. Stir it for one more minute. You’ll love the smell! Next, add the diced sweet potatoes to the pot. Sprinkle in the chili powder, cumin, smoked paprika, cayenne pepper, salt, and pepper. Stir everything together. This step mixes the spices well with the veggies. Then, pour in the vegetable broth and the diced tomatoes. Bring the whole mix to a simmer. Cover the pot and let it cook for about 20 minutes. Stir it occasionally. This helps the sweet potatoes cook well and soak up all the flavor. When the sweet potatoes are tender, it’s time for the next step. Now, add the rinsed black beans to the pot. This adds protein and makes the chili heartier. Let it simmer for another five minutes. This step warms the black beans through. It’s also the time to taste your chili. If you like more heat, you can add more cayenne pepper now. Once everything is done, serve the chili hot. Don't forget to garnish it with fresh cilantro and avocado slices if you like. Enjoy this rich and flavorful dish! Check the Full Recipe for more details. To boost flavor in your chili, use fresh herbs. Fresh cilantro adds bright notes. You can also try lime juice for a zesty touch. When cooking, let the spices bloom. Heat them in oil first. This step draws out their essence. Adjust the spice level by adding cayenne pepper. Start with a little, then taste. Add more if you like heat. You can change the texture of your chili. For a creamy chili, blend part of it. This method thickens the mix while keeping some chunks. If you prefer a chunky chili, add more beans. You can also throw in corn for added crunch. Use a large, heavy pot for even cooking. A Dutch oven works great here. It retains heat and keeps your chili simmering well. A wooden spoon is best for stirring. It won’t scratch your pot and gives you control. A ladle helps for serving, making it easy to dish out. Check out the full recipe for more tips and details to make this dish shine! {{image_2}} You can change the beans used in this chili. Try kidney beans or pinto beans. If you want more veggies, add corn or zucchini. You can also swap sweet potatoes for butternut squash. For added texture, mix in quinoa or brown rice. These grains work well and make it hearty. Herbs and spices can change the taste. Try adding oregano or thyme for a fresh twist. You can also use fresh lime juice for a bright flavor. For a creamy touch, add vegan cheese or cashew cream. These options make the chili rich and satisfying. You can serve it with vegan sour cream on top for extra creaminess. To store leftovers, let the chili cool first. Use an airtight container. Place it in the fridge. It stays fresh for up to five days. When you want to eat it, reheat the chili in a pot over medium heat. Stir often to ensure even heating. You can also use a microwave. Heat in short bursts, stirring in between. For freezing, let the chili cool completely. Use freezer-safe containers or bags. Leave some space at the top for expansion. It can last up to three months in the freezer. When you're ready to eat, take it out and thaw it overnight in the fridge. To reheat, warm it in a pot over low heat. Stir frequently. You can also use the microwave. Heat until it is hot all the way through. Enjoy the rich flavors of your Vegan Sweet Potato Black Bean Chili! For the full recipe, refer to the main section. Yes, you can make this chili in a slow cooker. Here’s how: 1. Start by peeling and dicing the sweet potatoes. 2. Chop the onion, garlic, and bell pepper. 3. In a skillet, heat olive oil and sauté the onion and bell pepper for about 5 minutes. 4. Add the garlic and sauté for another minute. 5. Transfer the sautéed veggies to the slow cooker. 6. Add the diced sweet potatoes, black beans, diced tomatoes, and spices. 7. Pour in the vegetable broth. 8. Stir everything together. 9. Cook on low for 6-8 hours or high for 3-4 hours. This slow-cooking method gives the flavors time to blend well. Yes, this recipe is gluten-free. Here are some key ingredients: - Sweet potatoes - Black beans - Diced tomatoes - Vegetable broth Make sure to check the labels on your broth and spices. Some brands may add gluten. To spice up your chili, try these tips: - Add more cayenne pepper. Start with 1 teaspoon. - Mix in diced jalapeños or serrano peppers. - Use spicy chili powder instead of mild. These options will boost the heat without hiding the other flavors. You want to keep it tasty! This blog post covers how to make Vegan Sweet Potato Black Bean Chili. We explored key ingredients, including spices that enhance flavors. You learned step-by-step how to prep and cook the chili for the best taste and texture. Plus, we shared tips for variations and storing your leftovers. Remember, this chili is flexible. You can change ingredients or spice levels based on your taste. Experiment to find what you love most. Enjoy your cooking!

Vegan Sweet Potato Black Bean Chili Rich in Flavor

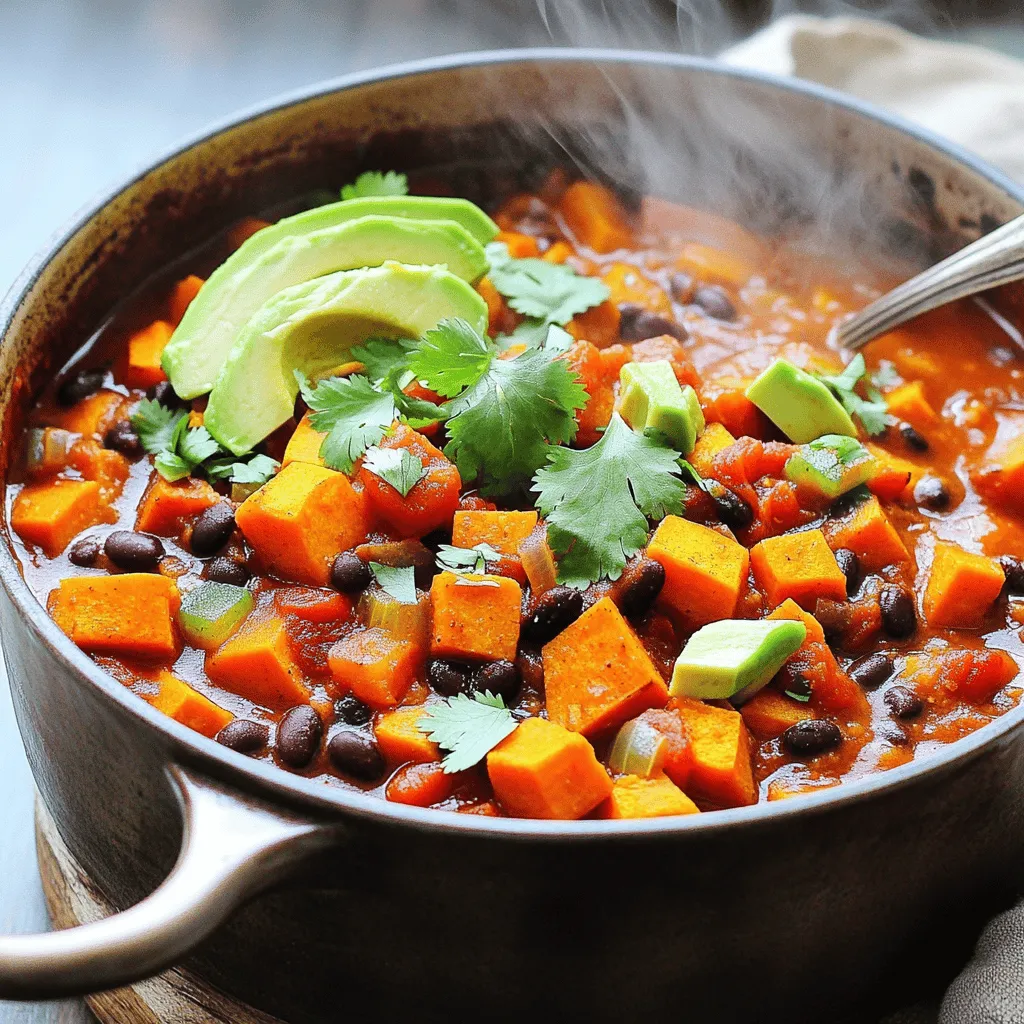
Are you ready to dive into a bowl of heartwarming goodness? My Vegan Sweet Potato Black Bean Chili is bursting

- 1 cup cornmeal - 1 cup all-purpose flour - 1 tablespoon baking powder - 1/2 teaspoon salt - 1/4 teaspoon black pepper - 1 cup buttermilk (or milk with vinegar) - 1/4 cup melted butter - 1 large egg - 1 cup shredded sharp cheddar cheese - 1/2 cup pickled jalapeños, chopped - 1/4 cup corn kernels - 2 tablespoons honey (optional) - Alternative for buttermilk: If you don’t have buttermilk, mix regular milk with a splash of vinegar. Let it sit for five minutes to thicken. - Cheese variations: You can try pepper jack for a spicy kick, or use mozzarella for a milder taste. - Spicing options for jalapeños: If you want less heat, use fewer jalapeños. You can also swap them for mild green chiles or roasted red peppers for a different flavor. These ingredients come together to create a muffin that is soft, cheesy, and full of flavor. You can check out the Full Recipe for detailed steps on making these tasty treats! First, I preheat my oven to 375°F (190°C). This helps the muffins rise well. Next, I prepare my muffin tin by lining it with paper liners or spraying it with cooking spray. This step makes it easy to remove the muffins later. Now, I gather my dry ingredients. In a mixing bowl, I combine: - 1 cup cornmeal - 1 cup all-purpose flour - 1 tablespoon baking powder - 1/2 teaspoon salt - 1/4 teaspoon black pepper I whisk these together until they blend well. This mix gives the muffins their nice texture. Next, I move on to the wet ingredients. In a separate bowl, I whisk together: - 1 cup buttermilk (or milk with a splash of vinegar) - 1/4 cup melted butter - 1 large egg I mix these until they combine smoothly. Then, I slowly pour this wet mix into the dry mix. I stir gently, making sure not to over-mix. Over-mixing can make the muffins tough. Now, I fold in the exciting parts! I add: - 1 cup shredded sharp cheddar cheese - 1/2 cup chopped pickled jalapeños (I adjust this for spice) - 1/4 cup corn kernels I also sometimes add 2 tablespoons of honey for a touch of sweetness. I fold everything until just combined. This helps keep the cheese and jalapeños evenly spread. I spoon the batter into the prepared muffin tin, filling each cup about 2/3 full. This gives them room to rise. Then, I place the muffin tin in the preheated oven. I bake them for 18-22 minutes. I check for doneness by inserting a toothpick. If it comes out clean, they are ready. Once they are golden and baked, I let the muffins cool in the pan for about 5 minutes. After that, I transfer them to a wire rack to cool completely. Enjoy these cheesy jalapeño cornbread muffins warm! If you want more details, refer to the Full Recipe. To get the best Cheesy Jalapeño Cornbread Muffins, avoid over-mixing. Mix your wet and dry ingredients until just combined. This helps keep your muffins light and fluffy. If you mix too much, your muffins may turn out tough. Adjusting spice levels is key for taste. If you like heat, add more jalapeños. If you prefer less spice, use fewer jalapeños or select mild ones. You can also remove the seeds from the jalapeños for less heat. For toppings, try a pat of flavored butter. Garlic or herb butter pairs perfectly with these muffins. You can also serve them with a drizzle of honey for a sweet twist. When it comes to drinks, these muffins go well with chili or soup. They also pair nicely with a crisp salad. If you want something sweet, serve them with iced tea or lemonade. To display your muffins, use a bright plate or tiered stand. This makes them look appealing and fun. For garnish, sprinkle chopped cilantro on top. This adds color and a fresh touch. You can also add slices of fresh jalapeño on top for an extra kick. For the full recipe, check out the details above. Enjoy baking! {{image_2}} You can switch up the cheese for a new taste. Try using pepper jack cheese for a spicier kick. Gouda adds a nice smoky flavor. If you want a milder taste, go for mozzarella. For those who need dairy-free options, use a nut-based cheese. There are great brands that melt well. Adjust the heat by changing the amount of jalapeños. If you love spice, add more! For a milder muffin, use fewer jalapeños. You can also add spices like cayenne or smoked paprika. These will give your muffins a unique twist. Change up your muffins with seasonal ingredients. In the fall, add pumpkin puree for a sweet touch. In summer, fresh corn or zucchini can brighten the flavor. You can also make sweet muffins by adding berries or sweet corn. These options make each batch unique and fun. For the full recipe, check the delicious details above! To keep your cheesy jalapeño cornbread muffins fresh, store them in an airtight container. Place them in the fridge if you plan to eat them within a few days. For longer storage, you can freeze them. Wrap each muffin tightly in plastic wrap, then place them in a freezer bag. This keeps them safe from freezer burn. When it's time to enjoy your muffins again, there are a few good ways to reheat them. You can use the oven or the microwave. For the oven, preheat to 350°F (175°C) and warm muffins for about 10 minutes. This helps them stay moist and keeps the flavors strong. If using the microwave, heat each muffin for about 20 to 30 seconds. Add a little butter before serving for extra flavor. These muffins can last about 3 to 5 days in the fridge. If frozen, they can last up to 3 months. To know if they are bad, check for mold or an off smell. If they feel dry or crumbly, it's time to toss them. Enjoy your cheesy jalapeño cornbread muffins at their best! For the full recipe, check out the earlier section. Yes, you can use regular milk. Just add a splash of vinegar to mimic buttermilk. This gives the muffins a nice tang. It works well to keep the texture light and fluffy. You can make these muffins healthier by using whole wheat flour. You can also reduce the cheese or use a low-fat option. Adding extra veggies, like chopped spinach or bell peppers, boosts flavor and nutrition. These muffins pair great with chili, soups, or salads. You can also enjoy them with butter or a spicy dip. They add a fun kick to any meal. Yes, you can prepare the batter ahead of time. Just store it in the fridge for a few hours. When you’re ready, fill the muffin tin and bake. Fresh muffins are just a short wait away! At high altitudes, you may need to reduce the baking powder. Increase flour by a couple of tablespoons to help structure. You might also need to add a bit more liquid to keep the batter moist. We explored the tasty world of Cheesy Jalapeño Cornbread Muffins. You learned about key ingredients and fun variations. I shared tips to bake the perfect muffin and store leftovers. Remember, you can always adjust the spice or change the cheese to match your taste. With these basics, you can enjoy fresh, warm muffins anytime. Experiment, have fun, and impress everyone with your baking skills!

Cheesy Jalapeño Cornbread Muffins Irresistible Treat

Are you ready to elevate your snack game? Cheesy Jalapeño Cornbread Muffins are the perfect blend of spicy and cheesy

- 1 lb large shrimp, peeled and deveined - 4 tablespoons unsalted butter, melted - 4 cloves garlic, minced - 1 teaspoon paprika - 1 teaspoon chili flakes (adjust to taste) - Salt and pepper to taste - 1 cup cherry tomatoes, halved - 1 cup asparagus, trimmed and cut into 2-inch pieces - 2 tablespoons fresh parsley, chopped (for garnish) - Lemon wedges, for serving You will need these ingredients to make the dish shine. The shrimp adds protein and texture, while the butter and garlic create a rich, savory base. The spices bring warmth and a little kick, which I love. The cherry tomatoes and asparagus add color and freshness. They also make the dish look beautiful. Don't forget the lemon wedges! They brighten the flavors and make each bite even better. Check the [Full Recipe] for how to put this all together! - Preheat your oven to 400°F (200°C). - In a mixing bowl, combine melted butter, minced garlic, paprika, chili flakes, salt, and pepper. This mix will give your shrimp a rich, savory flavor. - Add shrimp, cherry tomatoes, and asparagus to a large bowl. The bright colors will make your dish pop! - Pour the garlic butter mixture over the ingredients and toss to coat evenly. Make sure all the shrimp and veggies are well covered. - Spread the shrimp and vegetable mixture on a large sheet pan in a single layer. This helps everything cook evenly. - Bake for approximately 10-12 minutes until shrimp are pink and cooked through. Keep an eye on them so they don’t overcook. This recipe is quick and delicious. You can find the Full Recipe for more details! - Adjust chili flakes to your spice preference. - For more flavor, let the garlic butter mix sit for a few minutes. - Spread ingredients in a single layer on the sheet pan. This helps them cook evenly. - Watch the cooking time closely. Overcooked shrimp can become rubbery. - Garnish with fresh parsley before serving. It adds color and taste. - Serve with lemon wedges. Squeezing lemon over the shrimp brightens the dish. These tips will help you create a fantastic meal with ease. For the complete recipe, check out the [Full Recipe]. Enjoy your cooking! {{image_2}} You can easily switch ingredients to suit your taste. Replace shrimp with chicken or tofu for a different protein. This change works well and keeps the dish tasty. Try using seasonal vegetables like bell peppers or zucchini. They add color and flavor to your meal. Want to boost the flavor? Add a splash of white wine to the garlic butter mix. This small change gives a nice depth to the dish. You can also try different herbs like basil or thyme. These herbs can make the dish feel fresh and vibrant. Make your meal more filling by serving it over rice, quinoa, or pasta. Each option pairs well and adds a nice base. You can also enjoy this dish with a fresh garden salad. The crisp greens balance the rich garlic butter shrimp perfectly. Check out the Full Recipe for all the details! Store any leftovers in an airtight container in the refrigerator. This keeps the shrimp fresh for a few days. Make sure the container is sealed well to prevent any odors from your fridge affecting the shrimp. Reheat in the oven at 350°F (175°C) until heated through. This method helps keep the shrimp tender. You can also microwave in small increments. Stir in between to maintain texture and prevent overcooking. You can freeze portions for future meals. Ensure to use freezer-safe containers. This way, you can enjoy this dish later. Just remember to label the containers with dates for easy tracking. Typically, shrimp should be cooked for about 10-12 minutes at 400°F (200°C). This quick cooking time ensures they stay tender and juicy. Overcooking shrimp can make them tough, so keep an eye on them as they bake. Yes, just ensure to thaw and pat dry before cooking for optimal texture. Frozen shrimp can release excess water, which may lead to steaming instead of roasting. Thawing helps maintain that nice, firm bite we all love. Consider serving with rice, pasta, or a light salad for a balanced meal. The rich garlic butter flavor pairs well with many sides. Rice soaks up the juices, while pasta makes it hearty. A salad adds freshness. You can use any oven-safe baking dish or tray; just ensure that the shrimp and vegetables are spread out evenly. Spacing helps them cook evenly and get that nice, roasted finish. This recipe guides you in making delicious sheet pan garlic butter shrimp. You learned about the main ingredients, the baking steps, and handy tips for perfecting your dish. Remember, you can swap ingredients and customize flavors to suit your taste. Enjoy your meal with a fresh salad or over rice for a fuller experience. Don't forget to save your leftovers! This dish not only tastes great but also offers ease in preparation and cleanup. Happy cooking!

Sheet Pan Garlic Butter Shrimp Tasty and Quick Recipe

Looking for a quick and tasty meal? Try this Sheet Pan Garlic Butter Shrimp recipe! Packed with flavor and made

- Chicken and Vegetables Needed - 2 cups boneless, skinless chicken breast, sliced into thin strips - 1 cup broccoli florets - 1 bell pepper (red or yellow), sliced - 1 cup snap peas - Sauces and Seasonings - 3 cloves garlic, minced - 1 inch fresh ginger, grated - 3 tablespoons honey - 4 tablespoons soy sauce - 2 tablespoons cornstarch - 2 tablespoons water - 2 tablespoons vegetable oil - Salt and pepper to taste - Optional Garnishes - Sesame seeds for garnish - Green onions, chopped for garnish When I prepare this honey garlic chicken stir fry, I always start with fresh ingredients. The chicken gives it protein, while the veggies add color and crunch. Broccoli, bell peppers, and snap peas work well together. The garlic and ginger bring a great aroma and flavor. The sauce is simple yet delicious. Honey balances the soy sauce's saltiness. Cornstarch thickens it, making it cling to the chicken and veggies. I love how these flavors mix. You can add sesame seeds or green onions on top for a pop of color. Using the right ingredients makes this dish shine. Each bite is full of flavor and texture. I recommend checking out the Full Recipe to get all the details you need. Mixing the Sauce Start by making your sauce. In a small bowl, combine honey, soy sauce, cornstarch, and water. Stir until smooth. Set the sauce aside for later. Cooking the Chicken Heat one tablespoon of vegetable oil in a large skillet or wok. Use medium-high heat. When the oil is hot, add the sliced chicken. Season it with salt and pepper. Stir-fry the chicken for about 5-7 minutes. You want it golden brown and cooked through. Once done, remove the chicken from the skillet and set it aside. Sautéing the Aromatics In the same skillet, add the remaining tablespoon of oil. Toss in the minced garlic and grated ginger. Sauté for about 30 seconds until fragrant. This step adds great flavor to your dish. Cooking Times for Each Vegetable Now it’s time to add the veggies. First, add the broccoli florets, bell pepper slices, and snap peas. Stir-fry these for about 3-5 minutes. You want them tender but still crisp. This gives a nice texture to the dish. Techniques for Tender-Crisp Results To keep your vegetables tender-crisp, avoid overcrowding the pan. Stir them often to cook evenly. High heat helps maintain their bright colors and crunch. Adding Sauce to Chicken and Vegetables Return the cooked chicken to the skillet. Pour the honey-soy sauce mixture over the chicken and veggies. Stir everything together. Cook for an additional 2-3 minutes. This ensures everything is well-coated in sauce. How to Achieve the Perfect Coating To get that perfect coating, make sure the sauce thickens. The cornstarch in the sauce helps with this. Stir until you see a glossy finish on the chicken and vegetables. Now you have a delicious honey garlic chicken stir fry ready to enjoy. For a complete guide, check the Full Recipe. High Heat Stir-Frying for Flavor Stir-frying needs high heat. This method seals in taste. It helps the chicken get a nice crisp. Use a large skillet or wok for best results. Make sure the oil is hot before adding food. This step keeps the chicken and veggies from steaming. Importance of Prepping Ingredients Prep your ingredients before you start cooking. Slice the chicken and veggies in even pieces. This helps them cook at the same time. Measure out the sauce mix ahead of time too. When you’re ready to cook, everything is within reach. This makes the process smooth and fun. Overcooking Chicken and Vegetables Keep an eye on your chicken and veggies. Overcooking makes them dry and mushy. Cook the chicken until golden brown, about 5-7 minutes. For veggies, stir-fry for just 3-5 minutes. You want them tender-crisp. Not Allowing Sauce to Thicken Don’t rush the sauce! After adding it to the pan, let it cook for 2-3 minutes. This time allows the sauce to thicken and coat the food well. A thick sauce clings to the chicken and veggies, making each bite tasty. Remember, these tips will help you create a delicious Honey Garlic Chicken Stir Fry, perfect for any weeknight. For the full recipe, check out the section above. {{image_2}} Alternative Proteins for the Stir Fry You can swap chicken for other proteins. Try shrimp, beef, or tofu. Each protein offers a unique taste and texture. Shrimp cooks fast, while beef adds richness. Tofu is great for a plant-based option. Just adjust cooking times for each protein. Seasonal Vegetables You Can Use Feel free to mix in seasonal veggies. In spring, use asparagus or snap peas. In summer, add zucchini or bell peppers. Fall brings squash and carrots. Winter vegetables like bok choy or Brussels sprouts work well too. These swaps keep your dish fresh and fun. Adding Spices for Heat Want some spice? Add red pepper flakes or Sriracha. Start with a small amount and taste as you go. You can also use fresh chili peppers for a bold kick. This heats up the dish and makes it exciting. Using Different Sauces for Variety Experiment with sauces to change flavors. Try teriyaki or hoisin sauce for a sweeter twist. You can also use oyster sauce for umami depth. Each sauce brings a new vibe to the meal. Mix and match to find your favorite combo. You can find the Full Recipe for Honey Garlic Chicken Stir Fry and explore these variations to make it your own! To keep your honey garlic chicken stir fry fresh, follow these steps: - Best Practices for Refrigeration: Allow your stir fry to cool down before storing. This helps prevent condensation in the container. Place the leftovers in the fridge within two hours of cooking. - Storing in Airtight Containers: Use airtight containers for storage. This keeps moisture in and air out. You can also use resealable bags if you remove as much air as possible. When it comes to reheating, you want to keep your chicken tender and flavorful: - Methods to Keep Chicken Tender: The best way to reheat is in a skillet on medium heat. Add a splash of water or broth to keep it moist. Stir often until heated through. You can also use a microwave, but cover the dish to keep moisture in. - Best Timeframe for Consuming Leftovers: For the best taste, eat leftovers within three days. If you can’t finish them, freeze them for later. Just remember to thaw in the fridge before reheating. Enjoy your honey garlic chicken stir fry fresh, but don’t worry if you have extras; they store well! For the full recipe, refer back to the original instructions. You can serve this dish with many tasty sides. Here are some of my favorites: - Steamed rice - Fried rice - Noodles, like udon or soba - Crisp salad with a light dressing - Roasted vegetables These sides will balance the sweet and savory flavors of the stir fry. They help create a complete meal that is satisfying. Yes, you can make this dish ahead of time. Meal prep makes weeknight cooking easier. Here are some tips: - Cook the chicken and veggies: You can cook them in advance. Store them in the fridge for up to three days. - Make the sauce: Prepare the honey garlic sauce ahead. Store it separately to keep the stir fry fresh. - Freezing: You can freeze the cooked dish. Just let it cool first, then put it in an airtight container. It lasts up to three months. When ready to eat, just reheat on a skillet over medium heat. Making this stir fry vegetarian is simple. Here are some good substitutes: - For chicken: Use tofu, tempeh, or seitan. These options work well with the sauce. - Adapting the sauce: Use soy sauce or tamari for a gluten-free option. You can keep the honey or use maple syrup for a vegan version. These swaps keep the dish full of flavor while meeting different diets. If you want to try the full recipe, just follow the steps as outlined. This blog covered how to create a tasty Honey Garlic Chicken Stir Fry. We explored the essential ingredients and shared step-by-step instructions for perfect results. You learned key tips to avoid common mistakes and how to store leftovers effectively. In summary, this dish is versatile and easy to make. You can customize it to fit your taste and dietary needs. Embrace your kitchen skills and enjoy this delicious meal!

Honey Garlic Chicken Stir Fry Flavorful Weeknight Meal

Looking for a quick, tasty dinner? Hone in on my Honey Garlic Chicken Stir Fry! It’s packed with flavor, fresh

- 1 cup unsalted butter, melted - 1 cup brown sugar, packed - 1/2 cup granulated sugar - 2 large eggs - 1/4 cup pure maple syrup - 2 teaspoons vanilla extract - 2 cups all-purpose flour - 1 teaspoon baking powder - 1/2 teaspoon baking soda - 1/4 teaspoon salt - 1 cup pecans, roughly chopped - 1/2 cup white chocolate chips (optional) These ingredients come together to create chewy maple pecan blondies. Each item plays a key role in flavor and texture. The butter and sugars give the blondies their rich taste. Eggs add moisture and act as a binder. Maple syrup brings sweetness and a lovely maple flavor. The flour, baking powder, and baking soda help the blondies rise and create that perfect chewy bite. Nuts add crunch and flavor. You can choose to add white chocolate chips for a sweet twist. Feel free to mix and match based on your taste! If you want the full recipe, check the section above. - Calories per serving: Approximately 180 - Macronutrient breakdown: - Fat: 9g - Carbohydrates: 23g - Protein: 2g This nutritional info helps you keep track of what you eat. Each serving gives a nice treat without too many calories. Enjoy these blondies as a sweet snack or dessert! 1. First, preheat your oven to 350°F (175°C). This step is key so that your blondies bake evenly. 2. Next, prepare a 9x13 inch baking pan. You can grease it with butter or line it with parchment paper. Lining helps with easy removal later. 3. In a large mixing bowl, combine the melted butter, brown sugar, and granulated sugar. Whisk until smooth. This step builds the base flavor for your blondies. 4. Add the eggs one at a time. Mix well after each addition. Then, stir in the maple syrup and vanilla extract until everything blends nicely. 5. In a separate bowl, whisk together the flour, baking powder, baking soda, and salt. Gradually mix this dry mix into the wet ingredients. Stir gently until just combined to keep the blondies chewy. 6. Fold in the chopped pecans and white chocolate chips, if you like. Make sure they are evenly spread in the batter. 7. Pour the batter into your prepared baking pan. Spread it evenly with a spatula. This helps the blondies bake uniformly. 8. Bake for 25-30 minutes. Check doneness by inserting a toothpick in the center. It should come out with a few moist crumbs, not wet batter. 9. Once baked, let the blondies cool in the pan for about 10-15 minutes. Then, transfer them to a wire rack to cool completely. This step helps set their texture. You can find the Full Recipe above for a complete guide. Enjoy the process of creating these chewy maple pecan blondies! To make your blondies chewy, focus on how you mix the batter. Mix the wet ingredients until smooth but do not overmix. Overmixing can lead to a denser texture. When you add the dry ingredients, stir gently. You want to combine them without beating out the air. Baking time is also key. Bake your blondies for 25 to 30 minutes. Check for doneness by inserting a toothpick in the center. You want a few moist crumbs on the pick, not wet batter. This ensures a soft and chewy bite. You can make these blondies even better with extra flavor. Try adding a pinch of cinnamon or nutmeg to the batter. These spices add warmth and depth. You can also mix in some chocolate chips or caramel pieces for a sweet twist. For toppings, consider drizzling melted chocolate on top. A sprinkle of sea salt can elevate the flavor too. You can also top them with a scoop of ice cream for a decadent treat. If your blondies turn out undercooked, return them to the oven. Bake them for an additional 5 minutes. Check again with a toothpick. If they still seem too wet, keep baking in small increments until they are done. Dry blondies can happen if you bake too long. If this happens, try adding a bit of milk or cream to the batter next time. You can also serve them warm with a drizzle of maple syrup to add moisture. {{image_2}} You can make Chewy Maple Pecan Blondies even more exciting. One great way is to add chocolate or caramel. Just fold in some chocolate chips or drizzling caramel on top. This adds a rich layer of flavor. Another option is to swap out the pecans. You could use walnuts, almonds, or hazelnuts. If you like dried fruit, add raisins or cranberries. These changes give the blondies a new twist. If you're looking for gluten-free options, use almond or coconut flour instead of all-purpose flour. Make sure to check that your baking powder is gluten-free. This way, everyone can enjoy these treats. For a vegan version, replace the eggs with flaxseed meal mixed with water. Use plant-based butter and maple syrup to keep the flavor strong. This lets you enjoy blondies without eggs or dairy. Presenting your blondies well can make them even more special. You can dust them with powdered sugar for a lovely touch. Serve them on a wooden board for a rustic feel. Add whole pecans on top for decoration. If you want to gift these blondies, wrap them in clear cellophane. Tie them with a pretty ribbon. This makes an excellent gift for friends or family. You can also include a small note about the recipe. For those who love baking, this is a lovely way to share your passion! To keep your chewy maple pecan blondies fresh, store them in an airtight container. This protects them from air and moisture. A good option is a plastic or glass container with a tight lid. You can keep them at room temperature for up to five days. If you live in a warm area, consider placing them in the fridge. Just remember, chilling can change their texture a bit. If you want to save some blondies for later, freezing is great. First, cut the blondies into squares. Wrap each piece tightly in plastic wrap. Then place them in a freezer bag. Be sure to remove as much air as possible. For best results, eat them within three months. When you’re ready to enjoy them, take out a piece and let it thaw in the fridge. For a quick fix, you can warm them in the microwave for a few seconds. This helps them stay soft and tasty. Yes, you can swap out pecans for other nuts. Try walnuts or almonds for a twist. You can even use hazelnuts for a unique flavor. Just make sure to chop them roughly, just like the pecans. This will keep the texture nice and chewy. To get that chewy texture, focus on two things: mixing time and baking time. Mix the butter and sugars just until smooth. Overmixing can add air and make them more cake-like. Bake them just until the edges are golden. They should still look soft in the middle. This will help maintain that chewy goodness. If you're out of maple syrup, don't worry! You can use honey or agave nectar instead. These will add sweetness and a bit of flavor. You can also use brown sugar mixed with a splash of water to mimic the syrup. Adjust the amount to your taste. Check for a few key signs. The edges should be golden brown, while the center looks set but a bit soft. Use a toothpick to test. It should come out with a few moist crumbs, not wet batter. This means the blondies are perfectly baked. For more details, check the Full Recipe. This blog post covered how to make delicious blondies. We listed the ingredients and shared step-by-step instructions. You learned tips for better taste and texture, along with variations and storage info. Whether you want to switch nuts or add spices, there’s plenty to try. Remember, baking is fun and creative! Enjoy your blondies fresh or as a gift. You now have the tools to make the perfect batch every time!

Chewy Maple Pecan Blondies Rich and Irresistible Treat

Craving a sweet treat that’s both chewy and delightful? Look no further! These Chewy Maple Pecan Blondies are rich, easy

To create a delicious Crispy Baked Eggplant Parmesan, you will need: - 2 medium eggplants, sliced into 1/2 inch rounds - 1 teaspoon salt - 2 cups breadcrumbs (preferably whole wheat for extra crunch) - 1/2 cup grated Parmesan cheese - 1 teaspoon garlic powder - 1 teaspoon dried oregano - 1 teaspoon dried basil - 1/2 teaspoon black pepper - 3 large eggs - 2 cups marinara sauce (store-bought or homemade) - 2 cups shredded mozzarella cheese - Fresh basil leaves for garnish When choosing your ingredients, some brands stand out for quality: - Eggplants: Look for firm, shiny eggplants with no blemishes. - Breadcrumbs: I recommend using whole wheat breadcrumbs for added texture. Brands like Panko or Ian’s make great options. - Parmesan Cheese: Choose finely grated Parmesan from brands like Grana Padano or BelGioioso for a rich flavor. - Mozzarella Cheese: Opt for low-moisture mozzarella for the best melt. Polly-O or Galbani are solid choices. If you have dietary needs, here are some swaps: - Eggplant: You can use zucchini or portobello mushrooms for a different texture. - Breadcrumbs: For gluten-free, use almond flour or gluten-free breadcrumbs. - Cheese: Nutritional yeast can replace cheese for a vegan dish. You could also use a dairy-free cheese alternative. - Eggs: A flaxseed mixture (1 tablespoon flaxseed meal + 2.5 tablespoons water) can work well as an egg substitute. These options keep your meal tasty while meeting your dietary needs. Start by washing the eggplants. Cut them into 1/2 inch rounds. Sprinkle salt on the slices. This helps remove bitter water. Place the salted slices in a colander. Let them sit for 30 minutes. After that, rinse them under cold water. Pat them dry with paper towels. This step is key for crispy eggplant. In a shallow bowl, mix breadcrumbs, grated Parmesan, garlic powder, oregano, basil, and black pepper. This gives a nice flavor. In another bowl, beat the eggs until well mixed. Take each eggplant slice and dip it in the eggs. Let any extra egg drip off. Then, coat the slice in the breadcrumb mix. Press lightly to ensure it sticks well. Now, arrange the coated eggplant slices on lined baking sheets. Keep them in a single layer. Spray a little olive oil on top. This helps them crisp up nicely. Bake in a preheated oven at 425°F for 25-30 minutes. Flip them halfway through to brown evenly. Once golden brown, it’s time to layer. Spread a thin layer of marinara sauce in a baking dish. Place half of the crispy eggplant on top. Then add half of the remaining sauce and mozzarella cheese. Repeat these layers. Finish with marinara and cheese on top. Bake again for another 20-25 minutes. The cheese should melt and bubble. Let it cool before serving. Optionally, garnish with fresh basil leaves. Enjoy your tasty meal! For the full recipe, check [Full Recipe]. To get that perfect crispy eggplant, follow these tips: - Salt the Eggplant: Sprinkle salt on the eggplant slices. This step helps draw out moisture and bitterness. - Use Whole Wheat Breadcrumbs: They add extra crunch and flavor. - Don’t Overcrowd the Baking Sheets: Place the eggplant slices in a single layer. This ensures even cooking and crisping. - Spray with Olive Oil: A light spray or drizzle of olive oil before baking helps achieve a golden, crispy texture. - Flip Halfway: Turn the eggplant slices halfway through baking for even crispiness on both sides. Avoid these common pitfalls to ensure your dish turns out great: - Skipping the Salting Step: Don't skip this! It makes a huge difference in taste and texture. - Using Wet Eggplant: Make sure to pat dry the eggplant after rinsing. Excess moisture will lead to soggy eggplant. - Not Preheating the Oven: Always preheat your oven to 425°F (220°C) before baking. This helps the eggplant crisp up quickly. - Using Low-Quality Cheese: Good quality cheese melts better and enhances flavor. Always choose fresh mozzarella and real Parmesan. Having the right tools makes cooking easier and more fun: - Baking Sheets: Use two large ones to bake the eggplant in a single layer. - Parchment Paper: Line your baking sheets for easy cleanup and to prevent sticking. - Colander: This is great for salting and draining the eggplant. - Shallow Bowls: You need one for the eggs and another for the breadcrumb mixture for easy dipping. - Cooking Spray or Olive Oil Mister: This helps you apply oil evenly without overdoing it. Following these tips will help you create a Crispy Baked Eggplant Parmesan that is not only tasty but also healthy. Check out the Full Recipe for detailed steps! {{image_2}} Crispy Baked Eggplant Parmesan is a great choice for vegetarians. You can enjoy this dish without meat. The eggplant provides a hearty base. The layers of cheese and sauce add rich flavor. You can also add other veggies for variety. Some options include zucchini, mushrooms, or bell peppers. These will blend well with the eggplant. Want to make this dish even better? You can add more veggies or proteins! For a protein boost, try chickpeas or lentils. Just layer them in with the eggplant. If you love greens, add spinach or kale. These veggies cook down nicely. They add color and nutrients without changing the taste much. Feel free to mix and match based on what you have. The cheese is a key part of this recipe. But you can switch it up! Instead of mozzarella, try provolone or fontina. These will give a different flavor and texture. If you want a stronger taste, use aged cheddar. For a dairy-free option, look for vegan mozzarella. This way, everyone can enjoy a tasty meal. You can find many cheese alternatives that melt well, too. Explore these variations to make your Crispy Baked Eggplant Parmesan special. Check out the full recipe to see how to put it all together! After enjoying your meal, store leftovers in an airtight container. Let the dish cool down first. This keeps the eggplant from becoming soggy. You can keep it in the fridge for about three to four days. If you want to enjoy it later, freezing is a great option. To reheat, use your oven for the best results. Preheat your oven to 350°F (175°C). Place the eggplant parmesan in an oven-safe dish. Cover it with foil to keep it moist. Heat for about 20 minutes, then remove the foil and cook for another 10 minutes. This makes it crispy again. You can also use a microwave, but it may not be as crispy. If you want to freeze your dish, layer the eggplant in a freezer-safe container. Make sure to separate layers with parchment paper to prevent sticking. You can freeze it for up to three months. To cook from frozen, thaw it in the fridge overnight before reheating. This way, your crispy baked eggplant parmesan stays tasty and fresh. For the full recipe, check out the complete instructions above. Yes, you can. To make Crispy Baked Eggplant Parmesan ahead, prepare the eggplant and bake it. After baking, let it cool. Then, cover it and refrigerate for up to two days. When ready to serve, just reheat it in the oven until hot. This method keeps the flavors fresh. To make this dish gluten-free, use gluten-free breadcrumbs. Many brands offer tasty options. Also, check your marinara sauce for gluten. Most are fine, but it’s good to double-check. This way, you can enjoy the dish without worry. Crispy Baked Eggplant Parmesan pairs well with many sides. You can serve it with: - A fresh green salad - Garlic bread - Steamed veggies - Pasta with olive oil and herbs These sides add color and flavor, making your meal complete. For the full recipe, check the earlier section. This article covered ingredients for Crispy Baked Eggplant Parmesan, from main ingredients to substitutes. I shared step-by-step instructions for preparation, coating, and baking. You learned tips for crispiness and common mistakes to avoid. We explored tasty variations and how to store leftovers. In short, you can enjoy this dish in many ways. Experiment and have fun with it! Your kitchen will be filled with delicious smells soon.

Crispy Baked Eggplant Parmesan Tasty and Healthy Meal

Craving a tasty and healthy meal? You’ll love my Crispy Baked Eggplant Parmesan! This dish is not only packed with

To make your no bake lemon cheesecake cups, gather these simple ingredients: - 1 cup graham cracker crumbs - 2 tablespoons sugar - 1/4 cup unsalted butter, melted - 8 oz cream cheese, softened - 1 cup powdered sugar - 1/2 cup sour cream - 1/4 cup fresh lemon juice - Zest of 1 lemon - 1 teaspoon vanilla extract - Whipped cream, for topping - Lemon zest or slices, for garnish You can find the full recipe to guide you through each step. Each ingredient plays a key role in creating a creamy, zesty treat. The graham cracker crumbs form a crunchy base, while the cream cheese provides a rich filling. Lemon juice and zest add a bright flavor that makes this dessert refreshing. You’ll love how easy it is to whip up this delightful treat. Just make sure to use fresh lemons for the best taste! To start, gather your ingredients for the crust. You need graham cracker crumbs, sugar, and melted butter. In a medium bowl, combine 1 cup of graham cracker crumbs with 2 tablespoons of sugar and 1/4 cup of melted butter. Mix these until they feel like wet sand. Next, take small cups or mason jars. Distribute the crumb mixture evenly in each cup. Use the back of a spoon to press it down. This step ensures a firm base for your cheesecake. Now, let’s make the filling. In a large bowl, beat 8 ounces of softened cream cheese with an electric mixer. Mix it until it’s very smooth. Then, gradually add 1 cup of powdered sugar. Keep mixing until well combined. Next, mix in 1/2 cup of sour cream, 1/4 cup of fresh lemon juice, the zest of 1 lemon, and 1 teaspoon of vanilla extract. Blend until the filling is creamy and fluffy. This adds a nice lemon flavor. It's time to layer the filling. Spoon the lemon cream cheese filling over the crust in each cup. Make sure to spread it evenly. This helps each bite taste just right. After layering, cover the cups with plastic wrap. Place them in the fridge for at least 4 hours. This chilling time helps the filling set properly. When ready to serve, take the cups out of the fridge. Top each one with a dollop of whipped cream. You can also add some lemon zest or a thin slice of lemon for a nice touch. For a lovely presentation, serve the cups on a platter with fresh berries and mint leaves. For the full recipe, check out the details above. Enjoy your delicious no-bake lemon cheesecake cups! How to avoid a grainy texture To keep your cheesecake smooth, use softened cream cheese. Cold cream cheese creates lumps. Beat it well before adding other ingredients. Mix slowly, and be careful not to overmix. A gentle hand helps keep it creamy. Ensuring the crust is firm A good crust is key. Mix graham cracker crumbs, sugar, and melted butter well. Press the mixture firmly into the bottom of the cups. Use the back of a spoon to pack it down. This helps the crust hold its shape when you serve. Adding more lemon zest For a zesty kick, add more lemon zest to the filling. This adds freshness and brightens the flavor. You can also mix in a splash of lemon juice for extra tang. Taste as you go for the best balance. Suggestions for flavor variations Want to switch things up? Try adding berries for a fruity twist. You can blend strawberries or blueberries into the filling. Chocolate lovers can mix in cocoa powder for a rich flavor. Get creative and have fun with it! Best mixer for cream cheese An electric hand mixer works best for this recipe. It blends the cream cheese smoothly. If you have a stand mixer, that works great too. Just make sure to scrape down the sides often. Ideal cups or jars for serving Small glass jars or clear plastic cups are perfect. They show off the layers. Look for cups with a wide mouth for easy filling. This makes serving and eating much simpler. Enjoy your beautiful creation! {{image_2}} You can switch up the flavors to keep things fun. Here are two tasty options: - Berry cheesecake cups: Swap lemon juice with fresh berry puree. Use strawberries, raspberries, or blueberries. This gives a sweet and tangy taste. - Chocolate lemon cheesecake cups: Mix in cocoa powder with the cream cheese. This rich twist adds depth and a lovely chocolate flavor. If you have dietary needs, don't worry! Here are some easy swaps: - Dairy-free options: Use vegan cream cheese and coconut cream instead of sour cream. This keeps the creaminess while being dairy-free. - Gluten-free options: Choose gluten-free graham cracker crumbs for the crust. This way, everyone can enjoy these yummy cups! You can make your cheesecake cups shine with seasonal flair. Consider these ideas: - Using seasonal fruits for garnish: Top your cups with fresh fruit like strawberries in spring or peaches in summer. This not only looks pretty but adds flavor too. - Holiday-inspired flavors: For winter, add spices like cinnamon or nutmeg to the filling. This gives a cozy feel that fits holiday vibes well. For the complete experience, check out the Full Recipe. The no-bake lemon cheesecake cups last up to five days in the fridge. Store them in an airtight container. This keeps them fresh and tasty. If you cover each cup tightly, they will stay good longer. Yes, you can freeze no-bake cheesecake cups! They freeze well for up to two months. To freeze, place them in a freezer-safe container. Use plastic wrap to cover each cup tightly. This helps prevent freezer burn. To thaw, move the cheesecake cups to the fridge overnight. This keeps the texture smooth and creamy. After thawing, serve them cold. Add fresh whipped cream and lemon zest for extra flavor. Enjoy these tasty treats chilled for the best experience! For the Full Recipe, check the previous section. You can make these cheesecake cups a day ahead. Just prepare them and chill them overnight. This gives the flavors time to blend. I recommend chilling them for at least four hours before serving. This will help them set properly and taste best. Yes, you can change the crust! Try using Oreo cookies, vanilla wafers, or even digestive biscuits. Each option will give a unique taste. Just crush the cookies and mix them with melted butter and sugar like you do with graham crackers. The cheesecake is set when it feels firm to the touch. If you gently shake it, the filling should not jiggle much. You can also check for a smooth surface. If it looks fluffy and holds its shape, you are ready to serve! These cheesecake cups are fun and easy to make. We covered the ingredients, from crust to filling. You can customize flavors and avoid common mistakes with simple tips. The storage section makes it clear how to keep your treats fresh. For extra joy, try different variations to surprise friends and family. Enjoy your delicious creations whenever you like, and don't hesitate to experiment along the way! Happy baking!

No Bake Lemon Cheesecake Cups Easy and Delicious Treat

If you’re craving a sweet treat that’s both easy to make and delicious, you’re in the right spot! Today, I’m

Older posts
Newer posts
← Previous Page1 … Page53 Page54 Page55 … Page84 Next →

dsad

© 2026 Lisa Dishes • Built with GeneratePress

Our Policies

  • Copyright Policy
  • Cookie Policy
  • GDPR Policy
  • Privacy Policy
  • Disclaimer
  • Terms Of Use

More Information

  • Home
  • About
  • Contact
  • Appetizers
  • Dessert
  • Dinner
  • Drinks
©2026, Lisa Dishes About Back To Top