Skip to content
DisclaimerTerms Of UseGDPR PolicyCookie Policy

Lisa Dishes

  • Home
  • Drinks
  • Appetizers
  • Dinner
  • Dessert
  • About
  • Contact
  • Privacy Policy
DisclaimerTerms Of UseGDPR PolicyCookie Policy

NO-ING-IMG

- Cod fillets: You need 4 fillets, about 6 oz each. Cod is firm and flaky. - Butter: Use 4 tablespoons of unsalted butter. Unsalted lets the flavors shine. - Garlic: Fresh garlic is a must. Use 4 cloves, minced well for the best taste. - Lemon: Use the zest and juice of 1 lemon. This adds bright flavor to the fish. - Fresh parsley: One tablespoon, chopped. Fresh herbs enhance the dish's flavor and look. - Seasonings: Use salt and pepper to taste. These simple seasonings bring out the fish's flavor. - Garnishes: Lemon slices are perfect for garnishing. They add color and a hint of freshness. These ingredients make a simple yet flavorful dish. Each part plays a role in creating a delicious meal. Freshness counts, so try to use high-quality ingredients to get the best results. Happy cooking! Preheating the oven: Start by preheating your oven to 375°F (190°C). This step is key because it ensures even cooking. If your oven isn't hot enough, your cod may not cook through properly. Preparing the cod: Take your cod fillets and pat them dry with paper towels. This helps the seasoning stick better. Season both sides with salt and pepper. This simple step boosts the flavor and sets the stage for the dish. Melting butter: Grab a small saucepan and place it over medium heat. Add the unsalted butter and let it melt slowly. Stir it gently to keep it from browning. You want it melted and warm, not burnt. Sautéing garlic: Once the butter melts, add the minced garlic. Stir it for about one minute. Watch closely; you want it fragrant, not brown. Burnt garlic can ruin the dish's taste. Combining ingredients: After the garlic is ready, take the saucepan off the heat. Add the lemon zest and juice, plus the chopped parsley. Mix well to blend these fresh flavors into the butter. This sauce is the heart of your cod dish. Placing fillets: Line a baking sheet with parchment paper. Lay the seasoned cod fillets on the sheet. Make sure they have space between them for even cooking. Baking time: Now, pour the lemon garlic butter sauce over each fillet. Bake in the preheated oven for 12 to 15 minutes. To check if it’s done, use a fork. The cod should flake easily. If it does, it’s ready to eat! - Freshness of cod: Look for bright, clear eyes and firm flesh. The fish should not smell strong. If it smells like the sea, it’s fresh. Visit your local fish market for the best options. - Adjusting seasonings: Taste your garlic butter sauce before pouring it on the cod. If you love lemon, add more zest or juice. If you prefer less salt, cut back on it. This dish can fit your taste easily. - Plating the dish: Use a large white plate for a clean look. Place the cod fillet in the center. Spoon some lemon garlic butter sauce over it for flavor and style. - Enhancing visual appeal: Fresh parsley and lemon slices add color. Sprinkle chopped parsley around the plate. Place lemon slices beside the cod. This makes your dish pop and look inviting. {{image_2}} You can switch up the fish in this recipe. Cod is tasty, but other fish work too. Try halibut for a thicker fillet. Salmon adds a rich flavor, and tilapia cooks quickly. Each fish brings its own twist. If you need a dairy-free option, use plant-based butter. Look for brands that melt well. Coconut oil is another choice. It adds a light sweetness that works with lemon. To enhance the flavor, add spices. Paprika gives warmth and color. If you enjoy heat, sprinkle in some cayenne pepper. It adds a nice kick without overpowering. You can also try different herbs. Basil brings a sweet note, while dill adds a fresh taste. Thyme and oregano work well too. Mix and match to find your favorite blend. To store your Lemon Garlic Butter Cod, let it cool first. Place the cod on a plate and leave it at room temperature for about 30 minutes. This cooling method helps keep it fresh. For containers, I recommend using airtight glass or plastic containers. They keep the cod moist and tasty. Make sure to store it in the fridge. It will last for up to 3 days. When reheating, you want to keep the flavor intact. The best method is using the oven. Preheat your oven to 350°F (175°C). Place the cod on a baking dish and cover it with foil. Heat for about 10 minutes. This keeps it from drying out. You can also reheat in the microwave. Place the cod on a microwave-safe plate. Cover it with a damp paper towel and heat in short bursts. Start with 30 seconds, then check if it’s warm. Enjoy your meal just like it was fresh! How long does it take to bake cod at 375°F? Baking cod at 375°F takes about 12 to 15 minutes. The fish is done when it flakes easily with a fork. This quick cooking time makes it perfect for a busy weeknight meal. Can I make Lemon Garlic Butter Cod ahead of time? Yes, you can prepare Lemon Garlic Butter Cod ahead of time. You can season the cod and make the lemon garlic butter sauce in advance. Just store them separately in the fridge. When you're ready to eat, bake it fresh for the best taste. What sides pair well with Lemon Garlic Butter Cod? Several sides complement this dish well. Here are some ideas: - Steamed vegetables like broccoli or asparagus. - Garlic mashed potatoes or rice. - A fresh salad with lemon vinaigrette. These sides balance the flavors and add more nutrition to your meal. Is it possible to grill this recipe instead of baking? Absolutely! You can grill Lemon Garlic Butter Cod. Just preheat the grill and cook the fillets for about 6 to 8 minutes on each side. Use a grill basket to keep the fish from falling through the grates. This method adds a smoky flavor that's delicious. In this article, we covered how to make Lemon Garlic Butter Cod step by step. We discussed key ingredients like cod, butter, and fresh herbs. I shared tips for cooking, presentation, and even variations. Remember, fresh ingredients make a big difference. Take your time while cooking for the best results. Whether you bake or try grilling, this dish is sure to impress. Enjoy your cooking journey and the delicious meals ahead!

Lemon Garlic Butter Cod Flavorful Easy Meal Recipe

If you crave a quick, tasty meal that impresses, you’re in the right place! My Lemon Garlic Butter Cod recipe

- 1 ½ cups pretzel crumbs - ½ cup unsalted butter, melted - ¼ cup brown sugar - 2 (8 oz) packages cream cheese, softened - 1 cup granulated sugar - 1 teaspoon vanilla extract - 2 large eggs - 1 cup sour cream - 2 cups fresh strawberries, hulled and sliced - 1 cup strawberry gelatin powder - 1 ¼ cups boiling water The crust of these bars uses pretzel crumbs. They add a nice salty crunch. Mixing them with melted butter and brown sugar makes a sweet base. The cream cheese filling is rich and creamy. You blend it with sugar and vanilla for flavor. Adding eggs helps it set perfectly when baked. Sour cream gives it a nice tang and creaminess. Fresh strawberries are key for that fruity topping. You mix them with strawberry gelatin. The boiling water helps dissolve the gelatin. This mixture adds a bright, sweet layer on top. - Whipped cream for topping - Mint leaves for garnish Whipped cream can add a creamy touch on top. Mint leaves give a fresh look and taste. They make your bars feel fancy and special. - Preheat your oven to 350°F (175°C). - Make the crust by combining pretzel crumbs, melted butter, and brown sugar. To start, you want your oven warm. Preheating helps the crust set just right. While it warms up, mix the pretzel crumbs, melted butter, and brown sugar in a bowl. Make sure it blends well. This mixture gives a sweet and salty flavor, which is key to this recipe. Press the crust mixture into the bottom of a 9x9 inch baking dish evenly. After that, bake it for 10 minutes. When it’s done, let it cool while you work on the filling. - Beat cream cheese until creamy, then add sugar and vanilla. - Incorporate eggs one at a time, followed by sour cream. Now, grab a large bowl and beat the softened cream cheese with an electric mixer. You want it nice and creamy. Once it’s smooth, add the granulated sugar and vanilla extract. Mix those in until smooth again. Next, add the eggs. Do this one at a time and mix well after each egg. Finally, fold in the sour cream. This adds richness and a lovely texture to your filling. - Pour the filling over the crust and bake for 25-30 minutes. - Let the cheesecake cool on a wire rack before adding topping. Pour this creamy filling over your cooled pretzel crust. Spread it evenly. Now, bake in the oven for 25-30 minutes. You’ll know it’s ready when the edges are set, but the center should still jiggle a bit. After baking, let the cheesecake cool on a wire rack. This cooling step is important for the topping to stick well. - Dissolve strawberry gelatin in boiling water and mix with sliced strawberries. - Pour the topping over the cooled cheesecake and refrigerate. To make the topping, dissolve the strawberry gelatin powder in 1 ¼ cups of boiling water. Stir until it’s all mixed. Let it cool for a bit. Then, add the sliced strawberries to the gelatin mixture. Once your cheesecake has cooled to room temperature, pour this fruity topping over it. After that, refrigerate the bars for at least 4 hours. For the best taste, leave them overnight if you can. - Use finely crushed pretzel crumbs for best results. They give a nice crunch. - Ensure the crust is cool before adding the cheesecake layer. This keeps layers from mixing. - Avoid overmixing the cheesecake filling to keep it light and fluffy. - Bake until the center still has a slight jiggle. This means it’s creamy, not overcooked. - Chill in the fridge overnight for enhanced flavor. It allows the tastes to meld well. - Serve with fresh strawberries or whipped cream on top. This adds a nice touch to your dessert. {{image_2}} You can change up the flavors of these bars in fun ways. - Mixed Berries: Instead of using only strawberries, try mixed berries. This gives a nice fruit medley taste. - Different Gelatin Flavors: Swap strawberry gelatin for raspberry or peach. This adds a unique twist to each bite. You can also adjust the recipe for different diets. - Gluten-Free Option: Use gluten-free pretzels for a gluten-free version. This way, everyone can enjoy the treat. - Lighter Version: Choose low-fat cream cheese and sugar alternatives. This keeps the taste but makes it lighter for those watching their intake. These variations help everyone enjoy Strawberry Pretzel Cheesecake Bars their way! Store any leftover bars in an airtight container in the fridge. They will stay fresh for up to 5 days. If you want to keep them longer, you can freeze the bars for up to 3 months. Just remember to thaw them before serving to enjoy their full flavor. You do not need to reheat these bars. They taste best when served chilled. If you freeze them, allow the bars to thaw in the fridge before enjoying. This keeps the texture and flavor just right. Yes, they can be made a day ahead and stored in the fridge. This makes them ideal for gatherings. Just remember to cover them well to keep them fresh. Use a sharp knife and clean it between cuts for neat slices. This will help keep each bar intact. A little patience goes a long way here! Yes, consider drizzling chocolate sauce or adding nuts for extra flavor. You can also use whipped cream or fresh berries for a fun twist. Get creative with your toppings! You can use mascarpone cheese or a dairy-free cream cheese alternative. Both work well in this recipe and keep the texture creamy. Baking helps set the filling; skipping it may result in a runny texture. If you want a firmer bar, don’t skip this step! Strawberry Pretzel Cheesecake Bars are a tasty treat that blends sweet and salty. We covered the required ingredients, from pretzel crumbs to fresh strawberries. The step-by-step process ensures a smooth bake. You can customize your dessert with variations or store leftovers easily. Remember, chilling enhances the flavor. Enjoy sharing these bars with friends and family. Your time in the kitchen will be worth it when everyone loves the results!

Strawberry Pretzel Cheesecake Bars Simple and Sweet Delight

Looking for a dessert that combines sweet and salty in the best way? Strawberry Pretzel Cheesecake Bars are your answer!

- 2 salmon fillets - 1/4 cup teriyaki sauce - 1 cup brown rice - 2 cups water or vegetable broth - 1 cup broccoli florets - 1 carrot, julienned - 1 red bell pepper, sliced - 1 tablespoon sesame oil - Salt and pepper to taste - 2 green onions, sliced - 1 tablespoon sesame seeds When I make this Baked Teriyaki Salmon Bowl, I focus on fresh and simple ingredients. The salmon is the star here. You can use any good quality salmon fillets you find. I love the flavor of teriyaki sauce. It adds a sweet and tangy kick to the fish. Brown rice serves as a hearty base. It fills you up and pairs well with the salmon and veggies. I prefer using vegetable broth for cooking the rice. It adds more flavor, but water works too. For the veggies, I choose broccoli, red bell pepper, and carrot. They add color and crunch to the dish. You can switch them for what you have. Just keep them fresh and cut them into bite-sized pieces. Sesame oil gives a nutty flavor to the veggies. It’s simple but makes a big difference. You can adjust salt and pepper to your taste. It adds a bit of flavor and balances everything out. Finally, garnishing with green onions and sesame seeds makes the bowl look pretty. It adds a nice crunch and freshness. This meal is healthy, simple, and full of flavor. It’s perfect for any night of the week! - Preheat the oven to 400°F (200°C). - Place the salmon fillets on a lined baking sheet. Brush them with teriyaki sauce. Let them sit for 15 minutes to soak up the flavor. - Rinse the brown rice under cold water. This removes extra starch and helps it cook better. - Combine the rinsed rice with 2 cups of water or vegetable broth in a saucepan. Bring it to a boil. Reduce the heat, cover, and let it simmer for 30-35 minutes. The rice should be fluffy and have absorbed all the liquid. - In a skillet, heat 1 tablespoon of sesame oil over medium heat. - Add the broccoli, carrot, and red bell pepper. Sauté them for about 5-7 minutes. They should be tender but still crisp. - Season the veggies with a pinch of salt and pepper to enhance their taste. - After marinating, place the salmon in the preheated oven. Bake it for 12-15 minutes. - Check if the fish flakes easily with a fork. This means it’s done and ready to enjoy. - Take a scoop of rice and place it at the bottom of your bowl. - Add a layer of the sautéed vegetables on top of the rice. - Place the baked salmon on top of the veggies. - Drizzle any remaining teriyaki sauce over the salmon for a burst of flavor. - Garnish your bowl with sliced green onions and a sprinkle of sesame seeds for a nice crunch. To cook salmon just right, check for doneness. The fish should flake easily with a fork. This means it's done! You can also use a thermometer for accurate cooking. Aim for an internal temperature of 145°F (63°C). This ensures your salmon is safe to eat and still juicy. Want to take your teriyaki salmon to the next level? Experiment with homemade teriyaki sauce. It’s simple and lets you control the flavors. You can also add spices for an extra kick. Try garlic powder, ginger, or even a pinch of red pepper flakes. These will add depth to your dish. Meal prep can make your week easier. Prepare bowls in advance for quick meals. You can store components separately for freshness. Keep the rice, vegetables, and salmon in different containers. Then, just assemble when you are ready to eat. This keeps everything tasting great! {{image_2}} You can switch the salmon with chicken, tofu, or shrimp. Each protein adds a unique taste. Chicken gives a hearty flavor. Tofu brings a light, plant-based option. Shrimp cooks quickly and pairs well with teriyaki sauce. Adjust the cooking time based on the protein you pick. Chicken may take longer, while tofu and shrimp cook faster. If you want a change, use quinoa or jasmine rice instead of brown rice. Quinoa is packed with protein and has a nutty flavor. Jasmine rice offers a fragrant aroma and a soft texture. Both options bring a fresh twist to your bowl. Cook them the same way as brown rice for easy swaps. Feel free to add seasonal veggies or greens like spinach. Fresh produce boosts flavor and nutrition. You can use zucchini, snap peas, or bell peppers. Spinach adds a rich green color and is great for health. Sauté these veggies in sesame oil, just like the others. This keeps them crisp and tasty, enhancing your meal's appeal. To keep your leftovers fresh, store them in airtight containers. This helps maintain flavor and quality. I recommend eating them within 3 days for the best taste. You can freeze unassembled bowls or individual components. This way, you can enjoy them later. When ready to eat, thaw everything in the refrigerator before reheating. For the best reheating results, use a microwave or stovetop. This keeps the salmon moist and the veggies crisp. Just be careful not to overheat! You can serve many sides with this dish. Here are some great options: - Steamed green beans - Cucumber salad - Edamame - Pickled vegetables - Miso soup These sides add color and flavor to your meal. They also bring extra nutrients, making your bowl even healthier. Yes, store-bought teriyaki sauce saves time. Some popular brands include: - Kikkoman - Annie Chun's - Soy Vay Choose a brand with simple ingredients. Look for low-sodium options if you want to cut back on salt. To make this dish gluten-free, use gluten-free teriyaki sauce. Some brands make gluten-free sauces using tamari instead of soy sauce. Check the label to be sure. Also, choose gluten-free brown rice. To lower the calories and fat, try these tips: - Use less teriyaki sauce or a low-calorie version. - Replace salmon with a leaner protein like chicken or shrimp. - Use less sesame oil for cooking. These small changes can make a big difference in your meal. Enjoy a healthy and tasty dish! You’ve learned how to make a tasty baked teriyaki salmon bowl. This dish uses simple ingredients like salmon, brown rice, and fresh vegetables. You can even customize it with different proteins and veggies. Remember to store leftovers properly to keep them fresh. Enjoy experimenting with flavors and making it your own. Cooking should be fun and easy, and this bowl proves that. Dive into your kitchen and create a delicious meal!

Baked Teriyaki Salmon Bowl Healthy and Simple Meal

Looking for a healthy meal that’s easy to make? The Baked Teriyaki Salmon Bowl is your answer. Packed with flavor

- 1 pound baby carrots, peeled and trimmed - 2 tablespoons honey - 1 tablespoon olive oil - 1 teaspoon salt - 1/2 teaspoon ground cinnamon - 1/4 teaspoon black pepper - Fresh parsley, chopped (for garnish) - Garlic powder - Ginger - Lemon juice Gather these ingredients before you start. The baby carrots are the star of this dish. Their natural sweetness shines through when you glaze them. Honey adds a delightful touch of sweetness. Olive oil helps the glaze stick and gives a nice shine. Salt enhances the flavor, while cinnamon adds warmth. Black pepper gives it a slight kick. Fresh parsley makes your dish look bright and fresh. If you want to mix it up, try adding garlic powder for depth. Grated ginger can add a zesty twist. A splash of lemon juice brings in a tangy flavor that brightens everything up. These add-ins are great for customizing your taste. Let your creativity shine as you make this dish your own! First, preheat your air fryer to 375°F (190°C) for 3-5 minutes. This step is key for even cooking. In a large bowl, combine the honey, olive oil, salt, cinnamon, and black pepper. Mix well until you have a smooth glaze. This adds great flavor to your carrots. Now, toss the peeled baby carrots in the glaze. Make sure they are fully coated. Place the carrots in the air fryer basket in a single layer. Avoid overcrowding to allow for proper air circulation. Cook the carrots for 15-18 minutes. Shake the basket halfway through to ensure they cook evenly. The carrots should come out tender and a bit caramelized. Once done, transfer them to a serving dish and garnish with fresh parsley. Enjoy this sweet and savory side! To cook your carrots evenly, shake the basket halfway through cooking. This simple step helps all the carrots cook well. It keeps them from sticking together and burning. You will get a nice texture and color this way. You can check if the carrots are done by testing them with a fork. If the fork goes in easily, they are ready. Tender carrots are the goal here. If they need more time, pop them back in for a few more minutes. These honey-glazed carrots pair well with protein-rich dishes. They make a great side for chicken, beef, or fish. You can also serve them alongside grains for a complete meal. Enjoy them warm and garnished with fresh parsley for added flavor! {{image_2}} You can easily change the flavor of your honey glazed carrots. Adding a pinch of cayenne pepper gives them a nice kick. Just a little goes a long way. You can also try herbs like thyme or rosemary. These herbs add depth and freshness to the dish. Mix and match spices to find your perfect flavor. If you want a different sweet taste, swap honey for maple syrup. Maple syrup gives a rich and unique flavor. It also works well with the spices in this recipe. This simple change can add a fun twist to your dish. You can use other vegetables if you want variety. Sweet potatoes or parsnips make great substitutes. They cook well in the air fryer and soak up the glaze nicely. Just cut them into similar sizes as the baby carrots for even cooking. Enjoy experimenting with different veggies! You can store your honey glazed carrots in the fridge. Place them in an airtight container. They will stay fresh for up to 3 days. This makes it easy to enjoy leftovers. To reheat, use the air fryer for the best texture. Set it to 375°F (190°C). Heat the carrots for about 5 minutes. This keeps them tender and warm without losing flavor. You can freeze honey glazed carrots, but be aware they might change texture. Place them in a freezer-safe bag or container. They will last for up to 3 months. When you thaw, they may be softer, but they still taste great! Yes, but cut them into similar-sized pieces for even cooking. This ensures they cook at the same rate. Baby carrots are small, so if you use larger ones, slice them down to size. About 15-18 minutes depending on size and desired tenderness. Check them halfway through to see if they need more time. You want them tender, not mushy. Yes, replace honey with agave syrup or a vegan sweetener. This swap keeps the sweetness while making it plant-based. It’s a great option for vegans and those with honey allergies. They pair well with meats and grains for a balanced meal. Try them with chicken, pork, or rice. They add color and flavor to any plate. Offers a nutritious side option with beneficial ingredients, though moderate in sugar. Carrots are packed with vitamins, and the glaze adds a touch of sweetness without being too heavy. In this blog post, you learned how to make honey-glazed carrots in an air fryer. We covered the key ingredients and simple steps to prepare them. You discovered tips for even cooking and storage options. Lastly, we explored variations and answered common questions. Honey-glazed carrots make a delicious side for any meal. They are easy to prepare and healthier than many dishes. Enjoy trying different flavors to make this recipe your own!

Air Fryer Honey Glazed Carrots Flavorful Easy Side

Are you ready to elevate your dinner game with a quick side dish? These Air Fryer Honey Glazed Carrots are

The key ingredients for Creamy Mushroom Spinach Orzo create a rich and tasty dish. Each one plays a vital role: - Orzo pasta: This small pasta cooks quickly and blends well with the sauce. It absorbs flavors nicely. - Vegetable broth: This gives a tasty base for cooking the orzo. It adds depth to the dish. - Olive oil: This healthy fat helps cook the onions and mushrooms. It adds a light flavor. - Onion: Finely chopped onions bring sweetness and depth to the dish. They form the base of the flavor. - Garlic: Minced garlic adds a strong, aromatic flavor. It pairs well with mushrooms. - Mushrooms: Sliced mushrooms provide a meaty texture and earthy flavor. They are the star of the dish. - Fresh spinach: Chopped spinach adds color and nutrients. It wilts down and blends well with other ingredients. - Heavy cream: This adds creaminess and richness. You can use coconut milk for a dairy-free option. - Parmesan cheese: Grated Parmesan adds a salty, savory kick. Nutritional yeast can replace it for a vegan dish. - Salt and pepper: These seasonings enhance the flavors of all the ingredients. - Dried thyme: This herb adds warmth and earthiness, tying the dish together. - Fresh parsley: Chopped parsley is a garnish that adds freshness and color. You can swap or add ingredients to make this dish your own: - Protein options: Add chicken, shrimp, or chickpeas for more filling meals. - Different herbs: Try basil, oregano, or rosemary for new flavors. - Plant-based cream: Use cashew cream or almond milk for a lighter dish. - Gluten-free pasta: Use gluten-free orzo or another small pasta as a substitute. - Dairy-free cheese: Look for plant-based cheese to keep it vegan. Consider any dietary needs when choosing ingredients. This dish can be flexible and still taste great! To cook orzo to al dente, bring vegetable broth to a simmer. Add 1 cup of orzo pasta. Cook for about 8-10 minutes. Stir occasionally to avoid sticking. If you see any, add a little more broth. This keeps the orzo from clumping together. Start by heating 1 tablespoon of olive oil in a large skillet over medium heat. Next, add 1 medium onion, finely chopped. Sauté it for 3-4 minutes until it turns translucent. This step adds depth to your dish. Then, add 2 cloves of minced garlic and 8 oz of sliced mushrooms. Cook for 5-7 minutes. Stir regularly until the mushrooms turn golden brown. This browning adds a rich flavor to the meal. Once the orzo is ready, drain any extra broth. Add the orzo to the skillet with the onion, garlic, and mushrooms. Next, stir in 2 cups of roughly chopped spinach. Cook just until it wilts. Now, reduce the heat to low and pour in 1/2 cup of heavy cream, or coconut milk for a vegan twist. Mix everything well. Gradually add 1/4 cup of grated Parmesan cheese. Stir until it melts and creates a creamy texture. Taste and adjust seasoning with salt and pepper as needed. To make your Creamy Mushroom Spinach Orzo really shine, follow these tips: - Use fresh ingredients. Fresh spinach and mushrooms enhance flavor. - Don’t rush the sauté. Cook onions slowly. This gives a sweet taste. - Cook mushrooms well. Let them release moisture. This step adds depth. - Stir often. This helps prevent sticking and ensures even cooking. - Taste as you go. Adjust salt and pepper for your perfect flavor. Common mistakes can derail your dish: - Overcooking the orzo. It should be al dente, not mushy. - Skipping the seasoning. Salt and pepper bring all flavors together. - Using low-quality broth. A good broth boosts the whole dish. Pair your orzo with these ideas for a full meal: - Add grilled chicken or shrimp. This adds protein and makes it hearty. - Serve with a fresh salad. A light green salad complements the dish well. - Pair with crusty bread. Great for soaking up the creamy sauce. Garnishing is also key for presentation: - Sprinkle fresh parsley on top. This adds color and freshness. - Grate extra Parmesan. A little more cheese makes it extra special. - Drizzle with olive oil. A touch of oil enhances the dish’s richness. These tips will help you create a delicious and beautiful meal! {{image_2}} You can easily make this dish vegan and gluten-free. For a vegan option, use coconut milk instead of heavy cream. Replace grated Parmesan with nutritional yeast. To make it gluten-free, swap orzo for gluten-free pasta. These swaps keep the dish rich and tasty while meeting dietary needs. If you have allergies, here are some suggested ingredient swaps: - Use sunflower oil if you are allergic to olive oil. - Substitute mushrooms with zucchini or bell peppers for a different flavor. - For onion allergies, use leeks or shallots for sweetness without the strong taste. Adding herbs and spices can elevate the flavor of your dish. Try fresh basil or rosemary for a fragrant touch. A pinch of red pepper flakes adds warmth and a bit of heat. Incorporating proteins can make this meal more filling. You can add cooked chicken, shrimp, or beans for a boost. If you want a meatless protein, chickpeas or lentils work well too. Mix in these options for a heartier dinner that still feels light and fresh. To keep your Creamy Mushroom Spinach Orzo fresh, store it in an airtight container. This helps prevent moisture loss and keeps flavors intact. You can refrigerate it for up to three days. If you want to enjoy it later, check for any signs of spoilage, like unusual smells or colors. To freeze the orzo, let it cool completely. Then, place it in a freezer-safe bag or container. Press out as much air as possible before sealing. This helps avoid freezer burn. When you're ready to eat, thaw it in the fridge overnight. To reheat, add a splash of broth or water in a pan over low heat. Stir it often to keep the texture creamy. Avoid high heat as it can dry out the dish. Enjoy your delicious meal even after storing! To make this dish vegan, swap heavy cream for coconut milk. It gives a rich taste. You can also replace Parmesan cheese with nutritional yeast. Nutritional yeast adds a cheesy flavor without dairy. This way, you can enjoy a creamy texture while keeping it plant-based. Yes, you can use other pasta types, like penne or fusilli. Just remember that cooking times may change. For smaller pasta, check the package for the right time. Larger pasta may need a few extra minutes. Adjust the vegetable broth as needed to ensure the pasta cooks well. To make your meal heartier, add protein like chickpeas or cooked chicken. These options add flavor and nutrition. You can also serve it with a side salad or garlic bread. Both pair well with the creamy orzo and make a complete meal. In this post, we explored Creamy Mushroom Spinach Orzo. We covered key ingredients and their roles, plus helpful alternatives for different diets. You learned the steps to cook orzo and sauté vegetables perfectly. We shared tips for avoiding common mistakes and enhancing flavor. Whether you want to store leftovers or add protein, we provided clear guidance. This dish is flexible and great for any meal. Try out these ideas to make your orzo delicious and satisfying. Enjoy your cooking journey!

Creamy Mushroom Spinach Orzo Flavorful Dinner Delight

Welcome to a flavor-packed adventure! Today, I’m excited to share my go-to recipe for Creamy Mushroom Spinach Orzo. This dish

- Ramen noodles - Peanut butter (smooth or crunchy) - Sesame oil - Broccoli florets - Carrot, julienned - Red bell pepper, sliced - Green onions - Sesame seeds - Vegetable broth - Soy sauce - Sriracha - Ginger - Garlic When I create Spicy Peanut Butter Ramen, I always focus on the key ingredients. The ramen noodles are the base of this dish. They soak up all the flavors and create a comforting texture. You can choose smooth or crunchy peanut butter. Both add rich flavor and creaminess. Next, I love to add sesame oil. It brings a nutty aroma and depth to the dish. For vegetables, I use colorful broccoli, julienned carrots, and sliced red bell peppers. They add nutrition and crunch. Green onions and sesame seeds make perfect garnishes, adding freshness and a slight crunch. The broth is where the magic happens. I start with vegetable broth for a light base. Soy sauce adds salty umami flavor. Sriracha gives it a delightful kick, which you can adjust to your taste. Fresh ginger and garlic bring warmth and aromatic notes. I combine all these ingredients for a flavor-packed meal. For the full recipe, check out the link. Now, let’s get cooking! First, cook the ramen noodles according to the package instructions. This usually takes about 3 to 4 minutes. Drain the noodles and set them aside. To ensure a perfect noodle texture, avoid overcooking. Rinse the noodles with cold water after draining. This helps stop the cooking process and keeps them firm. Next, heat 1 tablespoon of sesame oil in a large saucepan over medium heat. Add 2 cloves of minced garlic and 1 teaspoon of grated ginger. Sauté these for about 1 minute, until they smell great. Then, pour in 2 cups of vegetable broth, 1 tablespoon of soy sauce, and 1 tablespoon of sriracha. Stir well to combine and bring the mixture to a gentle simmer. Now it's time to add some color and crunch. Toss in 1 cup of broccoli florets, 1 julienned carrot, and 1 sliced red bell pepper. Cook these in the broth for 3 to 4 minutes. You want the veggies to be tender but still crisp. This way, they add good texture to the dish. Once your veggies are ready, stir in 2 tablespoons of peanut butter. Mix it well until it melts into the broth. This creates a creamy and spicy sauce. Next, add the cooked ramen noodles to the saucepan. Toss them gently in the sauce until they are well coated. Serve hot and enjoy your spicy peanut butter ramen! For the full recipe, check out the details above. To create a creamy peanut butter sauce, start with smooth peanut butter. Smooth peanut butter blends well, making it easy to mix into the broth. If you prefer crunchy, add it later for texture. Add your peanut butter to the broth slowly. Stir until it melts fully. This step is key for a silky sauce. To adjust the spice level, start with a small amount of sriracha. You can always add more later. If you like it mild, use just a teaspoon. For heat seekers, go for a tablespoon or more. Taste as you go to find your perfect balance. A beautiful dish makes the meal special. To enhance your Spicy Peanut Butter Ramen, use a large bowl. This allows all the colors to shine. Layer the veggies on top for a vibrant look. Sprinkle sesame seeds and chopped green onions for contrast. You can also add a drizzle of sriracha on top for visual appeal. When serving, consider using chopsticks alongside a spoon. This gives your meal an authentic touch. You can also serve it with lime wedges for a fresh burst of flavor. One common mistake is overcooking the noodles. Follow the package instructions carefully. Drain them just before they are fully soft. They will continue cooking in the hot broth. Another mistake is letting the sauce separate. To avoid this, stir the sauce well before adding the noodles. Mix them gently but thoroughly. If the sauce looks too thick, add a splash of broth. This keeps it creamy and smooth. {{image_2}} You can add protein to your Spicy Peanut Butter Ramen for more flavor and nutrition. Here are some great options: - Chicken breast, sliced thin - Shrimp, peeled and deveined - Tofu, cubed and pan-fried - Pork tenderloin, thinly sliced - Beef strips, marinated and cooked Chicken pairs well, as it absorbs flavors nicely. Tofu is a great choice for a vegetarian option. Cook your protein separately and add it to the ramen just before serving. This keeps it juicy and tender. Adding different vegetables can change the taste and look of your ramen. You can use: - Snow peas for a crunchy bite - Spinach or kale for extra greens - Mushrooms for an earthy flavor - Zucchini, sliced or spiralized - Bell peppers in different colors for sweetness Seasonal veggies work best. In summer, try fresh corn or cherry tomatoes. In fall, add butternut squash for a sweet touch. These veggies can boost nutrients and make your dish more colorful. You can enhance the flavor of your ramen with extra spices or sauces. Here are some ideas: - Add lime juice for a zesty kick. - Use sesame seeds for crunch and flavor. - Try chili flakes for more heat. - Swap soy sauce for tamari for a gluten-free option. If you want a creamier sauce, mix in coconut milk. This gives a tropical twist. Adjust these ingredients based on your taste or dietary needs. This way, your ramen can be uniquely yours. For the complete recipe, check the Full Recipe. To keep your Spicy Peanut Butter Ramen fresh, follow these tips: - Cool it down: Let the ramen cool to room temperature. - Use airtight containers: Store leftovers in airtight containers. This prevents moisture loss and keeps flavors intact. - Refrigerate: Place the container in the fridge. Consume within 3 days for the best taste. When reheating, you want to keep the flavor and texture. Here’s how: - Use a pot: Pour the ramen into a pot over low heat. - Add a splash of broth: This helps bring back creaminess. Stir gently until warmed through. - Microwave option: If using a microwave, cover the bowl to keep moisture in. Heat in short bursts, stirring in between. You can freeze Spicy Peanut Butter Ramen with care: - Yes, you can freeze: Freeze the ramen without the veggies. They lose texture when thawed. - Use freezer-safe containers: Pack the noodles and sauce in containers or freezer bags. - Thawing: To thaw, place it in the fridge overnight. Reheat on the stove, adding broth if needed. For the complete recipe, check out the Full Recipe section. To make this dish vegetarian or vegan, use vegetable broth instead of chicken or beef broth. You can also swap the soy sauce for tamari, which is a gluten-free option. For protein, add tofu or tempeh. Just cube them and toss them in during the cooking stage. This keeps the meal plant-based and delicious. If you have a peanut allergy, consider using sunflower seed butter. It has a creamy texture and a nutty flavor. Another option is soy nut butter. It mimics peanut butter well and works in this recipe. Both options will give you a great taste without the nuts. Yes! To make Spicy Peanut Butter Ramen gluten-free, choose gluten-free ramen noodles made from rice or buckwheat. For broth, ensure you use gluten-free soy sauce or tamari. This way, everyone can enjoy this tasty dish. The heat level depends on how much sriracha you use. The base recipe calls for one tablespoon, which gives a nice kick. If you prefer it milder, start with less and adjust to your taste. You can always add more sriracha after cooking if you want extra heat. Absolutely! This ramen dish is great for meal prep. Cook it ahead and store it in airtight containers. It keeps well in the fridge for up to three days. Just reheat it on the stove or in a microwave. If you want to keep the noodles from getting soggy, store them separately and mix before serving. For the full recipe, check out the original details to guide your prep! This blog post shared a simple recipe for Spicy Peanut Butter Ramen. We covered essential ingredients like ramen noodles, peanut butter, and vegetable broth. You learned how to create a flavorful base and cook fresh veggies to pair with the noodles. We also explored storage tips and ways to adapt the dish for dietary needs. Remember, cooking is about having fun and trying new things. Enjoy your ramen, and feel free to customize it to suit your taste!

Spicy Peanut Butter Ramen Flavor-Packed Comfort Dish

Craving a dish that’s both comforting and full of flavor? You’re in the right place! Spicy Peanut Butter Ramen combines

To create a tasty teriyaki glazed tofu stir fry, you need these key ingredients: - 1 block (14 oz) firm tofu, drained and pressed - 2 tablespoons cornstarch - 2 tablespoons vegetable oil - 2 cups mixed vegetables (bell peppers, broccoli, snap peas, and carrots) - 3 green onions, chopped - 2 cloves garlic, minced - 1 tablespoon fresh ginger, grated - 1/4 cup teriyaki sauce (store-bought or homemade) - 1 tablespoon sesame seeds, for garnish - Cooked jasmine rice or noodles, for serving These ingredients make a delicious meal. The firm tofu gives protein, while the vegetables add color and crunch. The teriyaki sauce brings sweet and savory notes that tie everything together. You can easily change this recipe to fit your tastes. Here are some optional ingredients: - Mushrooms for an earthy flavor - Broccoli for extra nutrients - Baby corn for added crunch - Red pepper flakes for spice Feel free to mix and match these ingredients. This flexibility helps you create a dish that you love. If you run out of an ingredient, don’t worry! Here are some swaps you can use: - Use silken tofu instead of firm tofu for a softer texture. - Swap cornstarch with arrowroot powder for a gluten-free option. - Use olive oil if you don’t have vegetable oil. - Try soy sauce if you can’t find teriyaki sauce. These substitutions keep your dish tasty and satisfying. You can enjoy this stir fry with what you have on hand. For the complete recipe, check out the Full Recipe. Start with a block of firm tofu. Drain it well, then press it to remove extra moisture. This helps the tofu soak up flavor and get crispy. Cut the pressed tofu into small cubes. Pat them dry with a paper towel. This step is key for achieving the best texture. In a bowl, toss the tofu cubes with cornstarch. Make sure each piece is coated evenly. This coating creates a lovely crispy layer. Heat 1 tablespoon of vegetable oil in a non-stick skillet over medium-high heat. Once hot, add the tofu cubes in a single layer. Cook them for 5-7 minutes. Turn them occasionally so they brown evenly on all sides. Once they are golden and crispy, take them out and set aside. In the same skillet, add another tablespoon of oil. Add minced garlic and grated ginger. Sauté them for about 30 seconds. This will bring out their wonderful aroma. Next, toss in your mixed vegetables. Stir-fry them for about 4-5 minutes. You want them tender but still crisp. After that, return the crispy tofu to the skillet. Pour the teriyaki sauce over everything and stir well. Cook for another 2-3 minutes, until heated through. Finally, fold in chopped green onions for extra flavor. For the full recipe, check out the above details. To get the best glaze on your tofu, use cornstarch. This helps the tofu crisp up nicely. When you add the teriyaki sauce, make sure your stir fry is hot. The sauce will thicken and coat the tofu evenly. Stir it well to cover every piece. For a little extra flavor, add a splash of soy sauce. For a colorful and tasty stir fry, choose quick-cooking vegetables. I love using: - Bell peppers - Broccoli - Snap peas - Carrots These veggies add crunch and sweetness. You can mix and match based on what you have. Just cut them into bite-sized pieces to cook evenly. Serve your teriyaki glazed tofu stir fry over jasmine rice or noodles. This adds a nice base. To make it even better, sprinkle sesame seeds on top. You can also add fresh green onions for a pop of color. For a fun twist, try adding pineapple chunks for added sweetness. For the full recipe, check out the cooking instructions above. {{image_2}} This recipe is already vegan and gluten-free if you use gluten-free teriyaki sauce. Look for brands that clearly state they are gluten-free. Some sauces might contain wheat, so check the label. You can also make your own teriyaki sauce. Just mix soy sauce, rice vinegar, and a bit of sugar. If you want to change it up, swap tofu for other proteins. Tempeh works great and has a firmer texture. Seitan is another good choice, offering a meaty bite. For a non-vegan option, chicken or shrimp can also shine in this stir fry. Just be sure to adjust cooking times for different proteins. To make your dish pop, add spices like chili flakes or garlic powder. A splash of lime juice can brighten the flavors. If you want a smoky taste, try adding a bit of smoked paprika. You can also mix in other sauces, like sriracha or hoisin, for extra flavor. Don't be afraid to experiment! To store your teriyaki glazed tofu stir fry, you need a few simple steps. First, let the dish cool down to room temperature. Next, transfer it to an airtight container. This keeps the flavors fresh. Place the container in the fridge. It will last about 3 to 4 days. If you don't plan to eat it soon, consider freezing it. When reheating, I recommend using a skillet. Heat it over medium heat. Add a splash of oil to prevent sticking. Place the stir fry in the skillet and stir gently. This helps keep the tofu crispy. You can also microwave it for about 1-2 minutes. Stir halfway through to ensure even heating. If you want to freeze your stir fry, it’s easy. Pack the cooled dish in a freezer-safe container. Make sure to leave some space for expansion. It can stay in the freezer for up to 2 months. To enjoy later, thaw it overnight in the fridge. Then, reheat it as mentioned above. This makes meal prep simple and efficient! For the full recipe, check out the cooking instructions. You can make Teriyaki sauce with simple ingredients. Mix soy sauce, sugar, and mirin. Add garlic and ginger for extra flavor. Heat this mixture on the stove until it thickens. This makes a tasty sauce for your stir fry. You can find the full recipe at the end of this article. Firm or extra-firm tofu works best for stir fry. This type holds its shape and gets crispy. Silken tofu is too soft and will break apart. Press the tofu to remove excess water before cooking. This helps it absorb more flavor and achieve the right texture. Yes, you can use frozen vegetables in your stir fry. They are quick and easy to use. Just add them straight to the hot skillet. They may need a minute or two longer to cook. Frozen vegetables are a great way to save time and still enjoy a healthy meal. This blog post covers how to make teriyaki glazed tofu stir fry. You learned about key and optional ingredients, plus substitutions for common items. I shared step-by-step instructions for preparing and cooking tofu, tips for the glaze, and the best vegetable choices. You saw variations for vegan options and flavor boosts. Lastly, I included storage and reheating tips to keep your meal fresh. With these insights, you can create a delicious and personalized stir fry that's fun to make and enjoyable to eat.

Teriyaki Glazed Tofu Stir Fry Flavorful and Quick Meal

Craving a quick and tasty meal? I’ve got you covered with my Teriyaki Glazed Tofu Stir Fry. This dish is

- 1 pound potato gnocchi - 1 cup sun-dried tomatoes, chopped - 1 cup heavy cream These three ingredients form the heart of this dish. The potato gnocchi provides a soft and pillowy base. Sun-dried tomatoes offer a burst of flavor and a hint of sweetness. The heavy cream brings richness and a creamy texture that ties everything together perfectly. - 1 cup spinach, fresh - 1/2 cup grated Parmesan cheese - Fresh basil leaves for garnish These optional ingredients can elevate your dish. Fresh spinach adds color and nutrients. Grated Parmesan gives a salty kick that enhances the creaminess. Basil leaves not only look pretty but also add a fresh aroma. - 3 cloves garlic, minced - 2 tablespoons olive oil - 1 teaspoon dried basil - Salt and pepper to taste These pantry staples are key for flavor. Garlic adds a savory depth, while olive oil provides a smooth base for sautéing. Dried basil complements the sun-dried tomatoes and brings warmth. Salt and pepper balance the flavors, ensuring your dish shines. For the full recipe and detailed steps, check out the [Full Recipe]. First, grab a large skillet and heat the olive oil over medium heat. Add the minced garlic. Sauté it for about 1-2 minutes until it becomes fragrant. This step brings out the garlic's rich flavors. Next, stir in the chopped sun-dried tomatoes. Cook them for another 2-3 minutes. You want them to soften and release their delicious taste. Now it's time to create that luscious creamy sauce. Pour in the heavy cream and stir well to combine. Bring this mixture to a gentle simmer. It should bubble lightly, not boil hard. Add the dried basil, salt, and pepper to taste. Stir again, making sure the seasonings mix well. This is where the magic happens, and the sauce starts to thicken. While the sauce simmers, bring a pot of salted water to a boil. Drop in the gnocchi and cook them according to the package instructions. They will be ready when they float to the surface, usually in about 2-3 minutes. Once cooked, drain the gnocchi and add them directly to the skillet with your creamy sun-dried tomato sauce. Gently fold in the fresh spinach and grated Parmesan cheese. Let the spinach wilt and the cheese melt into the sauce. This should take about 2 minutes. Adjust the seasoning if needed, and if the sauce is too thick, add a little gnocchi cooking water. For the full recipe, feel free to check the details provided earlier. - Adjust seasoning to taste: Always taste your dish before serving. Add salt or pepper as needed. You want a balanced flavor that highlights the sun-dried tomatoes. - Tips for creaminess: To enhance creaminess, use heavy cream instead of milk. If you want it even richer, add more Parmesan cheese. If the sauce is thick, mix in some pasta water. - How to avoid overcooking gnocchi: Boil the gnocchi in salted water until they float. This usually takes about 2-3 minutes. Don’t leave them in too long or they can get mushy. - Best practices for sautéing garlic: Heat olive oil in a skillet on medium heat. Add minced garlic and stir. Cook for about 1-2 minutes. Watch closely; burnt garlic can ruin your dish. - Garnishing suggestions: Top your dish with fresh basil leaves and a sprinkle of Parmesan cheese. This adds color and flavor. You can also drizzle a bit of olive oil for extra shine. - Serving ideas for special occasions: Serve the gnocchi in warm bowls. Pair it with a light salad or crusty bread. This makes it feel fancy and complete, perfect for a dinner party. For the full recipe, check out [Full Recipe]. {{image_2}} You can make creamy sun dried tomato gnocchi even better by adding protein. Grilled chicken or shrimp works great. Simply cook the protein separately and toss it into the sauce at the end. This gives your dish a nice boost. You can also add bacon or sausage for a heartier option. Cook the bacon until crispy, then crumble it on top before serving. For sausage, brown it in the skillet first, then mix it with the creamy sauce. Both options add wonderful flavors. If you prefer a vegetarian dish, you can substitute the cream. Use plant-based cream or cashew cream. This keeps the dish rich without dairy. Adding more vegetables is also a great way to enhance the meal. Try bell peppers, zucchini, or mushrooms. Sauté them with the garlic and sun-dried tomatoes. This not only adds nutrition but also makes the dish more colorful and fun. To amp up the flavors, consider incorporating fresh herbs and spices. Thyme or oregano can add depth to the sauce. You can also sprinkle in some red pepper flakes for a kick. Experimenting with different cheese types can also change the dish. Try using goat cheese or feta for a tangy twist. Mixing cheeses can create a unique and tasty flavor profile, making every bite a new experience. To store leftovers of Creamy Sun Dried Tomato Gnocchi, let it cool first. Place it in an airtight container. This keeps the dish fresh for up to three days. When you are ready to eat, reheat it gently on the stove. Add a splash of cream or water to help restore creaminess. Stir often to avoid sticking. You can also use the microwave, but it may not heat evenly. Can you freeze creamy sauces? Yes, but they may change texture once thawed. It’s best to freeze the gnocchi separately from the sauce. To freeze, let both cool completely. Place them in freezer-safe bags or containers. Label with the date. When ready to eat, thaw overnight in the fridge. Reheat gently on the stove to warm through. For the best taste, consume the dish within three days when refrigerated. To maintain quality, store it properly. Look for signs of spoilage, such as off smells or changes in texture. If the gnocchi appears slimy or the sauce has separated, it’s best to discard it. Always trust your senses; if it doesn’t smell or look right, don’t eat it. Gnocchi is often made from potatoes, flour, and eggs. Some recipes use ricotta cheese instead of potatoes. You can find different types too, like sweet potato or spinach gnocchi. Each type offers a unique taste and texture. The classic potato gnocchi pairs well with sauces like creamy sun-dried tomato sauce. For the full recipe, check out the complete details above. To make fluffy gnocchi, use starchy potatoes. Avoid overworking the dough, as this can make it tough. Mix the ingredients just until combined. Roll the dough gently and cut it into small pieces. When boiling, cook gnocchi until they float to the top. This usually takes 2-3 minutes. Don’t let them sit too long in the water, or they can become soggy. Yes, you can make this recipe vegan! Replace the heavy cream with coconut milk or a plant-based cream. Use nutritional yeast instead of Parmesan cheese for a cheesy flavor. You can also skip the cheese altogether if you prefer. The gnocchi will still taste great with sun-dried tomatoes and fresh spinach. This blog post shared a delicious gnocchi recipe and tips. You learned about essential and optional ingredients, plus pantry staples. The step-by-step instructions helped break down cooking and preparing the sauce. Tips on perfecting the dish and variations showed how to customize it. Proper storage info ensures your leftovers stay fresh. Embrace creativity with the ingredient options and methods. Enjoy cooking and sharing this dish, knowing it suits your taste and occasions. Get ready to impress friends and family with your gnocchi skills!

Creamy Sun Dried Tomato Gnocchi Flavorful Delight

If you’re looking for a dish that’s both creamy and packed with flavor, this Creamy Sun Dried Tomato Gnocchi is

- 2 cups fresh blueberries - 2 cups fresh peaches, peeled and sliced - 1 tablespoon lemon juice - 1 cup rolled oats - 1/2 cup all-purpose flour - 1/2 cup brown sugar - 1/3 cup unsalted butter, melted - 1 teaspoon ground cinnamon - 1/4 teaspoon salt - 1/2 cup chopped nuts (walnuts or pecans) For my Blueberry Peach Crisp, I love using ripe, fresh blueberries and peaches. The combination gives a sweet and tart flavor that shines. The lemon juice adds a nice zing, making the fruit pop. The dry ingredients are crucial for that perfect crisp topping. Rolled oats and flour mix well with brown sugar for a sweet crunch. The butter brings it all together. It melts and binds the dry mix, creating a golden layer on top. If you need a gluten-free option, you can swap all-purpose flour for gluten-free flour. Look for oats labeled gluten-free as well. For a dairy-free version, use coconut oil instead of butter. When it comes to sweeteners, feel free to adjust to your taste. You might try maple syrup or honey for a different flavor. I often play with sweeteners to find what suits my mood. For the full recipe, check out the complete guide. - Preheat your oven to 350°F (175°C). - In a large bowl, combine 2 cups of fresh blueberries, 2 cups of sliced peaches, and 1 tablespoon of lemon juice. Mix gently to coat the fruit. Transfer the mix to a greased 9x13 inch baking dish. - In a separate bowl, combine 1 cup of rolled oats, 1/2 cup of all-purpose flour, and 1/2 cup of brown sugar. Mix in 1 teaspoon of ground cinnamon and 1/4 teaspoon of salt. - Pour in 1/3 cup of melted unsalted butter and stir well. Add 1/2 cup of chopped nuts, like walnuts or pecans, for more crunch. - Spread the oat mixture evenly over the fruit layer in the baking dish. Make sure all the fruit is covered. - Bake in your preheated oven for about 30-35 minutes. Look for a golden brown top and bubbly fruit. - Once done, remove it from the oven and let it cool slightly before serving. This will help the flavors mix well. - Serve warm, and if you like, add a scoop of vanilla ice cream for a special treat. For the full recipe, check the details above! To avoid soggy bottoms, use fresh fruit. Fresh blueberries and peaches provide the best flavor and texture. If you use frozen fruit, thaw and drain them first. This step prevents excess juice from making the crust wet. Also, sprinkle a little flour on the fruit before adding the topping. This helps absorb some juice and keeps the crisp crunchy. I love to serve blueberry peach crisp warm. A scoop of vanilla ice cream on top makes it even better. The cold ice cream blends perfectly with the warm crisp. If you prefer, whipped cream is a tasty option too. Both add a creamy contrast to the sweet fruit and crunchy topping. For a fun twist, serve the crisp in individual dishes. Small ramekins look nice and make serving easier. Each person gets their own portion, which adds a special touch. You can also garnish with fresh mint leaves for color. This simple addition makes the dish look fancy and inviting. {{image_2}} You can mix up the fruits in your crisp. Apples work well and add a nice crunch. Strawberries also bring a sweet touch. Feel free to use any fruit you love. Just keep the same amounts for best results. You can even try a mix of all three for a fun twist. Experimenting with fruit lets you find your favorite flavor. If you want a lighter crisp, you can reduce the sugar. Use only half the amount and still enjoy great taste. You can also swap in oats without gluten. These oats keep the texture nice while being gluten-free. For a vegan option, replace butter with coconut oil. You still get a lovely crisp without added dairy. Adding spices can elevate your dessert. A dash of nutmeg gives warmth and depth. Ginger can add a zesty kick that brightens the flavors. Just a pinch in the topping can change everything. Feel free to mix and match your favorite spices. This small step can create a unique flavor profile in your crisp. For the full recipe, check out the detailed steps to make your crisp a success. To store leftover blueberry peach crisp, let it cool first. Cover the dish tightly with plastic wrap or aluminum foil. You can also transfer it to an airtight container. In the fridge, it stays fresh for 3 to 5 days. Just reheat it gently in the oven or microwave before serving. This makes it taste almost as good as fresh! If you want to freeze your crisp, it’s best to do so before baking. Assemble the crisp, but skip the oven. Cover it tightly with plastic wrap, then foil. This prevents freezer burn and keeps flavors intact. When ready, bake it from frozen for about 10 to 15 extra minutes. If you freeze leftovers, thaw in the fridge overnight before reheating. Unbaked blueberry peach crisp can last up to 3 months in the freezer. Baked crisp lasts about 1 month if frozen. Refrigerated crisp should be eaten within 5 days. Use your senses to check for freshness. If it smells off or looks strange, it’s best to toss it. Enjoy your delicious dessert safely! It takes about 30 to 35 minutes to bake blueberry peach crisp. You want the top to be golden brown and the fruit to bubble. This time allows the flavors to mix well and the topping to get crispy. While it cooks, your kitchen fills with a lovely smell. Yes, you can use frozen fruit! Just make sure to thaw and drain the fruit first. Frozen fruit has more water than fresh fruit. If you use it without draining, your crisp might turn out too soggy. Adjust the baking time. You may need a few extra minutes to cook it fully. Blueberry peach crisp is great on its own, but you can add more fun! Serve it warm with a scoop of vanilla ice cream. The ice cream melts over the warm crisp, creating a tasty mix. You can also pair it with whipped cream or yogurt for a lighter option. Enjoy the contrast of hot and cold for a delightful treat. This blog post shared how to make a tasty blueberry peach crisp. We discussed fresh ingredients, alternative options, and simple steps to prepare your dish. I included tips to avoid sogginess and great serving ideas. You can try different fruits or spices to make it yours. Follow storage tips to keep leftovers fresh. Enjoy experimenting and creating your own tasty versions! Your perfect crisp awaits.

Blueberry Peach Crisp Flavorful and Easy Dessert Recipe

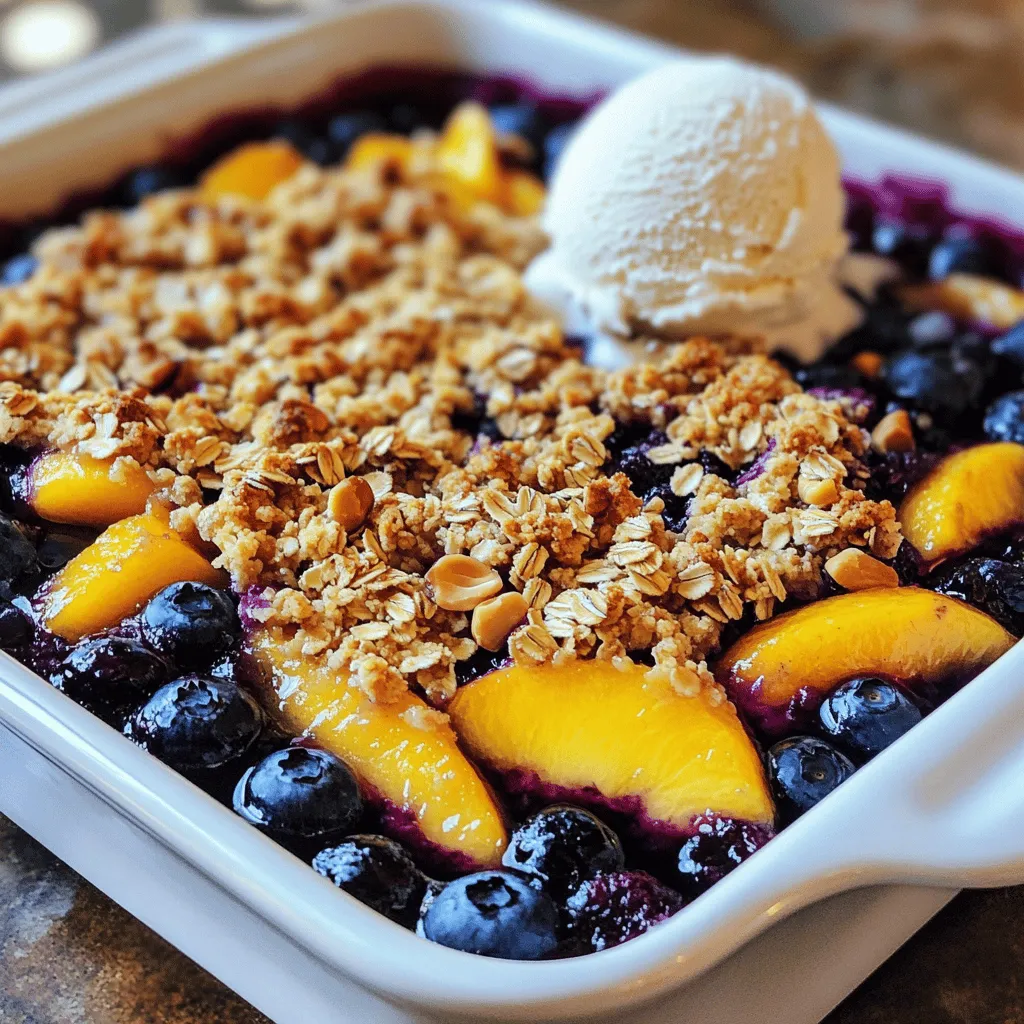
Are you craving a dessert that bursts with flavor and is super easy to make? Look no further! This Blueberry

To start making your cinnamon roll overnight oats, you need these key items: - 1 cup rolled oats - 1 cup unsweetened almond milk (or milk of choice) - 1 tablespoon chia seeds - 1 tablespoon maple syrup (or honey) - 1 teaspoon ground cinnamon - 1/2 teaspoon vanilla extract These ingredients create a creamy base, full of flavor. The oats soak in the almond milk and sweet syrup. The chia seeds add a nice texture and help thicken the mix. You can enhance your oats with these fun add-ins: - 1/4 cup Greek yogurt (optional) - 2 tablespoons raisins or dried cranberries - Chopped nuts (walnuts or pecans) for topping Greek yogurt adds creaminess. Raisins or cranberries give a sweet burst. Nuts add crunch and heartiness to your meal. Each serving of these delightful oats is packed with nutrition. Here’s what you get: - Calories: Approximately 300 - Protein: 10 grams - Fiber: 8 grams - Sugars: 8 grams These oats are a great choice for breakfast. They fuel your day with wholesome ingredients. You can find the full recipe to make these delightful oats and enjoy a delicious start to your morning! To start, gather your ingredients. You need rolled oats, almond milk, chia seeds, and sweeteners. In a medium bowl, mix 1 cup of rolled oats with 1 cup of almond milk. Add 1 tablespoon of chia seeds and 1 tablespoon of maple syrup. Next, sprinkle in 1 teaspoon of ground cinnamon and 1/2 teaspoon of vanilla extract. Stir everything together until well combined. This mix forms the base of your delicious overnight oats. After preparing the base, you can add extra creaminess if you want. Fold in 1/4 cup of Greek yogurt if you like a richer taste. It makes the oats smooth and tasty. Then, gently add 2 tablespoons of raisins or dried cranberries. These fruits give a sweet burst in every bite. Make sure all the ingredients blend well together. This step is key for a balanced flavor. Cover your bowl or jar tightly. Place it in the fridge overnight, or for at least 4 hours. This waiting time allows the oats to soak up all the liquid. In the morning, stir the mixture well. If it feels too thick, add a splash of almond milk until it reaches your desired texture. Serve your oats cold or at room temperature. Top with chopped nuts for crunch and a sprinkle of cinnamon for extra flavor. Enjoy this delightful breakfast treat! For the complete recipe, check out the Full Recipe. To make your oats creamy, use rolled oats. They soak up liquid well. I often add chia seeds for extra creaminess. They also help the oats thicken. If you want a richer texture, add Greek yogurt. Mix it in with the oats before refrigerating. This step makes a big difference. You can switch up the flavor easily. Try adding vanilla extract or even almond extract. For a fruity twist, mix in fresh or frozen berries. You could also use different spices like nutmeg or pumpkin spice. These changes keep your oats exciting and fun. Toppings can elevate your oats. Chopped nuts are a great choice for crunch. Walnuts and pecans work best. You can also add a sprinkle of cinnamon for extra flavor. For sweetness, drizzle a bit of maple syrup or honey on top. This gives your oats a delightful finish. For the full recipe, check [Full Recipe]. {{image_2}} You can easily make vegan cinnamon roll overnight oats. Just swap almond milk with oat or soy milk. Use maple syrup instead of honey for sweetness. For creaminess, skip the Greek yogurt or use a plant-based yogurt. These simple swaps keep the flavors rich and satisfying. You’ll enjoy a vegan treat that tastes just as delightful. For a fun twist, add chocolate chips to the mix. Just stir in a handful of mini chocolate chips before refrigerating. The chocolate melts slightly, giving a rich taste. It pairs well with the cinnamon flavor. This variation is perfect for chocolate lovers, making breakfast feel like a treat. If you want extra protein, mix in Greek yogurt. It adds creaminess and boosts nutrition. Combine the yogurt with your oats, milk, and other ingredients. This version keeps you full longer, making it great for busy mornings. You might even notice a richer taste, which makes each bite even more enjoyable. You can find the full recipe for cinnamon roll overnight oats to explore these variations! Storing leftover cinnamon roll overnight oats is easy. Place them in a sealed container. This keeps the oats fresh and prevents spills. If you have a portion left, just scoop it into a jar. Make sure to use a lid to cover it tightly. I suggest using glass jars or airtight plastic containers. Glass jars let you see the oats inside. They are also good for the environment. Plastic containers are lightweight and easy to carry. Choose a container that fits your fridge space. Your cinnamon roll overnight oats last about 3 to 5 days in the fridge. The oats may become thicker over time. Add a splash of almond milk to make them creamy again. You can enjoy them cold or warm. To heat them, pop them in the microwave for about 30 seconds. Stir and check the temperature before eating. Enjoy your delicious breakfast treat anytime! For the full recipe, check the link above. Yes, you can make these oats in advance. I often prepare them the night before. This lets the oats soak up all the flavors. You can store them in the fridge for up to three days. Just keep them in an airtight container. You can use any milk you prefer. Cow's milk, soy milk, or oat milk works well too. Each option gives a different flavor. Choose what you like best or what you have at home. To make more servings, simply double or triple the ingredients. For example, use 2 cups of oats and 2 cups of milk for four servings. Just keep the same ratio. This will help maintain the taste and texture. Absolutely! This recipe is perfect for meal prep. You can make several jars at once. Just store them in the fridge. Each morning, grab one and enjoy a quick, tasty breakfast. Cinnamon Roll Overnight Oats are easy to make and full of flavor. You can customize them to match your taste. This recipe offers ways to enjoy creamy oats with tasty add-ins and toppings. Remember, you can save time by prepping in advance. Feel free to adjust the recipe for larger servings or swap ingredients. With the right storage, your oats stay fresh and delicious. Enjoy your creamy breakfast treat anytime!

Cinnamon Roll Overnight Oats Delightful Breakfast Treat

Wake up to the sweet aroma of cinnamon rolls with my Cinnamon Roll Overnight Oats! This simple breakfast treat combines

Older posts
Newer posts
← Previous Page1 … Page42 Page43 Page44 … Page84 Next →

dsad

© 2026 Lisa Dishes • Built with GeneratePress

Our Policies

  • Copyright Policy
  • Cookie Policy
  • GDPR Policy
  • Privacy Policy
  • Disclaimer
  • Terms Of Use

More Information

  • Home
  • About
  • Contact
  • Appetizers
  • Dessert
  • Dinner
  • Drinks
©2026, Lisa Dishes About Back To Top