Skip to content
DisclaimerTerms Of UseGDPR PolicyCookie Policy

Lisa Dishes

  • Home
  • Drinks
  • Appetizers
  • Dinner
  • Dessert
  • About
  • Contact
  • Privacy Policy
DisclaimerTerms Of UseGDPR PolicyCookie Policy

NO-ING-IMG

To make sticky sesame cauliflower, you’ll need the following ingredients: - 1 medium head of cauliflower, cut into florets - 1 cup cornstarch - 1/2 cup vegetable oil (for frying) - 1/4 cup soy sauce - 1/4 cup maple syrup - 1 tablespoon rice vinegar - 1 tablespoon sesame oil - 2 cloves garlic, minced - 1 teaspoon ginger, grated - 2 tablespoons sesame seeds - 2 green onions, chopped (for garnish) - Salt and pepper to taste Having the right tools makes cooking easier. Here are the must-haves: - Large mixing bowl - Large pan or wok - Small saucepan - Paper towels for draining - Spatula or tongs for tossing If you lack an ingredient, don’t worry! Here are some smart swaps: - Use almond flour instead of cornstarch for coating. - If you don’t have vegetable oil, canola oil works well too. - Swap maple syrup with honey for sweetness. - Use apple cider vinegar if rice vinegar is not available. - Try sunflower oil instead of sesame oil for a different taste. - You can replace green onions with chives for garnish. These substitutions won't change the dish much and can fit your pantry needs. To start, grab one medium head of cauliflower. Cut it into nice, bite-sized florets. Place the florets in a large bowl. Sprinkle salt and pepper on them for flavor. Then, add one cup of cornstarch. Toss everything together until the cauliflower is fully coated. This coating helps create a crispy texture. Next, heat up half a cup of vegetable oil in a large pan or wok. Set the heat to medium-high. Once the oil is hot, carefully add the cauliflower in small batches. Avoid overcrowding the pan. Fry the florets until they turn a beautiful golden color and crispy, about 5 to 7 minutes. Use a slotted spoon to remove them and set them on paper towels to drain the excess oil. While the cauliflower cooks, you can make the sticky sauce. In a small saucepan, mix together a quarter cup of soy sauce, a quarter cup of maple syrup, one tablespoon of rice vinegar, and one tablespoon of sesame oil. Add two minced garlic cloves and one teaspoon of grated ginger. Heat this mixture over low heat, stirring often. After about 2 to 3 minutes, the sauce will be warm and fragrant, ready to coat your crispy cauliflower. To get the best sticky sesame cauliflower, follow these simple steps. First, coat your cauliflower florets well with cornstarch. This helps create a crispy texture when frying. Heat your oil to medium-high. If the oil is not hot enough, the cauliflower will soak up the oil. Fry the florets in batches to avoid crowding. This ensures even cooking and crispiness. Fry for 5-7 minutes until golden brown. After frying, let them drain on paper towels. This will keep them crispy. You can easily adjust this recipe for different diets. To make it gluten-free, use tamari instead of soy sauce. For a vegan option, ensure your maple syrup is pure and not mixed with other sweeteners. If you want more protein, you can add tofu or tempeh. Marinate them in the sauce for extra flavor. You can even swap the cauliflower for broccoli or Brussels sprouts for a twist. Avoid a few common mistakes to make the best sticky sesame cauliflower. Do not skip the cornstarch; it is key for crispiness. Also, be careful not to overcrowd the pan when frying. This can lead to soggy cauliflower. Make sure the oil is hot before adding the florets. Finally, don’t forget to toss the cauliflower in the sauce quickly after frying. This ensures every piece gets coated in that delicious sticky sauce. {{image_2}} You can easily change the sauce to fit your taste. Try using teriyaki sauce instead of soy sauce for a sweeter twist. A spicy hoisin sauce adds a kick, too. You can also mix soy sauce with peanut butter for a rich flavor. If you want a tangy touch, add a splash of lime juice to your sauce mix. Sticky sesame cauliflower can be a great base for more protein. You can add cooked tofu or tempeh for a hearty meal. Chickpeas work well, too, and they add extra fiber. If you like meat, toss in some cooked chicken or shrimp. This makes the dish more filling and satisfying. If you crave heat, add red pepper flakes to your sauce. You could also use sriracha for a spicy kick. For a deeper flavor, try using chili garlic sauce. Mix in fresh sliced jalapeños before serving for a bold taste. Adjust the spice level based on your preferences for a dish that excites your palate. To keep your sticky sesame cauliflower fresh, store it in an airtight container. Let it cool completely before sealing. This helps prevent sogginess. You can keep it in the fridge for up to three days. If you plan to eat it later, avoid adding the sauce until you reheat it. To reheat your leftovers, use a skillet over medium heat. Add a splash of water or oil to help steam the cauliflower. Stir it gently for about 5-7 minutes until hot. You can also use the microwave. Heat in short bursts of 30 seconds, stirring in between. This keeps the cauliflower tender yet crispy. You can freeze sticky sesame cauliflower, but it might lose some crunch. To freeze, store it in a freezer-safe bag after cooling. Squeeze out the air to prevent freezer burn. It will last for about three months. To enjoy, thaw it in the fridge overnight and reheat using the skillet method for best results. To get that perfect crunch, coat the cauliflower florets in cornstarch first. This creates a nice barrier that keeps moisture away. Fry the florets in hot oil without crowding the pan. Fry them in batches. This allows the heat to circulate and makes them crispy. Drain them on paper towels to soak up extra oil. You’ll love the golden brown color. Yes, you can make this dish gluten-free. Just swap regular soy sauce for gluten-free soy sauce or tamari. This will keep that savory flavor while avoiding gluten. Make sure your other ingredients, like the rice vinegar and cornstarch, are gluten-free as well. Absolutely! Sticky Sesame Cauliflower is great for meal prep. You can cook a big batch and store it for later. Just keep the sauce separate until you are ready to eat. This helps maintain the crispiness of the cauliflower. Leftovers can last in the fridge for up to three days. Store them in an airtight container to keep them fresh. If you want to eat them later, just remember to reheat them in the oven for best results. This helps keep them crispy instead of mushy. You can serve Sticky Sesame Cauliflower with rice or quinoa for a complete meal. It also pairs well with a fresh salad or steamed veggies. For a fun twist, try it in a wrap or as a topping on a grain bowl. The options are endless! You learned about the key ingredients and tools for making Sticky Sesame Cauliflower. I shared step-by-step instructions and tips for perfect cooking. Understanding variations and storage helps you get the most from your dish. Remember, cooking can be fun and flexible! Use these tips to impress your family and friends with your skill. Enjoy creating and sharing this tasty dish. Happy cooking!

Sticky Sesame Cauliflower Flavorful Vegetarian Dish

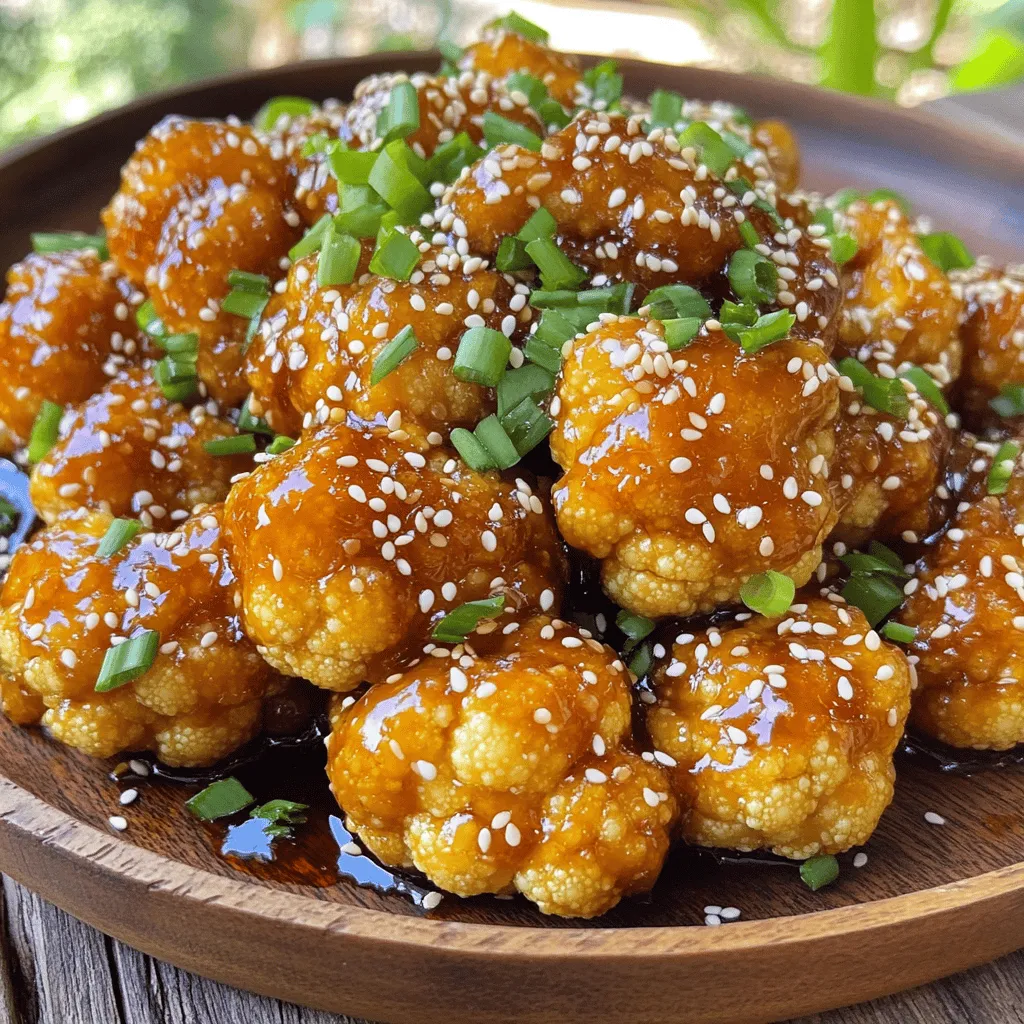
Looking for a tasty vegetarian dish that impresses? Sticky Sesame Cauliflower is here to save your meal times! Crunchy florets

To make a tasty cranberry pecan chicken salad, you need: - 2 cups cooked chicken, shredded or diced - 1 cup fresh spinach, chopped - 1/2 cup dried cranberries - 1/2 cup pecans, toasted and roughly chopped - 1/4 cup red onion, finely chopped - 1/2 cup Greek yogurt - 2 tablespoons honey - 1 tablespoon apple cider vinegar - Salt and pepper to taste - Optional: Fresh parsley for garnish Each ingredient plays a role. The chicken adds protein, and the spinach gives vitamins. Dried cranberries offer sweetness, while pecans add crunch. Red onion gives a sharp flavor. Greek yogurt is creamy and healthy. Honey brings in a touch of sweetness, and apple cider vinegar adds a tangy kick. Salt and pepper help enhance all the flavors. You can change things up with these ingredients: - Chopped celery for extra crunch - Sliced grapes for more sweetness - A sprinkle of feta cheese for a salty bite These options let you make your salad unique. You can mix and match based on your taste or what you have at home. This salad is not only delicious but also nutritious. - Calories: About 320 per serving - Protein: 30 grams - Fat: 18 grams - Carbohydrates: 20 grams - Fiber: 3 grams This salad is a great meal choice. It’s packed with protein and healthy fats, making it filling. The fiber from spinach and cranberries helps keep you full longer. Start by gathering your ingredients. You need cooked chicken, spinach, cranberries, pecans, and red onion. Chop the spinach and red onion into small pieces. Shred or dice the chicken if it’s not done yet. This step is quick and takes about five minutes. In a large bowl, combine the chicken, spinach, cranberries, pecans, and red onion. Mix them well. In a smaller bowl, whisk Greek yogurt, honey, apple cider vinegar, salt, and pepper until smooth. Pour this dressing over the chicken mixture. Gently fold the dressing in. Ensure everything is coated evenly. Taste and adjust the seasoning if needed. Chill the salad for at least 30 minutes. This helps the flavors blend together. Serve it cold for the best taste. You can garnish with fresh parsley for a pop of color. Pair it with whole-grain bread or crackers for a full meal. Enjoy your fresh and tasty Cranberry Pecan Chicken Salad! To make a great dressing, start with Greek yogurt. It adds creaminess and tang. Mix it with honey for sweetness. Honey balances the tartness of cranberries. Apple cider vinegar gives the dressing a nice kick. Whisk until smooth. Taste it; add salt and pepper to your liking. This simple dressing makes the salad shine. For this salad, use cooked chicken. You can bake, grill, or boil it. Baking gives a nice flavor. Grill it for a smoky touch. Boiling keeps it moist. Shred or dice the chicken into bite-sized pieces. This helps it mix well with other ingredients. Always let the chicken cool before adding it to the salad. You can make this salad a day ahead. Just store it in the fridge. The flavors blend better after chilling. Keep the dressing separate if you plan to store it longer. This keeps the salad fresh and crisp. If you want to meal prep, divide it into containers. This makes it easy to grab and go. Enjoy this tasty salad during the week! {{image_2}} You can make a great vegetarian version of this salad. Swap the chicken for chickpeas or diced tofu. Both options add protein and texture. You can also use roasted veggies like sweet potatoes for more flavor. Add extra spinach or even kale for a nice crunch. If you have nut allergies, skip the pecans. You can try sunflower seeds or pumpkin seeds instead. Both add a nice crunch without the nuts. For dairy-free options, replace Greek yogurt with a plant-based yogurt. Look for one that is thick and creamy for the best results. In spring and summer, add fresh fruits like strawberries or mango. They give a sweet twist and bright color. In fall, consider adding diced apples or pears. They pair well with the cranberries and pecans. For winter, you can use citrus fruits like orange or grapefruit. They add a refreshing taste to the salad. To store your Cranberry Pecan Chicken Salad, place it in an airtight container. Make sure the lid is tight. This keeps the salad fresh for up to three days. If you see any moisture, use a paper towel to soak it up first. This helps the salad stay crisp. You can freeze this chicken salad, but it may change the texture. Place the salad in a freezer-safe container. Leave some space at the top for expansion. It can last up to three months in the freezer. When ready to eat, move it to the fridge overnight to thaw. To reheat, I suggest adding a bit more Greek yogurt. This helps bring back moisture. Warm it in the microwave for about 30 seconds. Stir it well and check the temperature. If it’s not warm enough, heat it for another 15 seconds. Enjoy your salad chilled or warm, depending on your taste! You can use sour cream or plain yogurt as a substitute for Greek yogurt. Both options give a similar creamy texture. If you want a dairy-free option, try silken tofu or vegan yogurt. These choices keep the salad smooth and tasty. Remember, each option may change the taste slightly, so pick what you like best. Yes, rotisserie chicken works great in this recipe! It saves time and adds flavor. Just shred or dice the chicken before mixing it in. This makes your salad quick to prepare and still delicious. You can enjoy the added seasoning from the rotisserie chicken too. Cranberry Pecan Chicken Salad stays fresh for about three to four days in the fridge. Be sure to store it in an airtight container. This keeps it safe to eat and helps maintain its flavor. If you notice any change in smell or texture, it's best to toss it. In this blog post, we explored the key ingredients and step-by-step instructions for making a delicious Cranberry Pecan Chicken Salad. We shared tips for perfecting the dressing, cooking chicken, and even meal prep ideas. You can also find variations and storage info to suit your needs. Making this salad is easy, and you can customize it to your taste. Enjoy this fresh dish, whether you follow the recipe or adapt it. It’s tasty, versatile, and great for any occasion!

Cranberry Pecan Chicken Salad Simple and Fresh Recipe

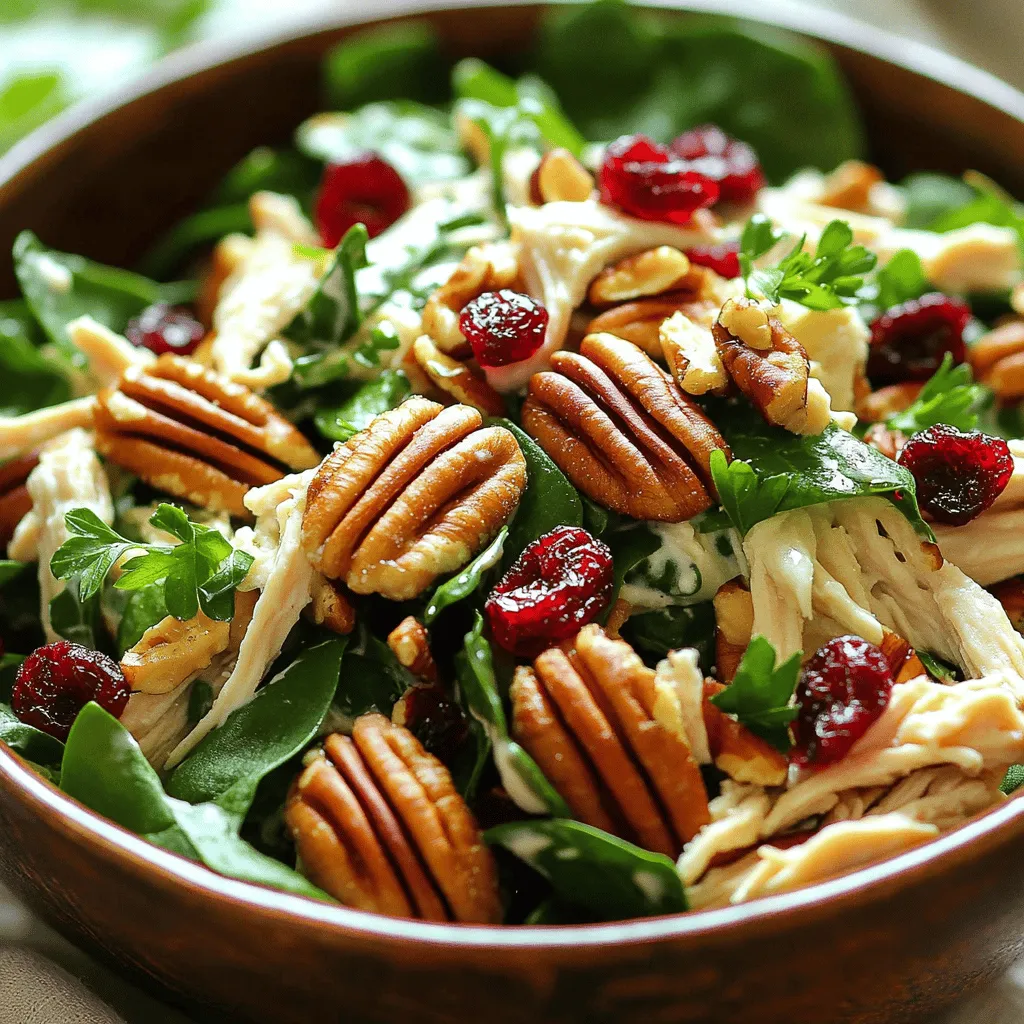
Looking for a tasty and easy dish? My Cranberry Pecan Chicken Salad is just what you need! Packed with flavor

- 12 large portobello mushrooms, stems removed - 1 cup fresh spinach, chopped - 1 cup canned artichoke hearts, drained and chopped - 1/2 cup cream cheese, softened - 1/4 cup grated Parmesan cheese - 1/4 cup shredded mozzarella cheese - 1 clove garlic, minced - 2 tablespoons olive oil - 1 teaspoon lemon juice - Salt and pepper to taste - 1/4 teaspoon red pepper flakes (optional) Gather all these ingredients to make your stuffed mushrooms. Start with fresh portobello mushrooms. These mushrooms should be large and firm. They will hold the filling well. Next, chop the spinach finely. Fresh spinach works best for flavor and texture. Canned artichoke hearts need to be drained and chopped. They add a unique taste to the dish. For the creamy filling, use softened cream cheese. This helps it mix easily with the other ingredients. Grated Parmesan and shredded mozzarella add delicious cheesy flavors. The Parmesan brings a nutty taste, while mozzarella adds creaminess. You will also need garlic for a punch of flavor. Minced garlic cooks quickly and blends well. Olive oil will help you sauté the garlic and vegetables. Lemon juice adds a touch of brightness. Finally, season with salt and pepper. Adjust these to your taste. If you like some heat, add red pepper flakes. They are optional but can enhance the flavor. With these ingredients, you can create a tasty and satisfying dish. Let's get cooking! 1. Preheat your oven to 375°F (190°C). Line a baking sheet with parchment paper. This keeps the mushrooms from sticking. 2. In a skillet, heat 2 tablespoons of olive oil over medium heat. Add 1 clove of minced garlic to the oil. Sauté for about 1 minute. The garlic should smell great! 3. Now, add 1 cup of chopped fresh spinach and 1 cup of drained, chopped artichoke hearts. Cook this mix until the spinach wilts, about 3 to 4 minutes. Keep stirring to prevent sticking. 1. In a mixing bowl, combine the sautéed mixture with 1/2 cup of softened cream cheese, 1/4 cup of grated Parmesan cheese, and 1/4 cup of shredded mozzarella cheese. 2. Add 1 teaspoon of lemon juice, salt, and pepper to taste. If you like spice, add 1/4 teaspoon of red pepper flakes. Mix everything well until it's creamy and smooth. 3. Now, take 12 large portobello mushrooms with the stems removed. Stuff each mushroom generously with the spinach and artichoke blend. Press down a bit to pack it in. 1. Place the stuffed mushrooms on the lined baking sheet. Bake them in your preheated oven for 20 to 25 minutes. They should be tender and golden brown on top. 2. Once done, remove the mushrooms from the oven. Let them cool for a few minutes before serving. Enjoy your savory snack! To make the best spinach and artichoke stuffed mushrooms, start with the right mushrooms. Choose large portobello mushrooms. Look for firm mushrooms with a smooth surface. Avoid any with dark spots or wrinkles. For cooking, preheat your oven to 375°F (190°C). This temperature helps the mushrooms cook evenly and turn golden brown. Baking them at this heat also softens the mushrooms while crisping the stuffing. You can boost the flavor of your stuffed mushrooms by adding herbs and spices. Fresh herbs like basil or parsley add a bright taste. A pinch of thyme or oregano works well too. Red pepper flakes add a nice kick if you like some heat. Experiment with different cheese varieties. Try using feta for a tangy twist or gouda for a smoky flavor. Mixing in some aged cheddar can also enhance the richness of your filling. {{image_2}} You can easily change some ingredients in this recipe. If you want a dairy-free option, try using dairy-free cream cheese. This will keep the creamy texture while making it suitable for those avoiding dairy. You can also swap out the vegetables. Instead of spinach and artichokes, use mushrooms or zucchini. These veggies can add a new twist and taste to your dish. These stuffed mushrooms pair well with a variety of sauces. A simple marinara or a creamy ranch dip can enhance the flavors. You might also enjoy serving them with a drizzle of balsamic glaze for a tangy kick. For side dishes, consider a fresh salad or garlic bread. These options balance the rich flavors of the stuffed mushrooms and round out your meal beautifully. To store leftovers, let the stuffed mushrooms cool completely. Place them in an airtight container. They keep well in the fridge for up to three days. For longer storage, freeze them. Wrap each mushroom in plastic wrap, then place them in a freezer bag. This method helps avoid freezer burn. To reheat stuffed mushrooms, preheat your oven to 350°F (175°C). Place the mushrooms on a baking sheet. Heat for about 10-15 minutes or until warm. This method keeps the texture nice and helps them stay tender. Avoid microwaving, as it may make them soggy. For extra crispiness, broil them for the last minute. Enjoy your stuffed mushrooms just like fresh! Can I prepare stuffed mushrooms in advance? Yes, you can prepare stuffed mushrooms ahead of time. Stuff them and store them in the fridge. Bake them just before serving for the best taste. What is the best way to clean mushrooms? To clean mushrooms, use a damp cloth or paper towel. Gently wipe the surface to remove dirt. Avoid soaking them in water, as mushrooms can absorb moisture and lose flavor. How long do stuffed mushrooms last in the fridge? Stuffed mushrooms can last three to four days in the fridge. Store them in an airtight container. Reheat them before eating for the best taste and texture. Can I make these without cheese? Yes, you can make stuffed mushrooms without cheese. Substitute with a mix of nuts or a dairy-free cream cheese for a similar texture and flavor. What are the nutrition facts for this dish? Each stuffed mushroom is about 80 calories. They are low in carbs and provide protein from cheese and artichokes. They also offer vitamins from spinach and artichokes. How can I make this recipe gluten-free? This recipe is naturally gluten-free. Just ensure that any added ingredients, like breadcrumbs or sauces, are certified gluten-free. Enjoy the dish without worry! This article covered how to make delicious spinach and artichoke stuffed mushrooms. We discussed key ingredients, preparation steps, and baking tips. You learned how to enhance flavor and tried different options too. Storing leftovers and reheating for the best taste was also shared. In closing, enjoy experimenting with this recipe. It’s easy to customize, and you can make it your own. Happy cooking!

Savory Spinach & Artichoke Stuffed Mushrooms Recipe

If you’re looking for a delicious appetizer, look no further! My savory spinach and artichoke stuffed mushrooms are perfect for

You can use 4 cups of peaches for this recipe. Fresh peaches give a nice flavor. If you choose fresh, slice them first. Canned peaches are also great. Just drain them well before using. Both options work well in this dish. I like to add 1 cup of granulated sugar. This sugar makes the peaches sweet and rich. A teaspoon of cinnamon adds warmth and spice. These two ingredients mix well with the fruity flavor of the peaches. For the cake base, you will need one package of yellow cake mix, about 15.25 ounces. This mix adds a fluffy texture. You also need 1 cup of unsalted butter, which is two sticks. Melt the butter and pour it over the cake mix. This helps create a nice golden crust when baked. If you want to add a crunch, sprinkle in some chopped pecans. They are optional but tasty! First, set your oven to 350°F (175°C). This will ensure your cake bakes evenly and turns golden brown. Preheating is key for a great texture. In a large bowl, combine 4 cups of peaches, 1 cup of sugar, and 1 teaspoon of cinnamon. If you use canned peaches, drain them first. Stir until the peaches are well coated. This mixture will be sweet and fragrant. Set it aside for now. Next, grease a 9x13 inch baking dish. Spread the peach mixture evenly on the bottom. Then, take the yellow cake mix and sprinkle it over the peaches. Do not stir; just let it sit on top. Now, melt 1 cup of butter. Pour it evenly over the cake mix. Try to cover as much of the mix as you can. If you like, add 1 cup of chopped pecans on top for crunch. Place the dish in the oven. Bake for 40 to 45 minutes. Look for a golden brown top that bubbles. Once done, let it cool for about 10 minutes before serving. Enjoy your delicious peach cobbler dump cake! To get a nice crust, start with the right oven temp. Preheat your oven to 350°F. This heat helps the cake mix brown well. Pour the melted butter evenly over the dry cake mix. This step is key. It helps crisp the top. If you want more crunch, add chopped pecans. They give texture and flavor. Keep an eye on it as it bakes. When the top turns golden brown, it’s ready! Serving this dish is simple and fun. Use a large spoon to scoop out portions. Place the warm cake in a bowl. Add a big scoop of vanilla ice cream on top. The cold ice cream contrasts nicely with the warm cake. You can sprinkle some cinnamon on the ice cream for extra flair. Serve it right away for the best taste. For the best experience, try these pairings. A drizzle of caramel sauce adds sweetness. Fresh mint leaves give a nice touch. They brighten the dish and add color. You can also serve it with whipped cream for a creamy finish. Each of these options enhances the flavor and makes your peach cobbler dump cake even more special. {{image_2}} You can change the fruit in this dump cake to suit your taste. Instead of peaches, you can use plums, cherries, or even mixed berries. Each fruit gives a new flavor and twist. Just remember to adjust the sugar based on the fruit's sweetness. For example, berries are usually tangy, so you might use less sugar. The process stays the same. Just layer the fruit in the pan and follow the recipe. If you need a gluten-free dessert, it's easy to make this dump cake fit your needs. Look for a gluten-free cake mix at your local store. There are many options available now. You can also use almond flour or coconut flour. Just replace the cake mix with an equal amount of your chosen flour. The rest of the recipe stays the same. This way, everyone can enjoy a slice without worry. Want to add some flair? You can enhance the flavor of your dump cake with spices and extracts. Try adding a splash of vanilla or almond extract to the peach mixture. You can also sprinkle in nutmeg or ginger for a warm touch. If you love nuts, mixing in chopped walnuts or almonds adds crunch. These little changes can make a big difference in taste! Store leftovers in an airtight container. This keeps the peach cobbler dump cake fresh. Make sure it cools down before sealing. Place it in the fridge. It will stay good for about 3 to 4 days. To reheat, use the oven for best results. Preheat your oven to 350°F (175°C). Place a piece of the cobbler in an oven-safe dish. Heat for about 15 minutes or until warm. You can also use a microwave. Heat for 30 seconds, then check. Add more time if needed. You can freeze peach cobbler dump cake for later. Cut it into pieces and wrap each slice in plastic wrap. Place the wrapped slices in a freezer bag. It can last up to 3 months in the freezer. When you want to enjoy it, thaw it in the fridge overnight before reheating. Yes, you can use frozen peaches in this recipe. Just thaw them first and drain any extra juice. This helps keep the dump cake from getting too soggy. Frozen peaches still taste great and save time. The cooking time for this dump cake is about 40 to 45 minutes. You want to bake it until the top is golden brown and bubbly. Keep an eye on it. Ovens can vary, so check a bit early. First, do not stir the cake mix after adding it. Just sprinkle it on top for the best texture. Second, using too much butter can make it greasy. Stick to the one cup as listed in the recipe. Lastly, let it cool for about 10 minutes before serving. This helps the layers set and makes serving easier. This post covered how to make a peach cobbler dump cake. We discussed the best ingredients, like fresh or canned peaches, sweeteners, and cake mix. I shared clear steps from preheating to serving tips. Exploring variations, storage options, and addressing common questions helped deepen your knowledge. In the end, this delicious dessert is easy to make and share. With these tips, you can enjoy and impress others with your own peach cobbler dump cake.

Peach Cobbler Dump Cake Simple and Tasty Recipe

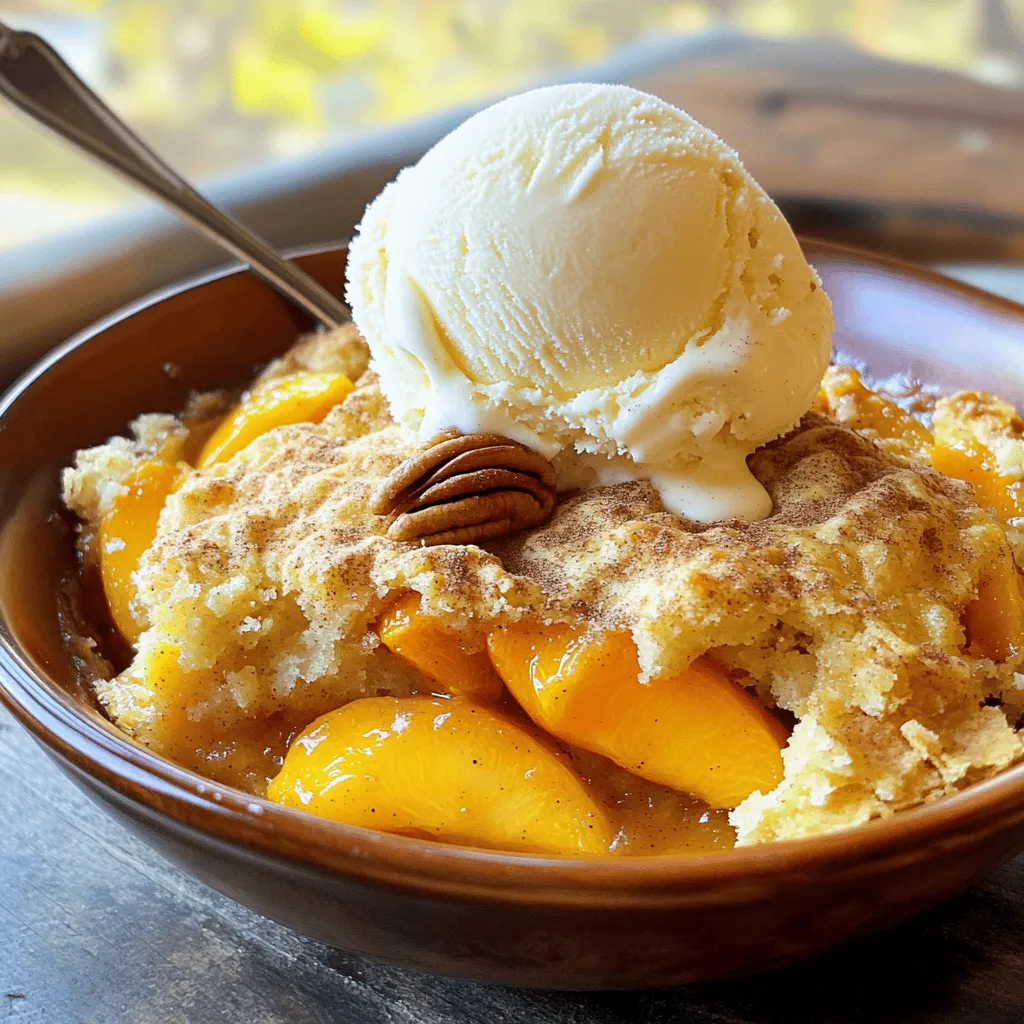
If you love sweet, comforting desserts, you’re in for a treat! This Peach Cobbler Dump Cake is a breeze to

To recreate those tasty nuggets, you need the following key ingredients: - 1 lb boneless, skinless chicken breasts, cut into bite-sized pieces - 1 cup pickle juice - 1 cup milk - 1 large egg - 1 cup all-purpose flour These items form the base of your nuggets. Chicken breasts give a nice bite. Pickle juice adds a tangy flavor. Milk and egg create a moist coating. To make your nuggets extra delicious, include these spices: - 1/2 teaspoon paprika - 1/2 teaspoon garlic powder - 1/2 teaspoon onion powder - 1 teaspoon salt - 1/2 teaspoon black pepper - 1/4 teaspoon cayenne pepper (optional for heat) These spices enhance the flavor. They make the nuggets taste close to the original. Paprika adds color, while garlic and onion powders bring depth. Cayenne pepper gives a nice kick, but it’s optional. If you need to make changes, consider these options: - Use chicken thighs for a juicier bite. - Substitute almond milk or oat milk for dairy-free needs. - Use gluten-free flour if you need a gluten-free option. These swaps keep the recipe flexible. You can still enjoy tasty nuggets no matter your needs. Don't hesitate to experiment! Start by cutting 1 pound of boneless, skinless chicken breasts into bite-sized pieces. Place these pieces in a medium bowl. Pour in 1 cup of pickle juice. This brine adds flavor and keeps the chicken tender. Cover the bowl and refrigerate for at least 30 minutes. This step is key for juicy nuggets. While the chicken marinates, prepare the breading. In a separate bowl, whisk together 1 cup of milk and 1 large egg. This mixture helps the flour stick to the chicken. In another bowl, combine 1 cup of all-purpose flour, 1/2 teaspoon paprika, 1/2 teaspoon garlic powder, 1/2 teaspoon onion powder, 1 teaspoon salt, 1/2 teaspoon black pepper, and 1/4 teaspoon cayenne pepper if you want some heat. Mix well until everything is evenly distributed. After marinating, drain the chicken well from the pickle juice. Dip each piece into the milk mixture. Let the excess drip off, then roll it in the seasoned flour until fully coated. Heat 1 cup of peanut oil in a deep skillet over medium heat. The oil is ready when a small piece of chicken sizzles upon contact. Fry the chicken nuggets in batches. Do not overcrowd the pan. Cook for about 3-4 minutes on each side until they are golden brown and cooked through. Use a thermometer to check that the internal temperature reaches 165°F. Once cooked, remove the nuggets using a slotted spoon. Place them on a paper towel-lined plate to drain excess oil. Serve the nuggets hot with your favorite dipping sauces, like honey mustard or barbecue sauce. Enjoy your homemade copycat Chick-fil-A nuggets! To get that perfect crispiness, use peanut oil. It has a high smoke point. Heat the oil until it sizzles when you add chicken. Fry in small batches. This avoids crowding, which makes them soggy. Cook until they are golden brown. This usually takes 3-4 minutes on each side. One common mistake is skipping the brine. Pickle juice makes the chicken juicy and tasty. Another mistake is not letting the oil heat enough. If the oil isn’t hot, the nuggets soak up too much oil. Lastly, don’t skip the seasoning in the flour. It adds great flavor to each bite. For the best flavor, marinate the chicken for at least 30 minutes. The longer, the better! You can also try adding more spices. Consider using smoked paprika or even a dash of cayenne pepper for heat. Pair the nuggets with honey mustard or barbecue sauce. These dips complement the chicken well. {{image_2}} If you like a kick, add cayenne pepper. Just mix 1/4 teaspoon into your flour mix. This small change gives your nuggets a nice heat. The spice level is up to you. Feel free to add more cayenne if you love it spicy! It pairs well with honey or ranch dressing. For a healthier option, try baking the nuggets. Preheat your oven to 400°F (200°C). After breading the chicken, place the nuggets on a baking sheet. Spray them lightly with cooking oil. Bake for 20-25 minutes until golden. Flip them halfway for even cooking. This method cuts down on oil but still gives great flavor. You can make these nuggets gluten-free easily. Swap all-purpose flour for a gluten-free blend. Many stores sell good gluten-free flours. Just make sure they are all-purpose blends. Follow the same steps for breading and frying. You’ll still enjoy delicious nuggets without gluten! To keep your chicken nuggets fresh, store them in an airtight container. Let them cool down first. Place a paper towel in the container to absorb any moisture. This helps keep the nuggets crispy. Store them in the fridge for up to three days. To reheat your chicken nuggets, use an oven for best results. Preheat your oven to 375°F (190°C). Place the nuggets on a baking sheet. Heat them for about 10-15 minutes. This method keeps them crispy. You can also use an air fryer. Set it to 375°F and cook for 5-7 minutes. You can freeze chicken nuggets for later. Allow them to cool completely first. Place them in a single layer on a baking sheet. Freeze them for about 1-2 hours. Once frozen, transfer them to a freezer bag. Label the bag with the date. They can last up to three months in the freezer. To cook them, bake from frozen. Cook for about 15-20 minutes at 375°F (190°C). Enjoy your nuggets anytime! To make these nuggets healthier, you can use several tips. First, swap some or all of the chicken breast for a leaner cut. You can also use whole wheat flour instead of all-purpose flour. If you bake the nuggets instead of frying, you can cut down on fat. Try using an air fryer for a crispy texture with less oil. You can also add spices like paprika and garlic powder without adding calories. Yes, you can use chicken thighs! Chicken thighs are juicier and have more flavor. Just make sure to cut them into similar-sized pieces. This ensures even cooking. The cooking time may vary slightly, so check for an internal temperature of 165°F (75°C) to be safe. There are many great sauces for chicken nuggets. Honey mustard is a classic choice. Barbecue sauce adds a nice smoky flavor. Ranch dressing is creamy and cool. You can also try buffalo sauce for some heat. For a twist, mix ketchup with a bit of hot sauce! You can store leftover nuggets in the fridge for up to three days. Make sure to place them in an airtight container. When you're ready to eat, reheat them in the oven or air fryer for best results. This keeps them crispy and delicious. This article covered how to make copycat Chick-fil-A nuggets at home. You learned about key ingredients, step-by-step cooking, and tips for crispy results. We also explored variations, storage tips, and answered common questions. Homemade nuggets can be fun and tasty. Now, you have the tools to impress family and friends. Enjoy crafting your delicious nuggets and experimenting with flavors. Your kitchen journey starts here!

Copycat Chick-fil-A Nuggets Easy and Delicious Recipe

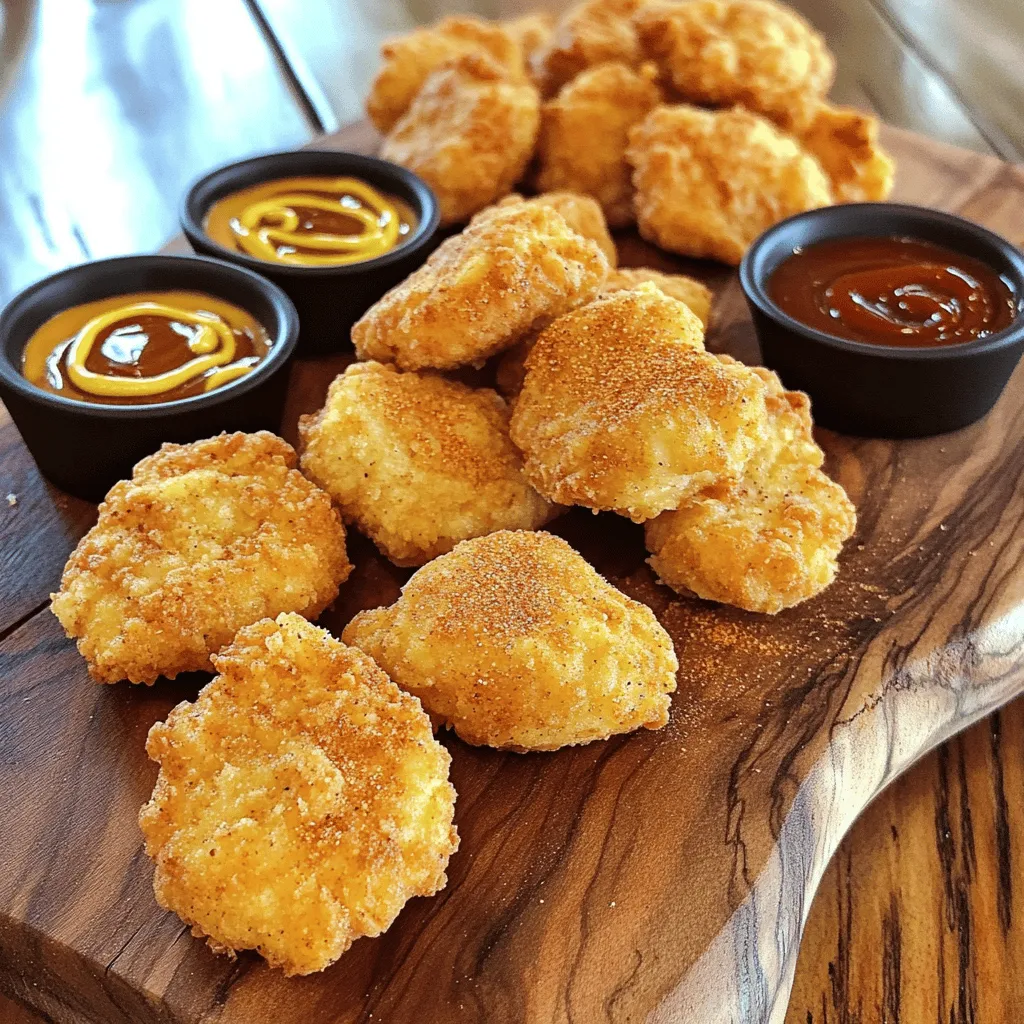
Want to enjoy the taste of Chick-fil-A nuggets at home? You’re in luck! In this easy and delicious recipe, I’ll

- 4 hard-boiled eggs, peeled and chopped - 1 ripe avocado, mashed - 2 tablespoons Greek yogurt (or mayonnaise) - 1 tablespoon Dijon mustard - Salt and pepper to taste - 1 tablespoon fresh lemon juice - 1 celery stalk, finely chopped - 2 green onions, sliced - Fresh herbs (like dill or parsley) for garnish - Large lettuce leaves (such as romaine or butter lettuce) for wrapping When making avocado egg salad lettuce wraps, I love to keep it simple yet tasty. The main ingredients are key here. Start with four hard-boiled eggs. Chop them up to get nice pieces. Then, grab a ripe avocado. Mash it well until it’s creamy. Combine these two in a bowl. Next, add two tablespoons of Greek yogurt or mayonnaise. This gives it a nice texture. You’ll want one tablespoon of Dijon mustard for a little kick. Don't forget to season with salt and pepper to taste. If you want to add some zing, include one tablespoon of fresh lemon juice. It brightens up the flavors. For crunch, finely chop one celery stalk. Add two sliced green onions for a fresh taste. For the wraps, use large lettuce leaves like romaine or butter lettuce. They hold everything together and make it easy to eat. You can also garnish with fresh herbs like dill or parsley for extra flavor. This combination creates a delicious, healthy meal that is easy to prepare. Plus, it’s full of protein and good fats! 1. Start by taking a medium mixing bowl. 2. Combine the chopped hard-boiled eggs and the mashed avocado. Mix them well. 3. Next, add the Greek yogurt or mayonnaise, Dijon mustard, and lemon juice. Stir until smooth. 1. Gently fold in the finely chopped celery and sliced green onions. This adds crunch and flavor. 2. Season the mixture with salt and pepper to your taste. 1. Prepare the lettuce leaves by washing them. Pat them dry with a paper towel. 2. Spoon a generous amount of the avocado egg salad onto the center of each lettuce leaf. 3. Garnish with fresh herbs like dill or parsley. This makes it look nice. 4. Roll the lettuce leaves around the filling or fold them over. Enjoy your wraps! - Choosing the right avocado for the recipe: Select a ripe avocado that yields slightly when you press it. If it feels hard, it’s not ready. A perfect avocado will have a smooth skin and a rich green color inside. - How to perfectly hard-boil eggs: Start with cold eggs in a pot of water. Bring it to a boil, then cover and turn off the heat. Let the eggs sit for about 12 minutes. After that, cool them in ice water. This method gives you firm whites and a nice yellow yolk. - Plate presentation for a visually appealing dish: Arrange the wraps on a colorful platter. Use fresh herbs as a garnish. This adds a pop of color and makes the dish look fresh. A sprinkle of lemon zest can also brighten the plate. - Pairing options that complement the wraps: Serve the wraps with a side of fresh fruit or crunchy veggies. You can also offer a light soup, like tomato or cucumber, to balance the meal. These pairings add flavor and texture to your lunch or dinner! {{image_2}} You can change the main protein in your wrap. Instead of eggs, try chicken or tuna. Both options work well with avocado. Just chop them up and mix them in. For a vegan twist, swap Greek yogurt for silken tofu or a dairy-free yogurt. This keeps the creamy texture while making it plant-based. To spice things up, add cayenne or paprika to the mix. These spices give a nice kick without overpowering the dish. You can also fold in extra veggies like bell peppers or cucumbers. They add crunch and color. Try diced pickles or grated carrots for another layer of flavor. Each addition makes the dish unique and exciting! To store leftover avocado egg salad, place it in an airtight container. This keeps the salad fresh and tasty. If you add lemon juice, it helps to slow browning. Use it within three days for best flavor. To keep lettuce crisp, wrap the leaves in a damp paper towel. Then place them in a plastic bag. This method keeps them fresh and crunchy for longer. Make sure the leaves are dry before storing. Wet leaves can spoil quickly. You can prepare the avocado egg salad ahead of time for quick meals. Just mix the salad and store it in the fridge. This way, you can grab it anytime for a healthy snack or lunch. For long-term storage, avoid freezing the avocado egg salad. Freezing can change the texture of the eggs and avocado. Instead, consider making the salad without avocado and freeze it. Then, add fresh avocado when you are ready to eat. This keeps your meal fresh and creamy. How long can I keep avocado egg salad in the fridge? You can keep avocado egg salad in the fridge for about 2 days. After that, the avocado may brown, and the salad won't taste as fresh. Store it in an airtight container to keep it longer. Can I use different types of lettuce for wraps? Yes, you can use many types of lettuce. Romaine and butter lettuce work well. You can also try collard greens or even cabbage for a crunchy twist. What can I do if my avocado is not ripe enough? If your avocado is not ripe, place it in a brown paper bag. The bag traps ethylene gas, which speeds up ripening. Check it daily until it feels soft but not mushy. Are there any gluten-free options for the wraps? Absolutely! Lettuce wraps are naturally gluten-free. Just make sure any ingredients you add, like sauces, are also gluten-free. How can I make this recipe vegan-friendly? To make this recipe vegan, replace the eggs with mashed chickpeas. Use a plant-based yogurt instead of Greek yogurt. This keeps the creamy texture while making it suitable for vegans. What are some healthy side dish suggestions to serve with it? You can serve fresh fruit, veggie sticks, or a light soup. A side salad with vinaigrette pairs nicely too. These sides keep your meal light and fresh. This recipe combines simple ingredients for a tasty salad. We covered the main and optional ingredients that boost flavor and nutrition. I shared easy steps to make the salad and wrap it in lettuce. Tips on storage and meal prep help keep your dish fresh. You can even customize your salad with different proteins or spices. Now, you can enjoy a healthy meal that’s quick and fun to make. Don't hesitate to experiment and make it your own!

Avocado Egg Salad Lettuce Wraps Easy and Nutritious

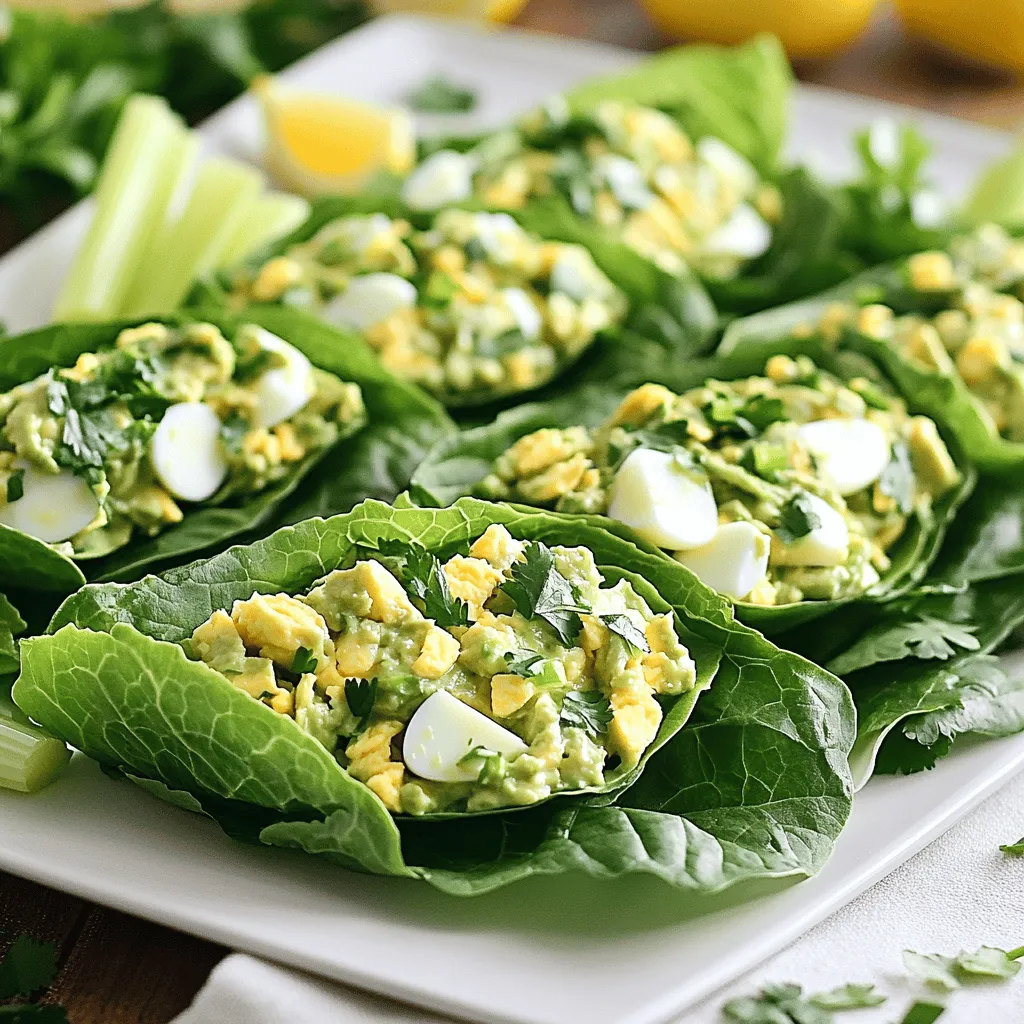
Looking for a tasty, easy meal that packs a nutritious punch? You’ve found it! Avocado Egg Salad Lettuce Wraps are

- 1 cup ricotta cheese - 1 cup all-purpose flour - 1/4 cup granulated sugar - 2 large eggs - 1/2 cup milk - 1/4 cup lemon juice (freshly squeezed) - Zest of 1 lemon - 1 teaspoon baking powder - 1/2 teaspoon baking soda - 1/4 teaspoon salt - Butter or oil for cooking Lemon ricotta pancakes need simple ingredients. The ricotta cheese gives them a creamy texture. All-purpose flour provides structure. Granulated sugar adds sweetness. Eggs help bind everything together. Milk makes the batter smooth. Fresh lemon juice gives a bright taste. Lemon zest adds a nice aroma. Baking powder and baking soda help them rise. Salt enhances the flavors. Use butter or oil for a good cook. - Use fresh lemon juice for best flavor. Bottled juice lacks freshness and taste. - Choosing the right ricotta cheese matters. Look for creamy and smooth ricotta. Avoid ones that are too watery. - You can add mix-ins like blueberries or chocolate chips. These add fun flavors. - For toppings, powdered sugar, honey, or maple syrup work great. They add sweetness and make pancakes special. - In a medium bowl, combine the ricotta cheese, eggs, milk, lemon juice, and zest. - Whisk until smooth and mixed well. - In another bowl, sift together the flour, sugar, baking powder, baking soda, and salt. - Mix the dry ingredients well to ensure even distribution. - Preheat your skillet over medium heat. - Grease the skillet with butter or oil to prevent sticking. - Use a 1/4 cup to pour batter onto the skillet for each pancake. - Cook for 2-3 minutes until bubbles form on the surface. - Flip the pancakes and cook for another 2-3 minutes until golden brown. - Repeat until all the batter is cooked, adding more grease as needed. - For presentation, stack a few pancakes on a plate. - Dust with powdered sugar for a sweet touch. - Serve with fresh berries and drizzle with honey or maple syrup. - Add a lemon slice on the side for a pop of color and flavor. To make the best Lemon Ricotta Pancakes, I have some tips for you. First, avoid over-mixing the batter. If you mix too much, pancakes can turn tough. Just fold the dry ingredients into the wet ones gently. A few lumps are fine. Next, pay attention to the cooking temperature. Preheat your skillet over medium heat. If the heat is too high, pancakes can burn on the outside and stay raw inside. A good test is to sprinkle a drop of water on the skillet. If it sizzles, you are ready to cook. Getting the batter thickness right is key for fluffy pancakes. The batter should be thick but pourable. If it’s too thick, add a little more milk. If it’s too thin, sprinkle in a bit more flour until it feels right. Also, you can adjust sweetness to your taste. The recipe calls for 1/4 cup of sugar, but you can add more or less. If you want a sweeter pancake, try adding a bit more sugar or serve with syrup or honey. Watch out for common mistakes when making Lemon Ricotta Pancakes. One big mistake is using old or expired baking powder and baking soda. These help the pancakes rise, so fresh ones are a must. Also, don’t forget to check if your pancakes are cooked. Signs of undercooked pancakes include a wet batter on top and a pale color. Overcooked pancakes will be dark and dry. Aim for a nice golden brown color on both sides. {{image_2}} You can change the taste of your Lemon Ricotta Pancakes easily. Adding herbs like basil or mint gives a fresh twist. Just mix in a tablespoon of finely chopped herbs into your batter. For more citrus zing, try lime or orange juice instead of lemon. These options create fun, bright flavors. If you're looking for gluten-free pancakes, use a gluten-free flour blend. This swap keeps the pancakes light and fluffy. For those who want a dairy-free option, try almond or coconut ricotta. These alternatives work well and keep the pancakes tasty and moist. Pancakes can be sweet or savory based on your choice of toppings. For a sweet treat, drizzle maple syrup or honey. Top with fresh berries for a colorful plate. If you're in the mood for savory, try adding avocado or smoked salmon. These options make pancakes a versatile meal for any time of day. You can also use leftovers in breakfast sandwiches or serve them alongside soups for a unique twist. To keep your pancakes fresh, place them in a sealed container. You can stack them with parchment paper between each pancake to avoid sticking. They last about 3 to 5 days in the fridge. This way, you can enjoy them later without losing flavor or texture. Freezing is a smart way to save pancakes for later. Start by letting them cool completely. Then, place them in a single layer on a baking sheet. Once frozen, transfer them into a freezer bag. They can stay good for up to 2 months. When you're ready to eat, simply reheat them in a microwave or toaster. Heat for about 1-2 minutes in the microwave or toast them until warm. Leftover ricotta cheese is versatile! You can mix it into pasta dishes or spread it on toast. For the lemon juice, it's great in salad dressings or in a homemade lemonade. You can even add it to yogurt for a refreshing snack. These ideas make sure nothing goes to waste! Lemon ricotta pancakes are fluffy pancakes made with ricotta cheese and fresh lemon juice. They have a light, creamy texture and a bright, zesty flavor. The ricotta adds richness, while the lemon gives a refreshing twist. You can serve these pancakes for breakfast or brunch, topped with fruit or syrup. Yes, you can make these pancakes ahead of time. To meal prep, cook the pancakes and let them cool. Then, stack them with parchment paper between each one. Place them in an airtight container and store in the fridge for up to three days. You can reheat them in a skillet or microwave when you're ready to serve. You can use alternatives like whole wheat flour or oat flour. These flours change the taste and texture slightly. If you want gluten-free pancakes, try almond flour or a gluten-free blend. Just remember to adjust the liquid in the recipe, as some flours absorb more moisture than others. Watch for bubbles forming on the surface of the pancakes. When the bubbles start to pop, it’s time to flip them. After flipping, look for a golden-brown color on both sides. If they are firm to the touch and spring back a bit, they are done. Lemon Ricotta Pancakes are simple to make and delightful to eat. We covered their ingredients, easy steps, and ways to perfect your pancakes. I shared tips to avoid common mistakes and ideas for variations. With options for storage and meal prep, you can enjoy these pancakes anytime. Whether you prefer them sweet or savory, Lemon Ricotta Pancakes offer something for everyone. Dive into this delicious recipe and make breakfast special!

Lemon Ricotta Pancakes Delightfully Fluffy Breakfast

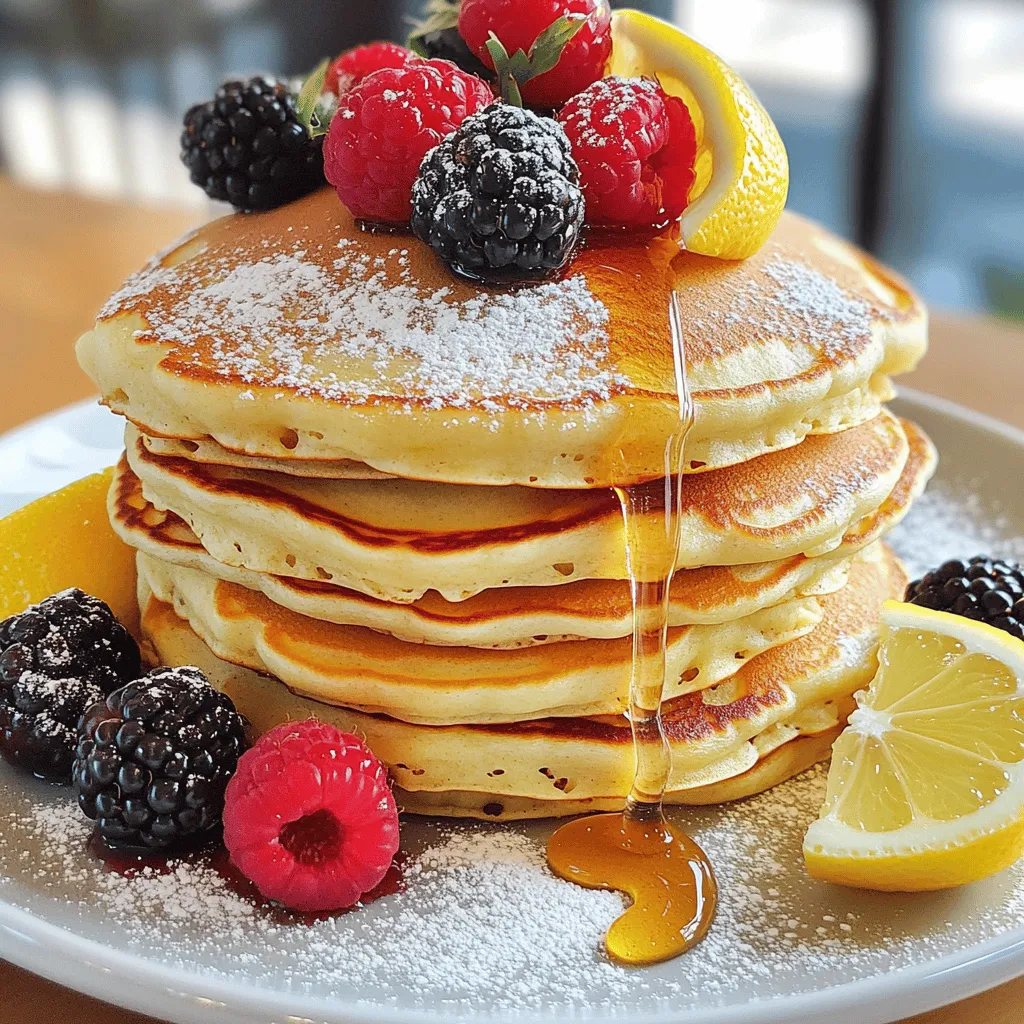
Start your day with a burst of flavor! Lemon Ricotta Pancakes are delightfully fluffy, and they bring sunshine to your

To make delicious Buffalo chicken stuffed peppers, you need some key items. Here’s what you will need: - 4 large bell peppers (any color) - 2 cups cooked chicken, shredded - 1/2 cup hot buffalo sauce - 1/2 cup cream cheese, softened - 1/2 cup shredded cheddar cheese - 1/4 cup blue cheese crumbles (optional) - 1/4 cup green onions, chopped - Salt and pepper to taste - Olive oil (for drizzling) These ingredients create a tasty blend of flavors and textures. The bell peppers serve as a crunchy vessel for the spicy filling. You can add your own twist to the dish with some optional ingredients. Here are a few ideas: - Extra veggies like diced tomatoes or corn - Different kinds of cheese, like mozzarella or pepper jack - A sprinkle of garlic powder or onion powder for more flavor - Some hot peppers if you want extra heat Feel free to mix and match these extras to suit your taste. If you don’t have some ingredients, don’t worry! Here are some easy swaps: - Use rotisserie chicken instead of cooking your own - Swap cream cheese with Greek yogurt for a lighter option - Replace blue cheese with feta or skip it entirely - Try quinoa or rice instead of chicken for a vegetarian option These substitutions keep the dish tasty while making it fit your needs. First, you need to wash your bell peppers. I use four large ones. Next, slice off the tops and remove the seeds. This step is key for a clean stuffing. Drizzle the outside and inside with olive oil. Sprinkle a pinch of salt inside each pepper. Place them upright in a baking dish. This helps them hold the filling well. In a large bowl, combine the shredded chicken with the hot buffalo sauce. I like to add half a cup of soft cream cheese for creaminess. Then, mix in half a cup of shredded cheddar cheese. If you enjoy blue cheese, toss in a quarter cup of those crumbles. Don't forget to add half of the chopped green onions! Mix it all up until it’s well combined. This filling packs a big flavor punch! Now, it’s time to stuff those peppers! Use a spoon to fill each one with the buffalo chicken mixture. Press down slightly to pack it in. Top each pepper with the remaining cheddar cheese for a gooey finish. Cover the baking dish with aluminum foil. Bake in a preheated oven at 375°F (190°C) for 20 minutes. After that, take off the foil and bake for another 10 to 15 minutes. You want the peppers to be tender and the cheese golden brown. Once done, let them cool a bit and add the rest of the green onions for a fresh touch. To get the best flavor, use good quality chicken. Shredded rotisserie chicken works well. Mix in the buffalo sauce to give your dish a kick. Cream cheese adds creaminess and balances the heat. The cheddar cheese brings a rich taste that melts nicely. If you like blue cheese, add it for a tangy touch. Chopped green onions add freshness and color. Always taste your mixture and adjust as needed. If you want less heat, use a milder buffalo sauce. You can also mix in some ranch dressing to tone it down. For those who love spice, try extra hot sauce. Adding more cheese can help balance the spice too. Always start slow, then add more heat until you find the right level for you. Make sure to press the filling down as you stuff the peppers. This helps the filling stay inside while baking. Fill each pepper generously, but don’t overstuff them. Leave a little space at the top. This way, the cheese can melt and create a nice crust. Drizzle olive oil on the outside of the peppers for added flavor and to help them cook evenly. {{image_2}} You can change the protein in Buffalo Chicken Stuffed Peppers. Use cooked turkey instead of chicken. Ground beef or shredded pork works well too. For a spicier kick, try adding chorizo. Each protein brings its own flavor. This keeps the dish fresh and exciting. You can make a great vegetarian version. Replace chicken with cooked quinoa or lentils. Add more veggies like black beans, corn, and diced tomatoes. Cream cheese can be swapped with vegan cream cheese. This makes the dish creamy without the meat. These swaps keep it hearty and satisfying. Want to experiment with flavors? Change the sauce! Instead of buffalo sauce, try barbecue sauce or teriyaki sauce. For a different twist, use ranch seasoning or Greek yogurt. You can also add spices like cumin or chili powder for more depth. These changes create a whole new dish. Each option provides a unique taste experience. To store leftover Buffalo Chicken Stuffed Peppers, let them cool down first. Then, place them in an airtight container. This keeps them fresh and tasty. You can keep them in the fridge for up to three days. Just make sure they are fully cooled before sealing the container. If you want to save some for later, freezing is a great option. Wrap each stuffed pepper in plastic wrap, then place them in a freezer-safe bag. This way, they won't get freezer burn. You can freeze them for up to three months. Just label the bags with the date for easy tracking. When you're ready to enjoy your stuffed peppers again, preheat your oven to 350°F (175°C). Place the peppers in a baking dish. Cover with foil to keep them moist. Heat for about 20-25 minutes or until they are warmed through. You can also microwave them if you’re in a hurry. Just heat for 2-3 minutes, checking to make sure they are hot all the way through. The best way to cook stuffed peppers is to bake them. Start by preheating your oven to 375°F (190°C). Then, prepare the peppers by cutting off the tops and removing the seeds. Lightly coat them with olive oil and season with salt. Once you fill them with your Buffalo chicken mixture, cover the dish with foil. This traps steam and cooks the peppers evenly. Baking them for 20 minutes with the foil, then uncovered for another 10-15 minutes, gives you tender peppers with bubbly cheese on top. Yes, you can make Buffalo Chicken Stuffed Peppers ahead of time. Prepare the filling and stuff the peppers as directed. Instead of baking, cover them and store in the fridge for up to 24 hours. When ready to serve, simply bake them. This makes it easy for busy days or gatherings. You can also freeze them for later. Just make sure to thaw them in the fridge before baking. Buffalo Chicken Stuffed Peppers pair well with many sides. For a simple meal, serve them with a fresh salad. A crunchy cucumber salad or coleslaw adds a nice touch. You might also enjoy them with some tortilla chips and salsa. If you're feeling indulgent, serve with ranch or blue cheese dip for extra flavor. Each of these options complements the spicy, creamy filling perfectly. Buffalo Chicken Stuffed Peppers are fun and easy to make. You learned essential and optional ingredients to fill your peppers. Following the step-by-step guide ensures your dish will turn out tasty. Tips on flavor and spice will help your dish shine. With variations for different diets, everyone can enjoy. Lastly, storing leftovers is easy, making this a practical meal. Now, you have all you need to create your own delicious Buffalo Chicken Stuffed Peppers! Enjoy cooking!

Savory Buffalo Chicken Stuffed Peppers Recipe

Are you ready to spice up your dinner? These Savory Buffalo Chicken Stuffed Peppers are packed with bold flavors. Imagine

To make this creamy broccoli cheddar soup, you will need: - 4 cups broccoli florets - 1 medium onion, diced - 2 cloves garlic, minced - 3 cups vegetable broth - 1 cup heavy cream - 2 cups shredded sharp cheddar cheese - 1 tablespoon olive oil - 1 teaspoon thyme (fresh or dried) - Salt and pepper to taste - 1 tablespoon lemon juice - Optional: Croutons for topping The broccoli gives the soup a bright color and fresh taste. The onion and garlic add flavor depth, making each bite rich and savory. Sharp cheddar cheese is key for that bold, cheesy flavor we all love. If you want to tweak the recipe, here are some great substitutions: - For heavy cream, you can use half-and-half or coconut milk for a lighter option. - Instead of sharp cheddar, feel free to try mild cheddar or even Gruyère for a different taste. - If you have vegetable broth, you can swap it with chicken broth for extra flavor. These swaps can help fit your taste or dietary needs without losing the soup's creamy goodness. To make this soup smoothly and easily, you will need: - A large pot to cook the soup. - A wooden spoon for stirring. - An immersion blender to blend the soup to a creamy texture. If you don’t have an immersion blender, a regular blender works too. Just be careful when blending hot soup. Always let it cool slightly and blend in batches. This will ensure a safe and smooth process! To get started, you need to chop your vegetables. Take 4 cups of broccoli florets and set them aside. Then, dice 1 medium onion. Mince 2 cloves of garlic. Having everything ready helps the cooking flow smoothly. Next, measure out your ingredients. You’ll need 3 cups of vegetable broth, 1 cup of heavy cream, and 2 cups of shredded sharp cheddar cheese. Don't forget to grab 1 tablespoon of olive oil, 1 teaspoon of thyme, salt, pepper, and 1 tablespoon of lemon juice. This ensures you have everything at hand. First, heat the olive oil in a large pot over medium heat. Add the diced onion and sauté for about 5 minutes. The onion should become soft and look translucent. Next, add the minced garlic and thyme. Cook this for another minute until you smell the wonderful aroma. Now, stir in the broccoli florets along with the vegetable broth. Bring the mixture to a boil. After it boils, reduce the heat and let it simmer. Cover the pot and cook for 10 to 15 minutes. This cooks the broccoli until it's tender. Once the broccoli is soft, use an immersion blender to blend the soup until smooth. If you like your soup chunkier, blend just half and mix it back in. This gives you a nice texture. It’s time to add the creamy goodness! Stir in the heavy cream and shredded cheddar cheese. Keep stirring over low heat until the cheese melts. Be careful not to let it boil, as this can change the texture. Finally, taste the soup. Add salt and pepper to your liking. Squeeze in the lemon juice for a bright flavor. If you want, serve the soup hot and top it with croutons for extra crunch. Enjoy your delicious creamy broccoli cheddar soup! To get that smooth texture, use an immersion blender. This tool helps mix the soup right in the pot. If you don't have one, a regular blender works too. Just be careful with hot liquids. Blend in small batches to avoid spills. Heat plays a big role here. When you blend the soup while it's warm, it becomes creamy. Letting it cool first can make it hard to blend well. Adding herbs and spices can make a big difference. Thyme brings a fresh taste and works well with broccoli. You can also try adding a pinch of nutmeg for warmth. If you want a richer taste, use sharp cheddar cheese. It has more flavor than mild cheese. A splash of lemon juice brightens up the soup too. This little trick balances the creaminess. Pair this soup with crusty bread or a fresh salad. A simple green salad adds crunch and freshness. For a nice touch, serve the soup in colorful bowls. Top it with croutons for added texture. You can even sprinkle some extra cheese on top for a cheesy finish. This will make your dish look more inviting and delicious! {{image_2}} You can easily change up this creamy broccoli cheddar soup. Adding other vegetables brings new flavors and colors. Try using cauliflower or carrots. They mix well with broccoli and add a nice crunch. If you want to make it vegan, swap heavy cream for coconut milk or cashew cream. Use nutritional yeast instead of cheese for a cheesy flavor without dairy. You can also use vegetable broth to keep it plant-based. Adding spices can give your soup a fun kick. A pinch of cayenne or red pepper flakes adds heat. For a warm taste, stir in smoked paprika or curry powder. These spices will transform your soup into something special. Regional variations exist too! In New England, you might find a touch of nutmeg added. In the South, consider using sharp cheddar for a bolder flavor. Each place has its twist on this classic dish. Garnishing is key for a beautiful soup. Consider adding fresh herbs like parsley or chives on top. They add color and freshness. Croutons make a great topping. You can buy them or make your own. Just toast leftover bread cubes with olive oil and seasonings. Place croutons on top right before serving for a crunchy bite. They enhance your creamy soup and make it even more enjoyable. To store your creamy broccoli cheddar soup, let it cool first. Pour leftovers into an airtight container. In the fridge, the soup lasts about 3 to 4 days. If you want to keep it longer, freeze it. In the freezer, this soup can last up to 3 months. Just make sure to leave some space in the container. The soup will expand as it freezes. When you're ready to enjoy your soup again, there are good ways to reheat it. You can use the stove or microwave. On the stove, heat it gently over low heat. Stir often to keep it smooth. In the microwave, heat it in short bursts. Stop every minute to stir. This helps avoid separation. If you see any separation, just stir it back together. Making this soup in advance is smart for quick meals. You can prepare a big batch and store it in portions. Use small containers for easy access. This way, you can grab a serving whenever you want. Just reheat and enjoy a warm bowl of soup. It’s perfect for busy days! Can I make this soup ahead of time? Yes, you can make this soup ahead of time. Just cool it, then store it in the fridge. It stays fresh for up to three days. When ready to eat, just reheat it on the stove. How do I make it vegetarian? This soup is already vegetarian if you use vegetable broth. Just ensure your cheese is vegetarian too. Most cheddar cheese fits this rule. What if I don’t have an immersion blender? If you don’t have an immersion blender, you can use a regular blender. Just blend in small batches. Be careful with hot soup to avoid spills. How can I thicken the soup? To thicken the soup, you can add more cheese. You can also use a cornstarch slurry. Mix equal parts cornstarch and water, then stir it in. Cook until the soup thickens. Is this soup healthy? This soup has healthy ingredients like broccoli and onion. Broccoli is high in vitamins. However, it does have cream and cheese, which add fat and calories. Caloric content and portion sizes One serving of this soup has about 400 calories. This can change based on how much cheese and cream you add. Adjust your portion to fit your diet. This post covered everything you need for creamy broccoli cheddar soup. We explored ingredients, substitutes, and essential tools. You learned step-by-step instructions for preparation and cooking, plus tips for creaminess and flavor. Variations gave you ideas for personalization, while storage info helps keep your soup fresh. In conclusion, making this soup is simple and fun. Experiment with ingredients so it fits your taste. Your kitchen will smell amazing, and you’ll enjoy a delicious, hearty meal.

Creamy Broccoli Cheddar Soup Easy and Flavorful Recipe

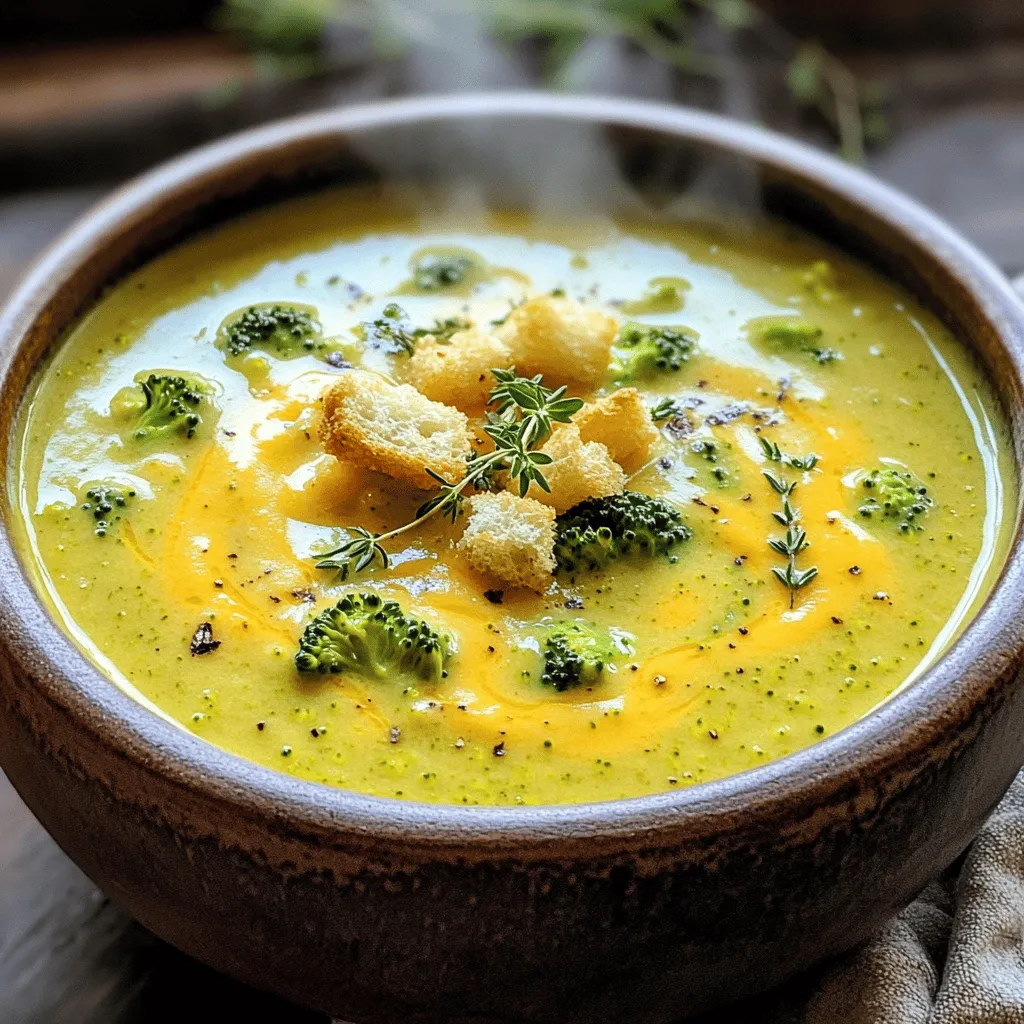
Are you ready to enjoy a warm bowl of creamy broccoli cheddar soup? This easy and tasty recipe brings comfort

- 2 lbs ripe tomatoes, quartered - 1 large onion, chopped - 4 cloves garlic, peeled - 3 tablespoons olive oil - Salt and pepper to taste - 1 teaspoon dried oregano - 1/2 teaspoon red pepper flakes (optional for heat) - 2 cups vegetable broth - 1 cup fresh basil leaves, packed - 1 tablespoon balsamic vinegar The first step in making roasted tomato basil soup is gathering your ingredients. Fresh tomatoes are key for this recipe. Look for ripe tomatoes. They should feel soft and smell sweet. The onion adds depth to the soup. Use a large onion for a strong flavor. Garlic gives the soup a bold taste. Use fresh cloves, not the pre-peeled ones. Olive oil helps to roast the vegetables. It adds a nice richness. You can adjust salt and pepper to your liking. Dried oregano brings a classic Italian touch. If you like heat, add red pepper flakes. Vegetable broth forms the soup's base, making it hearty. Fresh basil leaves give the soup its signature flavor. They should be bright green and fragrant. Lastly, balsamic vinegar adds a sweet tang to balance the flavors. Each ingredient plays a vital role. Together, they create a comforting and savory dish. A serving has about 150 calories. It also contains around 3 grams of protein and 6 grams of fat. This soup is low in calories and full of flavor. Tomatoes are rich in vitamins C and K. They also have antioxidants for health. Basil offers anti-inflammatory benefits. - Roasting pan or baking sheet - Large pot - Immersion blender or standard blender Use a roasting pan for even cooking. A large pot is needed to simmer the soup. An immersion blender is great for a smooth texture. If you don’t have one, a standard blender works well too. Just remember to be careful with hot soup. Each tool helps make this dish simple and fun. - Preheat the oven to 400°F (200°C). - Next, prepare the fresh veggies. Quarter the ripe tomatoes and chop the onion. Peel the garlic cloves. - Spread the tomatoes, onion, and garlic on a baking sheet. - Drizzle 3 tablespoons of olive oil over the veggies. - Season with salt, pepper, dried oregano, and red pepper flakes if you want some heat. Toss everything well to coat the veggies evenly. - Roast the veggies in your preheated oven for about 30 to 35 minutes. They should look caramelized and soft. - Once roasted, transfer the veggies to a large pot. Pour in 2 cups of vegetable broth and bring it to a simmer over medium heat. - Add 1 cup of fresh basil leaves and let it simmer for 5 more minutes. This helps the flavors mix well. - Now, use an immersion blender to puree the soup until it's smooth. If you don't have one, carefully blend it in batches using a standard blender. - Stir in 1 tablespoon of balsamic vinegar to enhance the flavor. Adjust the seasoning if needed. - Serve the soup hot, garnished with extra basil leaves or a drizzle of olive oil, if you like. To make your soup even better, consider these herbs and spices: - Fresh thyme - Bay leaves - A pinch of sugar to balance acidity For serving, you can add these garnishes: - Extra basil leaves - A swirl of olive oil - Croutons for crunch Avoid undercooking by ensuring your veggies are soft and caramelized. If you overcook, the soup may lose its fresh taste. Taste as you go to find the right seasoning balance. A little salt brings out the best in the tomatoes. If you're short on time, try steaming the tomatoes instead of roasting. This method cooks faster but may not give you the same rich flavor. When blending hot soup, use an immersion blender for safety. If you use a regular blender, let the soup cool slightly to avoid splatters. {{image_2}} If you want a creamy soup without dairy, try these options: - Coconut milk: Use one can for a rich, tropical taste. - Cashew cream: Blend soaked cashews with water for a smooth texture. - Almond milk: This option adds a light flavor and works well. For added creaminess, think about using: - Silken tofu: Blend it in for a protein boost. - Avocado: It brings a smooth feel and healthy fats. To make your soup heartier, you can add protein: - Lentils: Cook red or green lentils and stir them in for fiber. - Beans: White beans or chickpeas work great for texture and nutrition. If you prefer meat, try: - Chicken: Add cooked, shredded chicken for a classic touch. - Turkey: Use leftover turkey for a tasty twist. Want to change the flavor? Here are some ideas: - Spicy: Add more red pepper flakes or a dash of hot sauce for heat. - Smoky: Use smoked paprika or roasted garlic for a deeper taste. You can also explore regional twists: - Italian: Add a sprinkle of Parmesan cheese before serving. - Mexican: Top with fresh cilantro and a squeeze of lime for a zesty kick. To store leftover soup in the fridge, let it cool first. Pour the soup into a clean, airtight container. This keeps it fresh. You can store it in the fridge for up to five days. When reheating, pour the soup into a pot. Heat it on medium until warm. Stir it often to avoid sticking. You can also use a microwave. Heat in short bursts, stirring in between. For long-term storage, you can freeze the soup. Let it cool completely. Then, pour the soup into freezer-safe bags or containers. Leave some space at the top to allow for expansion. Seal tightly to prevent freezer burn. It can last up to three months in the freezer. To thaw, place the soup in the fridge overnight. You can also use the microwave on defrost. Reheat as you would from the fridge. In the fridge, your roasted tomato basil soup lasts about five days. In the freezer, it can last up to three months. Check for signs of spoilage before eating. Look for any off smells or changes in color. If it seems odd, it’s best to throw it away. Always trust your senses when it comes to food safety. To make this soup vegan, swap the vegetable broth for homemade or store-bought vegan broth. Use olive oil for roasting as it is plant-based. You can also skip the balsamic vinegar if you prefer, but it adds nice depth. Another option is to blend in some coconut milk for creaminess if you want a richer flavor. Always taste and adjust salt as needed. Yes, you can use canned tomatoes. Canned tomatoes save time and still give good flavor. Look for whole or crushed tomatoes without added sugars or preservatives. The downside is fresh tomatoes often have a brighter taste. Canned tomatoes can be softer, leading to a different texture. If using canned, reduce the cooking time since they are already cooked. This soup pairs well with many sides. A classic choice is a grilled cheese sandwich. You can also serve it with crusty bread or a fresh salad. For a heartier meal, add a side of roasted vegetables or a quinoa salad. Don’t forget to sprinkle some extra basil on top for a fresh touch! This blog post covered how to make a delicious roasted tomato basil soup. We discussed the key ingredients, nutritional benefits, and cooking tools needed. You learned how to roast your veggies, blend them, and enhance flavors for the best taste. I shared tips for variations and storage, ensuring your soup stays fresh. Lastly, we addressed common questions to help you succeed. Now you have the tools to create a flavorful dish that warms the heart and satisfies your palate. Enjoy making and sharing this comforting soup with family and friends.

Roasted Tomato Basil Soup Comforting and Savory Dish

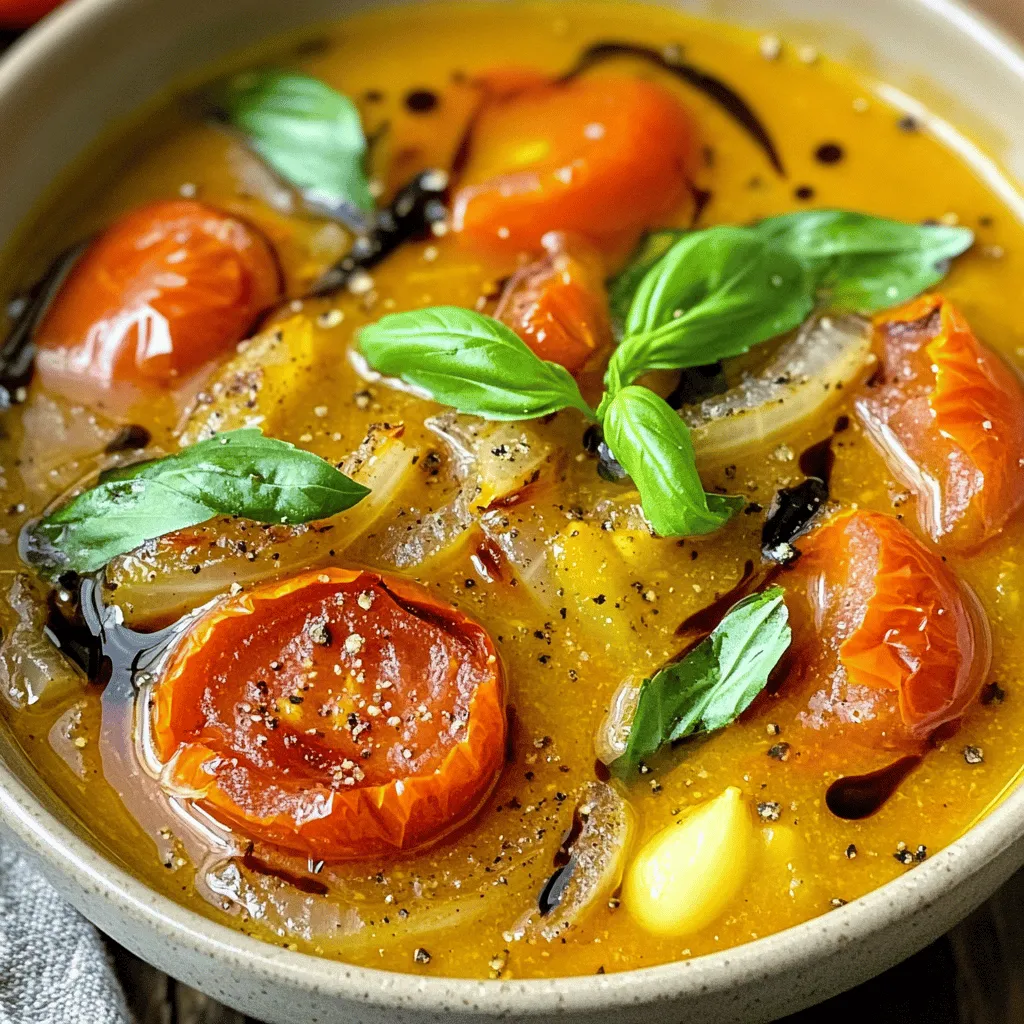
Are you ready for a warm bowl of comfort? Roasted Tomato Basil Soup is the perfect dish for chilly days.

Older posts
Newer posts
← Previous Page1 … Page39 Page40 Page41 … Page84 Next →

dsad

© 2026 Lisa Dishes • Built with GeneratePress

Our Policies

  • Copyright Policy
  • Cookie Policy
  • GDPR Policy
  • Privacy Policy
  • Disclaimer
  • Terms Of Use

More Information

  • Home
  • About
  • Contact
  • Appetizers
  • Dessert
  • Dinner
  • Drinks
©2026, Lisa Dishes About Back To Top